Cooking 1C-Reporting in Linux
Hello, dear readers and writers, as well as consistently excellent readers and writers Giktayms. A year and a half has passed since the writing of the previous article and we can say that the ice has broken. In any case, reporting from 1C can be done without loading into Windows. The path to the stars, as always, will be thorny and full of pitfalls, waiting for the unwary traveler, but with the right approach you will succeed. So let's get started:
For the preparation of statements we need:
- Configuration: 1C Enterprise Accounting 3.0 Prof.
- Technological platform: 1C Accounting 8.3.11 or higher
- Crypto Provider: CryptoPro 4.0.9929 or higher
- Operating system: GNU \ Linux (Mint, Ubuntu, Fedora, RHEL, or SUSE), to taste
- Document operator: Takskom LLC or Kaluga-Astral CJSC
- Will for war with ITS and technical support of the operator of document circulation
Part One: Cooking cakes server.
So, if you do not have your own 1C cluster, then it's time to pick it up. If there is - you can proceed to the next step. I will not analyze the basic things in detail, they are well covered by me on the ITS portal and other technical resources devoted to 1C accounting. Instead, I focus on the little things that should be paid attention to and which are usually forgotten.
We are determined with licenses
In 1C there are two types of licenses - per server and per client. Server licenses allow you to work in client-server mode, and this is what we need for 1C-Reporting in Linux. Client licenses allow you to run client software (thick, thin, web) and regulate one connection to the database (software) or many connections from a single device (hardware).
If you do not have a server license, then theoretically the thin client should work when connecting to the file base via Apache - but this configuration has not been tested.
If you have only one information base, then it is more profitable to use software client licenses. If there are more than two bases, for example, Trade, Salary and Accounting, a hardware license is more advantageous. Of course, provided that all users work in several databases at the same time.
If you have no more than 5 people working with each base at the same time, then with a clear conscience you can take a license for Server Mini for 5 connections. It is not expensive, and keeps 5 + 1 (client + configurator) connections (sessions) to each information base, for 32 and 64 bit server versions.
If you have a client license software, and it is one (for example, in the case of electronic delivery), then keep in mind that the software license in the client-server version is spent on each connection to the database. That is, launching the configurator and the client simultaneously over the network is no longer possible. The only solution, for example, for debugging the code is to connect to the server via SSH + X11 Forwarding and launch the configurator with the client already "locally".
Another moment, and it is very important: A hardware license is spent on each client (IP address) and a software license is spent on connecting (session) of the user. The number of software licenses is equal to the maximum number of connections. The software license is tied to the hardware, and very tough, so the general recommendation is to take the licensing server as a separate virtual machine with 2GB (two gibbytes) of RAM and a virtual SATA or IDE disk controller, always specifying the serial numbers of the disks. The licensing server itself does not require a server license.
KVM (qemu), Citrix (Xen) or VMWare (V-Sphere, ESXi) will be suitable as a virtualization platform, I do not recommend using VirtualBox or Hyper-V.
Choosing an architecture
Determined with licenses, now we single out one (hardware licenses) or two (software licenses) virtual machines for 1C cluster. The characteristics of the machines are as follows:
- Licensing server - 2 GB of memory, and 15GB on the hard disk.
- Accounting Server 1C - 14-16GB of memory, 15GB on the hard disk. If the server combines the functions of a DBMS, then another 30-300GB on the hard disk.
- Database server - depending on the type of server (PostgreSQL or Oracle, MS SQL 2017 is not supported yet) 4-16 GB of memory, and 30-300 GB on the hard disk for storing information databases. Again, the volume may be more, depending on what and how you store.
PostgreSQL can be kept on the same machine as 1C itself.
Please note that virtual disks are best kept on the SATA or SCSI bus (virtual machine with UEFI boot support, for example ovmf), and physically store on the lvm volume or iSCSI / FiberChannel / SAS LUN´e. This will allow you at any time to increase the volume of the disk to the needs of the operating system or database.
If you use KVM, then specify the IDE bus for the licensing server and VirtIO-SCSI for the 1C / DBMS cluster.
After preparing the machines, we install the favorite distribution package there (for beginners, I recommend Ubuntu Server 16.04 LTS), the DBMS (for example, PostgreSQL), the server part of the enterprise platform 1C to the licensing server and the 1C cluster. If you wish, you can add the configuration to the Apache2.4 web server on a cluster of 1C-enterprise servers (I use it together with nginx for authentication from the outside using certificates, but these are lyrics).
Raise the cluster
To install the cluster on the licensing server and the future 1C cluster, unpack the archive of the server part of 1C. Previously, it could be downloaded using the elinks browser, but now this method no longer works (says that the file was not found).
PS If anyone knows a way to download the 1C distribution without resorting to the corporate repository, directly from the server command line, write in the comments.
Further, all examples will be given for the Ubuntu Server 16.04 LTS distribution and the bash command shell. For RHEL-based distributions, replace dpkg with rpm.
Unpack the archive:
mkdir 1c-dist tar -zxf deb64.tar.gz -C 1c-dist Install 1C on the licensing server and server cluster, if you do not need a web server:
sudo dpkg -i 1c-dist/1c-enterprise83-{common,server}*.deb Install 1C on a server cluster if you need a web server:
sudo dpkg -i 1c-dist/1c-enterprise83-{common,server,ws}*.deb We activate the launch of the server cluster and start it:
sudo systemctl enable srv1cv83 sudo systemctl start srv1cv83 Now you can configure a cluster of 1C servers of the enterprise. This can be done from the command line or from the MMC graphical snap-in on the Windows platform. In the future, I will probably make my shell over the console utility, but so far this is enough.
We start the client-server cluster management manager to manage from the command line:
sudo /opt/1C/v8.3/x86_64/ras cluster --daemon Get information on the cluster:
/opt/1C/v8.3/x86_64/rac localhost:1545 cluster list The localhost: 1545 parameter can be omitted if you plan to manage only the local cluster. If necessary, you can manage any cluster, the ball would be the desired username and password of the administrator of the cluster of 1C servers of the enterprise. Further we assume that the commands are executed locally on each of the servers, for example, via SSH. However, nobody forbids us to manage both servers from one console.
The most important thing in the exhaust team for us is the GUID of our cluster, copy it to the clipboard or save it to the session variable like this (on both servers, licensing and the main server 1C):
cluster=$(/opt/1C/v8.3/x86_64/rac localhost:1545 cluster list | awk '/cluster/ { print $3 }') On the licensing server, we delete the server cluster:
/opt/1C/v8.3/x86_64/rac localhost:1545 cluster remove --cluster=$cluster On the main server 1C, we add a new server to the cluster:
/opt/1C/v8.3/x86_64/rac localhost:1545 server --cluster=$cluster insert --agent-host=< > --agent-port=1540 --port-range=1560:1591 --name=" " --using=normal We get our server ID:
/opt/1C/v8.3/x86_64/rac localhost:1545 server --cluster $cluster list or
server=$(/opt/1C/v8.3/x86_64/rac localhost:1545 server --cluster $cluster list | awk '/server/ { print $3 }' | tail -n 1) Remove all role assignment requirements:
for rule in $(/opt/1C/v8.3/x86_64/rac localhost:1545 rule --cluster=$cluster list --server=$server | awk '/rule / { print $3 }'); do /opt/1C/v8.3/x86_64/rac localhost1545 rule --cluster=$cluster remove --server=$server --rule=$rule; done Add the license server role:
/opt/1C/v8.3/x86_64/rac localhost:1545 rule --cluster=$cluster insert --server=$server --position=0 --object-type=LicenseService --rule-type=always /opt/1C/v8.3/x86_64/rac localhost:1545 rule --cluster=$cluster insert --server=$server --position=1 --rule-type=never After setting up the server cluster and transferring the licensing server to a separate host (you may have to register them in the hosts file if you do not have your own DNS server), we can proceed to the next part.
Part Two: Cooking stuffing customer
Installing the client part in something trivial - install common components from the server and a thick client (for jobs, only thin can be used). As a client system, I recommend something simple and convenient for a simple user, all the same, either the management or the accountant will work in the system, perhaps even cashiers and other staff. In my case, the choice falls on Linux Mint, you can choose another distribution, for example Rosa or Astra Linux, due to religious state preferences. It should be noted that currently 1C is not very good friends with Gnome 3.0 and its derivatives, in particular, at the time of writing 1C 8.3.11, Cinnamon was dropped when launching, so the best choice would be Xfce, KDE or Mate environment. For guidance, accustomed to the Mac, a bunch of Mate + CairoDock will do.
At the moment, 1C-Reporting works only with CryptoPro software ICS (with a hard copy in 1C), however, the EDM can be used with the same VipNet or another CADES-compatible CRMS.
Thick and thin client:
mkdir 1c-dist tar -zxf deb64.tar.gz -C 1c-dist tar -zxf client-deb64.tar.gz -C 1c-dist sudo dpkg -i 1c-dist/1c-enterprise83-{common,server,client}*.deb Only thin client:
mkdir 1c-dist tar -zxf thin.client-deb64.tar.gz -C 1c-dist sudo dpkg -i 1c-dist/1c-enterprise83-thin-client*.deb Install CryptoPro 4.0:
mkdir cp-csp tar -zxf linux-amd64_deb.tgz -C cp-csp sudo apt-get install pcscd pcsc-tools opensc lsb-core lsb-release sudo dpkg -i cp-csp/linux-amd64_deb/cprocsp-{compat-debian,curl,rdr-emv,rdr-gui-gtk,rdr-mskey,rdr-novacard,rdr-pcsc,rdr-rutoken,rsa}*.deb cp-csp/linux-amd64_deb/lsb-cprocsp-{base,ca-certs,capilite,kc1,pkcs11,rdr-64}*.deb We check and install the license for CryptoPro (you can stay on the trial version and try the product before purchasing, or if you have a license for CryptoPro in the certificate - do nothing):
/opt/cprocsp/sbin/amd64/cpconfig -license -view /opt/cprocsp/sbin/amd64/cpconfig -license -set < > Now we connect a USB token, a smart card, a USB flash drive with a CryptoPro container to the workstation, produce a list of containers and import certificates. When importing from rutoken, there may be problems with the encoding in the container name, in this case you can use the inline call iconv to convert the encoding, there cp1251.
/opt/cprocsp/bin/amd64/csptest -keyset -enum -verifycontext -fqcn At the exit should receive a list of containers of the form:
\. \ Aktiv Rutoken lite 00 00 \ blahblahblah
\. \ Aktiv Rutoken ECP \ blahblahblah
\. \ HDIMAGE \ mycont
If we received cracks in the container name, we try to display information like this:
/opt/cprocsp/bin/amd64/csptest -keyset -enum -verifycontext -fqcn | iconv -f cp1251 If the container is created in Windows and has Cyrillic in the name, importing a specific container will be slightly more complicated, but not impossible.
/opt/cprocsp/bin/amd64/certmgr -inst -store uMy -cont '\\.\Aktiv Rutoken lite 00 00\blahblahblah' Or in the case of cp1251
/opt/cprocsp/bin/amd64/certmgr -inst -store uMy -cont "$(echo '\\.\Aktiv Rutoken lite 00 00\' | iconv -t cp1251)" Next, we need to get a certificate of the head CA that issued your certificate. To do this, we need to display a list of certificates installed in the user's personal certificate store:
/opt/cprocsp/bin/amd64/certmgr -list -store uMy We need the value of the “CA cert URL” field, we can automatically download certificates of certification authorities like this:
mkdir CAs wget -P CAs $(/opt/cprocsp/bin/amd64/certmgr -list -store uMy | awk '/CA cert URL/ { print $5 }') for cert in $(ls -1 CAs/*.crt); do sudo /opt/cprocsp/bin/amd64/certmgr -inst -store mRoot -file $cert; done If we need BrowserPlugin EDS support, it is put in two stages - a plug-in for Linux + a plug-in for the Firefox / Chrome browser.
sudo apt-get install alien tar -zxf cades_linux_amd64.tar.gz -C cp-csp alien -kci cp-csp/cprocsp-pki*.rpm We check the work of the crypto-provider through the CryptoPro portal (web) or from the command line. If you did not see the certificate through the web, then the machine cannot verify the authenticity of the certificate of the head center of the certificate issuer, or the certificate did not pass authentication. You may need to download and manually install the CRL, for example, if access to the Internet from the machine is limited or you did not install the curl client a step earlier.
To check from the command line with checking the entire chain of CA, we use the following commands:
touch /tmp/test /opt/cprocsp/bin/amd64/cryptcp -sign -dn <e-mail > -errchain /tmp/test /tmp/test.sgn rm /tmp/test /tmp/test.sgn Now that the software is installed on the client, proceed to the final stage - setting up the reporting itself.
Part Three: We glaze
The final stage is the most important. At this stage, we already have an installed and configured cluster of 1C servers of the enterprise, and a client machine with 1C thin and thick clients. We will need a thick client for the initial deployment of information security, activation of licenses and updating of information security configuration (configurator mode) in other cases we need a thin client. Itself 1C-Reporting works only in the thin client.
PS Maybe employees of 1C or Kaluga-Astral will explain this behavior of the system when working with the external component of interaction with SKZI.
Set up a connection to the database:
We start the client 1C and add a new connection to the information base. If the database on the server cluster does not yet exist, we create it from a thick client, you can empty it and then import the dump using the configurator (dt, cf file) or DBMS. In principle, everything is as usual here, we specify the name of the head node of the server cluster, the name of the infobase, and select the preferred launch type “Thin client”.
We configure SKZI in 1C:
All settings are given for the “Taxi” interface, if you use the classic 1C-Enterprise interface - select the corresponding items of the main menu of the program.
Open “Administration” -> “Program Settings”: “Exchange of electronic documents”.
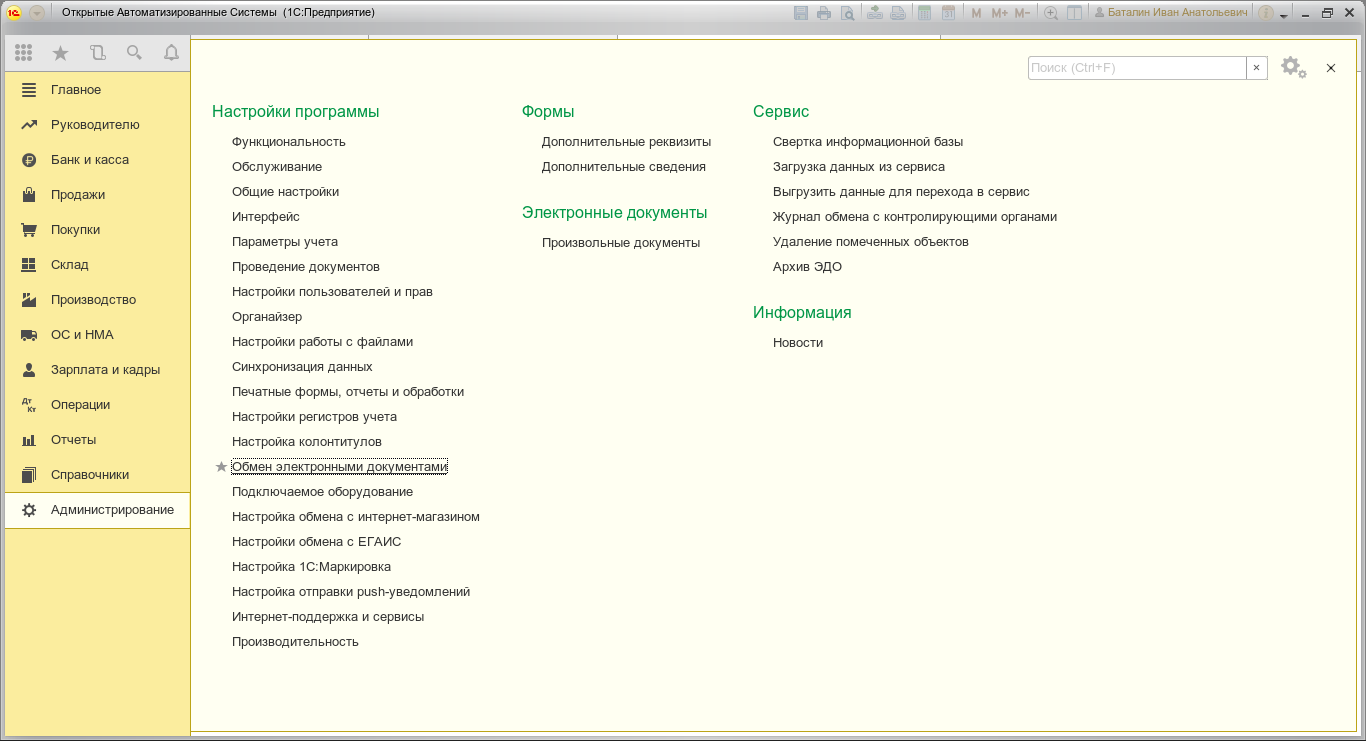
From the opened tab, select “Electronic signature and encryption”: “Settings for electronic signature and encryption”.

Go to the “Programs” tab, find “CryptoPro CSP (GOST 2001)” and “CryptoPro CSP (GOST 2012)” - for these programs, specify the path “/opt/cprocsp/lib/amd64/libcapi20.so”. After entering the program path, we can switch to any item in the list, the status of the scan result should change from “The path to the program was not specified” to “Installed on the computer”.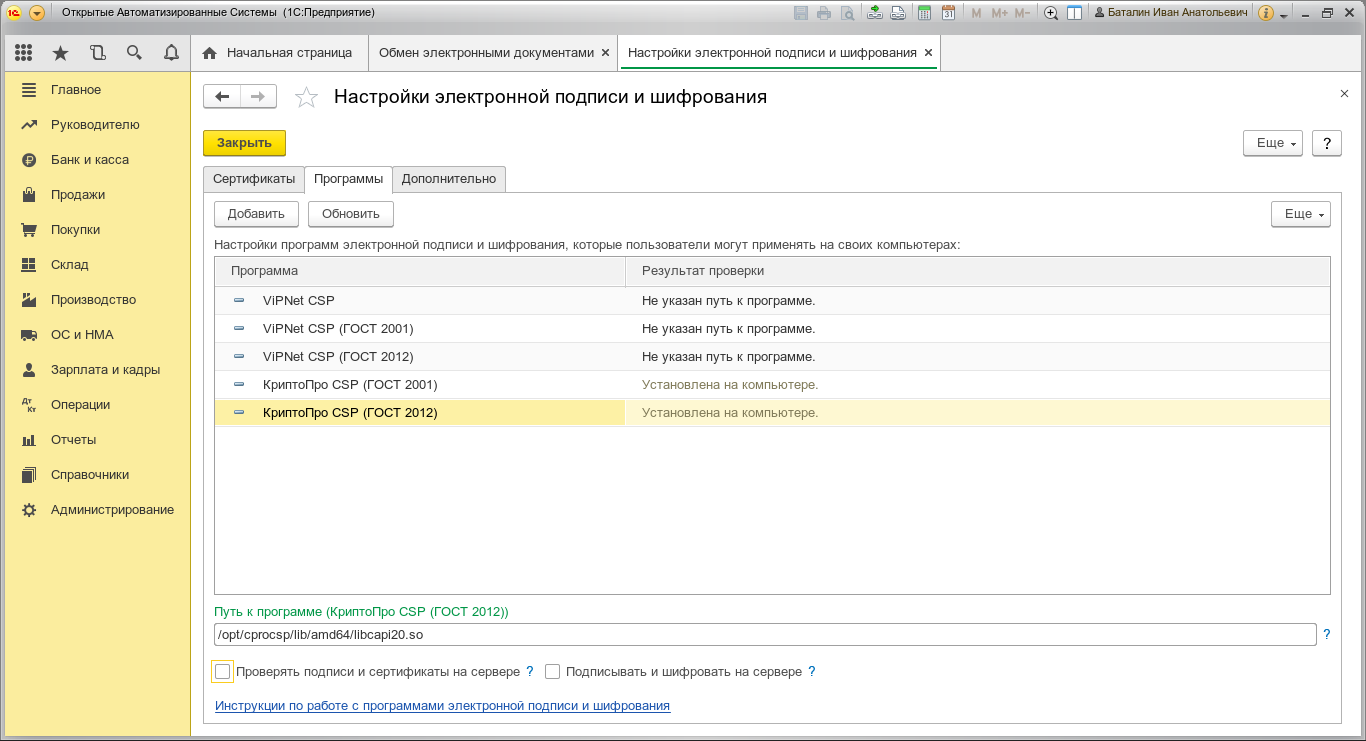
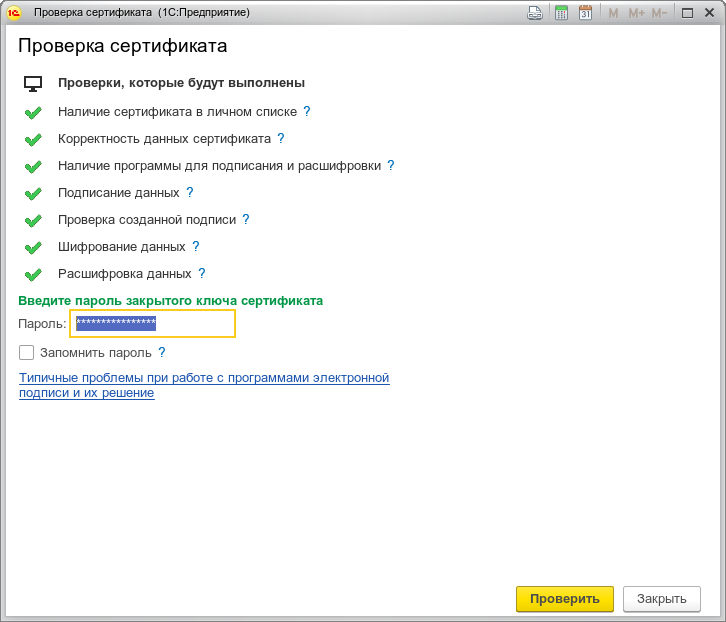
Add certificates and check the work of SKZI:
Go to the “Certificates” tab, click the “Add” button from those installed on the computer. I have not tried to issue a certificate on the thin client side before, it did not work before. Select a certificate from the ones installed in the user's repository, click the “Check” button, enter pin password. You should get a window with a validated certificate:
Add a document operator:
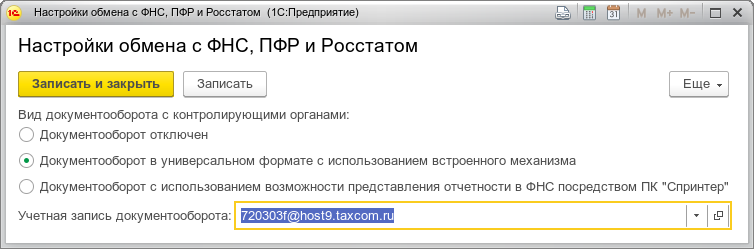
Now we need to add a document operator, if it is not configured at the Windows client level earlier. To do this, open the “Reports” -> “1C-Reporting”: “Regulated reports”. From the opened tab, select the item “Settings” and then “Application for connection to 1C-Reporting” or “Exchange settings with regulatory authorities”. In the case of manual configuration of the exchange with KO, click on the direction of delivery of reports, which we set up, for example, the FTS. In the window that opens, select “Document flow in a universal format using the built-in mechanism” and create a new workflow account (or select an existing one).
In the “Assignment” of the account, indicate the direction of exchange with this operator, choose the operator JSC “Kaluga-Astral” or LLC “Takskom”. Mailing address - specify the e-mail address issued by the operator EDO. Document ID - specify yours, assigned by EDO operator and operator's ID (the first part of your identifier before the hyphen).
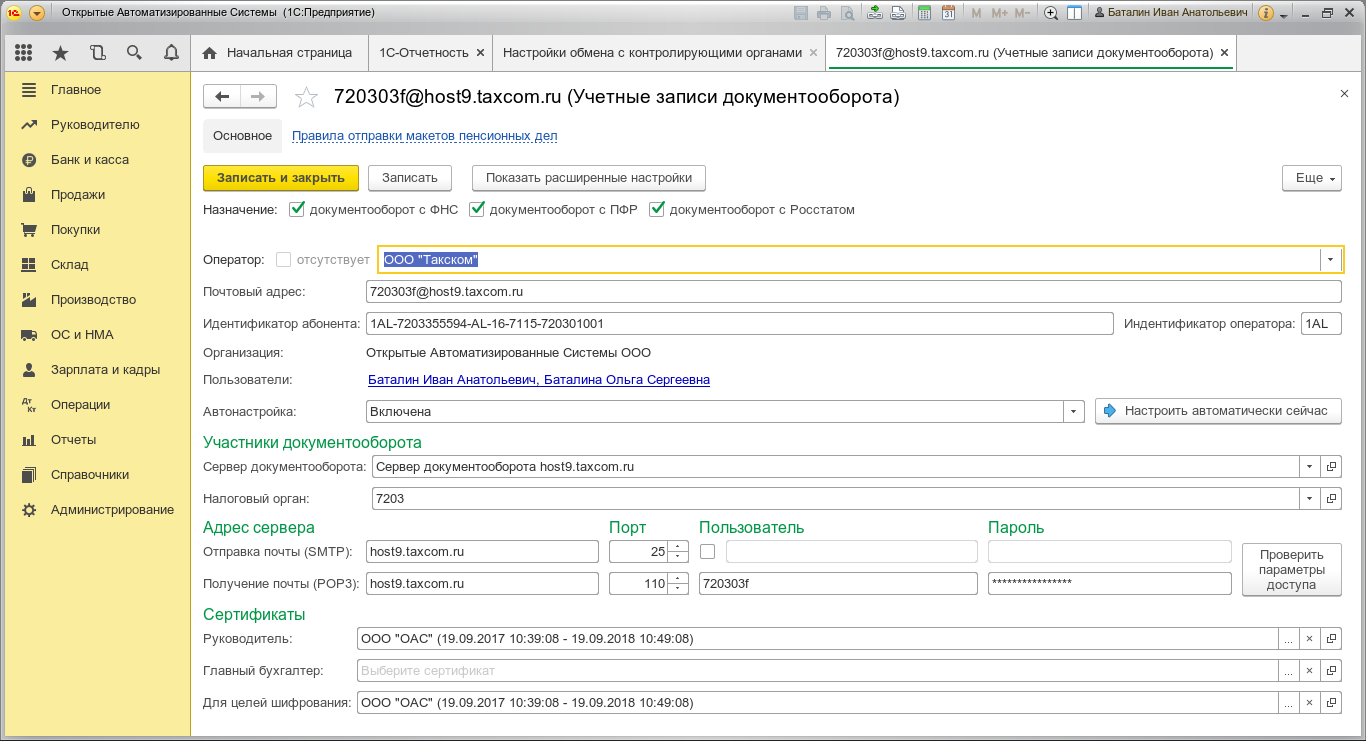
We carry out operator auto-tuning:
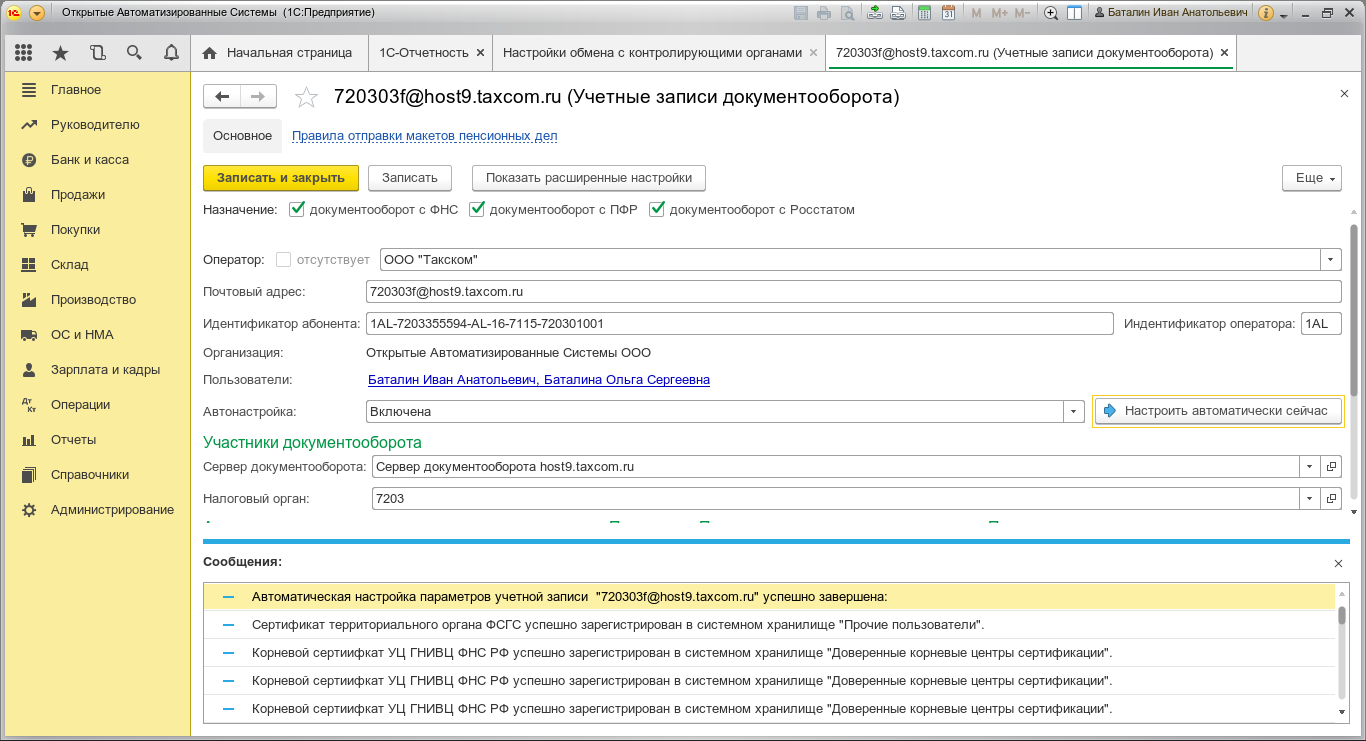
Select users and click “Auto Setup”. Must pass the exchange of data, decrypt the xml container with the settings and update the certificates of the head and subordinate CAs. This operation (auto-tuning) needs to be done manually for the first time on all Linux clients.
We configure the server for automatic EDM and EDCO exchange (optional):
Open “Administration” -> “Program Settings”: “Maintenance”. Further “Routine operations”: “Routine and background tasks”. We find in the list “Updating inspections by regulatory authorities”, “Obtaining results of sending reports” and “Exchange with regulatory authorities”. Assign an exchange schedule. I have daily worth. It will be requested only when opening the client program 1 time per day.
We check the work of the document operator, EDM and 1C-Reporting.
Unfortunately, there is still a problem in the implementations of the EDI and EDCO subsystems. For example, when receiving confirmation and sending a report to the regulatory authorities, it is necessary to enter the pin code of the container each time for each fact of data signing. The pin-code saved in the EDM settings is not taken into account by the 1C configuration, it is possible that this behavior will be corrected in future software versions. One thing is for sure: the ice has broken.
')
Source: https://habr.com/ru/post/358388/
All Articles