Kubernetes-ha. Deploy Kubernetes failover cluster with 5 masters
Hello!
In this publication, I would like to talk about the Kubernetes High Availability Cluster (HA).
')
Table of contents:
Introduction
At the new place of work I had to face an interesting task, namely: to deploy a highly accessible kubernetes cluster. The main message of the task was to achieve maximum resiliency of the cluster in the event of failure of physical machines.
A small introduction:
I got a job with a project with a minimum amount of documentation and one deployed stand, on which the individual components of this project “hung out” in docker containers. Four fronts for different services, launched through pm2, also worked at this stand.
After I was able to figure out the scheme of services and the logic of their work, it was up to the choice of the infrastructure on which the project would work. After all the discussions, we stopped at two versions of the development of events. The first is to stuff everything into lxc containers and steer everything with the help of ansible. The second is to leave everything at docker and try k8s in work.
In the first version, most of the projects in our company work. However, in this case, we decided to leave everything to the docker, but put the project in a failover cluster using kubernetes.
For enhanced fault tolerance, it was decided to deploy the cluster with five master nodes.
According to the table in the etcd documentation on the CoreOS site ,
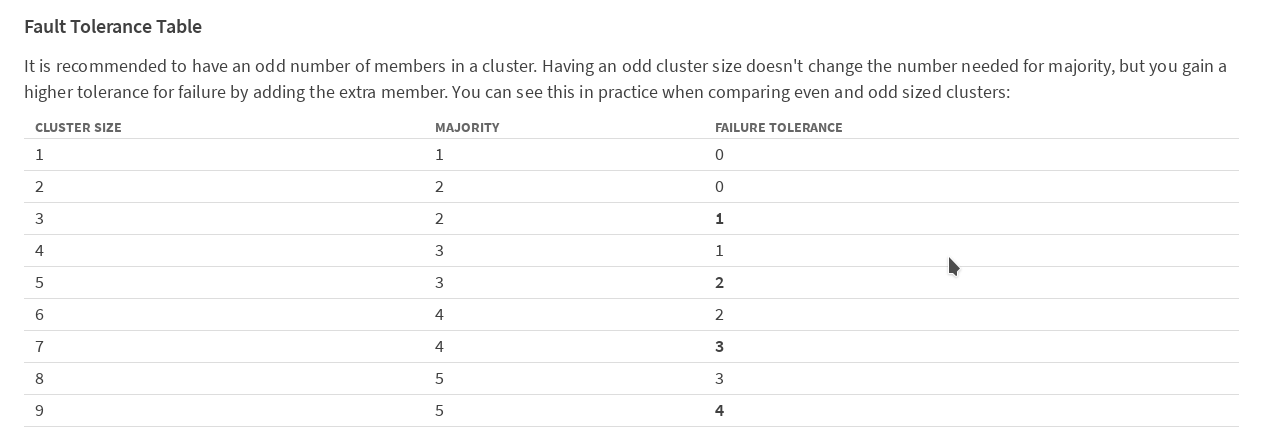
It is recommended to have an odd number of members in the cluster. In order for the cluster to continue working after the failure of one member (in our case, the master kubernetes), you need at least 3 machines. In order for the cluster to work after losing 2 machines, they need to have 5. We decided to play it safe and deploy a version with 5 masters.
Kubernetes has very detailed official documentation, although, in my opinion, quite complicated; especially when faced with this product for the first time.
It is bad that in the documents the work schemes are mainly described when there is only one node with the master role in the cluster. There is also not much information on the work of the cluster in the HA mode on the Internet, and in my Russian part, in my opinion, it is not at all. So I decided to share my experience. Perhaps he is useful to someone. So, I'll start:
The main idea was spied on githab from cookeem . In general, I implemented it, correcting most of the flaws in the configs, increasing the number of master nodes in the cluster to five. All of the following configs and scripts can be downloaded from my repository on GitHub .
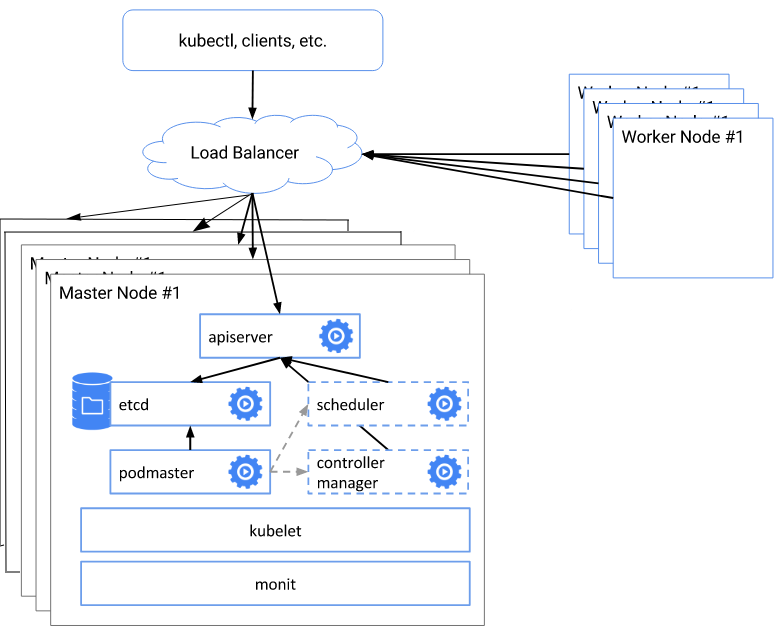
The whole essence of the scheme is as follows:
List of software used
Before starting the deployment, you need to prepare the system on all nodes of the cluster, namely: install the necessary packages, configure the firewall, disable the swap As they say, before you begin.
If swap is used, then it needs to be disabled; kubeadm does not support swap. I immediately put the system without a swap partition.
Rules / etc / fstab. Or manually
Lyibo via sed
In Debian 9, there is no selinux. If it is in your distribution, then it needs to be translated into permissive mode
If there are any rules in iptables, then they should be cleared. During installation and configuration, Docker and kubernetes prescribe their firewall rules.
On each node of the cluster, you must specify the correct hostname.
This completes the preparation, restart before the next step.
On the cluster machine, install the docker according to the instructions from the kubernetes documentation :
Further we put kubeadm, kubelet and kubectl according to the same instruction.
Install keepalived:
For proper operation of CNI (Container Network Interface) you need to set / proc / sys / net / bridge / bridge-nf-call-iptables to 1
On each master node we prepare the script create-config.sh
In the configuration file itself, cookeem has quite detailed comments, but still let's go over the main points:
After all the values are registered, on each master-quest, you need to run the create-config.sh script to create configs.
Based on the received configs, we create an etcd cluster
After the containers have been raised on all the wizards, we check the status of etcd
If the cluster is all right, then move on. If something is wrong, then we look at the logs
On hb-master01, using kubeadm, we initialize the kubernetes cluster.
If there is an error according to Kubelet version, then you need to add a key
After the master is initialized, kubeadm will display the service information. It will contain a token and a hash to initialize other cluster members. Be sure to save the line of the form: kubeadm join --token XXXXXXXXXXXXX 172.26.133.21:6443 --discovery-token-ca-cert-hash sha256: XXXXXXXXXXXXXXXXXXXXXXXXX somewhere separately, since this information is output once; if the tokens are lost, they will have to be regenerated.
Next, you need to set the environment variable, to be able to work with the cluster as root
If you want to work as a regular user, then follow the instructions that appeared on the screen when the wizard initialized.
We check that everything was done correctly:
Check that everything is OK
Now, after our cluster is working with one node, it is time to introduce the remaining master codes into the cluster.
To do this, with hb-master01, you need to copy the / etc / kubernetes / pki directory to the remote / etc / kubernetes / directory of each wizard. To copy in the ssh settings, I temporarily allowed the connection root. After copying the files, of course, this feature is disabled.
On each of the remaining masters, set up an ssh server
Copy files
Now on hb-master02, use kubeadm to start the cluster, make sure that pod kube-apiserver- is in working condition.
Repeat on hb-master03, hb-master04, hb-master05
Check that all masters are initialized and work in a cluster.
Create replicas of the kube-dns service. On hb-master01 run
On all masternods, make a line with the number of api servers in the configuration file
If you are using kubernetes versions greater than 1.9, you can skip this step.
On all masternods we configure keepalived and nginx as a balancer
Testing work
If 100% - then everything is OK.
After we get a working virtual address, we specify it as the server API address.
On hb-master01
Remove all kube-proxy pod to restart them with new parameters.
Check that all restartanuli
At each work node, install docke, kubernetes and kubeadm, by analogy with the masters.
Add a node to the cluster using tokens generated during initialization of hb-master01
We check that all working nodes are included in the cluster and they are available.
Only on working nodes in the /etc/kubernetes/bootstrap-kubelet.conf and /etc/kubernetes/kubelet.conf files we change
the value of the server variable on our virtual IP
Then you can increase the performance of your cluster by adding new work nodes, as needed.
Install ingress-nginx
Ntgthm we have to install ingress.
The following documentation is written in the kubernetes documentation about Ingress:
An API object that controls external access to services in a cluster, usually HTTP.
Ingress can provide load balancing, SSL termination, and name-based shared hosting.
In general, then in more detail I can hardly describe. Setting up ingress is material for a separate article; in the context of installing a cluster, I will only describe its installation.
Check that ingress has risen:
At this step, the cluster configuration is complete. If you did everything correctly, you should get a fault-tolerant, working Kubernetes cluster with a fail-safe entry point and a balancer on the virtual address.
Thank you for your attention, I will be glad to comment, or indications of inaccuracy. You can also create an issue on github, I will try to respond quickly to them.
Respectfully,
Evgeny Rodionov
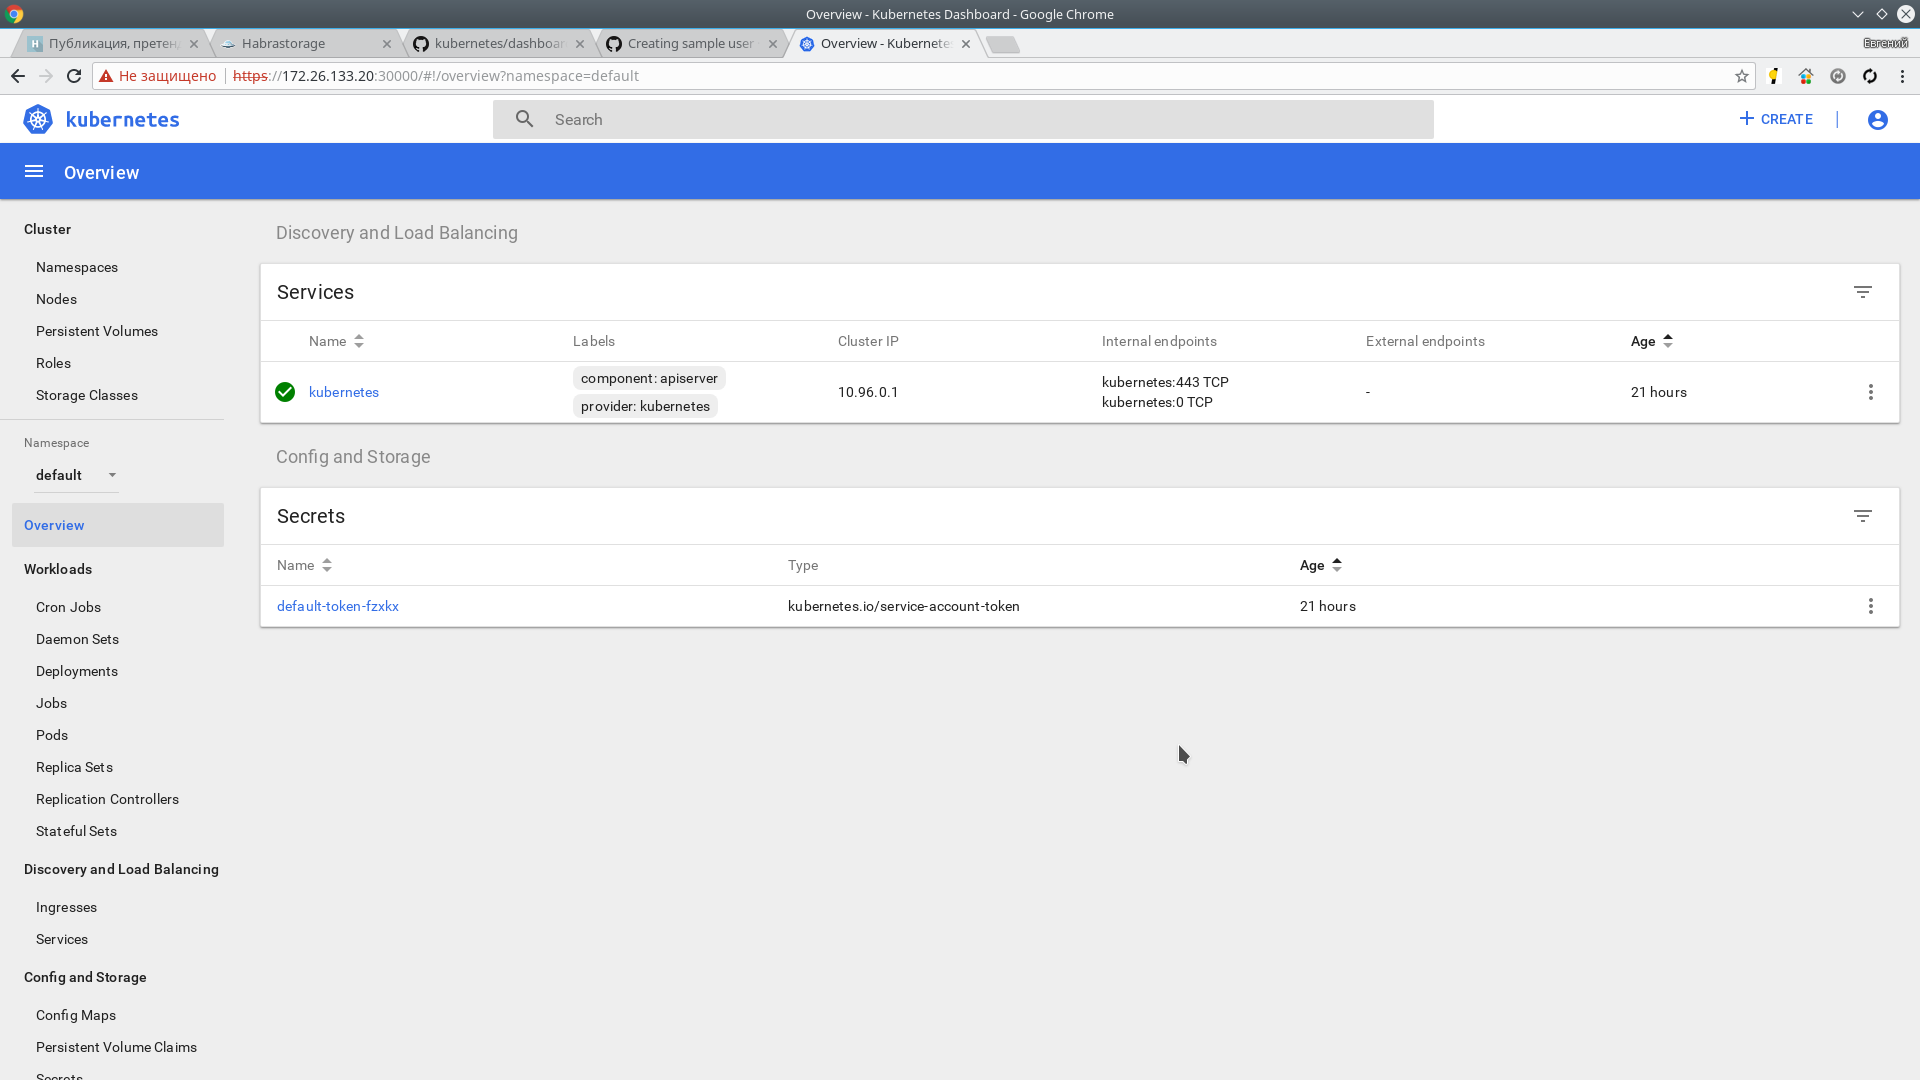
Installing the Kubernetes Dashboard
In Kubernetes, in addition to cli, there is not a bad toolbar. It is installed very simply, instructions and documentation are on GitHub
Commands can be executed on any of 5 masters. I work with hb-master01
Checking:
The panel is now available at:
This is not convenient for me, so I will use NodePort and will place the panel at https: //172.26.133.20.030000 on the first available port in the range allocated to NodePort.
Replace the type: ClusterIP value with type: NodePort and in the port section: add the nodePort value: 30000

Next, create a user with the name admin-user and cluster administrator authority.
We get a token for the user admin-user
Copy the token and go to:
Next, install Heapster. It is a tool for monitoring the resources of all components of the cluster. Project page on GitHub
Installation:
In a couple of minutes the information should go. Checking:
Also metrics are available in the web interface.

Thanks for attention.
Use materials:
In this publication, I would like to talk about the Kubernetes High Availability Cluster (HA).
')
Table of contents:
- Introduction
- List of software used
- Host List and Assignment
- Principle of operation and deployment
- Preparing the OS for deployment. Install docker, kubeadm, kubelet and kubectl
- Preparation of the configuration script
- Creating etcd cluster
- Wizard initialization with kubeadm
- CIDR setup
- Initialize the rest of the master
- Configuring keepalived and virtual IP
- Adding working nodes to the cluster
- Install ingress-nginx
- Additionally
Introduction
At the new place of work I had to face an interesting task, namely: to deploy a highly accessible kubernetes cluster. The main message of the task was to achieve maximum resiliency of the cluster in the event of failure of physical machines.
A small introduction:
I got a job with a project with a minimum amount of documentation and one deployed stand, on which the individual components of this project “hung out” in docker containers. Four fronts for different services, launched through pm2, also worked at this stand.
After I was able to figure out the scheme of services and the logic of their work, it was up to the choice of the infrastructure on which the project would work. After all the discussions, we stopped at two versions of the development of events. The first is to stuff everything into lxc containers and steer everything with the help of ansible. The second is to leave everything at docker and try k8s in work.
In the first version, most of the projects in our company work. However, in this case, we decided to leave everything to the docker, but put the project in a failover cluster using kubernetes.
For enhanced fault tolerance, it was decided to deploy the cluster with five master nodes.
According to the table in the etcd documentation on the CoreOS site ,
It is recommended to have an odd number of members in the cluster. In order for the cluster to continue working after the failure of one member (in our case, the master kubernetes), you need at least 3 machines. In order for the cluster to work after losing 2 machines, they need to have 5. We decided to play it safe and deploy a version with 5 masters.
Kubernetes has very detailed official documentation, although, in my opinion, quite complicated; especially when faced with this product for the first time.
It is bad that in the documents the work schemes are mainly described when there is only one node with the master role in the cluster. There is also not much information on the work of the cluster in the HA mode on the Internet, and in my Russian part, in my opinion, it is not at all. So I decided to share my experience. Perhaps he is useful to someone. So, I'll start:
The main idea was spied on githab from cookeem . In general, I implemented it, correcting most of the flaws in the configs, increasing the number of master nodes in the cluster to five. All of the following configs and scripts can be downloaded from my repository on GitHub .
Brief outline and description of the deployment architecture
The whole essence of the scheme is as follows:
- create etcd cluster
- With the help of kubeadm init we create the first master certificates, keys, etc.
- using the generated configuration files, we initialize the remaining 4 master nodes
- configure the nginx balancer on each master node for the virtual address
- we change the address and port of the server API to a dedicated virtual address
- Add working nodes to the cluster
List of software used
- linux:
The choice of operating system. Initially we wanted to try CoreOS in our work, but at the very moment of our choice the company that produced this OS was acquired by RedHat. After acquiring CoreOS, RedHat did not announce its future plans for the acquired developments, so we were afraid to use it, due to possible licensing restrictions in the future.
I chose Debian 9.3 (Stretch) simply because I was more used to working with it; In general, there is not much difference in the choice of OS for Kubernetes. The whole scheme below will work on any supported OS, from the list in the official documentation for kubernetes- Debian
- Ubuntu
- HypriotOS
- CentOS
- Rhel
- Fedora
- Container linux
- containers:
At the time of this writing, docker version 17.03.2-ce, build f5ec1e2 and docker-compose version 1.8.0 recommended by the documentation. - Kubernetes v1.9.3
- networks add-ons: flannel
- Balancer: nginx
Virtual IP: keepalived Version: 1: 1.3.2-1
Host list
| Hostnames | IP address | Description | Components |
|---|---|---|---|
| hb-master01 ~ 03 | 172.26.133.21 ~ 25 | master nodes * 5 | keepalived, nginx, etcd, kubelet, kube-apiserver, kube-scheduler, kube-proxy, kube-dashboard, heapster |
| N \ A | 172.26.133.20 | keepalived virtual IP | N \ A |
| hb-node01 ~ 03 | 172.26.133.26 ~ 28 | Work nodes * 3 | kubelet, kube-proxy |
Preparing the OS for deployment. Install docker, kubeadm, kubelet and kubectl
Before starting the deployment, you need to prepare the system on all nodes of the cluster, namely: install the necessary packages, configure the firewall, disable the swap As they say, before you begin.
$ sudo -i :~# If swap is used, then it needs to be disabled; kubeadm does not support swap. I immediately put the system without a swap partition.
swapoff -a Rules / etc / fstab. Or manually
vim /etc/fstab # swap was on /dev/sda6 during installation #UUID=5eb7202b-68e2-4bab-8cd1-767dc5a2ee9d none swap sw 0 0 Lyibo via sed
sed -i '/ swap / s/^\(.*\)$/#\1/g' /etc/fstab In Debian 9, there is no selinux. If it is in your distribution, then it needs to be translated into permissive mode
If there are any rules in iptables, then they should be cleared. During installation and configuration, Docker and kubernetes prescribe their firewall rules.
On each node of the cluster, you must specify the correct hostname.
vim /etc/hostname hb-master01 This completes the preparation, restart before the next step.
reboot On the cluster machine, install the docker according to the instructions from the kubernetes documentation :
apt-get update apt-get install -y \ apt-transport-https \ ca-certificates \ curl \ software-properties-common \ curl -fsSL https://download.docker.com/linux/ubuntu/gpg | apt-key add - add-apt-repository \ "deb https://download.docker.com/linux/$(. /etc/os-release; echo "$ID") \ $(lsb_release -cs) \ stable" apt-get update && apt-get install -y docker-ce=$(apt-cache madison docker-ce | grep 17.03 | head -1 | awk '{print $3}') docker-compose Further we put kubeadm, kubelet and kubectl according to the same instruction.
apt-get update && apt-get install -y apt-transport-https curl -s https://packages.cloud.google.com/apt/doc/apt-key.gpg | apt-key add - cat <<EOF >/etc/apt/sources.list.d/kubernetes.list deb http://apt.kubernetes.io/ kubernetes-xenial main EOF apt-get update apt-get install -y kubelet kubeadm kubectl Install keepalived:
apt-get install keepalived systemctl enable keepalived && systemctl restart keepalived For proper operation of CNI (Container Network Interface) you need to set / proc / sys / net / bridge / bridge-nf-call-iptables to 1
sysctl net.bridge.bridge-nf-call-iptables=1 Preparation of the configuration script
git clone https://github.com/rjeka/kubernetes-ha.git cd kubernetes-ha On each master node we prepare the script create-config.sh
vim create-config.sh #!/bin/bash # local machine ip address export K8SHA_IPLOCAL=172.26.133.21 # local machine etcd name, options: etcd1, etcd2, etcd3, etcd4, etcd5 export K8SHA_ETCDNAME=etcd1 # local machine keepalived state config, options: MASTER, BACKUP. One keepalived cluster only one MASTER, other's are BACKUP export K8SHA_KA_STATE=MASTER # local machine keepalived priority config, options: 102, 101, 100, 99, 98. MASTER must 102 export K8SHA_KA_PRIO=102 # local machine keepalived network interface name config, for example: eth0 export K8SHA_KA_INTF=ens18 ####################################### # all masters settings below must be same ####################################### # master keepalived virtual ip address export K8SHA_IPVIRTUAL=172.26.133.20 # master01 ip address export K8SHA_IP1=172.26.133.21 # master02 ip address export K8SHA_IP2=172.26.133.22 # master03 ip address export K8SHA_IP3=172.26.133.23 # master04 ip address export K8SHA_IP4=172.26.133.24 # master05 ip address export K8SHA_IP5=172.26.133.25 # master01 hostname export K8SHA_HOSTNAME1=hb-master01 # master02 hostname export K8SHA_HOSTNAME2=hb-master02 # master03 hostname export K8SHA_HOSTNAME3=hb-master03 # master04 hostname export K8SHA_HOSTNAME4=hb-master04 # master04 hostname export K8SHA_HOSTNAME4=hb-master05 # keepalived auth_pass config, all masters must be same export K8SHA_KA_AUTH=55df7dc334c90194d1600c483e10acfr # kubernetes cluster token, you can use 'kubeadm token generate' to get a new one export K8SHA_TOKEN=4ae6cb.9dbc7b3600a3de89 # kubernetes CIDR pod subnet, if CIDR pod subnet is "10.244.0.0/16" please set to "10.244.0.0\\/16" export K8SHA_CIDR=10.244.0.0\\/16 ############################## # please do not modify anything below ############################## In the configuration file itself, cookeem has quite detailed comments, but still let's go over the main points:
Decrypt create-config.sh
# settings on the local machine of each node (each node has its own)
K8SHA_IPLOCAL - the IP address of the node on which the script is configured
K8SHA_ETCDNAME is the name of the local machine in the ETCD cluster, respectively on master01 - etcd1, master02 - etcd2, etc.
K8SHA_KA_STATE - role in keepalived. One MASTER node, all other BACKUP.
K8SHA_KA_PRIO - keepalived priority, the master has 102 of the remaining 101, 100, ..... 98. When the master falls with the number 102, its place is occupied by the node with the number 101, and so on.
K8SHA_KA_INTF - keepalived network interface. The name of the interface that will listen
# general settings for all masternode are the same
K8SHA_IPVIRTUAL = 172.26.133.20 - virtual IP cluster.
K8SHA_IP1 ... K8SHA_IP5 - IP addresses of masters
K8SHA_HOSTNAME1 ... K8SHA_HOSTNAME5 - hostnames for masternotes. An important point, under these names, kubeadm will generate certificates.
K8SHA_KA_AUTH - password for keepalived. You can set any
K8SHA_TOKEN - cluster token. You can generate the command kubeadm token generate
K8SHA_CIDR - subnet address for pods. I use flannel therefore CIDR 0.244.0.0/16. Must be shielded - in the config should be K8SHA_CIDR = 10.244.0.0 \\ / 16
After all the values are registered, on each master-quest, you need to run the create-config.sh script to create configs.
kubernetes-ha# ./create-config.sh Creating etcd cluster
Based on the received configs, we create an etcd cluster
docker-compose --file etcd/docker-compose.yaml up -d After the containers have been raised on all the wizards, we check the status of etcd
docker exec -ti etcd etcdctl cluster-health member 3357c0f051a52e4a is healthy: got healthy result from http://172.26.133.24:2379 member 4f9d89f3d0f7047f is healthy: got healthy result from http://172.26.133.21:2379 member 8870062c9957931b is healthy: got healthy result from http://172.26.133.23:2379 member c8923ecd7d317ed4 is healthy: got healthy result from http://172.26.133.22:2379 member cd879d96247aef7e is healthy: got healthy result from http://172.26.133.25:2379 cluster is healthy docker exec -ti etcd etcdctl member list 3357c0f051a52e4a: name=etcd4 peerURLs=http://172.26.133.24:2380 clientURLs=http://172.26.133.24:2379,http://172.26.133.24:4001 isLeader=false 4f9d89f3d0f7047f: name=etcd1 peerURLs=http://172.26.133.21:2380 clientURLs=http://172.26.133.21:2379,http://172.26.133.21:4001 isLeader=false 8870062c9957931b: name=etcd3 peerURLs=http://172.26.133.23:2380 clientURLs=http://172.26.133.23:2379,http://172.26.133.23:4001 isLeader=false c8923ecd7d317ed4: name=etcd2 peerURLs=http://172.26.133.22:2380 clientURLs=http://172.26.133.22:2379,http://172.26.133.22:4001 isLeader=true cd879d96247aef7e: name=etcd5 peerURLs=http://172.26.133.25:2380 clientURLs=http://172.26.133.25:2379,http://172.26.133.25:4001 isLeader=false If the cluster is all right, then move on. If something is wrong, then we look at the logs
docker logs etcd Initializing the first master node with kubeadm
On hb-master01, using kubeadm, we initialize the kubernetes cluster.
kubeadm init --config=kubeadm-init.yaml If there is an error according to Kubelet version, then you need to add a key
--ignore-preflight-errors=KubeletVersion After the master is initialized, kubeadm will display the service information. It will contain a token and a hash to initialize other cluster members. Be sure to save the line of the form: kubeadm join --token XXXXXXXXXXXXX 172.26.133.21:6443 --discovery-token-ca-cert-hash sha256: XXXXXXXXXXXXXXXXXXXXXXXXX somewhere separately, since this information is output once; if the tokens are lost, they will have to be regenerated.
Your Kubernetes master has initialized successfully! To start using your cluster, you need to run the following as a regular user: mkdir -p $HOME/.kube sudo cp -i /etc/kubernetes/admin.conf $HOME/.kube/config sudo chown $(id -u):$(id -g) $HOME/.kube/config You should now deploy a pod network to the cluster. Run "kubectl apply -f [podnetwork].yaml" with one of the options listed at: https://kubernetes.io/docs/concepts/cluster-administration/addons/ You can now join any number of machines by running the following on each node as root: kubeadm join --token XXXXXXXXXXXX 172.26.133.21:6443 --discovery-token-ca-cert-hash sha256:XXXXXXXXXXXXXXXXXXXXXXX Next, you need to set the environment variable, to be able to work with the cluster as root
vim ~/.bashrc export KUBECONFIG=/etc/kubernetes/admin.conf source ~/.bashrc If you want to work as a regular user, then follow the instructions that appeared on the screen when the wizard initialized.
To start using your cluster, you need to run the following as a regular user: mkdir -p $HOME/.kube sudo cp -i /etc/kubernetes/admin.conf $HOME/.kube/config sudo chown $(id -u):$(id -g) $HOME/.kube/config We check that everything was done correctly:
kubectl get node NAME STATUS ROLES AGE VERSION hb-master01 NotReady master 22m v1.9.5 NotReady cidr, . CIDR setup
kubectl apply -f https://raw.githubusercontent.com/coreos/flannel/v0.9.1/Documentation/kube-flannel.yml clusterrole "flannel" created clusterrolebinding "flannel" created serviceaccount "flannel" created configmap "kube-flannel-cfg" created daemonset "kube-flannel-ds" created Check that everything is OK
kubectl get pods --all-namespaces NAMESPACE NAME READY STATUS RESTARTS AGE kube-system kube-apiserver-hb-master01 1/1 Running 0 1h kube-system kube-controller-manager-hb-master01 1/1 Running 0 1h kube-system kube-dns-6f4fd4bdf-jdhdk 3/3 Running 0 1h kube-system kube-flannel-ds-hczw4 1/1 Running 0 1m kube-system kube-proxy-f88rm 1/1 Running 0 1h kube-system kube-scheduler-hb-master01 1/1 Running 0 1h Initialize the rest of the master
Now, after our cluster is working with one node, it is time to introduce the remaining master codes into the cluster.
To do this, with hb-master01, you need to copy the / etc / kubernetes / pki directory to the remote / etc / kubernetes / directory of each wizard. To copy in the ssh settings, I temporarily allowed the connection root. After copying the files, of course, this feature is disabled.
On each of the remaining masters, set up an ssh server
vim /etc/ssh/sshd_config PermitRootLogin yes systemctl restart ssh Copy files
scp -r /etc/kubernetes/pki 172.26.133.22:/etc/kubernetes/ \ && scp -r /etc/kubernetes/pki 172.26.133.23:/etc/kubernetes/ \ && scp -r /etc/kubernetes/pki 172.26.133.24:/etc/kubernetes/ \ && scp -r /etc/kubernetes/pki 172.26.133.25:/etc/kubernetes/ Now on hb-master02, use kubeadm to start the cluster, make sure that pod kube-apiserver- is in working condition.
kubeadm init --config=kubeadm-init.yaml Your Kubernetes master has initialized successfully! To start using your cluster, you need to run the following as a regular user: mkdir -p $HOME/.kube sudo cp -i /etc/kubernetes/admin.conf $HOME/.kube/config sudo chown $(id -u):$(id -g) $HOME/.kube/config You should now deploy a pod network to the cluster. Run "kubectl apply -f [podnetwork].yaml" with one of the options listed at: https://kubernetes.io/docs/concepts/cluster-administration/addons/ You can now join any number of machines by running the following on each node as root: kubeadm join --token xxxxxxxxxxxxxx 172.26.133.22:6443 --discovery-token-ca-cert-hash sha256:xxxxxxxxxxxxxxxxxxxxxxxxx Repeat on hb-master03, hb-master04, hb-master05
Check that all masters are initialized and work in a cluster.
kubectl get nodes NAME STATUS ROLES AGE VERSION hb-master01 Ready master 37m v1.9.5 hb-master02 Ready master 33s v1.9.5 hb-master03 Ready master 3m v1.9.5 hb-master04 Ready master 17m v1.9.5 hb-master05 Ready master 19m v1.9.5 kubectl get pods --all-namespaces NAMESPACE NAME READY STATUS RESTARTS AGE kube-system kube-apiserver-hb-master01 1/1 Running 0 6m kube-system kube-apiserver-hb-master02 1/1 Running 0 1m kube-system kube-apiserver-hb-master03 1/1 Running 0 1m kube-system kube-apiserver-hb-master04 1/1 Running 0 1m kube-system kube-apiserver-hb-master05 1/1 Running 0 10s kube-system kube-controller-manager-hb-master01 1/1 Running 0 6m kube-system kube-controller-manager-hb-master02 1/1 Running 0 1m kube-system kube-controller-manager-hb-master03 1/1 Running 0 1m kube-system kube-controller-manager-hb-master04 1/1 Running 0 1m kube-system kube-controller-manager-hb-master05 1/1 Running 0 9s kube-system kube-dns-6f4fd4bdf-bnxl8 3/3 Running 0 7m kube-system kube-flannel-ds-j698p 1/1 Running 0 6m kube-system kube-flannel-ds-mf9zc 1/1 Running 0 2m kube-system kube-flannel-ds-n5vbm 1/1 Running 0 2m kube-system kube-flannel-ds-q7ztg 1/1 Running 0 1m kube-system kube-flannel-ds-rrrcq 1/1 Running 0 2m kube-system kube-proxy-796zl 1/1 Running 0 1m kube-system kube-proxy-dz25s 1/1 Running 0 7m kube-system kube-proxy-hmrw5 1/1 Running 0 2m kube-system kube-proxy-kfjst 1/1 Running 0 2m kube-system kube-proxy-tpkbt 1/1 Running 0 2m kube-system kube-scheduler-hb-master01 1/1 Running 0 6m kube-system kube-scheduler-hb-master02 1/1 Running 0 1m kube-system kube-scheduler-hb-master03 1/1 Running 0 1m kube-system kube-scheduler-hb-master04 1/1 Running 0 48s kube-system kube-scheduler-hb-master05 1/1 Running 0 29s Create replicas of the kube-dns service. On hb-master01 run
kubectl scale --replicas=5 -n kube-system deployment/kube-dns On all masternods, make a line with the number of api servers in the configuration file
If you are using kubernetes versions greater than 1.9, you can skip this step.
vim /etc/kubernetes/manifests/kube-apiserver.yaml - --apiserver-count=5 systemctl restart docker && systemctl restart kubelet Configuring keepalived and virtual IP
On all masternods we configure keepalived and nginx as a balancer
systemctl restart keepalived docker-compose -f nginx-lb/docker-compose.yaml up -d Testing work
curl -k https://172.26.133.21:16443 | wc -1 wc: invalid option -- '1' Try 'wc --help' for more information. % Total % Received % Xferd Average Speed Time Time Time Current Dload Upload Total Spent Left Speed 100 233 100 233 0 0 15281 0 --:--:-- --:--:-- --:--:-- 15533 If 100% - then everything is OK.
After we get a working virtual address, we specify it as the server API address.
On hb-master01
kubectl edit -n kube-system configmap/kube-proxy server: https://172.26.133.20:16443 Remove all kube-proxy pod to restart them with new parameters.
kubectl get pods --all-namespaces -o wide | grep proxy kubectl delete pod -n kube-system kube-proxy-XXX Check that all restartanuli
kubectl get pods --all-namespaces -o wide | grep proxy kube-system kube-proxy-2q7pz 1/1 Running 0 28s 172.26.133.22 hb-master02 kube-system kube-proxy-76vnw 1/1 Running 0 10s 172.26.133.23 hb-master03 kube-system kube-proxy-nq47m 1/1 Running 0 19s 172.26.133.24 hb-master04 kube-system kube-proxy-pqqdh 1/1 Running 0 35s 172.26.133.21 hb-master01 kube-system kube-proxy-vldg8 1/1 Running 0 32s 172.26.133.25 hb-master05 Adding working nodes to the cluster
At each work node, install docke, kubernetes and kubeadm, by analogy with the masters.
Add a node to the cluster using tokens generated during initialization of hb-master01
kubeadm join --token xxxxxxxxxxxxxxx 172.26.133.21:6443 --discovery-token-ca-cert-hash sha256:xxxxxxxxxxxxxxxxxxxxxxxxxxxxxxxxxxxxxxxx [preflight] Running pre-flight checks. [WARNING FileExisting-crictl]: crictl not found in system path [discovery] Trying to connect to API Server "172.26.133.21:6443" [discovery] Created cluster-info discovery client, requesting info from "https://172.26.133.21:6443" [discovery] Requesting info from "https://172.26.133.21:6443" again to validate TLS against the pinned public key [discovery] Cluster info signature and contents are valid and TLS certificate validates against pinned roots, will use API Server "172.26.133.21:6443" [discovery] Successfully established connection with API Server "172.26.133.21:6443" This node has joined the cluster: * Certificate signing request was sent to master and a response was received. * The Kubelet was informed of the new secure connection details. Run 'kubectl get nodes' on the master to see this node join the cluster. We check that all working nodes are included in the cluster and they are available.
kubectl get nodes NAME STATUS ROLES AGE VERSION hb-master01 Ready master 20h v1.9.5 hb-master02 Ready master 20h v1.9.5 hb-master03 Ready master 20h v1.9.5 hb-master04 Ready master 20h v1.9.5 hb-master05 Ready master 20h v1.9.5 hb-node01 Ready <none> 12m v1.9.5 hb-node02 Ready <none> 4m v1.9.5 hb-node03 Ready <none> 31s v1.9.5 Only on working nodes in the /etc/kubernetes/bootstrap-kubelet.conf and /etc/kubernetes/kubelet.conf files we change
the value of the server variable on our virtual IP
vim /etc/kubernetes/bootstrap-kubelet.conf server: https://172.26.133.20:16443 vim /etc/kubernetes/kubelet.conf server: https://172.26.133.20:16443 systemctl restart docker kubelet Then you can increase the performance of your cluster by adding new work nodes, as needed.
Install ingress-nginx
Ntgthm we have to install ingress.
The following documentation is written in the kubernetes documentation about Ingress:
An API object that controls external access to services in a cluster, usually HTTP.
Ingress can provide load balancing, SSL termination, and name-based shared hosting.
In general, then in more detail I can hardly describe. Setting up ingress is material for a separate article; in the context of installing a cluster, I will only describe its installation.
kubectl apply -f kube-ingress/mandatory.yaml namespace "ingress-nginx" created deployment.extensions "default-http-backend" created service "default-http-backend" created configmap "nginx-configuration" created configmap "tcp-services" created configmap "udp-services" created serviceaccount "nginx-ingress-serviceaccount" created clusterrole.rbac.authorization.k8s.io "nginx-ingress-clusterrole" configured role.rbac.authorization.k8s.io "nginx-ingress-role" created rolebinding.rbac.authorization.k8s.io "nginx-ingress-role-nisa-binding" created clusterrolebinding.rbac.authorization.k8s.io "nginx-ingress-clusterrole-nisa-binding" configured deployment.extensions "nginx-ingress-controller" created kubectl apply -f kube-ingress/service-nodeport.yaml service "ingress-nginx" created Check that ingress has risen:
kubectl get all -n ingress-nginx NAME READY STATUS RESTARTS AGE pod/default-http-backend-5c6d95c48-j8sd4 1/1 Running 0 5m pod/nginx-ingress-controller-58c9df5856-vqwst 1/1 Running 0 5m NAME TYPE CLUSTER-IP EXTERNAL-IP PORT(S) AGE service/default-http-backend ClusterIP 10.109.216.21 <none> 80/TCP 5m service/ingress-nginx NodePort 10.96.229.115 172.26.133.20 80:32700/TCP,443:31211/TCP 4m NAME DESIRED CURRENT UP-TO-DATE AVAILABLE AGE deployment.apps/default-http-backend 1 1 1 1 5m deployment.apps/nginx-ingress-controller 1 1 1 1 5m NAME DESIRED CURRENT READY AGE replicaset.apps/default-http-backend-5c6d95c48 1 1 1 5m replicaset.apps/nginx-ingress-controller-58c9df5856 1 1 1 5m At this step, the cluster configuration is complete. If you did everything correctly, you should get a fault-tolerant, working Kubernetes cluster with a fail-safe entry point and a balancer on the virtual address.
Thank you for your attention, I will be glad to comment, or indications of inaccuracy. You can also create an issue on github, I will try to respond quickly to them.
Respectfully,
Evgeny Rodionov
Additionally
|Installing the Kubernetes Dashboard
In Kubernetes, in addition to cli, there is not a bad toolbar. It is installed very simply, instructions and documentation are on GitHub
Commands can be executed on any of 5 masters. I work with hb-master01
kubectl apply -f https://raw.githubusercontent.com/kubernetes/dashboard/master/src/deploy/recommended/kubernetes-dashboard.yaml Checking:
kubectl get pods --all-namespaces -o wide | grep kubernetes-dashboard kube-system kubernetes-dashboard-5bd6f767c7-cz55w 1/1 Running 0 1m 10.244.7.2 hb-node03 The panel is now available at:
http: // localhost: 8001 / api / v1 / namespaces / kube-system / services / https: kubernetes-dashboard: / proxy /But in order to get at it, you need to forward the proxy from the local machine using the command
kubectl proxy This is not convenient for me, so I will use NodePort and will place the panel at https: //172.26.133.20.030000 on the first available port in the range allocated to NodePort.
kubectl -n kube-system edit service kubernetes-dashboard Replace the type: ClusterIP value with type: NodePort and in the port section: add the nodePort value: 30000
Next, create a user with the name admin-user and cluster administrator authority.
kubectl apply -f kube-dashboard/dashboard-adminUser.yaml serviceaccount "admin-user" created clusterrolebinding "admin-user" created We get a token for the user admin-user
kubectl -n kube-system describe secret $(kubectl -n kube-system get secret | grep admin-user | awk '{print $1}') Name: admin-user-token-p8cxl Namespace: kube-system Labels: <none> Annotations: kubernetes.io/service-account.name=admin-user kubernetes.io/service-account.uid=0819c99c-2cf0-11e8-a281-a64625c137fc Type: kubernetes.io/service-account-token Data ==== ca.crt: 1025 bytes namespace: 11 bytes token: XXXXXXXXXXXXXXXXXXXXXXXXXXXXXXXXXXXXXXXXXXXXXXXXXXXXXXXXXXXXXXXXXXXXXXXXXXXXXXXXXXXXXXXXXXXXXXXXXXXXXXXXXXXXXXXXXXXXXXXXXXXXXXXXXXXXXXXXXXXXXXXXXXXXXXXXXXXXXXXX Copy the token and go to:
https://172.26.133.20天0000/Now we have access to the Kubernetes cluster control panel with admin privileges.
Heapster
Next, install Heapster. It is a tool for monitoring the resources of all components of the cluster. Project page on GitHub
Installation:
git clone https://github.com/kubernetes/heapster.git cd heapster kubectl create -f deploy/kube-config/influxdb/ deployment "monitoring-grafana" created service "monitoring-grafana" created serviceaccount "heapster" created deployment "heapster" created service "heapster" created deployment "monitoring-influxdb" created service "monitoring-influxdb" created kubectl create -f deploy/kube-config/rbac/heapster-rbac.yaml clusterrolebinding "heapster" created In a couple of minutes the information should go. Checking:
kubectl top nodes NAME CPU(cores) CPU% MEMORY(bytes) MEMORY% hb-master01 166m 4% 1216Mi 31% hb-master02 135m 3% 1130Mi 29% hb-master03 142m 3% 1091Mi 28% hb-master04 193m 4% 1149Mi 29% hb-master05 144m 3% 1056Mi 27% hb-node01 41m 1% 518Mi 3% hb-node02 38m 0% 444Mi 2% hb-node03 45m 1% 478Mi 2% Also metrics are available in the web interface.
Thanks for attention.
Use materials:
Source: https://habr.com/ru/post/358264/
All Articles