Robot Tank on Raspberry Pi with OpenCV
At one time I was fond of assembling machine robots on Arduino and Raspberry Pi. I liked to play constructor, but I wanted something more.
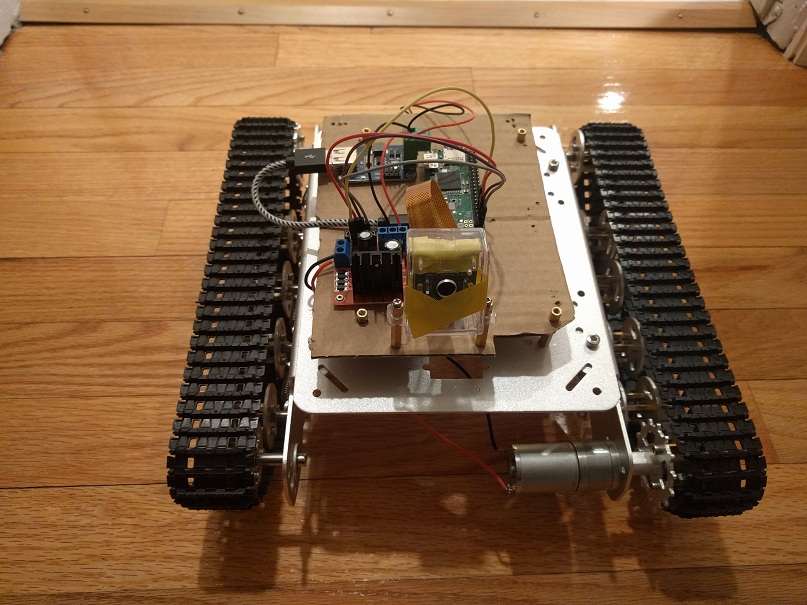
And once, wandering around Aliexpress, I came across an aluminum chassis for a tank. This creation looked in comparison with plastic cars like Ferrari in comparison with a cart.
I made myself a gift for the New Year, the tank arrived, it was assembled and then I had to revive it. I took my own Raspberry, power converter, motor controller and battery. All this was put on the tank and earned joy.
Further on, a simple REST API for taxiing was written on the python, and on Android it was the same simple program that allowed you to control the tank by pulling this API.
')
The tank should shoot, and the next step was the appearance of his camera. I didn’t manage to guess with the camera body - he didn’t hold the camera in the open position and was so tight in the shut that the camera had a lens flying off. Having suffered, I simply wound the camera tape to the cover of the case. Now the tank could not just drive around the room, but also take pictures.
It is worth noting a serious advantage of the tank over the cars at home - on the track it does not make a difference, go on hard floor or on the carpet. Wheeled transport slips on a soft carpet, up to the impossibility of turning.
Then I wanted to develop the tank in the direction of autonomous navigation, relying on pictures from the camera. I had to immerse myself in the world of computer vision and discover OpenCV. It all started with the recognition of color and contour - printed a red circle on paper, pasted it on the TV and made the robot spin until the circle was found.
The idea was to mark visible objects in the room (sofa, TV, table) with colored circles and teach the robot to navigate by color.
Using OpenCV, we searched for the contours of the desired color (with permissible tolerance), then we looked for a circle among the contours.
It seemed that the main problem could be a random circle of the desired color on any of the objects.
However, the main problem turned out to be that the color is very changeable depending on the lighting, so the range in which red was recognized (for example) had to be stretched to shades that very remotely resemble the original color. Or choose the desired color from the image, but in any case it was not red anymore, but a shade of brown.
Search mug red:
Color recognition has come to a standstill, I was distracted by the cascades of Haar, using a tank for photo-hunting for a cat. The cat was disguised well, forcing the cascade to make mistakes in half of the cases (if anyone does not know, OpenCV comes with the Haar cascade specially trained on the seals - take it and use it).
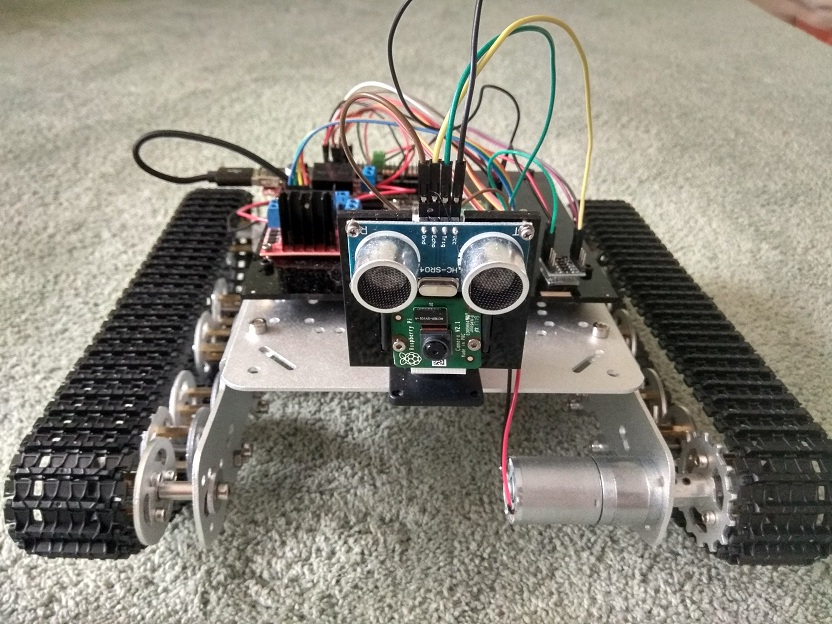
The hunt for a cat had beneficial consequences for the robot - since it was not always possible to catch the object of the hunt in a static camera, I put a tripod with two servomotors (and a PWM module to control them through Raspberry).
Continuing research on what can be squeezed out of the pictures of the room, I naturally came to neural networks. Having swallowed the Tensorflow tutorial, I processed a photo from the tank with the detector and the results were promising - a TV, a table, a sofa, a cat, a refrigerator were recognized unmistakably.
These experiments were carried out on a computer, and the matter remained for a small one - to transfer the TF to the Raspberry Pi. Fortunately, a unique person lives on a githaba who has gained patience and broke through the installation of all dependencies and many hours of compilation - and laid out the shared Tensorflow for Raspberry Pi.
However, further study of the topic revealed that OpenCV does not stand still and its contributors released the DNN module (Deep Neural Networks), which offers integration with neural networks trained in TensorFlow. This solution is much more convenient to develop, plus there is no need for the TF itself. I had to conjure a little, since the latest version of the Mobile SSD neural network for TF was no longer picked up by the latest version of OpenCV. Should have been looking for
and check the working version of Mobile SSD. Plus, DNN normally works only under OpenCV 3.4, and I did not find this version for Raspberry. I had to collect it myself, the benefit is much easier than messing with TensorFlow. At the same time, Raspbian (Stretch) failed to assemble OpenCV under the latest version, but on the latest version of the previous generation (Jessie) everything took off as it should.
Sample code using DNN and not using Tensorflow.
Several files responsible for the names of the objects were pulled from the TF and the dependence on the TF itself was removed (there was only read from the file).
Source code on githaba.
In general, the tank's pictures can now be recognized by the neural network, and this is a very important step in navigation in terms of recognizing landmarks. However, some images were not enough for full navigation, it was necessary to measure the distance to obstacles. So the robot has an echo sounder. To connect the echo sounder to the Raspberry, you need to work a little - the echo sounder returns the signal to 5V, and the Raspberry takes 3.3V. On the knee, this problem is solved mainly by resistors on the brainboard, but I did not want to fence such amateur work on the robot. As a result, the Level Shifter microcircuit was found, which does everything that is needed, and is the size of a nail.
In addition, I attended to the appearance of the robot - I didn’t like it very much that the microcircuits and the camera with the echo sounder were stuck to the cardboard boxes. The development of technology in our world allows you to cut plastic with a laser with a reasonable investment of time and money. In general, I found a workshop with a laser machine, spent some time studying the instructions for this wonderful machine, and not on the first attempt cut out the panels for the microcircuits and the camera with an echo sounder.
Everything is ready for autonomous navigation, but the task turned out to be not so simple and on the first attempt I dug a little. I decided to take a pause, think about everything, study analogs. Perhaps this navigation will serve as a topic for a separate article.
REST interface that the robot provides as a base for further use:
And once, wandering around Aliexpress, I came across an aluminum chassis for a tank. This creation looked in comparison with plastic cars like Ferrari in comparison with a cart.
I made myself a gift for the New Year, the tank arrived, it was assembled and then I had to revive it. I took my own Raspberry, power converter, motor controller and battery. All this was put on the tank and earned joy.
Further on, a simple REST API for taxiing was written on the python, and on Android it was the same simple program that allowed you to control the tank by pulling this API.
')
The tank should shoot, and the next step was the appearance of his camera. I didn’t manage to guess with the camera body - he didn’t hold the camera in the open position and was so tight in the shut that the camera had a lens flying off. Having suffered, I simply wound the camera tape to the cover of the case. Now the tank could not just drive around the room, but also take pictures.
It is worth noting a serious advantage of the tank over the cars at home - on the track it does not make a difference, go on hard floor or on the carpet. Wheeled transport slips on a soft carpet, up to the impossibility of turning.
Then I wanted to develop the tank in the direction of autonomous navigation, relying on pictures from the camera. I had to immerse myself in the world of computer vision and discover OpenCV. It all started with the recognition of color and contour - printed a red circle on paper, pasted it on the TV and made the robot spin until the circle was found.
The idea was to mark visible objects in the room (sofa, TV, table) with colored circles and teach the robot to navigate by color.
Using OpenCV, we searched for the contours of the desired color (with permissible tolerance), then we looked for a circle among the contours.
It seemed that the main problem could be a random circle of the desired color on any of the objects.
However, the main problem turned out to be that the color is very changeable depending on the lighting, so the range in which red was recognized (for example) had to be stretched to shades that very remotely resemble the original color. Or choose the desired color from the image, but in any case it was not red anymore, but a shade of brown.
Search mug red:
import cv2 import numpy as np import sys def mask_color(img, c1, c2): img = cv2.medianBlur(img, 5) hsv = cv2.cvtColor(img, cv2.COLOR_BGR2HSV) mask = cv2.inRange(hsv, c1, c2) mask = cv2.erode(mask, None, iterations=2) mask = cv2.dilate(mask, None, iterations=2) return mask def find_contours(img): gray = cv2.cvtColor(img, cv2.COLOR_BGR2GRAY) blurred = cv2.GaussianBlur(gray, (5, 5), 0) thresh = cv2.threshold(blurred, 30, 255, cv2.THRESH_BINARY)[1] thresh = cv2.bitwise_not(thresh) im2, cnts, hierarchy = cv2.findContours(thresh, cv2.RETR_CCOMP, cv2.CHAIN_APPROX_SIMPLE) cp_img = img.copy() cv2.drawContours(cp_img, cnts, -1, (0,255,0), 3) return cp_img def find_circles(img): gray = cv2.cvtColor(img, cv2.COLOR_BGR2GRAY) blurred = cv2.medianBlur(gray,5) circles = cv2.HoughCircles(blurred,cv2.HOUGH_GRADIENT,1,20,param1=50,param2=30,minRadius=0,maxRadius=0) cimg = img if circles is not None: circles = np.uint16(np.around(circles)) for i in circles[0,:]: cv2.circle(img,(i[0],i[1]),i[2],(255,0,0),2) cv2.circle(img,(i[0],i[1]),2,(0,0,255),3) print "C", i[0],i[1],i[2] return cimg def find_circle(img, rgb): tolerance = 4 hsv = cv2.cvtColor(rgb, cv2.COLOR_BGR2HSV) H = hsv[0][0][0] c1 = (H - tolerance, 100, 100) c2 = (H + tolerance, 255, 255) c_mask = mask_color(img, c1, c2) rgb = cv2.cvtColor(c_mask,cv2.COLOR_GRAY2RGB) cont_img = find_contours(rgb) circ_img = find_circles(cont_img) cv2.imshow("Image", circ_img) cv2.waitKey(0) if __name__ == '__main__': img_name = sys.argv[1] img = cv2.imread(img_name) rgb = np.uint8([[[0, 0, 255 ]]]) find_circle(img, rgb) Color recognition has come to a standstill, I was distracted by the cascades of Haar, using a tank for photo-hunting for a cat. The cat was disguised well, forcing the cascade to make mistakes in half of the cases (if anyone does not know, OpenCV comes with the Haar cascade specially trained on the seals - take it and use it).
The hunt for a cat had beneficial consequences for the robot - since it was not always possible to catch the object of the hunt in a static camera, I put a tripod with two servomotors (and a PWM module to control them through Raspberry).
Continuing research on what can be squeezed out of the pictures of the room, I naturally came to neural networks. Having swallowed the Tensorflow tutorial, I processed a photo from the tank with the detector and the results were promising - a TV, a table, a sofa, a cat, a refrigerator were recognized unmistakably.
These experiments were carried out on a computer, and the matter remained for a small one - to transfer the TF to the Raspberry Pi. Fortunately, a unique person lives on a githaba who has gained patience and broke through the installation of all dependencies and many hours of compilation - and laid out the shared Tensorflow for Raspberry Pi.
However, further study of the topic revealed that OpenCV does not stand still and its contributors released the DNN module (Deep Neural Networks), which offers integration with neural networks trained in TensorFlow. This solution is much more convenient to develop, plus there is no need for the TF itself. I had to conjure a little, since the latest version of the Mobile SSD neural network for TF was no longer picked up by the latest version of OpenCV. Should have been looking for
and check the working version of Mobile SSD. Plus, DNN normally works only under OpenCV 3.4, and I did not find this version for Raspberry. I had to collect it myself, the benefit is much easier than messing with TensorFlow. At the same time, Raspbian (Stretch) failed to assemble OpenCV under the latest version, but on the latest version of the previous generation (Jessie) everything took off as it should.
Sample code using DNN and not using Tensorflow.
Several files responsible for the names of the objects were pulled from the TF and the dependence on the TF itself was removed (there was only read from the file).
Source code on githaba.
import cv2 as cv import tf_labels import sys DNN_PATH = "---path-to:ssd_mobilenet_v1_coco_11_06_2017/frozen_inference_graph.pb" DNN_TXT_PATH = "--path-to:ssd_mobilenet_v1_coco.pbtxt" LABELS_PATH = "--path-to:mscoco_label_map.pbtxt" tf_labels.initLabels(PATH_TO_LABELS) cvNet = cv.dnn.readNetFromTensorflow(pb_path, pb_txt) img = cv.imread(sys.argv[1]) rows = img.shape[0] cols = img.shape[1] cvNet.setInput(cv.dnn.blobFromImage(img, 1.0/127.5, (300, 300), (127.5, 127.5, 127.5), swapRB=True, crop=False)) cvOut = cvNet.forward() for detection in cvOut[0,0,:,:]: score = float(detection[2]) if score > 0.25: left = int(detection[3] * cols) top = int(detection[4] * rows) right = int(detection[5] * cols) bottom = int(detection[6] * rows) label = tf_labels.getLabel(int(detection[1])) print(label, score, left, top, right, bottom) text_color = (23, 230, 210) cv.rectangle(img, (left, top), (right, bottom), text_color, thickness=2) cv.putText(img, label, (left, top), cv.FONT_HERSHEY_SIMPLEX, 1, text_color, 2) cv.imshow('img', img) cv.waitKey() In general, the tank's pictures can now be recognized by the neural network, and this is a very important step in navigation in terms of recognizing landmarks. However, some images were not enough for full navigation, it was necessary to measure the distance to obstacles. So the robot has an echo sounder. To connect the echo sounder to the Raspberry, you need to work a little - the echo sounder returns the signal to 5V, and the Raspberry takes 3.3V. On the knee, this problem is solved mainly by resistors on the brainboard, but I did not want to fence such amateur work on the robot. As a result, the Level Shifter microcircuit was found, which does everything that is needed, and is the size of a nail.
In addition, I attended to the appearance of the robot - I didn’t like it very much that the microcircuits and the camera with the echo sounder were stuck to the cardboard boxes. The development of technology in our world allows you to cut plastic with a laser with a reasonable investment of time and money. In general, I found a workshop with a laser machine, spent some time studying the instructions for this wonderful machine, and not on the first attempt cut out the panels for the microcircuits and the camera with an echo sounder.
Everything is ready for autonomous navigation, but the task turned out to be not so simple and on the first attempt I dug a little. I decided to take a pause, think about everything, study analogs. Perhaps this navigation will serve as a topic for a separate article.
REST interface that the robot provides as a base for further use:
GET /ping GET /version GET /name GET /dist POST /fwd/on POST /fwd/off POST /back/on POST /back/off POST /left/on POST /left/off POST /right/on POST /right/off POST /photo/make GET /photo/:phid GET /photo/list POST /cam/up POST /cam/down POST /cam/right POST /cam/left POST /detect/haar/:phid POST /detect/dnn/:phid References:
Source: https://habr.com/ru/post/358230/
All Articles