Use GPG to encrypt messages and files.
Briefly on how to create keys, encrypt and sign files, and send keys to a key server.
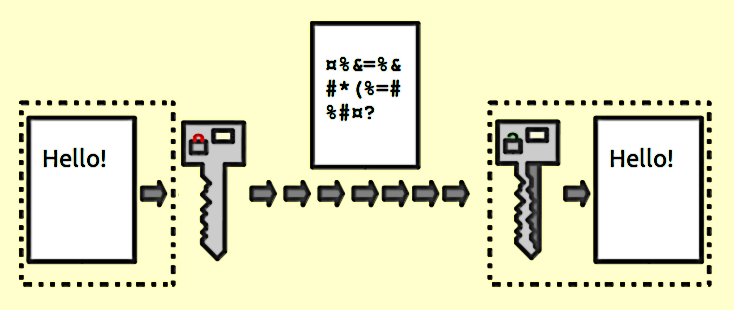
GPG (also known as GnuPG) was created as a free alternative to non-free PGP . GPG is used to encrypt information and provides various algorithms (RSA, DSA, AES, etc.) to solve this problem.
GPG can be used for symmetric encryption, but mainly the program is used for asymmetric encryption of information. In short, with symmetric encryption, one key is used to encrypt and decrypt a message (for example, which character corresponds to a particular letter). Asymmetric encryption uses 2 keys - public and private. Public is used for encryption, and you can give it to your friends, and private - to decrypt, and you must keep it safe. Thanks to this scheme, only the owner of the private key can decrypt the message (even the one who encrypted the message cannot perform the reverse operation). You can read more about asymmetric encryption in Wikipedia .
GPG Installation
Windows
Download and install Gpg4win .
GNU / Linux
Most GNU / Linux distributions have a GPG installed. If you haven’t installed it, install the gnupg package using your package manager or build it from source .
Android
For Android, there are programs GnuPG for Android and OpenKeychain. The creators of GnuPG for Android recommend using OpenKeychain.
OpenKeychain official website
OpenKeychain in F-Droid
OpenKeychain on Google Play
GnuPG for Android official website
GnuPG for Android sources on GitHub
Thank you comrade under the nickname sormon for reminding me !
Using
Only Linux use will be shown here (as of this writing, the latest version of GPG is 2.2.6)
First of all, it is worth clarifying that in most Linux distributions there are two binary files: gpg and gpg2 . As far as I remember, these were two different versions: 1.4.x and 2.0.x, and for convenient use I did alias, so that when gpg was started, gpg2 was executed. Now in Debian and Arch Linux /bin/gpg2 is a symbolic link to /bin/gpg and the need for such manipulations has disappeared. You can verify this by running file /bin/gpg2 .
So, let's begin!
Having entered gpg without arguments, it will create the files it needs (if they have not yet been created) and will wait for the input of the information to be encrypted.
user@PC:~$ gpg gpg: '/home/user/.gnupg' gpg: '/home/user/.gnupg/pubring.kbx' gpg: : . , ... gpg: ... In the presence of a key, we can enter text, press the key combination Ctrl + D and get a portion of the cracks directly into the console. But so far we have no key.
Key creation
To create a key, you need to run GPG with the argument "--full-generate-key" (you can also with "--gen-key", but in this case we will not have a choice of some important parameters).
UPD: If you run GPG also with the --expert argument, the choice of key type will be much wider. For the addition, thanks to friend nikitasius !
user@PC:~$ gpg --full-generate-key gpg (GnuPG) 2.2.6; Copyright (C) 2018 Free Software Foundation, Inc. This is free software: you are free to change and redistribute it. There is NO WARRANTY, to the extent permitted by law. : (1) RSA RSA ( ) (2) DSA Elgamal (3) DSA ( ) (4) RSA ( ) ? user@PC:~$ gpg --full-generate-key --expert gpg (GnuPG) 2.2.6; Copyright (C) 2018 Free Software Foundation, Inc. This is free software: you are free to change and redistribute it. There is NO WARRANTY, to the extent permitted by law. Please select what kind of key you want: (1) RSA and RSA (default) (2) DSA and Elgamal (3) DSA (sign only) (4) RSA (sign only) (7) DSA (set your own capabilities) (8) RSA (set your own capabilities) (9) ECC and ECC (10) ECC (sign only) (11) ECC (set your own capabilities) (13) Existing key Your selection? You can choose any option, but note that choosing the third or fourth option, you can not encrypt messages and files!
... ? 1 RSA 1024 4096. ? (2048) For an RSA key with a size of 2048 bits is sufficient, but you can choose a size up to 4096 bits (using keys of size less than 2048 bits is insecure).
... ? (2048) 2048 - 2048 . 0 = <n> = - n <n>w = - n <n>m = - n <n>y = - n ? (0) If you select a limited key validity period, then upon expiry of its key, the key will be declared invalid. You can renew the key until it expires.
GPG will ask if we have specified the date correctly, and if so, you will need to specify a name, an email address and a note (all this is optional, but you need to specify at least one thing).
... 01 1970 00:00:00 +00 ? (y/N) y GnuPG . : Habrahabr User : habr@habr.com : My own key : "Habrahabr User (My own key) <habr@habr.com>" (N), (C), (E); (O)/(Q)? Here you can make edits or continue.
Then gpg will ask you for a password (I recommend refreshing your memory and reading about the rules for choosing a strong password). If you are running X server, then you will get a dialog box where you need to enter a password. If not, then the password is entered directly into the console.
Add this line to the ~/.gnupg/gpg-agent.conf :pinentry-program /usr/bin/pinentry-tty
Pynentry is the very dialog box. In addition to the tty-version (console), there are several versions (graphics) that you can try.
Then restart gpg-agent. On systems with systemd, this is done like this:systemd --user reload gpg-agent
... . , - ( , , ); . - -: In the terminal, the entered password is not displayed!
Also here is a helpful tip that will speed up key creation. It is advisable to follow it, but not necessarily (and very carefully, so as not to stick with the excess).
... -: : . , - ( , , ); . gpg: /home/user/.gnupg/trustdb.gpg: gpg: 5699884482E426AC gpg: '/home/user/.gnupg/openpgp-revocs.d' gpg: '/home/user/.gnupg/openpgp-revocs.d/2BB6803FCF82316969619C155699884482E426AC.rev'. . pub rsa2048 1970-01-01 [SC] 2BB6803FCF82316969619C155699884482E426AC uid Habrahabr User (My own key) <habr@habr.com> sub rsa2048 1970-01-01 [E] At this stage, the key is generated and added to the keychain . A keyring can contain many keys. Also at this stage, a revocation certificate is created - a file with which the generated key can be revoked (invalidated). It is recommended to store it in a safe place, since if attackers gain access to it, they will be able to revoke your key.
So what do all these weird last lines mean?
rsa - RSA encryption algorithm.
2048 - The length of the key.
1970-01-01 - Key creation date.
2BB680 ... E426AC - The key imprint. It should be checked when importing someone else's public key - it must be the same on both sides.
uid - User-ID.
pub and sub - Key Types:
pub - Public key.
sub - Public subkey
sec - Secret key.
ssb - Secret subkey.
[SC] and [E] - The purpose of each key. When you create a key, you get as many as 4 encryption keys: for encryption, decryption, signature, and signature verification:
S - Signature.
C - Key Signature (Certification). This will be discussed later.
E - Encryption.
A - Authentication. It can be used, for example, in SSH.
Why do I need to sign messages? In order to confirm that the message was written by you and has not changed during the transfer. If the message is changed, then it will be indicated when verifying the signature.
Configuration
The configuration file is stored in the file ~/.gnupg/gpg.conf
For example, here is an example of my configuration file, which I recommend to put myself:
keyid-format 0xlong throw-keyids no-emit-version no-comments keyid-format 0xlong - output key identifier format. Each key and subkey has its own identifier. By default it is not displayed, its short version was previously displayed.
Available formats:none - Do not display (default).short - Short entry.0xshort - A short entry with the prefix "0x".long - Long entry.0xlong is a long entry with the prefix "0x".
throw-keyids - Do not include key information in the encrypted message. This option may be useful to anonymize the recipient of the message.
no-emit-version - Do not insert a GPG version into an encrypted message.
no-comments - Removes all comments from the encrypted message.
These are all options that can be found in the man page. In the configuration file, they are written without the prefix " -- ".
Commands and options
I will describe only the most basic.
--armor-a - Create an ASCII (character) output. When encrypted, GPG creates binary output by default. With this option, GPG encodes information encoded with Radix-64 (Base64 variant). This textual output can be sent, for example, in an instant messenger or by e-mail, as well as displayed on the screen.
--encrypt-e - Encrypt the message.
--recipient-r - Specify the key to be used for encryption . You can use the information user ID (name, mail), key ID, key fingerprint.
--decrypt-d - Decrypt the message.
--sign-s - Sign the message. The signature will be located separately from the message itself.
--clear-sign--clearsign - Sign the message. The signature is saved with the message.
--local-user-u - Specify the key to be used for signing . Similar to the --recipient option, but this is not the same thing .
--verify - Verify the signature.
--list-keys-k - Display a list of public keys.
--list-secret-keys-K - Display a list of private keys.
--export - export the public key to a file, which can then be sent somewhere.
--import - import the public key.
--edit-key - Edit the key.
--expert - "Expert Mode".
Examples
gpg -a -r 0x12345678 -e decrypted.txt > encrypted.gpg
Encrypt the decrypted.txt file to the encrypted.gpg file with the key 0x12345678 . In this case, the finished file will be text, not binary.
gpg -r 0x12345678 -d encrypted.gpg > decrypted.txt
Decrypt the encrypted.gpg file with the key 0x12345678 and save it to the decrypted.txt file.
gpg -u 0x12345678 -s message.txt > sign.asc
Sign the message file with the key 0x12345678 and save the signature in the file sign.asc .
gpg -r 0x12345678 --clearsign message.txt > message.gpg
Sign the message.txt file with the key 0x12345678 and write the message with the signature to the file message.gpg .
gpg --verify message.asc message.txt
Verify the signature of the message.txt file, which is recorded in the message.asc file.
gpg --import pubkey.gpg
Import the public key from the pubkey.gpg file.
Editing the key, signing other people's keys and sending the key to the key server
The key is edited by the gpg --edit-key <KeyID> command - edit gpg --edit-key <KeyID> .
After entering this command, you will see this:
user@PC:~$ gpg --edit-key CCA230DA07929EB7 gpg (GnuPG) 2.2.6; Copyright (C) 2018 Free Software Foundation, Inc. This is free software: you are free to change and redistribute it. There is NO WARRANTY, to the extent permitted by law. . sec rsa2048/CCA230DA07929EB7 : 2018-05-08 : : SC : : ssb rsa2048/7859E2A888E31276 : 2018-05-08 : : E [ ] (1). Habrahabr User (My own key) <habr@habr.com> gpg> Available commands you can find out by typing help .
Here we can add different plug-ins, add user IDs, and also sign other people's public keys.
Why do I need to sign the keys? So you can confirm that the owner of the key being signed is who he claims to be. In this way, you create the so-called "Trust Network". Example: Alice signed Bob’s public key, and Bob signed Charlie’s public key. If Alice receives Charlie's public key, she can trust him, because the key is signed by those whom Alice trusts, i.e. Bob. In order to get signatures for their key, people even arrange special meetings where they exchange their public keys and sign them.
Now about the key servers. The key server is a special server that stores public keys. Key servers are used to distribute public keys.
Attention! Keys sent to the key server cannot be deleted! They can only be revoked by importing the certificate of revocation to the server, while the key still remains on the server.
Send public key to server:gpg --keyserver <URL> --send-keys <KeyID>
Get the public key with the key identifier from the server:gpg --keyserver <URL> --recv-keys <KeyID>
Get key updates from the server:gpg --keyserver <URL> --refresh-keys
Find the key on the server:gpg --keyserver <URL> --search-keys <UID KeyID>
For convenience, you can register the address of the key server in gpg.conf , so as not to prescribe it in the commands:keyserver <URL>
Where can you encounter using GPG
Git
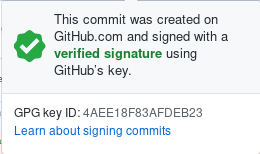
You can use GPG to sign your commits. So you confirm that you made the commit. In GitHub, you can corrupt your public key and commits signed with your key will get a tick.
UPD: You can read about Git configuration for using GPG in the Git documentation .
Here is an example of the Git `s configuration file from comrade nikitasius :
[commit] gpgsign = true [user] signingkey = <KeyID> [gpg] program = /bin/gpg Download distributions and other files
Most installation distribution images are distributed by signed developers. If you upload a modified image, then when checking the signature you will immediately notice that the image is not original. An example is the popular Tails distribution.
Package managers
All packages are signed by developers to protect against changes. When installing packages, these signatures are checked. This is all done automatically without user intervention.
Links
GPG website
GPG article on Wikipedia
Website dedicated to IB and GPG
Key Servers:pgp.mit.edukeyserver.pgp.com
')
Source: https://habr.com/ru/post/358182/
All Articles