Software graphic coprocessor on STM32
A year has passed and many evenings have been stunned by the writing of the next, much larger and this time useful project. Last time, everywhere I had to squeeze as soon as possible. I began to miss the resources of that long-suffering stone and at some point an interesting solution came. Give some of the tasks to another controller. (Like last time, there is a lot of water and images under the cut.)
Despite the presence of such projects as Nextion HMI and Gameduino, I decided to make my decision for a number of reasons. Gameduino, though it seemed like an interesting solution (VGA output and FPGA on board), but the inability to get the second version of this board made me buy its first revision. It was pain and suffering:
- incomprehensible protocol;
- a small number of examples in the network;
- storing graphics in the host (you can on the SD card, but then you need FatFS, and it eats much more, and the meaning is lost);
- a set of magic numbers that only the Guru will understand, etc.
- in general, this project is more dead than alive.
Despite the explosive popularity of Nextion now, the project began to appear before such widespread and other reasons for refusal:
')
- I did not want to deal with nextion (starting with IDE);
- the danger of running into a non-European fee (although this seems to be cured);
- only pre-programmed actions from the IDE are available (correct, if it is not right);
- need to write for both host and display;
- a large overhead in the protocol (which, however, is explicable).
And most importantly, in both cases there is no possibility to add something of your own.
Offtop
It may seem that sGPU is very similar to the Nextion display, but it is not. It is much simpler and appeared out of interest, but eventually swelled so much that I wanted to share with the community, especially after a few requests.
Some of the ideas were borrowed from all sorts of libraries, personal on trifles and old consoles (after reading a bunch of manuals on the device, but not all that we would like).
Describing all the possibilities in one article clearly will not work, moreover, all the available commands can be viewed in the source code for the host (Arduino library) or in the file “commandDiscriptions.txt”.
What if there is a good display and a simple stm32 controller? Obviously! Throw all the interaction with the screen on it!
The first thing was taken by the library to work with the display from Adafruit and almost completely rewritten, then screwed DMA. There are graphic primitives, text output is,
It would be possible to dwell on this and write already under stm32, but it’s so hard to resist the next trolleybus!
What is it for?
It may seem that sGPU is very similar to the Nextion display, but it is not. It is much simpler and appeared out of interest, but eventually swelled so much that I wanted to share with the community, especially after a few requests.
Some of the ideas were borrowed from all sorts of libraries, personal on trifles and old consoles (after reading a bunch of manuals on the device, but not all that we would like).
Describing all the possibilities in one article clearly will not work, moreover, all the available commands can be viewed in the source code for the host (Arduino library) or in the file “commandDiscriptions.txt”.
There was nothing to do
What if there is a good display and a simple stm32 controller? Obviously! Throw all the interaction with the screen on it!
The first thing was taken by the library to work with the display from Adafruit and almost completely rewritten, then screwed DMA. There are graphic primitives, text output is,
and everything is quite good:
It would be possible to dwell on this and write already under stm32, but it’s so hard to resist the next trolleybus!
Controller for sGPU
From the STM32F4xx series, he refused immediately, due to the absurdity of the idea (use such a controller for such nonsense!
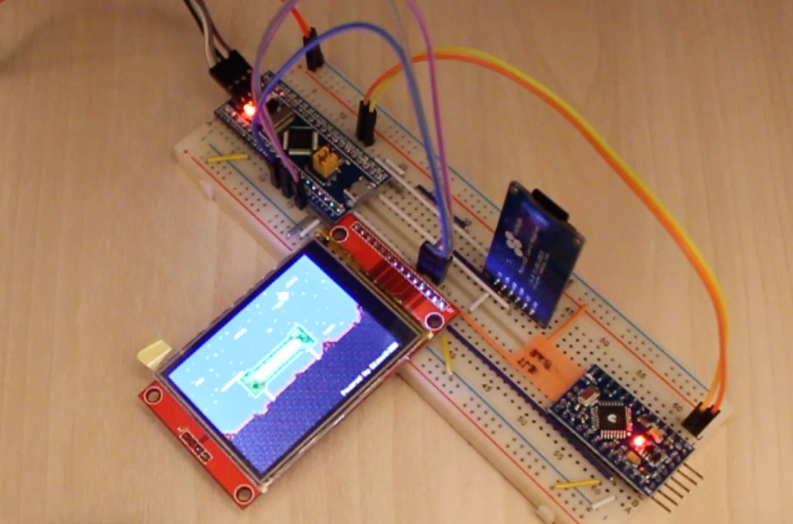
STM32F103C8T6 with 20 KB of RAM (hereinafter referred to as the mini version) and STM32F103VET6 with 64 KB of RAM (hereinafter the pro version) were chosen.
Since mini is much more common thanks to the Chinese and their cheap and beloved clone maple mini, it was decided to choose it as the main core, despite some limitations described below (the board with the pro version is also released as a ministm32 clone).
Not just wrote the core, just change the type of controller in the project and change a couple of inclusions and get sGPU with a large memory and the FSMC controller (low cost and prevalence of the mini version, do not give rest to not use it).
Screen
The screen was used, based on the ILI9341 driver (screen resolution 320x240). Interaction with the screen is using SPI (there is also a possibility for FSMC, but it was not possible to test for various reasons) at the maximum possible speed for this controller - 36 Mbps (from actually measured, approximately 2.7 Mb / s or 22 Mbps), but only with DMA transmission, as indicated in the Reference manual (RM0008 for F101-F107).
After futile attempts, it was not possible to start SPI at a higher speed. The SPI block in the controller simply goes crazy (a stable maximum of 80 MHz for F_CPU, instead of 72 MHz, gives a little more than 36 Mbit / s not overclocked).
Interface
The most interesting thing started when the choice appeared before the host and sGPU communication interface.
Interface requirements were as follows:
- Support by almost any controller;
- Easy to implement;
- It has sufficient bandwidth;
- It has a minimum number of used lines.
The choice fell on the UART. With the choice of speed it was no longer so obvious, since not all devices can support the exchange rate in 1MBd. Without thinking, I just made four possible speeds: 9600, 57600, 115200 and 1M. It is also made possible to select the speed by hardware, using 3 GPIO (matching GPIO and speeds can be found in STM32_GPU_GPIO_Pinout.txt), which gives 8 possible values.
Of these, only 4 are used, the rest is in reserve (at least 1200 Bod can be made).
The speed is selected by mask, by
read port status:
switch(GPIOA->IDR & 0x07) // GPIO { case 0x01: { init_UART1(USART_BAUD_9600); print(T_BAUD_9600); } break; case 0x02: { init_UART1(USART_BAUD_57600); print(T_BAUD_57K); } break; case 0x03: { init_UART1(USART_BAUD_115200); print(T_BAUD_115K); } break; case 0x04: { init_UART1(USART_BAUD_1M); print(T_BAUD_1M); } break; /* * params 0x05-0x07 and 0x00: reserved * */ default: { init_UART1(USART_BAUD_57600); print(T_DAUD_DEFAULT); } break; } Tiles
This is the first thing sGPU should be able to do.
Each tile is just an array of bytes with color indices in the current color palette.
This is how an 8x8 tile looks like (increased 10 times):
And this is how the tile file looks higher:
0E 0E 0E 0E 0E 0E 0E 0E 0E 38 38 0E 0E 38 38 0E 0E 38 28 0E 0E 28 38 0E 0E 0E 0E 0E 0E 0E 0E 0E 0E 0E 0E 0E 0E 0E 0E 0E 0E 38 0E 0E 0E 0E 38 0E 0E 0E 38 38 38 38 0E 0E 0E 0E 0E 0E 0E 0E 0E 0E
I will definitely not describe in more detail what tiles are, I will hope for your ability to find information on the network, the amount of information is painfully large.
Since there can be hundreds and thousands of tiles, they will occupy insane amounts of ROM. It is completely illogical to transfer them from the host side (as done in Gameduino first revision).
The output was to cling the memory card over SPI,
Ultimately, on the part of the host, it is enough to send the file name and how many tiles to load into the sGPU RAM.
Like this:
gpu.loadTile8x8("pcs8x8", TILE_SET_W, RAM_POS, 1);
// pcs8x8 – ( );
// TILE_SET_W – ;
// ;
// RAM_POS – RAM, ;
// 1 – .
Agree that a command of 5 bytes in size (this is the minimum size for loading one tile at the moment of writing this article) is much smaller than the cumbersome FatFS library that eats up a significant part of both operational and permanent memory, which is not noticeable on the stm32 level controller.
The following tile sizes are supported:
- 8x8 - the smallest, using only 64 bytes of RAM;
- 16x16 - medium type, use 4 times more RAM (256 bytes);
- 32x32 is the largest, again 4 times more and requires 4 times more RAM (1024 bytes).
The latter type of tiles is available only for the pro version, since only 10 of these eat up half the memory of the mini version, which is quite obvious - unacceptable.
I also mention that I used the trick when displaying them on the screen. In addition to using DMA (there is a buffer for one converted tile in RGB565), I check the index of each tile, and if it matches the previous one, then the conversion is skipped, and the old tile is output to the new coordinates. Despite such a waste of memory, it has an undeniable advantage when the same tiles are displayed on the screen in a row. There is no time for conversion, so the tile is displayed almost immediately.
Example of 8x8 tile output:
A fly in the ointment - on the video above, the code for the host uses the C version of the library (the same can be achieved only if you use STM32 under the Arduino).
Here is an oscillogram of tile output: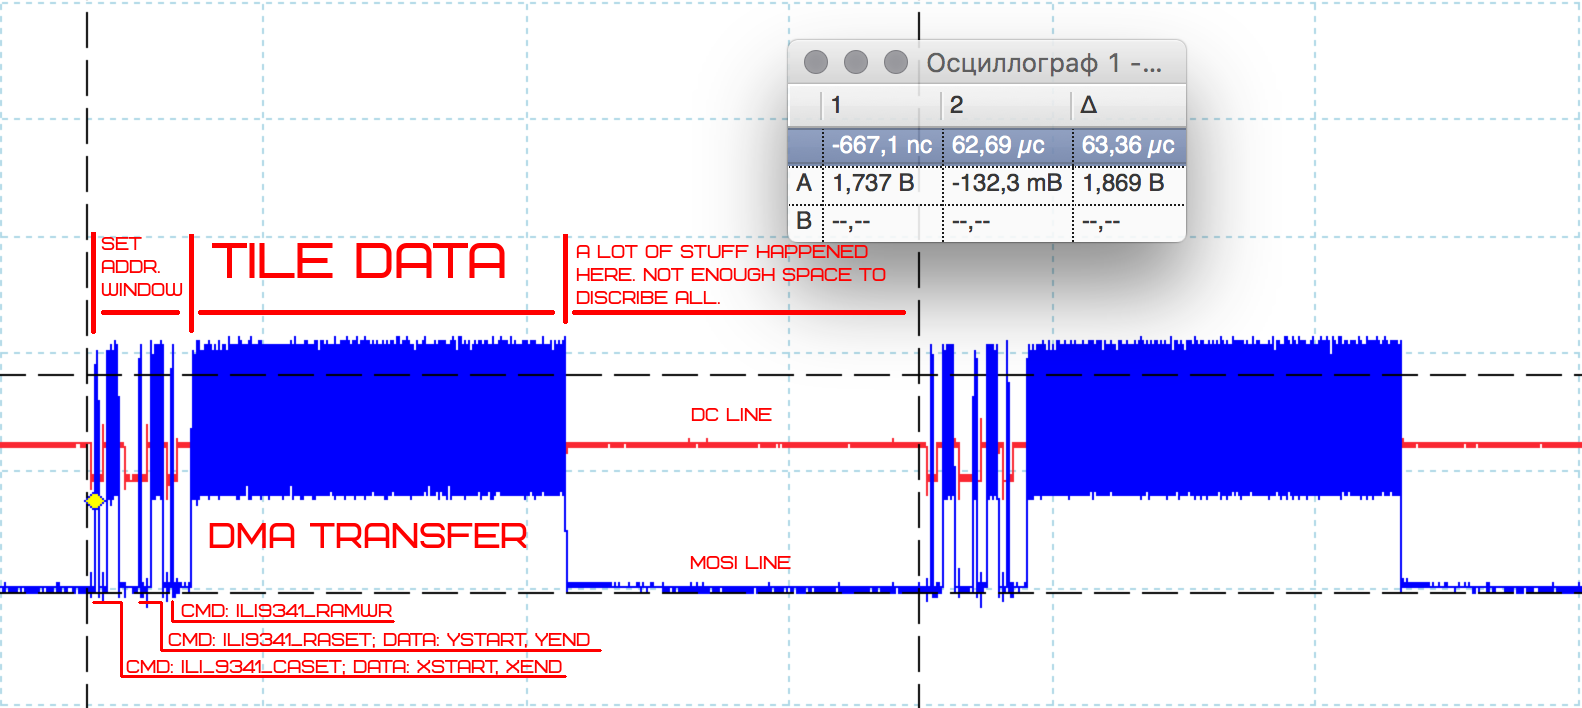
A bigger piece: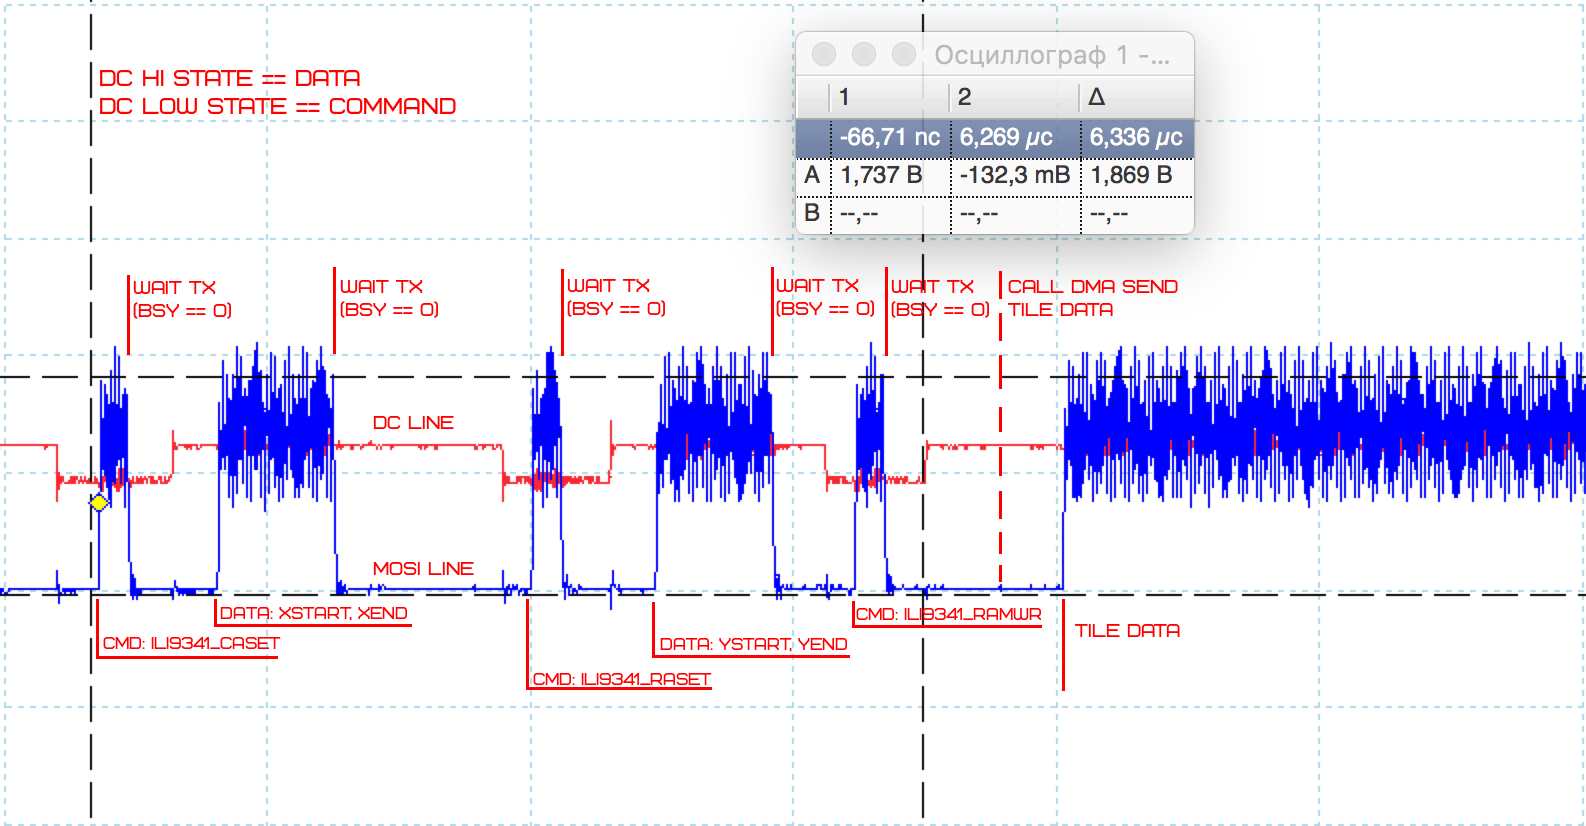
On it you can see a lot of voids while setting the address window. These voids are mostly DC line switching (data or command selection, second channel red line) and waiting for the SPI buffer (waiting for all data to be transmitted). With this because of the features of the display you can hardly do anything (only 9 bit mode or FSMC).
Creating tiles
Before any tile gets sGPU RAM, it must first be downloaded from the SD card, but before that it must be placed there.
Creating a tile is not so difficult, just do the following:
- In GIMP, the finished image is rendered into an indexed mode;
- export as raw data (standard R, G, B);
- rename the file by mask 8.3 (8 characters maximum for the file name and 3 for the extension, this is a limitation of the current FatFS settings), I usually use the * .tle extension (sGPU substitutes the extension itself, so the host will not have to transfer it);
- place the * .tle file on the SD card in the root;
- ???;- PROFIT !!!
Not really, because you need to create the tile image itself or the tile set. Among the many tools for pixel art, I chose PixelEdit (again I will hope for your ability to find information on the web).
Having made an image there, it is enough to export it as * .png and feed it to GIMP (as described above).
A very important point:most importantly, do not forget to transfer the correct, finite width of the image in the tiles, otherwise sGPU will load the garbage! You also need to comply with the multiplicity of tiles size to 8 (8x8, 16x16, 32x32). This is true for a set of tiles.
most importantly, do not forget to transfer the correct, finite width of the image in the tiles, otherwise sGPU will load the garbage! You also need to comply with the multiplicity of tiles size to 8 (8x8, 16x16, 32x32). This is true for a set of tiles.
Sprites
The second thing that should be able to sGPU: create sprites from tiles. Sprite is the union of tiles into a group (if simplified).
Those who are not aware of one of the secrets of Mario is better not to watch:
Mario sprite consists of four 8x8 tiles.
The number of mini sprites is 56, while for the pro version there is a little more - 63. Their number for the mini and pro versions was calculated differently. So for mini this is the sum of half the maximum number of tiles of each type, whereas for pro this is the sum of quarters of
Sprites can consist of any, but identical type of tiles, i.e. you can't make a sprite from 8x8 and 16x16 tiles at the same time, but you can have two sprites from 8x8 and 16x16 tiles. Each sprite consists of four tiles (maximum) of the
The following combinations of sizes are possible:
- 1x1;
- 1x2;
- 2x1;
- 2x2
where the first digit is the height in the tiles, and the second width in the tiles.
In addition, each sprite contains coordinates in pixels, where it will be drawn (it can help to calculate collisions of two sprites, but this is also there).
Sprite structure:
typedef struct { uint16_t posX; // \__ uint16_t posY; // / uint8_t type; // ( 1x1, 1x2… 8x8, 16x16…) uint8_t visible;// uint8_t tle[4]; // } sprite_t; Tile background
The third thing that should be able to sGPU.
The memory contains an array of 1200 bytes (40x30 tiles) with tile indices of only 8x8 in size (in the future there may be a choice).
The tile map is stored in RAM and loaded from an SD card (extension * .map). Currently there are no tools to create a map file.
Rather, there is, but only a set of crutches ...
The only way is to export the map from PixelEdit to * .txt, erase all the beginning to the tile indices and give to tilemapConverter (I wrote on Qt on the principle that it was). I recommend to write my version of the converter, as my curve, but if you need it, write in the comments.
An example of a tile background can be seen during power up.
These 18 tiles are 8x8 pixels in size (magnified 10 times):
Allow you to do this (increased 2 times):
Now the most unpleasant. Sprites and tile backgrounds use the same 8x8 tiles. This means that you need to use different tiles for the background and sprites (yes, there are not so many mini versions).
Memory allocation
Obviously, stm32's RAM memory is limited and you can't cram a lot into it. For reasons unknown to me, I decided to give the memory for mini tiles - 7680 bytes, for pro - 40960 bytes.
But I did not want to give all this memory for one type of tiles. The problem arose with the distribution of this memory, more precisely, how many of which tiles to use.
Earlier, when I read articles about old consoles, I came across the fact that, depending on the console, there was always a lack of some type of tiles.
Therefore, taking into account a bunch of possible scenarios, it was decided to distribute as follows:
- 80 8x8 tiles, as the most used resource;
- 10 16x16 tiles, unfortunately there are few of them, since this is all that remains of the free memory.
Do not forget about a larger controller, in which 64 kb of RAM, for it the distribution will already be as follows:
- 160 8x8 tiles, again as the most used resource;
- 80 tiles 16x16, this time there are a lot more;
- 10 tiles 32x32, they are few again, but this time it is worth considering their size.
Until now, I doubt the correctness of the distribution (the dynamics are not an option). The rest can be found in the file "RAMmath.txt".
Color palette
To reduce the memory used, tiles do not use the color entirely for each pixel (it’s a pity there is not so much memory) that would significantly increase performance, but only color indices from the color palette. This decision reduced the memory requirement by half and made it possible to use the trick to change the palette and display the same tiles (no need to load new ones).
A similar trick was used in all the old consoles. The most notable and famous
example (for those who are not aware of another of the secrets of Mario is better not to look, it can change life)
In the game Super Mario Bros. Tiles for clouds and bushes are identical, only the colors of the palette change. Just like the palette of Mario and Luigi.
As the simplest palette, the NES palette was used, but its failure was discovered.
Armed with a GIMP and a built-in colorimeter in the system, I expanded the color set to 76 (4 black colors for the reserve).
Not being a person with perfect color perception, I, of course, could not make an adequate palette of 76 colors:

I would be very grateful if anyone can find or make a more adequate palette of 256 colors (with one color for the future alpha channel).
If you need to use a different palette, you can download it from an SD card. The sGPU RAM has as many as 512 bytes for this (256 colors, two bytes per color, just like in the GameBoy Advance, but only in RGB565).
Exporting a palette from GIMP is very simple, it is enough to export any indexed image (like raw data), and GIMP next to the image file will create another one with the extension * .pal. It should be placed on the SD card (do not forget about the size of the name up to 8 characters).
Protocol
The protocol was written so that the size of any team was as small as possible. Strictly defined dimensions and parameters of teams, and the complete lack of control of the correctness of the command. All for maximum speed of command execution (after all, everything is done programmatically, if you remember).
Any command begins with a byte of its code. The final size of the whole team depends on its code. So to fill the entire screen with a single color, you only need 3 bytes, but in order to draw a triangle already 15 bytes.
Command codes are neatly divided into ranges (sections), there are a large number of unused codes. In total, 255 teams are available in the current protocol implementation; not even half of them are used (there is a free field for creativity).
Host side
On the host side, sGPU looks like a normal screen, but only via the UART interface.
In spite of the large input buffer for sGPU commands, there is still the risk of its overflow. Therefore, there are two options for protection (in fact 1):
- The programmatic answer to the host. Slow, but widely supported option (you can use at least USB <-> UART and only 3 lines to share);
- Hardware response to the host. Much faster, since GPIO is used, and it is enough for the host to monitor the status of this pin and there is less chance that the buffer will be full.
There are two versions of libraries under Arduino. The version of the library, completely sharpened by Arduino (in C ++), of course, although it has an insane amount of advantages, but it has one huge and side disadvantage - it’s very thick and slow (see the tile section). In other words, an empty sketch, let's say this:
#include <STMsGPU.h> STMsGPU gpu; void setup() {} void loop() {} eats up 1634 bytes of ROM and 217 bytes of RAM, and this is without the method of synchronization with sGPU! Moreover, if you use STM32, then these numbers will already be 10 (at least) times higher - 16732 bytes of ROM and 3960 bytes of RAM!
Therefore, there is a version in C. Unfortunately, while sharpened by atmega328p (and others like it) and deprived of almost all the advantages of the Arduino. These shortcomings are compensated by both increased speed and a much smaller size: 922 bytes of ROM and 46 bytes of RAM (you can do less of course) only with synchronization.
Most importantly, if you used the library for Adafruit ili9341 screens, you won't have to rewrite almost anything! There is almost complete compatibility with all methods.
disadvantages
There is not a large amount of memory, because of this it is impossible to make a framebuffer, since the required amount of memory for one frame of the entire screen will take 180 kilobytes. Because of this, there is currently no alpha channel for tiles and sprites.
Slow. Against FPGA (FT800, RA8875 and the like), a simple 72 MHz controller does not have the slightest chance to resist. It is clear that running the FSMC on the pro version will help the situation, but not as much as we would like.
Sources
All source codes and even firmware for stm32 are on Github (if suddenly you do not have a programmer, then you can flash through STM32 Flash Loader Demonstrator on UART1).
Here is the link to the project repository (I hope I won’t get a ban / mute account because of the habraeffect traffic, if it still exists). In the source code you will find a project for sGPU (under IAR ARM version 7.40), code for AVR and Arduino (the tautology is still available), there are also descriptions of the connections and much more.
In general, the project is very raw, despite the existing opportunities.
If you have questions, ask, I will be glad to answer. I can also write more, highlighting any moments where more detail (just let me know whether it is necessary or not). In one article, as already mentioned above, do not cram everything.
Source: https://habr.com/ru/post/357914/
All Articles