How to download VPS: your Nextcloud cloud

2017 is in the yard: the government spies and blocks websites, large corporations give your personal data to the government or sell it to the side. You already have a VPN subscription, but in Russia such services are now outlawed. You rented a VPS abroad and go to the network through it, but the power is idling.
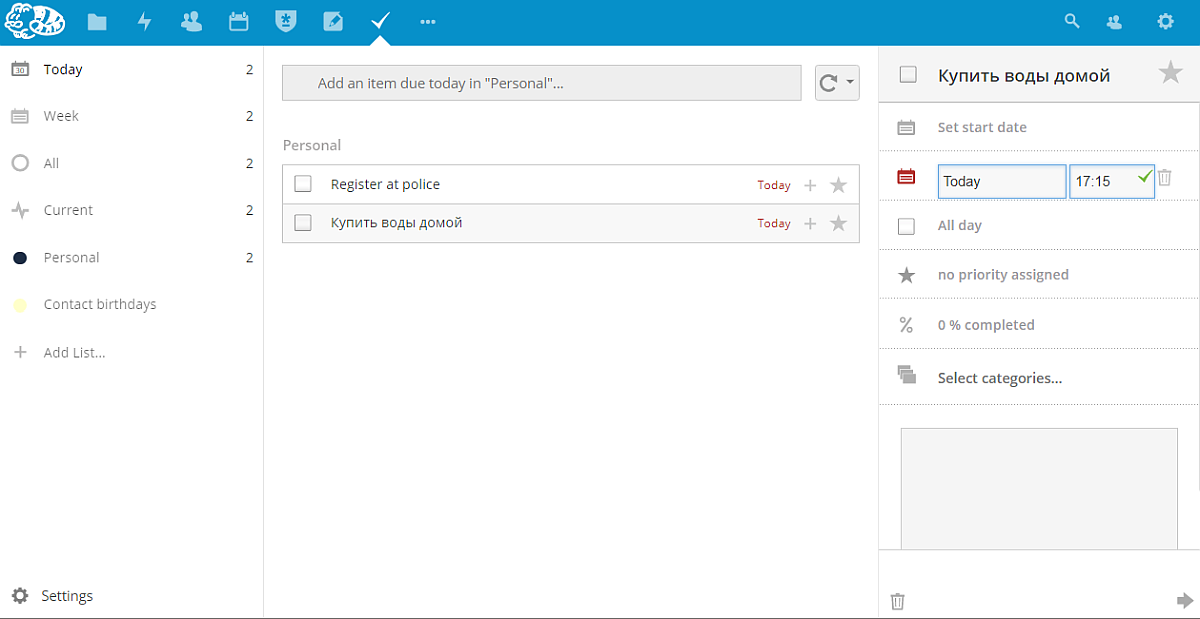
Install Nextcloud ! It will replace the synchronization of contacts, calendar, to-do list and file storage / exchanger on your smartphone, and it will come down on your PC for Dropbox. And we will add independence, and we will load the server.
Next is a long but not complicated instruction about server rental, installation and configuration of Nextcloud on the server and on PCs / smartphones, including synchronization of contacts and calendar.
')
Disclaimer
1. I live in China, here the problem of blocking is more acute than in Russia. Not by hearsay, I know that even Google and Dropbox can one day be turned off forever, and I don’t want to use domestic services for various reasons.
2. On my server as a means of circumventing locks is Shadowsocks - for Russia it is now overkill, but in China it helps out. At first I put Streisand , but this is a bust.
3. I am not a professional sysadmin. Do not use this instruction thoughtlessly on a server with important information. And make backups.
Nextcloud is an open source project of your personal “cloud”: it combines the functions of Dropbox, contacts, calendar and Google task list, as well as many other things. In other words, you can opt out of Google and synchronize your data from your computer and smartphone to your server.
Why do you need it?
- If you are paranoid.
- If you do not trust large corporations.
- If you want to keep your data under personal control.
- If Google doesn’t work in your country, or it may suddenly stop working .
- If you do not mind paying every month for hosting, or if you already have a working server.
- If ... so you never know.
What is required?
- VPS Server on Ubuntu 17.04
I have a VPS on DigitalOcean - on a nearby droplet and my blog is spinning. If you search for a referral link (in my blog for example, or somewhere else on the Internet), then for registration at the expense of throwing a little for tests, enough for a couple of months. But the choice of server is completely yours. - Domain
Not necessarily, but very desirable. In the .RU zone, the domain costs a penny (199 rubles per year), in other zones it is also not very expensive. Register a domain and bind to it the IP address of the server (record A). - SSH Software
PuTTY, Puttygen, Pageant for Windows. If you use Ubuntu or macOS, then either you already know everything, or you do not need it.
What do we do?
On server
- Install Apache, PHP and MySQL
- Let's add a free SSL certificate Let's Encrypt
- Install and configure NextCloud
On customers
- PC and Android clients
- Migrate contacts, calendar, and tasks from Gmail
Server
Suppose you have already rented a server and were able to connect to it via SSH via Putty.
Start
Update the list of packages
sudo apt-get update Apache
Install Apache2 web server
sudo apt-get install apache2 Edit the configuration
sudo nano /etc/apache2/apache2.conf At the end of the file we add two lines, substituting our values:
ServerName IP-- ServerName - Turn on mode headers, useful later
sudo a2enmod headers Leadtsrypt
Install a certificate for an encrypted connection if you have a domain. Very desirable.
Add repository for LetsEncrypt Certbot
sudo add-apt-repository ppa:certbot/certbot Update the list of packages
sudo apt-get update Install Certbot
sudo apt-get install python-certbot-apache We get a certificate
sudo certbot --apache -d - answer the questions: provide your e-mail, agree to the conditions, when choosing a redirect, select the option "2 - redirect".
Set up automatic renewal of certificates every three months:
sudo crontab -e select editing via nano, add the following line and save the file:
15 3 * * * /usr/bin/certbot renew --quiet Mysql
Install the MySQL database
sudo apt-get install mysql-server Set the root password for the database. Be sure to remember or write it down. Then run the command to configure security.
mysql_secure_installation Answer a few questions. You can refuse to force the verification of the complexity of the password and replace the root-password (the first two questions, answer 'N'), answer the remaining questions with 'Y'.
Php
Install PHP 7 and the necessary modules
sudo apt-get install php libapache2-mod-php php-mcrypt php-mysql Add php-cli
sudo apt-get install php-cli And the php-apcu caching module
apt-get install php-apcu Open the configuration file and edit it.
sudo nano /etc/apache2/mods-enabled/dir.conf In the list of index files with different extensions, rewrite it so that at the beginning was index.php.
Restart apache
sudo systemctl restart apache2 File Directory
It is better to create a folder for personal files in a separate place on the server, and not in the way that NextCloud by default wants to do. This is needed to increase security.
Create a directory in / media /
sudo mkdir /media/nextcloud/ Change the permissions of the directory
chown -R www-data:www-data /media/nextcloud/ Nextcloud
Download the latest version of NextCloud in * .tar.bz2 format from the official site. To do this, open the release page in the browser and find the new version. At the time of this writing, the latest version is 12.0.2, so the link will be as follows:
download.nextcloud.com/server/releases/nextcloud-12.0.2.tar.bz2
Copy it to the clipboard.
Let's go back to PuTTY. Change to the temporary directory
cd /tmp Download the archive from NextCloud, replace the link to the latest.
curl -LO https://download.nextcloud.com/server/releases/<span style="color: #ff0000;">nextcloud-12.0.2.tar.bz2</span> Unpack the archive
sudo tar -C /var/www -xvjf /tmp/nextcloud-12.0.2.tar.bz2 Create a script to install
nano /tmp/nextcloud.sh Paste the following code into it.
#!/bin/bash ocpath='/var/www/nextcloud' htuser='www-data' htgroup='www-data' rootuser='root' printf "Creating possible missing Directories\n" mkdir -p $ocpath/data mkdir -p $ocpath/assets mkdir -p $ocpath/updater printf "chmod Files and Directories\n" find ${ocpath}/ -type f -print0 | xargs -0 chmod 0640 find ${ocpath}/ -type d -print0 | xargs -0 chmod 0750 chmod 755 ${ocpath} printf "chown Directories\n" chown -R ${rootuser}:${htgroup} ${ocpath}/ chown -R ${htuser}:${htgroup} ${ocpath}/apps/ chown -R ${htuser}:${htgroup} ${ocpath}/assets/ chown -R ${htuser}:${htgroup} ${ocpath}/config/ chown -R ${htuser}:${htgroup} ${ocpath}/data/ chown -R ${htuser}:${htgroup} ${ocpath}/themes/ chown -R ${htuser}:${htgroup} ${ocpath}/updater/ chmod +x ${ocpath}/occ printf "chmod/chown .htaccess\n" if [ -f ${ocpath}/.htaccess ] then chmod 0644 ${ocpath}/.htaccess chown ${rootuser}:${htgroup} ${ocpath}/.htaccess fi if [ -f ${ocpath}/data/.htaccess ] then chmod 0644 ${ocpath}/data/.htaccess chown ${rootuser}:${htgroup} ${ocpath}/data/.htaccess fi Run the script
sudo bash /tmp/nextcloud.sh Create a NextCloud configuration file in Apache
sudo nano /etc/apache2/sites-available/nextcloud.conf Insert the following text
Alias /nextcloud "/var/www/nextcloud/" <Directory /var/www/nextcloud/> Options +FollowSymlinks AllowOverride All <IfModule mod_dav.c> Dav off </IfModule> SetEnv HOME /var/www/nextcloud SetEnv HTTP_HOME /var/www/nextcloud </Directory> <VirtualHost *:443> ServerName <span style="color: #ff0000;">_</span> <IfModule mod_headers.c> Header always set Strict-Transport-Security "max-age=15552000; includeSubDomains"</IfModule> </VirtualHost> Activate the configuration file
sudo a2ensite nextcloud Enable advanced options
sudo a2enmod rewrite sudo apt-get install php-bz2 php-curl php-gd php-imagick php-intl php-mbstring php-xml php-zip Restart apache
sudo systemctl reload apache2 Create MySQL database
Let's go to MySQL, at the entrance you will need the MySQL root-password, which we created earlier.
mysql -u root -p Create a new database called nextcloud
CREATE DATABASE nextcloud; Give her the parameters, do not forget to insert a new password
GRANT ALL ON nextcloud.* to 'nextcloud'@'localhost' IDENTIFIED BY '____'; Reset the parameters and exit MySQL
FLUSH PRIVILEGES exit While we are in the console, we will do a couple more things for seamless updates:
Install the necessary rights to the directory with Nextcloud
chown -R www-data:www-data /var/www/nextcloud/ And delete the directory / var / www / nextcloud / assets
Configure NextCloud
In the browser, open ip_or_domain / nextcloud
If everything is done correctly, you will see the NextCloud page and an invitation to create an administrator account:
The first two fields are the name and password for the administrator account.
Data folder : specify the directory you created in the step "Directory for files", in the example this is / media / nextcloud
Configure the database
You need to specify the parameters that we used in the step “Create MySQL database”
The first line is the database name.
The second line is the database password (not root-password!)
Third line - user
The fourth line is the address for accessing the database, it must be localhost and port 5342
Congratulations, NextCloud is installed and working, you are in the administrator account.
Security setting
When you first log into the admin panel, you will see a message that additional configuration is required to secure your server. Now I will tell you what to do.
Editing .htaccess
sudo nano /var/www/nextcloud/.htaccess Immediately after the line
<IfModule mod_headers.c> add Header always set Strict-Transport-Security "max-age=15768000; includeSubDomains; preload"Remove Apache default page
sudo rm -rf /var/www/html/ ATTENTION: run the command only if the server was clean and there is nothing valuable in the / var / www / html directory.
Turn on memcache
Stop apache
sudo systemctl stop apache2 Edit the NextCloud configuration
sudo nano /var/www/nextcloud/config/config.php At the end of the file, add the line
'memcache.local' => '\OC\Memcache\APCu', Open the Apache PHP configuration file.
sudo nano /etc/php/7.0/apache2/php.ini There is a lot of text in the file. Scroll through until you find the section on opcache , then paste the following parameters there:
opcache.enable=1 opcache.enable_cli=1 opcache.interned_strings_buffer=8 opcache.max_accelerated_files=10000 opcache.memory_consumption=128 opcache.save_comments=1 opcache.revalidate_freq=1 Restart Apache.
sudo systemctl reload apache2 All security warnings should disappear, All checks passed will remain .
Admin panel
Basic settings
Be sure to pass all basic security checks. It looks like this. If there are warnings - go back to the instructions for setting up and check that everything is done correctly.

Sharing
Set the settings for the distribution of files, if you use the cloud is not alone. We have a private small server, and thousands of simultaneous downloads can create a serious load on it. It is necessary to force a password to download to each public link, and after a few days to make it inactive.

Theming
Here you can give Nextcloud individuality: set a name, a signature, a picture for the background, and even change the color of the design. Done at will.

Encryption
Do not include it . It significantly increases the load on the server and on disk storage, but does not greatly affect the security: encryption keys will be stored on the same server, and if an attacker gets access to it, he can read even encrypted files.
Applications
Applications are add-ons that extend the functions of the cloud. Here is what I set for myself:
Two Factor TOTP Provider
Allows you to set up two-factor authorization to your account using one-time codes via the Google Authenticator or FreeOTP application .
Be sure to configure this login method for the administrator account, preferably for the user too. This can be done in the Personal section, at the very bottom of the page.

Calendar, Contacts
We’ll use them instead of Google’s calendar and contacts, more on that later.


Deck
Project management in the style of Kanban .

Notes
Text notes can be conveniently synchronized with the phone.
OPDS catalog
Server library for accessing books. Works with applications like FBreader .
Passman
Password store for sites in the browser. There is a plugin for Chrome .
Phone sync
One-way synchronization of SMS messages from phone to cloud via Nextcloud SMS .

Tasks
A simple to-do list with a calendar.
Users
You are now in the administrator account, but you do not need to use it to store files and synchronize settings. Leave it to access cloud settings. For everyday personal use, you need a simple user account.
- Open the Users section
- At the top, enter the username and password
- Click on Groups, add a new group Users
- Click Create
- Assign a place quota to not accidentally overfill the server

Now you have a limited user - what you need for everyday use. It is with the ordinary user that we will continue to work. Log out of the administrator account and log in as a new user.
Migrate contacts from Gmail
This can be done through a computer, but then the portraits of contacts will not be saved, so we will do everything on the smartphone. If there are no Google contacts on the smartphone - scroll further.
We will need
- Account on your nextcloud
- Android smartphone
- DAVdroid and OpenTask application for synchronizing contacts and tasks
- ZenUI Dialer application (or any other for copying contacts)
Steps
Install DAVdroid
- Install DAVdroid and OpenTask ;
I recommend installing the DAVdroid from the F-Droid, because it is free there. And on Google Play asking for 249 rubles . - Run DAVdroid, create an account
Click the "+ " button , select "Login with URL and user name"
Enter your Nextcloud address in the formhttps://ip--.ru/nextcloud/remote.php/dav/
As well as your username and password .
- Create a name for your account (for example, user @ nextcloud)
- Click Create account
- DAVdroid will ask for multiple permissions to access your contacts and calendar, allow them. (if not requested - lower the curtain on top and see if there is a request there)

- Check the checkboxes opposite the Contacts at the top and the names of your Google calendars below (I have this Contact birthdays and Personal ).
- Click the circular arrow icon at the top to start the first sync.
(for the first time it sometimes shows an error message, just try again)
Transfer contacts from Google to DAVdroid
- Install ZenUI Dialer
- Launch and go to contact management (button "three points" -> Manage contacts )
- Select Copy contacts
- For Copy contacts from, select your Google account.
- For Copy contacts to, select the DAVdroid Address book
- Answer OK to the question Do you want to keep the originals , otherwise contacts will be deleted from Google .
- Wait until copying is complete.
- Open DAVdroid and sync contacts again.
When synchronization is complete, all your contacts will be available in the web interface: https: //your_domain/nextcloud/index.php/apps/contacts/

If there are no contacts on the smartphone
If for some reason you do not have contacts from Google on your phone, but you can open them in the browser on your PC, skip the step Transfer Contacts from Google to DAVdroid , export contacts from Google Contacts (More -> Export) to the vCard file, and then import the file through the Nextcloud web interface.
The calendar
Go to the standard Calendar application on your smartphone and check that the new Nextcloud calendar is displayed in the list of your calendars. Now you can save events there, they will automatically synchronize with your own Nextcloud server. Google is no longer needed.

The web version of the calendar will be available from the browser at your_domain / nextcloud / index.php / apps / calendar

Task list
Start the OpenTasks application (the menu may simply be called Tasks ), now there is a Local list (only on the device) and your “cloud” list.

Another client for the task list is SimpleTask Nextcloud . Less functions, but works a little more reliably.
In the browser, tasks will be available at your_domain / nextcloud / index.php / apps / tasks

PC sync
Windows and macOS
- Install and run the client from the official site
- Enter your server address as your_domain / nextcloud
- Enter the username and password of the user account
- Select a local folder to synchronize (for example, D: \ Nextcloud)
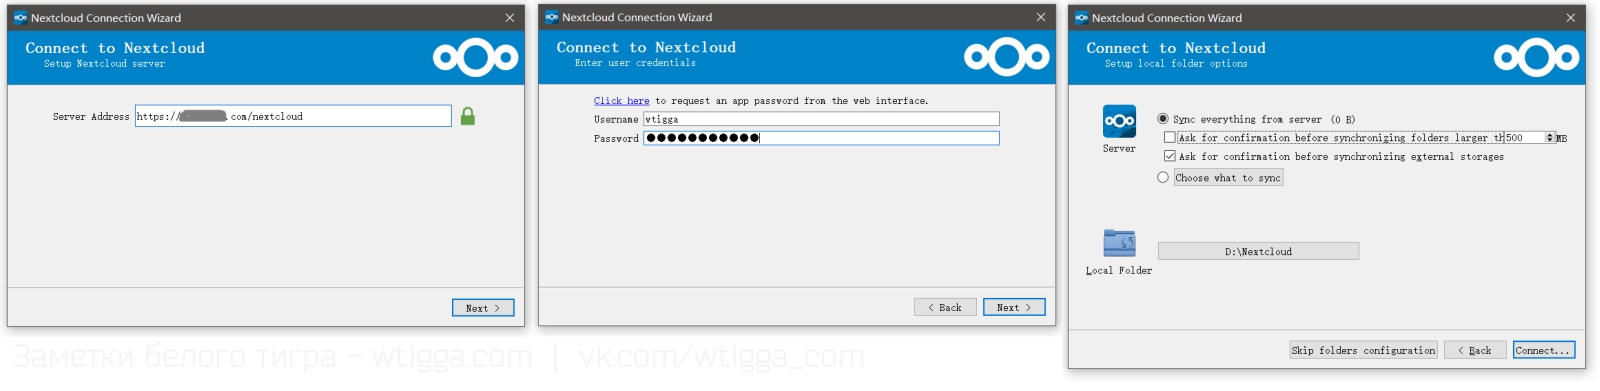
Is done.
It works like Dropbox: they dropped the file into a folder - it flies away to the server. And vice versa.
How to change the language of Nextcloud (Windows)
For some reason, the developers have not provided for a language change through the application settings, by default it uses the system one. I have Windows in Chinese (and nothing can be done about it), but the applications are still more convenient to keep in a more familiar language. Here is the solution to the problem:
- Turn off the Nextcloud client
- Open the folder where you installed Nextcloud (by default c: \ Program Files (x86) \ Nextcloud \)
- Find the files client_ru.qm, qt_ru.qm and qtbase_ru.qm
- Delete all other language files:
client_ca.qm client_cs.qm client_de.qm client_el.qm client_es.qm client_es_AR.qm client_et.qm client_eu.qm client_fa.qm client_fi.qm client_fr.qm client_gl.qm client_hu.qm client_it.qm client_ja.qm client_nb_NO.qm client_nl.qm client_pl.qm client_pt.qm client_pt_BR.qm client_en.qm client_sk.qm client_sl.qm client_sr.qm client_sv.qm client_th.qm client_tr.qm client_TW.qm client_uk.qm client_zh_CN.qm client_zh_TW.qm qt_ar.qm qt_ca.qm qt_cs.qm qt_da.qm qt_de.qm qt_es.qm qt_fa.qm qt_fi.qm qt_fr.qm qt_gl.qm qt_he.qm qt_hu.qm qt_it.qm qt_ja.qm qt_ko.qm qt_lt.qm qt_pl.qm qt_pt.qm qt_en.qm qt_sk.qm qt_sl.qm qt_sv.qm qt_uk.qm qt_zh_CN.qm qt_zh_TW.qm qtbase_ca.qm qtbase_cs.qm qtbase_de.qm qtbase_fi.qm qtbase_fr.qm qtbase_he.qm qtbase_hu.qm qtbase_it.qm qtbase_ja.qm qtbase_ko.qm qtbase_lv.qm qtbase_pl.qm qtbase_en.qm qtbase_sk.qm qtbase_uk.qm - Launch Nextcloud
Is done.
Android and iOS
The client for iPhone is in the official AppStore , for Android - on Google Play and on F-Droid . Installation is simple and the same on both platforms:
- Install and run the client
- Enter your server address as your_domain / nextcloud
- Enter the username and password of the user account
Is done.
You can try to upload a few files and see how they fly to the cloud.
Backup photos
Like on Dropbox / Google Drive, you can enable automatic download of all new photos and videos to the cloud in Nextcloud. But do not forget about the size of the hard drive: in the cheapest server is only 20 gigabytes. I sync large volumes of photos to a laptop and home media server using Syncthing, for free and very quickly.
On iOS, you can additionally enable the CryptoCloud option, then all files will be stored on the server in encrypted form. Useful, for example, if you use someone else's Nextcloud server. But files can be viewed only from iOS devices.
Personal impressions
It’s a pity that I found out about Nextcloud only now: how much time I killed to install Google services on my previous phones, all for the sake of syncing the contact list and calendar. Everything works stably, as far as China allows. Pings to the server are large, but there is always a connection
Please tell in the comments
- How badly I set up the server and how to do better
- Why I am paranoid and do not need to be afraid of Google
- What else can you do with your VPS?
Source: https://habr.com/ru/post/357854/
All Articles