Yourself Dropbox on OS X
For a long time, I used Dropbox (in conjunction with GrabBox for quick uploading of screenshots), until one fine day it pleased me with error 429. Well, everyone probably saw something like this:

The reason for this error, oddly enough, is not necessarily related to the excess of traffic . Moreover:
It was a volitional decision to abandon Dropbox (as well as the rest of proprietary) and tried almost all the basic free solutions to install on your server - owncloud , pydio , seafile . I will not strongly focus on them, reviews and comparisons can be easily found on the net. I can only say in general terms, this is one of the most disgusting examples of software that I have seen - heavy, buggy, overloaded with useless functionality. In terms of moderation of resource consumption and speed, I was only pleased with the seafile, but there the developers have very strange priorities and a desire to monetize more. At the same time, people writing a client and people writing a web interface have different ideas about it. Complete mess.
Further actions suggested themselves - to reinvent their own bicycle.
There was not much time, so it was logical to use the existing tools. With the synchronization of directories all was simple and clear - there is a great bunch of rsync + Automator. We monitor the folder, when changing, we set rsync on it, then distribute it to any number of our servers.
But this is not enough, we need direct links and the ability to quickly share them.
')
For these purposes, a small script was written on ~ 100 lines, which greatly simplified the screenshots of both screenshots and other files.
How it works in practice:
So, what we need:
- own server on Linux or OS X with configured web server and ssh access using keys
- homebrew on the client machine to install the script and dependencies
Open the terminal and perform the initial installation:
If you basically do not use homebrew, then you can manually download the script from the github , put it somewhere and run from there. Do not forget to also put the terminal-notifier and pv - the script actively uses them.
The next step is to add profiles, the profiles are stored in ~ / .esupload and are plain text files with a list of parameters.
Parameters are:
Further on specific tasks.
The task is to make a screenshot using standard tools (⌘⇧3 or 4), we get a direct link to the clipboard.
Create a separate directory for screenshots and reassign saving to this directory:
Next, create a profile named screenshot ( ~ / .esupload / screenshot ):
Thus, when uploading a screenshot, it will be assigned a random name, if necessary (on Retina displays) it will be reduced and deleted after upload.
Finally, open Automator, create a new Folder Action, specify our directory with screenshots, and add the “Run shell script” action, in which we select “Pass input: as arguments” and / usr / local / bin / esupload with the screenshot profile as the processor.
You can also add an additional filter with the conditions of which files will be transferred to the script for uploading, but since we use the catalog solely for screenshots, there is no special point in this.
You should get something like this:
Save, click Run to check. Everything.
To test the fill itself, you can run esupload manually:
The task is to throw the file onto the application icon in the dock, we get a direct link to it in the clipboard.
Create a file ( ~ / .esupload / file ) profile:
Using the track_progress parameter, the progress of filling the current file will be displayed every 30 seconds (by default). This is useful for large files that can be poured long enough.
Open Automator again, this time we create an application in which, as an action, we do everything the same as we did for the screenshots, not forgetting only to change the profile to file :

Save the application in / Applications , if you wish, you can replace the icon by replacing the file Resources / AutomatorApplet.icns inside the application.
The bike is ready! Pros and cons in my opinion are quite obvious, but I think we need to bring them as a result.
Pros:
Minuses:
Wishes and suggestions, both by the method itself and by the script , are welcome.
The reason for this error, oddly enough, is not necessarily related to the excess of traffic . Moreover:
Unfortunately, we do not provide detailed traffic information on the links. Thus, it is impossible to find out about the traffic on which of the links led to blocking. Statistics and metrics related to general links are not tracked, so we cannot provide information on the reasons for blocking access links.For paid accounts, all this also remains in force, only traffic limits are increased 10 times. And that's for $ 99 a year.
It was a volitional decision to abandon Dropbox (as well as the rest of proprietary) and tried almost all the basic free solutions to install on your server - owncloud , pydio , seafile . I will not strongly focus on them, reviews and comparisons can be easily found on the net. I can only say in general terms, this is one of the most disgusting examples of software that I have seen - heavy, buggy, overloaded with useless functionality. In terms of moderation of resource consumption and speed, I was only pleased with the seafile, but there the developers have very strange priorities and a desire to monetize more. At the same time, people writing a client and people writing a web interface have different ideas about it. Complete mess.
Further actions suggested themselves - to reinvent their own bicycle.
There was not much time, so it was logical to use the existing tools. With the synchronization of directories all was simple and clear - there is a great bunch of rsync + Automator. We monitor the folder, when changing, we set rsync on it, then distribute it to any number of our servers.
But this is not enough, we need direct links and the ability to quickly share them.
')
For these purposes, a small script was written on ~ 100 lines, which greatly simplified the screenshots of both screenshots and other files.
How it works in practice:
So, what we need:
- own server on Linux or OS X with configured web server and ssh access using keys
- homebrew on the client machine to install the script and dependencies
Open the terminal and perform the initial installation:
brew install http://deseven.info/sys/esupload.rb mkdir ~/.esupload If you basically do not use homebrew, then you can manually download the script from the github , put it somewhere and run from there. Do not forget to also put the terminal-notifier and pv - the script actively uses them.
The next step is to add profiles, the profiles are stored in ~ / .esupload and are plain text files with a list of parameters.
Parameters are:
# remote_host=example.org # remote_dir=/remotedir # ( HTTP-) remote_url=http://example.org/share # URL # ( ) remote_user=$USER # ssh remote_ident=$HOME/.ssh/id_rsa # ssh random_name=no # chmod=u=rwx,g=rw,o=r # is_screenshot=no # delete_after_upload=no # track_progress=no # track_interval=30 # Further on specific tasks.
Screenshots
The task is to make a screenshot using standard tools (⌘⇧3 or 4), we get a direct link to the clipboard.
Create a separate directory for screenshots and reassign saving to this directory:
mkdir ~/Screenshots defaults write com.apple.screencapture location ~/Screenshots killall SystemUIServer Next, create a profile named screenshot ( ~ / .esupload / screenshot ):
remote_dir=/var/www/example.org/screenshots remote_host=example.org remote_user=upload remote_url=http://example.org/screenshots random_name=yes is_screenshot=yes delete_after_upload=yes Thus, when uploading a screenshot, it will be assigned a random name, if necessary (on Retina displays) it will be reduced and deleted after upload.
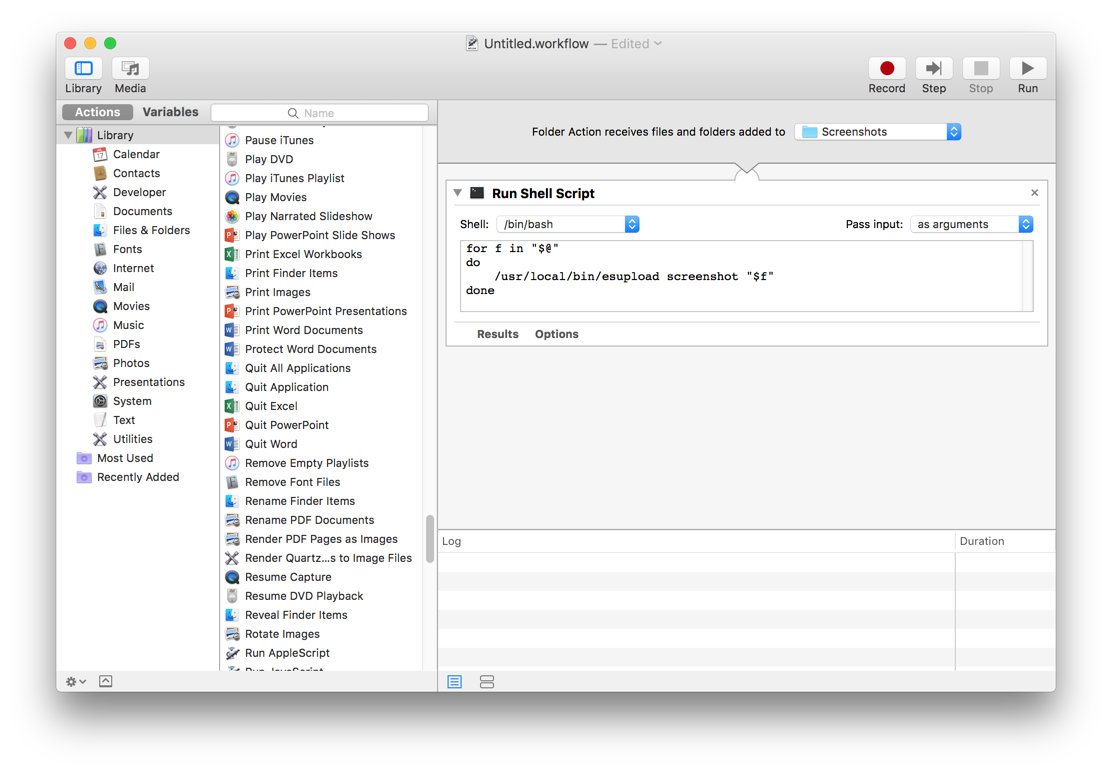
Finally, open Automator, create a new Folder Action, specify our directory with screenshots, and add the “Run shell script” action, in which we select “Pass input: as arguments” and / usr / local / bin / esupload with the screenshot profile as the processor.
You can also add an additional filter with the conditions of which files will be transferred to the script for uploading, but since we use the catalog solely for screenshots, there is no special point in this.
You should get something like this:
Save, click Run to check. Everything.
To test the fill itself, you can run esupload manually:
esupload screenshot "/path/to/screenshot" Files
The task is to throw the file onto the application icon in the dock, we get a direct link to it in the clipboard.
Create a file ( ~ / .esupload / file ) profile:
remote_dir=/var/www/example.org/share remote_host=example.org remote_user=upload remote_url=http://example.org/share track_progress=yes Using the track_progress parameter, the progress of filling the current file will be displayed every 30 seconds (by default). This is useful for large files that can be poured long enough.
Open Automator again, this time we create an application in which, as an action, we do everything the same as we did for the screenshots, not forgetting only to change the profile to file :
Save the application in / Applications , if you wish, you can replace the icon by replacing the file Resources / AutomatorApplet.icns inside the application.
The bike is ready! Pros and cons in my opinion are quite obvious, but I think we need to bring them as a result.
Pros:
- safe (ssh is used for file transfer and authorization)
- simple and flexible (can be sharpened under any scenario)
- no dependence on third-party services and products
Minuses:
- there is no way to control already uploaded files and get links to them
- no queue and transfer control
- lack of access control and other features
Wishes and suggestions, both by the method itself and by the script , are welcome.
Source: https://habr.com/ru/post/357806/
All Articles