Do-it-yourself interactive 3D maps
If 3D-graphics is not your main specialization, you may still have to, or, as in the case of the author of this report, Alexander Amosov ( @ s9k ), you want to work with it. The entry threshold is not so high, you can take the WebGL technology available in the browser, the popular Three.js framework and a small company of like-minded people to make an interesting project with your own hands. It is by the example of such a project, started in the Avito hakaton, and we will analyze the main stages, pay attention to the problem areas, and finally motivate us to create something as cool as this office map.
The project, by the way, is interesting in itself. In modern large open space to navigate in space, to find the right people or negotiations are often very difficult. Of course, you can make a diagram in Excel, but this is not always a super good solution. Alexander Amosov had an idea to make it more convenient, which he shared on Frontend Conf , and the following is a transcript of his report.
')
A few words about the project. Our company is actively developing, there are new employees, and there is a banal problem of navigation in the office.
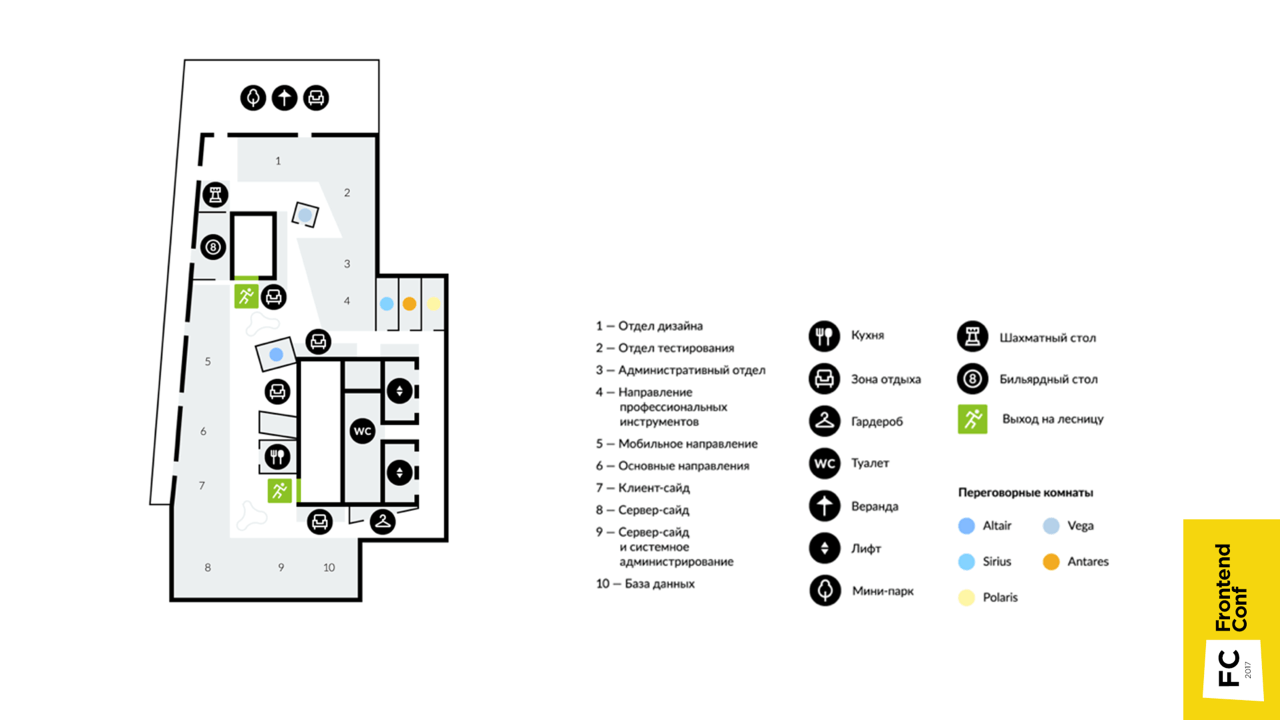
Until recently, there were schematic maps, for example, like this map of one of the floors, which shows what is located. But it is fixed , but over time, something changes, people change to different departments, and the map becomes irrelevant.
An even bigger problem was finding the right employee. At first there was a powerful table in Confluence, where the cells are the places of the employees, in which their names are entered. If the imagination is not very good, it is not very convenient. In the presented image, the table (on the left) and the map (on the right) correspond to the same place in the office. Of course, the scheme can be made with the help of a table, it will be a very cheap and quick solution, but extremely beloved.

There was an idea to make it more convenient, so that new employees without difficulty find what they need .
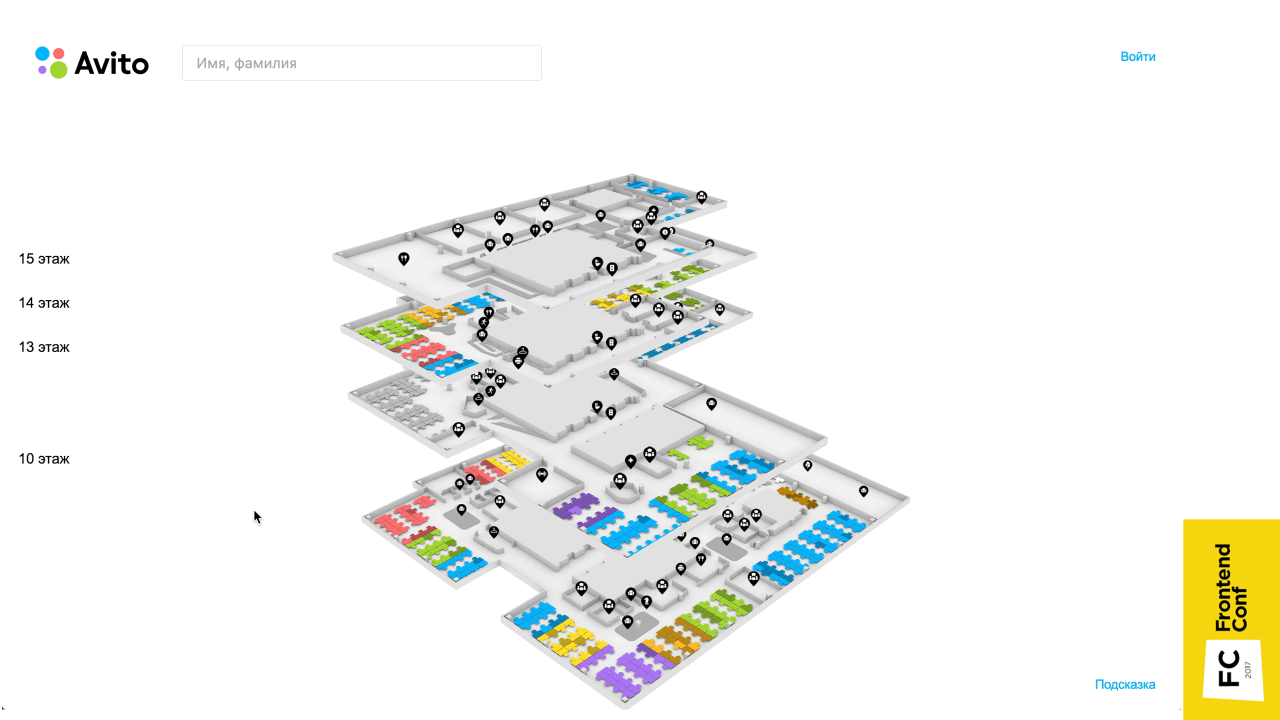
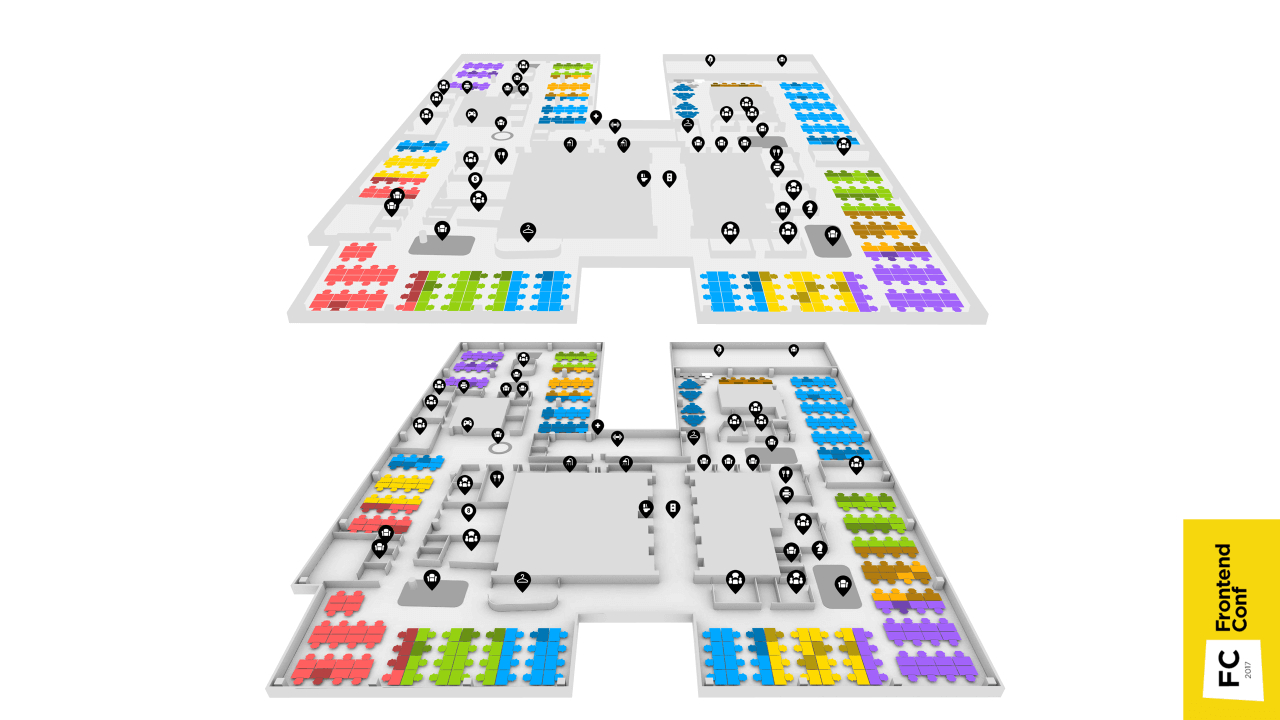
This is a three-dimensional map that has all the floors, you can search for a person and find out where he is, get his contacts and tritely find the right conversation.
When the project was just being born, naturally, it was not without controversy. I was told: “Why 3D? This is all incomprehensible. Everyone is accustomed to two-dimensional maps! They can be made quickly and easily. Let's do the two-dimensional! ”
Why was the 3D implementation chosen?
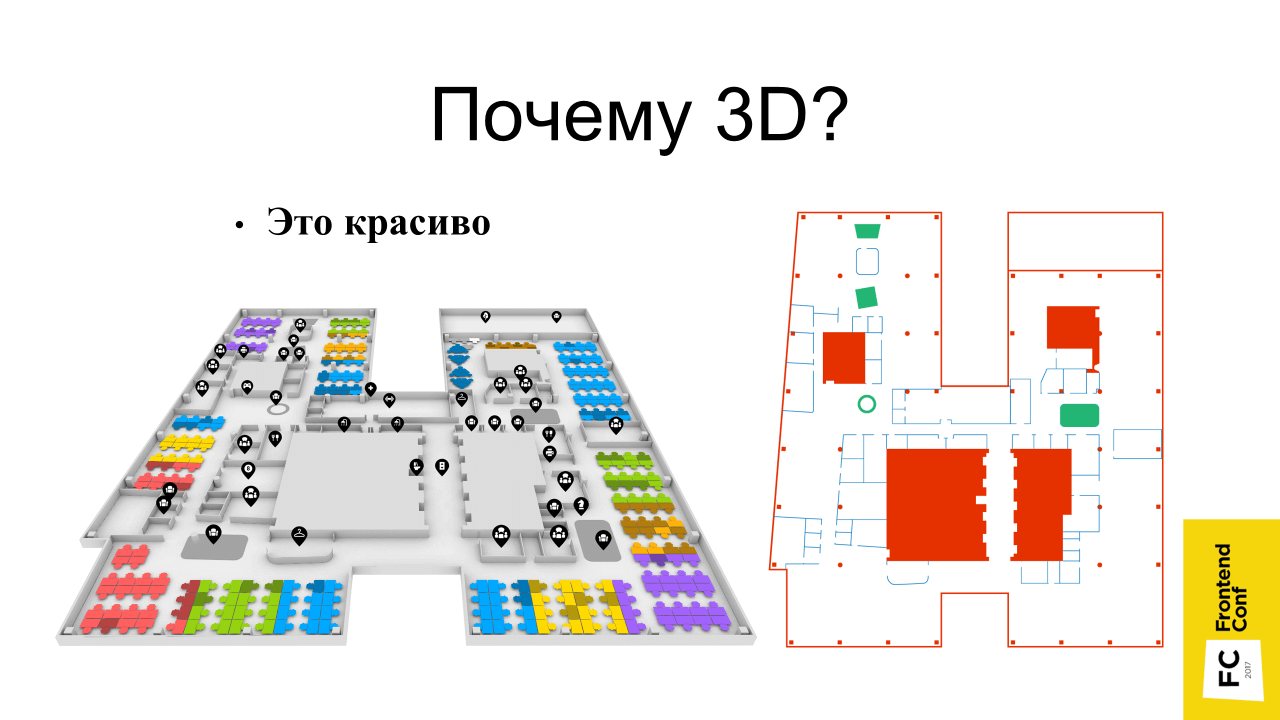
The original two-dimensional svg-scheme would look on the page is not very beautiful. Even in the absence of large resources due to 3D, shadows and perspective, the map looks more elegant.
• This is clear
Such maps, it seems to me, are more illustrative, because we still exist in three-dimensional space. You can turn as you like, and navigate - it is very convenient.
• Because I can
This is the main reason - I can, this is interesting to me, in contrast to the two-dimensional implementation, which I would not do.
How does it all start?
There are options:
• Find a modeler (optional)
This is probably the most ideal option - to find a person who understands 3D MAX and similar programs so that he can do everything, and you would just take this model.
• Find ready-made models (optional)
If there is no such person, ready-made models can be found on the Internet.
• Master the 3D editor yourself
This option is actually mandatory (there is no word “optional” in brackets) - because you need it anyway. Just a matter of immersion level. Even if you have a modeler, then, most likely, you still have to edit something yourself or at least open it in the editor to check that the model is done as it should. Therefore, this item is necessary.
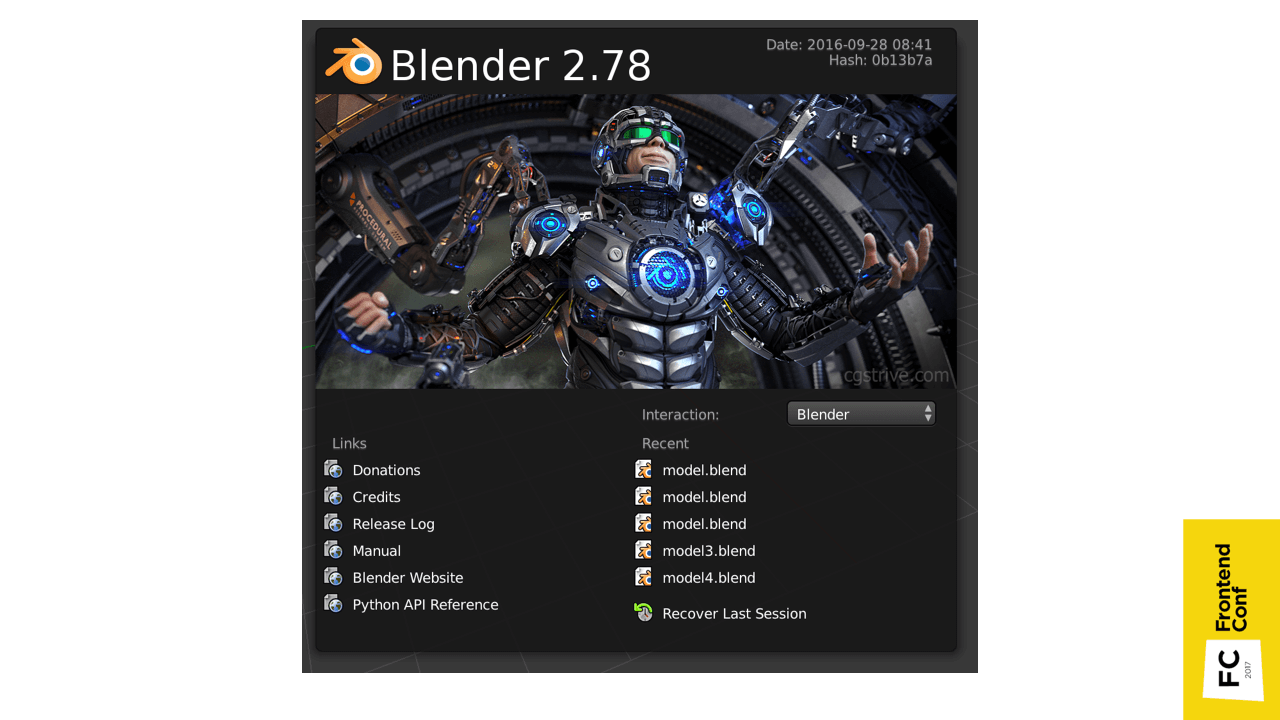
I used the blender 3D editor.
Probably everyone has heard about 3D MAX - a program for three-dimensional editing. This is its counterpart, only from the world of OpenSource. This editor is free, is under all major platforms and it is constantly evolving. There is a cool feature in it - everything that can be done with Blender can be done with a regular python script.
You can hover over some element of the interface, and a pop-up window will show which method you need to perform in order to get data, or to trigger a specific action.

Another cool feature is that it supports import from SVG by default.

I just had the source material SVG, so it really suited me. You can simply import the scheme, convert to triangles and set the height of the wall. The only thing that there were no chairs on which there are employees, they had to be placed in Blender manually.
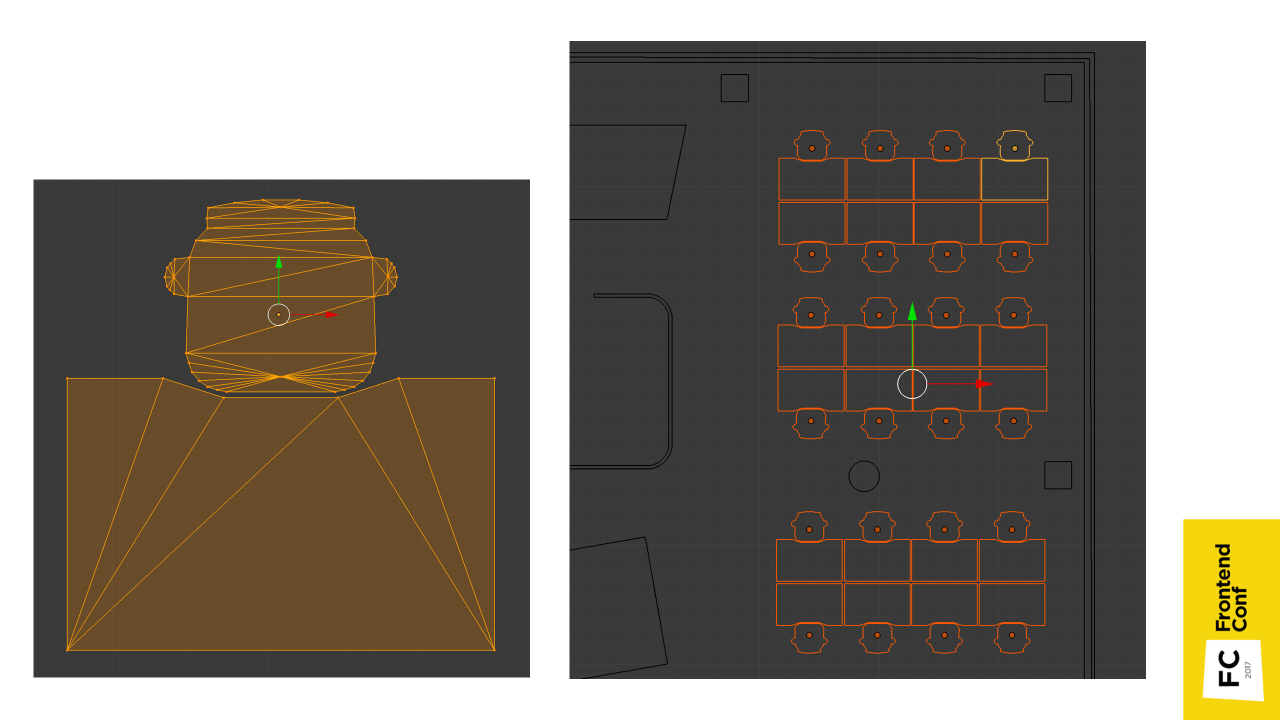
In principle, these places are all the same, so they had to be cloned with a slight shift. The most convenient place to place when you look at the top, but it turned out that when you look at the top, everything seems to be in order, but in fact they can be at different levels.
Plus, when you clone places, you can accidentally clone the so-called geometry. Geometry is the points that make up the skeleton . Duplication is not very good, as the model begins to occupy more disk space.
Here comes to the aid of one of the chips, namely, that you can use the python script.
We simply take the geometry of the place, run over the selected objects, reset the turn, indicate that they all refer to the same geometry and height (Z axis is pointing up) reset to 0.
Shadows were also baked in Blender. Naturally, with shading objects look more volumetric . When using the ambient occlusion real-time shading technique (mutual shading of objects), drawing will slow down, so it is best to bake the shadows in advance .

The figure shows the pre-baked shadows: on the right — the texture, on the left — the texture coordinates by which this texture is superimposed on the object.

Another example of what texture coordinates look like.
After some simple actions, you need to press the “Bake” button, select mutual shading and bake. These are not real shadows, because I am not very well versed in three-dimensional editors, and it was difficult for me to arrange light sources beautifully so that everything would be textured and cool. Therefore, mutual shading is quite a suitable option.
You can compare how a flat implementation and a picture with shadows look like.
We figured out the models, we believe that there is a model, and now we need to embed it in the browser so that everyone can use it.
The WebGL specification comes to the rescue.
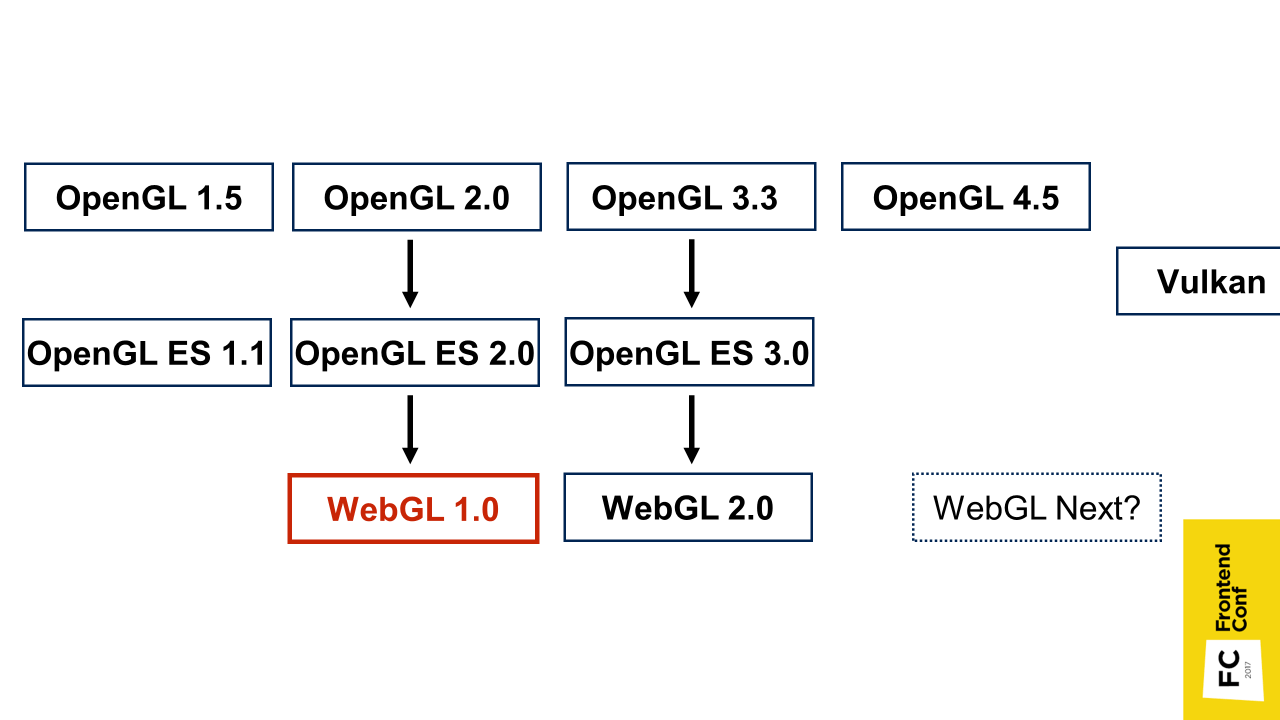
A little bit of a story about what it is. WebGL is based on the OpenGL for Embedded Systems version 2.0 specification, and essentially repeats it with minor changes. OpenGL for Embedded Systems, in turn, is a subset of the OpenGL specifications, only designed for mobile devices. That is, there is cut too much.
WebGL version 2.0 is also supported by browsers, but is not yet so common. WebGL Next is also being discussed now, but it is not clear what it will focus on, and whether it will be at all. Maybe on Vulkan - for now it’s not clear.
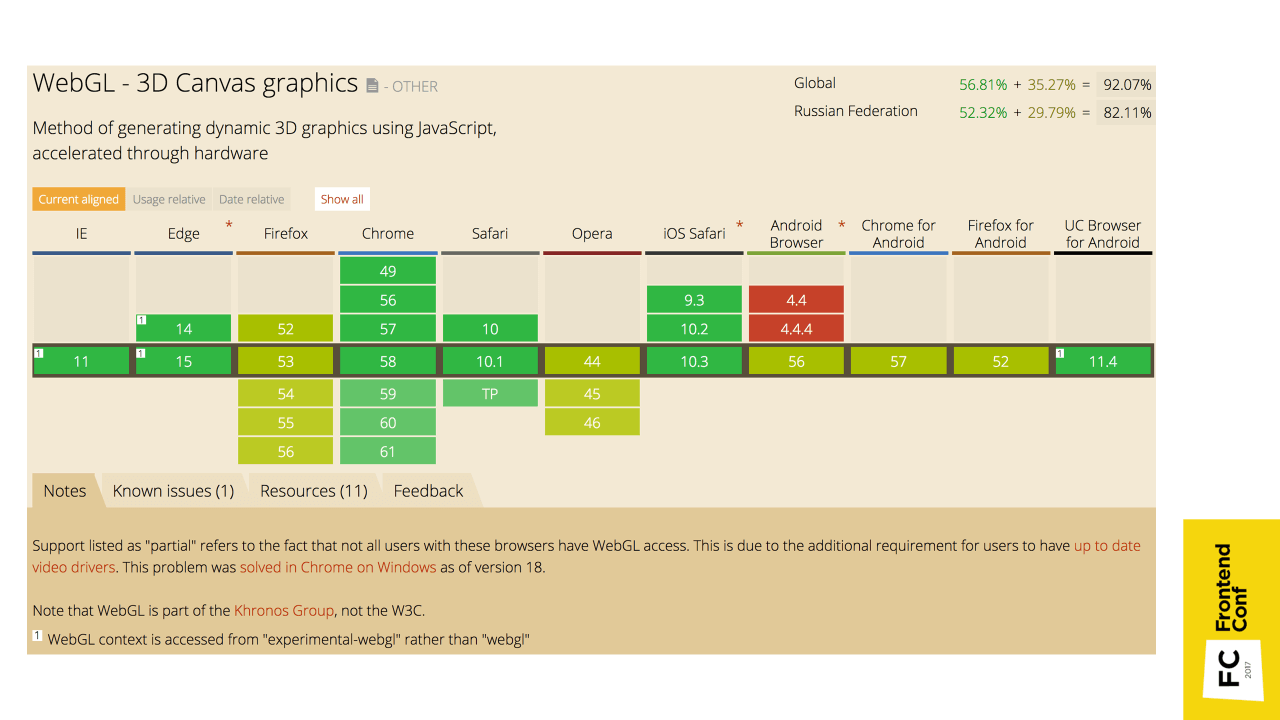
WebGL 1.0 is supported everywhere : on iOS, Android, etc. There are no problems with this.

For comparison, WebGL 2.0 is currently not very well supported, so for now let's wait.
In order to understand WebGL, let's compare two- and three-dimensional implementations. Let's make a simple test: how the two- and three-dimensional implementations of the usual red square will look like.
A two-dimensional implementation on Canvas is quite simple:
There is a canvas element, we take its two-dimensional context, define the fill style, and draw a square.
The three-dimensional implementation seems to be similar at first: there is also a canvas element, the context is taken using canvas.getContext ('webgl'). But here are the differences. Now I will try to explain. You can not go deep into the implementation and not be afraid of incomprehensible terms, then I will explain how to simplify it all.
What you need to do next:
1. Vertex shader - compile and transfer.
2. Fragment shader , which simply gives red color at the output - again compile and transfer
3. Program - we associate both shaders with the program and use it.
4. The vertex buffer , in which the coordinates of the square's vertices are set, after creation, you need to bind, transfer the coordinates of the vertices, associate the position attribute from the vertex shader with the vertex buffer, and use it.
5. Then we need to draw all this.
So "easy" turned out to be a red square!
You probably understand that WebGL is not so simple. It is quite low-level , there are a bunch of methods, and there are a million arguments in them. And this is a simplified code - there are no checks for errors that are needed in real code.
I recommend reading, there everything is available is told from the very beginning. Starting, for example, with drawing the simplest triangle, and ending with the creation of full-fledged three-dimensional objects with shadows.
If there is no time to figure it out, but most likely it is not there - even the project that I did was implemented as part of a hackathon within a couple of days (the first prototype with 2 floors). Therefore, favorite (or not favorite) frameworks come to the rescue.
I used Three.js , as the most popular and used WebGL framework. The most important advantage of this framework is that they create convenient abstractions , with the help of which you can do everything faster and with less code, without delving into the low-level API. It is possible for the entire project not to write a single shader.
This example is taken from the Readme Three.js :
By copying this code into your browser, in fact, we already have a full three-dimensional visualization. And this is not just some ordinary square, but a three-dimensional cube, which also rotates.
Consider this example.

Thus, we have a complete visualization.
If you take a piece of code where we create a cube, it is easy to replace it with code where there is a loader.
We call the load method in order to load the model, and already on the stand we add not an abstract cube, but our model, and see it in the browser. This is generally already cool!
To get a model, you need the model to have a specific format. In Three.js there is a ready-made exporter that needs to be connected (by default it does not exist in Blender) and with its help export the model into a format in which you can already import it into the scene.

But the picture turned out to be static, but we want to twist the model, look at it from different sides.
In Three.js, OrbitControls is already available for this. It is not in the main Three.js folder, but in examples (<script src = "three / examples / js / controls / OrbitControls.js"> </ script>). There is a lot of everything that is not included in the core-code, but you can additionally connect it.
We connect OrbitControls, and create their instance by passing the camera object:
Now our camera is controlled by OrbitControls. After that, you can rotate our model with the mouse. We pinch the left mouse button and start moving it, you can also zoom in and out.
This is an example from Three.js. There just is the loading of the model and controls, in principle, this is already a complete visualization. If we sell, for example, a watch, you can make a model or find it on the Internet, insert it into the browser and the user can zoom in and view it from different sides.
When we have mastered the basics, we want more - to realize the work of a full-fledged application - not just twist-twirl, but connect additional functions.
I divided the application into 2 parts.
This is the part that is responsible for working with Canvas and WebGL. It contains:
The interface is fairly standard and superimposes over the canvas; it has search, authorization, and movement across floors. Thus, the floors can be allocated not only directly by clicking on them in three-dimensional space, but also using the classic two-dimensional interface.

I chose two independent blocks, because it seemed convenient to me - if someone suddenly doesn’t support WebGL, you can quickly replace the viewer with an alternative one, for example, you can replace it with a two-dimensional implementation with a static picture. The UI may remain the same - let's say highlight the places in this two-dimensional image.

Everything is managed through the Redux store. If any action occurs, action is created. In this case, we can select the floor, as in the three-dimensional scheme, by clicking on the floor, and in the two-dimensional interface. Respectively, the action will occur, the state of the application will be updated, and then spread to both parts: the Viewer and the UI.
It would seem that everything is fine: there is a model, there is interactivity, there is an interface. But, most likely, at this moment if there is a sufficiently large application, you will encounter the problem that users will say: “Everything is slowing down!”.
I'll tell you what problems I encountered, and what helped me solve them.

The first problem was the brakes in Safari on macOS. Moreover, if you try to profile, it seems to be a
I have long understood what could be wrong. Disconnected everything that is possible - it still slows down. Then I took an example from Three.js with a cube that showed above, launched it, and it also slows down!

It turned out that the thing was this. WebGL supports hardware-based anti-aliasing , which does not require any effort to turn it on. You can simply specify antialias: true - be it pure WebGL or Three.js, and the picture gets better. And due to the fact that it is hardware anti-aliasing, it works fast enough, I have never noticed any problems with it until this moment.
But it was in Safari on Retina screens of mac-books with a huge resolution and, as always, a weak video card, this problem appeared. It helped to disable hardware anti-aliasing for such devices in this browser.

Another problem that was still complained about was that when the application was started, the computer cooler started spinning and making noises furiously .
It all turned out to be simple. In the example that I showed, there is a function
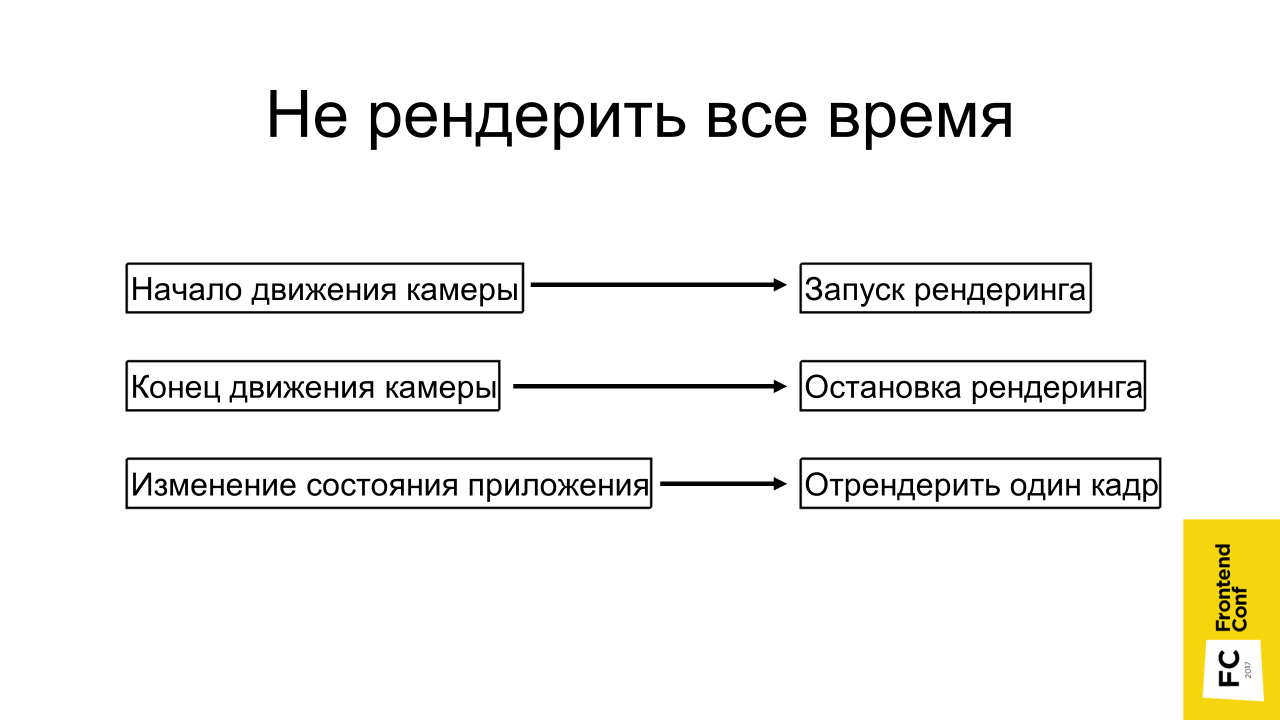
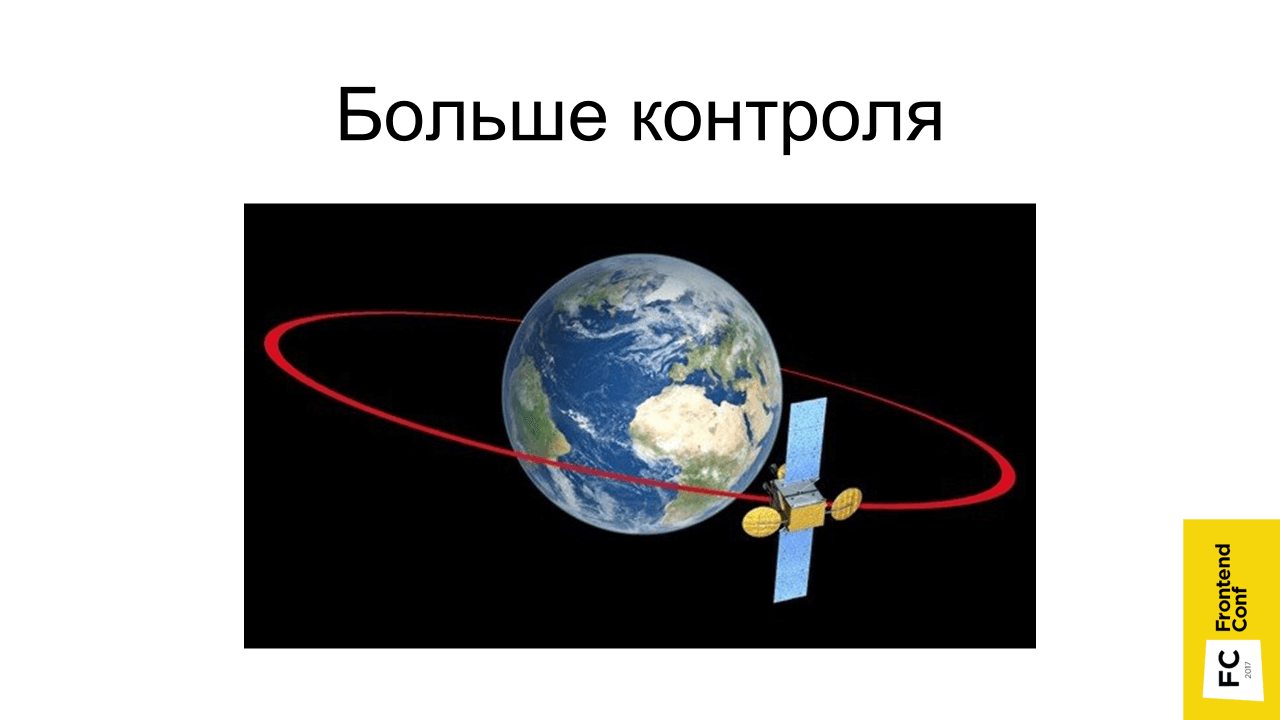
The solution is obvious: do not render when not needed . We start to rotate the camera, everything moves, we start rendering. As soon as we let go of the mouse button, stopped rotating the camera, we can stop the render.
If the state of the application has changed, let's say we have chosen a place through a two-dimensional interface and need to highlight it, we can generally just render one frame and that's it - it is already highlighted.
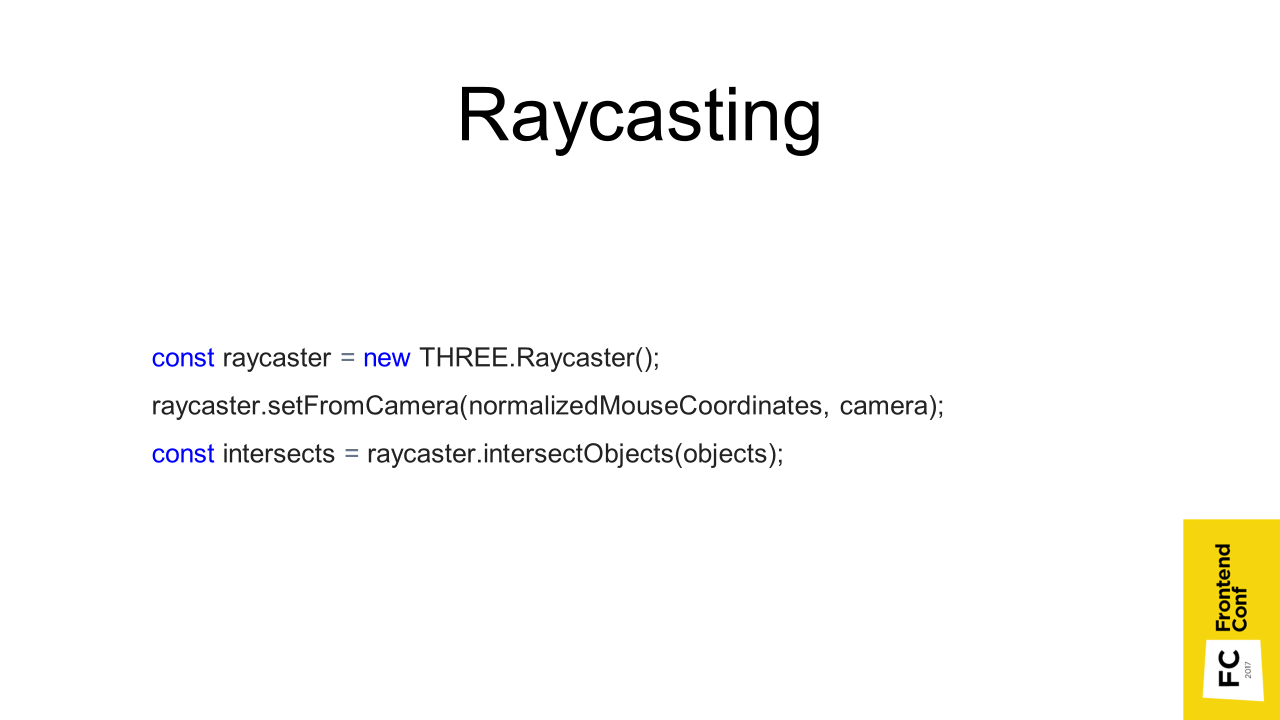
I have already mentioned Raycasting. When we click on the canvas, a vector is created in three-dimensional space and it is calculated which triangles that the objects consist of intersect this vector. Accordingly, what the first object we crossed, that and select. In Three.js it looks like this:
But if we have rather large models consisting of a large number of triangles, then this may take a long time. In fact, you need to go through all the triangles that make up all the objects. Therefore, another method is used. In Blender, you can create an object in advance that approximates an object, but consists of a very small number of triangles (shown in red in the image above).
We can make it invisible or even place it on a separate stage, but raycasting happens with it and much faster.
And if for floors it was necessary to create them manually - because there is a complicated geometry, then for places you can generate automatically in JS code. We take a place, calculate the maximum position in x and y axes (we don’t even need it in z), and it’s ready. We have a square consisting of 2 triangles - that's all.
Using the Instancing technique gave the biggest performance boost (left result). Before using Instancing, there were 365 draw calls (drawing on a video card), and after - 51. Although this is also quite a lot, probably due to icons.
What's the point? Remember, I told you that there are places that refer to the same geometry - just different instances are in different places with different colors. When there are such objects of the same type, we can use this technique and use it to reduce the number of drawings on the video card. All these places are combined into one object, which is rendered at a time - in one pass.
Instancing is included in the specification of WebGL 2, in the very first WebGL it is available through an extension that is supported and available in all modern browsers.
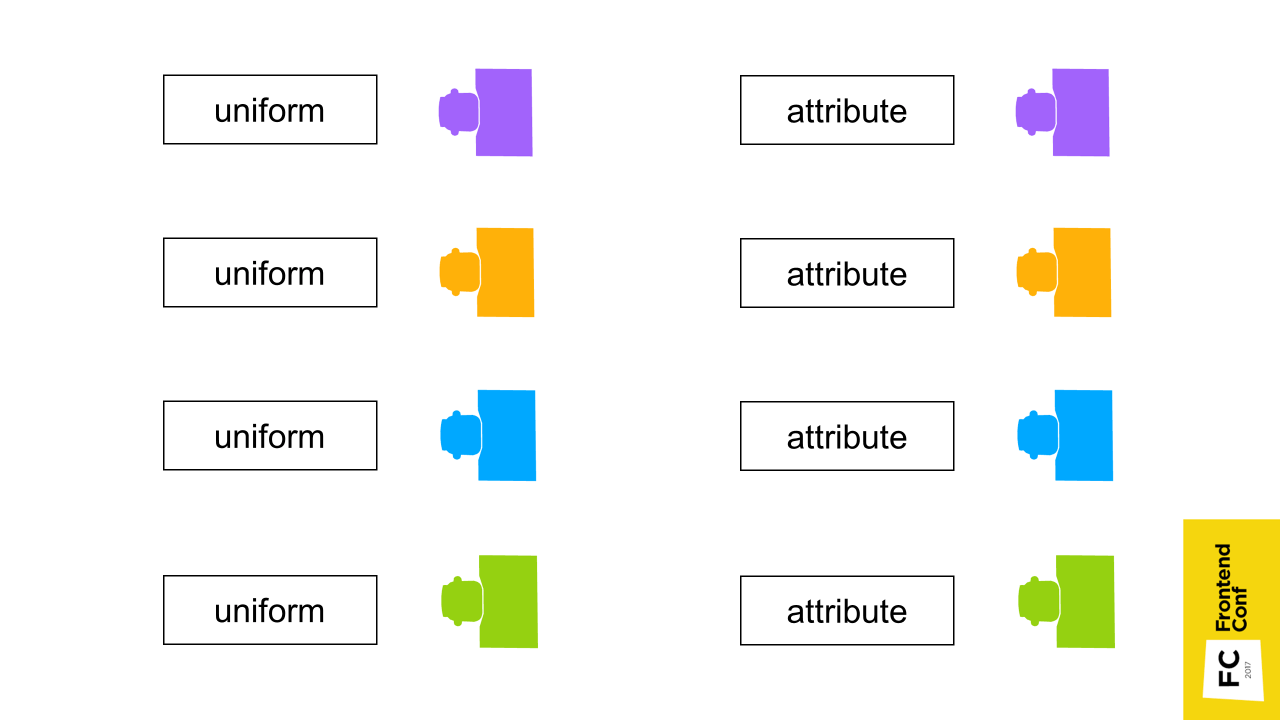
I'll try to explain how it works. Suppose, by default, there are 4 places in 4 different positions in 4 different colors. Usually we transfer this data through uniform - this is “variable”, which apply to the entire shader program. If these places are combined into one Batch, then the places will be the same color and be in one place crowded.
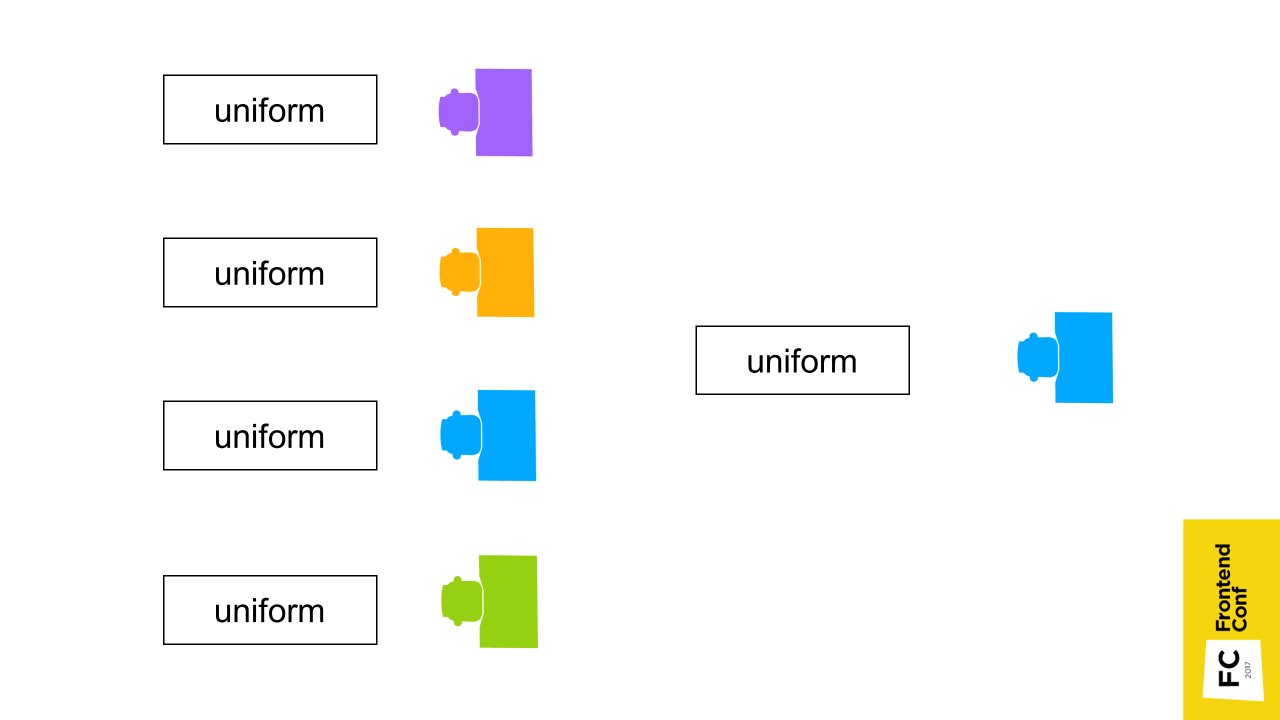
Therefore, to transfer exactly this data: color, position of places. need through attribute. This is a parameter that is transmitted for each vertex separately.
What you should know about Instancing:

The next problem you encounter is this picture (in Chrome). This usually happens when there is not enough video memory .
What can help?
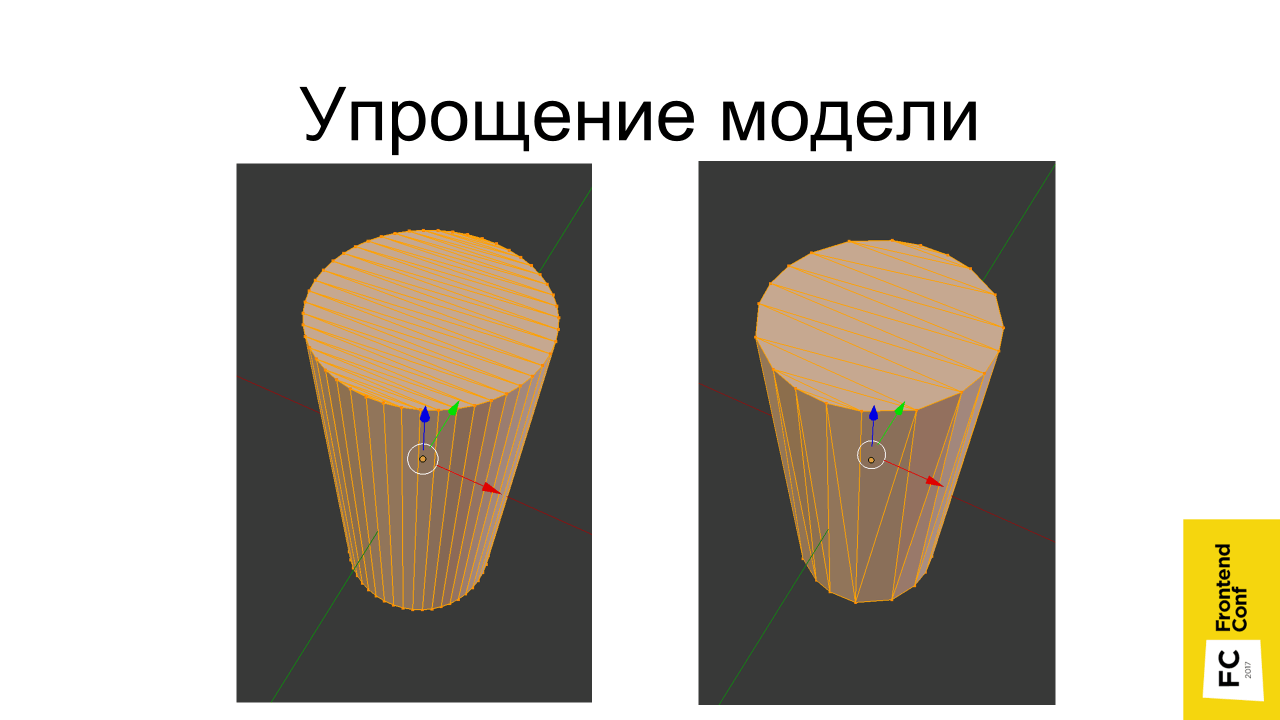
When converting svg images to a three-dimensional object, Blender creates a lot of extra points. Objects are obtained, of course, well smoothed, but, most likely, this is not particularly visible. And every extra point is the consumption of video memory and a decrease in performance .
Usually in three-dimensional games are used as low-poly models with a small number of triangles. To neutralize this, beautiful pictures are achieved by using a large number of textures. Unfortunately, this becomes a problem in the browser due to the fact that not much memory can be allocated under the tab and the tab will crash if it is not enough. Therefore, there are techniques to reduce the number of textures and their optimization.
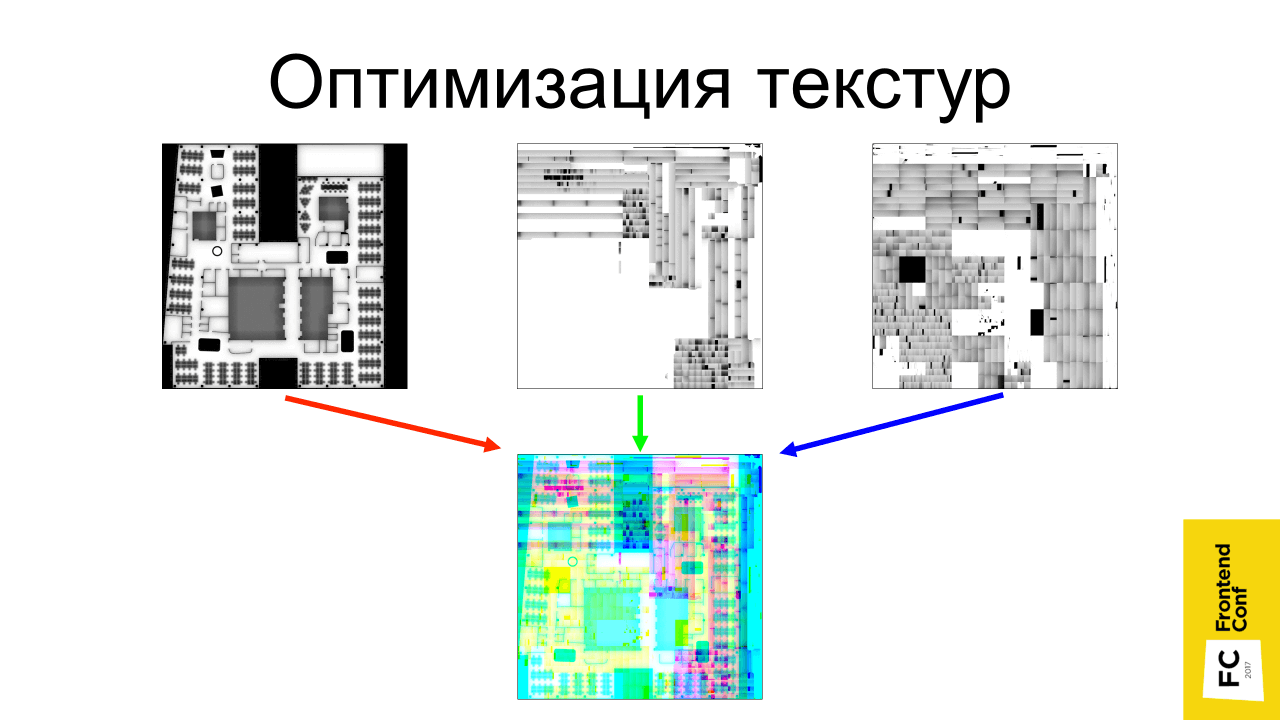
One of their techniques involves combining several textures into one. Suppose if there are 3 black and white textures, they can be broken down into channels and merged into one: transfer the first texture to the red channel, second to the green and third - to the blue. It turns out that in the end all this will take 3 times less video memory.
There are different formats: DXT, PVRTC, ETC, which allow you to make a texture of 1024 * 1024 in size on a video card to occupy video memory as a texture of 512 * 512, that is, 4 times less.
It would seem a steep profit, but there are big limitations:
Regarding the quality of compressed textures - the cat did not suffer much from compression.
Artifacts are already visible on the textures of this type - the shadow merges with the inscription itself. But for variegated textures (like herbs) this is great.
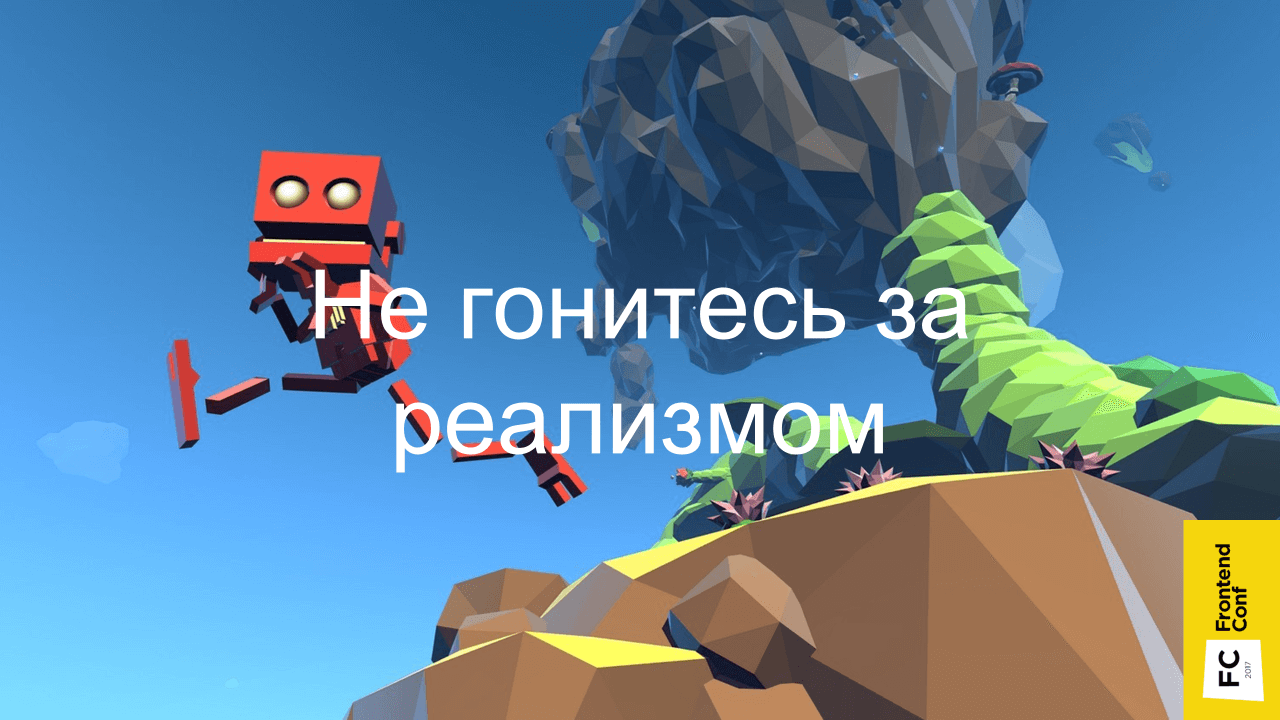
The most important and useful advice - do not pursue realism ! Note that in indie games almost never have super-realistic graphics. She is sketchy - colorful, funny, but little poly men run around, but everything is fun and fun, works fast and requires less resources to develop.
The last thing I wanted to say. If you do 3D, do not do the project alone. Find companions. I did a project in the framework of the hackathon; I was helped by many good people. One is difficult, and when you are together, it motivates, and everything turns out faster.
✓ Course on three-dimensional graphics on Udacity
✓ The book “Programming of three-dimensional graphics”
✓ Examples of threejs
✓ Video about text rendering in WebGL ( slides )
✓ Video about WebGL performance ( article )
https://twitter.com/gc_s9k
s9k0@ya.ru
The project, by the way, is interesting in itself. In modern large open space to navigate in space, to find the right people or negotiations are often very difficult. Of course, you can make a diagram in Excel, but this is not always a super good solution. Alexander Amosov had an idea to make it more convenient, which he shared on Frontend Conf , and the following is a transcript of his report.
')
Story
A few words about the project. Our company is actively developing, there are new employees, and there is a banal problem of navigation in the office.
Until recently, there were schematic maps, for example, like this map of one of the floors, which shows what is located. But it is fixed , but over time, something changes, people change to different departments, and the map becomes irrelevant.
An even bigger problem was finding the right employee. At first there was a powerful table in Confluence, where the cells are the places of the employees, in which their names are entered. If the imagination is not very good, it is not very convenient. In the presented image, the table (on the left) and the map (on the right) correspond to the same place in the office. Of course, the scheme can be made with the help of a table, it will be a very cheap and quick solution, but extremely beloved.
There was an idea to make it more convenient, so that new employees without difficulty find what they need .
This is a three-dimensional map that has all the floors, you can search for a person and find out where he is, get his contacts and tritely find the right conversation.
2D vs 3D
When the project was just being born, naturally, it was not without controversy. I was told: “Why 3D? This is all incomprehensible. Everyone is accustomed to two-dimensional maps! They can be made quickly and easily. Let's do the two-dimensional! ”
Why was the 3D implementation chosen?
The original two-dimensional svg-scheme would look on the page is not very beautiful. Even in the absence of large resources due to 3D, shadows and perspective, the map looks more elegant.
• This is clear
Such maps, it seems to me, are more illustrative, because we still exist in three-dimensional space. You can turn as you like, and navigate - it is very convenient.
• Because I can
This is the main reason - I can, this is interesting to me, in contrast to the two-dimensional implementation, which I would not do.
How does it all start?
Creating a model
There are options:
• Find a modeler (optional)
This is probably the most ideal option - to find a person who understands 3D MAX and similar programs so that he can do everything, and you would just take this model.
• Find ready-made models (optional)
If there is no such person, ready-made models can be found on the Internet.
• Master the 3D editor yourself
This option is actually mandatory (there is no word “optional” in brackets) - because you need it anyway. Just a matter of immersion level. Even if you have a modeler, then, most likely, you still have to edit something yourself or at least open it in the editor to check that the model is done as it should. Therefore, this item is necessary.
I used the blender 3D editor.
Probably everyone has heard about 3D MAX - a program for three-dimensional editing. This is its counterpart, only from the world of OpenSource. This editor is free, is under all major platforms and it is constantly evolving. There is a cool feature in it - everything that can be done with Blender can be done with a regular python script.
You can hover over some element of the interface, and a pop-up window will show which method you need to perform in order to get data, or to trigger a specific action.
Another cool feature is that it supports import from SVG by default.
I just had the source material SVG, so it really suited me. You can simply import the scheme, convert to triangles and set the height of the wall. The only thing that there were no chairs on which there are employees, they had to be placed in Blender manually.
In principle, these places are all the same, so they had to be cloned with a slight shift. The most convenient place to place when you look at the top, but it turned out that when you look at the top, everything seems to be in order, but in fact they can be at different levels.
Plus, when you clone places, you can accidentally clone the so-called geometry. Geometry is the points that make up the skeleton . Duplication is not very good, as the model begins to occupy more disk space.
Here comes to the aid of one of the chips, namely, that you can use the python script.
import bpy geometry = bpy.data.meshes['place'] for obj in bpy.context.selected_objects: obj.rotation_euler.x = 0 obj.rotation_euler.y = 0 obj.data = geometry obj.location.z = 0 We simply take the geometry of the place, run over the selected objects, reset the turn, indicate that they all refer to the same geometry and height (Z axis is pointing up) reset to 0.
Shadows
Shadows were also baked in Blender. Naturally, with shading objects look more volumetric . When using the ambient occlusion real-time shading technique (mutual shading of objects), drawing will slow down, so it is best to bake the shadows in advance .
The figure shows the pre-baked shadows: on the right — the texture, on the left — the texture coordinates by which this texture is superimposed on the object.
Another example of what texture coordinates look like.
After some simple actions, you need to press the “Bake” button, select mutual shading and bake. These are not real shadows, because I am not very well versed in three-dimensional editors, and it was difficult for me to arrange light sources beautifully so that everything would be textured and cool. Therefore, mutual shading is quite a suitable option.
You can compare how a flat implementation and a picture with shadows look like.
We figured out the models, we believe that there is a model, and now we need to embed it in the browser so that everyone can use it.
Webgl
The WebGL specification comes to the rescue.
A little bit of a story about what it is. WebGL is based on the OpenGL for Embedded Systems version 2.0 specification, and essentially repeats it with minor changes. OpenGL for Embedded Systems, in turn, is a subset of the OpenGL specifications, only designed for mobile devices. That is, there is cut too much.
WebGL version 2.0 is also supported by browsers, but is not yet so common. WebGL Next is also being discussed now, but it is not clear what it will focus on, and whether it will be at all. Maybe on Vulkan - for now it’s not clear.
WebGL 1.0 is supported everywhere : on iOS, Android, etc. There are no problems with this.
For comparison, WebGL 2.0 is currently not very well supported, so for now let's wait.
2D vs 3D [2]
In order to understand WebGL, let's compare two- and three-dimensional implementations. Let's make a simple test: how the two- and three-dimensional implementations of the usual red square will look like.
A two-dimensional implementation on Canvas is quite simple:
<canvas id="canvas" width="100" height="100"></canvas> <script> (function() { const canvas = document.getElementById('canvas'); const context = canvas.getContext('2d'); context.fillStyle = 'rgba(255, 0, 0, 1)'; context.fillRect(25, 25, 50, 50); }()); </script> There is a canvas element, we take its two-dimensional context, define the fill style, and draw a square.
The three-dimensional implementation seems to be similar at first: there is also a canvas element, the context is taken using canvas.getContext ('webgl'). But here are the differences. Now I will try to explain. You can not go deep into the implementation and not be afraid of incomprehensible terms, then I will explain how to simplify it all.
<canvas id="canvas" width="100" height="100"></canvas> <script> (function() { const canvas = document.getElementById('canvas'); const gl = canvas.getContext('webgl'); // // // // // }()); </script> What you need to do next:
1. Vertex shader - compile and transfer.
const vertexShaderSource = ` attribute vec4 position; void main() { gl_Position = position; } `; const vertexShader = gl.createShader(gl.VERTEX_SHADER); gl.shaderSource(vertexShader, vertexShaderSource); gl.compileShader(vertexShader); 2. Fragment shader , which simply gives red color at the output - again compile and transfer
const fragmentShaderSource = ` void main() { gl_FragColor = vec4(1.0, 0.0, 0.0, 1.0); } `; const fragmentShader = gl.createShader(gl.FRAGMENT_SHADER); gl.shaderSource(fragmentShader, vertexShaderSource); gl.compileShader(fragmentShader); 3. Program - we associate both shaders with the program and use it.
const program = gl.createProgram(); gl.attachShader(program, vertexShader); gl.attachShader(program, fragmentShader); gl.linkProgram(program); gl.useProgram(program); 4. The vertex buffer , in which the coordinates of the square's vertices are set, after creation, you need to bind, transfer the coordinates of the vertices, associate the position attribute from the vertex shader with the vertex buffer, and use it.
const vertices = new Float32Array([ -0.5, 0.5, -0.5, -0.5, 0.5, 0.5, 0.5, -0.5 ]); const vertexSize = 2; const vertexBuffer = gl.createBuffer(); gl.bindBuffer(gl.ARRAY_BUFFER, vertexBuffer); gl.bufferData(gl.ARRAY_BUFFER, vertices, gl.STATIC_DRAW); const attrPosition = gl.getAttribLocation(program, 'position'); gl.vertexAttribPointer(attrPosition, vertexSize, gl.FLOAT, false, 0, 0); gl.enableVertexAttribArray(attrPosition); 5. Then we need to draw all this.
const vertices = new Float32Array([ -0.5, 0.5, -0.5, -0.5, 0.5, 0.5, 0.5, -0.5 ]); const vertexSize = 2; // … gl.drawArrays(gl.TRIANGLE_STRIP, 0, vertices.length / vertexSize); So "easy" turned out to be a red square!
You probably understand that WebGL is not so simple. It is quite low-level , there are a bunch of methods, and there are a million arguments in them. And this is a simplified code - there are no checks for errors that are needed in real code.
If you want to delve into the native WebGL, there is an excellent book in Russian Koichi Matsuda, Roger Lee "WebGL: programming three-dimensional graphics."
I recommend reading, there everything is available is told from the very beginning. Starting, for example, with drawing the simplest triangle, and ending with the creation of full-fledged three-dimensional objects with shadows.
If there is no time to figure it out, but most likely it is not there - even the project that I did was implemented as part of a hackathon within a couple of days (the first prototype with 2 floors). Therefore, favorite (or not favorite) frameworks come to the rescue.
I used Three.js , as the most popular and used WebGL framework. The most important advantage of this framework is that they create convenient abstractions , with the help of which you can do everything faster and with less code, without delving into the low-level API. It is possible for the entire project not to write a single shader.
This example is taken from the Readme Three.js :
var scene, camera, renderer, geometry, material, mesh; init(); animate(); function init() { scene = new THREE.Scene(); camera = new THREE.PerspectiveCamera(75, window.innerWidth / window.innerHeight, 1, 10000); camera.position.z = 1000; geometry = new THREE.BoxGeometry( 200, 200, 200 ); material = new THREE.MeshBasicMaterial( { color: 0xff0000, wireframe: true } ); mesh = new THREE.Mesh( geometry, material ); scene.add( mesh ); renderer = new THREE.WebGLRenderer(); renderer.setSize( window.innerWidth, window.innerHeight ); document.body.appendChild( renderer.domElement ); } function animate() { requestAnimationFrame( animate ); mesh.rotation.y += 0.02; renderer.render( scene, camera ); } By copying this code into your browser, in fact, we already have a full three-dimensional visualization. And this is not just some ordinary square, but a three-dimensional cube, which also rotates.
Consider this example.
- We have a certain scene (
scene) - this is virtual space. These scenes may be several, but usually she is one. If there are several scenes, then they exist as parallel worlds. - There is a camera (
camera) - the point from which we will shoot and receive a picture on the screen. - Next comes the code section where we create the object. This creates the geometry of the cube (
geometry) and its material (material), in this case, just a flat red color. When we combine the cube frame and impose material on it, we get a red cube (mesh), which we then place on the stage (our virtual space). - The next step is to create a renderer object, create a canvas object and interact with WebGL. In this case, we set the size so that the rendering takes place in full screen, and add the canvas to the body on the page.
- After that, we just need to call the
animate()function, which byrequestAnimationFramecalls itself - plus the cube rotates.
Thus, we have a complete visualization.
If you take a piece of code where we create a cube, it is easy to replace it with code where there is a loader.
var loader = new THREE.ObjectLoader(); loader.load('model.json', function(mesh) { scene.add(mesh); }); We call the load method in order to load the model, and already on the stand we add not an abstract cube, but our model, and see it in the browser. This is generally already cool!
To get a model, you need the model to have a specific format. In Three.js there is a ready-made exporter that needs to be connected (by default it does not exist in Blender) and with its help export the model into a format in which you can already import it into the scene.
But the picture turned out to be static, but we want to twist the model, look at it from different sides.
In Three.js, OrbitControls is already available for this. It is not in the main Three.js folder, but in examples (<script src = "three / examples / js / controls / OrbitControls.js"> </ script>). There is a lot of everything that is not included in the core-code, but you can additionally connect it.
We connect OrbitControls, and create their instance by passing the camera object:
scene = new THREE.Scene(); camera = new THREE.PerspectiveCamera(75, window.innerWidth / window.innerHeight, 1, 10000); camera.position.z = 1000; new THREE.OrbitControls(camera); Now our camera is controlled by OrbitControls. After that, you can rotate our model with the mouse. We pinch the left mouse button and start moving it, you can also zoom in and out.
This is an example from Three.js. There just is the loading of the model and controls, in principle, this is already a complete visualization. If we sell, for example, a watch, you can make a model or find it on the Internet, insert it into the browser and the user can zoom in and view it from different sides.
To learn more about the world of three-dimensional graphics based on the use of the Three.js framework, there is an excellent course on Udacity. He is very funny, however, in English.
How the application works
When we have mastered the basics, we want more - to realize the work of a full-fledged application - not just twist-twirl, but connect additional functions.
I divided the application into 2 parts.
Viewer
This is the part that is responsible for working with Canvas and WebGL. It contains:
- Model with baked shadows;
- Object reykasting occurs - the mechanism for determining which element of three-dimensional space we hit by clicking on the canvas. This is necessary, for example, to allocate seats on the plan or to obtain information on the icon.
- Sprites for icons are original two-dimensional pictures in three-dimensional space. If you played the first three-dimensional shooters, then remember that, for example, in Doom 1 and 2 all opponents were made sprites, that is, two-dimensional, and always looked at you.
Ui
The interface is fairly standard and superimposes over the canvas; it has search, authorization, and movement across floors. Thus, the floors can be allocated not only directly by clicking on them in three-dimensional space, but also using the classic two-dimensional interface.
I chose two independent blocks, because it seemed convenient to me - if someone suddenly doesn’t support WebGL, you can quickly replace the viewer with an alternative one, for example, you can replace it with a two-dimensional implementation with a static picture. The UI may remain the same - let's say highlight the places in this two-dimensional image.
Everything is managed through the Redux store. If any action occurs, action is created. In this case, we can select the floor, as in the three-dimensional scheme, by clicking on the floor, and in the two-dimensional interface. Respectively, the action will occur, the state of the application will be updated, and then spread to both parts: the Viewer and the UI.
It would seem that everything is fine: there is a model, there is interactivity, there is an interface. But, most likely, at this moment if there is a sufficiently large application, you will encounter the problem that users will say: “Everything is slowing down!”.
Everything slows down
I'll tell you what problems I encountered, and what helped me solve them.
The first problem was the brakes in Safari on macOS. Moreover, if you try to profile, it seems to be a
requestAnimatioFrame gives you an honest 60 FPS and it seems that everything should be fine, but from the video you can see that everything happens in spurts. And this is only in Safari - everything is fine in Chrome, and in FireFox it's fine.I have long understood what could be wrong. Disconnected everything that is possible - it still slows down. Then I took an example from Three.js with a cube that showed above, launched it, and it also slows down!
It turned out that the thing was this. WebGL supports hardware-based anti-aliasing , which does not require any effort to turn it on. You can simply specify antialias: true - be it pure WebGL or Three.js, and the picture gets better. And due to the fact that it is hardware anti-aliasing, it works fast enough, I have never noticed any problems with it until this moment.
But it was in Safari on Retina screens of mac-books with a huge resolution and, as always, a weak video card, this problem appeared. It helped to disable hardware anti-aliasing for such devices in this browser.
Another problem that was still complained about was that when the application was started, the computer cooler started spinning and making noises furiously .
It all turned out to be simple. In the example that I showed, there is a function
animate() , which, by requestAnimationFrame calls itself. The thing is that we basically do not need it. Suppose we rotated the model - the picture is static, nothing happens, but the video card suffers, requestAnimationFrame (in the ideal case) triggers 60 times per second. Nothing happens, but we torture the video card for nothing, forcing the scene to be redrawn again and again.The solution is obvious: do not render when not needed . We start to rotate the camera, everything moves, we start rendering. As soon as we let go of the mouse button, stopped rotating the camera, we can stop the render.
If the state of the application has changed, let's say we have chosen a place through a two-dimensional interface and need to highlight it, we can generally just render one frame and that's it - it is already highlighted.
I have already mentioned Raycasting. When we click on the canvas, a vector is created in three-dimensional space and it is calculated which triangles that the objects consist of intersect this vector. Accordingly, what the first object we crossed, that and select. In Three.js it looks like this:
- have a raycaster
- We transmit the coordinates and the camera, and the objects for which you want to check the intersection,
- we end up with intersections.
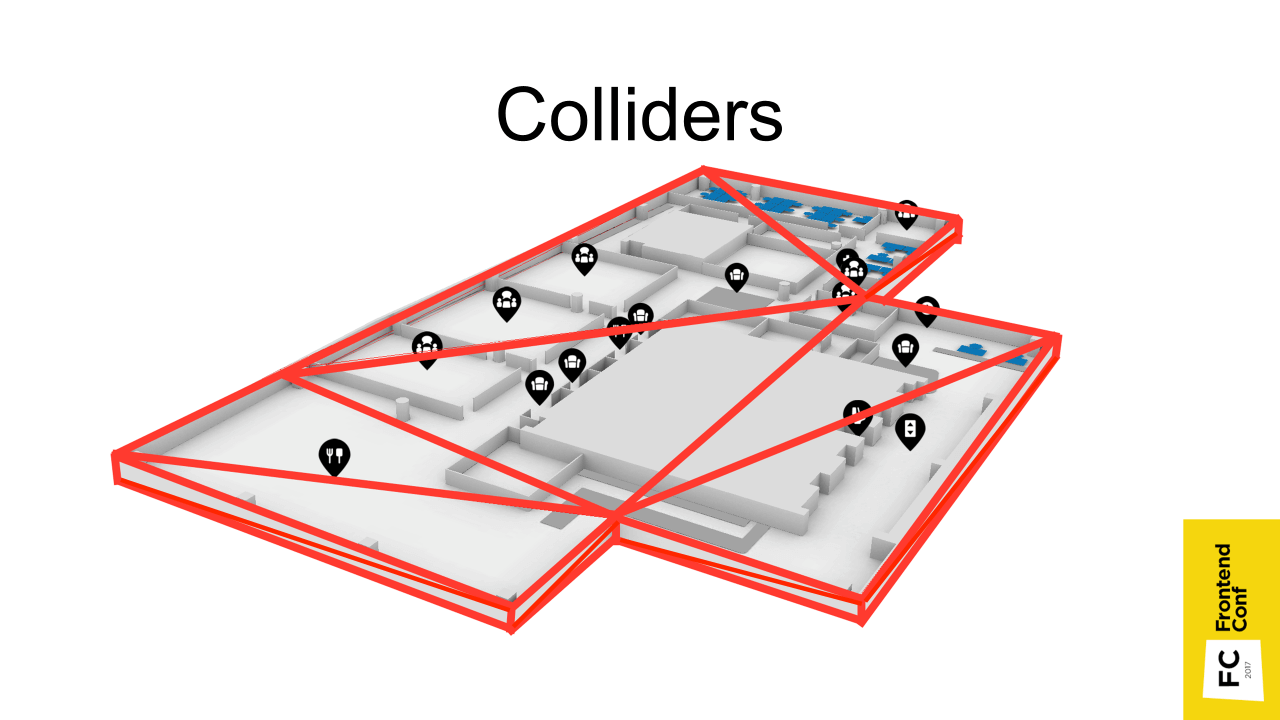
But if we have rather large models consisting of a large number of triangles, then this may take a long time. In fact, you need to go through all the triangles that make up all the objects. Therefore, another method is used. In Blender, you can create an object in advance that approximates an object, but consists of a very small number of triangles (shown in red in the image above).
We can make it invisible or even place it on a separate stage, but raycasting happens with it and much faster.
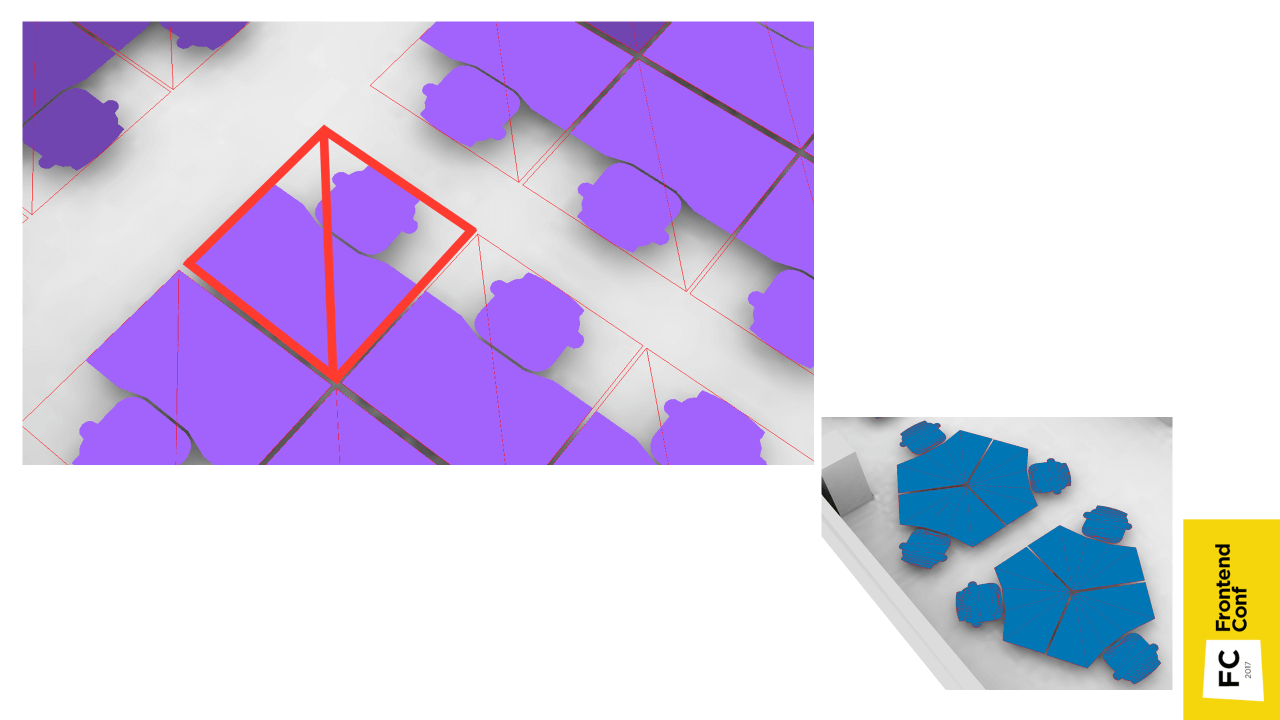
And if for floors it was necessary to create them manually - because there is a complicated geometry, then for places you can generate automatically in JS code. We take a place, calculate the maximum position in x and y axes (we don’t even need it in z), and it’s ready. We have a square consisting of 2 triangles - that's all.
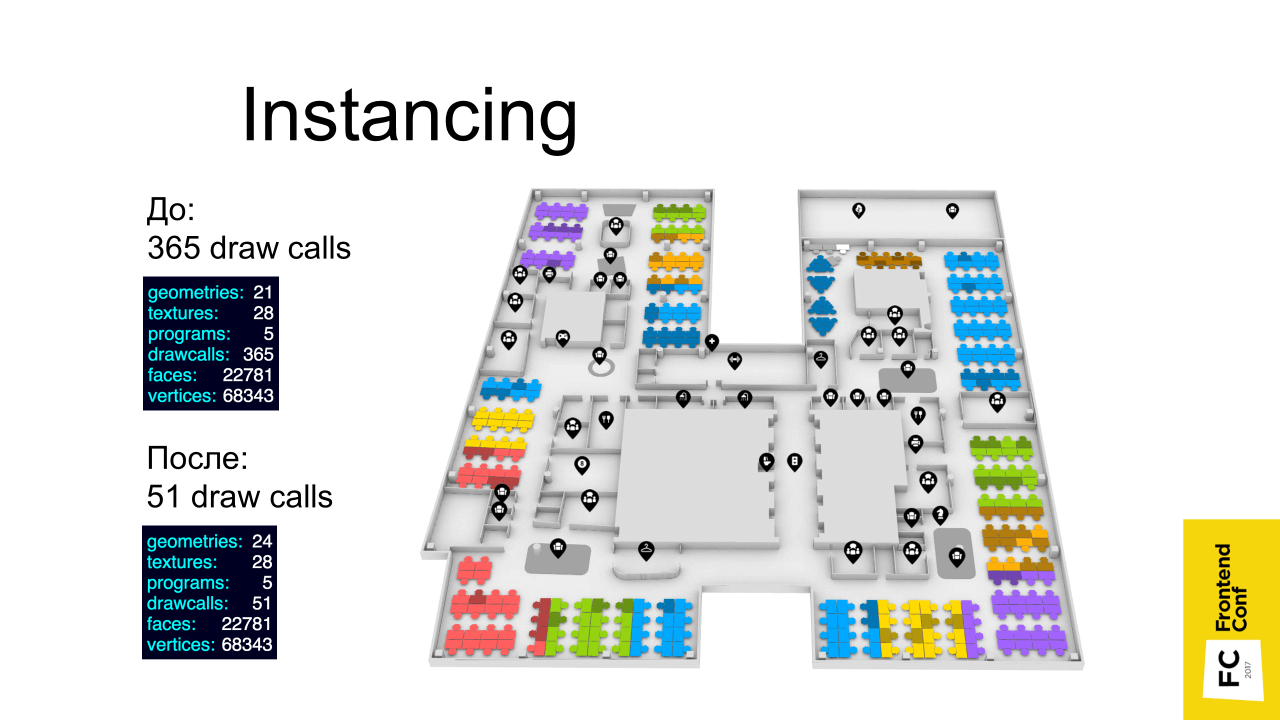
Using the Instancing technique gave the biggest performance boost (left result). Before using Instancing, there were 365 draw calls (drawing on a video card), and after - 51. Although this is also quite a lot, probably due to icons.
What's the point? Remember, I told you that there are places that refer to the same geometry - just different instances are in different places with different colors. When there are such objects of the same type, we can use this technique and use it to reduce the number of drawings on the video card. All these places are combined into one object, which is rendered at a time - in one pass.
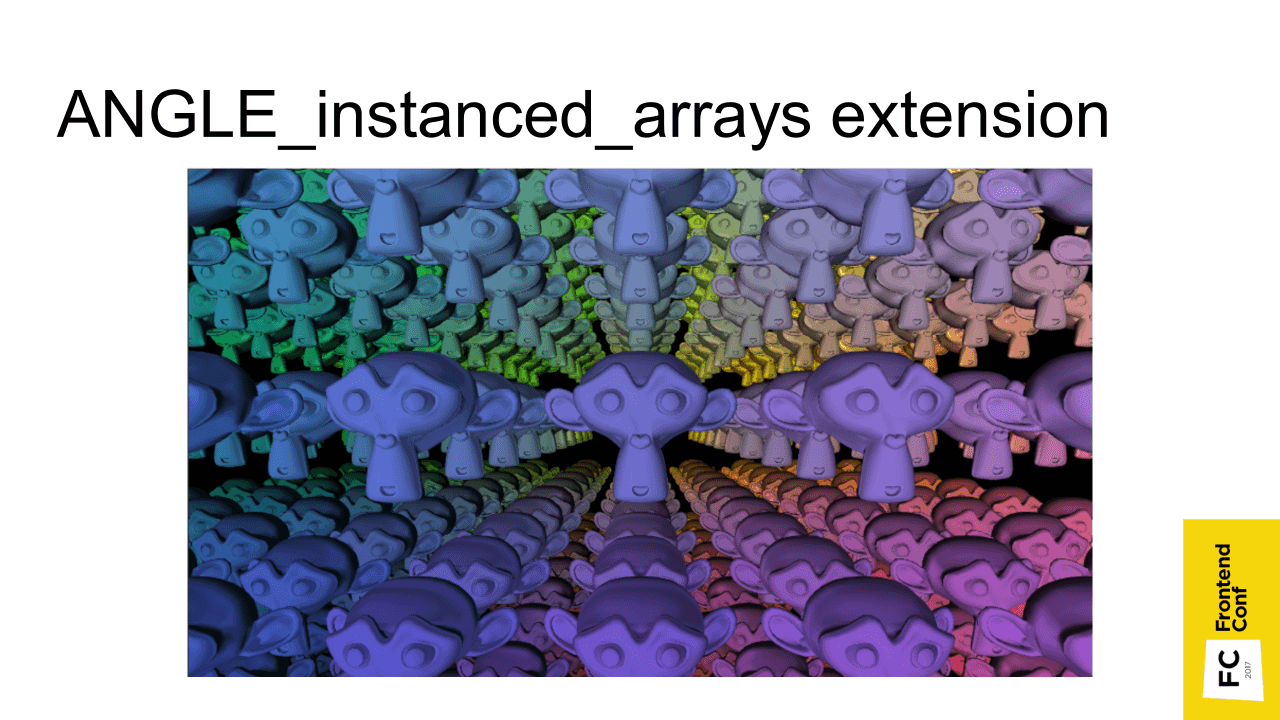
Instancing is included in the specification of WebGL 2, in the very first WebGL it is available through an extension that is supported and available in all modern browsers.
I'll try to explain how it works. Suppose, by default, there are 4 places in 4 different positions in 4 different colors. Usually we transfer this data through uniform - this is “variable”, which apply to the entire shader program. If these places are combined into one Batch, then the places will be the same color and be in one place crowded.
Therefore, to transfer exactly this data: color, position of places. need through attribute. This is a parameter that is transmitted for each vertex separately.
What you should know about Instancing:
- It greatly improves performance . If you have a lot of objects of the same type and everything slows down, most likely, it will give a big boost.
- But it is difficult . See examples from Three.js here .
The next problem you encounter is this picture (in Chrome). This usually happens when there is not enough video memory .
What can help?
Simplify model
When converting svg images to a three-dimensional object, Blender creates a lot of extra points. Objects are obtained, of course, well smoothed, but, most likely, this is not particularly visible. And every extra point is the consumption of video memory and a decrease in performance .
Texture optimization
Usually in three-dimensional games are used as low-poly models with a small number of triangles. To neutralize this, beautiful pictures are achieved by using a large number of textures. Unfortunately, this becomes a problem in the browser due to the fact that not much memory can be allocated under the tab and the tab will crash if it is not enough. Therefore, there are techniques to reduce the number of textures and their optimization.
One of their techniques involves combining several textures into one. Suppose if there are 3 black and white textures, they can be broken down into channels and merged into one: transfer the first texture to the red channel, second to the green and third - to the blue. It turns out that in the end all this will take 3 times less video memory.
Compressed textures
There are different formats: DXT, PVRTC, ETC, which allow you to make a texture of 1024 * 1024 in size on a video card to occupy video memory as a texture of 512 * 512, that is, 4 times less.
It would seem a steep profit, but there are big limitations:
- Different formats (DXT - supported only on the desktop, PVRTC - on iOS, ETC - on Android). In general, most likely, you will have to keep 4 different textures (for each format, and the fourth uncompressed) and check which format your system supports. If no formats are supported, then use the original uncompressed texture.
- Deterioration of the picture . The degree of distortion depends on the original image.
- Problems with transparency when artifacts appear on the border of a transparent area.
- Larger files (but gzip can be used). A completely black PNG image with a size of 1024 * 1024 is downloaded instantly, but on the video memory, each point will memory out. With compressed images, the opposite situation is observed - the texture file itself may weigh more, but it will take less space on the video memory.
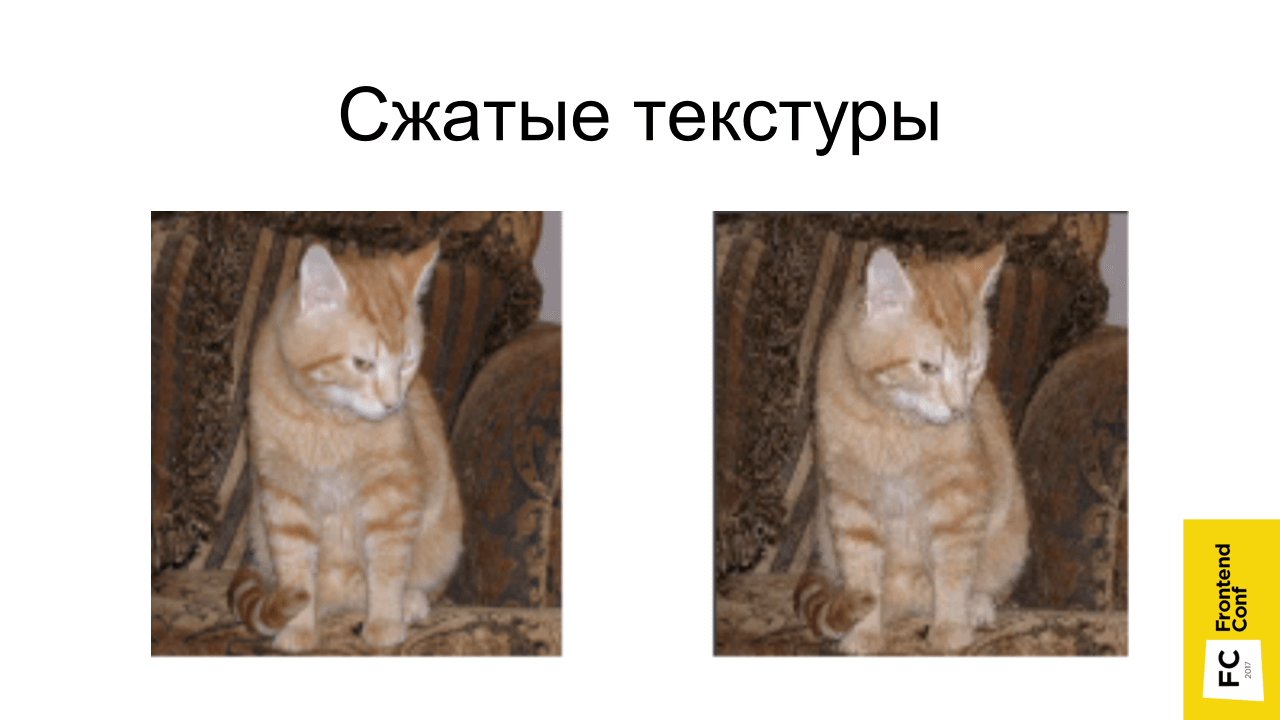
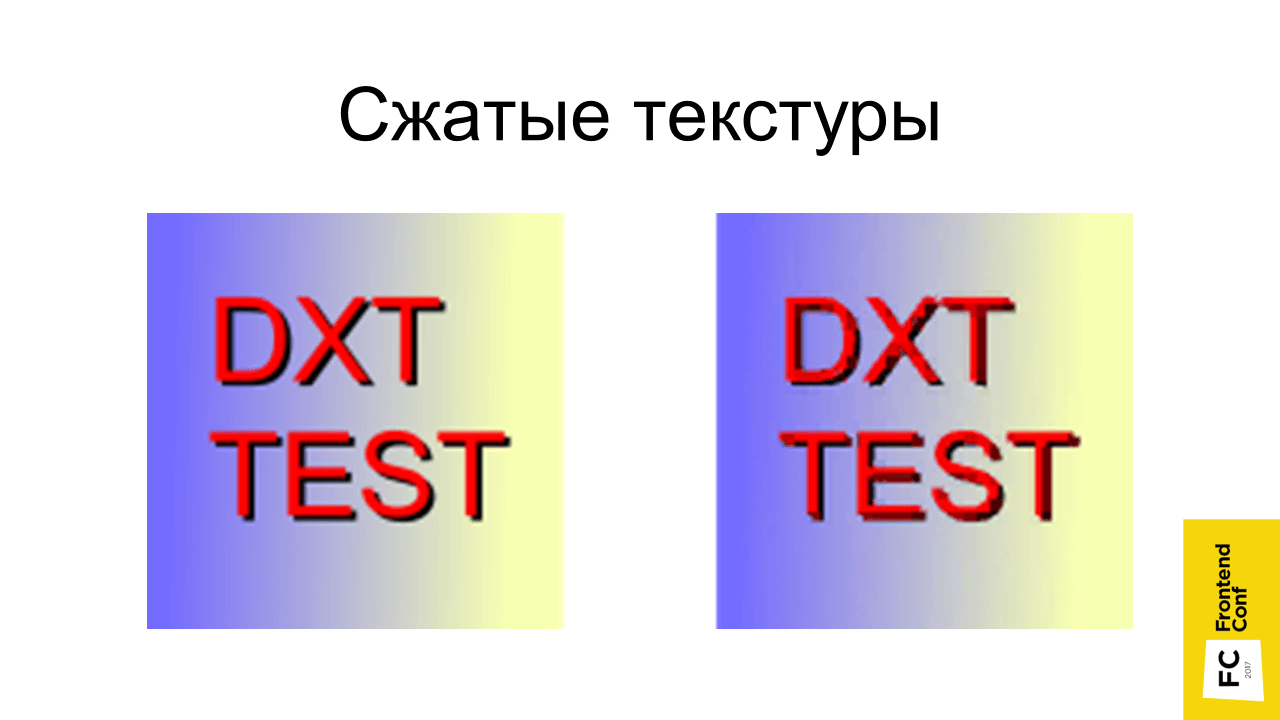
Regarding the quality of compressed textures - the cat did not suffer much from compression.
Artifacts are already visible on the textures of this type - the shadow merges with the inscription itself. But for variegated textures (like herbs) this is great.
The most important and useful advice - do not pursue realism ! Note that in indie games almost never have super-realistic graphics. She is sketchy - colorful, funny, but little poly men run around, but everything is fun and fun, works fast and requires less resources to develop.
The last thing I wanted to say. If you do 3D, do not do the project alone. Find companions. I did a project in the framework of the hackathon; I was helped by many good people. One is difficult, and when you are together, it motivates, and everything turns out faster.
Useful links:
✓ Course on three-dimensional graphics on Udacity
✓ The book “Programming of three-dimensional graphics”
✓ Examples of threejs
✓ Video about text rendering in WebGL ( slides )
✓ Video about WebGL performance ( article )
Contacts:
https://twitter.com/gc_s9k
s9k0@ya.ru
Time flies unnoticed, and quite a bit remains before the RIT ++ conference festival, we recall it will take place on May 28 and 29 in Skolkovo.Soon we will publish the program, but for now we are giving a small selection of FrontEnd Conf applications :
- Dmitry Shagarov (Tutmee Agency). Animation on the site - easy sauce or main course?
- (Coderiver).
- (Luxoft). Apollo GraphQL.
You can still book tickets, but do not forget, the price is steadily increasing.
Source: https://habr.com/ru/post/354980/
All Articles