Setting security for applications on the SAP Cloud Platform cloud platform
Our cloud platform SAP Cloud Platform has a whole set of embedded services. In this article we will focus on the security topic - we will look at the security services in the Neo environment, as well as the capabilities of the SAP Cloud Platform to ensure the security of the applications and services you have developed.
In this article we will discuss the following topics in order to better understand the capabilities of the SAP Cloud Platform security services, as well as what is meant by these or other terms:

')
Then we will look at a practical example on the free trial account of the SAP Cloud Platform - anyone can create it. In this section, we describe how the security configuration for an application works, depending on its execution environment (for example, HTML5 and Java).
The outline of our article on SAP Cloud Platform security services in the Neo environment:
(hereinafter - again a lot of text)
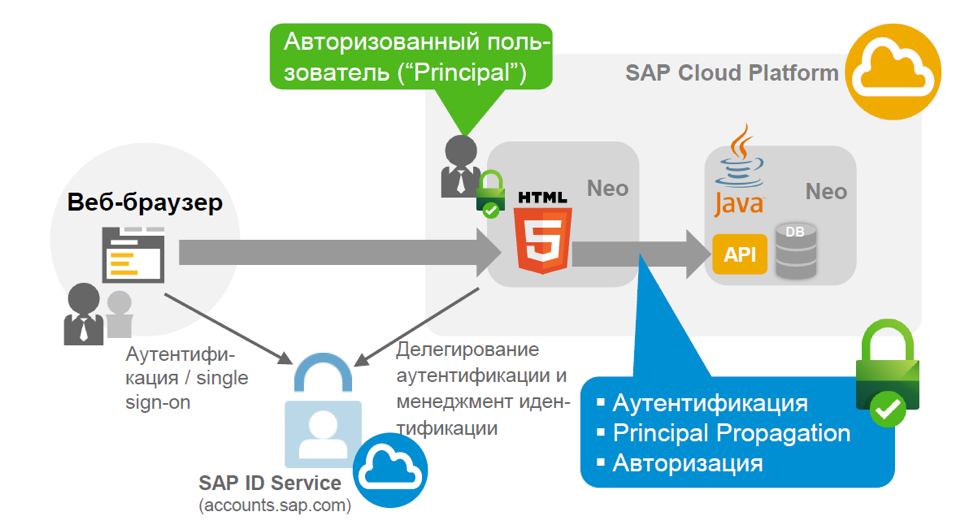
One of the key concepts of the SAP Cloud Platform is that authentication and authorization management in any scenario running on the platform is carried out through the so-called Identity Provider (IdP). This system is designed for secure user management. Users can be of different types - regular employees, administrators and others. The task of securely managing these users, especially securely managing their credentials, is often delegated to the identity provider. It provides identification information to applications that depend on it to secure the authentication and management of user accounts.

No one wants to keep track of thousands of user accounts, create new users and new passwords over and over. Most of us have a huge list of passwords and user accounts for various applications that we have to work with daily. Isn't it easier to centralize user management? This will allow you to reuse existing accounts. For this purpose, and there is an identity provider that securely stores the user account and manages it. The SAP Cloud Platform offers integration with any identity provider that you, as an application developer, want to use to manage user accounts.
For example, in a productive scenario, users are employees who use the new application based on the SAP Cloud Platform. In this case, the user's corporate directory is the identity provider.
For a B2C scenario, the user account can be a social network account - Twitter, Facebook, Google, etc. In this case, social networks take on the role of an identity provider.
The SAP Cloud Platform also offers an identity provider from SAP as an option. Therefore, if you want to get started quickly and you do not have an identification provider that allows you to quickly set up several accounts for testing, then you can always use the SAP ID service as a standard identification provider. It manages a fairly large number of user accounts for SAP. For example, the user of the SAP ID service is your trial account user in the SAP Cloud Platform or, if you are an SAP client, your S-user. However, SAP ID has some limitations from the point of view of the developer who wants to deploy the application on the SAP Cloud Platform platform and use this service as a provider. You cannot control the process of registering a user in the SAP ID and cannot simply remove a user from this user base, because this is an SAP user base.
So, the first option of the provider is the SAP ID:
SAP Online Identity Provider
If you want to have your own tenant with full control, then you can use the cloud identity provider, which is provided as part of the service in the SAP Cloud Platform and is called the Identity Authentication service. This service is similar to the SAP ID, but it is provided as your own tenant, which you as a customer can use to fully manage the user base in this tenant. You can also customize the look, user interfaces, place your own logo. And most importantly, you can control the level of security in terms of the password policy that you set for your tenant and for users in it. For example, if you use it for a client scenario, then the requirements may not be as strict as for employees who need to change their passwords every three months (or something like that). Thus, the integrated SAP Cloud Platform service is more functional in comparison with the free SAP ID. However, it is paid - on the free trial account Identity Autentification service will not be available.
The second option is Identity Authentication:

What if you need the ability to integrate with your existing corporate identity provider? In the SAP Cloud Platform, this is a prerequisite. In this scenario, both the SAP provider and third-party providers are supported — for example, Microsoft Active Directory. The only condition for integration with the selected provider is that it must be compatible with the SAML 2.0 security markup language, a well-known standard in this space. This protocol is supported not only by SAP, but also by almost any other identity provider.
In this way, you can very easily integrate the platform and your applications running on the SAP Cloud Platform with your identity provider.
The third option is a corporate identity provider:
Now consider the different types of users and options for using the identity provider depending on this.
In fact, there are almost no restrictions. There are two types of users: business users and platform users. This terminology can be found in almost any topic related to the SAP Cloud Platform. Business users are authorized as an end user for applications running on the SAP Cloud Platform. For example, if you use SuccessFactors, then you have a business user managing employee data. A private user who logs in, for example, through your Twitter account, can also be used as a business user. Thus, a business user is the end user.
Platform users are users who perform administrative tasks on the platform. There are far fewer such users compared to business users. Typically, they are the developers or administrators of your application and, as a rule, work with tools such as the control panel (Cloud Cockpit), the console client, or the Eclipse tools for interacting with the platform.
The figure below shows the options for the use of identity providers, depending on the type of user, as well as some recommendations.
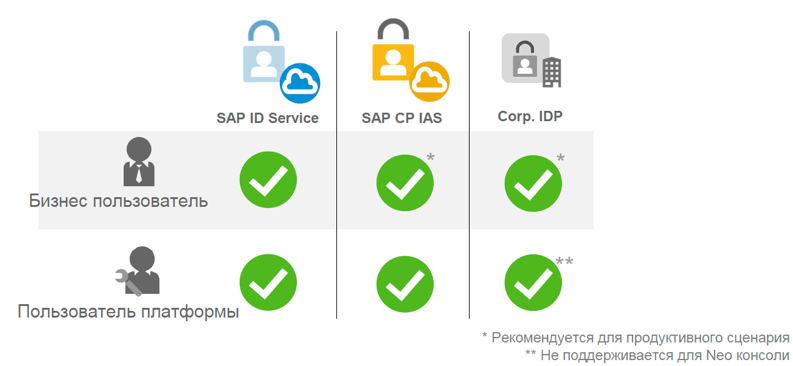
A business user can use the SAP ID service as a provider. However, for productive scenarios, it is recommended to use the SAP Cloud Platform Identity Authentication service or the corporate provider to have full control and use the SAP ID for testing.
The platform user can also use all three types of identity providers: SAP ID, SAP Cloud Platform Identity Authentication and your corporate IDP. But such a user has some restrictions on the use of corporate IDP: in this scenario, it will not be possible to use the console client for the Neo environment to authenticate users of the platform. As a result, you get a fairly rich set of options.
Now let's talk a little about authorization in the SAP Cloud Platform. If you are a user of the platform, then you are assigned roles at the platform level. In the Neo environment, these may be predefined roles — for administrators, developers, or support users. In the Neo SAP Cloud Platform environment, a set of predefined roles is provided, and if you, for example, use a productive account and are an administrator in it, you can assign any of these roles to your account participants. By the way, users of the platform are the members of the account. In the control panel there is a tab in the menu called “Members” (or “Participants”) - this is where you can add users to the platform and assign roles to them.

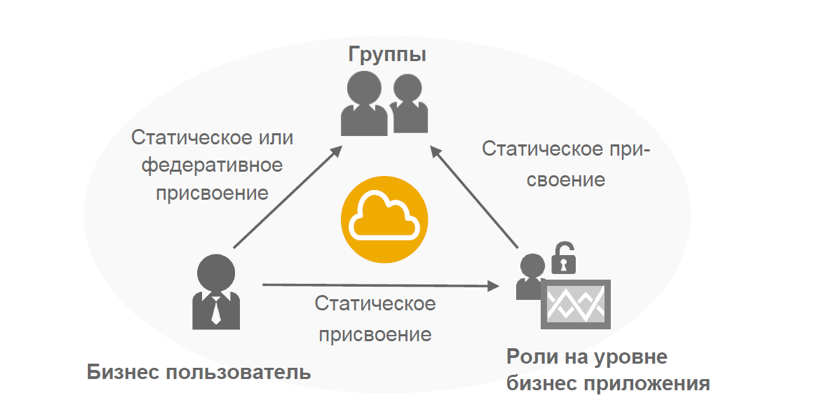
For business users, this process is a little different. You should be able to assign roles to thousands or even tens of thousands of business users. Here we are not talking about roles at the platform level, but about the roles defined by your business applications. To assign a role to a business user, you can log into the SAP Cloud Platform control panel through your user platform and “statically” add business users to those roles defined by business applications.
But imagine that at some point in time this model no longer scales, especially if you need to assign a huge number of business roles to an equally large number of business users. For this task in the Neo environment, you can use "groups". Basically, these groups cover one or several application roles in one object on the platform, and after adding a business user to such a group, the user is automatically assigned to all these business roles from the applications assigned to this group. You can use some properties that users can set here. For example, if users belong to a department that operates mainly in Moscow, then they should only see data from Moscow.
Thus, assigning roles to a business user through the settings of your application in the SAP Cloud Platform dashboard can only be done statically - this means that you assign the user with the identifier “abc” to the role “xyz”, and as long as you do not change (for example, delete the user ID), the role will be assigned.
Assigning a business user to a group can also be done statically — that is, you assign that user to the “abc” group, and then you will not have to assign each role separately. This can be done dynamically, i.e. based on an attribute that is shared by thousands or millions of business users. This attribute can be used in a runtime environment when a user is authorized in an application on the SAP Cloud Platform to assign a user to a group dynamically based on this attribute and its value.
For the administrator (platform user), this means that you do not need to perform actions to assign roles each time.
As soon as the attribute changes, and the value of these attributes of the union usually changes in the basic user base, then when the user logs on to the system, the next time the role is assigned or not, depending on the value of this attribute.
Part 2. Setting up security for HTML5 applications

Many users of the SAP Cloud Platform usually use HTML5 and Java to build their applications in the Neo environment. The implementation of the user interface of a business application with modern technology based on the Fiori and SAPUI5 libraries occurs in the HTML5 part of the application. More complex business logic can be in a backend system — for example, on a corporate network or a specific SAP system, usually implemented in Java. Both HTML5 and Java applications make sense if they interact with each other. Each of them implements different, but complementary functions.
In this part we will look at the HTML5 application. xProject is a simple project management application. For example, employees can use the application on the SAP Cloud Platform to manage projects and track time spent on various tasks in the enterprise.
If you are a member of a working group of a specific project, then this application should allow you to log in and record the time spent on various projects in the enterprise. There is also a group of users who are administrators in this application.
Thus, we have business users who are divided into two groups. There is also an HTML5 application that is used as an interface, and a Java application for the backend. In our case, the Java part of the application offers a RESTful API that uses the HTTP protocol to provide this business function to the component that wants to use it. Web applications offer APIs for the user interface, as well as for other customers who can use the business functionality offered by the Java part of the application.

Consider in detail the HTML5 application and authentication of business users. As we have already found out, we have a choice of identity providers. The concept of the SAP Cloud Platform is to delegate authentication to an identity provider. For this scenario, we will use the SAP ID as the identity provider, so the HTML5 application delegates the SAP ID authentication. We will consider end-user authentication, their authorization on the HTML5 side, and the process of obtaining specific user information by using user information from the SAP ID service in the HTML5 application. This makes it possible to read user attributes - for example, the user name. But the SAP ID service uses a limited set of attributes: first name, last name, email address, and display name. We can use these attributes on the HTML5 side for display to the user.
For testing, we need an HTML5 demo application called xProject, which can be found in the GitHub repository :.
Use the instruction in the README.md in this repository to download the application to the SAP Cloud Platform.
To create a trial account in the SAP Cloud Platform, follow the link . Then select “Neo Trial” as the medium on the home page (if a trial account is used) and go to the tab “Applications” -> “HTML5 Applications”. Next you need to implement the steps described in GitHub.
As a result, you get a running HTML5 application.

In the Web IDE, you can familiarize yourself with the code and functions responsible for the security of the application.
Go to the Web IDE and open the file "neo-app.json". This file is a deployment descriptor for HTML5 applications. It is here that properties are added to implement authorization, so that not every user is allowed to access applications, but only those who are project members or project managers in the xProject application.

Consider the code snippet of the “neo-app.json” file:
The first step is to identify the authentication methods. If you want to secure the HTML5 application in such a way that each individual source is protected, then you must use “SAML” as the authentication method, which is the first property in this snippet.
But, apparently, in our case "none" is used. This means that we also have publicly available sources in the script. Thus, if you have sources that should be accessible to everyone (for example, it can be the home page of the application), this is the parameter specified. In the event that you use “none” as an authentication method, then you also need to specify in the deployment descriptor file what exactly should be protected and accessible only to users belonging to a particular role. In our case, the application defines the path that precedes “protected” (therefore, it is written “/ protected /”), and everything under it should be accessible only to users who have a specific role.
In the HTML5 deployment descriptor, you specify this secure access by declaring a permission called Access Project Data. Later in the control panel (cockpit), we will assign a role to this permission, which can then be assigned to users through this path. But at the same time, this means that users who do not have this permission also get access to the application - but only to its public parts.
Now let's look at another code snippet, which is also presented in the neo-app.json file:
After logging into the application, you can also log out, and this property in the deployment descriptor is called “logoutPage”.
It determines what the page should be for redirecting the user after clicking on the exit button from the application. To ensure that your browser does not display the cached page after exit, you need to define the maximum period of "0" for these pages in HTML5. This means that they will not be cached. Otherwise, you may be faced with the fact that after clicking on “Logout” the user will not actually log out, because the browser will actually show you the cached page. Or the user will be logged out, but the page will display the information as if the user is still in it. A little later, we will look at how you can check whether this exit request is being executed and how this exit request can be traced in the browser.
Let's move on to the following code snippet, presented in the neo-app.json file:
After successful login, the user should see some data. As already mentioned, when using the SAP ID service, we only have a very limited set of available information about the user: first name, last name, and email address. To see them, you need to specify access to the API for HTML5 applications, which gives information about the user by writing the path "/ services / userapi" in the file "neo-app.json".
After that, you can use the JSON model, which refers to the specified path to access information about the current user. The JSON model uses data from the SAP ID service or any other identity provider and displays the user information in your HTML5 application.
Let's return to the SAP Cloud Platform control panel, where we can access the HTML5 application downloaded from GitHub and assign roles to users.
Go to the control panel environment Neo. Select "HTML5 Applications" in the "Applications" tab, then click on the application with the name "xproject". You will see a window with detailed information about the application:

In the Overview tab, find the description of the permissions for accessing the Application Permissions application. As you can see, here is the resolution described in the “neo-app.json” file with the name “accessProjectData”.

Now the permission “accessProjectData” is assigned by default to all users who have an account developer role. These are users who have such a role in the members section of your Members account at the platform level (there is no such tab in the trial account, because it can have only one participant and all possible roles have already been assigned to it).
Of course, you can not change anything - in this case, you as the account developer will have access to the application and the system. But we will do it a little differently and add our business role. Then we assign users to whom we want to give access.
To do this, go to the tab "Roles". As you can see, initially the list of roles is empty. Click on "New Role" to create a new business role.
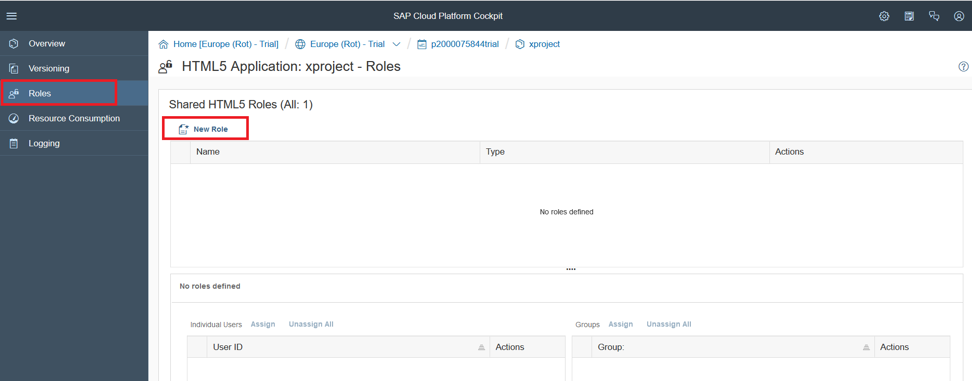
In the window that opens, enter the name of the role: “Employee” and save the changes.

Now you need to assign this role to the business user. To do this, click "Assign":

After that, a window will appear where you will need to enter a user ID.
Enter in the user ID field of another trial account. After assigning this business role to permissions, a user of another account in the Neo environment will have access to this application. And since the information about this user is stored in the SAP ID, we will use it in our scenario as an identification provider. We are similar to using its login credentials.
If you do not have a second trial account, you can create one and enter the user ID of this account in this field.
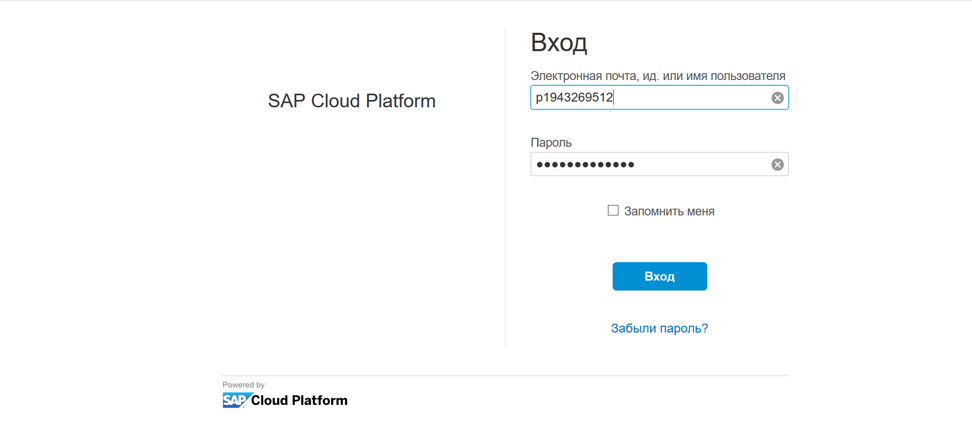
For example, the user id of my second account is p1943269512. I enter this data in the “User ID” field. Please note that the username must be entered without trial at the end.
Then you need to click "Assign".

This is how the page will look after assigning a user to the role “Employee”. As you can see, the user who will be allowed to access the application is different from the user under which we are in the control panel in the SCP where the application is deployed.

Now we need to go back to the “Overview” tab and assign the “Employee” business role to the “accessProjectData” permission. To do this, find the tab "Application Permissions" and click on "Edit" to edit.

Opposite the permission “accessProjectData”, select “Employee” instead of “AccountDeveloper” as the role and click “Save”.

Let's try to run the application. To do this, simply click on the link to the application in the Overview tab.

Please note that the application window must be opened in incognito mode; otherwise, when you try to log in, you can use the account information of the account where you deployed the application, and not the ones you specify. In this case, you will get the error "HTTP Status 403 - Forbidden".

You will see the initial page of the application, which is available to all users. To gain access to other resources that are under a secured path, you need to authenticate. When you click the Login button, this action will force the HTML5 runtime to redirect the user to the identity provider (in our case, this is the SAP ID).
Click on the "Login" button to log in:

In the window that appears, enter the name and password of the user that we added to the role “Employee”, and then click “Login”.
After successful login, we receive an error message about access to the backend, as well as red “Role not assigned” inscriptions. This happens because for the time being HTML5 does not interact with a Java application acting as a backend.

Thus, we logged in as a user to an HTML5 site, authenticated, and received permission to access this page. Obviously, the user information that was used to log in is now shared between the SAP ID service and the HTML5 application using the user interface API. The user information that you see in the welcome window comes from the SAP Service ID.
Now let's look at logging out using SAML tracing. You can open it in the Developer Tools section of Google Chrome or install and open it in Mozilla Firefox. Press the "Exit" button as an icon in the upper right of the screen.
Check if an exit request was sent in the SAML trace window.
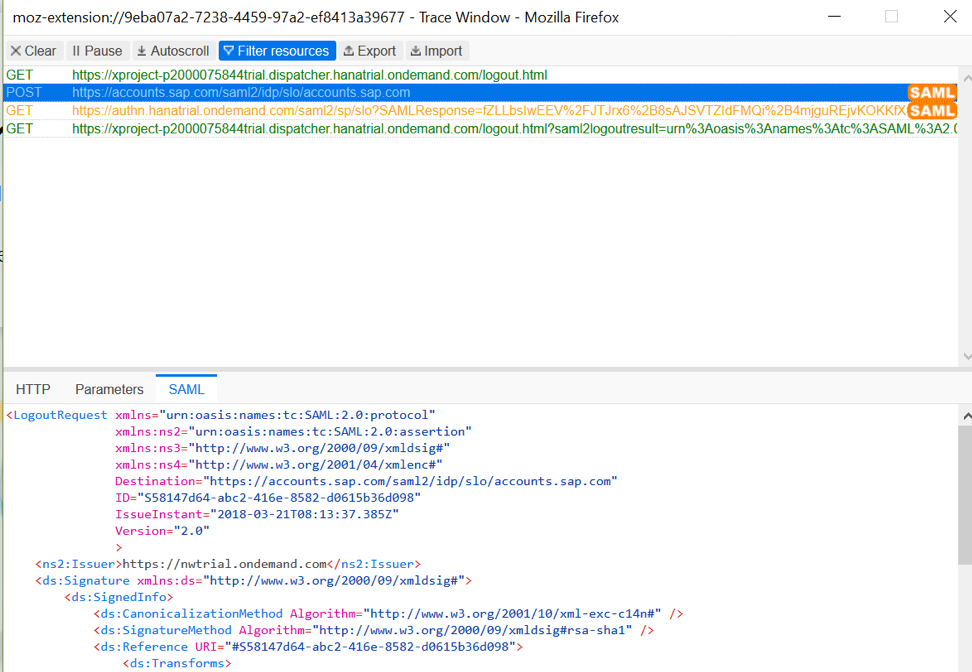
As can be seen from the SAML protocol, the request has been sent, which means you can be sure that you have logged out. If you now click "Login", then you will need to pass authentication again.
Part 3. Setting Security for Java Applications
The Java application contains business logic, cares about the integrity of our data and allows users to manage their projects and report the time they spent on these projects.
In the HTML5 application setup, we looked at end-user authentication and used the SAP ID service for this. As a result, we have an authenticated user, which should now be transferred to the Java part of our xProject application. And now we need to understand how the end user is authenticated in a Java application? How does an authenticated user, or a different "principal", gain access to the Java application from the user interface (from the HTML5 application)? When does a user interface use a Java application-related API to use Java business logic? And the main question: how to implement this mechanism for accessing Java via HTML5? This method is also called “Principal Propagation”.
Since the user gets access to the project data in this scenario, we need to apply a role-based authorization model in the Java application backend and implement the ability to set the user permission to view the data.
In the HTML5 application, our authorization model was pretty tough. We defined one permission, “accessProjectData”, to which the “Employee” business role was assigned, and we added a business user to this role. Thus, this user has access to the part of the user interface of the application after successful login using the SAP ID service.
Now we want to access our data, which is managed and stored on the side of the Java application of our application. We need to organize a more detailed concept of authorization using two roles.
Consider a script authorization model. When it comes to accessing data in the backend, we need to apply a more detailed authorization model, compared to the model on the HTML5 side. For our script, we use two different roles that are defined in Java. One is for project members, and the other is for project managers. Project participants can designate their time in projects that are assigned to them, and project managers in the application can also create new projects and execute the administrative part in a business application. Project managers can assign project participants, delete them, and so on. Thus, all administrative elements will be available only to users who are assigned the role of project manager, and the remaining elements - to project participants.

We need a Java demo application called xProject, which can be found in the GitHub repository .
Following the steps in README.md in this repository, upload this application to the SAP Cloud Platform through the Eclipse NEON development environment. Note that you will need to install the “SAP Cloud Platform Tools for Java” in Eclipse. To do this, go to the menu Help -> Install new Software ... in the window that opens, enter the URL tools.hana.ondemand.com/neon and install the necessary components.
Authentication requirements are typically specified in the deployment descriptor for setting up security for a Java application. Like the “neo-app.json” file for an HTML5 application, we also have a corresponding deployment descriptor for Java-based applications — it's called “web.xml”.
Referring to the source code of this application in Eclipse, to consider the authorization and authentication methods described in the aforementioned file "web.xml".
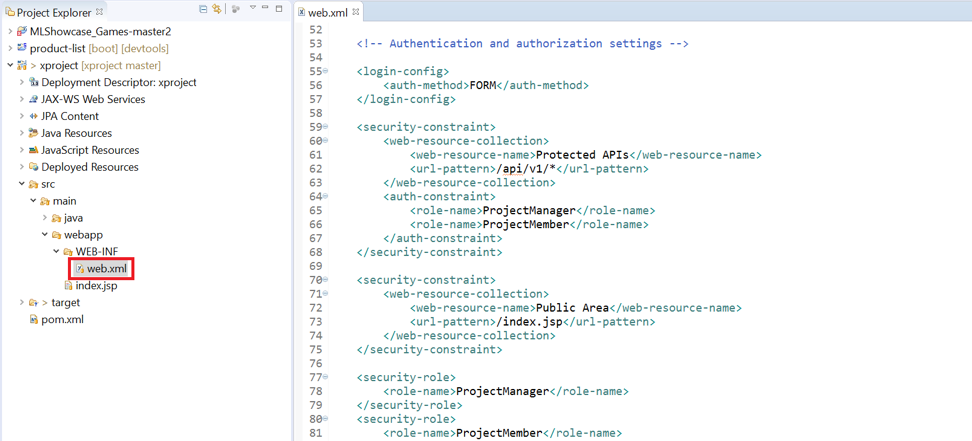
Its most important part is the login-config property, which describes the authentication method, i.e. What authentication mechanism should be used to authenticate your business users:
...
<login-config>
<auth-method> FORM </ auth-method>
</ login-config>
...
In our scenario, as can be seen from the fragment, the FORM method is used. FORM allows you to use SAML based authentication, since we always delegate authentication to the identity provider of your choice, compatible with SAML 2.0. The FORM method also describes “application-to-application SSO” or “single sign-on to the application”, which provides interaction between applications. Therefore, the input configuration must always be specified in “web.xml”.
To access the HTML5 component that calls the Java backend APIs, you need the following fragment in the same file:
These APIs are called through so-called “destinations” or “destinations”. You set up your destination whenever you make a call to a component that is on or outside the SAP Cloud Platform. That is, you need to specify the name of the destination in the application call component. In our case, this will be part of HTML5.
In the deployment descriptor “neo-app.json”, the path to the API for retrieving project data from the backend is configured as a destination that refers to a destination named “projectAPI”. Then we will use this name in the SAP Cloud Platform control panel when we create a destination. In fact, we will need two destinations: one to retrieve project data, and the other to get data for a schedule that people will watch through the application. These two items are necessary for an HTML5 application to successfully invoke a Java backend. They will be created in the SCP control panel so that the HTML5 application can understand which URLs will access the Java application. That's why we need to specify the actual URL and the technical endpoint of the URL API provided by the Java application.
HTML5, . - , – .
«web.xml»:
, Java-: . . «web.xml» Java .
SCP, . , , API- Java , , . , , — .
, SCP GitHub. SCP.
SAP Cloud Platform, . «Neo Trial» ( ) «Applications» -> «Java Applications».
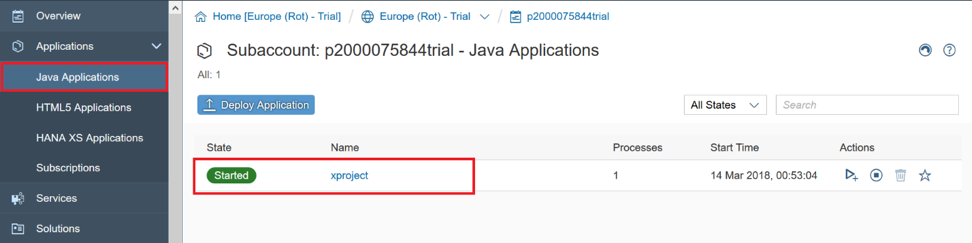
, Java- «xproject» SCP.
.
«Security» -> «Trust». , «Principal Propagation» « » . , «Edit».
«Principal Propagation» «Enabled», .
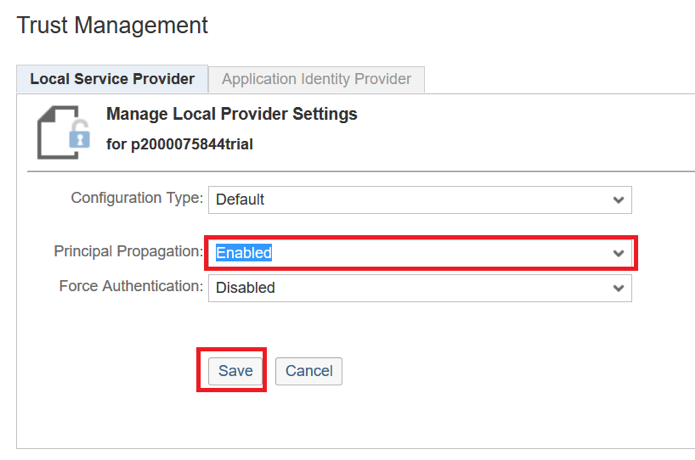
«Principal Propagation» . , , . , «Application-to-application SSO».
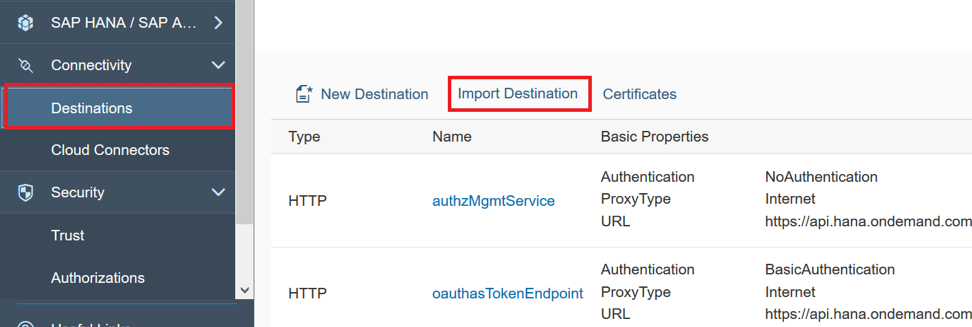
«Connectivity» -> «Destinations», . API-.
«projectAPI» «timesheetAPI» GitHub , .

«Import Destinations» .
«projectAPI».
URL : xprojectXYZ.hanatrial.ondemand.com/xproject/api/v1/web/projects .
«XYZ» . Java- «xproject», «Applications» -> «Java Applications».
«Overview» Java-. Here's what it looks like:
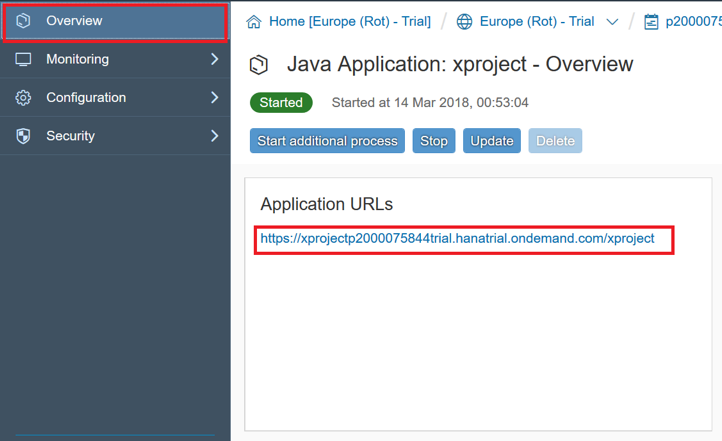
«api/v1/web/projects/». : xprojectp2000075844trial.hanatrial.ondemand.com/xproject/api/v1/web/projects .
URL «projectAPI», «Save».
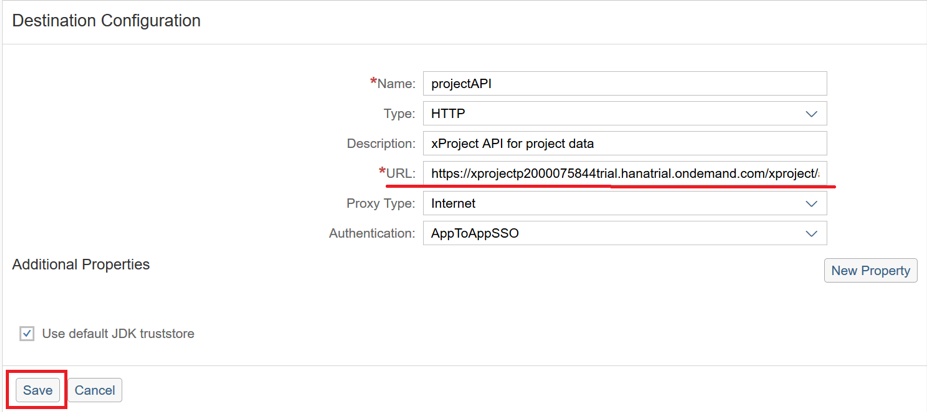
, «AppToAppSSO», «Principle Propagation».
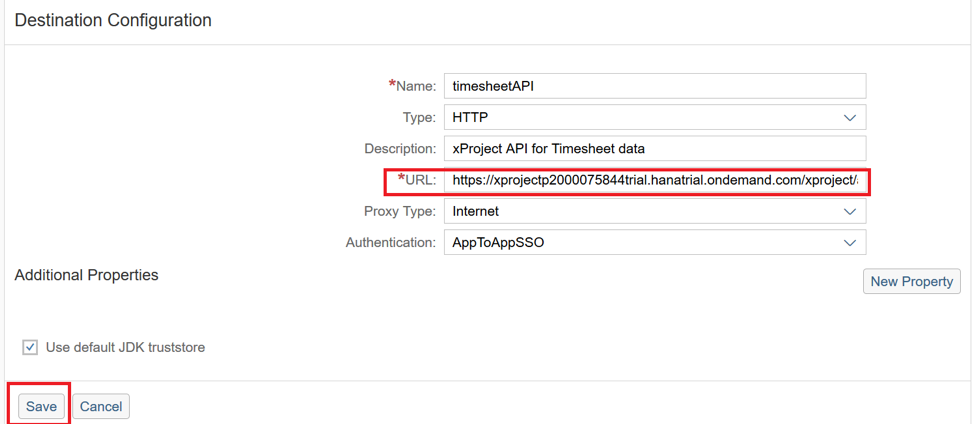
«timesheetAPI»: URL Java- «api/v1/web/timesheets/». :
xprojectp2000075844trial.hanatrial.ondemand.com/xproject/api/v1/web/timesheets .
URL «timesheetAPI» .
, HTML5- .
- Java-. , «Applications» -> «Java Applications», «xproject».
«Security» -> «Roles».
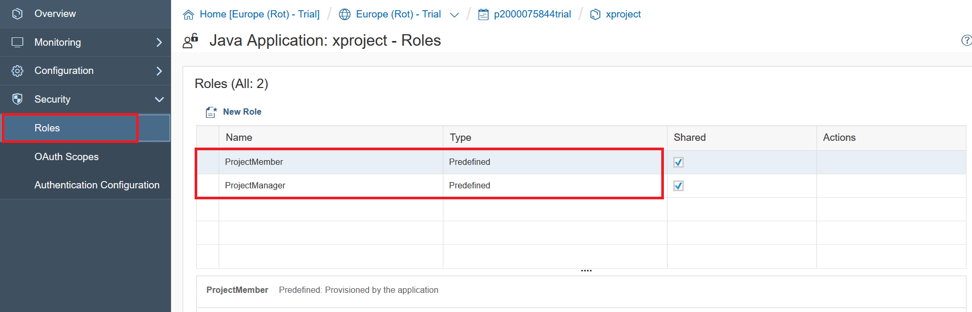
, , Java, «web.xml». , , «Predefined» «». , «Employee» HTML5 .
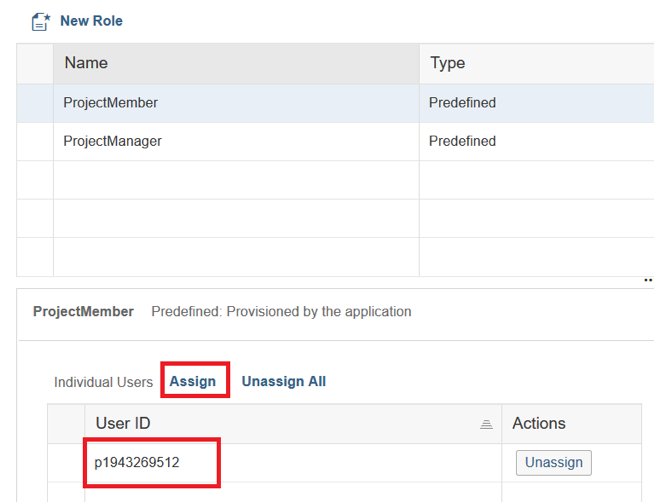
: «ProjectMember» , «Assign». «ProjectManager».
Done! . -.
HTML5 , «Applications» -> «HTML5 Applications», .
-.
«Login» , .

HTML5 . «Application-to-application SSO» , , HTML5 , Java. , Java , . , , . , . .
:
, . , .
, xProject, : HTML5 Java. , Neo SAP Cloud Platform.
HTML5, , , , , . . , , .
Java- , . «Principal Propagation», HTML5 Java . Java — , .
In this article we will discuss the following topics in order to better understand the capabilities of the SAP Cloud Platform security services, as well as what is meant by these or other terms:
- user authentication
- authorization management
- Securely transfer identification information between different environments and applications (“identity pooling” or identity federation)
- single sign-on technology on the SAP Cloud Platform
- security difference between business users and platform users
')
Then we will look at a practical example on the free trial account of the SAP Cloud Platform - anyone can create it. In this section, we describe how the security configuration for an application works, depending on its execution environment (for example, HTML5 and Java).
The outline of our article on SAP Cloud Platform security services in the Neo environment:
- Part 1 (theoretical) . Security Services Overview
- Part 2. Setting up security for HTML5 applications
- Part 3. Configuring Security for Java Applications
(hereinafter - again a lot of text)
Part 1. Overview of security services
One of the key concepts of the SAP Cloud Platform is that authentication and authorization management in any scenario running on the platform is carried out through the so-called Identity Provider (IdP). This system is designed for secure user management. Users can be of different types - regular employees, administrators and others. The task of securely managing these users, especially securely managing their credentials, is often delegated to the identity provider. It provides identification information to applications that depend on it to secure the authentication and management of user accounts.
No one wants to keep track of thousands of user accounts, create new users and new passwords over and over. Most of us have a huge list of passwords and user accounts for various applications that we have to work with daily. Isn't it easier to centralize user management? This will allow you to reuse existing accounts. For this purpose, and there is an identity provider that securely stores the user account and manages it. The SAP Cloud Platform offers integration with any identity provider that you, as an application developer, want to use to manage user accounts.
For example, in a productive scenario, users are employees who use the new application based on the SAP Cloud Platform. In this case, the user's corporate directory is the identity provider.
For a B2C scenario, the user account can be a social network account - Twitter, Facebook, Google, etc. In this case, social networks take on the role of an identity provider.
The SAP Cloud Platform also offers an identity provider from SAP as an option. Therefore, if you want to get started quickly and you do not have an identification provider that allows you to quickly set up several accounts for testing, then you can always use the SAP ID service as a standard identification provider. It manages a fairly large number of user accounts for SAP. For example, the user of the SAP ID service is your trial account user in the SAP Cloud Platform or, if you are an SAP client, your S-user. However, SAP ID has some limitations from the point of view of the developer who wants to deploy the application on the SAP Cloud Platform platform and use this service as a provider. You cannot control the process of registering a user in the SAP ID and cannot simply remove a user from this user base, because this is an SAP user base.
So, the first option of the provider is the SAP ID:
SAP Online Identity Provider
- Free service
- Default Identity Provider for Business Applications Running in Free SAP CP Trial Accounts
- Default Identity Provider for the SAP Cloud Platform control panel and console client
If you want to have your own tenant with full control, then you can use the cloud identity provider, which is provided as part of the service in the SAP Cloud Platform and is called the Identity Authentication service. This service is similar to the SAP ID, but it is provided as your own tenant, which you as a customer can use to fully manage the user base in this tenant. You can also customize the look, user interfaces, place your own logo. And most importantly, you can control the level of security in terms of the password policy that you set for your tenant and for users in it. For example, if you use it for a client scenario, then the requirements may not be as strict as for employees who need to change their passwords every three months (or something like that). Thus, the integrated SAP Cloud Platform service is more functional in comparison with the free SAP ID. However, it is paid - on the free trial account Identity Autentification service will not be available.
The second option is Identity Authentication:
- Cloud Identification Lifecycle Management Solution
- Recommended and pre-configured identity provider for a business application in a productive SAP Cloud Platform account
- Custom Identity Provider for SCP Control Panel and Console Client
- Paid service
What if you need the ability to integrate with your existing corporate identity provider? In the SAP Cloud Platform, this is a prerequisite. In this scenario, both the SAP provider and third-party providers are supported — for example, Microsoft Active Directory. The only condition for integration with the selected provider is that it must be compatible with the SAML 2.0 security markup language, a well-known standard in this space. This protocol is supported not only by SAP, but also by almost any other identity provider.
In this way, you can very easily integrate the platform and your applications running on the SAP Cloud Platform with your identity provider.
The third option is a corporate identity provider:
- Customizable identity provider for SAP CP business applications in any account (trial and production)
- Includes integration with corporate identity and access control (IAM)
- Prerequisite: SAML 2.0 compliance
Now consider the different types of users and options for using the identity provider depending on this.
In fact, there are almost no restrictions. There are two types of users: business users and platform users. This terminology can be found in almost any topic related to the SAP Cloud Platform. Business users are authorized as an end user for applications running on the SAP Cloud Platform. For example, if you use SuccessFactors, then you have a business user managing employee data. A private user who logs in, for example, through your Twitter account, can also be used as a business user. Thus, a business user is the end user.
Platform users are users who perform administrative tasks on the platform. There are far fewer such users compared to business users. Typically, they are the developers or administrators of your application and, as a rule, work with tools such as the control panel (Cloud Cockpit), the console client, or the Eclipse tools for interacting with the platform.
The figure below shows the options for the use of identity providers, depending on the type of user, as well as some recommendations.
A business user can use the SAP ID service as a provider. However, for productive scenarios, it is recommended to use the SAP Cloud Platform Identity Authentication service or the corporate provider to have full control and use the SAP ID for testing.
The platform user can also use all three types of identity providers: SAP ID, SAP Cloud Platform Identity Authentication and your corporate IDP. But such a user has some restrictions on the use of corporate IDP: in this scenario, it will not be possible to use the console client for the Neo environment to authenticate users of the platform. As a result, you get a fairly rich set of options.
Now let's talk a little about authorization in the SAP Cloud Platform. If you are a user of the platform, then you are assigned roles at the platform level. In the Neo environment, these may be predefined roles — for administrators, developers, or support users. In the Neo SAP Cloud Platform environment, a set of predefined roles is provided, and if you, for example, use a productive account and are an administrator in it, you can assign any of these roles to your account participants. By the way, users of the platform are the members of the account. In the control panel there is a tab in the menu called “Members” (or “Participants”) - this is where you can add users to the platform and assign roles to them.
For business users, this process is a little different. You should be able to assign roles to thousands or even tens of thousands of business users. Here we are not talking about roles at the platform level, but about the roles defined by your business applications. To assign a role to a business user, you can log into the SAP Cloud Platform control panel through your user platform and “statically” add business users to those roles defined by business applications.
But imagine that at some point in time this model no longer scales, especially if you need to assign a huge number of business roles to an equally large number of business users. For this task in the Neo environment, you can use "groups". Basically, these groups cover one or several application roles in one object on the platform, and after adding a business user to such a group, the user is automatically assigned to all these business roles from the applications assigned to this group. You can use some properties that users can set here. For example, if users belong to a department that operates mainly in Moscow, then they should only see data from Moscow.
Thus, assigning roles to a business user through the settings of your application in the SAP Cloud Platform dashboard can only be done statically - this means that you assign the user with the identifier “abc” to the role “xyz”, and as long as you do not change (for example, delete the user ID), the role will be assigned.
Assigning a business user to a group can also be done statically — that is, you assign that user to the “abc” group, and then you will not have to assign each role separately. This can be done dynamically, i.e. based on an attribute that is shared by thousands or millions of business users. This attribute can be used in a runtime environment when a user is authorized in an application on the SAP Cloud Platform to assign a user to a group dynamically based on this attribute and its value.
For the administrator (platform user), this means that you do not need to perform actions to assign roles each time.
As soon as the attribute changes, and the value of these attributes of the union usually changes in the basic user base, then when the user logs on to the system, the next time the role is assigned or not, depending on the value of this attribute.
Part 2. Setting up security for HTML5 applications
Many users of the SAP Cloud Platform usually use HTML5 and Java to build their applications in the Neo environment. The implementation of the user interface of a business application with modern technology based on the Fiori and SAPUI5 libraries occurs in the HTML5 part of the application. More complex business logic can be in a backend system — for example, on a corporate network or a specific SAP system, usually implemented in Java. Both HTML5 and Java applications make sense if they interact with each other. Each of them implements different, but complementary functions.
In this part we will look at the HTML5 application. xProject is a simple project management application. For example, employees can use the application on the SAP Cloud Platform to manage projects and track time spent on various tasks in the enterprise.
If you are a member of a working group of a specific project, then this application should allow you to log in and record the time spent on various projects in the enterprise. There is also a group of users who are administrators in this application.
Thus, we have business users who are divided into two groups. There is also an HTML5 application that is used as an interface, and a Java application for the backend. In our case, the Java part of the application offers a RESTful API that uses the HTTP protocol to provide this business function to the component that wants to use it. Web applications offer APIs for the user interface, as well as for other customers who can use the business functionality offered by the Java part of the application.
Consider in detail the HTML5 application and authentication of business users. As we have already found out, we have a choice of identity providers. The concept of the SAP Cloud Platform is to delegate authentication to an identity provider. For this scenario, we will use the SAP ID as the identity provider, so the HTML5 application delegates the SAP ID authentication. We will consider end-user authentication, their authorization on the HTML5 side, and the process of obtaining specific user information by using user information from the SAP ID service in the HTML5 application. This makes it possible to read user attributes - for example, the user name. But the SAP ID service uses a limited set of attributes: first name, last name, email address, and display name. We can use these attributes on the HTML5 side for display to the user.
For testing, we need an HTML5 demo application called xProject, which can be found in the GitHub repository :.
Use the instruction in the README.md in this repository to download the application to the SAP Cloud Platform.
To create a trial account in the SAP Cloud Platform, follow the link . Then select “Neo Trial” as the medium on the home page (if a trial account is used) and go to the tab “Applications” -> “HTML5 Applications”. Next you need to implement the steps described in GitHub.
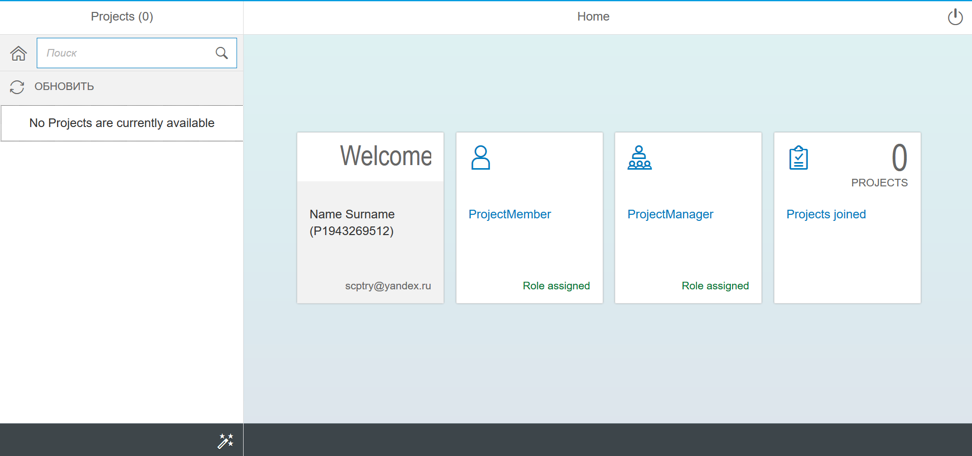
As a result, you get a running HTML5 application.
In the Web IDE, you can familiarize yourself with the code and functions responsible for the security of the application.
Go to the Web IDE and open the file "neo-app.json". This file is a deployment descriptor for HTML5 applications. It is here that properties are added to implement authorization, so that not every user is allowed to access applications, but only those who are project members or project managers in the xProject application.
Consider the code snippet of the “neo-app.json” file:
}
"authenticationMethod": "none",
...
"routes": […
],
"securityConstraints": [
{
"permission": "accessProjectData", "description": "Access Project Data", "protectedPaths": [
"/protected/"
]
}
],
...
}
The first step is to identify the authentication methods. If you want to secure the HTML5 application in such a way that each individual source is protected, then you must use “SAML” as the authentication method, which is the first property in this snippet.
But, apparently, in our case "none" is used. This means that we also have publicly available sources in the script. Thus, if you have sources that should be accessible to everyone (for example, it can be the home page of the application), this is the parameter specified. In the event that you use “none” as an authentication method, then you also need to specify in the deployment descriptor file what exactly should be protected and accessible only to users belonging to a particular role. In our case, the application defines the path that precedes “protected” (therefore, it is written “/ protected /”), and everything under it should be accessible only to users who have a specific role.
In the HTML5 deployment descriptor, you specify this secure access by declaring a permission called Access Project Data. Later in the control panel (cockpit), we will assign a role to this permission, which can then be assigned to users through this path. But at the same time, this means that users who do not have this permission also get access to the application - but only to its public parts.
Now let's look at another code snippet, which is also presented in the neo-app.json file:
}
...
"logoutPage": "/logout.html", ...
"cacheControl": [
{
"directive": "private",
"maxAge": 0,
"path": "/protected/*html"
},
...
}
After logging into the application, you can also log out, and this property in the deployment descriptor is called “logoutPage”.
It determines what the page should be for redirecting the user after clicking on the exit button from the application. To ensure that your browser does not display the cached page after exit, you need to define the maximum period of "0" for these pages in HTML5. This means that they will not be cached. Otherwise, you may be faced with the fact that after clicking on “Logout” the user will not actually log out, because the browser will actually show you the cached page. Or the user will be logged out, but the page will display the information as if the user is still in it. A little later, we will look at how you can check whether this exit request is being executed and how this exit request can be traced in the browser.
Let's move on to the following code snippet, presented in the neo-app.json file:
...
"routes": [
{
"path": "/services/userapi",
"target": {
"type": "service",
"name": "userapi"
}
},
...
After successful login, the user should see some data. As already mentioned, when using the SAP ID service, we only have a very limited set of available information about the user: first name, last name, and email address. To see them, you need to specify access to the API for HTML5 applications, which gives information about the user by writing the path "/ services / userapi" in the file "neo-app.json".
After that, you can use the JSON model, which refers to the specified path to access information about the current user. The JSON model uses data from the SAP ID service or any other identity provider and displays the user information in your HTML5 application.
Let's return to the SAP Cloud Platform control panel, where we can access the HTML5 application downloaded from GitHub and assign roles to users.
Go to the control panel environment Neo. Select "HTML5 Applications" in the "Applications" tab, then click on the application with the name "xproject". You will see a window with detailed information about the application:
In the Overview tab, find the description of the permissions for accessing the Application Permissions application. As you can see, here is the resolution described in the “neo-app.json” file with the name “accessProjectData”.
Now the permission “accessProjectData” is assigned by default to all users who have an account developer role. These are users who have such a role in the members section of your Members account at the platform level (there is no such tab in the trial account, because it can have only one participant and all possible roles have already been assigned to it).
Of course, you can not change anything - in this case, you as the account developer will have access to the application and the system. But we will do it a little differently and add our business role. Then we assign users to whom we want to give access.
To do this, go to the tab "Roles". As you can see, initially the list of roles is empty. Click on "New Role" to create a new business role.
In the window that opens, enter the name of the role: “Employee” and save the changes.
Now you need to assign this role to the business user. To do this, click "Assign":
After that, a window will appear where you will need to enter a user ID.
Enter in the user ID field of another trial account. After assigning this business role to permissions, a user of another account in the Neo environment will have access to this application. And since the information about this user is stored in the SAP ID, we will use it in our scenario as an identification provider. We are similar to using its login credentials.
If you do not have a second trial account, you can create one and enter the user ID of this account in this field.
For example, the user id of my second account is p1943269512. I enter this data in the “User ID” field. Please note that the username must be entered without trial at the end.
Then you need to click "Assign".
This is how the page will look after assigning a user to the role “Employee”. As you can see, the user who will be allowed to access the application is different from the user under which we are in the control panel in the SCP where the application is deployed.
Now we need to go back to the “Overview” tab and assign the “Employee” business role to the “accessProjectData” permission. To do this, find the tab "Application Permissions" and click on "Edit" to edit.
Opposite the permission “accessProjectData”, select “Employee” instead of “AccountDeveloper” as the role and click “Save”.
Let's try to run the application. To do this, simply click on the link to the application in the Overview tab.
Please note that the application window must be opened in incognito mode; otherwise, when you try to log in, you can use the account information of the account where you deployed the application, and not the ones you specify. In this case, you will get the error "HTTP Status 403 - Forbidden".
You will see the initial page of the application, which is available to all users. To gain access to other resources that are under a secured path, you need to authenticate. When you click the Login button, this action will force the HTML5 runtime to redirect the user to the identity provider (in our case, this is the SAP ID).
Click on the "Login" button to log in:
In the window that appears, enter the name and password of the user that we added to the role “Employee”, and then click “Login”.
After successful login, we receive an error message about access to the backend, as well as red “Role not assigned” inscriptions. This happens because for the time being HTML5 does not interact with a Java application acting as a backend.
Thus, we logged in as a user to an HTML5 site, authenticated, and received permission to access this page. Obviously, the user information that was used to log in is now shared between the SAP ID service and the HTML5 application using the user interface API. The user information that you see in the welcome window comes from the SAP Service ID.
Now let's look at logging out using SAML tracing. You can open it in the Developer Tools section of Google Chrome or install and open it in Mozilla Firefox. Press the "Exit" button as an icon in the upper right of the screen.
Check if an exit request was sent in the SAML trace window.
As can be seen from the SAML protocol, the request has been sent, which means you can be sure that you have logged out. If you now click "Login", then you will need to pass authentication again.
Part 3. Setting Security for Java Applications
The Java application contains business logic, cares about the integrity of our data and allows users to manage their projects and report the time they spent on these projects.
In the HTML5 application setup, we looked at end-user authentication and used the SAP ID service for this. As a result, we have an authenticated user, which should now be transferred to the Java part of our xProject application. And now we need to understand how the end user is authenticated in a Java application? How does an authenticated user, or a different "principal", gain access to the Java application from the user interface (from the HTML5 application)? When does a user interface use a Java application-related API to use Java business logic? And the main question: how to implement this mechanism for accessing Java via HTML5? This method is also called “Principal Propagation”.
Since the user gets access to the project data in this scenario, we need to apply a role-based authorization model in the Java application backend and implement the ability to set the user permission to view the data.
In the HTML5 application, our authorization model was pretty tough. We defined one permission, “accessProjectData”, to which the “Employee” business role was assigned, and we added a business user to this role. Thus, this user has access to the part of the user interface of the application after successful login using the SAP ID service.
Now we want to access our data, which is managed and stored on the side of the Java application of our application. We need to organize a more detailed concept of authorization using two roles.
Consider a script authorization model. When it comes to accessing data in the backend, we need to apply a more detailed authorization model, compared to the model on the HTML5 side. For our script, we use two different roles that are defined in Java. One is for project members, and the other is for project managers. Project participants can designate their time in projects that are assigned to them, and project managers in the application can also create new projects and execute the administrative part in a business application. Project managers can assign project participants, delete them, and so on. Thus, all administrative elements will be available only to users who are assigned the role of project manager, and the remaining elements - to project participants.
We need a Java demo application called xProject, which can be found in the GitHub repository .
Following the steps in README.md in this repository, upload this application to the SAP Cloud Platform through the Eclipse NEON development environment. Note that you will need to install the “SAP Cloud Platform Tools for Java” in Eclipse. To do this, go to the menu Help -> Install new Software ... in the window that opens, enter the URL tools.hana.ondemand.com/neon and install the necessary components.
Authentication requirements are typically specified in the deployment descriptor for setting up security for a Java application. Like the “neo-app.json” file for an HTML5 application, we also have a corresponding deployment descriptor for Java-based applications — it's called “web.xml”.
Referring to the source code of this application in Eclipse, to consider the authorization and authentication methods described in the aforementioned file "web.xml".
Its most important part is the login-config property, which describes the authentication method, i.e. What authentication mechanism should be used to authenticate your business users:
...
<login-config>
<auth-method> FORM </ auth-method>
</ login-config>
...
In our scenario, as can be seen from the fragment, the FORM method is used. FORM allows you to use SAML based authentication, since we always delegate authentication to the identity provider of your choice, compatible with SAML 2.0. The FORM method also describes “application-to-application SSO” or “single sign-on to the application”, which provides interaction between applications. Therefore, the input configuration must always be specified in “web.xml”.
To access the HTML5 component that calls the Java backend APIs, you need the following fragment in the same file:
"routes": [
...
{
"path": "/api/projects",
"target": {
"type": "destination",
"name": "projectAPI"
},
"description": "Project API"
},
...
],
...
These APIs are called through so-called “destinations” or “destinations”. You set up your destination whenever you make a call to a component that is on or outside the SAP Cloud Platform. That is, you need to specify the name of the destination in the application call component. In our case, this will be part of HTML5.
In the deployment descriptor “neo-app.json”, the path to the API for retrieving project data from the backend is configured as a destination that refers to a destination named “projectAPI”. Then we will use this name in the SAP Cloud Platform control panel when we create a destination. In fact, we will need two destinations: one to retrieve project data, and the other to get data for a schedule that people will watch through the application. These two items are necessary for an HTML5 application to successfully invoke a Java backend. They will be created in the SCP control panel so that the HTML5 application can understand which URLs will access the Java application. That's why we need to specify the actual URL and the technical endpoint of the URL API provided by the Java application.
HTML5, . - , – .
«web.xml»:
...
<security-role>
<role-name>ProjectManager</role-name>
</security-role>
<security-role>
<role-name>ProjectMember</role-name>
</security-role>
...
<security-constraint>
<web-resource-collection>
<web-resource-name>Protected APIs</web-resource-name>
<url-pattern>/api/v1/*</url-pattern>
</web-resource-collection>
<auth-constraint>
<role-name>ProjectManager</role-name>
<role-name>ProjectMember</role-name>
</auth-constraint>
</security-constraint>
...
, Java-: . . «web.xml» Java .
SCP, . , , API- Java , , . , , — .
, SCP GitHub. SCP.
SAP Cloud Platform, . «Neo Trial» ( ) «Applications» -> «Java Applications».
, Java- «xproject» SCP.
.
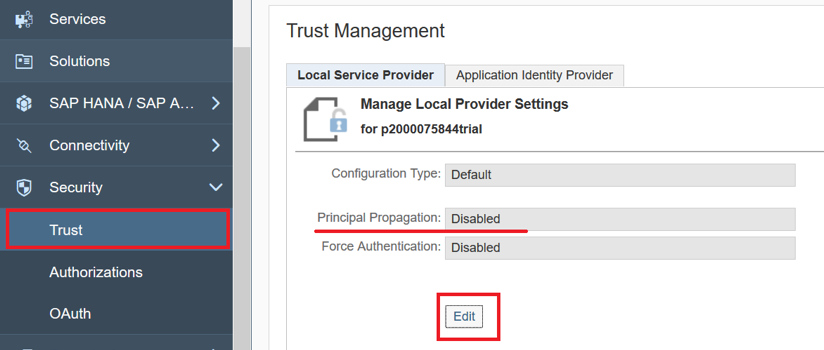
«Security» -> «Trust». , «Principal Propagation» « » . , «Edit».
«Principal Propagation» «Enabled», .
«Principal Propagation» . , , . , «Application-to-application SSO».
«Connectivity» -> «Destinations», . API-.
«projectAPI» «timesheetAPI» GitHub , .
«Import Destinations» .
«projectAPI».
URL : xprojectXYZ.hanatrial.ondemand.com/xproject/api/v1/web/projects .
«XYZ» . Java- «xproject», «Applications» -> «Java Applications».
«Overview» Java-. Here's what it looks like:
«api/v1/web/projects/». : xprojectp2000075844trial.hanatrial.ondemand.com/xproject/api/v1/web/projects .
URL «projectAPI», «Save».
, «AppToAppSSO», «Principle Propagation».
«timesheetAPI»: URL Java- «api/v1/web/timesheets/». :
xprojectp2000075844trial.hanatrial.ondemand.com/xproject/api/v1/web/timesheets .
URL «timesheetAPI» .
, HTML5- .
- Java-. , «Applications» -> «Java Applications», «xproject».
«Security» -> «Roles».
, , Java, «web.xml». , , «Predefined» «». , «Employee» HTML5 .
: «ProjectMember» , «Assign». «ProjectManager».
Done! . -.
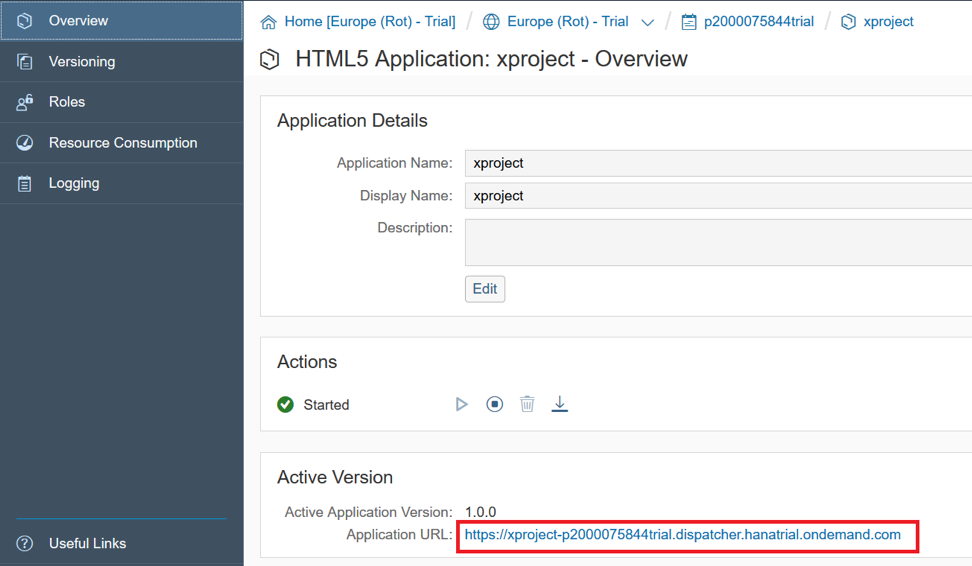
HTML5 , «Applications» -> «HTML5 Applications», .
-.
«Login» , .
HTML5 . «Application-to-application SSO» , , HTML5 , Java. , Java , . , , . , . .
:
, . , .
Conclusion
, xProject, : HTML5 Java. , Neo SAP Cloud Platform.
HTML5, , , , , . . , , .
Java- , . «Principal Propagation», HTML5 Java . Java — , .
Source: https://habr.com/ru/post/354914/
All Articles