ReactiveValidation: data validation in WPF
Hello, Habr!
I would like to talk about the Open Source library for WPF - ReactiveValidation, in the process of writing which I tried to focus on FluentValidation and Reactive UI. Its task is to validate the form each time the user changes the data inside it.
An example of working with the library. Good news - you can use your template
')
The main features of the library:
In the development process, I tried to focus on FluentValidation, so the syntax is easily recognizable. However, there are differences: something was adapted to the task, something was not implemented, but first things first.
All information about the state of the object is stored in the property Validator, which is formed using rules. Let's consider its creation on the example of machine properties:
This example is very similar to the one that offers FluentValidation, so I hope that it does not need comments. I focus on the fact that the validator is an internal object in relation to the ViewModel, and is finally built no earlier than in the constructor.
To be able to display errors in the user interface, you need to connect the resource dictionary from the library (containing the ControlTemplate by default) and, preferably, create a style (have to do this for each type of control) and redefine the Attached property inside it ReactiveValidation.AutoRefreshErrorTemplate and ReactiveValidation.ErrorTemplate, as shown in the example:
This code is most conveniently placed in App.xaml, where it will be available to the entire application.
I think the reasons for adding a ControlTemplate are obvious. But the properties may cause confusion. Unfortunately, the standard Validation from WPF contains many problems that lead to incorrect display of the error pattern (used when the property is valid and vice versa). To avoid this, a handful of crutches were written that work through the attached properties.
It remains only to apply the style to the controls and everything will work:
If everything is collected, we get the following simple application:
As you fill the fields, the red triangle will disappear, indicating an error:
Message text and localization
In applications where there is no need to use localization, you can use the usual static strings. Below is an example to change the entire message text for a property validator:
To specify the display name of the property, you can use the DisplayName attribute (from the namespace ReactiveValidation.Attributes)
To localize messages, the ResourceManager class is used, which is created along with the resources. By creating two files Default.resx and Default.ru.resx, you can provide support for two languages.
For convenience, using the static class, you can set the default resource manager - for this, it is enough to assign its value to ValidationOptions.LanguageManager.DefaultResourceManager. However, it is possible to use another resource manager. All of the above is demonstrated in this example:
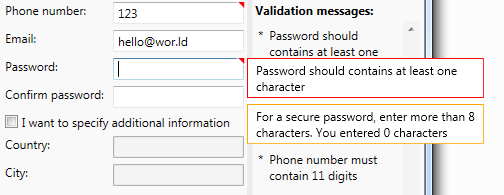
If the Email or PhoneNumber value is empty, a message will be displayed from the default resource with the PhoneNumberOrEmailRequired key. In addition, the mail must satisfy the regular expression, and if there is a mismatch, the message will be output from the Additional resource with the NotValidEmail key.
To localize the displayed names, you need to use the attribute and pass the DisplayNameKey and ResourceType to override the resource (you cannot use the ResourceManager for the attributes, so its type is used):
Culture is taken from CultureInfo.CurrentUICulture for localization. In addition, it is possible to override it with the help of ValidationOptions.LanguageManager.CurrentCulture. By default, the text of the messages does not change when the culture is changed, however, this behavior can be enabled using the ValidationOptions.LanguageManager.TrackCultureChanged option, and a number of features should be taken into account:
In addition, it does not make sense to include this behavior if the localization change in the interface is not supported.
Additional features:
What I would like to say:
Source code available on GitHub, MIT license
In addition, you can download from Nuget
Projects mentioned in the article:
I would like to thank my adeptuss and @baisel colleagues.
for helping to develop the first version of the project.
And also @truetanchik for patience and error correction.
I would like to talk about the Open Source library for WPF - ReactiveValidation, in the process of writing which I tried to focus on FluentValidation and Reactive UI. Its task is to validate the form each time the user changes the data inside it.
An example of working with the library. Good news - you can use your template
')
The main features of the library:
- Rules are created via the fluent interface.
- Full internal control over property changes
- Localization support (including on-the-fly)
- GUI message display
Reasons for creating
There is an application on WPF that receives data from the user and sends it to the server. The server, in turn, calls the database stored procedures. A complete check of the validity of the input data is implemented in the code of the stored procedure, so the user, passing incorrect parameters, is guaranteed to receive an exception with a message (it will be returned to the application and displayed). Obviously, we can predict some of the exceptions on the client, and we must process them there. At the beginning we used the following constructions:
The disadvantages of this option include:
The next step was the implementation of validation through annotation attributes (DataAnnotations) and the use of IDataErrorInfo. The result is the following code:
BaseViewModel implements a mechanism that, through reflection (reflection), obtains a list of properties and their validation attributes. When a property is changed, the check of all attributes is called, and the results are written to the dictionary. When calling the indexer
This approach greatly simplified the most frequent use cases of validation - checking the required values, comparisons with constants, and so on. The implementation of the IDataErrorInfo interface allows displaying non-valid fields in the GUI. It is also possible to block the execution button until the user completes all the fields correctly. In this form, the work of the library completely suited us, but then we got properties dependent on each other ...
The very example I gave above illustrates this problem. If the test uses two values that may change, then when one changes, it is necessary to revalue and another. The mechanism I described above did not support this, which in some places caused the code to crack from crutches supporting it all in working condition (I did not give them in the example, but they are based on calls of a PropertyChanged of another property with looping control). Listening to the advice of my colleagues, I wrote a new mechanism that corrected the aforementioned deficiencies, after which there was a desire to use it without a twinge of conscience in other projects not related to work. That is why I wanted to rewrite all the code from scratch, given the errors of the original designand adding new ones .
private override void Execute() { if(string.IsNullOrEmpty(Property1) == true) { MessageBox.Show(" Property1"); return; } if(Property2 < Property3) { MessageBox.Show("Property2 Property3"); return; } ... // do(); } The disadvantages of this option include:
- Excess code
- User interaction only through pop-ups
The next step was the implementation of validation through annotation attributes (DataAnnotations) and the use of IDataErrorInfo. The result is the following code:
public class ViewModel : BaseViewModel { [IsRequired] public string Property1 { get {...} set {...} } [CustomValidation(typeof(ViewModel), nameof(ValidateProperty2))] public int? Property2 { get {...} set {...} } public int? Property3 { get {...} set {...} } [UsedImplicitly] public static ValidationResult ValidateProperty2(int? property2, ValidationContext validationContext) { var viewModel = (ViewModel)validationContext.ObjectInstance; if (viewModel.Property2 < viewModel.Property3) { return new ValidationResult("Property2 Property3"); } return ValidationResult.Success; } } BaseViewModel implements a mechanism that, through reflection (reflection), obtains a list of properties and their validation attributes. When a property is changed, the check of all attributes is called, and the results are written to the dictionary. When calling the indexer
string this[string columnName] from the IDataErrorInfo interface, these values are returned (message concatenation).This approach greatly simplified the most frequent use cases of validation - checking the required values, comparisons with constants, and so on. The implementation of the IDataErrorInfo interface allows displaying non-valid fields in the GUI. It is also possible to block the execution button until the user completes all the fields correctly. In this form, the work of the library completely suited us, but then we got properties dependent on each other ...
The very example I gave above illustrates this problem. If the test uses two values that may change, then when one changes, it is necessary to revalue and another. The mechanism I described above did not support this, which in some places caused the code to crack from crutches supporting it all in working condition (I did not give them in the example, but they are based on calls of a PropertyChanged of another property with looping control). Listening to the advice of my colleagues, I wrote a new mechanism that corrected the aforementioned deficiencies, after which there was a desire to use it without a twinge of conscience in other projects not related to work. That is why I wanted to rewrite all the code from scratch, given the errors of the original design
In the development process, I tried to focus on FluentValidation, so the syntax is easily recognizable. However, there are differences: something was adapted to the task, something was not implemented, but first things first.
All information about the state of the object is stored in the property Validator, which is formed using rules. Let's consider its creation on the example of machine properties:
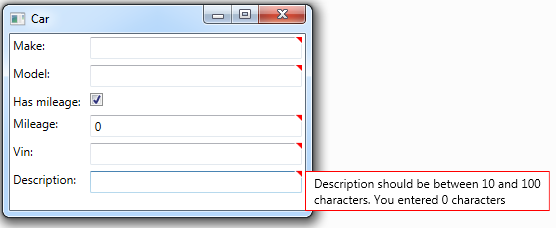
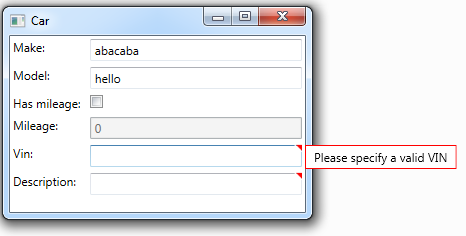
public class CarViewModel : ValidatableObject { public CarViewModel() { Validator = GetValidator(); } private IObjectValidator GetValidator() { var builder = new ValidationBuilder<CarViewModel>(); builder.RuleFor(vm => vm.Make).NotEmpty(); builder.RuleFor(vm => vm.Model).NotEmpty().WithMessage("Please specify a car model"); builder.RuleFor(vm => vm.Mileage).GreaterThan(0).When(model => model.HasMileage); builder.RuleFor(vm => vm.Vin).Must(BeAValidVin).WithMessage("Please specify a valid VIN"); builder.RuleFor(vm => vm.Description).Length(10, 100); return builder.Build(this); } private bool BeAValidVin(string vin) { // VIN } // INotifyPropertyChanged } This example is very similar to the one that offers FluentValidation, so I hope that it does not need comments. I focus on the fact that the validator is an internal object in relation to the ViewModel, and is finally built no earlier than in the constructor.
To be able to display errors in the user interface, you need to connect the resource dictionary from the library (containing the ControlTemplate by default) and, preferably, create a style (have to do this for each type of control) and redefine the Attached property inside it ReactiveValidation.AutoRefreshErrorTemplate and ReactiveValidation.ErrorTemplate, as shown in the example:
xmlns:b="clr-namespace:ReactiveValidation.WPF.Behaviors;assembly=ReactiveValidation" ... <ResourceDictionary> <ResourceDictionary.MergedDictionaries> <ResourceDictionary Source="/ReactiveValidation;component/WPF/Themes/Generic.xaml" /> </ResourceDictionary.MergedDictionaries> <Style x:Key="TextBox" TargetType="TextBox"> <Setter Property="b:ReactiveValidation.AutoRefreshErrorTemplate" Value="True" /> <Setter Property="b:ReactiveValidation.ErrorTemplate" Value="{StaticResource ValidationErrorTemplate}" /> <!-- Margin --> <Setter Property="Margin" Value="3" /> </Style> </ResourceDictionary> This code is most conveniently placed in App.xaml, where it will be available to the entire application.
I think the reasons for adding a ControlTemplate are obvious. But the properties may cause confusion. Unfortunately, the standard Validation from WPF contains many problems that lead to incorrect display of the error pattern (used when the property is valid and vice versa). To avoid this, a handful of crutches were written that work through the attached properties.
It remains only to apply the style to the controls and everything will work:
<TextBlock Grid.Row="0" Grid.Column="0" Margin="3" Text="Make: " /> <TextBox Grid.Row="0" Grid.Column="1" Style="{StaticResource TextBox}" Text="{Binding Make, Mode=TwoWay, UpdateSourceTrigger=PropertyChanged}" /> <TextBlock Grid.Row="1" Grid.Column="0" Margin="3" Text="Model: " /> <TextBox Grid.Row="1" Grid.Column="1" Style="{StaticResource TextBox}" Text="{Binding Model, Mode=TwoWay, UpdateSourceTrigger=PropertyChanged}" /> <TextBlock Grid.Row="2" Grid.Column="0" Margin="3" Text="Has mileage: " /> <CheckBox Grid.Row="2" Grid.Column="1" Margin="3" IsChecked="{Binding HasMileage, Mode=TwoWay, UpdateSourceTrigger=PropertyChanged}" /> <TextBlock Grid.Row="3" Grid.Column="0" Margin="3" Text="Mileage: " /> <TextBox Grid.Row="3" Grid.Column="1" Style="{StaticResource TextBox}" IsEnabled="{Binding HasMileage}" Text="{Binding Mileage, Mode=TwoWay, UpdateSourceTrigger=PropertyChanged}" /> <TextBlock Grid.Row="4" Grid.Column="0" Margin="3" Text="Vin: " /> <TextBox Grid.Row="4" Grid.Column="1" Style="{StaticResource TextBox}" Text="{Binding Vin, Mode=TwoWay, UpdateSourceTrigger=PropertyChanged}" /> <TextBlock Grid.Row="5" Grid.Column="0" Margin="3" Text="Description: " /> <TextBox Grid.Row="5" Grid.Column="1" Style="{StaticResource TextBox}" Text="{Binding Description, Mode=TwoWay, UpdateSourceTrigger=PropertyChanged}" /> If everything is collected, we get the following simple application:
As you fill the fields, the red triangle will disappear, indicating an error:
Message text and localization
In applications where there is no need to use localization, you can use the usual static strings. Below is an example to change the entire message text for a property validator:
builder.RuleFor(vm => vm.PhoneNumber) .NotEmpty() .When(vm => Email, email => string.IsNullOrEmpty(email) == true) .WithMessage("You need to specify a phone or email") .Matches(@"^\d{11}$") .WithMessage("Phone number must contain 11 digits"); To specify the display name of the property, you can use the DisplayName attribute (from the namespace ReactiveValidation.Attributes)
[DisplayName(DisplayName = "Minimal amount")] public int MinAmount { get; set; } To localize messages, the ResourceManager class is used, which is created along with the resources. By creating two files Default.resx and Default.ru.resx, you can provide support for two languages.
For convenience, using the static class, you can set the default resource manager - for this, it is enough to assign its value to ValidationOptions.LanguageManager.DefaultResourceManager. However, it is possible to use another resource manager. All of the above is demonstrated in this example:
builder.RuleFor(vm => vm.Email) .NotEmpty() .When(vm => PhoneNumber, phoneNumber => string.IsNullOrEmpty(phoneNumber) == true) .WithLocalizedMessage(nameof(Resources.Default.PhoneNumberOrEmailRequired)) .Matches(@"^\w+@\w+.\w+$") .WithLocalizedMessage(Resources.Additional.ResourceManager, nameof(Resources.Additional.NotValidEmail)); If the Email or PhoneNumber value is empty, a message will be displayed from the default resource with the PhoneNumberOrEmailRequired key. In addition, the mail must satisfy the regular expression, and if there is a mismatch, the message will be output from the Additional resource with the NotValidEmail key.
To localize the displayed names, you need to use the attribute and pass the DisplayNameKey and ResourceType to override the resource (you cannot use the ResourceManager for the attributes, so its type is used):
[DisplayName(DisplayNameKey = nameof(Resources.Default.PhoneNumber))] public string PhoneNumber { get; set; } [DisplayName(ResourceType = typeof(Resources.Additional), DisplayNameKey = nameof(Resources.Additional.Email))] public string Email { get; set; } Culture is taken from CultureInfo.CurrentUICulture for localization. In addition, it is possible to override it with the help of ValidationOptions.LanguageManager.CurrentCulture. By default, the text of the messages does not change when the culture is changed, however, this behavior can be enabled using the ValidationOptions.LanguageManager.TrackCultureChanged option, and a number of features should be taken into account:
- The change of localization “on the fly” is based on the fact that within the ValidationMessage class there is a subscription to an event of the LanguageManager class.
- Subscription occurs only if the TrackCultureChanged property is true. Therefore, it should be asked only once - at the start of the application and no longer change.
- If culture is changed using CultureInfo.CurrentUICulture, after changing it, you need to call the ValidationOptions.LanguageManager.OnCultureChanged () method
In addition, it does not make sense to include this behavior if the localization change in the interface is not supported.
Additional features:
- There are 2 main types of messages: errors (Error) and warnings (Warining). Warnings are also displayed on the GUI (only in orange), but the model is considered valid. In addition, there is a gradation of ordinary / simple (Simple). Regular messages are shown when focusing or hovering the cursor on a control, while simple messages are displayed only when hovering.
- The rules are based on extensions-methods, so you can easily extend them with your own validators.
- The basic interface required for the object being validated is IValidatableObject. In the library there is an implementation ValidatableObject based on INPC. You can easily define your own base class with this interface, since its implementation contains a bit of code (the project shows examples with the redefinition from ReactiveObject from Reactive UI)
- If a property inherited from INotifyPropertyChanged or INotifyCollectionChanged is validated, then special adapter classes monitor their call, initiating revalidation. You can extend subscriptions with your own classes, for example, add IReactiveNotifyCollectionItemChanged <> from Reactive UI
What I would like to say:
- There is no asynchronous validation. I think it is possible to discuss whether it is needed or not, but nevertheless, it is not supported now.
- I am ashamed, but errors are possible. I hope that they will be quickly found and corrected.
- This is my first development experience for Open Source. I am very worried that the opportunities that I initially invested will not be enough. Hope this will also be easily fixable.
Source code available on GitHub, MIT license
In addition, you can download from Nuget
Projects mentioned in the article:
- FluentValidation , which I often see in applications like Web API
- Reactive UI , in addition, I recommend this series of articles ( first , second and third parts)
I would like to thank my adeptuss and @baisel colleagues.
for helping to develop the first version of the project.
And also @truetanchik for patience and error correction.
Source: https://habr.com/ru/post/354886/
All Articles