Check Point API + Splunk. Automation of protection against network attacks
Hello colleagues, today we will tell and demonstrate the approaches and mechanisms for automating the system of protection against network attacks based on Check Point and Splunk.
The constant increase in the number of network attacks and their complexity, increase the requirements for security systems. Organizations must quickly adapt to current conditions and effectively defend themselves against modern attacks. Requirements for the effectiveness and performance of protection systems are also increasing. With the release of the new version of Gaia R80, the possibility of using the REST API was announced, which opens up broad possibilities for automating settings, administration, monitoring, etc.
')
Check Point API
R80.10 created a command line interface and REST API that provide new ways to manage a Check Point server through an automation server. For administrators with experience, new APIs offer better performance and convenience of day-to-day management.
The automation server communicates with the management server (CPM) in the same way that SmartConsole does.
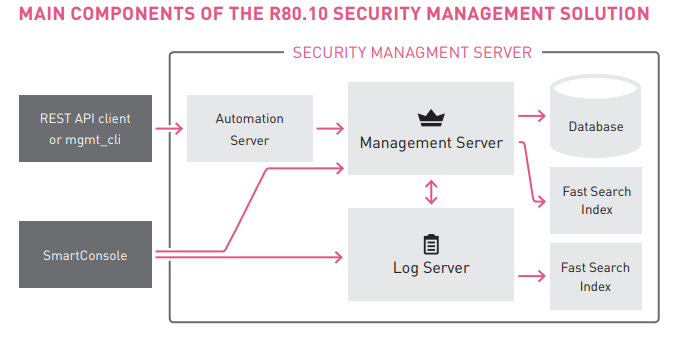
This architecture provides:
- The scan and warning errors that SmartConsole demonstrates will also be presented when using the API.
- Audit logs created using SmartConsole will also be generated using an automation session.
- The same user permission profile when using SmartConsole will also be used when using an automation session.
When you call the API using the REST API or the command line, a new session is created, several active sessions are allowed for the same administrator, since an individual token is issued for each session. When a script publishes changes, only its own changes are published, and not changes caused by other scripts that run simultaneously.
When managing the Management server through an API, you must adhere to the following plan :
you must first log in to the server, make changes, publish these changes, set a policy, and end the session.

Using Check Point API you can manage:
- User sessions on the SmartConsole;
- Objects, access list;
- Services and applications (their categorization);
- Access control & NAT, Threat Prevention;
- Enable / Disable Blades;
- Network interface settings;
- Search for objects;
- Running teams on GAIA;
- And much more.
Using the API, you can automate workflows and ensure that security systems work consistently with IT processes and systems.
More information about the features of Check Point API can be found in our article .
Check Point API + Splunk
Our organization has developed Check Point co Splunk integration.
Check Point has IPS functionality (Intrusion Prevention System - Intrusion Prevention System). Using various mechanisms and technologies, the IPS module analyzes traffic, identifies and blocks network attacks and potential vulnerabilities. All signatures have different levels of criticality (critical, high, medium, low). In accordance with the Threat Prevention security policy, the IPS module can detect and block attacks and anomalies in the network.
This functionality is demanding of computational resources, and in the case of real network attacks, when a powerful network attack is coming from several addresses, the device can be very loaded, giving a drawdown in the operation of legitimate services.
Also in many organizations we can see a large number of rules from DETECT reactions, that is, the system only registers the fact of a successful attack, waiting for a person to react. Often this method leads to losses and losses. In turn, in such a situation, the attacker may learn potentially important information for subsequent malicious activity. We do not block the attack, but only write to the event log of its existence. It is extremely important to avoid this situation.
At the time of a serious attack, it is necessary to automatically block the addresses of attack sources at the firewall level and make changes to the IPS policy, that is, change the system's response to the signature from DETECT in PREVENT to block attempts from other IPs.
In our organization, a system was developed that blocks the ip addresses of the attackers and the repeated attempts to attack on a specific signature based on the IPS logs that come to Splunk.
The system consists of three main components :
- Checkpoint Point GAIA R80 or higher.
- Splunk.
- API and script that allows you to make changes to the security policy.
For preliminary preparation for the operation of the system it is necessary to take three steps:
- Configure sending logs with CP in Splunk.
- Create Network Groups objects in CP: BlackList, WhiteList, GreyList.
- Create a firewall rule for Drop BlackList.
The Blacklist group is designed to block IP addresses at the firewall level, in WhiteList we add ip addresses that do not need to be blocked; in GreyList, when a signature is triggered, those ip addresses are added to the database on the security gateway, but do not belong to any of the groups that is, it is a buffer group, and is created for the administrator to choose the action for the hosts: added to BlackList or WhiteList.
Scheme of the system :
- Gateway detects the attack and sends the IPS signature log to Splunk.
- Splunk processes IPS logs, determines the attacker's address, signature, time, and provides the result as input parameters.
- Next, the system checks for the address in WhiteList or GreyList.
- If there is no match on the previous item, the address is placed in the BlackList and subsequently blocked at the firewall level, without entering the Threat Prevention field, as a result of which the risk of a successful attack is reduced, and we also keep the device's performance. IPS resources for this and similar attacks are no longer wasted. Also, the signature on which the attack is launched is placed from Detect to Prevent for the subsequent blocking of events by this signature
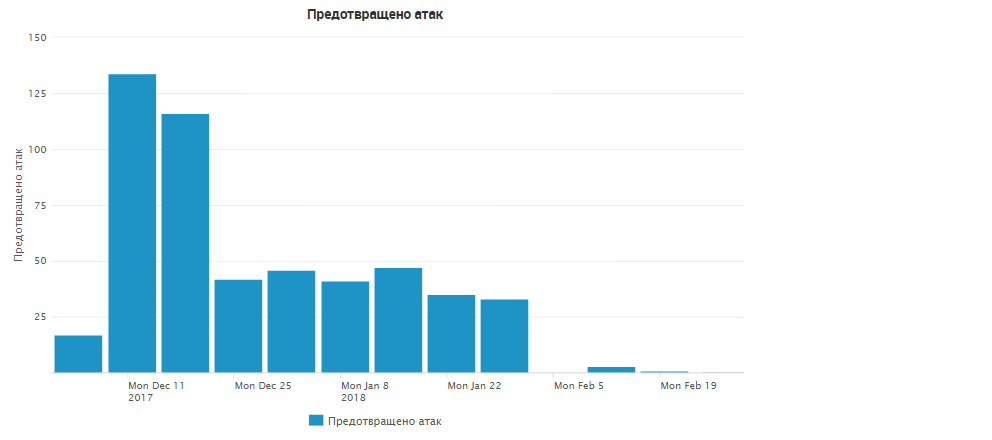
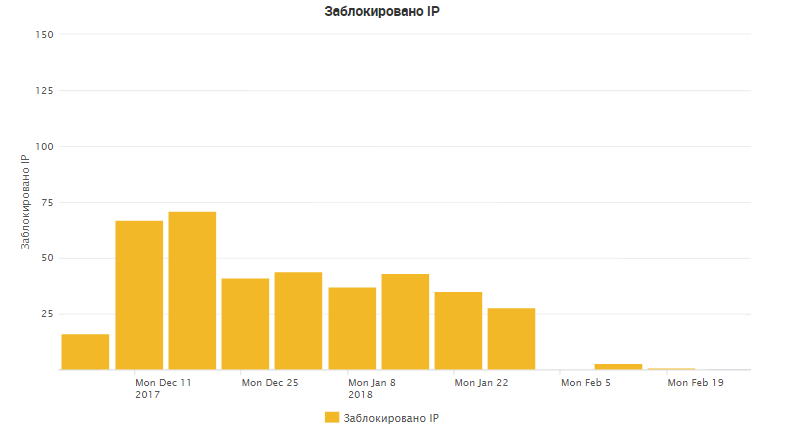
During the three months of operation of this system, more than 500 attacks were detected, and as a result, more than 300 ip addresses of the attackers were blocked. In more detail you can study the results in the charts:

Also, the IPS signatures were identified and placed in Prevent, which were most active:
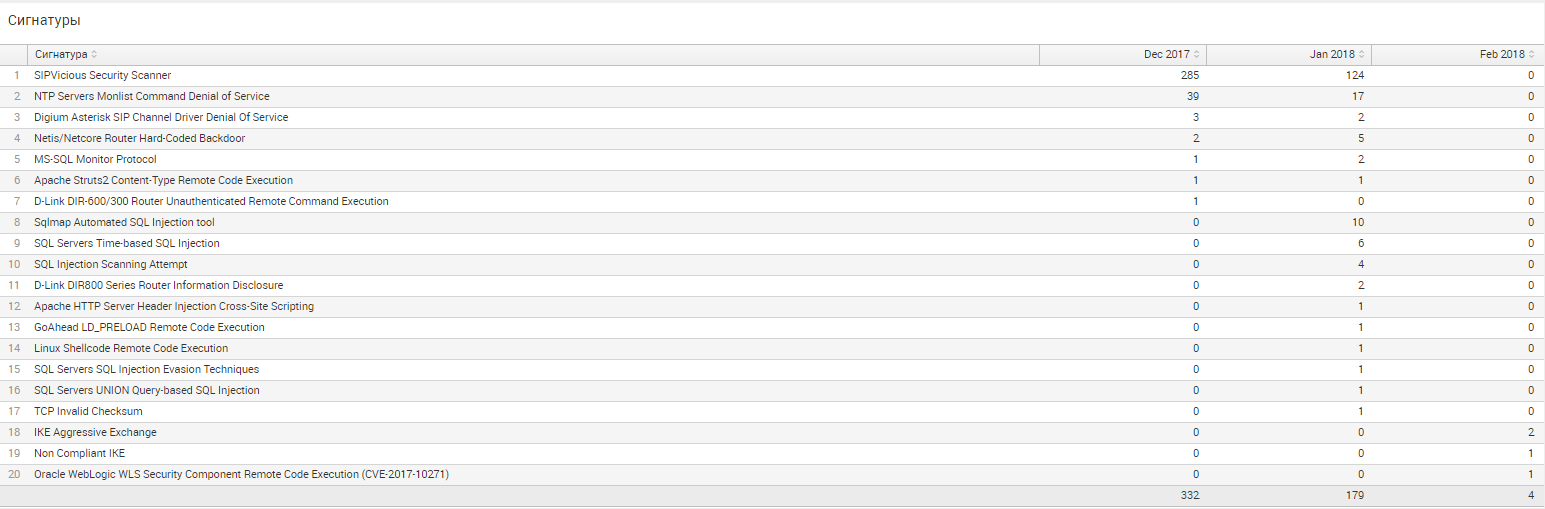
As you can see, the greatest number of attacks are:
- Searches for vulnerabilities and injections on the server.
- DDos.
- Search backdoors.
- Attempts to remotely execute code.
- Attempts to use vulnerabilities for products of any specific companies (DLink).
The time of adding the attacker's ip address to the Check Point database and blocking it at the firewall level is about 4-6 minutes from the attack time. The speed of this system depends on how you set up the frequency of transmission of logs in Splunk, and the installation time of the policy on the security gateway. You can use Splunk not only to implement this system, but also to analyze logs in a more convenient way than it is done in the SmartEvent blade, having tweaked the system for your tasks. For more details, see the article about the integration of Splunk and Checkpoint.
As for the script settings, everything can be customized to your specific requirements, for example, blocking ip addresses for a while, or managing other blades, it all depends on your tasks.
Practice
The presented video material contains the theoretical and practical part. The first half of the video duplicates the described theoretical part, and in a practical example, the algorithm of this system is shown, an example of the attack of the demo network is carried out, and the system displays the operation of the system in Check Point and Splunk.
Conclusion
The system works successfully, namely it improves the quality of infrastructure protection and more optimally distributes the firewall resources. All this is done by automating processes, namely the integration of Check Point and Splunk.
If you do not want to miss future lessons, then subscribe to our group VK , Youtube and Telegram . If for any reason you could not find the document you need or solve your problem with Check Point, feel free to contact us .
Source: https://habr.com/ru/post/354844/
All Articles