How to detect FinFisher. ESET Manual
Thanks to serious countermeasures against analysis, FinFisher spyware remained poorly understood. This is a well-known surveillance tool, however, only a partial analysis was published from previous samples.
The situation began to change in the summer of 2017 after the analysis of FinFisher cyber espionage campaigns by ESET. During the study, we identified attacks involving the compromise of the victims of the Internet provider .

')
When we began the analysis of Malvari, the main efforts were spent on overcoming measures to counter the analysis of FinFisher in its versions under Windows. The combination of advanced obfuscation and proprietary virtualization makes the removal of masking with FinFisher extremely difficult.
In this guide, we share what we learned from the FinFisher analysis process. In addition to analyzing the FinFisher virtual machine, the guide will help you understand protection using the virtual machine as a whole, that is, proprietary virtual machines found in the binary code and used to protect the software.
We also analyzed the versions of FinFisher for Android, whose protection mechanism is based on the open access LLVM obfuscator. It is not as complicated and interesting as the versioning mechanism for Windows, so we will not discuss it in this manual.
We hope that the guide will be useful to information security researchers and virus analysts to understand the tools and tactics of FinFisher, as well as to protect customers from this threat.
Opening the FinFisher sample in IDA Pro, we notice in the main function a simple but effective method of countering disassembling, the first defense.
FinFisher uses a common technique against disassembling - hiding the course of execution by replacing one unconditional jump command with two complementary conditional jumps. They indicate the same transition point, therefore, regardless of the transition being performed, the order of code execution does not change. After the conditional transitions are meaningless bytes of code. They are designed to confuse the disassembler, since under normal conditions it will not be able to recognize the non-working area and will continue to work on disassembling this garbage.
This way of using this technique makes this feature special. In most malware that we have studied, the method is used a certain number of times. However, FinFisher applies this trick after each command.
This protection is very effective against the disassembler and confuses it so that many sections of the code do not go through the process properly. And, of course, the graphical mode in IDA Pro becomes impossible to use. Our first task is to get rid of this protection.
The code was obviously obfuscated not manually, but with the help of an automatic tool, and we observe a certain pattern in all pairs of transition commands.
There are two different types of transition pairs — an internal transition with an indent of 32 bits and a short transition with an indent of 8 bits.
The operation code of both conditional internal transitions (where DWORD is the indent of the transition) begins with byte 0x0F, and the second byte equals 0x8?, Where? in both commands, the transitions differ only by 1 bit. This is due to the fact that the OS x86 opcodes for complementary transitions are consecutive in numerical terms. For example, this obfuscation scheme always binds JE with JNE (opcodes 0x0F 0x84 and 0x0F 0x85), JP with JNP (opcodes 0x0F 0x8A and 0x0F 0x8B), and so on.
After these opcodes, there is a 32-bit argument defining the indent where the transition will take place. Since the size of both commands is 6 bytes, the indents of two consecutive transitions differ exactly by 6 (see Figure 1).
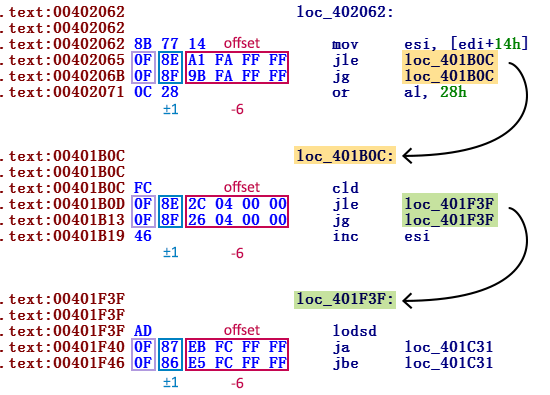
Figure 1. Screenshot of the teams, after which two conditional internal transitions follow each time
For example, the code below can be used to detect these two consecutive transitions:
De-fussing short transitions is based on a similar idea, only the constants differ.
The opcode of the short conditional jump is 0x7 ?, followed by one byte - the jump indent. Therefore, again we are looking for two consecutive conditional internal transitions, and we need opcodes: 0x7 ?; indent; 0x7? ± 1; indent -2. After the first opcode, there is one byte, differing by 2 in two successive transitions (which, again, are the size of both commands) (Figure 2).

Figure 2. Examples of commands, followed by two short conditional transitions each time.
For example, this code can be used to detect two conditional short transitions:
After detecting one of these pairs of conditional transitions, we de-code the code with a patch, turning the first conditional transition into an unconditional (using opcode 0xE9 for internal transition pairs and 0xEB for short transition pairs) and filling the remaining bytes with empty commands (0x90)
In addition to these two situations, there may be places where a pair of transitions consists of short and internal, that is, of different types. But this is only found in a few places, so in the FinFisher samples this can be corrected manually.
Using these inserts, IDA Pro begins to “understand” the new code and is ready (well, or almost ready) to create a diagram. It may happen that we need to make another improvement: add endings, that is, assign the node with the transition position, so that it coincides with the transition command on the chart. For this purpose, we can use the IDA Python function
The final step in circumventing the tricks that interfere with the disassembler’s normal operation is to correct the definitions of the functions. It may happen that the command after the transition will be
Thus, we remove the first level of protection FinFisher, designed against disassembling.
After the successful deobfusion of the first level of protection, the main function opens to us, the sole purpose of which is to launch a specially created virtual machine and its further use to interpret the baytkod with, actually, the payload.
Unlike a regular executable file, an executable file with a virtual machine internally uses a set of virtualized commands instead of directly executing processor commands. Virtualized commands are executed by a virtual processor, which has its own structure and does not convert bytecode to unmanaged machine code. This virtual processor, like bytecode (and virtual commands), is determined by who programs the virtual machine (Figure 3).
In the introduction, we said that one of the famous examples of a virtual machine is a Java VM. But in this case, the virtual machine is inside the binary code, so here we are confronted with a virtual machine to protect against reverse engineering. There are well-known commercial protections using a virtual machine, such as VMProtect and Code Virtualizer.
FinFisher spyware is compiled from source, and then the resulting binary file is protected by the virtual machine at the assembler level. The protection process involves translating the instructions of the original binary file into virtual instructions, and then creating a new binary file containing the bytecode and virtual processor. Native instructions from the source binary file are lost. A secure, virtualized pattern must have the same behavior as an unprotected pattern.
To analyze a binary file protected by a virtual machine, the following is necessary:
The first two tasks take a lot of time, and the first one can become quite complicated. It includes the analysis of each vm_handler handler and an understanding of how registers, memory access, calls, and so on are transmitted.
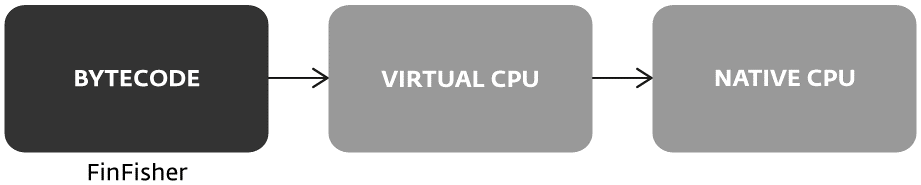
Figure 3. Bytecode interpreted by the virtual CPU
There is no standard for defining individual parts of a virtual machine. Therefore, we will define some terms that we will refer to in this work:
During the interpretation of the bytecode, the virtual machine uses a virtual stack and a single virtual register:
In the following sections, we will describe the elements of a virtual machine in technical details and describe how to analyze them.
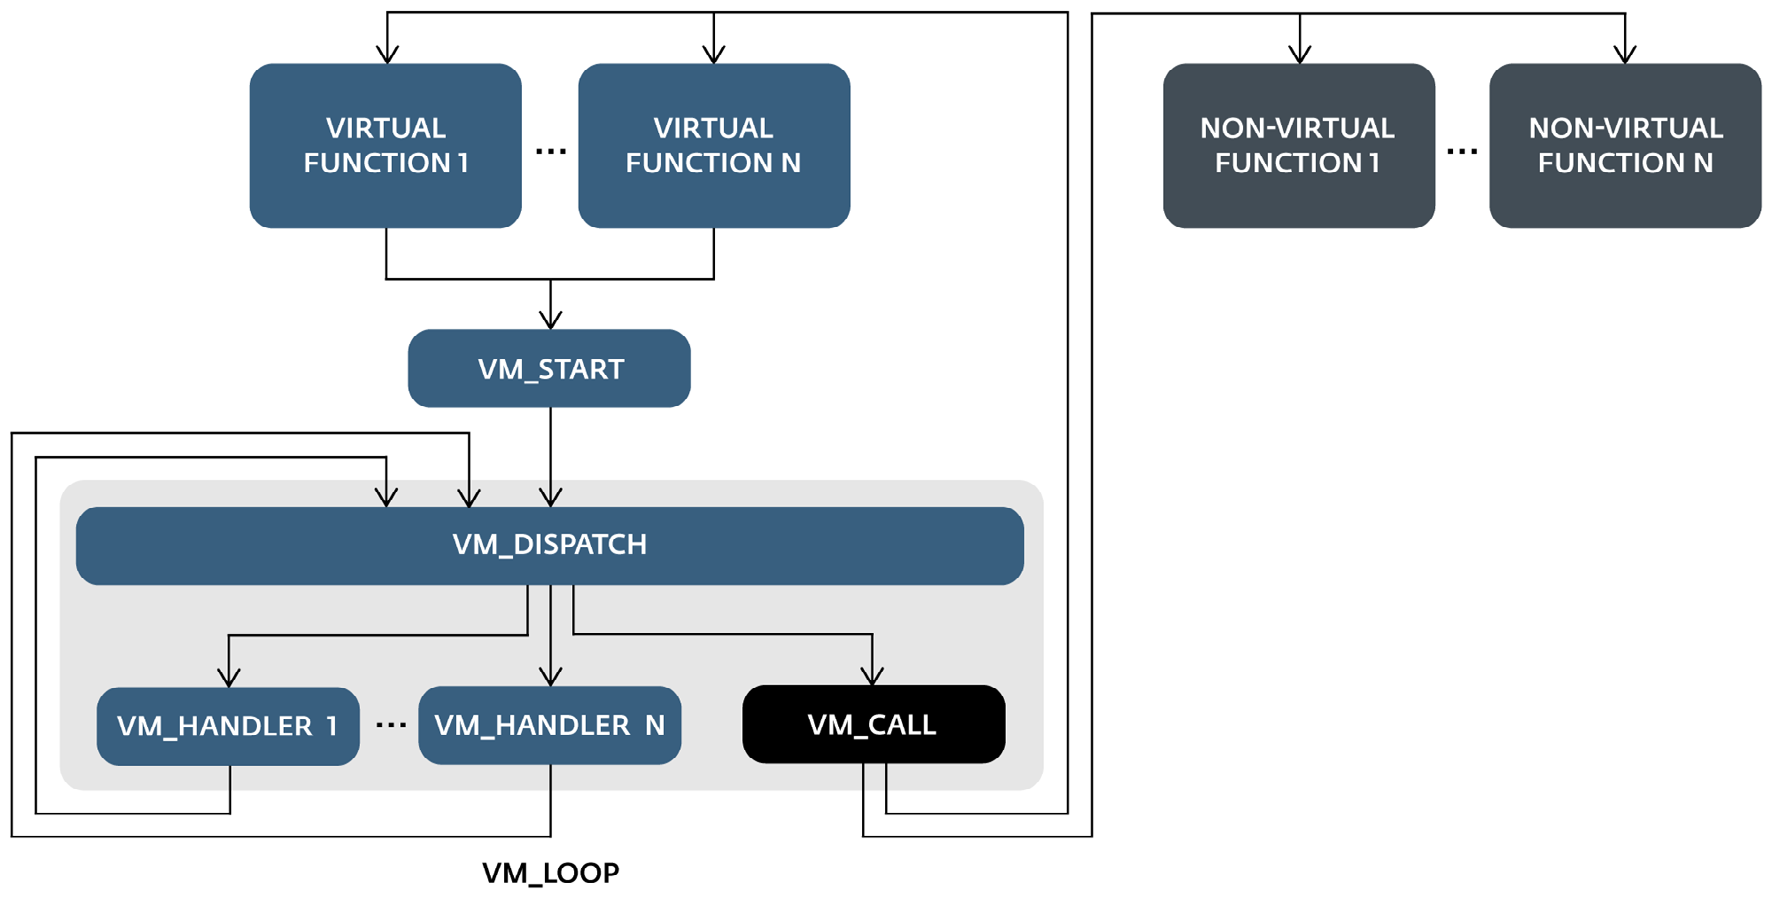
The deobfuscated graphical representation of the main function of Malvaris consists of three parts: initialization and the other two, which we called vm_start and interpreter ( vm_dispatcher + vm_handlers ).
The initialization component sets a unique identifier for what can be interpreted as a bytecode entry point and pushes it onto the stack. Then comes the transition to the vm_start part, that is, the initialization process of the virtual machine itself. The decoding of the bytecode occurs and control passes to vm_dispatcher , which starts the cycles of virtual bytecode commands and interprets them with the help of vm_handlers .
The vm_dispatcher is launched from the pusha command and ends with the
The graphical model created after de-fussing the first level is shown in Figure 4. The part related to vm_start is not so important for the analysis of the interpreter. However, it helps to understand the implementation of the virtual machine as a whole, how it uses and manages the virtual flags, the virtual stack, etc. The second part, vm_dispatcher with vm_handlers , is the base.

Figure 4. Graphic representation of vm_start and vm_dispatcher
The call to vm_start is made from almost every function, including the main one.
The calling function always pushes the virtual identifier and then makes the transition to vm_start . Each virtual team has its own virtual identifier. In this example, the identifier of the virtual entry point, where the execution from the main function starts from, is 0x21CD0554 (Figure 5).
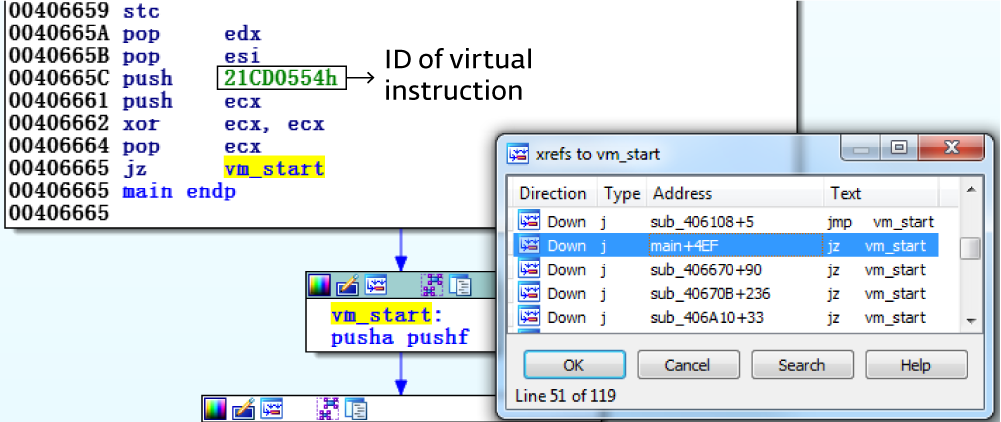
Figure 5. vm_start is called from each of the 119 virtualized functions.
The identifier of the first virtual command of the corresponding function is given as an argument.
In this part, most of the code is devoted to preparing the vm_dispatcher - mainly bytecode and memory allocation for the entire interpreter. The most important pieces of code do the following:
The preparation of virtual opcodes (steps 1, 3 and 4) is performed only once, at the beginning, and is skipped in subsequent versions of vm_start , while only commands for using flags and registers are executed.
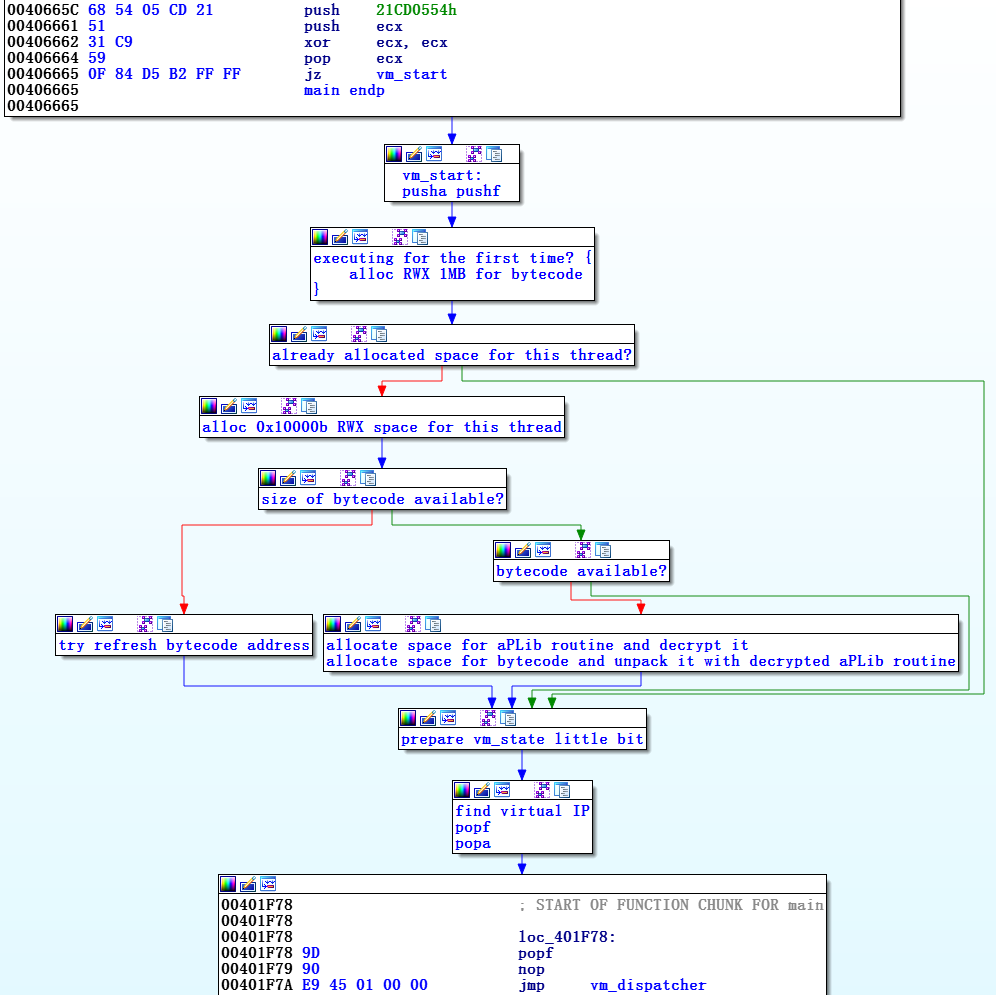
Figure 6. All code from vm_start to vm_dispatcher is grouped and named depending on the destination.
This part includes the vm_dispatcher with all the vm_handlers (34 in FinFisher samples) and is an important element for analyzing and / or virtualizing the virtual machine. The interpreter executes bytecode.
The
Better understand the interpreter will help create a well-structured diagram. We recommend its division into two parts - vm_start and vm_dispatcher , that is, you need to define the beginning of the function in the first vm_dispatcher command . In this case, the vm_handlers themselves referenced by vm_dispatcher are still missing. You can use the following function to connect these handlers to the vm_dispatcher diagram:
add to the top of the vm_handlers links of the last vm_dispatcher command
produces an addition at the end
After adding each vm_handler handler to the dispatcher function, the diagram looks like that shown in Figure 7 below.
This part is responsible for processing and decoding bytecode. She performs the following steps:
After the vm_handler for the command is executed, the same sequence is repeated for the one that follows it, starting with the first vm_dispatcher command . In the case of the vm_call handler , control is passed to vm_start (except when followed by a non-virtualized function).
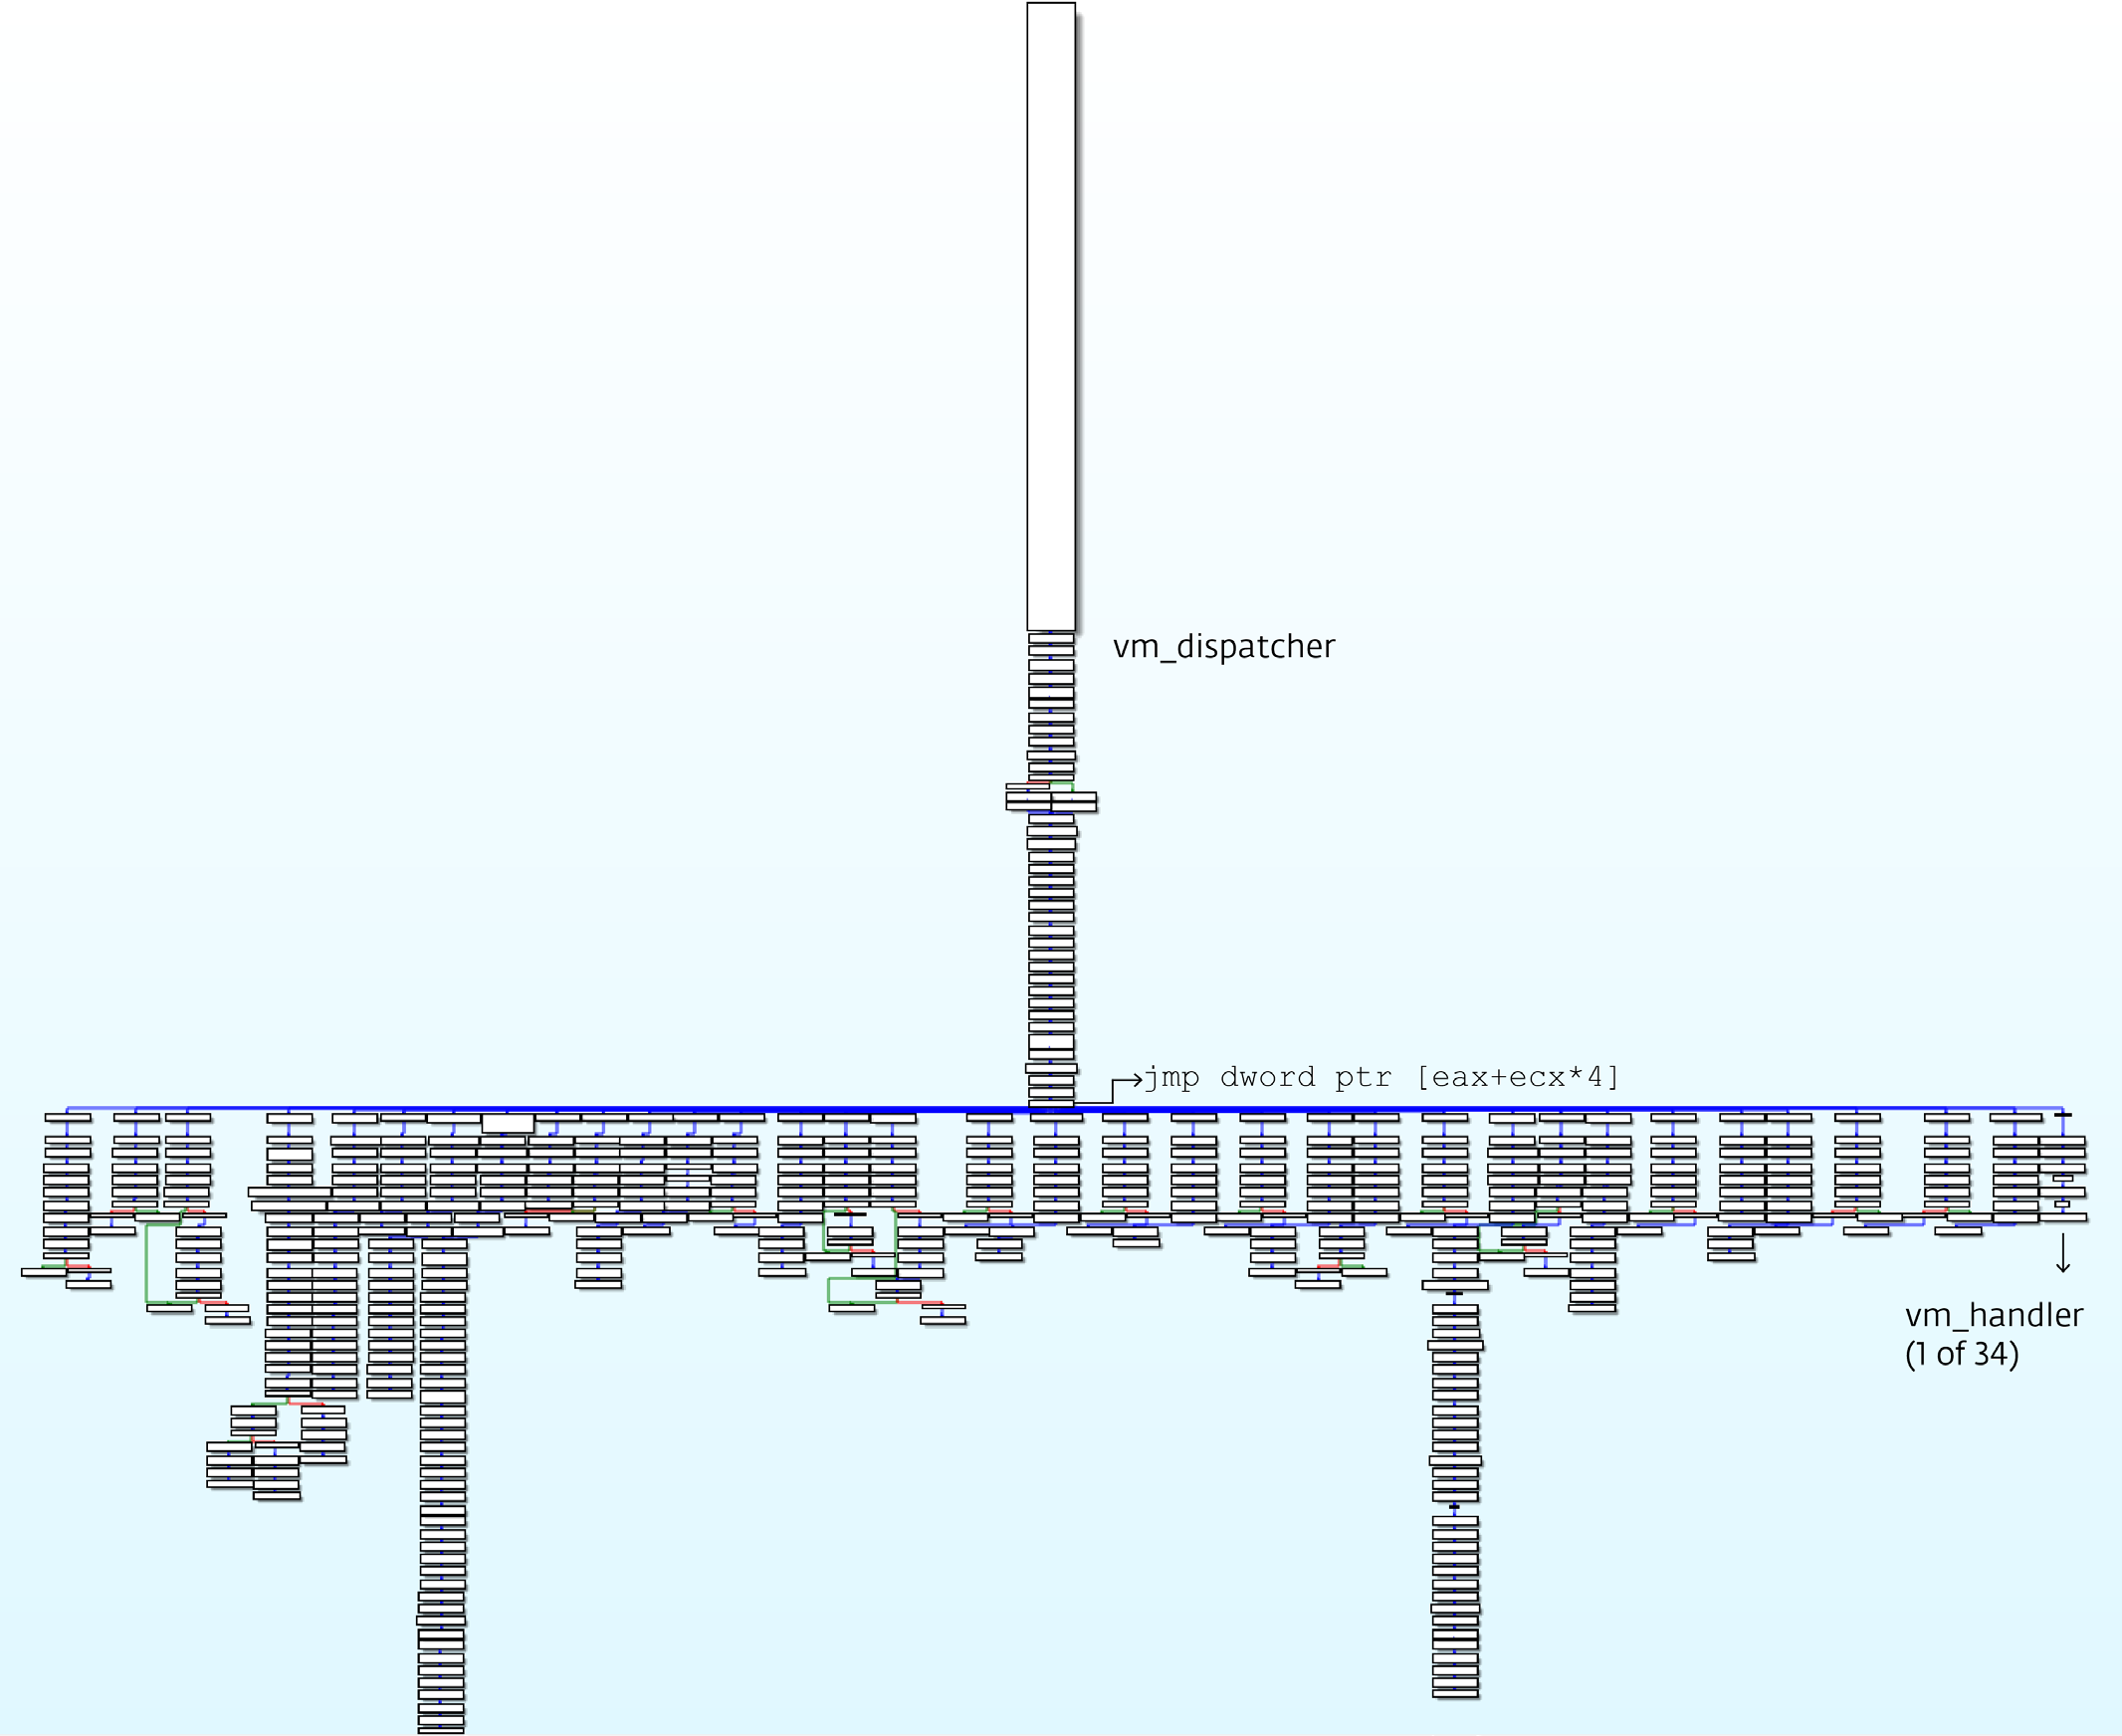
Figure 7. The vm_dispatcher diagram with all 34 vm_handlers.
In this part, we describe the vm_context - the structure used by the virtual machine, containing all the information necessary for the execution of the vm_dispatcher and each vm_handler .
When we study the vm_dispatcher and vm_handlers code in more detail, we can see that it contains commands related to data processing that refer to
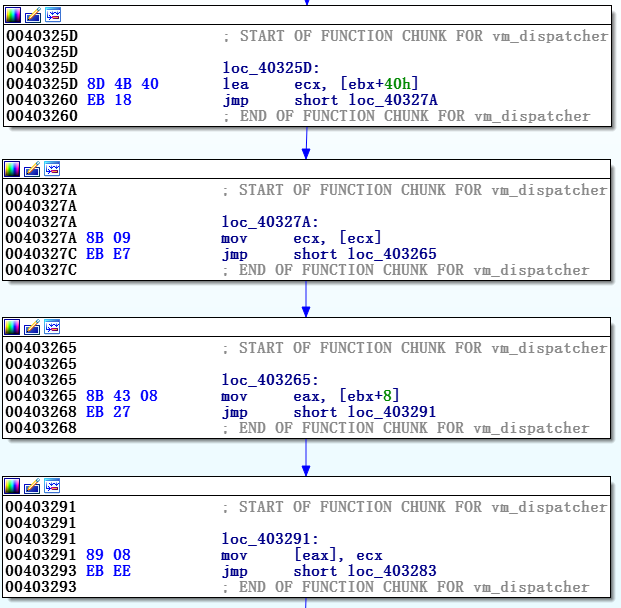
Figure 8. Screenshot of one of the vm_handlers
The ebx register points to the structure we called vm_context . We need an understanding of how this structure is used - what its members are, what they mean, and how they are applied. To solve this problem for the first time, you will have to guess how vm_context and its parts are used.
For example, let's look at the sequence of commands at the end of vm_dispatcher :
Since we know that the last command is a transition to vm_handler , we can conclude that ecx contains a virtual opcode, and therefore the 0x3C vm_struct element refers to a virtual opcode.
Let's make another unfounded assumption. At the end of almost every vm_handler there is the following command:
The same vm_context element was used earlier in the vm_dispatcher code - just before going to vm_handler . vm_dispatcher copies 24 bytes from a structure element to another location (
That is, we can start to consider the vm_context (
After performing the steps above and using the debugging program, we see which values are contained in the corresponding elements of the structure, that is, we can define all the elements of vm_context .
After analysis, we can restore the structures and vm_context , and FinFisher's vi_params :
Each vm_handler operates with one virtual opcode, that is, 34 vm_handlers handlers account for a maximum of 34 virtual opcodes. Execution of one vm_handler means execution of one vm_instruction , therefore, to determine what vm_instruction performs, we need to analyze the corresponding vm_handler .
After the reconstruction of vm_context and the name of all indents in ebx, the previously shown vm_handler becomes more readable, it is shown in Figure 9.
At the end of this function, we notice a sequence of commands starting with vm_instruction_pointer , which increases by 24, that is, by the size of the vi_params structure of each of the vm_instruction . Since this sequence is repeated at the end of almost every vm_handler, we conclude that this is the standard terminating function code, and the vm_handler body itself can be written simply as:
So, we have just analyzed the first command of this virtual machine :-)
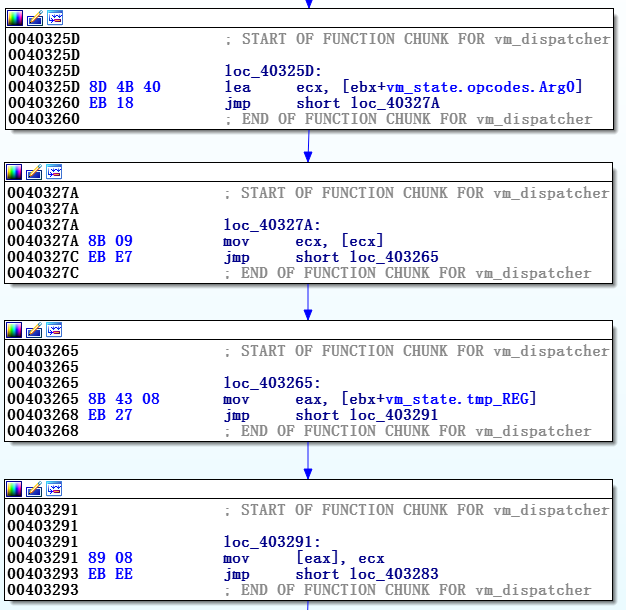
Figure 9. Previous vm_handler after inserting into vm_context structure
To illustrate the operation of the analyzed command, let us assume that the filling of the vi_params structure is performed as follows:
From the above, we see that the following command is executed:
At this stage, we should already understand what one of the vm_instructions performs . The perfect steps should serve as a demonstration of the work of the entire interpreter.
However, there are some vm_handlers that are more difficult to analyze. Conditional jumps of this virtual machine are more difficult to understand because of how the flags are converted.
As noted earlier, vm_dispatcher starts with getting native EFLAGS (from vm_code ) to the top of its own stack. Thus, when the handler of the corresponding transition decides whether or not to perform it, it is checked against EFLAGS on its own stack and applies its own transition method. Figure 10 illustrates how the JNP (Jump if no parity) virtual handler is applied through parity check.
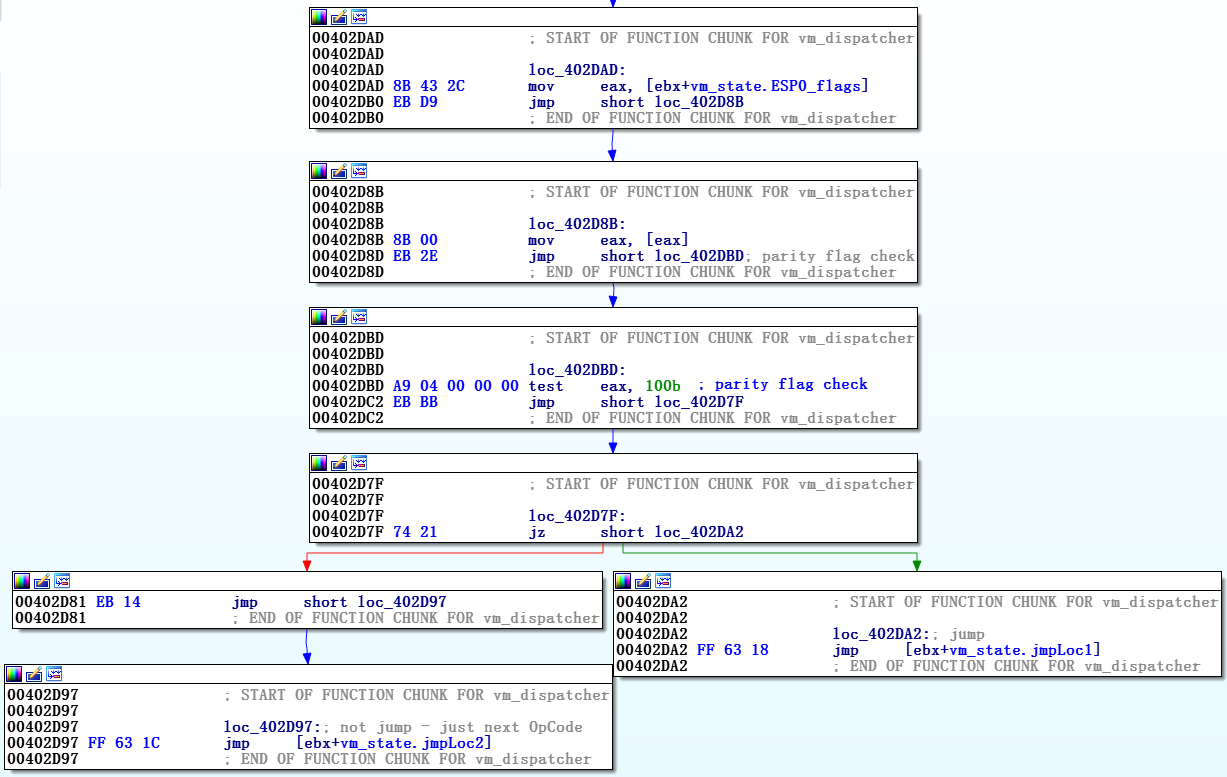
Figure 10. Screenshot of JNP_handler
For the remaining virtual conditional transitions, it may be necessary to check several signs — for example, the result of a virtualized JBE transition (Jump if below or equal) depends on both values, the carry flag and the zero flag, but the principle is the same.
After analyzing all 34 vm_handlers in the FinFisher virtual machine, we can describe its virtual commands as follows:

Figure 11. vm_table with all 34 vm_handlers
Note that the “ tmp_REG ” keyword refers to the virtual register used by the virtual machine, the temporary register in the vm_contex t structure, while “ reg ” refers to the processor's own register, i.e. eax.
Let's look at the analyzed commands of the virtual machine. For example, case_3_vm_jcc is a general handler of a transition command that can execute any processor transition command, conditional and unconditional.
Obviously, this virtual machine does not virtualize every hardware command, this is where commands from the list above will be useful to us (case 4 and case 6).
These two vm_handler are used to execute code directly. All they do is read the opcode of the processor command as an argument and execute the instruction.
It should also be noted that vm_registers are always at the top of their own stack, while the identifier of the executable register is stored in the last byte of the virtual command arg0. To access the corresponding virtual register, you can use the following code:
After correct analysis of all vm_instructions, there is still one more step that needs to be done before starting to analyze the sample - we need to write our own bytecode disassembler (manually parsing it will be problematic because of its size).
By making efforts and writing a more reliable disassembler, we will save ourselves the strength later when the FinFisher virtual machine changes and is updated.
Let's start with vm_handler 0x0C , which executes the following command:
This command takes exactly one argument — the identifier of the own register used as reg. This identifier should be displayed with the name of its own register, for example, using the command
To disassemble this vm_handler, you can use the following code:
Again, vm_handlers for transitions are harder to understand. In the case of transitions, the components vm_context.vi_params.Arg0 and vm_context. vi_params.Arg1 store the indent to which the transition occurs. This “jump indent” is actually indented in bytecode. To parse the transition handlers, we need to rearrange the marker to the transition area. Such code will suit us:
Finally, there is a vm_handler responsible for executing native commands with arguments that require special handling. For this we need a disassembler for our own x86 commands, for example, the Distorm tool from open access.
The command length is stored in vm_context.vi_params.OpCode & 0x0000FF00. Opcode own team for execution is stored in the arguments. To parse the vm_handler that executes the native code, you can use the code below:
At this point, we wrote all the functions in Python to parse each of the vm_handlers . All of them, including the code responsible for marking the transition areas, determining the virtual team ID after the call, and some others are needed to write your own disassembler.
After all this, it can be driven by bytecode.

Figure 12. Part of the unpacked and decrypted bytecode FinFisher
For example, from the bytecode shown in Figure 12, we can get the following output:
After analyzing all the virtual handlers and building our own custom disassembler, we can again look at the virtual teams in order to understand the basic idea of creating them.
First, we must understand that virtualization protection was applied at the assembler level. The authors transformed their own teams into their own, somehow complicated, which are executed by a special virtual CPU. For this, a temporary "register" ( tmp_REG ) is used.
We can look at a few examples in order to understand how this transformation works. Take the virtual command from the previous example -
- it was converted from its own team
Take another example:
Here are your own commands that have been converted to these virtualized commands (where reg is one of its own registers):
However, this is not the only way to virtualize a set of commands. There are other uses of the virtual machine for protection, with other approaches. For example, there is a commercial implementation of protection via a virtual machine that uses the mathematical logic NOR (when both inputs are negative), with several time registers instead of one.
In turn, FinFisher did not go so far and did not transform all its own commands. While many of them are virtualized, some may not be so - these are mathematical commands such as
A significant disadvantage of protecting a binary with a virtual machine is the negative impact on performance. In the case of the FinFisher virtual machine, we approximately estimate its speed as more than one hundred times slower than in the case of the internal code, based on counting the number of commands executed for processing each of the vm_instruction ( vm_dispatcher + vm_handler).
Therefore, it makes sense to protect only selected parts of the binaries - and this is what they do in those FinFisher samples that we analyzed.
Moreover, as already mentioned, some of the virtual machine's handlers can directly call their own functions. As a result, virtual machine security users (i.e. FinFisher authors) can decide at assembly stage what functions to protect with its help. For the marked functions, their commands will be virtualized; for the rest, the original functions will be called by the corresponding virtual handler. Thus, the execution of the code may be less time consuming, while the most interesting parts of the binary file remain protected (Figure 13).
13. , FinFisher, ,
In addition to the length of the bytecode, which our parser has to handle, it is necessary to remember that in some FinFisher samples there is some mixing. And although the same virtual machine is used for protection, the definition of correspondence between virtual opcodes and vm_handlers does not always coincide. They can be (and this happens) randomly paired, and these pairs are different for different FinFisher samples that we analyze. This means that the vm_handler for the virtual opcode 0x5 in this sample processes the command
To solve this problem, we can use the signature for each of the analyzed vm_handlers. The script for IDA Python in Appendix A can be applied after obtaining the diagram from Figure 7 (it is especially important to remove the obfuscation of the jz / jnz transitions, as described in the first section of this guide), to give names to the handlers based on their signatures. (With minor modifications, this script can also be used to restore signatures if vm_handlers are modified in the updated version of FinFisher.)
As mentioned above, the first vm_handler in the FinFisher sample that you encounter during the analysis may differ from the JL that we cited the sample as an example, but the script will determine all vm_handlers in the right way.
After disassembling and a few changes, it is possible to compile the code. We will use virtual teams as our own. As a result, we get a pure binary code without protection.
Most of the vm_instructions commands can be compiled by simple copying, since at the output of the disassembler, most of the commands look like native ones. But some sections need to be refined in a special way:
• tmp_REG — since we have defined tmp_REG as a global variable, we need to make changes to the code for those cases when the address stored in it is dereferenced. (Since dereferencing an address located in a global variable is not possible for the x86 command set.). For example, a virtual machine contains a virtual command.
• Flags - virtual teams do not change flags, and their own math commands do this. Therefore, it is important for us that the virtual math teams in the devirtualized binary do not do this either, which means the need to preserve the flags before executing the commands and restoring them after the completion of execution.
• Transitions and calls - we need to move the marker to the area of the virtual team (transition) or function (call).
• Call API functions - in most cases they are loaded dynamically, in other cases they are accessed from the IAT (address import table) of the binary file, so they need to be processed accordingly.
• Global variables, own code - some global variables must be stored in a devirtualized binary. Also, in the FinFisher dropper there is a function to switch between x64 and x86, which is performed in processor mode (in fact, this is done only with the help of a command
Depending on the result, at the output of your disassembler you may still need to make a couple more changes to get your own commands that can be compiled. Then you will need to compile the code using your preferred compiler into a binary without a virtual machine.
In this tutorial, we described how FinFisher uses two ways to protect the main deliverable component. The goal of protection is not to counter anti-virus detection, but to hide configuration files and new techniques used in spyware by creating difficulties for reverse engineering. Since to date, no other detailed analysis of the FinFisher obfuscated spyware has been published, the task of the developers of this protection mechanism could now be considered to have been successfully completed.
We showed how the level of protection opposing disassembling can be overcome by the automatic method, and how to effectively analyze the virtual machine.
We hope that the guide will help reverse engineering specialists to analyze the virtual machine protected FinFisher samples, as well as provide a better understanding of the specifics of protection using the virtual machine as a whole.
This script is also available in the ESET repository on GitHub .
The situation began to change in the summer of 2017 after the analysis of FinFisher cyber espionage campaigns by ESET. During the study, we identified attacks involving the compromise of the victims of the Internet provider .
')
When we began the analysis of Malvari, the main efforts were spent on overcoming measures to counter the analysis of FinFisher in its versions under Windows. The combination of advanced obfuscation and proprietary virtualization makes the removal of masking with FinFisher extremely difficult.
In this guide, we share what we learned from the FinFisher analysis process. In addition to analyzing the FinFisher virtual machine, the guide will help you understand protection using the virtual machine as a whole, that is, proprietary virtual machines found in the binary code and used to protect the software.
We also analyzed the versions of FinFisher for Android, whose protection mechanism is based on the open access LLVM obfuscator. It is not as complicated and interesting as the versioning mechanism for Windows, so we will not discuss it in this manual.
We hope that the guide will be useful to information security researchers and virus analysts to understand the tools and tactics of FinFisher, as well as to protect customers from this threat.
Measures against disassembly
Opening the FinFisher sample in IDA Pro, we notice in the main function a simple but effective method of countering disassembling, the first defense.
FinFisher uses a common technique against disassembling - hiding the course of execution by replacing one unconditional jump command with two complementary conditional jumps. They indicate the same transition point, therefore, regardless of the transition being performed, the order of code execution does not change. After the conditional transitions are meaningless bytes of code. They are designed to confuse the disassembler, since under normal conditions it will not be able to recognize the non-working area and will continue to work on disassembling this garbage.
This way of using this technique makes this feature special. In most malware that we have studied, the method is used a certain number of times. However, FinFisher applies this trick after each command.
This protection is very effective against the disassembler and confuses it so that many sections of the code do not go through the process properly. And, of course, the graphical mode in IDA Pro becomes impossible to use. Our first task is to get rid of this protection.
The code was obviously obfuscated not manually, but with the help of an automatic tool, and we observe a certain pattern in all pairs of transition commands.
There are two different types of transition pairs — an internal transition with an indent of 32 bits and a short transition with an indent of 8 bits.
The operation code of both conditional internal transitions (where DWORD is the indent of the transition) begins with byte 0x0F, and the second byte equals 0x8?, Where? in both commands, the transitions differ only by 1 bit. This is due to the fact that the OS x86 opcodes for complementary transitions are consecutive in numerical terms. For example, this obfuscation scheme always binds JE with JNE (opcodes 0x0F 0x84 and 0x0F 0x85), JP with JNP (opcodes 0x0F 0x8A and 0x0F 0x8B), and so on.
After these opcodes, there is a 32-bit argument defining the indent where the transition will take place. Since the size of both commands is 6 bytes, the indents of two consecutive transitions differ exactly by 6 (see Figure 1).
Figure 1. Screenshot of the teams, after which two conditional internal transitions follow each time
For example, the code below can be used to detect these two consecutive transitions:
def is_jump_near_pair(addr): jcc1 = Byte(addr+1) jcc2 = Byte(addr+7) # ? if Byte(addr) != 0x0F || Byte(addr+6) != 0x0F: return False # 2 ? if (jcc1 & 0xF0 != 0x80) || (jcc2 & 0xF0 != 0x80): return False # ? if abs(jcc1-jcc2) != 1: return False # ? dst1 = Dword(addr+2) dst2 = Dword(addr+8) if dst1-dst2 != 6 return False return True De-fussing short transitions is based on a similar idea, only the constants differ.
The opcode of the short conditional jump is 0x7 ?, followed by one byte - the jump indent. Therefore, again we are looking for two consecutive conditional internal transitions, and we need opcodes: 0x7 ?; indent; 0x7? ± 1; indent -2. After the first opcode, there is one byte, differing by 2 in two successive transitions (which, again, are the size of both commands) (Figure 2).
Figure 2. Examples of commands, followed by two short conditional transitions each time.
For example, this code can be used to detect two conditional short transitions:
def is_jcc8(b): return b&0xF0 == 0x70 def is_jump_short_pair(addr): jcc1 = Byte(addr) jcc2 = Byte(addr+2) if not is_jcc8(jcc1) || not is_jcc8(jcc2): return False if abs(jcc2–jcc1) != 1: return False dst1 = Byte(addr+1) dst2 = Byte(addr+3) if dst1 – dst2 != 2: return False return True After detecting one of these pairs of conditional transitions, we de-code the code with a patch, turning the first conditional transition into an unconditional (using opcode 0xE9 for internal transition pairs and 0xEB for short transition pairs) and filling the remaining bytes with empty commands (0x90)
def patch_jcc32(addr): PatchByte(addr, 0x90) PatchByte(addr+1, 0xE9) PatchWord(addr+6, 0x9090) PatchDword(addr+8, 0x90909090) def patch_jcc8(addr): PatchByte(addr, 0xEB) PatchWord(addr+2, 0x9090) In addition to these two situations, there may be places where a pair of transitions consists of short and internal, that is, of different types. But this is only found in a few places, so in the FinFisher samples this can be corrected manually.
Using these inserts, IDA Pro begins to “understand” the new code and is ready (well, or almost ready) to create a diagram. It may happen that we need to make another improvement: add endings, that is, assign the node with the transition position, so that it coincides with the transition command on the chart. For this purpose, we can use the IDA Python function
append_func_tail .The final step in circumventing the tricks that interfere with the disassembler’s normal operation is to correct the definitions of the functions. It may happen that the command after the transition will be
push ebp , in which case IDA Pro (erroneously) considers this the beginning of the function and, accordingly, begins its new definition. In this case, we need to delete the function definition, make a correct entry and add more endings.Thus, we remove the first level of protection FinFisher, designed against disassembling.
FinFisher virtual machine
After the successful deobfusion of the first level of protection, the main function opens to us, the sole purpose of which is to launch a specially created virtual machine and its further use to interpret the baytkod with, actually, the payload.
Unlike a regular executable file, an executable file with a virtual machine internally uses a set of virtualized commands instead of directly executing processor commands. Virtualized commands are executed by a virtual processor, which has its own structure and does not convert bytecode to unmanaged machine code. This virtual processor, like bytecode (and virtual commands), is determined by who programs the virtual machine (Figure 3).
In the introduction, we said that one of the famous examples of a virtual machine is a Java VM. But in this case, the virtual machine is inside the binary code, so here we are confronted with a virtual machine to protect against reverse engineering. There are well-known commercial protections using a virtual machine, such as VMProtect and Code Virtualizer.
FinFisher spyware is compiled from source, and then the resulting binary file is protected by the virtual machine at the assembler level. The protection process involves translating the instructions of the original binary file into virtual instructions, and then creating a new binary file containing the bytecode and virtual processor. Native instructions from the source binary file are lost. A secure, virtualized pattern must have the same behavior as an unprotected pattern.
To analyze a binary file protected by a virtual machine, the following is necessary:
- Analyze Virtual CPU
- Write your own disassembler for this nonstandard virtual CPU and parse bytecode
- Optionally: compile the disassembled code into a binary file, getting rid of the virtual machine.
The first two tasks take a lot of time, and the first one can become quite complicated. It includes the analysis of each vm_handler handler and an understanding of how registers, memory access, calls, and so on are transmitted.
Figure 3. Bytecode interpreted by the virtual CPU
Terms and Definitions
There is no standard for defining individual parts of a virtual machine. Therefore, we will define some terms that we will refer to in this work:
- Virtual machine (vm) –virtual CPU; contains vm_dispatcher, vm_start, vm_handlers
- vm_start - initialization; there is a memory allocation and decryption process
- Bytecode (also known as pcode) - virtual vm_instructions with arguments are stored here
- vm_dispatcher - calls and decodes virtual opcodes; essentially prepares for the execution of any of the vm_handlers
- vm_handler - implementation of vm_instruction ; execution of one vm_handler means execution of one vm_instruction
- Interpreter (also known as vm_loop ) - vm_dispatcher + vm_handlers - virtual CPU
- Virtual opcode is an analogue of native opcodes
- vm_context ( vm_structure ) - the internal structure used by the interpreter
- vi_params - structure within the structure vm_context ; virtual command parameters used by vm_handler ; includes vm_opcode and arguments
During the interpretation of the bytecode, the virtual machine uses a virtual stack and a single virtual register:
- vm_stack - analogous to the native stack used by the virtual machine
- vm_register is an analogue of the native register used by this virtual machine; hereinafter called tmp_REG
- vm_instruction - a command defined by the developers of the virtual machine; the body (implementation) of a command is called by its vm_handler
In the following sections, we will describe the elements of a virtual machine in technical details and describe how to analyze them.
The deobfuscated graphical representation of the main function of Malvaris consists of three parts: initialization and the other two, which we called vm_start and interpreter ( vm_dispatcher + vm_handlers ).
The initialization component sets a unique identifier for what can be interpreted as a bytecode entry point and pushes it onto the stack. Then comes the transition to the vm_start part, that is, the initialization process of the virtual machine itself. The decoding of the bytecode occurs and control passes to vm_dispatcher , which starts the cycles of virtual bytecode commands and interprets them with the help of vm_handlers .
The vm_dispatcher is launched from the pusha command and ends with the
jmp dword ptr [eax+ecx*4] command (or similar), that is, by switching to the corresponding vm_handler .Vm_start
The graphical model created after de-fussing the first level is shown in Figure 4. The part related to vm_start is not so important for the analysis of the interpreter. However, it helps to understand the implementation of the virtual machine as a whole, how it uses and manages the virtual flags, the virtual stack, etc. The second part, vm_dispatcher with vm_handlers , is the base.
Figure 4. Graphic representation of vm_start and vm_dispatcher
The call to vm_start is made from almost every function, including the main one.
The calling function always pushes the virtual identifier and then makes the transition to vm_start . Each virtual team has its own virtual identifier. In this example, the identifier of the virtual entry point, where the execution from the main function starts from, is 0x21CD0554 (Figure 5).
Figure 5. vm_start is called from each of the 119 virtualized functions.
The identifier of the first virtual command of the corresponding function is given as an argument.
In this part, most of the code is devoted to preparing the vm_dispatcher - mainly bytecode and memory allocation for the entire interpreter. The most important pieces of code do the following:
- Allocation for bytecode and several variables 1 MB of memory with permission to read, write and execute.
- Allocating 0x10000 bytes with the same resolution for local variables in the virtual machine for the current task chain - vm_stack .
- XOR (exclusive OR) decoding. The decrypted code is unpacked as aPLib. The decryption process in the sample uses a slightly modified version of the XOR dword key. He skips the first six dwords and then applies the XOR to the remaining five dwords using the key. Below is the process algorithm (hereinafter, we call it XOR decryption_code):
int array[6]; int key; for (i = 1; i < 6; i++) { array[i] ^= key; } - Call to the aPLib process to unpack the bytecode. After it, the virtual opcodes still remain encrypted (Figure 6).
The preparation of virtual opcodes (steps 1, 3 and 4) is performed only once, at the beginning, and is skipped in subsequent versions of vm_start , while only commands for using flags and registers are executed.
Figure 6. All code from vm_start to vm_dispatcher is grouped and named depending on the destination.
FinFisher Interpreter
This part includes the vm_dispatcher with all the vm_handlers (34 in FinFisher samples) and is an important element for analyzing and / or virtualizing the virtual machine. The interpreter executes bytecode.
The
jmp dword ptr [eax+ecx*4] command jumps to one of the 34 vm_handlers . Each vm_handler implements one virtual machine command. To understand what each of the vm_handler does , you need to deal with vm_context and vm_dispatcher .1. Creating a graphical structure in IDA
Better understand the interpreter will help create a well-structured diagram. We recommend its division into two parts - vm_start and vm_dispatcher , that is, you need to define the beginning of the function in the first vm_dispatcher command . In this case, the vm_handlers themselves referenced by vm_dispatcher are still missing. You can use the following function to connect these handlers to the vm_dispatcher diagram:
AddCodeXref(addr_of_jmp_instr, vm_handler,XREF_USER|fl_JN) add to the top of the vm_handlers links of the last vm_dispatcher command
AppendFchunk produces an addition at the end
After adding each vm_handler handler to the dispatcher function, the diagram looks like that shown in Figure 7 below.
2. Vm_dispatcher
This part is responsible for processing and decoding bytecode. She performs the following steps:
pushaandpusfto prepare virtual registers and virtual flags for the subsequent execution of virtual commands.- Gets the address of the program in memory and the address of vm_stack
- Reads 24 bytes of bytecode defining the next vm_instruction command and its arguments
- Decrypts bytecode using the previously described XOR procedure.
- Adds the program address in memory as an argument in bytecode if the argument is a global variable.
- Receives a virtual opcode (a number in the range of 0-33) from the decrypted bytecode
- Makes a transition to the appropriate vm_handler handler that interprets the virtual opcode.
After the vm_handler for the command is executed, the same sequence is repeated for the one that follows it, starting with the first vm_dispatcher command . In the case of the vm_call handler , control is passed to vm_start (except when followed by a non-virtualized function).
Figure 7. The vm_dispatcher diagram with all 34 vm_handlers.
3. Vm_context
In this part, we describe the vm_context - the structure used by the virtual machine, containing all the information necessary for the execution of the vm_dispatcher and each vm_handler .
When we study the vm_dispatcher and vm_handlers code in more detail, we can see that it contains commands related to data processing that refer to
ebx+offset , where offset is a number from 0x00 to 0x50. In Figure 8, you can see what the main part of vm_handler 0x05 looks like in one of the FinFisher samples.Figure 8. Screenshot of one of the vm_handlers
The ebx register points to the structure we called vm_context . We need an understanding of how this structure is used - what its members are, what they mean, and how they are applied. To solve this problem for the first time, you will have to guess how vm_context and its parts are used.
For example, let's look at the sequence of commands at the end of vm_dispatcher :
movzx ecx, byte ptr [ebx+0x3C] // vm_handler jmp dword ptr [eax+ecx*4] // 34 vm_handlers Since we know that the last command is a transition to vm_handler , we can conclude that ecx contains a virtual opcode, and therefore the 0x3C vm_struct element refers to a virtual opcode.
Let's make another unfounded assumption. At the end of almost every vm_handler there is the following command:
add dword ptr [ebx], 0x18. The same vm_context element was used earlier in the vm_dispatcher code - just before going to vm_handler . vm_dispatcher copies 24 bytes from a structure element to another location (
[ebx+38h] ) and decrypts it by XOR in order to get part of the current bytecode.That is, we can start to consider the vm_context (
[ebx+0h] ) element as the vm_instruction_pointer pointer, and the decoded position (from [ebx+38h] to [ebx+50h] ) as the virtual team ID, its virtual opcode and arguments. We gave the name vi_params to all this structure.After performing the steps above and using the debugging program, we see which values are contained in the corresponding elements of the structure, that is, we can define all the elements of vm_context .
After analysis, we can restore the structures and vm_context , and FinFisher's vi_params :
struct vm_context { DWORD vm_instruct_ptr; // DWORD vm_stack; // vm_stack DWORD tmp_REG; // “” DWORD vm_dispatcher_loop; // vm_dispatcher DWORD cleanAndVMDispatchFn; // , vm_dispatcher, DWORD cleanUpDynamicCodeFn; // , vm_instr_ptr cleanAndVMDispatchFn DWORD jmpLoc1; // DWORD jmpLoc2; // vm_opcode – vm_instruction DWORD Bytecode_start; // DWORD DispatchEBP; DWORD ImageBase; // DWORDESP0_flags;// ( vm_code) DWORDESP1_flags;// DWORD LoadVOpcodesSectionFn; vi_params bytecode; // vm_handler, DWORD limitForTopOfStack; // }; struct vi_params { DWORD Virtual_instr_id; DWORD OpCode; // values 0 – 33 -> , DWORD Arg0; // 4 dword vm_handler DWORD Arg4; // DWORD Arg8; // DWORD ArgC; // }; 4. Use of virtual teams - vm_handlers
Each vm_handler operates with one virtual opcode, that is, 34 vm_handlers handlers account for a maximum of 34 virtual opcodes. Execution of one vm_handler means execution of one vm_instruction , therefore, to determine what vm_instruction performs, we need to analyze the corresponding vm_handler .
After the reconstruction of vm_context and the name of all indents in ebx, the previously shown vm_handler becomes more readable, it is shown in Figure 9.
At the end of this function, we notice a sequence of commands starting with vm_instruction_pointer , which increases by 24, that is, by the size of the vi_params structure of each of the vm_instruction . Since this sequence is repeated at the end of almost every vm_handler, we conclude that this is the standard terminating function code, and the vm_handler body itself can be written simply as:
mov [tmp_REG], Arg0 So, we have just analyzed the first command of this virtual machine :-)
Figure 9. Previous vm_handler after inserting into vm_context structure
To illustrate the operation of the analyzed command, let us assume that the filling of the vi_params structure is performed as follows:
struct vi_params { DWORD ID_of_virt_instr = , ; DWORD OpCode = 0x0C; DWORD Arg0 = 0x42; DWORD Arg4 = 0; DWORD Arg8 = 0; DWORD ArgC = 0; }; From the above, we see that the following command is executed:
mov [tmp_REG], 0x42 At this stage, we should already understand what one of the vm_instructions performs . The perfect steps should serve as a demonstration of the work of the entire interpreter.
However, there are some vm_handlers that are more difficult to analyze. Conditional jumps of this virtual machine are more difficult to understand because of how the flags are converted.
As noted earlier, vm_dispatcher starts with getting native EFLAGS (from vm_code ) to the top of its own stack. Thus, when the handler of the corresponding transition decides whether or not to perform it, it is checked against EFLAGS on its own stack and applies its own transition method. Figure 10 illustrates how the JNP (Jump if no parity) virtual handler is applied through parity check.
Figure 10. Screenshot of JNP_handler
For the remaining virtual conditional transitions, it may be necessary to check several signs — for example, the result of a virtualized JBE transition (Jump if below or equal) depends on both values, the carry flag and the zero flag, but the principle is the same.
After analyzing all 34 vm_handlers in the FinFisher virtual machine, we can describe its virtual commands as follows:
Figure 11. vm_table with all 34 vm_handlers
Note that the “ tmp_REG ” keyword refers to the virtual register used by the virtual machine, the temporary register in the vm_contex t structure, while “ reg ” refers to the processor's own register, i.e. eax.
Let's look at the analyzed commands of the virtual machine. For example, case_3_vm_jcc is a general handler of a transition command that can execute any processor transition command, conditional and unconditional.
Obviously, this virtual machine does not virtualize every hardware command, this is where commands from the list above will be useful to us (case 4 and case 6).
These two vm_handler are used to execute code directly. All they do is read the opcode of the processor command as an argument and execute the instruction.
It should also be noted that vm_registers are always at the top of their own stack, while the identifier of the executable register is stored in the last byte of the virtual command arg0. To access the corresponding virtual register, you can use the following code:
def resolve_reg(reg_pos): stack_regs = ['eax', 'ecx', 'edx', 'ebx', 'esp', 'ebp', 'esi', 'edi'] stack_regs.reverse() return stack_regs[reg_pos] reg_pos = 7 – (state[arg0] & 0x000000FF) reg = resolve_reg(reg_pos) 5. Writing Your Own Disassembler
After correct analysis of all vm_instructions, there is still one more step that needs to be done before starting to analyze the sample - we need to write our own bytecode disassembler (manually parsing it will be problematic because of its size).
By making efforts and writing a more reliable disassembler, we will save ourselves the strength later when the FinFisher virtual machine changes and is updated.
Let's start with vm_handler 0x0C , which executes the following command:
mov [tmp_REG], reg This command takes exactly one argument — the identifier of the own register used as reg. This identifier should be displayed with the name of its own register, for example, using the command
resolve_regin the example above.To disassemble this vm_handler, you can use the following code:
def vm_0C(state, vi_params): global instr reg_pos = 7 – (vi_arams[arg0] & 0x000000FF) tmpinstr = “mov [tmp_REG], %s” % resolve_reg(reg_pos) instr.append(tmpinstr) return Again, vm_handlers for transitions are harder to understand. In the case of transitions, the components vm_context.vi_params.Arg0 and vm_context. vi_params.Arg1 store the indent to which the transition occurs. This “jump indent” is actually indented in bytecode. To parse the transition handlers, we need to rearrange the marker to the transition area. Such code will suit us:
def computeLoc1(pos, vi_params): global instr jmp_offset = (vi_params[arg0] & 0x00FFFFFF) + (vi_params[arg1] & 0xFF000000) if jmp_offset < 0x7FFFFFFF: jmp_offset /= 0x18 # their increment by 0x18 is my increment by 1 else: jmp_offset = int((- 0x100000000 + jmp_offset) / 0x18) return pos+jmp_offset Finally, there is a vm_handler responsible for executing native commands with arguments that require special handling. For this we need a disassembler for our own x86 commands, for example, the Distorm tool from open access.
The command length is stored in vm_context.vi_params.OpCode & 0x0000FF00. Opcode own team for execution is stored in the arguments. To parse the vm_handler that executes the native code, you can use the code below:
def vm_04(vi_params, pos): global instr nBytes = vi_params[opCode] & 0x0000FF00 dyn_instr = pack(“<LLLL”, vi_params[arg0], vi_params[arg4], vi_params[arg8], vi_params[argC])[0:nBytes] dec_instr = distorm3.Decode(0x0, dyn_instr, distorm3.Decode32Bits) tmpinstr = “%s” % (dec_instr[0][2]) instr.append(tmpinstr) return At this point, we wrote all the functions in Python to parse each of the vm_handlers . All of them, including the code responsible for marking the transition areas, determining the virtual team ID after the call, and some others are needed to write your own disassembler.
After all this, it can be driven by bytecode.
Figure 12. Part of the unpacked and decrypted bytecode FinFisher
For example, from the bytecode shown in Figure 12, we can get the following output:
mov tmp_REG, 0 add tmp_REG, EBP add tmp_REG, 0x10 mov tmp_REG, [tmp_REG] push tmp_REG mov tmp_REG, EAX push tmp_REG 6. Understanding the use of this virtual machine
After analyzing all the virtual handlers and building our own custom disassembler, we can again look at the virtual teams in order to understand the basic idea of creating them.
First, we must understand that virtualization protection was applied at the assembler level. The authors transformed their own teams into their own, somehow complicated, which are executed by a special virtual CPU. For this, a temporary "register" ( tmp_REG ) is used.
We can look at a few examples in order to understand how this transformation works. Take the virtual command from the previous example -
mov tmp_REG, EAX push tmp_REG - it was converted from its own team
push eax. If virtualization is applied, a temporary register is used in the time step to change the command to something more complex.Take another example:
mov tmp_REG, 0 add tmp_REG, EBP add tmp_REG, 0x10 mov tmp_REG, [tmp_REG] push tmp_REG Here are your own commands that have been converted to these virtualized commands (where reg is one of its own registers):
mov reg, [ebp+0x10] push reg However, this is not the only way to virtualize a set of commands. There are other uses of the virtual machine for protection, with other approaches. For example, there is a commercial implementation of protection via a virtual machine that uses the mathematical logic NOR (when both inputs are negative), with several time registers instead of one.
In turn, FinFisher did not go so far and did not transform all its own commands. While many of them are virtualized, some may not be so - these are mathematical commands such as
add, imuland div. If these commands appear in the original binary file, vm_handlerresponsible for executing own commands is invoked to process them in a protected file. The only change that occurs is that EFLAGS and its own registers are retrieved right before the execution of their own command, and then removed after the execution is completed. So it is possible to avoid the virtualization of each own team.A significant disadvantage of protecting a binary with a virtual machine is the negative impact on performance. In the case of the FinFisher virtual machine, we approximately estimate its speed as more than one hundred times slower than in the case of the internal code, based on counting the number of commands executed for processing each of the vm_instruction ( vm_dispatcher + vm_handler).
Therefore, it makes sense to protect only selected parts of the binaries - and this is what they do in those FinFisher samples that we analyzed.
Moreover, as already mentioned, some of the virtual machine's handlers can directly call their own functions. As a result, virtual machine security users (i.e. FinFisher authors) can decide at assembly stage what functions to protect with its help. For the marked functions, their commands will be virtualized; for the rest, the original functions will be called by the corresponding virtual handler. Thus, the execution of the code may be less time consuming, while the most interesting parts of the binary file remain protected (Figure 13).
13. , FinFisher, ,
7. FinFisher
In addition to the length of the bytecode, which our parser has to handle, it is necessary to remember that in some FinFisher samples there is some mixing. And although the same virtual machine is used for protection, the definition of correspondence between virtual opcodes and vm_handlers does not always coincide. They can be (and this happens) randomly paired, and these pairs are different for different FinFisher samples that we analyze. This means that the vm_handler for the virtual opcode 0x5 in this sample processes the command
mov [tmp_REG], arg0, and in another protected sample it can be assigned to another virtual opcode.To solve this problem, we can use the signature for each of the analyzed vm_handlers. The script for IDA Python in Appendix A can be applied after obtaining the diagram from Figure 7 (it is especially important to remove the obfuscation of the jz / jnz transitions, as described in the first section of this guide), to give names to the handlers based on their signatures. (With minor modifications, this script can also be used to restore signatures if vm_handlers are modified in the updated version of FinFisher.)
As mentioned above, the first vm_handler in the FinFisher sample that you encounter during the analysis may differ from the JL that we cited the sample as an example, but the script will determine all vm_handlers in the right way.
8. Compiling Disassembled Code Without a Virtual Machine
After disassembling and a few changes, it is possible to compile the code. We will use virtual teams as our own. As a result, we get a pure binary code without protection.
Most of the vm_instructions commands can be compiled by simple copying, since at the output of the disassembler, most of the commands look like native ones. But some sections need to be refined in a special way:
• tmp_REG — since we have defined tmp_REG as a global variable, we need to make changes to the code for those cases when the address stored in it is dereferenced. (Since dereferencing an address located in a global variable is not possible for the x86 command set.). For example, a virtual machine contains a virtual command.
mov tmp_REG, [tmp_REG] which needs to be rewritten as follows: push eax mov eax, tmp_REG mov eax, [eax] mov tmp_REG, eax pop eax • Flags - virtual teams do not change flags, and their own math commands do this. Therefore, it is important for us that the virtual math teams in the devirtualized binary do not do this either, which means the need to preserve the flags before executing the commands and restoring them after the completion of execution.
• Transitions and calls - we need to move the marker to the area of the virtual team (transition) or function (call).
• Call API functions - in most cases they are loaded dynamically, in other cases they are accessed from the IAT (address import table) of the binary file, so they need to be processed accordingly.
• Global variables, own code - some global variables must be stored in a devirtualized binary. Also, in the FinFisher dropper there is a function to switch between x64 and x86, which is performed in processor mode (in fact, this is done only with the help of a command
retf). All this needs to be kept in the compilation process.Depending on the result, at the output of your disassembler you may still need to make a couple more changes to get your own commands that can be compiled. Then you will need to compile the code using your preferred compiler into a binary without a virtual machine.
Conclusion
In this tutorial, we described how FinFisher uses two ways to protect the main deliverable component. The goal of protection is not to counter anti-virus detection, but to hide configuration files and new techniques used in spyware by creating difficulties for reverse engineering. Since to date, no other detailed analysis of the FinFisher obfuscated spyware has been published, the task of the developers of this protection mechanism could now be considered to have been successfully completed.
We showed how the level of protection opposing disassembling can be overcome by the automatic method, and how to effectively analyze the virtual machine.
We hope that the guide will help reverse engineering specialists to analyze the virtual machine protected FinFisher samples, as well as provide a better understanding of the specifics of protection using the virtual machine as a whole.
Appendix A
IDA Python script to name vm_handlers in FinFisher
This script is also available in the ESET repository on GitHub .
import sys SIGS={'8d4b408b432c8b0a90800f95c2a980000f95c03ac275ff631c':'case_0_JL _loc1','8d4b408b432c8b0a9400074ff631c':'case_1_JNP_loc1','8d4b408b432c 8b0a94000075a90800f95c2a980000f95c03ac275ff631c':'case_2_JLE_loc1','8d4 b408b7b508b432c83e02f8dbc38311812b5c787cfe7ed4ae92f8b066c787d3e7e 4af9b8e80000588d80' : 'case_3_vm_jcc', '8b7b508b432c83e02f3f85766c77ac6668 137316783c728d7340fb64b3df3a4c67e98037818b43c89471c64756c80775af83318588b6 32c' : 'case_4_exec_native_code', '8d4b408b98b438898833188b43c8b632c' : 'c ase_5_mov_tmp_REGref_arg0', '8b7b508b432c83e02f3f85766c77ac6668137316783c7 28d7340fb64b3df3a4c67e98037818b43c89471c64756c80775af83318588b632c' : 'cas e_6_exec_native_code','8d4b408b432c8b0a94000075ff631c':'case_7_JZ_loc1' , '8d4b408b432c8b0a94000075a90800f95c2a980000f95c03ac275ff6318' : 'case_8_ JG_loc1','8d43408b089438833188b43c8b632c':'case_9_mov_tmp_REG_arg0','3 3c9894b8833188b632c8b43c' : 'case_A_zero_tmp_REG', '8d4b408b432c8b0a980000 75ff631c':'case_B_JS_loc1','8d4b40fb69b870002bc18b4b2c8b548148b4b889118 33188b43c8b632c' : 'case_C_mov_tmp_REGDeref_tmp_REG', '8d4b40fb69b870002bc 18b4b2c8b4481489438833188b43c8b632c' : 'case_D_mov_tmp_REG_tmp_REG', '8d4b 408b432c8b0a9100075ff631c':'case_E_JB_loc1','8d4b408b432c8b0a9100075a94 000075ff631c':'case_F_JBE_loc1','8d4b408b432c8b0a94000074ff631c':'cas e_10_JNZ_loc1','8d4b408b432c8b0a9080074ff631c':'case_11_JNO_loc1','8b7 b50834350308d4b408b414343285766c773f50668137a231c6472c280772aa8d57d83c7389 1783ef3c7477a300080777cb83c7889783ef8c647cf28077c3183c7dc67688b383c0188947 183c7566c7777fe668137176283c72c672d803745895f183c75c67848037df478b4314c674 08037288947183c75c67928037515f8b632c' : 'case_12_vm_call', '8d4b40b870002b 18b532c8b4482489438833188b43c8b632c' : 'case_13_mov_tmp_REG_tmp_REG_notRly ','8d4b408b432c8b0a9400075ff631c':'case_14_JP_loc1','8d4b40fb69b870002 bc18b4b2c8b5388954814833188b43c8b632c' : 'case_15_mov_tmp_REG_tmp_REG', '8 d4b408b432c8b0a9080075ff631c':'case_16_JO_loc1','8d4b408b432c8b0a90800f 95c2a980000f95c03ac274ff631c':'case_17_JGE_loc1','8b4388b089438833188b4 3c8b632c' : 'case_18_deref_tmp_REG', '8d4b408b4388b9d3e089438833188b43c8b6 32c' : 'case_19_shl_tmp_REG_arg0l', '8d4b408b432c8b0a98000074ff631c' : 'ca se_1A_JNS_loc1','8d4b408b432c8b0a9100074ff631c':'case_1B_JNB_loc1','8b 7b2c8b732c83ef4b924000fcf3a4836b2c48b4b2c8b438894124833188b43c8b632c' : 'c ase_1C_push_tmp_REG', '8d4b408b432c8b0a94000075a9100075ff6318' : 'case_1D_ JA_loc1','8d4b40b870002b18b532c8b448241438833188b43c8b632c':'case_1E_ad d_stack_val_to_tmp_REG', '8b7b508343503066c77ac3766813731565783c728d4b40c6 72e803746fb6433d3c783c058947183c758d714fb64b3df3a45ac671280377a8b383c01889 47183c7566c777f306681371fac83c72c671f803777895f183c75c677080372b47c6798037 618b4b14894f183c75c67778037b48b632c8d12' : 'case_1F_vm_jmp', '8d4b408b914b 8833188b43c8b632c' : 'case_20_add_arg0_to_tmp_REG', '8d4b408b98b4388918331 88b632c8b43c' : 'case_21_mov_tmp_REG_to_arg0Dereferenced' } SWITCH = 0 # addr of jmp dword ptr [eax+ecx*4] (jump to vm_handlers) SWITCH_SIZE=34 sig = [] def append_bytes(instr, addr): for j in range(instr.size): sig.append(Byte(addr)) addr += 1 return addr defmakeSigName(sig_name,vm_handler): print “naming %x as %s” % (vm_handler, sig_name) MakeName(vm_handler,sig_name) return if SWITCH == 0: print “First specify address of switch jump - jump to vm_handlers!” sys.exit(1) foriinrange(SWITCH_SIZE): addr = Dword(SWITCH+i*4) faddr = addr sig = [] while 1: instr = DecodeInstruction(addr) if instr.get_canon_mnem() == “jmp” and (Byte(addr) == 0xeb or Byte (addr) == 0xe9): addr = instr.Op1.addr continue if instr.get_canon_mnem() == “jmp” and Byte(addr) == 0xff and Byte (addr+1) == 0x63 and (Byte(addr+2) == 0x18 or Byte(addr+2) == 0x1C): addr = append_bytes(instr, addr) break if instr.get_canon_mnem() == “jmp” and Byte(addr) == 0xff: break if instr.get_canon_mnem() == “jz”: sig.append(Byte(addr)) addr += instr.size continue if instr.get_canon_mnem() == “jnz”: sig.append(Byte(addr)) addr += instr.size continue if instr.get_canon_mnem() == “nop”: addr += 1 continue addr = append_bytes(instr, addr) sig_str = “”.join([hex(l)[2:] for l in sig]) hsig = ''.join(map(chr, sig)).encode(“hex”) for key, value in SIGS.iteritems(): if len(key) > len(sig_str): ifkey.find(sig_str)>=0: makeSigName(value,faddr) else: ifsig_str.find(key)>=0: makeSigName(value,faddr) Source: https://habr.com/ru/post/354830/
All Articles