Flask Mega-Tutorial, Part XXII: Background Tasks
(edition 2018)
Miguel grinberg


This is the twenty-second part of the Mega-Tutorial, in which I will tell you how to create background tasks that work independently of the web server.
Under the spoiler is a list of all articles in the 2018 series.
- Chapter 1: Hello world!
- Chapter 2: Templates
- Chapter 3: Web Forms
- Chapter 4: Database
- Chapter 5: User Logins
- Chapter 6: Profile Page and Avatars
- Chapter 7: Error Handling
- Chapter 8: Subscribers, Contacts, and Friends
- Chapter 9: Pagination
- Chapter 10: Email Support
- Chapter 11: Reconstruction
- Chapter 12: Date and Time
- Chapter 13: I18n and L10n
- Chapter 14: Ajax
- Chapter 15: Improving Application Structure
- Chapter 16: Full Text Search
- Chapter 17: Deploying to Linux
- Chapter 18: Deploying to Heroku
- Chapter 19: Deploying to Docker Containers
- Chapter 20: JavaScript Magic
- Chapter 21: User Notifications
- Chapter 22: Background Tasks (This article)
- [ Chapter 23: Application Programming Interfaces (API) ] ( https://habr.com/post/358152/ )
Note 1: If you are looking for old versions of this course, this is here .
Note 2: If suddenly you would like to speak in support of my (Miguel) work, or simply do not have the patience to wait for the article for a week, I (Miguel Greenberg) offer the full version of this manual (in English) in the form of an electronic book or video. For more information, visit learn.miguelgrinberg.com .
This chapter focuses on the implementation of long-running or complex processes that must be performed as part of an application. These processes cannot be performed synchronously in the context of the request because they block the response to the client for the duration of the task. I briefly touched on this topic in Chapter 10 , moving the sending of e-mail messages to background threads so that the client does not have to wait for the 3-4 seconds that are required to send e-mail. Although the use of flows for e-mail is acceptable, this solution does not scale well when the processes in question are much longer. A common practice is to upload long tasks to a workflow, or, most likely, to a pool.
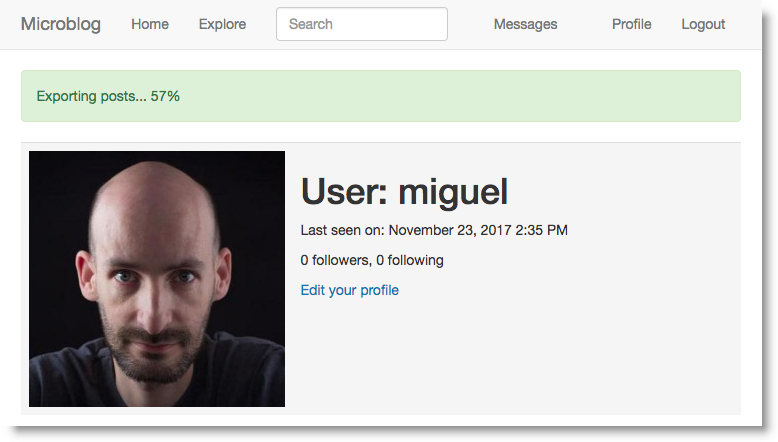
To justify the need for lengthy tasks, I'm going to introduce the export function in Microblog, through which users will be able to request a data file with all of their blog posts. When a user uses this option, the application should export all user messages to a JSON file, and then send it to the user by email. While this is happening, the user will see a notification indicating the percent complete.
GitHub links for this chapter: Browse , Zip , Diff .
Introduction to Task Queues
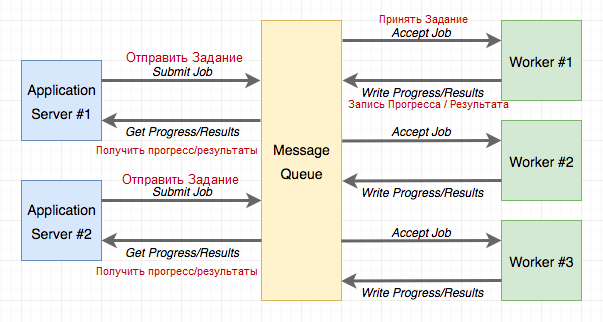
Task queues provide the application with a convenient solution for requesting the task to be completed by a workflow. Workflows run independently of the application and may even be located on another system. Communication between the application and the handler is carried out through the message queue . The application sends the job, and then tracks its execution, interacting with the queue. The following diagram shows a typical implementation:
The most popular task queue for Python is Celery . This is a fairly complex package that has many options and supports multiple message queues. Another popular version of the Python task queue is Redis Queue or simply RQ, which only supports Redis Message Queuing, but is much easier to configure than Celery.
Both Celery and RQ are quite suitable for supporting background tasks in a Flask application, so the simplicity of RQ will contribute to my choice for this application. However, implementing the same functionality with Celery is not much more difficult. If you are interested in Celery more than RQ, you can read the article Using Celery with Flask , which I wrote on my blog.
Using RQ
RQ - standard Python package, which is installed via pip :
(venv) $ pip install rq (venv) $ pip freeze > requirements.txt As I mentioned earlier, the connection between the application and the RQ handler will be in the Redis message queue, so you need to start the Redis server. There are many options for installing and running the Redis server in one click to download the source installers and compile it directly on your system. If you are using Windows, then Microsoft supports installers here . In Linux, you can probably get it as a package through the package manager of your operating system. Mac OS X users can start brew install redis , and then start the service manually using the redis-server command.
You will not need to interact with Redis in everything except checking that the service is running and available for RQ.
Creating a Task (Tasks)
I will show you how to accomplish a simple task through RQ so that you can familiarize yourself with it. Task is nothing more than a Python function. Here is an example of the task that I am going to implement in the new app / tasks.py module :
app / tasks.py : An example background task.
import time def example(seconds): print('Starting task') for i in range(seconds): print(i) time.sleep(1) print('Task completed') This task takes the number of seconds as an argument, and then waits for this time, printing the counter once per second.
Run RQ Worker
Now that the task is ready, the handler can start. This is done using the rq worker command:
(venv) $ rq worker microblog-tasks 18:55:06 RQ worker 'rq:worker:miguelsmac.90369' started, version 0.9.1 18:55:06 Cleaning registries for queue: microblog-tasks 18:55:06 18:55:06 *** Listening on microblog-tasks... The workflow is now connected to Redis and keeps track of all tasks that can be assigned to it in a queue with the name microblog-tasks . In cases where it is required that several handlers have more bandwidth, all you need to do is run more rq worker instances, all connected to the same queue. Then, when the task appears in the queue, it will be selected by any of the available workflows. In a production environment , you will probably need to have at least as many working processors as available in the CPU.
Task Execution
Now open the second terminal window and activate the virtual environment in it. I'm going to use a shell session to run the example() task in the worker:
>>> from redis import Redis >>> import rq >>> queue = rq.Queue('microblog-tasks', connection=Redis.from_url('redis://')) >>> job = queue.enqueue('app.tasks.example', 23) >>> job.get_id() 'c651de7f-21a8-4068-afd5-8b982a6f6d32' The Queue class from RQ represents the application queue of tasks. It takes two arguments, the name of the queue and the Redis connection object, which in this case I initialize with the default URL. If the Redis server is running on a different host or port, you must use a different URL.
The enqueue() method is used to add a job to the queue. The first argument is the name of the task you want to perform, specified directly as a function object or as an import string. I find the string option to be much more convenient, since it makes it unnecessary to import a function on the application side. All remaining arguments given to enqueue() will be passed to the function running in the worker.
As soon as the enqueue() call is made, you will notice some activity in the first terminal window in which the worker RQ is running. You will see that the example() function now works and prints a counter once per second. At the same time, your other terminal is not locked, and you can continue evaluating the expressions in the shell. In the example above, I called the job.get_id() method to get a unique task identifier. Another interesting expression that you can try to use with the job object is to check whether the function has ended in the workplace:
>>> job.is_finished False If you passed 23 as I did in my example above, then the function will work for about 23 seconds. After this time, job.is_finished will become True . Is not that great?! I really like the simplicity of RQ!
As soon as the function finishes, the worker ( worker ) returns to waiting for new jobs, so you can repeat the call to enqueue() with other arguments if you want to experiment more. The data that is stored in the queue regarding the task will remain there for a while (by default, 500 seconds), but eventually will be deleted. This is important, the task queue does not save the history of completed tasks.
Task progress report
The example of the task that I used above is unrealistically simple. Typically, during a lengthy task, you want some progress information to be available to the application, which, in turn, can show it to the user. RQ supports this with the meta job object attribute. Let me rewrite the example() task to record progress reports:
app / tasks.py : An example of a background task with a progress report.
import time from rq import get_current_job def example(seconds): job = get_current_job() print('Starting task') for i in range(seconds): job.meta['progress'] = 100.0 * i / seconds job.save_meta() print(i) time.sleep(1) job.meta['progress'] = 100 job.save_meta() print('Task completed') This new version of example() uses the RQ get_current_job() function to get an instance of the task, similar to the one that is returned to the application when the task is sent. The meta object object attribute is a dictionary in which the task can write any user data that it wants to transfer to the application. In this example, for recording, I use the progress element, which represents the percentage of task completion. Every time progress is updated, I call job.save_meta() to job.save_meta() RQ to write data to Redis where the application can find it.
On the application side (currently only the Python shell), I can run this task and then track the progress as follows:
>>> job = queue.enqueue('app.tasks.example', 23) >>> job.meta {} >>> job.refresh() >>> job.meta {'progress': 13.043478260869565} >>> job.refresh() >>> job.meta {'progress': 69.56521739130434} >>> job.refresh() >>> job.meta {'progress': 100} >>> job.is_finished True As you can see above, on this side, the meta attribute is readable. To refresh the contents from Redis, you must call the refresh() method.
Representation of tasks in the database
For the example above, it was enough to run the task and see how it is executed. For a web application, things get a little more complicated, because as soon as one of these tasks starts as part of the request, this request is completed and the entire context for this task is lost. Since I want the application to track which tasks each user performs, I need to use a database table to maintain some state. Below you can see a new implementation of the Task model:
app / models.py : Task model.
# ... import redis import rq class User(UserMixin, db.Model): # ... tasks = db.relationship('Task', backref='user', lazy='dynamic') # ... class Task(db.Model): id = db.Column(db.String(36), primary_key=True) name = db.Column(db.String(128), index=True) description = db.Column(db.String(128)) user_id = db.Column(db.Integer, db.ForeignKey('user.id')) complete = db.Column(db.Boolean, default=False) def get_rq_job(self): try: rq_job = rq.job.Job.fetch(self.id, connection=current_app.redis) except (redis.exceptions.RedisError, rq.exceptions.NoSuchJobError): return None return rq_job def get_progress(self): job = self.get_rq_job() return job.meta.get('progress', 0) if job is not None else 100 An interesting difference of this model from the previous ones is that the primary key field id is a string, not an integer. This is because for this model I am not going to rely on my own generation of the primary key by the database, but instead will use task identifiers created by RQ.
The model will store the full name of the task (submitted to RQ), a description of the task suitable for display to users, a connection with the user who requested the task, and a logical value indicating whether the task is completed or not. The purpose of the complete field is to separate completed tasks from tasks that are being actively executed, since the tasks that are being performed require special processing to display the progress of the updates.
The get_rq_job() method is a helper method that loads an RQ Job instance from a given task identifier, which I can get from the model. This is done using Job.fetch() , which loads an instance of a job from data that exists in Redis. The get_progress() method builds on top of the get_rq_job() method and returns the percent completion of the task. This method has some interesting assumptions. If the job ID from the model does not exist in the RQ queue, this means that the job has already been completed, and the data has expired and has been removed from the queue, so in this case 100 percent is returned. On the other hand, if the task exists, but there is no information associated with the meta attribute, then we can safely assume that the task is scheduled for execution, but it has not yet been possible to start, so 0 returns as progress in this situation.
To apply the changes to the database schema, you must create a new migration and then update the database:
(venv) $ flask db migrate -m "tasks" (venv) $ flask db upgrade A new model can also be added to the shell context to make it available in shell sessions without the need to import it:
microblog.py : Add the task model to the shell context.
from app import create_app, db, cli from app.models import User, Post, Message, Notification, Task app = create_app() cli.register(app) @app.shell_context_processor def make_shell_context(): return {'db': db, 'User': User, 'Post': Post, 'Message': Message, 'Notification': Notification, 'Task': Task} RQ integration with Flask
In the configuration, you must add the connection URL for the Redis service:
class Config(object): # ... REDIS_URL = os.environ.get('REDIS_URL') or 'redis://' As always, the Redis connection URL will be obtained from the environment variable, and if the variable is not defined, the default URL will be used, which assumes that the service is running on the same host and port as the default.
The application factory function will be responsible for initializing Redis and RQ:
app / _ init_ .py : RQ integration.
# ... from redis import Redis import rq # ... def create_app(config_class=Config): # ... app.redis = Redis.from_url(app.config['REDIS_URL']) app.task_queue = rq.Queue('microblog-tasks', connection=app.redis) # ... app.task_queue will be the queue in which tasks will be presented. Having a queue attached to an application is convenient because I can use current_app.task_queue to access it anywhere on the application. To facilitate sending or checking any part of an application, I can create several helper methods in the User model:
app / models.py : Helper methods of the task in the user model.
# ... class User(UserMixin, db.Model): # ... def launch_task(self, name, description, *args, **kwargs): rq_job = current_app.task_queue.enqueue('app.tasks.' + name, self.id, *args, **kwargs) task = Task(id=rq_job.get_id(), name=name, description=description, user=self) db.session.add(task) return task def get_tasks_in_progress(self): return Task.query.filter_by(user=self, complete=False).all() def get_task_in_progress(self, name): return Task.query.filter_by(name=name, user=self, complete=False).first() The launch_task() method transfers the task to the RQ queue along with adding it to the database. The name argument is the name of the function, as defined in app / tasks.py . When sent to RQ, the function adds to app.tasks . name to build the full name of the function. The description argument is a clear description of the task that can be presented to users. For the function of exporting a blog post, I will use the name export_posts and descriptions Exporting posts... The remaining arguments are positional and key arguments that will be passed to the task. The function starts by calling the enqueue() method of the queue to send the job. The returned job object contains the task id assigned by the RQ, so I can use it to create the corresponding task object in my database.
Note that launch_task() adds, but does not fix, a new Task object in the session. In general, it is best to work with a database session in higher-level functions, since this allows you to combine several updates made by lower-level functions into a single transaction. This is not a strict rule, and later in this chapter you will see an exception in which a commit is performed in a child function.
The get_tasks_in_progress() method returns a complete list of functions that are get_tasks_in_progress() user. Later you will see that I use this method to include information about the tasks performed on the pages that are displayed to the user.
Finally, get_task_in_progress() is a simpler version of the previous one that returns a specific task. I prohibit users from running two or more tasks of the same type at the same time, so before starting a task, I can use this method to find out if the previous task is currently being executed.
Sending emails from RQ Task
This may seem like a departure from the main topic, but as I said above, with the completion of the background export task, an email will be sent to the user with a JSON file that contains all the messages. The email functionality I introduced in Chapter 11 needs to be extended in two ways. First, I need to add file attachment support so that I can attach a JSON file. Secondly, the send_email() function sends letters asynchronously using a background thread. When I am going to send an email from a background task that is already asynchronous, having a second level background task based on a thread makes little sense, so I need to support both synchronous and asynchronous sending of email.
Fortunately, Flask-Mail supports attachments, so all I need to do is extend the send_email() function to take them (attachments) into an additional argument, and then set them up in the Message object. And in addition to send the letter as a priority task, I just need to add a boolean sync argument:
app / email.py : Sending emails with attachments.
# ... def send_email(subject, sender, recipients, text_body, html_body, attachments=None, sync=False): msg = Message(subject, sender=sender, recipients=recipients) msg.body = text_body msg.html = html_body if attachments: for attachment in attachments: msg.attach(*attachment) if sync: mail.send(msg) else: Thread(target=send_async_email, args=(current_app._get_current_object(), msg)).start() The attach() method of the Message class takes three arguments that define the attachment: File name, Media type, and actual file data. The file name is just the name that the recipient will see associated with the attachment; it should not be a real file. The media type determines which type of attachment it is, which helps e-mail readers display it accordingly. For example, if you send jpg/png as a media type, the email reader will know that the attachment is an image, in which case it can show it as such. For the blog entry data file, I'm going to use the JSON format, which uses the application/json media type. The third and last argument is a string or sequence of bytes with the contents of the attachment.
To make it simple, the attachments argument to send_email() will be a list of tuples, and each tuple will have three elements that correspond to the three arguments to attach() . Therefore, for each item in this list, you must send a tuple as an attach() argument. In Python, if you have a list or a tuple with arguments that you want to send to a function, you can use func(*args) to expand this list to an actual argument list, instead of using a more tedious syntax, such as func(args[0], args[1], args[2]) . For example, if you have args = [1, 'foo'] , the call will send two arguments, as if you called func (1, 'foo') . Without * call would have a single argument that would be a list.
As for the synchronous sending of email, I just had to return to the mail.send(msg) call directly when sync is True .
Task helpers
Although the example() task I used above was a simple standalone function, a function that exports blog posts will require some of the functions that I have in the application, like database access and email sending functions. Since this will be done in a separate process, I need to initialize Flask-SQLAlchemy and Flask-Mail, which, in turn, need an instance of the Flask application from which to get their configuration. So I'm going to add an instance of the Flask application and the application context at the top of the app / tasks.py module :
app / tasks.py : Application creation and context.
from app import create_app app = create_app() app.app_context().push() The application is created in this module, since it is the only module that will import the RQ worker. When using the flask command, the microblog.py module in the root directory creates an application, but the RQ worker does not know anything about it, so it needs to create its own instance of the application, if necessary for the task functions. You have already seen the app.app_context() method in several places, pressing the context makes the application the “current” application instance, and this allows extensions such as Flask-SQLAlchemy to use current_app.config to get their configuration. Without context, the expression current_app returns an error.
Then I thought about how I would report on the progress of this function. In addition to sending progress information through the job.meta dictionary, I would like to send notifications to the client so that the completion percentage can be dynamically updated without having to refresh the page. To do this, I'm going to use notification mechanisms similar to the ones I created in Chapter 21 . Updates will work similarly to the unread message icon. When the server displays the template, it will include the "static" progress information obtained from job.meta , but then, as soon as the page appears in the client browser, the notifications will dynamically update the percentage using notifications. Because of the notifications, updating the progress of the running task will be a little more complicated than how I did it in the previous example, so I'm going to create a decorator function to update the progress:
app / tasks.py : Set task progress.
from rq import get_current_job from app import db from app.models import Task # ... def _set_task_progress(progress): job = get_current_job() if job: job.meta['progress'] = progress job.save_meta() task = Task.query.get(job.get_id()) task.user.add_notification('task_progress', {'task_id': job.get_id(), 'progress': progress}) if progress >= 100: task.complete = True db.session.commit() The export task can call _set_task_progress() to record the percent complete. job.meta Redis, task task.user , , add_notification() . task_progress , , , , (progress number). JavaScript, .
, , , complete . , , add_notification() , . , , - , .
. :
app/tasks.py : .
def export_posts(user_id): try: # # except: # try/except? , , , Flask , , , . , , , RQ, Flask, , , , RQ , . , RQ worker -, , .
, , :
app/tasks.py : .
import sys # ... def export_posts(user_id): try: # ... except: _set_task_progress(100) app.logger.error('Unhandled exception', exc_info=sys.exc_info()) , , , 100%, logger Flask , sys.exc_info() . , flask Application logger , Flask . , 7 . app.logger .
, , :
app/tasks.py : .
import time from app.models import User, Post # ... def export_posts(user_id): try: user = User.query.get(user_id) _set_task_progress(0) data = [] i = 0 total_posts = user.posts.count() for post in user.posts.order_by(Post.timestamp.asc()): data.append({'body': post.body, 'timestamp': post.timestamp.isoformat() + 'Z'}) time.sleep(5) i += 1 _set_task_progress(100 * i // total_posts) # except: # ... , . ISO 8601. datetime Python, , , ISO "Z", UTC.
- . i , , total_posts , . i total_posts 0 100.
, , time.sleep(5) . , sleep, , , .
, , data :
app/tasks.py : .
import json from flask import render_template from app.email import send_email # ... def export_posts(user_id): try: # ... send_email('[Microblog] Your blog posts', sender=app.config['ADMINS'][0], recipients=[user.email], text_body=render_template('email/export_posts.txt', user=user), html_body=render_template('email/export_posts.html', user=user), attachments=[('posts.json', 'application/json', json.dumps({'posts': data}, indent=4))], sync=True) except: # ... send_email() . , attach() Flask-Mail's Message . - , Python json.dumps() .
, , HTML . :
app/templates/email/export_posts.txt : Export posts text email template.
Dear {{ user.username }}, Please find attached the archive of your posts that you requested. Sincerely, The Microblog Team HTML- :
app/templates/email/export_posts.html: Export posts HTML email template.
<p>Dear {{ user.username }},</p> <p>Please find attached the archive of your posts that you requested.</p> <p>Sincerely,</p> <p>The Microblog Team</p> . , .
export_posts :
app/main/routes.py : Export posts route and view function.
@bp.route('/export_posts') @login_required def export_posts(): if current_user.get_task_in_progress('export_posts'): flash(_('An export task is currently in progress')) else: current_user.launch_task('export_posts', _('Exporting posts...')) db.session.commit() return redirect(url_for('main.user', username=current_user.username)) , , . , . , get_task_in_progress() , .
, launch_task() . - , RQ worker app.tasks. . - , . Task . .
, . , , , " ":
app/templates/user.html : .
... <p> <a href="{{ url_for('main.edit_profile') }}"> {{ _('Edit your profile') }} </a> </p> {% if not current_user.get_task_in_progress('export_posts') %} <p> <a href="{{ url_for('main.export_posts') }}"> {{ _('Export your posts') }} </a> </p> ... {% endif %} , , , .
, . , RQ worker :
- , Redis
- , RQ.
rq worker microblog-tasks - Flask,
flask run(FLASK_APP)
, . Bootstrap, . - , . - , . , . , :
app/templates/base.html : .
... {% block content %} <div class="container"> {% if current_user.is_authenticated %} {% with tasks = current_user.get_tasks_in_progress() %} {% if tasks %} {% for task in tasks %} <div class="alert alert-success" role="alert"> {{ task.description }} <span id="{{ task.id }}-progress">{{ task.get_progress() }}</span>% </div> {% endfor %} {% endif %} {% endwith %} {% endif %} ... {% endblock %} ... . . , get_tasks_in_progress() , . , , , , .
alert . CSS, alert-success , alert-info. Bootstrap HTML . , , .
<span> , id . , JavaScript . , , -progress . , , <span> #<task.id> - progress .
, "" , . , , .
<span> , JavaScript:
app/templates/base.html : .
... {% block scripts %} ... <script> ... function set_task_progress(task_id, progress) { $('#' + task_id + '-progress').text(progress); } </script> ... {% endblock %} id jQuery <span> . , , jQuery , .
, _set_task_progress() app/tasks.py add_notification() . , - , , 21 , . , add_notification() , , .
JavaScript, , , unread_message_count , . , task_progress , set_task_progress() , . , JavaScript:
app/templates/base.html : .
for (var i = 0; i < notifications.length; i++) { switch (notifications[i].name) { case 'unread_message_count': set_message_count(notifications[i].data); break; case 'task_progress': set_task_progress( notifications[i].data.task_id, notifications[i].data.progress); break; } since = notifications[i].timestamp; } , , if , unread_message_count , switch , , . "C", , switch . , if/elseif . , .
, , RQ task_progress , task_id progress , set_task_progress() .
, 10 , .
, , . , , Flask-Babel , :
(venv) $ flask translate update , , app/translations/es/LC_MESSAGES/messages.po .
, , :
(venv) $ flask translate compile . : Redis RQ. , , , , , .
Linux
Linux, Redis , . Ubuntu Linux sudo apt-get install redis-server .
RQ, " Gunicorn Supervisor" 17 , Supervisor, rq worker-tasks gunicorn . (, , production), numprocs , , .
Heroku
Heroku, Redis . , Postgres. Redis , :
$ heroku addons:create heroku-redis:hobby-dev URL- redis Heroku REDIS_URL , , .
Heroku web-dyno worker dyno, rq , . procfile:
web: flask db upgrade; flask translate compile; gunicorn microblog:app worker: rq worker microblog-tasks :
$ heroku ps:scale worker=1 Docker
Docker Redis. Redis Docker:
$ docker run --name redis -d -p 6379:6379 redis:3-alpine redis REDIS_URL , , MySQL. , redis:
$ docker run --name microblog -d -p 8000:5000 --rm -e SECRET_KEY=my-secret-key \ -e MAIL_SERVER=smtp.googlemail.com -e MAIL_PORT=587 -e MAIL_USE_TLS=true \ -e MAIL_USERNAME=<your-gmail-username> -e MAIL_PASSWORD=<your-gmail-password> \ --link mysql:dbserver --link redis:redis-server \ -e DATABASE_URL=mysql+pymysql://microblog:<database-password>@dbserver/microblog \ -e REDIS_URL=redis://redis-server:6379/0 \ microblog:latest , RQ. , , , , start up, -. docker run , worker:
$ docker run --name rq-worker -d --rm -e SECRET_KEY=my-secret-key \ -e MAIL_SERVER=smtp.googlemail.com -e MAIL_PORT=587 -e MAIL_USE_TLS=true \ -e MAIL_USERNAME=<your-gmail-username> -e MAIL_PASSWORD=<your-gmail-password> \ --link mysql:dbserver --link redis:redis-server \ -e DATABASE_URL=mysql+pymysql://microblog:<database-password>@dbserver/microblog \ -e REDIS_URL=redis://redis-server:6379/0 \ --entrypoint venv/bin/rq \ microblog:latest worker -u redis://redis-server:6379/0 microblog-tasks Docker , . --entrypoint , ( ) . rq venv/bin/rq , .
')
Source: https://habr.com/ru/post/354752/
All Articles