Configure VPN server (GRE / IPSec StrongSwan, OSPF Quagga)
Who would have thought that deploying some of the company's servers at Amazon was a bad idea.
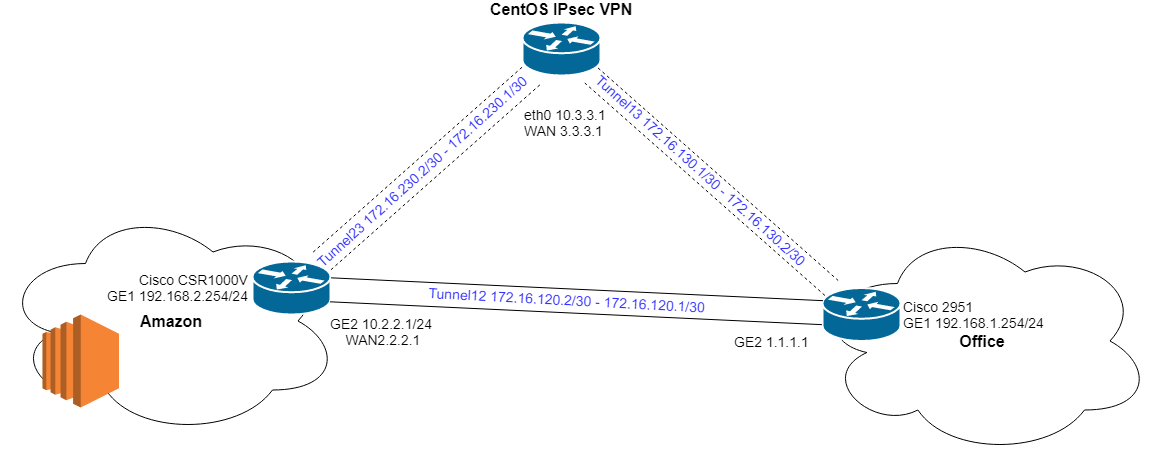
As a result, the task is to make an additional VPN tunnel between Amazon and infrastructure in the Russian Federation.
In addition to a simple how-to describe a few features in the configuration that can be encountered.
')
As a result, the task is to make an additional VPN tunnel between Amazon and infrastructure in the Russian Federation.
In addition to a simple how-to describe a few features in the configuration that can be encountered.
')
Configuring firewall and routing
We buy a VPS hoster from an as yet unblocked for an amount equivalent to 10,000 Mongolian MNT per month, we put CentOS 7, we include packet forwardingecho net.ipv4.ip_forward=1 >>/etc/sysctl.d/ipv4.forward.enable.conf sysctl -a
Add in the firewall rules for receiving IPsec packetsfirewall-cmd --zone=dmz --permanent --add-rich-rule='rule protocol value="esp" accept' firewall-cmd --zone=dmz --permanent --add-port=500/udp firewall-cmd --zone=dmz --permanent --add-port=4500/udp firewall-cmd --permanent --add-service="ipsec" firewall-cmd --reload firewall-cmd --list-allStrongSwan setup
Install the IPsec StrongSwan daemon:yum install -y epel-release yum install -y strongswan
Making the preliminary settings in /etc/strongswan.d/charon.conf :charon { # Cisco IKEv2 make_before_break = yes # install_routes = no }
Setting Strongswan can be done in two ways.The old way using the strongswan daemon is already quite well described:
configuration file
/etc/strongswan/ipsec.conf
File with passwords and certificates:
/etc/ipsec.secrets
Stop Service:systemctl stop strongswanA new way using the charon daemon, which appeared in version 5.2.0:
The whole configuration is stored in /etc/strongswan/swanctl/swanctl.conf
Consider two options for setting up the charon daemon:Same authentication and encryption settings for everyone. Let's make only PSK different:
connections { ToWorld { local_addrs = 10.3.3.1 version = 1 proposals = aes256-sha1-modp1536 reauth_time = 1440m local { auth = psk } remote { auth = psk } children { ToWorld-1 { local_ts = dynamic[gre] remote_ts = dynamic[gre] mode = transport esp_proposals = aes128-sha1-modp1536 rekey_time = 60m start_action = trap dpd_action = restart } } } } secrets { ike-To-2951 { id = 1.1.1.1 secret = "etokto2ttakoimohnatenkyi" } ike-To-CSR1000V { id = 2.2.2.2 secret = "zdorovkakzhiznkasampro100klass" } }Individual authentication and encryption settings:
connections { To2951 { encap = no remote_addrs = 1.1.1.1 version = 1 proposals = aes256-sha1-modp1536 reauth_time = 1440m fragmentation = yes local-1 { auth = psk id = 10.3.3.1 } remote-1 { auth = psk } children { To2951-1 { local_ts = 10.3.3.1/32[gre] remote_ts = 1.1.1.1/32[gre] mode = transport esp_proposals = aes128-sha1-modp1536 rekey_time = 60m start_action = start dpd_action = restart } } } ToCSR1000V { encap = no remote_addrs = 2.2.2.2 version = 1 proposals = aes256-sha1-modp1536 reauth_time = 1440m fragmentation = yes local-1 { auth = psk id = 10.3.3.1 } remote-1 { auth = psk } children { ToCSR1000V-1 { local_ts = 10.3.3.1/32[gre] remote_ts = 2.2.2.2/32[gre] mode = transport esp_proposals = aes128-sha1-modp1536 rekey_time = 60m start_action = start dpd_action = restart } } } } secrets { ike-To-2951 { id-1 = 1.1.1.1 secret = "etokto2ttakoimohnatenkyi" } ike-To-CSR1000V { id-1 = 2.2.2.2 secret = "zdorovkakzhiznkasampro100klass" } }
Turn on the servicesudo systemctl enable strongswan-swanctl sudo systemctl start strongswan-swanctlLifting Tunnels with Cisco Routers
We configure GRE tunnels in CentOS
Create/etc/sysconfig/network-scripts/ifcfg-Tunnel13NAME=Tunnel13 DEVICE=Tunnel13 ONBOOT=yes STARTMODE=onboot BOOTPROTO=none TYPE=GRE PEER_OUTER_IPADDR=1.1.1.1 PEER_INNER_IPADDR=172.16.130.2/30 MY_INNER_IPADDR=172.16.130.1/30 MY_OUTER_IPADDR=10.3.3.1 ZONE=trusted TTL=30 MTU=1400
Create/etc/sysconfig/network-scripts/ifcfg-Tunnel23NAME=Tunnel23 DEVICE=Tunnel23 ONBOOT=yes STARTMODE=onboot BOOTPROTO=none TYPE=GRE PEER_OUTER_IPADDR=2.2.2.2 PEER_INNER_IPADDR=172.16.230.2/30 MY_INNER_IPADDR=172.16.230.1/30 MY_OUTER_IPADDR=10.3.3.1 ZONE=trusted TTL=30 MTU=1400
There are a couple of features in configuring GRE interfaces.
The first is to reduce the MTU for correct packet passing.
The second is to specify TTL, this will be needed in the future when we configure OSPF. If this is not done, OSPF packets will arrive at the remote host with a TTL of one (due to GRE over IPsec), remaining unanswered. Accordingly, the devices will hang in the INIT / DROTHER state, we will not wait for connectivity. However, the correct ICMP responses can be confusing.
We lift interfacesifup Tunnel13 ifup Tunnel23We create the tunnel on Cisco 2951
crypto keyring StrongSwanKeyring pre-shared-key address 3.3.3.1 key etokto2ttakoimohnatenkyi crypto isakmp policy 60 encr aes 256 authentication pre-share group 5 crypto isakmp identity address crypto isakmp profile StrongSwanIsakmpProfile keyring StrongSwanKeyring match identity address 3.3.3.1 crypto ipsec transform-set StrongSwanTransformSet esp-aes esp-sha-hmac mode transport crypto ipsec profile StrongSwanIpsecProfile set transform-set StrongSwanTransformSet set pfs group5 set isakmp-profile StrongSwanIsakmpProfile interface Tunnel13 ip address 172.16.130.2 255.255.255.252 tunnel source GigabitEthernet2 tunnel destination 3.3.3.1 tunnel protection ipsec profile StrongSwanIpsecProfileCreate a tunnel on the Cisco CSR1000V
crypto keyring StrongSwanKeyring pre-shared-key address 3.3.3.1 key etokto2ttakoimohnatenkyi crypto isakmp policy 60 encr aes 256 authentication pre-share group 5 crypto isakmp identity address crypto isakmp profile StrongSwanIsakmpProfile keyring StrongSwanKeyring match identity address 3.3.3.1 crypto ipsec transform-set StrongSwanTransformSet esp-aes esp-sha-hmac mode transport crypto ipsec profile StrongSwanIpsecProfile set transform-set StrongSwanTransformSet set pfs group5 set isakmp-profile StrongSwanIsakmpProfile interface Tunnel23 ip address 172.16.230.2 255.255.255.252 tunnel source GigabitEthernet2 tunnel destination 3.3.3.1 tunnel protection ipsec profile StrongSwanIpsecProfile
We check that the tunnels have risen, encryption is working.
On CentOSstrongswan statusall
On ciscoshow crypto session detailConfigure Dynamic Routing on Quagga
If you are using OSPF-based dynamic routing, then the next step would be to raise the OSPF daemon on CentOS, setting up new tunnels as a backup route.Configure OSPF on CentOS
As a daemon, install Quagga:yum install -y quagga
Create the daemon configuration file/etc/quagga/zebra.confhostname StrongSwanServer log file /var/log/quagga/quagga.log ! interface Tunnel13 ip address 172.16.130.1/30 ! interface Tunnel23 ip address 172.16.230.1/30 !
The weight of the path can be adjusted with the cost or bandwidth parameters, setting them on the desired interfaces.
Set rights and enable servicechown quagga:quaggavt /etc/quagga/zebra.conf systemctl enable zebra.service systemctl start zebra.service
Create the daemon configuration file/etc/quagga/ospfd.conflog file /var/log/quagga/ospfd.log ! router ospf ospf router-id 10.3.3.1 passive-interface default no passive-interface Tunnel13 no passive-interface Tunnel23 network 172.16.130.0/30 area 0.0.0.0 network 172.16.230.0/30 area 0.0.0.0
Set rights and enable servicechown quagga:quaggavt /etc/quagga/ospfd.conf systemctl enable ospfd.service systemctl start ospfd.service
Then we can launch the vtysh terminal and work with Quagga in a cis-like interface, for example:vtysh show running-configConfigure OSPF on a Cisco 2951
router ospf 1 passive-interface default no passive-interface Tunnel12 no passive-interface Tunnel13 no passive-interface GigabitEthernet1 network 192.168.1.0 0.0.0.255 area 0 network 172.16.120.0 0.0.0.3 area 0 network 172.16.130.0 0.0.0.3 area 0Configure OSPF on Cisco CSR1000V
router ospf 1 passive-interface default no passive-interface Tunnel12 no passive-interface Tunnel23 no passive-interface GigabitEthernet1 network 192.168.2.0 0.0.0.255 area 0 network 172.16.120.0 0.0.0.3 area 0 network 172.16.230.0 0.0.0.3 area 0
Check the visibility of neighbors and the routes that came to CentOS:vtysh show ospf neighbor show ip ospf route
and on Cisco:show ospf neighbor show ip ospf routeWhat remains to be seen
I described the easiest option. Of course, you configure key exchange using IKE v2, certificate authorization , add additional filtering to the firewall by address, make OSPF with authorization and, with a large number of routers, split into area, change the values of hello-interval and dead-interval to interfaces.
I would be happy to advice in the comments, and information about typos - in a personal. Thanks for attention.
Source: https://habr.com/ru/post/354490/
All Articles