How to improve performance using serverless architecture

Photo : Jesse Darland with Unsplash
This article will discuss how to transfer the process of image preprocessing from an application server to an absolutely serverless AWS platform architecture.
The essence of the problem
If the web application allows you to upload an image, most likely it needs to be processed before it is shown to the user.
')
The article will talk about serverless architecture based on the AWS platform, which provides ample opportunities for scaling.
In one of my recent projects (a web-based trading application, when working with which the user needs to upload a product image), the original image is first cropped at a 4: 3 aspect ratio. It is then converted into three different formats used in various elements of the user interface: 800x600, 400x300 and 200x150.
Being a developer of the Ruby on Rails framework, I first decided to try the RubyGem packages, namely Paperclip or Dragonfly , which use ImageMagick for image processing.
This is a fairly simple approach, but it has its drawbacks:
- Images are processed on the application server. This may lead to an increase in the overall response time due to increased processor load.
- The application server has limited performance and is not suitable for step-by-step request processing. If you want to simultaneously process multiple images, it can be fully loaded for a long time. Improving server performance, in turn, will increase costs.
- Images are processed sequentially. Again, if you want to immediately process a lot of images, it will be long.
- If the above packages are configured incorrectly, the processed images will be saved to disk, which can quickly lead to a shortage of free space on the server.
In general, if an application processes a sufficiently large number of images, this solution does not scale.
Decision
If you look at the process of image processing, you can understand that in most cases there is no need to execute it directly on the application server. This is especially true if the same transformations are always performed, which do not require any other data than the image itself. So it was in my case: I always just did that I created several images of different sizes, optimizing their level of quality.
As soon as it became clear that this task can be easily separated from the rest of the application logic, the thought of a serverless solution that just takes the original image as input data and performs all the necessary transformations immediately came to mind.
It turned out that the AWS Lambda service is ideal for this purpose. It is capable of processing thousands of requests per second, while you only have to pay for the actual computing time. If the code is not executed, then the money will not be required from you.
AWS S3 offers unlimited storage at a low price, and AWS SNS provides simple “publisher-subscriber” messaging for microservices, distributed systems, and serverless applications. Finally, AWS Cloudfront is used as a content delivery network for images stored in S3.
The combination of these four AWS services gives us a powerful solution for image processing at minimal cost.
High level architecture
Creating different versions of an image from the same source begins with loading the original in AWS S3. Then, using AWS SNS, the AWS Lambda function is launched, which is responsible for creating new versions and reloading them into AWS S3. In more detail, the process looks like this:
- Images are uploaded to a specific folder inside the AWS S3 batch.
- Every time a new image is uploaded to this folder, the service sends a message with the S3 key of the created object in the AWS SNS topic.
- AWS Lambda, configured as a user in the same SNS topic, reads the message and uses this key to retrieve the new image.
- AWS Lambda processes the image by performing the necessary conversions, and then loads it back into S3.
- Processed images are displayed to users. In order to optimize download speed, AWS Cloudfront content delivery network is used for this.
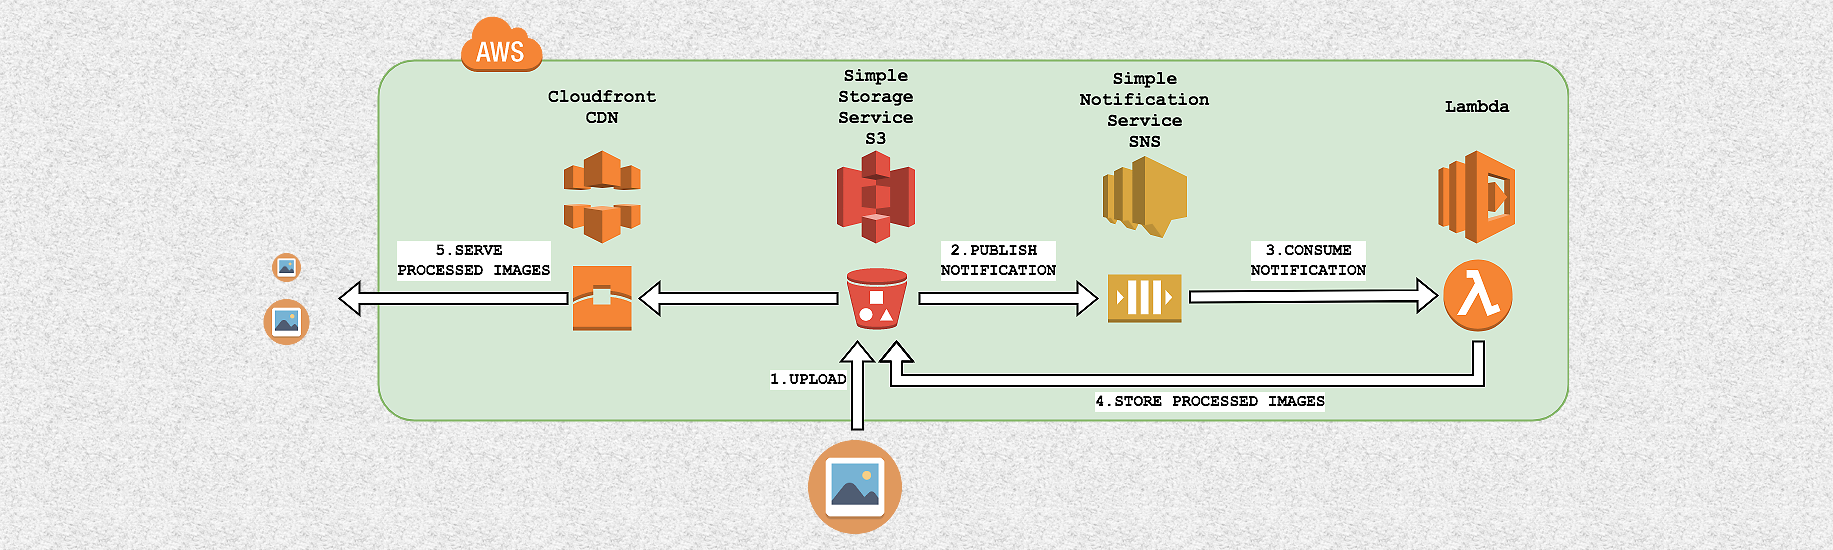
This architecture is easily scalable, as each loaded image initiates a new execution of Lambda code to process a particular request. Thus, multiple code execution allows you to process thousands of images simultaneously.
The disk space and computing resources of the application server are not used, since all data is stored in S3 and processed by the Lambda service.
Finally, setting up the content delivery network for S3 is very simple and allows you to maintain high download speed anywhere in the world.
Step-by-step instruction
The implementation of this solution is not very complicated, since basically (with the exception of the Lambda code, which performs pre-processing of images) includes only the setting. The rest of this article describes in detail how to configure the AWS architecture. And so that you can fully appreciate its work, the AWS Lambda code for resizing the loaded image is also given.
To test it yourself, you will need an AWS account. You can create one and use the AWS free starter pack here .
Step 1: Create a topic in AWS SNS
First of all, you need to set up a new SNS (Simple Notification Service) topic, where AWS will post messages every time a new image is uploaded to S3. Such a message contains an S3-key object, which is subsequently used by the Lambda function to extract and process the image.
From the AWS console, go to the SNS page , click Create topic, and enter a topic name, for example, image-preprocessing.

Then you need to change the topic's policy to allow the S3 bakt to post messages.
On the topic page, click Actions -> Edit Topic Policy, select Advanced view, add the following JSON block (with your own Amazon resource names (arn) in the Resource and SourceArn lines) to the Statement array and update the policy:
{ "Sid": "ALLOW_S3_BUCKET_AS_PUBLISHER", "Effect": "Allow", "Principal": { "AWS": "*" }, "Action": [ "SNS:Publish", ], "Resource": "arn:aws:sns:us-east-1:AWS-OWNER-ID:image-preprocessing", "Condition": { "StringLike": { "aws:SourceArn": "arn:aws:s3:*:*:YOUR-BUCKET-NAME" } } } An example of a full JSON policy text is here .
Step 2: Create AWS S3 Folder Structure
Now you need to prepare the folder structure in S3, in which the original and processed images will be stored. In this example, we will create image versions in two sizes: 800x600 and 400x300.
From the AWS console, open the S3 page and create a new bakt. I will call it image-preprocessing-example. Next you need to create a folder in the bucket called originals, 800x600 and 400x300.

Step 3: Configure AWS S3 Events
Every time a new image is uploaded to the folder, the originals S3 should publish a message in the image-preprocessing topic, so that this image can be processed.
To set up the publication of such messages, open the S3 bakt via the AWS console, click Properties -> Events -> Add notification and complete the following fields:
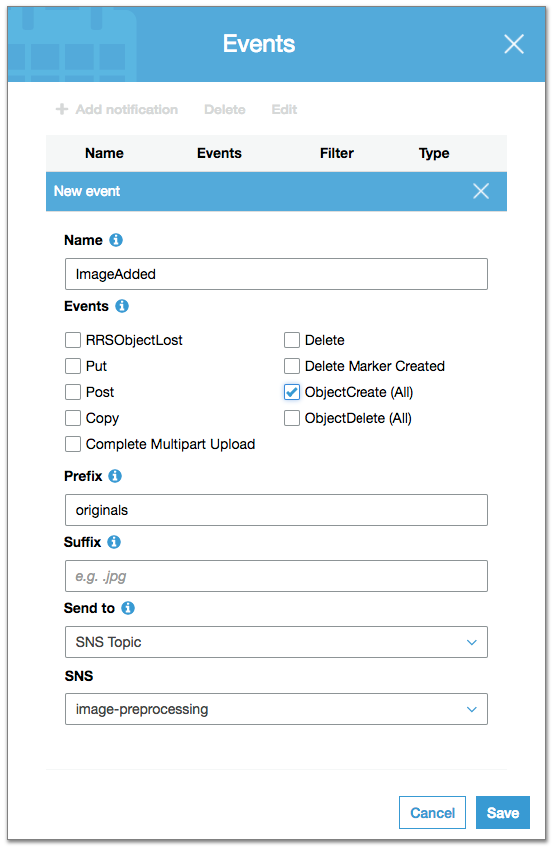
Here we set a rule for generating an event each time a new object is created (ObjectCreate checkbox) inside the originals folder (Prefix field), and publishing this event in the SNS topic image-preprocessing.
Step 4: Configure the IAM Role to Provide Lambda Access to the S3 Folder
You need to create a Lambda function that will download images from the S3 folder, process them, and upload the processed versions back to S3. But first you need to configure the IAM role so that the Lambda function can access the required S3 folder.
From the AWS console, go to the IAM page:
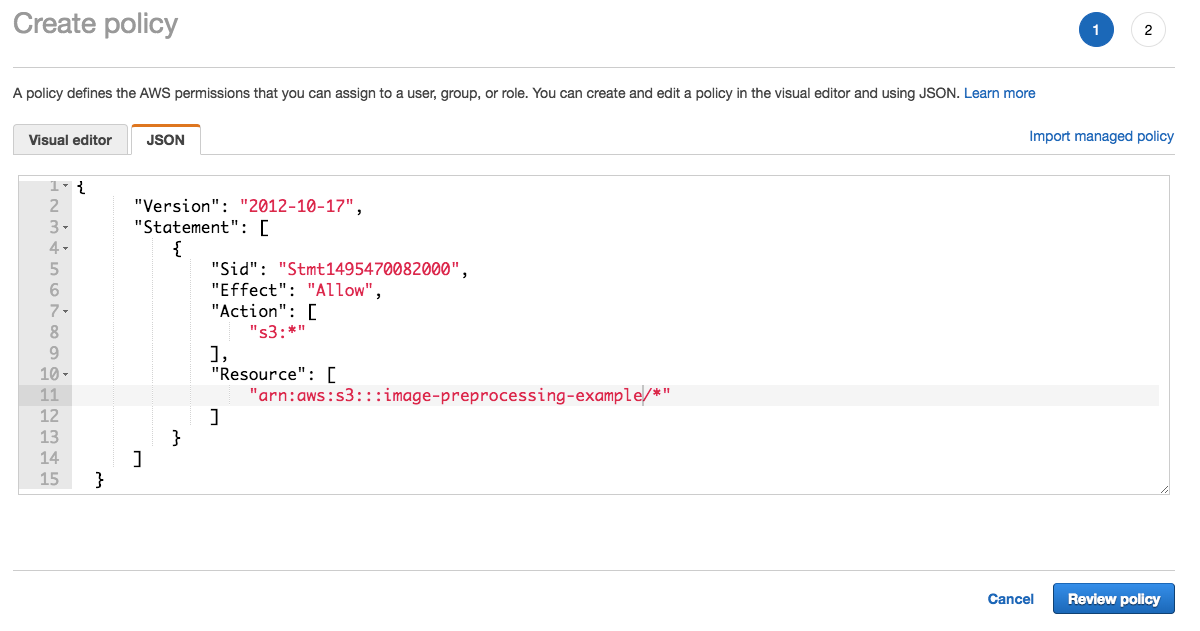
- Click Create Policy .
- Click JSON and enter the name of your bucket:
{ "Version": "2012-10-17", "Statement": [ { "Sid": "Stmt1495470082000", "Effect": "Allow", "Action": [ "s3:*" ], "Resource": [ "arn:aws:s3:::YOUR-BUCKET-NAME/*" ] } ] } The Resource string refers to our baket in S3. Click Review, enter a policy name, for example, AllowAccessOnYourBucketName, and create a policy.
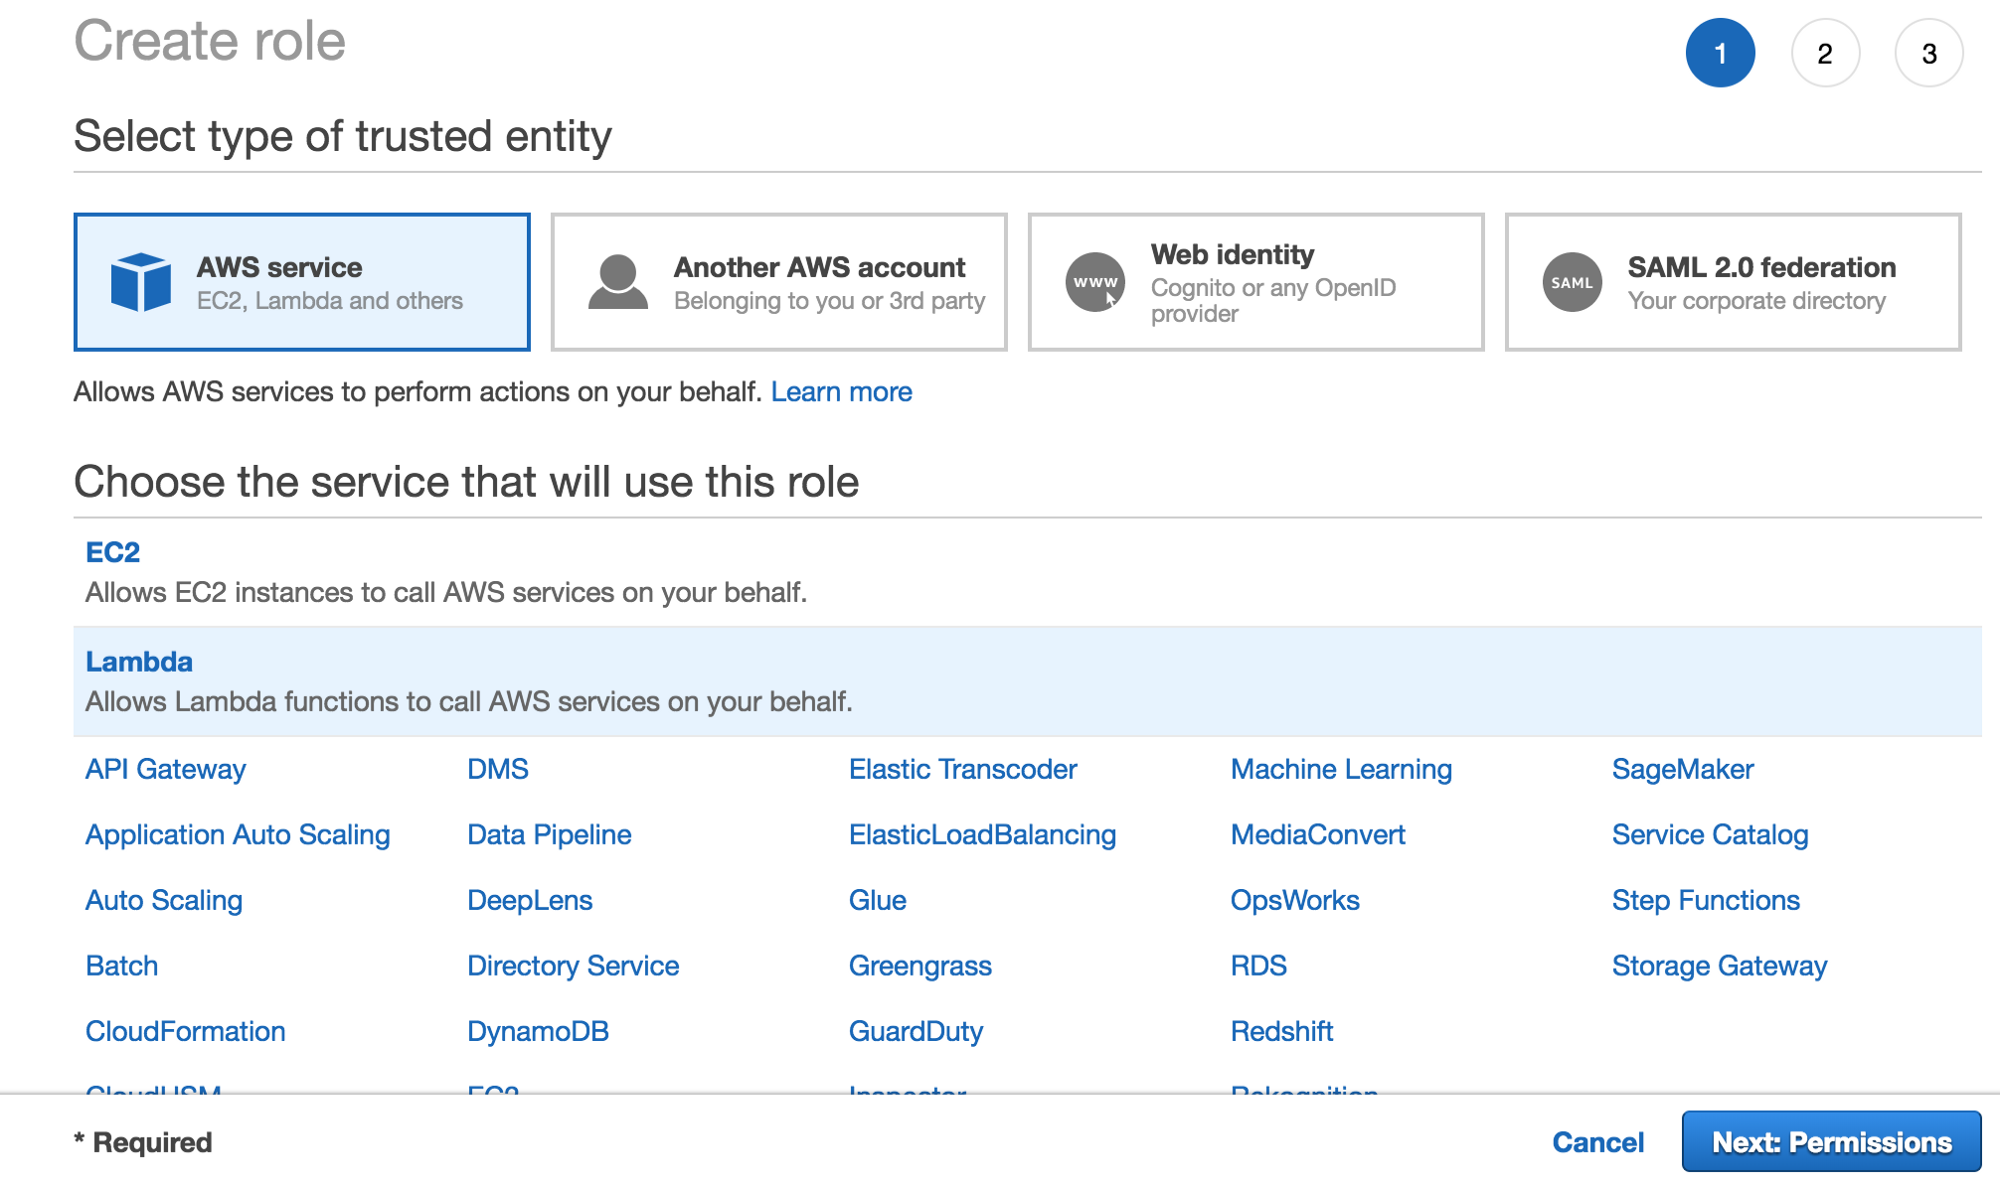
- Click Roles -> Create role.
- Select AWS Service -> Lambda (the service that will use the policy).
- Select the policy you created earlier (AllowAccessOnYourBucketName).
- Now click review, enter a name (LambdaS3YourBucketName) and click Create a role.
Creating a
Lambda Role
Attaching a policy to the role of
Lambda
Saving role
Step 5: Create the AWS Lambda Function
Next, you need to configure the Lambda function so that it reads messages from the image-preprocessing topic and generates modified versions of the images.
Let's start by creating a new Lambda function.
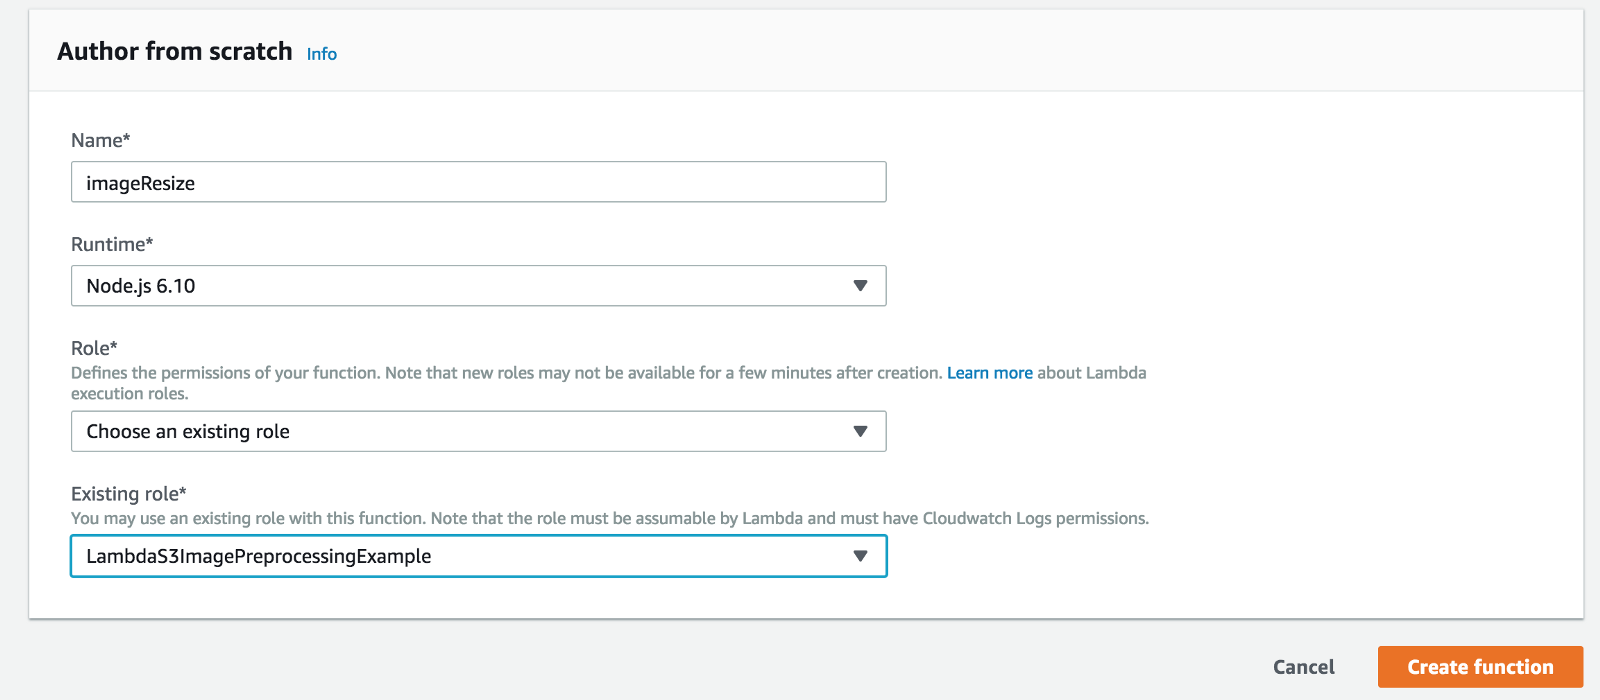
From the AWS console, go to the Lambda page , click Create function and enter the name of the new function, for example, ImageResize. Select the runtime environment (in this case, Node.js 6.10) and the previously created IAM role.
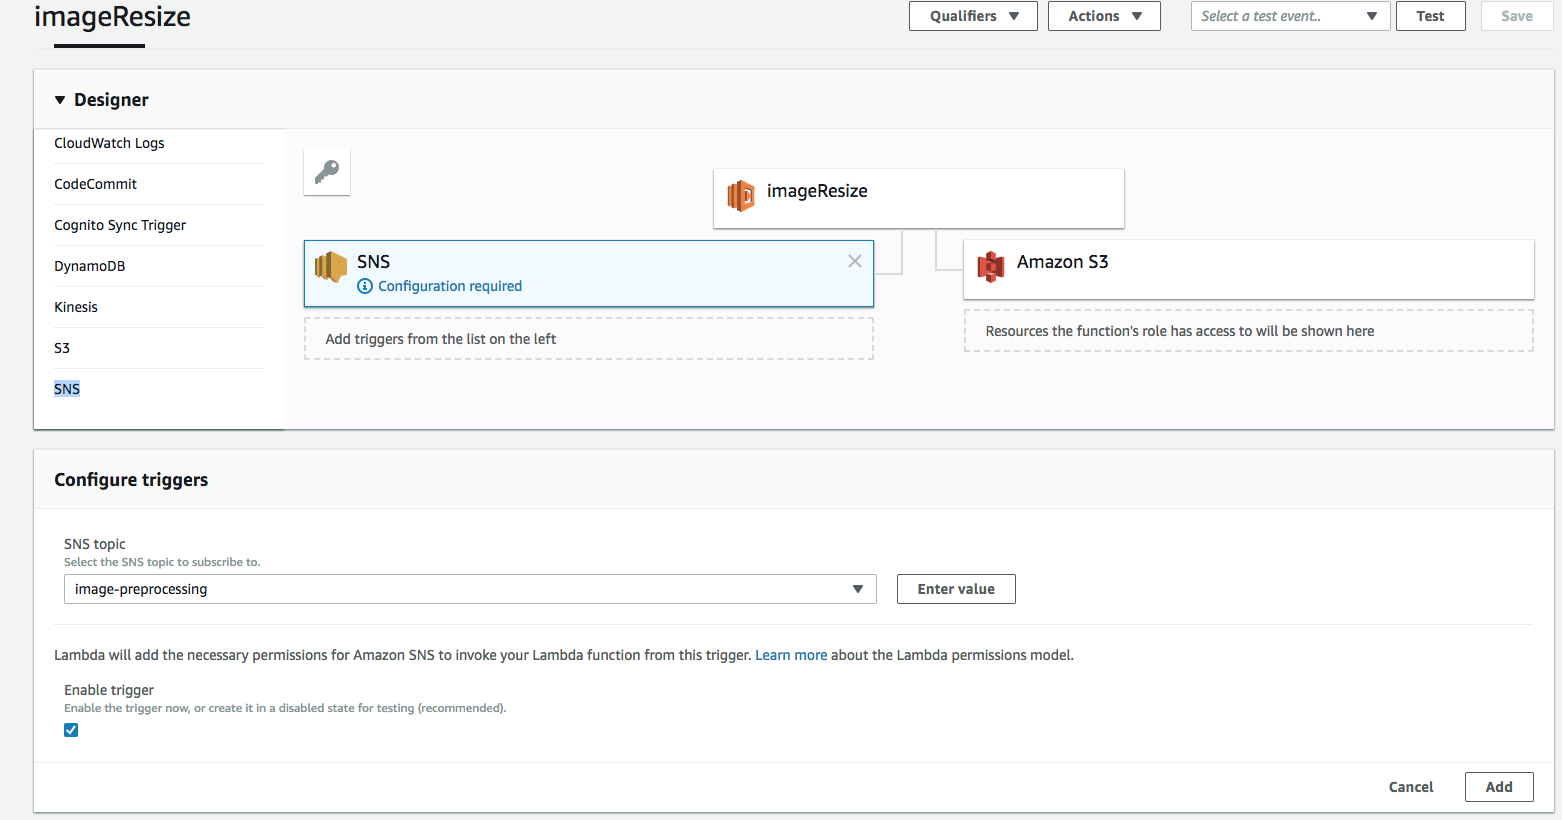
Then you need to add the SNS to the number of triggers so that the Lambda function is called every time a new message is posted in the image-preprocessing topic.
To do this, click SNS in the list of triggers, select image-preprocessing in the list of SNS topics, and click Add.
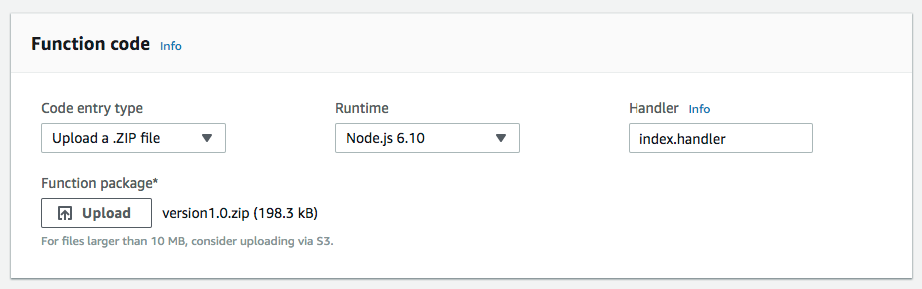
Now you need to load the code that will handle the S3 ObjectCreated event, which includes retrieving the downloaded image from the originals folder, processing it, and reloading it into the appropriate folders for the modified images.
The code can be downloaded here .
The only element that needs to be loaded into the Lambda function is the version1.1.zip archive, which contains the index.js file and the node_modules folder.
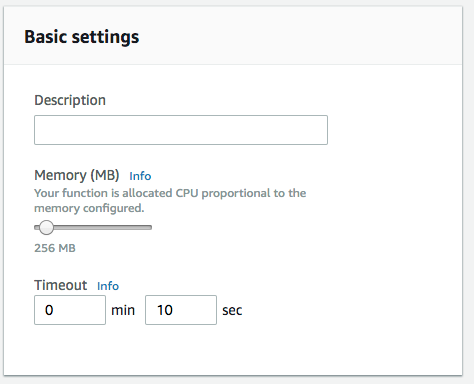
To provide the Lambda function with enough resources for image processing, you can increase the memory up to 256 MB, and the maximum execution time (timeout) up to 10 seconds. The need for resources depends on the size of the image and the complexity of the transformations.
The code itself is fairly simple and designed to demonstrate AWS integration.
First, the handler function (export.handler) is defined. It is called by an external trigger. In this case, a message published in SNS that contains the S3 key of the object of the loaded image.
First of all, it analyzes the JSON text of the event message to extract the name of the S3 bucket, the S3 key of the object of the loaded image, and the file name (the last part of the key).
After getting the name of the bucket and the object key, the loaded image is retrieved using the s3.getObject operation, and then passed to the function for resizing. The variable SIZE contains the dimensions of the images to be obtained. They correspond to the names of the S3 folders into which the converted images are loaded.
var async = require('async'); var AWS = require('aws-sdk'); var gm = require('gm').subClass({ imageMagick: true }); var s3 = new AWS.S3(); var SIZES = ["800x600", "400x300"]; exports.handler = function(event, context) { var message, srcKey, dstKey, srcBucket, dstBucket, filename; message = JSON.parse(event.Records[0].Sns.Message).Records[0]; srcBucket = message.s3.bucket.name; dstBucket = srcBucket; srcKey = message.s3.object.key.replace(/\+/g, " "); filename = srcKey.split("/")[1]; dstKey = ""; ... ... // Download the image from S3 s3.getObject({ Bucket: srcBucket, Key: srcKey }, function(err, response){ if (err){ var err_message = 'Cannot download image: ' + srcKey; return console.error(err_message); } var contentType = response.ContentType; // Pass in our image to ImageMagick var original = gm(response.Body); // Obtain the size of the image original.size(function(err, size){ if(err){ return console.error(err); } // For each SIZES, call the resize function async.each(SIZES, function (width_height, callback) { var filename = srcKey.split("/")[1]; var thumbDstKey = width_height +"/" + filename; resize(size, width_height, imageType, original, srcKey, dstBucket, thumbDstKey, contentType, callback); }, function (err) { if (err) { var err_message = 'Cannot resize ' + srcKey; console.error(err_message); } context.done(); }); }); }); } The resize function converts the original image using the gm library, in particular, it changes the image size, cuts it if necessary and reduces the quality to 80%. It then loads the modified image into S3, using the s3.putObject operation, and specifies the ACL: public-read to make the new image publicly available.
var resize = function(size, width_height, imageType, original, srcKey, dstBucket, dstKey, contentType, done) { async.waterfall([ function transform(next) { var width_height_values = width_height.split("x"); var width = width_height_values[0]; var height = width_height_values[1]; // Transform the image buffer in memory original.interlace("Plane") .quality(80) .resize(width, height, '^') .gravity('Center') .crop(width, height) .toBuffer(imageType, function(err, buffer) { if (err) { next(err); } else { next(null, buffer); } }); }, function upload(data, next) { console.log("Uploading data to " + dstKey); s3.putObject({ Bucket: dstBucket, Key: dstKey, Body: data, ContentType: contentType, ACL: 'public-read' }, next); } ], function (err) { if (err) { console.error(err); } done(err); } ); }; Step 6: Testing
Now you can check whether everything works correctly by uploading the image to the originals folder. If everything was done correctly, we will get the corresponding converted versions of the downloaded image in folders 800x600 and 400x300.
In the video below you can see three windows: on the left - the originals folder, in the middle - the 800x600 folder, and on the right - the 400x300 folder. After uploading the file to the originals folder, the two other windows are updated to check if the images were created.
And voila, here they are;)
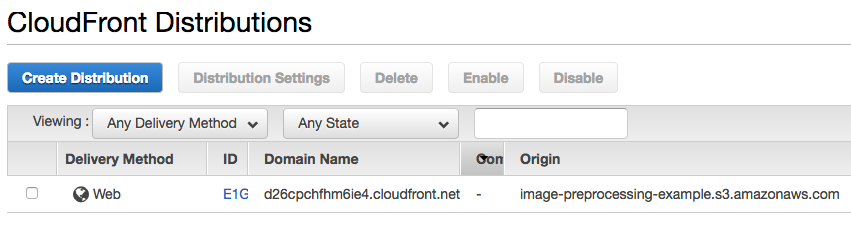
(Optional) Step 7: Add Cloudfront Content Delivery Network
Now that the images are created and uploaded to S3, they need to be delivered to the end users. To increase download speed, you can use the Cloudfront content delivery network. For this:
- Open the CloudFront page .
- Click Create Distribution.
- When requesting a delivery method, select Web Distribution.
- In the Origin Domain Name field, select the required S3 batch and click Create Distribution.
The network creation process will take some time, so wait until the CDN status changes from In Progress to Deployed .
After the network is deployed, you can use the domain name instead of the link to the S3 baket. For example, if the name of your Cloudfront domain is 1234-cloudfront-id.cloudfront.net , then you can access the processed images folder using the links 1234-cloudfront-id.cloudfront.net/400x300/FILENAME and 1234-cloudfront-id.cloudfront .net / 800x600 / FILENAME
There are many other important parameters in Cloudfront, but we will not consider them in this article. For more detailed instructions on setting up your content delivery network, refer to the Amazon Guide .
Source: https://habr.com/ru/post/354394/
All Articles