Using the MVC pattern when designing the tableview
Hi, Habr! I present to your attention the translation of the article "iOS Tableview with MVC" , published in October 2016 on Medium.com by the developer Stan Ostrovskiy.
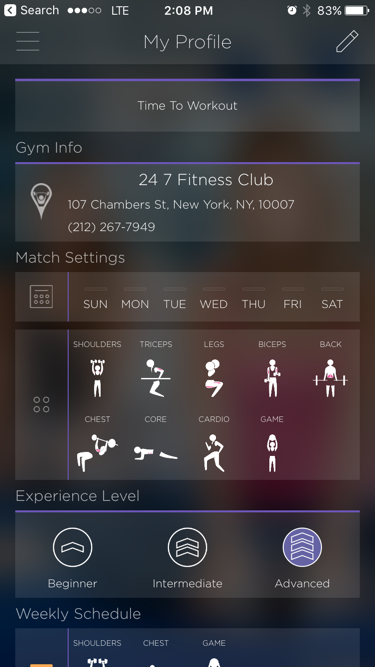
An example of using UITableView in an application
In this article, using a specific example, you can familiarize yourself with the use of the popular MVC pattern, when designing one of the most popular elements of the UITableView interface. Also, this article in a fairly clear and accessible form makes it possible to understand the basic architectural principles when designing your application, and also gives you the opportunity to become familiar with the UITableView element. Considering the fact that a considerable number of developers often neglect any architectural solutions when creating their applications, I believe that this article will be very useful for both novice developers and programmers with a certain experience. The MVC pattern is promoted by Apple itself and is the most popular pattern used in iOS development. This does not mean that it is suitable for any tasks and is always the optimal choice, but, first, with MVC, the easiest way is to get a general understanding of the architecture of your application, and, second, quite often MVC is really well suited for solving certain problems. project tasks. This article will help you structure your code, make it convenient, reusable, readable and compact.
If you are developing iOS projects, then you already know that one of the most used components is UITableView . If you are not yet developing for iOS, then in any case you can see that UITableView is used in many modern applications, such as Youtube, Facebook, Twitter, Medium, as well as in the vast majority of instant messengers, etc. Simply put, every time you need to display a variable number of data objects, you use a UITableView .
')
Another basic component for this purpose is the CollectionView, which I personally prefer to use because it is more flexible than the TableView.
So you want to add a UITableView to your project.
The most obvious way that UITableViewController usually goes, in which a UITableView is immediately integrated. Its setup is quite simple; you need to add your own data array and create a table cell. It looks simple and works the way we want, except for a few moments: firstly, the UITableViewController code becomes huge and secondly, it breaks the whole concept of the MVC pattern.
Even if you don’t want to deal with any design patterns, in any case you probably want to break apart a UITableViewController code consisting of several thousand lines.
There are several methods for transferring data between the Model and the Controller, in this article I will use delegation. This approach allows you to get clear, modular and reusable code.
Instead of using a single UITableViewController , we split it into several classes:
Let's start with UITableViewCell
Part 1: TableViewCell
Create a new project as “Single View Application”, and delete the standard ViewController.swift and Main.storyboard files. We will create all the files that we need later, step by step.
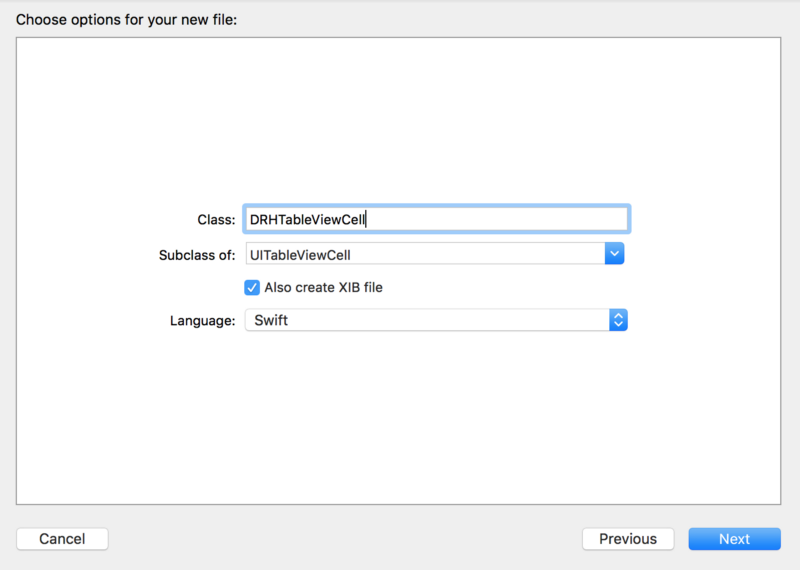
First, create a subclass of UITableViewCell . If you want to use a XIB file, check the “Also create XIB file” option.
For this example, we use a table cell with the following fields:
You can use Autolayout as you like, because the design of the table cell does not affect anything, from what we do in this guide. Create an outlet for each subview. Your DRHTableViewCell.swift file should look like this:
As you can see, I changed all the default @IBOutlet values with "!" on "?". Each time you add a UILabel from InterfaceBuilder to your code, a “!” Is automatically added to the variable at the end, which means that the variable is declared as an implicitly retrievable optional. This is done to ensure compatibility with the Objective-C API, but I prefer not to use forced extraction, so I use the usual optionals instead.
Next, we need to add a method to initialize all the elements of the table cell (labels, images, etc.). Instead of using separate variables for each item, let's create a small class DRHTableViewDataModelItem .
The date is of course better stored as the Date type, but for simplicity, in our example we will store it as a String.
All variables are optional, so you can not worry about their default values. We will write Init () a little later, and now let's go back to DRHTableViewCell.swift and add the following code that initializes all the elements in our table cell.
The SetImageWithURL method depends on how you are going to work by loading images in a project, so I will not describe it in this article.
Now that we have a cell ready, we can go to the TableView table.
Part 2: TableView
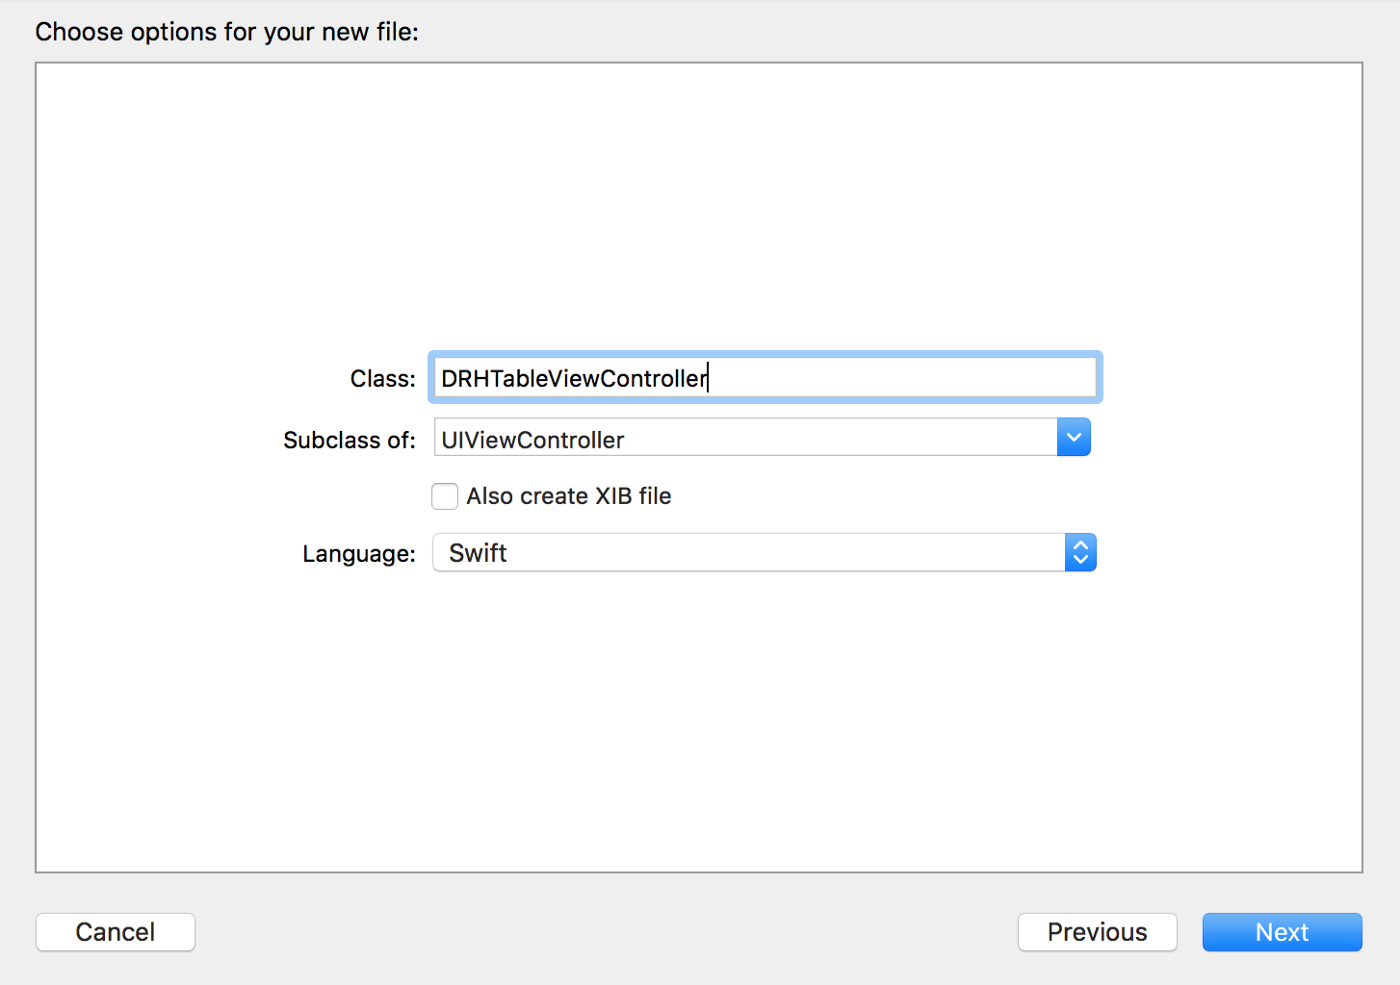
In this example, we will use the viewController in the Storyboard. First create a subclass of UIViewController :
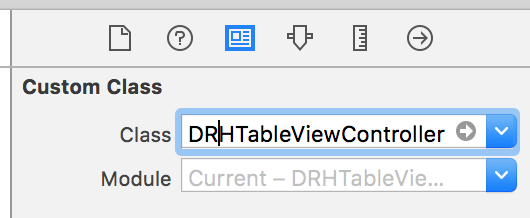
In this project, I will use UIViewController instead of UITableViewController to extend the control on elements. Also, using UITableView as a sub- view will allow you to place the table as you please, with Autolayout . Next, create a storyboard file and give it the same name DRHTableViewController . Drag the ViewController from the library with the objects and type the class name into it:
Add a UITableView link to all four edges of the controller:

And at the end add the tableView outlet to the DRHTableViewController :
We have already created the DRHTableViewDataModelItem , so we can add the following local variable to the class:
This variable stores the data that we will display in the table.
Note that we do not initialize this array in the ViewController class: this is just an empty array for the data. We will fill it with data later, with the help of delegation.
Now set all the basic tableView properties in the viewDidLoad method. You can customize the colors and styles as you like, the only property that we definitely need in this example is registerNib :
Instead of creating a nib before calling this method and entering the long and complex identifier of our cell, we will make both the Nib and ReuseIdentifier properties of the DRHTableViewCell class
Always try to avoid using long and complex identifiers in the project body. If there are no other options, you can make a string variable and assign this value to it.
Open DRHTableViewCell and add the following code to the top of the class:
Save the changes and return to DRHTableViewController. Calling the registerNib method will look much simpler:
Do not forget to set the tableViewDataSource and TableViewDelegate to self.
As soon as you do this, the compiler will give the error: “ Cannot assign value of DRHTableViewController to type UITableViewDelegate ” (I cannot assign a value of type DRHTableViewController to type UITableViewDelegate ).
When you use a subclass of UITableViewController, you already have a built-in delegate and datasource. If you add UITableView as a subtype of UIViewController, you need to implement the UIViewController compliance with the UITableViewControllerDelegate and UITableViewControllerDataSource protocols yourself.
To get rid of this error, simply add two extensions to the DRHTableViewController class:
After that, another error will appear: “Type DRHTableViewController does not conform to protocol UITableViewDataSource” (Type DRHTableViewController does not comply with the UITableViewDataSource protocol). This is because there are several required methods that need to be implemented in these extensions.
All methods in UITableViewDelegate are optional, so there will be no error unless you override them. Click the mouse with “Command” clamped on UITableViewDelegate to see which methods are available. The most frequently used methods are the selection of table cells, the setting of the height of the table cell, and the configuration of the upper and lower table headers.
As you may have noticed, the two methods mentioned above should return a value, so you see again the error ”Missing return type” . Let's fix it. First, let's set the number of columns in the section: we have already declared the dataArray data array , so we can simply take its number of elements:
Some may have noticed that I did not override another method: numberOfSectionsInTableView , which is commonly used in UITableViewController . This method is optional and it returns a default value of one. In this example, we have only one section in the tableView , so there is no need to override this method.
The final step in configuring the UITableViewDataSource is to set up a table cell in the cellForRowAtIndexPath method:
Let's look at it line by line.
To create a table cell, we call the dequeueReusableCell method with the identifier DRHTableViewCell . It returns a UITableViewCell , and, accordingly, we use optional type conversion from UITableViewCell to DRHTableViewCell :
Next, we make a safe extraction of the optional and, if successful, return the cell:
If, however, the value could not be retrieved, then we return the default UITableViewCell cell
Maybe we still forgot something? Yes, we need to initialize the cell with data:
Now we are ready for the final part: we need to create and connect the DataSource to our TableView
Part 3: DataModel
Create a class DRHDataModel .
Inside this class, we request data either from a JSON file or using HTTP
request or simply from a local data file. This is not something that I would like to focus on in this article, so therefore I will assume that we have already made an API request and it returned to us an optional array of type AnyObject and an optional Error Error:
In the setDataWithResponse method , we will populate an array from DRHTableViewDataModelItem using the array received in the request. Add the following code below requestData :
As you remember, we have not yet created any initializer for the DRHTableViewDataModel . So let's go back to the DRHTableViewDataModel class and add a method to initialize. In this case, we will use an optional initializer with the [String: String] dictionary? ..
If any field is absent in the dictionary, or the dictionary itself is nil, initialization will fail (return nil).
Having this initializer, we can create the setDataWithResponse method in the DRHTableViewDataModel class:
After the completion of the for loop, we will have a ready-filled array of DRHTableViewDataModelItem . How now to transfer this array to the TableView ?
Part 4: Delegate
First create the DRHTableViewDataModelDelegate delegate protocol in the DRHTableViewDataModel.swift file immediately above the DRHTableViewDataModel class declaration :
Inside this protocol we will also create two methods:
The key word “class” in the protocol limits the applicability of the protocol to class types (excluding structures and enumerations). This is important if we are going to use a weak reference to the delegate. We must be sure that we will not create a cycle of strong links between the delegate and the delegated objects, so we use a weak link (see below)
Next, add an optional weak variable to the DRHTableViewDataModel class:
Now we need to add a delegate method. In this example, we need to pass the Error error, if the data request fails, in the case of a successful request, we will create an array of data. The error handler method is inside the requestData method
Finally, add the second delegate method to the end of the setDataWithResponse method:
Now we are ready to transfer the data to tableView .
Part 5: Data Mapping
With the DRHTableViewDataModel, we can fill our tableView with data. First we need to create a link to the dataModel inside the DRHTableViewController :
Next, we need to make a data request. I'll do it inside ViewWillAppear so that the data is updated each time the page opens.
This is a simple example, so I query the data in viewWillAppear. In a real application, this will depend on many factors, such as data caching time, use of the API, and application logic.
Next, set the delegate to self, in the ViewDidLoad method:
You will see the error again, because DRHTableViewController does not yet implement the DRHTableViewDataModelDelegate function. Correct this by adding the following code to the end of the file:
And finally, we need to handle didFailDataUpdateWithError and didRecieveDataUpdate events :
As soon as we initialize our local dataArray with the data , we are ready to update the table. But instead of doing this in the didRecieveDataUpdate method, we use the browser's dataArray property:
The code inside didSet will be executed immediately after the dataArray is initialized, that is, exactly when we need to.
That's all! You now have a working tableView prototype, with an individually configured table cell and initialized data. And you don't have any tableViewController classes with a few thousand lines of code. Each block of code you have created is reusable and can be reused anywhere in the project, which gives undeniable advantages.
For your convenience, you can view the full project code at the following link on Github.
An example of using UITableView in an application
In this article, using a specific example, you can familiarize yourself with the use of the popular MVC pattern, when designing one of the most popular elements of the UITableView interface. Also, this article in a fairly clear and accessible form makes it possible to understand the basic architectural principles when designing your application, and also gives you the opportunity to become familiar with the UITableView element. Considering the fact that a considerable number of developers often neglect any architectural solutions when creating their applications, I believe that this article will be very useful for both novice developers and programmers with a certain experience. The MVC pattern is promoted by Apple itself and is the most popular pattern used in iOS development. This does not mean that it is suitable for any tasks and is always the optimal choice, but, first, with MVC, the easiest way is to get a general understanding of the architecture of your application, and, second, quite often MVC is really well suited for solving certain problems. project tasks. This article will help you structure your code, make it convenient, reusable, readable and compact.
If you are developing iOS projects, then you already know that one of the most used components is UITableView . If you are not yet developing for iOS, then in any case you can see that UITableView is used in many modern applications, such as Youtube, Facebook, Twitter, Medium, as well as in the vast majority of instant messengers, etc. Simply put, every time you need to display a variable number of data objects, you use a UITableView .
')
Another basic component for this purpose is the CollectionView, which I personally prefer to use because it is more flexible than the TableView.
So you want to add a UITableView to your project.
The most obvious way that UITableViewController usually goes, in which a UITableView is immediately integrated. Its setup is quite simple; you need to add your own data array and create a table cell. It looks simple and works the way we want, except for a few moments: firstly, the UITableViewController code becomes huge and secondly, it breaks the whole concept of the MVC pattern.
Even if you don’t want to deal with any design patterns, in any case you probably want to break apart a UITableViewController code consisting of several thousand lines.
There are several methods for transferring data between the Model and the Controller, in this article I will use delegation. This approach allows you to get clear, modular and reusable code.
Instead of using a single UITableViewController , we split it into several classes:
- DRHTableViewController: we will make it a subclass of UIViewController , and add a UITableView as its subview
- DRHTableViewCell: a subclass of UITableViewCell
- DRHTableViewDataModel: this class will deal with API requests, generate data and return them to DRHTableViewController using delegation
- DRHTableViewDataModelItem: a simple class that contains data that we will display in a cell DRHTableViewCell
Let's start with UITableViewCell
Part 1: TableViewCell
Create a new project as “Single View Application”, and delete the standard ViewController.swift and Main.storyboard files. We will create all the files that we need later, step by step.
First, create a subclass of UITableViewCell . If you want to use a XIB file, check the “Also create XIB file” option.
For this example, we use a table cell with the following fields:
- Avatar Image (user image)
- Name Label (username)
- Date Label
- Article Title (article title)
- Article Preview (article preview)
You can use Autolayout as you like, because the design of the table cell does not affect anything, from what we do in this guide. Create an outlet for each subview. Your DRHTableViewCell.swift file should look like this:
class DRHTableViewCell: UITableViewCell { @IBOutlet weak var avatarImageView: UIImageView? @IBOutlet weak var authorNameLabel: UILabel? @IBOutlet weak var postDateLabel: UILabel? @IBOutlet weak var titleLabel: UILabel? @IBOutlet weak var previewLabel: UILabel? } As you can see, I changed all the default @IBOutlet values with "!" on "?". Each time you add a UILabel from InterfaceBuilder to your code, a “!” Is automatically added to the variable at the end, which means that the variable is declared as an implicitly retrievable optional. This is done to ensure compatibility with the Objective-C API, but I prefer not to use forced extraction, so I use the usual optionals instead.
Next, we need to add a method to initialize all the elements of the table cell (labels, images, etc.). Instead of using separate variables for each item, let's create a small class DRHTableViewDataModelItem .
class DRHTableViewDataModelItem { var avatarImageURL: String? var authorName: String? var date: String? var title: String? var previewText: String? } The date is of course better stored as the Date type, but for simplicity, in our example we will store it as a String.
All variables are optional, so you can not worry about their default values. We will write Init () a little later, and now let's go back to DRHTableViewCell.swift and add the following code that initializes all the elements in our table cell.
func configureWithItem(item: DRHTableViewDataModelItem) { // setImageWithURL(url: item.avatarImageURL) authorNameLabel?.text = item.authorName postDateLabel?.text = item.date titleLabel?.text = item.title previewLabel?.text = item.previewText } The SetImageWithURL method depends on how you are going to work by loading images in a project, so I will not describe it in this article.
Now that we have a cell ready, we can go to the TableView table.
Part 2: TableView
In this example, we will use the viewController in the Storyboard. First create a subclass of UIViewController :
In this project, I will use UIViewController instead of UITableViewController to extend the control on elements. Also, using UITableView as a sub- view will allow you to place the table as you please, with Autolayout . Next, create a storyboard file and give it the same name DRHTableViewController . Drag the ViewController from the library with the objects and type the class name into it:
Add a UITableView link to all four edges of the controller:
And at the end add the tableView outlet to the DRHTableViewController :
class DRHTableViewController: UIViewController { @IBOutlet weak var tableView: UITableView? } We have already created the DRHTableViewDataModelItem , so we can add the following local variable to the class:
fileprivate var dataArray = [DRHTableViewDataModelItem]() This variable stores the data that we will display in the table.
Note that we do not initialize this array in the ViewController class: this is just an empty array for the data. We will fill it with data later, with the help of delegation.
Now set all the basic tableView properties in the viewDidLoad method. You can customize the colors and styles as you like, the only property that we definitely need in this example is registerNib :
tableView?.register(nib: UINib?, forCellReuseIdentifier: String) Instead of creating a nib before calling this method and entering the long and complex identifier of our cell, we will make both the Nib and ReuseIdentifier properties of the DRHTableViewCell class
Always try to avoid using long and complex identifiers in the project body. If there are no other options, you can make a string variable and assign this value to it.
Open DRHTableViewCell and add the following code to the top of the class:
class DRHMainTableViewCell: UITableViewCell { class var identifier: String { return String(describing: self) } class var nib: UINib { return UINib(nibName: identifier, bundle: nil) } ..... } Save the changes and return to DRHTableViewController. Calling the registerNib method will look much simpler:
tableView?.register(DRHTableViewCell.nib, forCellReuseIdentifier: DRHTableViewCell.identifier) Do not forget to set the tableViewDataSource and TableViewDelegate to self.
override func viewDidLoad() { super.viewDidLoad() tableView?.register(DRHTableViewCell.nib, forCellReuseIdentifier: DRHTableViewCell.identifier) tableView?.delegate = self tableView?.dataSource = self } As soon as you do this, the compiler will give the error: “ Cannot assign value of DRHTableViewController to type UITableViewDelegate ” (I cannot assign a value of type DRHTableViewController to type UITableViewDelegate ).
When you use a subclass of UITableViewController, you already have a built-in delegate and datasource. If you add UITableView as a subtype of UIViewController, you need to implement the UIViewController compliance with the UITableViewControllerDelegate and UITableViewControllerDataSource protocols yourself.
To get rid of this error, simply add two extensions to the DRHTableViewController class:
extension DRHTableViewController: UITableViewDelegate { } extension DRHTableViewController: UITableViewDataSource { } After that, another error will appear: “Type DRHTableViewController does not conform to protocol UITableViewDataSource” (Type DRHTableViewController does not comply with the UITableViewDataSource protocol). This is because there are several required methods that need to be implemented in these extensions.
extension DRHTableViewController: UITableViewDataSource { func tableView(_ tableView: UITableView, cellForRowAt indexPath: IndexPath) -> UITableViewCell { } func tableView(_ tableView: UITableView, numberOfRowsInSection section: Int) -> Int { } } All methods in UITableViewDelegate are optional, so there will be no error unless you override them. Click the mouse with “Command” clamped on UITableViewDelegate to see which methods are available. The most frequently used methods are the selection of table cells, the setting of the height of the table cell, and the configuration of the upper and lower table headers.
As you may have noticed, the two methods mentioned above should return a value, so you see again the error ”Missing return type” . Let's fix it. First, let's set the number of columns in the section: we have already declared the dataArray data array , so we can simply take its number of elements:
func tableView(_ tableView: UITableView, numberOfRowsInSection section: Int) -> Int { return dataArray.count } Some may have noticed that I did not override another method: numberOfSectionsInTableView , which is commonly used in UITableViewController . This method is optional and it returns a default value of one. In this example, we have only one section in the tableView , so there is no need to override this method.
The final step in configuring the UITableViewDataSource is to set up a table cell in the cellForRowAtIndexPath method:
func tableView(_ tableView: UITableView, cellForRowAt indexPath: IndexPath) -> UITableViewCell { if let cell = tableView.dequeueReusableCell(withIdentifier: DRHTableViewCell.identifier, for: indexPath) as? DRHTableViewCell { return cell } return UITableViewCell() } Let's look at it line by line.
To create a table cell, we call the dequeueReusableCell method with the identifier DRHTableViewCell . It returns a UITableViewCell , and, accordingly, we use optional type conversion from UITableViewCell to DRHTableViewCell :
let cell = tableView.dequeueReusableCell(withIdentifier: DRHTableViewCell.identifier, for: indexPath) as? DRHTableViewCell Next, we make a safe extraction of the optional and, if successful, return the cell:
if let cell = tableView.dequeueReusableCell(withIdentifier: DRHTableViewCell.identifier, for: indexPath) as? DRHTableViewCell { return cell } If, however, the value could not be retrieved, then we return the default UITableViewCell cell
if let cell = tableView.dequeueReusableCell(withIdentifier: DRHTableViewCell.identifier, for: indexPath) as? DRHTableViewCell { return cell } return UITableViewCell() Maybe we still forgot something? Yes, we need to initialize the cell with data:
func tableView(_ tableView: UITableView, cellForRowAt indexPath: IndexPath) -> UITableViewCell { if let cell = tableView.dequeueReusableCell(withIdentifier: DRHTableViewCell.identifier, for: indexPath) as? DRHTableViewCell { cell.configureWithItem(item: dataArray[indexPath.item]) return cell } return UITableViewCell() } Now we are ready for the final part: we need to create and connect the DataSource to our TableView
Part 3: DataModel
Create a class DRHDataModel .
Inside this class, we request data either from a JSON file or using HTTP
request or simply from a local data file. This is not something that I would like to focus on in this article, so therefore I will assume that we have already made an API request and it returned to us an optional array of type AnyObject and an optional Error Error:
class DRHTableViewDataModel { func requestData() { // code to request data from API or local JSON file will go here // this two vars were returned from wherever: // var response: [AnyObject]? // var error: Error? if let error = error { // handle error } else if let response = response { // parse response to [DRHTableViewDataModelItem] setDataWithResponse(response: response) } } } In the setDataWithResponse method , we will populate an array from DRHTableViewDataModelItem using the array received in the request. Add the following code below requestData :
private func setDataWithResponse(response: [AnyObject]) { var data = [DRHTableViewDataModelItem]() for item in response { // create DRHTableViewDataModelItem out of AnyObject } } As you remember, we have not yet created any initializer for the DRHTableViewDataModel . So let's go back to the DRHTableViewDataModel class and add a method to initialize. In this case, we will use an optional initializer with the [String: String] dictionary? ..
init?(data: [String: String]?) { if let data = data, let avatar = data[“avatarImageURL”], let name = data[“authorName”], let date = data[“date”], let title = data[“title”], let previewText = data[“previewText”] { self.avatarImageURL = avatar self.authorName = name self.date = date self.title = title self.previewText = previewText } else { return nil } } If any field is absent in the dictionary, or the dictionary itself is nil, initialization will fail (return nil).
Having this initializer, we can create the setDataWithResponse method in the DRHTableViewDataModel class:
private func setDataWithResponse(response: [AnyObject]) { var data = [DRHTableViewDataModelItem]() for item in response { if let drhTableViewDataModelItem = DRHTableViewDataModelItem(data: item as? [String: String]) { data.append(drhTableViewDataModelItem) } } } After the completion of the for loop, we will have a ready-filled array of DRHTableViewDataModelItem . How now to transfer this array to the TableView ?
Part 4: Delegate
First create the DRHTableViewDataModelDelegate delegate protocol in the DRHTableViewDataModel.swift file immediately above the DRHTableViewDataModel class declaration :
protocol DRHTableViewDataModelDelegate: class { } Inside this protocol we will also create two methods:
protocol DRHTableViewDataModelDelegate: class { func didRecieveDataUpdate(data: [DRHTableViewDataModelItem]) func didFailDataUpdateWithError(error: Error) } The key word “class” in the protocol limits the applicability of the protocol to class types (excluding structures and enumerations). This is important if we are going to use a weak reference to the delegate. We must be sure that we will not create a cycle of strong links between the delegate and the delegated objects, so we use a weak link (see below)
Next, add an optional weak variable to the DRHTableViewDataModel class:
weak var delegate: DRHTableViewDataModelDelegate? Now we need to add a delegate method. In this example, we need to pass the Error error, if the data request fails, in the case of a successful request, we will create an array of data. The error handler method is inside the requestData method
class DRHTableViewDataModel { func requestData() { // code to request data from API or local JSON file will go here // this two vars were returned from wherever: // var response: [AnyObject]? // var error: Error? if let error = error { delegate?.didFailDataUpdateWithError(error: error) } else if let response = response { // parse response to [DRHTableViewDataModelItem] setDataWithResponse(response: response) } } } Finally, add the second delegate method to the end of the setDataWithResponse method:
private func setDataWithResponse(response: [AnyObject]) { var data = [DRHTableViewDataModelItem]() for item in response { if let drhTableViewDataModelItem = DRHTableViewDataModelItem(data: item as? [String: String]) { data.append(drhTableViewDataModelItem) } } delegate?.didRecieveDataUpdate(data: data) } Now we are ready to transfer the data to tableView .
Part 5: Data Mapping
With the DRHTableViewDataModel, we can fill our tableView with data. First we need to create a link to the dataModel inside the DRHTableViewController :
private let dataSource = DRHTableViewDataModel() Next, we need to make a data request. I'll do it inside ViewWillAppear so that the data is updated each time the page opens.
override func viewWillAppear(_ animated: Bool) { super.viewWillAppear(true) dataSource.requestData() } This is a simple example, so I query the data in viewWillAppear. In a real application, this will depend on many factors, such as data caching time, use of the API, and application logic.
Next, set the delegate to self, in the ViewDidLoad method:
dataSource.delegate = self You will see the error again, because DRHTableViewController does not yet implement the DRHTableViewDataModelDelegate function. Correct this by adding the following code to the end of the file:
extension DRHTableViewController: DRHTableViewDataModelDelegate { func didFailDataUpdateWithError(error: Error) { } func didRecieveDataUpdate(data: [DRHTableViewDataModelItem]) { } } And finally, we need to handle didFailDataUpdateWithError and didRecieveDataUpdate events :
extension DRHTableViewController: DRHTableViewDataModelDelegate { func didFailDataUpdateWithError(error: Error) { // handle error case appropriately (display alert, log an error, etc.) } func didRecieveDataUpdate(data: [DRHTableViewDataModelItem]) { dataArray = data } } As soon as we initialize our local dataArray with the data , we are ready to update the table. But instead of doing this in the didRecieveDataUpdate method, we use the browser's dataArray property:
fileprivate var dataArray = [DRHTableViewDataModelItem]() { didSet { tableView?.reloadData() } } The code inside didSet will be executed immediately after the dataArray is initialized, that is, exactly when we need to.
That's all! You now have a working tableView prototype, with an individually configured table cell and initialized data. And you don't have any tableViewController classes with a few thousand lines of code. Each block of code you have created is reusable and can be reused anywhere in the project, which gives undeniable advantages.
For your convenience, you can view the full project code at the following link on Github.
Source: https://habr.com/ru/post/354326/
All Articles