Atlassian Jira Software functionality in Jira plugin
 I often see questions on how to make a plugin using functionality from Jira Software. It is difficult to find information on the Internet, so I decided to make an article in which I will tell you how to connect the Jira Software functionality to the plugin for Jira.
Often there is a need to get all the tasks that are associated with the epic, or add a task to the epic. This is usually done through an Epic Link link, but let's try to do it “correctly” through the services provided by Jira Software.
So, in this article we will develop a plugin that displays information about all tasks in the epic and adds tasks to the epic through the REST call we created.
Create a plugin
Open the terminal and execute the command:
')
atlas-create-jira-plugin The terminal will ask questions. Below are the questions and answers to them:
Define value for groupId: : ru.matveev.alexey.sw.tutorial Define value for artifactId: : sw-tutorial Define value for version: 1.0.0-SNAPSHOT: : Define value for package: ru.matveev.alexey.sw.tutorial: : Confirm properties configuration: groupId: ru.matveev.alexey.sw.tutorial artifactId: sw-tutorial version: 1.0.0-SNAPSHOT package: ru.matveev.alexey.sw.tutorial Y: : Y Making changes to pom.xml
Change the jira.version property to 7.9.0:
<jira.version>7.9.0</jira.version> Add to the maven-jira-plugin in the configuration tag:
<applications> <application> <applicationKey>jira-software</applicationKey> <version>${jira.software.application.version}</version> </application> </applications> Add the jira.software.application.version property:
<jira.software.application.version>7.9.0</jira.software.application.version> The lines above allow us to run Jira Software using the atlas-run command version 7.9.0.
It is also necessary to increase the size of the JVM, since in my environment Jira Software did not start up with an error of low memory:
<jvmArgs>-Xms512M -Xmx1g</jvmArgs> Add REST module
In the terminal, run the following command:
atlas-create-jira-plugin-module Below are the questions and answers to them:
Enter New Classname MyRestResource: : Choose a number (1/2/3/4/5/6/7/8/9/10/11/12/13/14/15/16/17/18/19/20/21/22/23/24/25/26/27/28/29/30/31/32/33/34): 14 Enter Package Name ru.matveev.alexey.sw.tutorial.rest: : Enter REST Path /myrestresource: : Enter Version 1.0: : Show Advanced Setup? (Y/y/N/n) N: : N Add Another Plugin Module? (Y/y/N/n) N: : N Add functionality to Jira Software
Run in the terminal:
atlas-run After Jira launches, the target directory will appear in the plugin folder. You need to go to the target / jira / home / plugins / installed-plugins directory and look for the jar file that starts with the jira-greenhopper-plugin. In my case, the file looks like this:
jira-greenhopper-plugin-7.9.0-DAILY20180326142825.jar Such a file name means that the version of the jira-greenhopper-plugin is 7.9.0-DAILY20180326142825. Therefore, we add dependency on the jira-greenhopper-plugin plugin to the pom.xml file as follows:
<dependency> <groupId>com.atlassian.jira.plugins</groupId> <artifactId>jira-greenhopper-plugin</artifactId> <version>7.9.0-DAILY20180326142825</version> <scope>provided</scope> </dependency> After we add the plugin depending, we can use the functionality of Jira Software. But now we need to understand what services Jira Software we can use.
Jira uses OSGI, which means that the plugin must export services that can be used by other plugins. Let's try to find the services that Jira Software exports.
In the browser click on the link:
http://localhost:2990/jira/plugins/servlet/upm#osgi My screen looks like this:
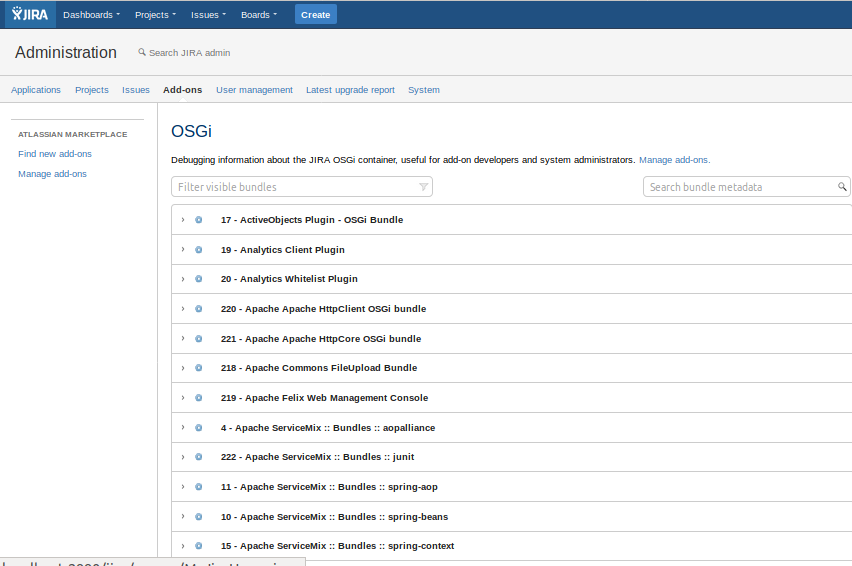
Find the Atlassian Greenhopper plugin and open the Registered Services menu:
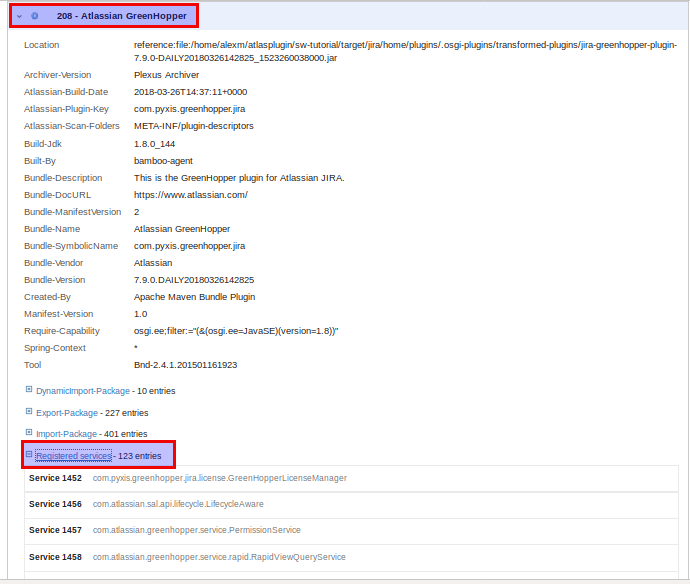
Among all the services there will be the services we need:
Service 1477 com.atlassian.greenhopper.service.issue.RapidViewIssueService Service 1476 com.atlassian.greenhopper.service.issuelink.EpicService Write a task view in the epic and add a task in the epic
Remove the sw-tutorial / src / test / java / ut / ru / matveev / alexey / sw / tutorial / rest / MyRestResourceTest.java file.
Change the contents of the file sw-tutorial / src / main / java / ru / matveev / alexey / sw / tutorial / rest / MyRestResource.java to:
package ru.matveev.alexey.sw.tutorial.rest; import com.atlassian.greenhopper.model.Epic; import com.atlassian.greenhopper.service.Page; import com.atlassian.greenhopper.service.PageRequests; import com.atlassian.greenhopper.service.ServiceOutcome; import com.atlassian.greenhopper.service.issue.RapidViewIssue; import com.atlassian.greenhopper.service.issue.RapidViewIssueService; import com.atlassian.greenhopper.service.issuelink.EpicService; import com.atlassian.jira.issue.Issue; import com.atlassian.jira.issue.IssueManager; import com.atlassian.jira.jql.builder.JqlQueryBuilder; import com.atlassian.jira.security.JiraAuthenticationContext; import com.atlassian.jira.user.ApplicationUser; import com.atlassian.plugin.spring.scanner.annotation.imports.ComponentImport; import com.atlassian.plugins.rest.common.security.AnonymousAllowed; import com.atlassian.query.Query; import javax.inject.Inject; import javax.ws.rs.*; import javax.ws.rs.core.MediaType; import javax.ws.rs.core.Response; import java.util.HashSet; import java.util.List; import java.util.Set; import java.util.stream.Collectors; @Path("/message") public class MyRestResource { private final EpicService epicService; private final IssueManager issueManager; private final JiraAuthenticationContext jiraAuthenticationContext; private final RapidViewIssueService rapidViewIssueService; @Inject public MyRestResource(@ComponentImport EpicService epicService, @ComponentImport IssueManager issueManager, @ComponentImport JiraAuthenticationContext jiraAuthenticationContext, @ComponentImport RapidViewIssueService rapidViewIssueService) { this.epicService = epicService; this.issueManager = issueManager; this.jiraAuthenticationContext = jiraAuthenticationContext; this.rapidViewIssueService = rapidViewIssueService; } @Path("/hello") @GET @AnonymousAllowed @Produces({MediaType.APPLICATION_JSON, MediaType.APPLICATION_XML}) public Response getMessage() { return Response.ok(new MyRestResourceModel("Hello World")).build(); } @Path("/epictasks") @GET @AnonymousAllowed @Produces({MediaType.APPLICATION_JSON, MediaType.APPLICATION_XML}) public Response getEpicTasks(@QueryParam("epic key") String epicKey) { ApplicationUser user = jiraAuthenticationContext.getLoggedInUser(); ServiceOutcome<Epic> epic = epicService.getEpic(user, epicKey); Query query = JqlQueryBuilder.newBuilder().where().buildQuery(); ServiceOutcome<Page<RapidViewIssue>> issues = rapidViewIssueService.getIssuesForEpic(user, epic.getValue(), PageRequests.request(0L, 100), query); List<String> issueList = issues.getValue().getValues().stream().map(el -> el.getIssue().getSummary()).collect(Collectors.toList()); return Response.ok(new MyRestResourceModel(issueList.toString())).build(); } @Path("/epictasks") @POST @AnonymousAllowed @Produces({MediaType.APPLICATION_JSON, MediaType.APPLICATION_XML}) public Response addTaskToEpic(@QueryParam("epic key") String epicKey, @QueryParam("issue key") String issueKey) { ApplicationUser user = jiraAuthenticationContext.getLoggedInUser(); ServiceOutcome<Epic> epic = epicService.getEpic(user, epicKey); Set<Issue> issueSet = new HashSet<>(); issueSet.add(issueManager.getIssueByCurrentKey(issueKey)); epicService.addIssuesToEpic(user, epic.getValue(), issueSet); return Response.ok(new MyRestResourceModel(issueKey + " added to " + epicKey)).build(); } } The code above is raw and was created only to show how you can work with Jira Software. Especially to simplify the code, all the necessary checks were omitted, so the code may cause a NullPointerException when passing invalid parameters.
The code creates an epictasks method. If the epictasks are accessed via the GET method and the key is transferred to the epic, all tasks in the transferred epic will be displayed. If the epictasks is accessed via the POST method and the epic key and task key are transmitted, the task will be added to the epic.
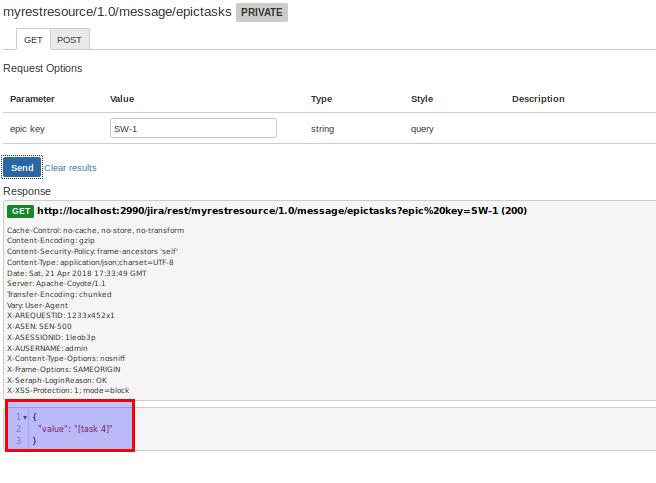
Suppose we have an epic with the key SW-1 and a task with the key SW-5. First let's turn to epictasks via GET:
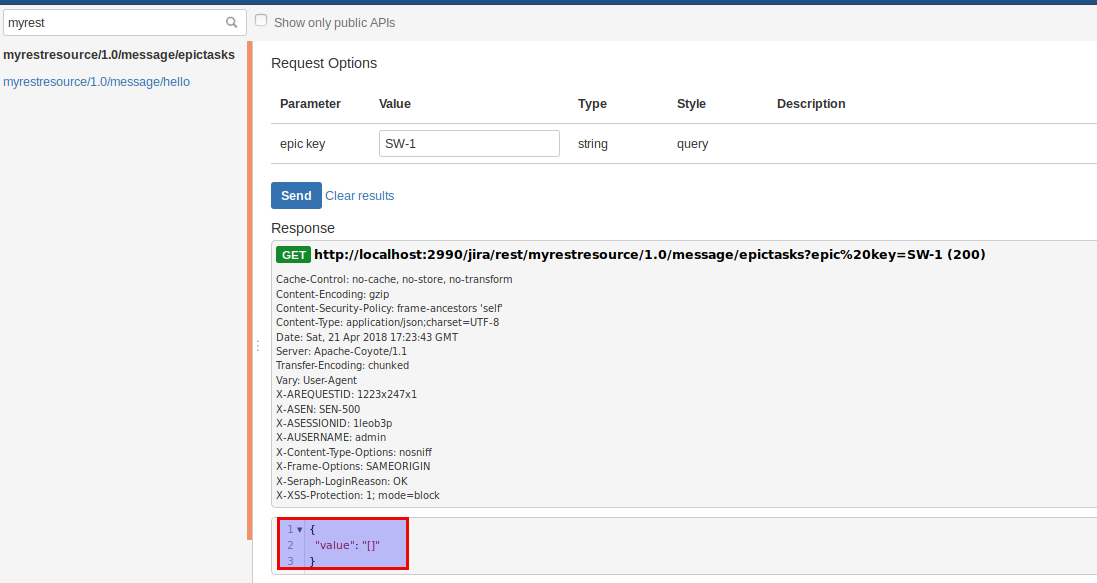
From the screenshot above, we see that the epic SW-1 is not a task.
Now let's turn to epictasks through the POST method and pass the SW-1 epic and the SW-5 task into it:
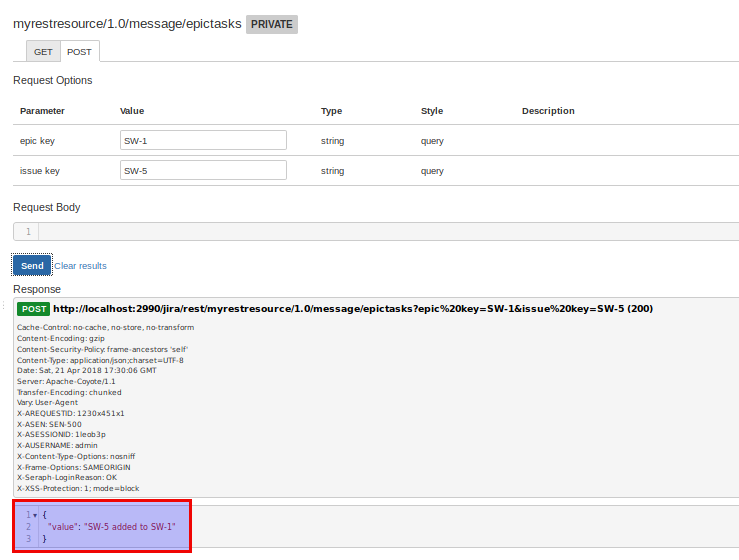
We see that task SW-5 has been added to the epic SW-1.
Let's try to call epictasks again via the GET method:
We see that the epic SW-1 has a task SW-5.
Thus, we accomplished the goal of this article: we added a task to the epic and received information about the tasks in the epic using the Jira Software functionality.
The source code of the plugin can be found here .
Source: https://habr.com/ru/post/354048/
All Articles