9 Tips to Improve React Application Code Quality
The React library makes life easier for developers who have to create complex user interfaces. It is enough for the programmer to prepare simple descriptions of graphical representations for the state of the application, and React, when the data changes, will effectively update and redraw only those components that are affected by these changes. However, in order to create high-quality projects on React, the programmer needs to make efforts to master this library and development tools.

The author of the article, the translation of which we are publishing today, wants to share with the audience of React-developers nine useful tips aimed at improving the quality of the code. These tips cover a fairly wide range of topics - from tools to programming style.
Improving the quality of programs contributes to the use of a good code verification system for errors. Typically, such checks are performed using liner programs. If the developer has a thoughtful set of rules of linting, the code editor will automatically be able to track the appearance of something that can lead to problems. However, early detection of potential problems is only one of the tasks solved, for example, with the help of ES Lint . Equally important is the fact that the use of such tools leads to the fact that the developer will always be aware of advanced developments in the field of programming for React.
')
Consider an example.
The constant use of linter helps to improve the quality of programs and has a beneficial effect on the development of the programmer, improving how he perceives the code. Receiving such prompts, the programmer will very soon learn not to make the mistakes that the code verification system “swears”.
In order to equip your development environment with a linter for JavaScript, you can use the ESLint resource or take a look at the Airbnb style guide page . In addition, you can install the ESLint plugin for React.
Above, we talked about how a linter behaves when trying to work with a property that has not passed validation. Now consider the following example.
Here, if you want the
Using the
Here, in addition, it is worth saying that it is not recommended to use too “blurry” property types like
That is why it shows how to use
The presence of
When a property does not receive the expected data, corresponding entries appear in the error log, which allow the programmer to know that he is either sending something to the component or not transmitting something that the system expects. This simplifies the search for errors, especially when it comes to working with a variety of reusable components. In addition, the code in which these mechanisms are used acquires the properties of self-documenting.
Note that unlike earlier versions of React, the
Consider an example. In the code snippet shown below, there is a
The code for all these components could be written right here, since this is where data is loaded from the same place, represented by the
Although there is no hard and fast rule concerning the transfer of code to components, before doing this, it is worth looking for answers to the following questions:
If at least one of these questions is answered positively, then you need to move this code to the component.
However, it should be borne in mind that very few people will like to see in the program texts huge components consisting of 200-300 lines of code and full of various auxiliary mechanisms.
It is important for a React developer to be aware of when to use components (Component), pure components (PureComponent), and stateless functional components (Stateless Functional Component).
In the examples above, you might have noticed that instead of declaring a
Understand the features of different types of components.
Functional stateless components are one of the most common types of components in the arsenal of React-developer. They provide a convenient and concise way to create components that do not use states , references to elements, or methods of the life cycle .
The essence of such components is that they are normal functions and do not have a state. In fact, these are simply functions that return JSX.
Normally, when a component receives a new property, React redraws such a component. However, sometimes a component gets new properties that, in fact, have not changed, but this also leads to the fact that React redraws it.
The use of pure components ,
How do I know that React performs unnecessary re-rendering of components? To do this, you can use why-did-you-update - a great package for React. The tools in this package let you know about the performance of re-rendering of components, which you can do without.
Messages about avoiding re-rendering of components
Once it is determined that unnecessary re-rendering is being applied, you can use, instead of
If you are serious about becoming a professional React developer, then React developer tools should be included in your workflow. If you have already written to React, you probably have seen suggestions to use developer tools in the console. They are available for major browsers such as Chrome and Firefox .
Developer tools give access to the structure of the React-application and allow you to see all the properties and states used in the project. They are an excellent tool for examining the internal structure of components and debugging applications.
Although someone may not like this approach, I found that using embedded conditional expressions made the texts of my programs much cleaner.
Take a look at this code snippet.
There is a function that checks the user's role (it should have the value of
That's what I like about all this:
Writing embedded conditional expressions is pretty simple. It starts with writing a conditional expression. If, for example, instead of an expression, to write just
Next, we associate the conditional expression with
Libraries of snippets, pre-prepared template code fragments, speed up the development process and reduce the number of errors. Here is what their usage looks like. I, working in VS Code, create a new .js-file. I enter the
Snipples
If you select the one you need and press Enter, the corresponding code fragment will get into the editor.
Snippet inserted into the editor
Snippets are a very useful thing, as they not only contribute to the fact that minor errors do not penetrate the code, but also help the developer to find and use actual examples of code design.
There are many snippets libraries that can be integrated into various editors. In this case, the library uses ES7 React / Redux / React-Native / JS Snippets for VS Code .
If you, working with React, feel that some things slip away from your understanding, you should look for training resources that reveal the basics of the internal mechanisms of React. In my case, such a resource was a series of five materials called React Internals . She helped my professional growth. I suppose this series will be useful to those who have a general idea of what they want to achieve, but there is no complete confidence in how to do it.
Bit is a great tool for turning components into building blocks that can be used in various applications. In this case, changes made to components in different places of their application can be synchronized.
In addition, Bit can be used to organize components at the command level, to convert their sets into shared libraries, which makes working with them easier. There is also an interactive sandbox , tools for testing components in isolation, and other features.
StoryBook is an interactive development environment for components of the user interface, which can help in working with component libraries, in analyzing various component states. It simplifies the process of developing and testing components.
The StoryBook system is able to accelerate the development of React components due to the presence of a specialized environment in which components can be seen in action during experiments with their properties.
How to improve the quality of React-application code? According to the author of the material this contributes to the following:
We hope you find these recommendations useful.
Dear readers! What would you advise to React-developers who want to improve the quality of their code and grow professionally?

The author of the article, the translation of which we are publishing today, wants to share with the audience of React-developers nine useful tips aimed at improving the quality of the code. These tips cover a fairly wide range of topics - from tools to programming style.
1. Checking the code with the linter
Improving the quality of programs contributes to the use of a good code verification system for errors. Typically, such checks are performed using liner programs. If the developer has a thoughtful set of rules of linting, the code editor will automatically be able to track the appearance of something that can lead to problems. However, early detection of potential problems is only one of the tasks solved, for example, with the help of ES Lint . Equally important is the fact that the use of such tools leads to the fact that the developer will always be aware of advanced developments in the field of programming for React.
')
Consider an example.
import react from 'react'; /* */ /* */ export default class App extends React.Component { render() { const { userIsLoaded, user } = this.props; if (!userIsLoaded) return <Loader />; return ( /* */ ) } }</code>, <code>render()</code>, <code>this.props.hello</code>. , , : <source>'hello' is missing in props validation (react/prop-types) The constant use of linter helps to improve the quality of programs and has a beneficial effect on the development of the programmer, improving how he perceives the code. Receiving such prompts, the programmer will very soon learn not to make the mistakes that the code verification system “swears”.
In order to equip your development environment with a linter for JavaScript, you can use the ESLint resource or take a look at the Airbnb style guide page . In addition, you can install the ESLint plugin for React.
2. Using propTypes and defaultProps
Above, we talked about how a linter behaves when trying to work with a property that has not passed validation. Now consider the following example.
static propTypes = { userIsLoaded: PropTypes.boolean.isRequired, user: PropTypes.shape({ _id: PropTypes.string, )}.isRequired, } Here, if you want the
userIsLoaded property not to be necessary, you will need to add the following to the code: static defaultProps = { userIsLoaded: false, } Using the
PropType and defaultProps mechanisms, we can describe the properties used in the components, which allows React to organize their validation, which improves the quality and stability of programs. In this case, we tell the system that the userIsLoaded property must be a boolean value, and that its default value is false , which makes it optional. If the property is mandatory, then there is no need to set its default value.Here, in addition, it is worth saying that it is not recommended to use too “blurry” property types like
Object or Array .That is why it shows how to use
shape to validate a user object, inside of which there is an id , whose propType is a string . The entire user object is required.The presence of
propTypes and defultProp , for each component that uses props , plays a big role in developing reliable React-applications.When a property does not receive the expected data, corresponding entries appear in the error log, which allow the programmer to know that he is either sending something to the component or not transmitting something that the system expects. This simplifies the search for errors, especially when it comes to working with a variety of reusable components. In addition, the code in which these mechanisms are used acquires the properties of self-documenting.
Note that unlike earlier versions of React, the
propTypes mechanism is propTypes not included in React by default and to use it you will need to add this feature to the project as a dependency. In order to do this, you can use the prop-types npm-package.3. About creating new components
Consider an example. In the code snippet shown below, there is a
Profile component. Inside this component are the MyOrder and MyDownloads . export default class Profile extends PureComponent { static propTypes = { userIsLoaded: PropTypes.bool, user: PropTypes.shape({ _id: PropTypes.string, }).isRequired, } static defaultProps = { userIsLoaded: false, } render() { const { userIsLoaded, user } = this.props; if (!userIsLoaded) return <Loaded />; return ( <div> <div className="two-col"> <section> <MyOrders userId={user._id} /> <MyDownloads userId={user._id} /> </section> <aside> <MySubscriptions user={user} /> <MyVotes user={user} /> </aside> </div> <div className="one-col"> {isRole('affiliate', user={user._id) && <MyAffiliateInfo userId={user._id} /> } </div> </div> ) } } The code for all these components could be written right here, since this is where data is loaded from the same place, represented by the
user object. However, this approach will transform small components into one giant component. All this leads us to the question of when to create new components.Although there is no hard and fast rule concerning the transfer of code to components, before doing this, it is worth looking for answers to the following questions:
- Is code functionality getting cumbersome?
- Does this code represent a kind of independent phenomenon?
- Do you plan to reuse this code?
If at least one of these questions is answered positively, then you need to move this code to the component.
However, it should be borne in mind that very few people will like to see in the program texts huge components consisting of 200-300 lines of code and full of various auxiliary mechanisms.
4. Components, pure components, stateless functional components. What to choose?
It is important for a React developer to be aware of when to use components (Component), pure components (PureComponent), and stateless functional components (Stateless Functional Component).
In the examples above, you might have noticed that instead of declaring a
Profile as a Component , we describe it as PureComponent .Understand the features of different types of components.
Functional components without state
Functional stateless components are one of the most common types of components in the arsenal of React-developer. They provide a convenient and concise way to create components that do not use states , references to elements, or methods of the life cycle .
const Billboard = () => ( <ZoneBlack> <Heading>React</Heading> <div className="billboard_product"> <Link className="billboard_product-image" to="/"> <img alt="#" src="#"> </Link> <div className="billboard_product-details"> <h3 className="sub">React</font></h3> <p>Lorem Ipsum</p> </div> </div> </ZoneBlack> ); The essence of such components is that they are normal functions and do not have a state. In fact, these are simply functions that return JSX.
▍Clean components
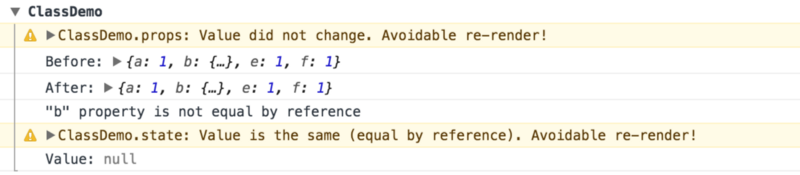
Normally, when a component receives a new property, React redraws such a component. However, sometimes a component gets new properties that, in fact, have not changed, but this also leads to the fact that React redraws it.
The use of pure components ,
PureComponent , helps to prevent this. For example, if a property is a string or a logical value, and it changes, PureComponent recognizes this, but if the property changes inside an object, then PureComponent will not cause re-rendering.How do I know that React performs unnecessary re-rendering of components? To do this, you can use why-did-you-update - a great package for React. The tools in this package let you know about the performance of re-rendering of components, which you can do without.
Messages about avoiding re-rendering of components
Once it is determined that unnecessary re-rendering is being applied, you can use, instead of
Component , PureComponent , in order to avoid this unnecessary rendering.5. React Developer Tools
If you are serious about becoming a professional React developer, then React developer tools should be included in your workflow. If you have already written to React, you probably have seen suggestions to use developer tools in the console. They are available for major browsers such as Chrome and Firefox .
Developer tools give access to the structure of the React-application and allow you to see all the properties and states used in the project. They are an excellent tool for examining the internal structure of components and debugging applications.
6. Using Inline Conditional Expressions
Although someone may not like this approach, I found that using embedded conditional expressions made the texts of my programs much cleaner.
Take a look at this code snippet.
<div className="one-col"> {isRole('affiliate', user._id) && <MyAffiliateInfo userId={user._id} /> } </div> There is a function that checks the user's role (it should have the value of
'affiliate' ), after which there is an operator && and a component <MyAffiliateInfo/> .That's what I like about all this:
- I did not need to write a separate function.
- I did not need to use the additional
ifexpression in therenderfunction. - I did not have to create a “link” leading to some other place of the component.
Writing embedded conditional expressions is pretty simple. It starts with writing a conditional expression. If, for example, instead of an expression, to write just
true , this will result in the <MyAffiliateInfo /> component always being displayed.Next, we associate the conditional expression with
<MyAffiliateInfo /> using && . Thanks to this approach, the component will be displayed only if the conditional expression returns true .7. Snippets libraries
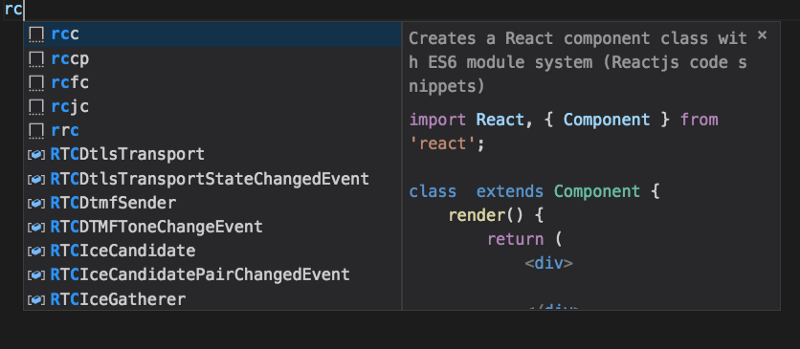
Libraries of snippets, pre-prepared template code fragments, speed up the development process and reduce the number of errors. Here is what their usage looks like. I, working in VS Code, create a new .js-file. I enter the
rc text in it and see what is shown in the figure below.Snipples
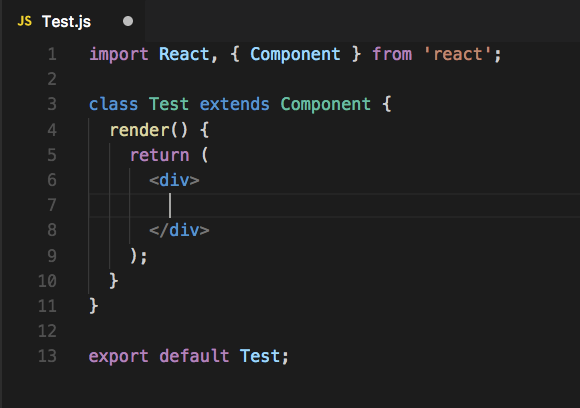
If you select the one you need and press Enter, the corresponding code fragment will get into the editor.
Snippet inserted into the editor
Snippets are a very useful thing, as they not only contribute to the fact that minor errors do not penetrate the code, but also help the developer to find and use actual examples of code design.
There are many snippets libraries that can be integrated into various editors. In this case, the library uses ES7 React / Redux / React-Native / JS Snippets for VS Code .
8. About additional training materials
If you, working with React, feel that some things slip away from your understanding, you should look for training resources that reveal the basics of the internal mechanisms of React. In my case, such a resource was a series of five materials called React Internals . She helped my professional growth. I suppose this series will be useful to those who have a general idea of what they want to achieve, but there is no complete confidence in how to do it.
9. Application of Bit and StoryBook for the organization of convenient work with components
Bit is a great tool for turning components into building blocks that can be used in various applications. In this case, changes made to components in different places of their application can be synchronized.
In addition, Bit can be used to organize components at the command level, to convert their sets into shared libraries, which makes working with them easier. There is also an interactive sandbox , tools for testing components in isolation, and other features.
StoryBook is an interactive development environment for components of the user interface, which can help in working with component libraries, in analyzing various component states. It simplifies the process of developing and testing components.
The StoryBook system is able to accelerate the development of React components due to the presence of a specialized environment in which components can be seen in action during experiments with their properties.
Results
How to improve the quality of React-application code? According to the author of the material this contributes to the following:
- Using the code verification system.
- Application propTypes and DefaultProps.
- Sophisticated approach to the creation of new components.
- Knowledge of the features of components, pure components, and stateless functional components.
- Using React developer tools.
- Use built-in conditional expressions.
- Using snippets libraries.
- Improving the qualifications of the developer due to the development of quality manuals on React.
- The use of tools like Bit and StoryBook, which allow to improve the development and use of components.
We hope you find these recommendations useful.
Dear readers! What would you advise to React-developers who want to improve the quality of their code and grow professionally?
Source: https://habr.com/ru/post/353924/
All Articles