Small laptop for system administrator
I am a system administrator, and I need a small, lightweight laptop that will always be at hand. And during working hours, and when I rest in distant lands.
Unfortunately, my working Thinkpad x200 is too heavy and cumbersome to wear constantly, but nothing radically better was found. In general, small laptops have recently slipped to imitate MacBook Air - something subtle, brilliant, with a minimum of ports, with functionality sacrificed to style. Such a laptop is only suitable for putting likes on Facebook, but not for work.
')
Not finding anything worthy, I thought about how a laptop would turn out if it were developed, thinking not about marketing, but about the needs of real users. For example, system administrators. Thoughts on the whole article.
Of course, your understanding of the admin notebook does not have to coincide with mine, but I hope you will find a couple of interesting thoughts here.
Just keep in mind that although I am an administrator by position, I actually have to work as a network engineer, and installer, and do a lot of other work related to hardware: we have a tiny company, we are in the province, so that's it.
In order not to constantly clarify "this laptop," later in the article I will call it the admin book. So let's get started ...
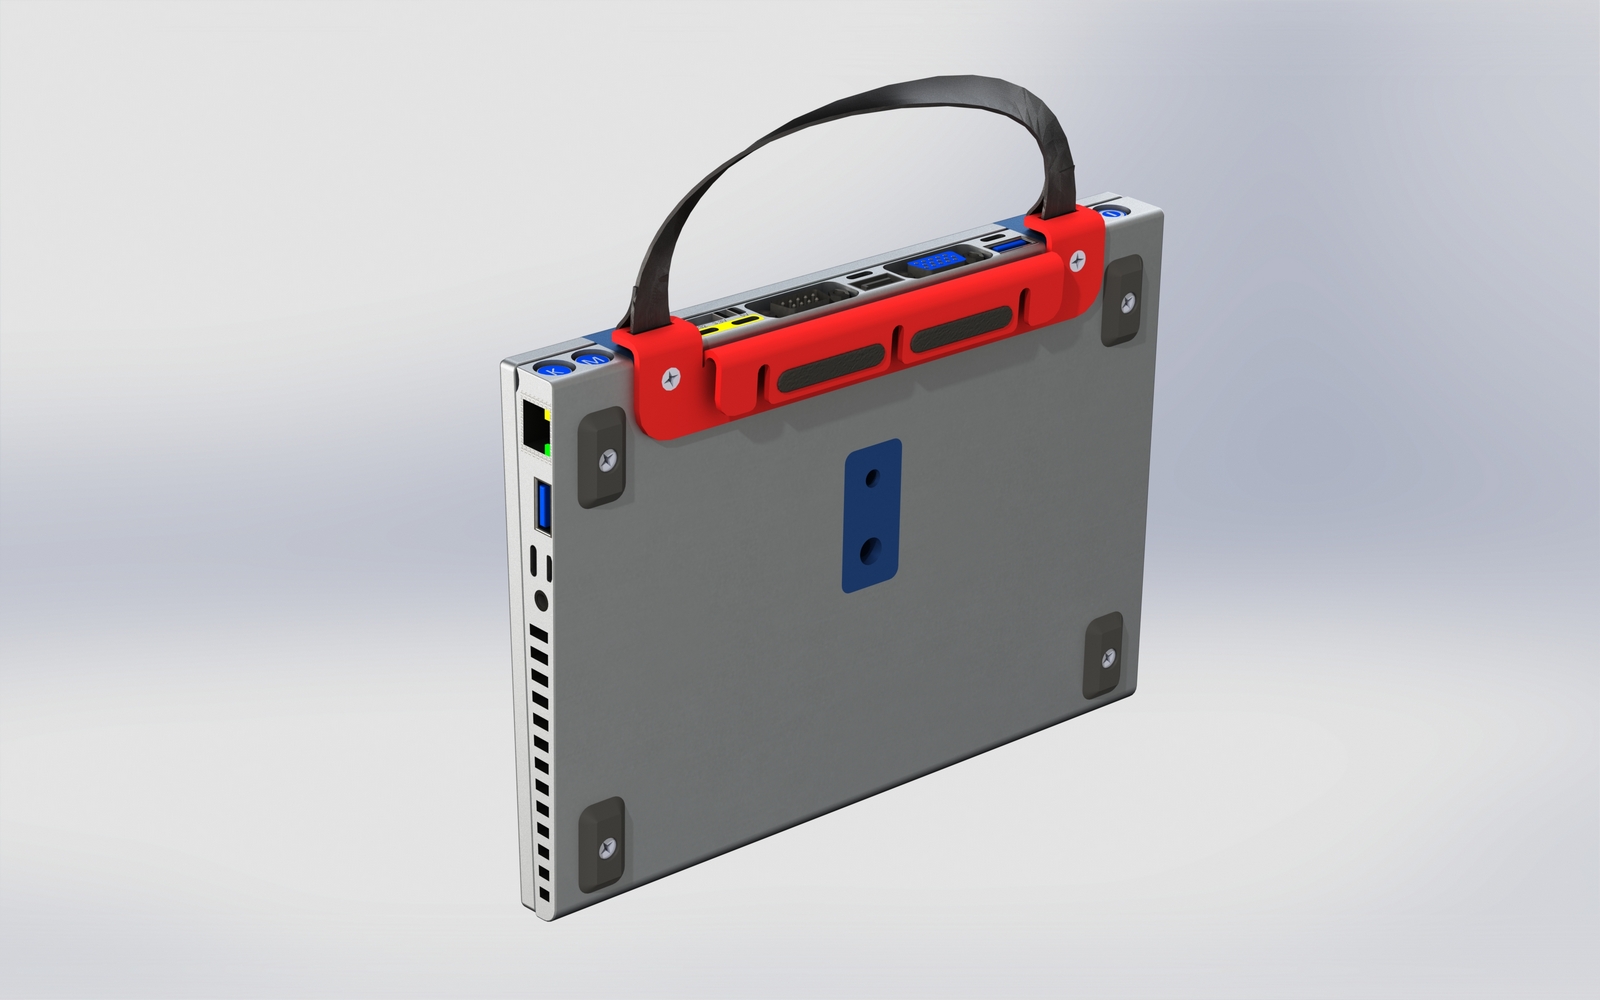
1. Dimensions and weight
Of course, you want less and easier, but the keyboard with the screen should not be too small, and the connectors also need to be placed somewhere. Indeed, one of the main features of the admin book is the ability to connect to custom equipment.
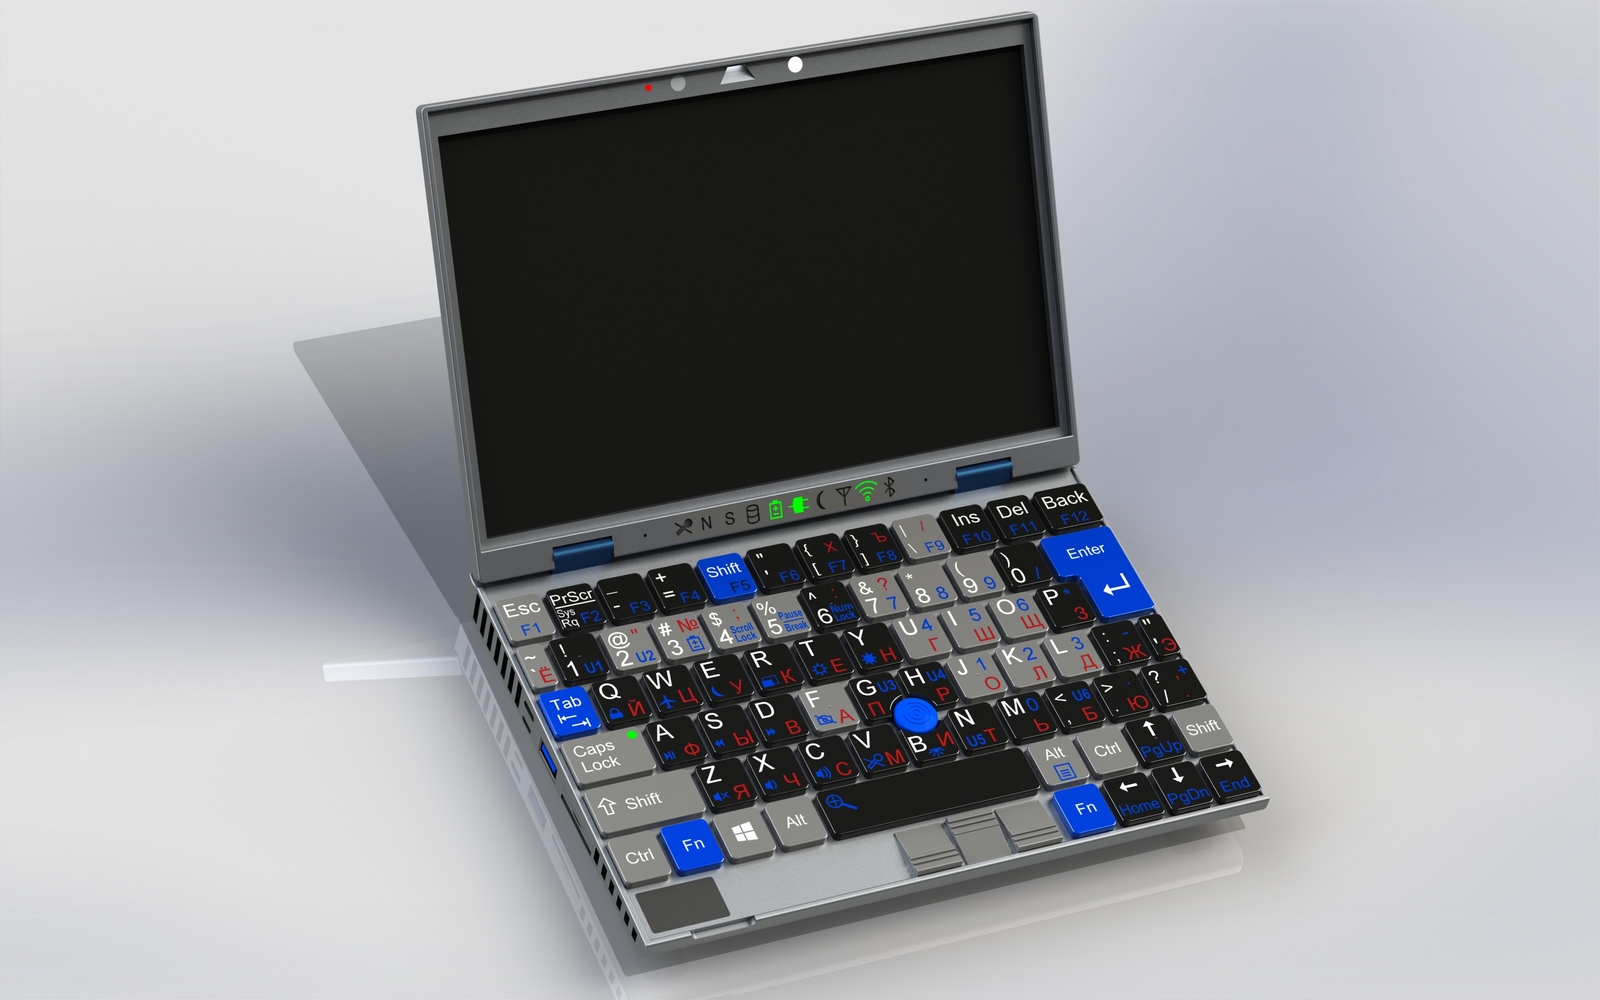
Approximately I want a laptop twice as small as x200, the dimensions of which coincide with an A4 sheet. Yes, and side pockets of many bags and backpacks miraculously to the size of a little more than the A5 format. So, the adminbook will be exactly that size: 210x148mm
Thickness - what happens. The model in this article has a thickness of 19-25mm (including the legs), but I am satisfied with 3cm. In order to “feel” the size, pick up a book of the most popular format 84x108 / 32. For 400 pages in a hard cover, its size is 205x135x25mm. The adminbook is almost the same, only half a centimeter more in height and a centimeter in width.
The weight of the mentioned book is 0.4 kg. And the adminbook weight is 600-700 grams (half the weight of the Thinkpad). Not so hard.
Of course, the adminbook case is made of
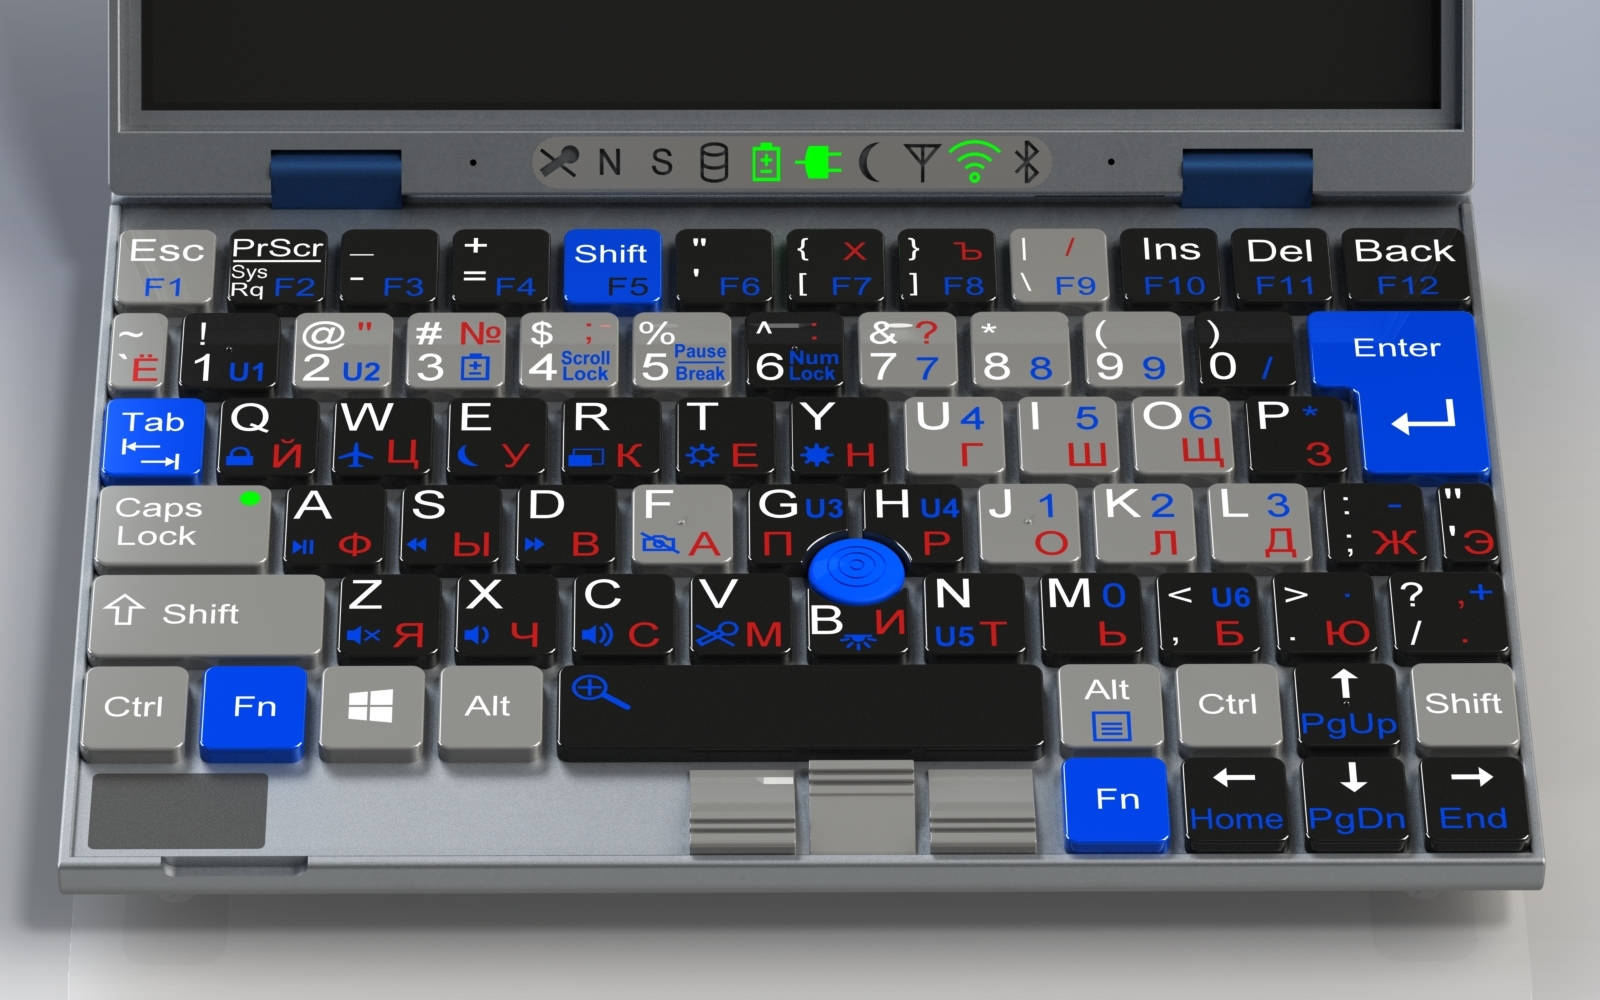
2. Keyboard and trackpoint
For a comfortable work on a laptop, a well-designed keyboard is important. Of course, the best keyboard is the one I used to. For me, this is Mitsumi Classic and its analogs, and on laptops - the keyboard of old Thinkpads. But neither one nor the other will simply fit into the adminbook due to its size (the main block of keys on Mitsumi is 285x95mm).
Compared to the classic keyboard, the adminbook doesn’t have enough width, but there is little space on top. This means that some keys from the right side of the keyboard will have to be moved to the top row and placed in some more or less meaningful order.
In order to better “feel” the keyboard, I made life-size mockups, moved buttons to and fro, put my fingers differently for a set of typical hot keys, and came to the version that you see here.
I will try to explain my thoughts.
First, it was necessary to set the size of the keys. On a conventional keyboard, their pitch is 3/4 "(19mm), and the size of the pads for fingers is from 12x12 to 16x16mm. Will it work out to use this size?
Let's count. The maximum number of keys that you need to fit in one row is 12 (functional). The result is a 17.5mm (210/12) step. With just one and a half millimeters less than the standard step.
But keys from edge to edge is a bad idea. It is better to leave around the keyboard a little space for a protective side. Reducing the step to 17mm, we get the appropriate length of the row 202mm. Taking 2mm as the distance between the keys, we get the width of the key equal to 15mm.
Determined with the width, now we calculate the height. There will be 6 rows of keys, plus the trackpoint buttons should fit below the space bar. That is, 7 rows. 148/7 = 21 This is even more than the standard 19mm. So take 19mm. At such a height, sufficient 17 mm remain for the sides of the keyboard and hinges of the display.
As a result, we get a keyboard with a key size of 15x17mm at intervals of 2mm. That is, in height - as on a standard keyboard, and in width - only 2 mm less!
Since this is a laptop for professionals, the convenience of using hotkeys is important. And my personal bzik - so that combinations with modifier keys (Ctrl, Alt, Shift, Fn) can be easily pressed with one hand. As far as possible.
Therefore, I did not save space by throwing out the right modifier keys, as some manufacturers of compact notebooks do. Moreover, I added another Shift to the uppermost row in order to make it more convenient to use the upper case of the keys carried there.
For fans of blind dialing on the right keys (F, J, 1,6, Up), bumps are made for tactile orientation. Although I think that with this keyboard, the key way of working will be to press the keys “at a glance”. And here I have a complaint about the developers of modern laptops: on their keyboards, the function keys are not divided into groups of four. What is uncomfortable for me personally.
In my version, groups of four start with keys of a different color. This allows you to position your fingers on the right keys without focusing on what is written there - just guided by color. Unfortunately, the function keys had to be combined with other keys, so they have to be pressed in combination with Fn.
In general, I use the color references throughout the keyboard. The row with numeric keys is specially grayed out to visually separate the QWERTY row, while keys 1 and 6 are highlighted in black. At the same time on a noticeable black 6-ke is NumLock.
On the right side of the keyboard, the keys are highlighted in gray, which in the NumLock mode work as a numeric keypad. But only part 1 through 9 is highlighted - it turned out to be more convenient than selecting all the numbers and the keys of arithmetic operations to the right of them. By the way, this whole digital part works as digital not only in the NumLock mode, but also when the Fn button is pressed. And Enter also works as Enter numeric keypad.
Tab and upper shift are among the keys of the same size, so they are highlighted in blue. The caps mode indicator is built into CapsLock, Fn + AltGr emulates the context menu key.
Key quotes and tilde (E and E) - 10.5 mm wide. This is quite acceptable, because tilde is used relatively rarely. But quotes in programming are used constantly, so they are duplicated in the top row right next to the Shift. By the way, I somehow got the HP ProBook 4510s, so his tilde key is also 10.5 mm. And this is on a 15 inch laptop!
However, if desired, the tilde can also be duplicated on a full-size key (for example, by one). See it written in blue U1? This means custom key configuration: along with pressing Fn, the key code that is written for it in the BIOSe is processed. There are six such keys on the keyboard. They can be assigned as an emulation of the usual keys, and something non-standard. For example, the buttons on the advanced keyboards for calling a calculator, browser or email client.
Multimedia functions are moved to the left down to not reach far, pressing Stop or Mute.
Of course, the admin book needs keyboard backlighting. It uses an analogue ThinkPad-ovsky ThinkLight - an LED above the display that illuminates the keyboard on top. In this case, it is better than highlighting the keys below, because There are three symbols on the keys, and only English letters are usually made transparent to the bottom light. The Fn + B key (below the trackpoint, you can feel it even in the dark) cycles through the keyboard backlight and the webcam backlight.
Left of the trackpad keys left empty space. This is done so that the adminbook can be kept in one hand - four fingers from the bottom, under the bottom, and the thumb from above in this empty space. At the same time, please note that there is a small cutout under the finger to make it easier to open the display. The biometric identification sensor is also located there (see paragraph 16).
Since there is no place for the touchpad at all, the trackpoint is used as the positioning device. Do not be alarmed if you have not worked with him - in fact, quite a handy thing.
Three buttons under the space bar work the same as on the mouse. When the middle button is pressed, the trackpoint is scrolled up and down, left and right, and even at the same time diagonally.
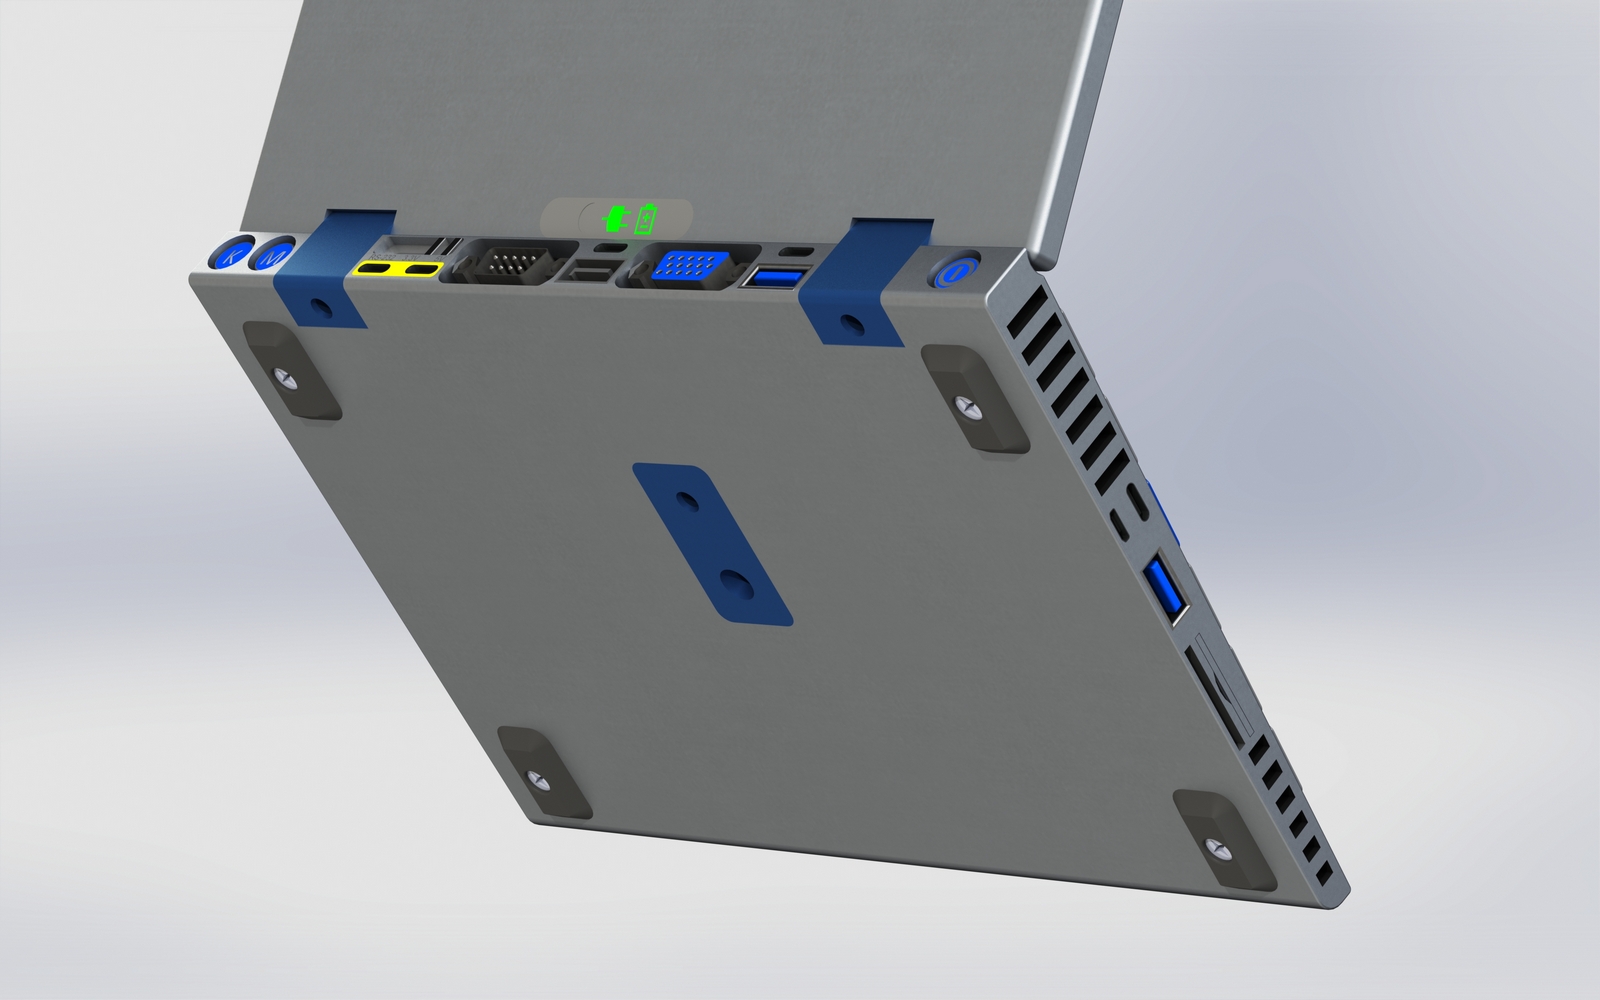
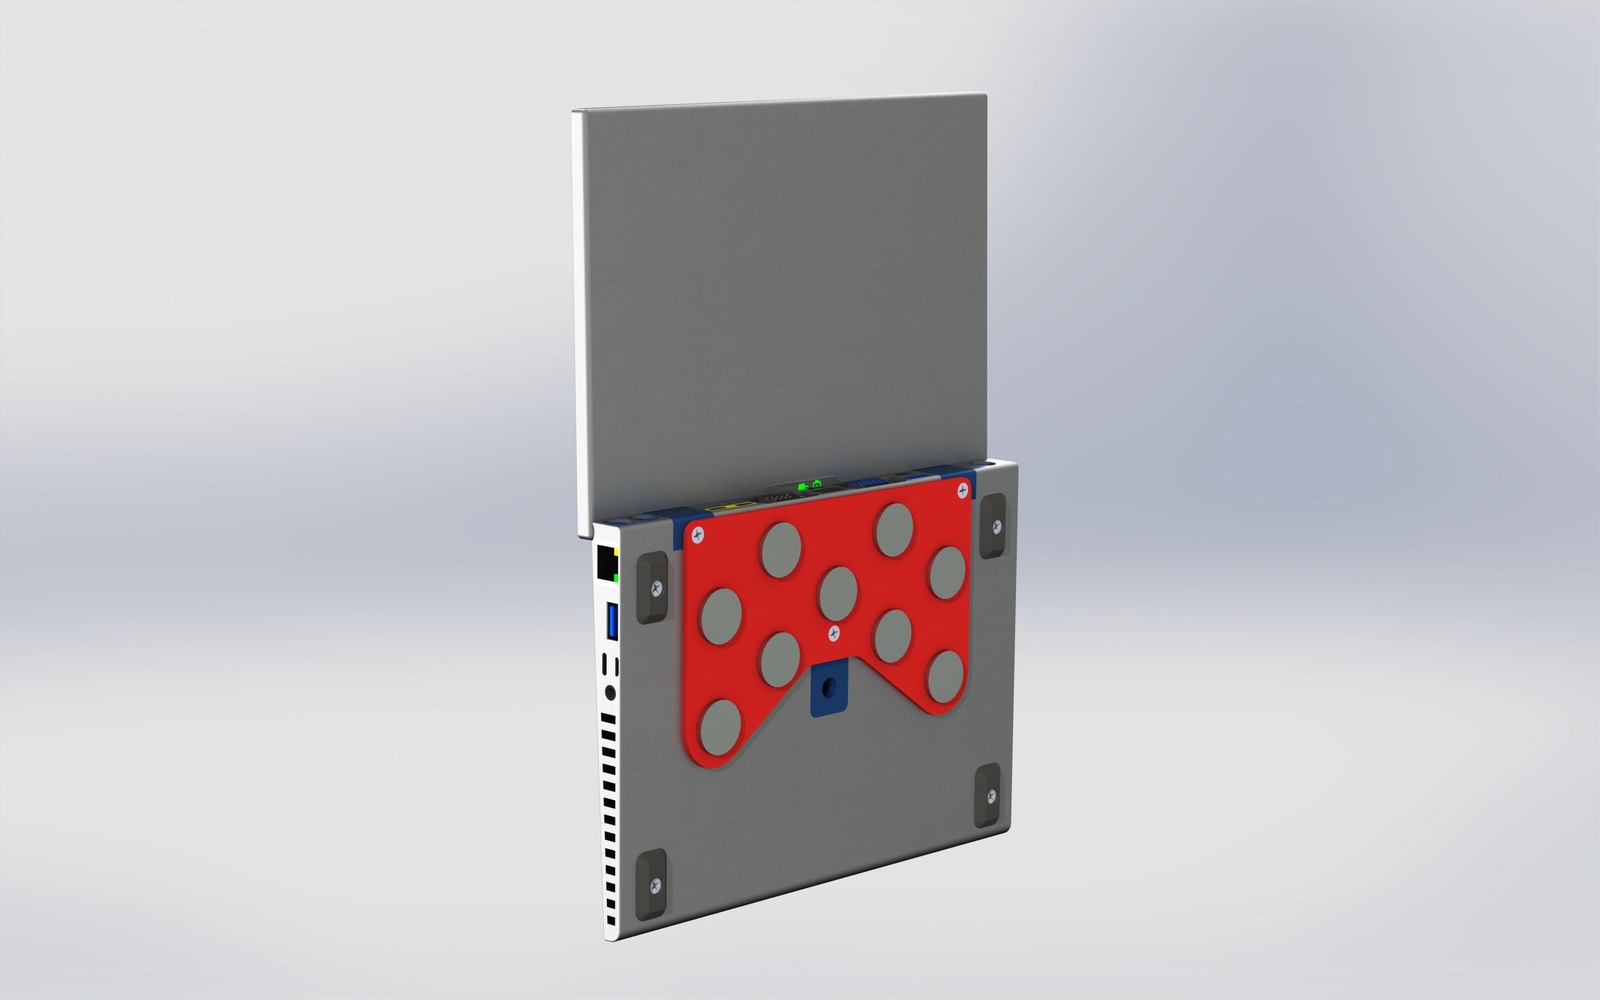
3. Buttons on the back of the case
Since the keyboard is occupied by all the available space, the power button had to be put on the back side. I believe that this is better than taking away the scarce space from the keyboard. Moreover, the power is turned on only once per session and the location of the button at the back is not such a big inconvenience.
True, there is a problem with the spontaneous pressing of the back buttons, when the admin book is in the bag. And although they are slightly recessed into the body relative to the back wall, you need to lock the pressing of these buttons when the display is closed.

In addition to the power button on the back there are two buttons for switching the monitor and keyboard. This is done for the convenience of setting up "headless" servers. Usually they are configured remotely over the network, but anything can happen. And I don’t want to carry a monitor and keyboard with me all the time.
Just imagine: you arrive at some distant platform at the edge of civilization, connect the adminbook to the server via MicroUSB (or USB Type-C) and pressing the back button of the "K" keyboard with the trackpoint "are sent" to the server as a USB keyboard and mouse.
Connect the server and adminbook with a VGA cable, press the “M” button - and the adminbook's VGA connector starts working on the input, turning the beech screen into a small LCD monitor connected to the server.
In this case, the USB cable from the server is powered, recharging the admin book.
And, “cherry on the cake” - through this same USB cable the adminbook pretends to be an optical drive, similarly to the well-known Zalman (emulating CDs from existing iso files). Plus works as an external disk, so that configuration files can be copied to / from here / here.
That is, by connecting the adminbook to the system board via USB and VGA, we can use the beech as a keyboard, mouse, monitor, CD drive and external drive of this system, installing the operating system there directly from the laptop. Or perform testing if a system disk image with test utilities / antivirus is emulated for the system integrator.
In addition, with the same button, the keyboard and trackpoint can switch not only to work as a USB keyboard / mouse, but also to work as a Bluetooth keyboard / mouse. Including in the off state adminbook (so as not to waste energy on the processor, if only the keyboard and the trackpoint will be used).
Of course, the monitor as a VGA screen can also work without turning on the rest of the notebook.
4. Power Supply
In order not to carry too much with you, I want the adminbook and the phone to be powered by a single charge. And here there are three options:
- normal charging 5V / 2A (power up to 10W)
- charging Quick Charge (up to 18W)
- USB PowerDelivery standard charging (up to 100W)
The first type of charge is the most common, the second is found on many modern smartphones, the third is still rare. Fortunately, there are charges that support all three standards, but they do not come with phones. But complete with adminbook universal power supply will be useful. Even better, there will be two exits - for beech and for the phone.
But if suddenly it happens that you find yourself without this power supply - it does not matter. Use any other charge that will be nearby. You can charge the adminbook via the MicroUSB or USB Type-C connectors. Several connectors are made for ease of connection (left / right / back), and for duplication in case any of the connectors breaks (which often happens with tablets).
Normal charging and QuickCharge are supported on all connectors, PowerDelivery is supported only on Type-C.
I suppose that the adminbook will be useful for the PowerBank's capabilities - to charge a mobile phone from a beech battery, even if it is turned off. And in order to prevent the battery from completely discharging, make a setting in the BIOS to limit at which battery charge the power to the USB connectors is cut off.
I remind you that the technology PowerDelivery supports charging in both directions. That is, through the same connector you can both charge the laptop and charge the phone from the laptop.
5. Processor
This is not a gaming laptop or a workstation for complex calculations. I think there should be enough processors of the Kaby Lake-Y family with a nominal TDP of 4.5W (judging by the characteristics, it can be configured from 3.5 to 7W).
Unfortunately, I didn’t see these processors alive, I had a chance to try only Kaby Lake-U in the form of i5-7200U. On my typical tasks, no “brakes” were observed. I believe that there will be no problems with version Y. I do not know what its real performance is, I think 70-80 percent of the U series. While the power consumption is 3 times less (for the U series, TDP = 15W, adjustable from 7 to 25).
And with less consumption, battery life increases, the weight and size of the cooling system decreases (which, again, leaves more room for the battery).
Of course, I want to be able to change the power settings of the processor, choosing what is more important at the moment - performance or charge savings.
6. Display
Based on the size of the admin book, the screen size will be 9-9.5 ". Resolution 1920x1200 (16:10) or 1920x1080 (16: 9 FullHD). If it seems to someone that this is a lot, look at dozens of phone models with a resolution of 1440x2560. In any case, 1366x768 will definitely not be there - after FullHD it is impossible to look at such permission without tears.
The display must have a bright backlight so that you can work on the street during the day. And also anti-reflective (better matte) coating.
Perhaps the touch screen. Although I personally did not come across laptops with touch screens, I admit that sometimes it is more convenient and faster to just poke a finger.
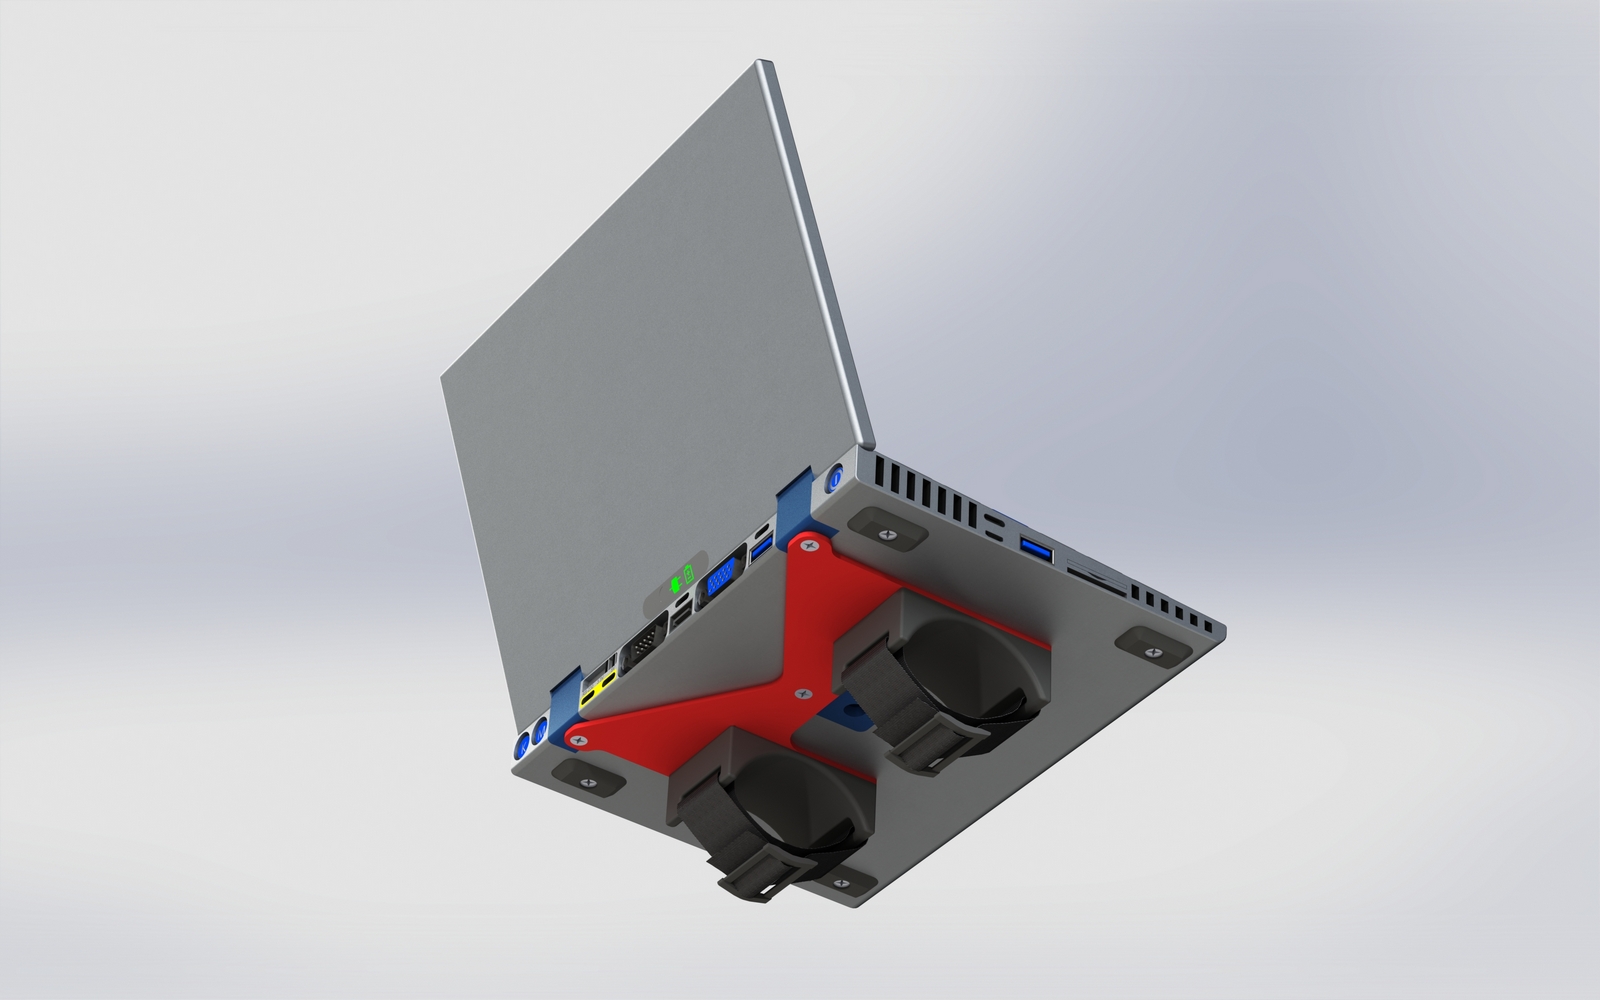
The hinges are made so that the display reclines 180 °. On my Thinkpad, it's done the same way, and sometimes it is needed.
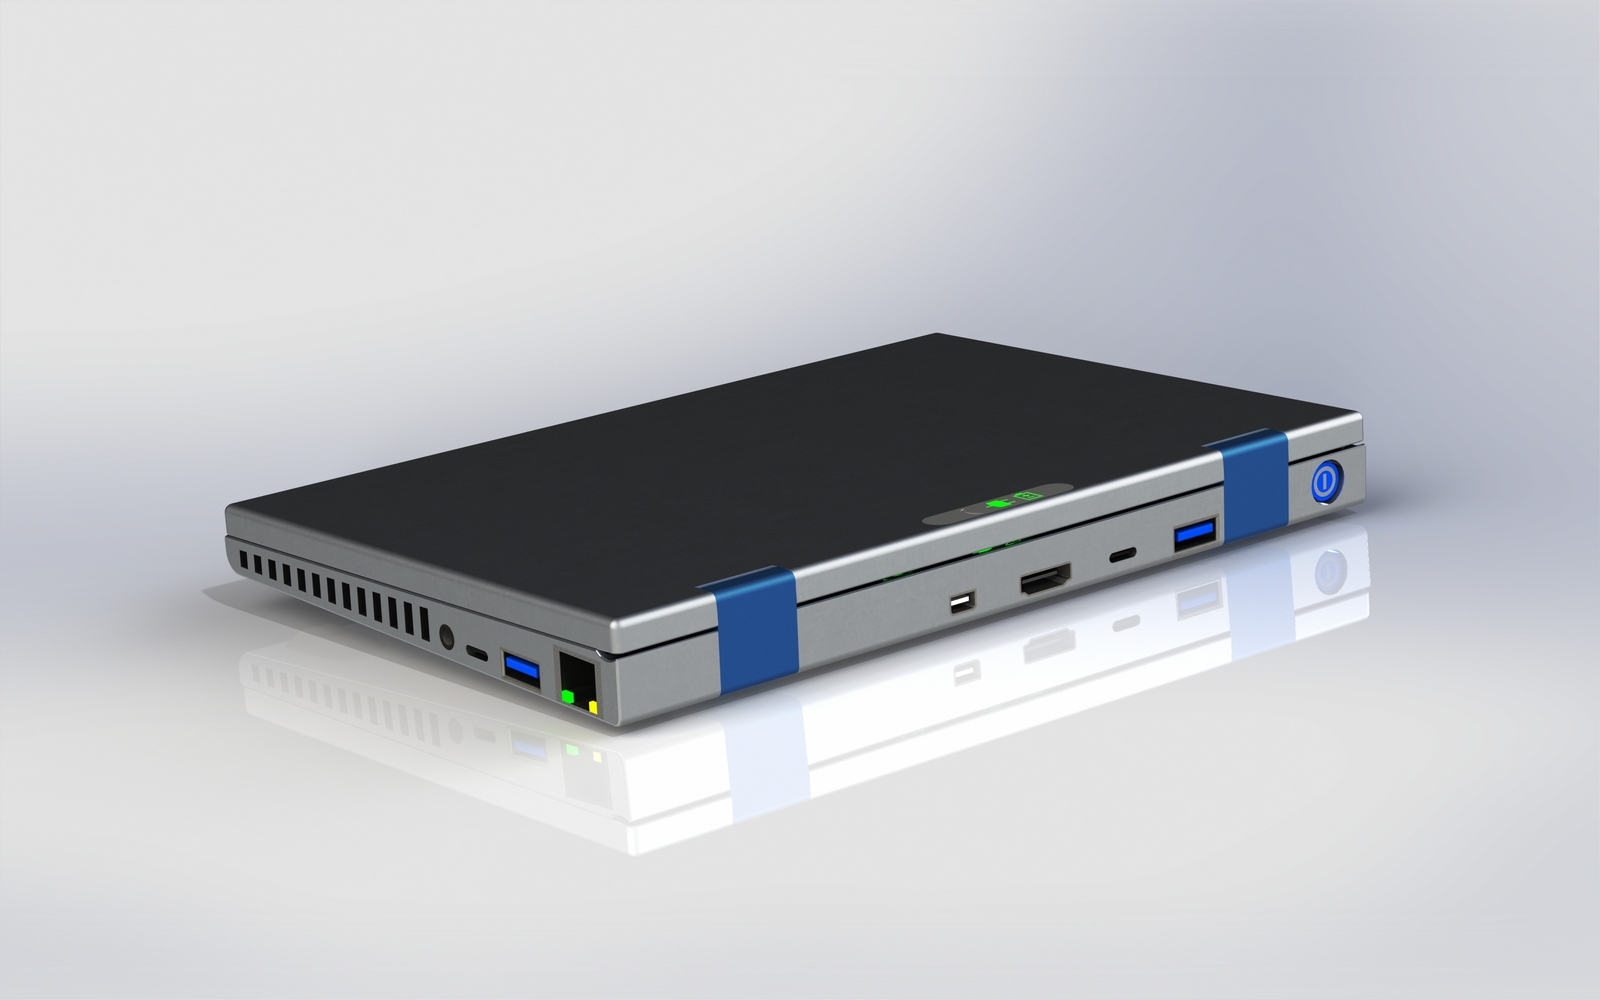
7. Network port
It is located on the side, so that you can visually observe the indicators of the link and the connection speed using indicators. Since the minimum thickness of the case is limited by the size of the connectors, the network port is located as close as possible to the back wall, right next to the buttons.
The port is, of course, gigabit, with support for VLANs and Wake-on-LAN. It must be protected from burnout when Passive POE voltage is applied to the cable (used in Mikrotik and UBNT).
Moreover, the adminbook should be able to eat from the 12-24V supplied to the network port. This will allow powering both from routers / switches and directly from automotive and UPS batteries without any power supply units. It is enough to have a Passive POE injector or, if you do not need Ethernet at the moment, to crimp a piece of a twisted pair on one side, and on the other hand clean the wires and connect to the battery terminals.
I understand that for administrators who are accustomed to comfortable chairs and air-conditioned rooms, this method of power supply looks strange. But I sometimes have to work in such a wilderness, where there is no cellular connection, and even UAZs get stuck on the “roads”. Therefore, we must be ready for anything.
8. Serial port
Yes, I know that there are USB-COM adapters. I myself have one. But the serial port is so often used to configure hardware, that it should be in the admin box “by default”.
Initially, I was thinking of using the 8P8C modifier (AKA RJ-45) instead of the DB-9 connector. But it turned out that all the cables I have with 8P8C from the “computer” side are still terminated DB-9. So we will use it.
Next to the COM port you see a slide switch. This level switch is RS-232 / + 3.3V / + 5V. The first option is a standard RS-232 with bipolar voltage levels. The other two are UART with voltages 3.3 / 5V for a logical unit and 0V for a logical zero.
As you guessed, it is necessary to connect (including flashing) with all sorts of routers and controllers, which are now dark. By the way, in such a noble cause it would be very appropriate if the free pins of the connector are supplied with voltages of 5 and 3.3V, in order not to look for a separate power supply for the firmware being flashed.
9. Microcontroller
Below the slide switch are two USB Type-C connectors, marked in yellow. This is nothing more than the outputs of the STM32 series microcontroller built into the adminbook.
The fact is that sometimes there is a need for the I2C, 1-Wire, JTAG, ADC protocols, and even banal GPIOs, which are in controllers, but are absent in “large” computers.
So I propose to solve this problem by installing a microcontroller. USB Type-C connectors are chosen because of the standard computer connectors they have the most contacts - as many as 24 pieces. That is, a total of 48 outputs. Enough for both the data line and the power supply for plug-in electronics.
At first, I wanted to use something like an Arduinov comb, but there is only enough space for 14 contacts and it is not as convenient to connect as a ready-made standard connector.
Some confusion is caused by the fact that USB-C connectors have a symmetrical shape and their two pieces. But this is easily solved: it is enough to write L and R (left / right connectors) on the plug connectors and know that you need to stick them up.
The microcontroller can work both with the adminbook turned on and off. In addition, he can wake off a beech, if one of the events needs the reaction of a “big” computer.
Of course, a development environment and ready-made libraries with examples for the most popular protocols implemented using the built-in microcontroller will look good with the adminbook.
10. USB connectors
In total, on all sides of the adminbook there are three USB 3.0 Type A connectors, two USB 2.0 Type Micro-B connectors and four USB 3.1 Type C. Although it’s hardly possible to use them all at once, since because of the size of the case they are next.
Since USB Type-C supports alternative modes, it makes sense to take advantage of this. Alternative modes are when the connector works as HDMI or DisplayPort video outputs. Of course, to connect to a TV or monitor, you will need adapters or corresponding cables that have USB-C from one end and HDMI / DP from the other.
But in the case of a tiny adminbook it is better to use adapters than to occupy a scarce place with separate HDMI and DisplayPort connectors. In addition, adapters can be supplied complete with the admin book.
11. SATA connector
As long as there are “big” computers with SATA disks, there will be a need to connect to these disks in order to test them and copy the information. And - directly, and not via USB adapters. Power for SATA drives can be taken from the power supply of a large computer. Or from the universal power unit adminbook through the converter USB to SATA Power.
12. Other connectors and features
Right - 3.5mm jack for a wired headset. Left: SD card reader and SIM card holder. Left and right behind the grilles near the front of the case - the speakers.
Webcam ordinary, 2 megapixels. Next to the camera is an LED display that lights up when the camera is turned on, as well as a backlight LED so that you can communicate from dark rooms. While talking, the microphone and camera can be forcibly turned off with the key combinations with Fn. At the same time, the LED next to the camera goes out, and a red crossed microphone lights up in the row of indicators under the display.
13. Radio Interfaces
WiFi - 2.4 and 5 GHz standards 802.11 a / b / g / n / ac with support for Wireless Direct, Intel WI-Di / Miracast, Wake On Wireless LAN. , Miracast , , - .
-, , - , , . , , . .
Bluetooth . 4.2. , , (. 3)
4G(LTE)/3G/EDGE/GPRS
GPS/GLONASS/Galileo/Beidou. , , . 3G . , - .
14.
: , NumLock, ScrollLock, , , , , , WiFi, Bluetooth.
, : , , .
:
- : 70% , 30% , — , 10% — .
- : (QuickCharge/PowerDelivery/Passive POE) — , 5 — , « » — .
- : 4G(LTE) — , 3G — , EDGE/GPRS — .
( ) , . .
15.
— SODIMM ( 8 ), SSD — 256 .2 2242.
16.
. . — - . , Fujitsu .
17.
, - ? … !
. Thinkpad- . , - , - , .
, , . ! , .
. ? , , , , , - . .
, - .
? No problem. ? . . 180°.
? - .
.
, ? : . , -, , , . , 5 — , - . — , — . !
18.
, - . , / . - .
«-» , «» — . .
:
- COM port
- VGA
- SATA
- BIOSe
- USB Type-C
- MicroUSB
- POE
- QuickCharge
! … , : HDMI Mini DisplayPort. DP Mini , // MiniDP VGA/DVI/HDMI/DP. .
Ethernet-, ( ).
19.
| Opportunities | Full version | |
| The size | 21014826 | 21014826 |
| Weight | 600-700 | 600-700 |
| Display | 9-9,5" (19201200 19201080) , | 9-9,5" (19201200 19201080) |
| Kaby Lake-Y Kaby Lake-U | Kaby Lake-Y Kaby Lake-U | |
| Video output | VGA, HDMI DisplayPort ( USB Type-C) | HDMI, Mini DisplayPort |
| VGA ( , ) | - | |
| 5, QuickCharge, USB PowerDelivery, Passive POE (12-24V Ethernet) | USB PowerDelivery | |
| Ethernet | 1 /, VLAN, Wake-on-LAN | 1 /, VLAN |
| COM | DB-9, RS-232 UART (5 3,3) | - |
| 4- 3,5 | 4- 3,5 | |
| SD | there is | there is |
| SIM | there is | there is |
| 6 | - | |
| Bluetooth | there is | there is |
| Wi-Fi | 2.4/5 a/b/g/n/ac, WiDi, Miracast, Wake On Wireless LAN | 2.4/5 a/b/g/n/ac, WiDi, Miracast |
| WAN | 4G(LTE)/3G/EDGE/GPRS | 4G(LTE)/3G/EDGE/GPRS |
| GNSS | WAN | - |
| Yes | - | |
| - Bluetooth | Yes | - |
| USB | USB 3.0 Type A — 3., USB 2.0 Type Micro-B — 2., USB 3.1 Type C — 4. | USB 3.0 Type A — 3., USB 3.1 Type C — 3. |
| SATA | there is | - |
| STM32, 48 , | - | |
| there is | - | |
| - | ||
| there is | there is | |
| PowerBank | Yes | Yes |
| WEB | 2 , | 2 , |
Source: https://habr.com/ru/post/353762/
All Articles