The device of special effects for games under NES. Part 1
There are several series of articles about programming under NES, one of them has even been translated into Russian on Habré . However, none of them goes further than a review of the basic capabilities of the console — the overall architecture of the console, the fundamentals of the assembler are discussed, briefly describes how to display sprites on the screen, mentions something about music and mappers, and the cycle ends.
I will try to continue the story about the withdrawal of graphics for NES games from the place where other tutorials end. Understanding yourself how to program animation effects is quite difficult, due to the small amount of information about this, both in Russian and in English. But you shouldn’t get upset, because you can use the code from classic games as documentation, which are now easy to find in the network in the form of ROM-files.
Therefore, before you program something, you have to figure out how these or other effects are arranged for NES, and the article will be devoted to how to do it. There are many articles from the category " Games that squeezed out of the NES maximum ", we will try to understand how all the main effects are made in these games, and also create tools that can be used to find other games that are no less technologically advanced.
In any descriptions of the iron prefix NES or the use of terms, I could be wrong and, most likely, wrong. In the description of the program part, the information is supposedly more accurate, verified by disassembling and debugging scripts. Links to all the tools used in the article are listed at the end. If the text refers to an "emulator" without specifying the name, Fceux is implied. Particularly important or interesting, in my opinion, moments are highlighted with exclamation marks.
')
Suppose you read the nesdoug 'articles in BubaVV , and already know the basic things about graphics programming for NES. I will not write about it in detail, but only describe briefly and in a simplified way (you can skip this part and return to it when you have questions, why any effect is made this way and not otherwise):
I will not analyze these features of NES in detail, they are “chewed” in review articles, for example, here . I brought them just to list the 5 basic ways to create animations and effects on NES - animation by writing to the screen, animating by changing the scrolling position, animating by changing the contents of the CHR-bank, animating by changing the palette and animating the drawing of sprites .
It may be worthwhile to isolate a separate way of animation by changing the state processor's bit , for example, turning on and off rendering, changing the brightness of color channels, changing the active screen, or alternately changing two active banks between each other.
Now, attention, all the graphical effects on the NES are done in one of these ways or a combination of them !
Below, I will examine examples of the effects of each type and tell you how to determine exactly how the game creates this or that effect. But before that, some more theory, which is very important to understand.
The video processor is controlled by the instructions of the console's central processor, but it works in parallel with it. To create a smooth animation, you need to make changes in the video memory only at the moment when the video processor is not busy drawing a frame, otherwise the user will replace a sudden change of state on the screen! At best, at worst, the user will also see a frantic “jerkiness” of the picture, since the change in the state of the video processor is recorded in his memory, and this leads to a loss of information in his internal registers that control the position of the raster drawing the picture on the screen. So you can write to the video memory only when the rendering of the background and sprites is turned off in the video processor.
Modern graphics systems usually do not allow changing the contents of the current frame, and use double buffering - they draw a picture in an invisible memory area, which the video card then displays on the screen as a whole. The old video processors did not have enough speed to prepare a whole frame in time while the previous one was being drawn.
To give commands to the video processor, the program has a very short time interval between the end of one frame and the beginning of the next! In order to have time to do it at the right time, the video processor at the end of the frame generates an interrupt. The program must install the interrupt handler. It is in this place that the fastest and most optimized code is written, and the most cunning tricks are found.
However, despite all the difficulties, many games perform operations with changing video memory not only in this processor (between frames), but also during frame rendering!
So all effects are further subdivided into interframe (change is made between frames) and midframe (change is made right during the drawing of one frame).
It uses several possible synchronization options for the central and video console processors.
About both ways of synchronization between the CPU and PPU in the middle of the frame (interrupt, and according to the condition of checking on the CPU), if there is interest, I will tell in another article with code examples, now it’s enough to understand that changing the memory can be done between frames (and even Developers should do this quickly enough!), and even during the frame drawing.
Now you can proceed to the analysis of what can be achieved in one way or another.
Changing the palette between frames is one of the easiest to implement effects. There are several types of effects that are implemented with the help of animation palette.
The easiest of them - the usual flicker, when one color is replaced by another. Another effect is “running waves of color,” for example, waves of a waterfall, quicksand, or fire. Finally, the third type of effects is flashing one of the colors in the palette of one frame of the image while simultaneously blanking other colors, so you can show a moving particle of rain, snow, or another particle effect. If you carefully read the theory, you can calculate that such an animation will have a maximum of three frames, if you do not combine it with the animation by writing to the screen page (tiles are limited to two bits of color, one of which is occupied by background). All three types of such animation can be seen in different levels of the game Duck Tales 2 :
The video shows the animation playing in both directions.
Unfortunately, the rain effect is hard to see in the video, so here it is on the gif:
Identifying this type of animation is very easy, and special tools are not needed for this. Open the PPU Viewer window in the emulator and see if the palette changes or not. For ease of learning "flashing" frames with raindrops slow down the speed.
Changing the palette completely in the middle of the frame is difficult, but possible .
For animation in the game process, this method is not used, but occasionally used in static parts of the frame. The obvious effect is to draw an interface using a palette other than the level palette.

Less obvious is changing colors from one to another all the time to create a gradient effect.
How to recognize
The emulator allows you to see which palette was loaded at the time of drawing any line of the frame. See the screensaver Indiana Jones and the Last Crusade :
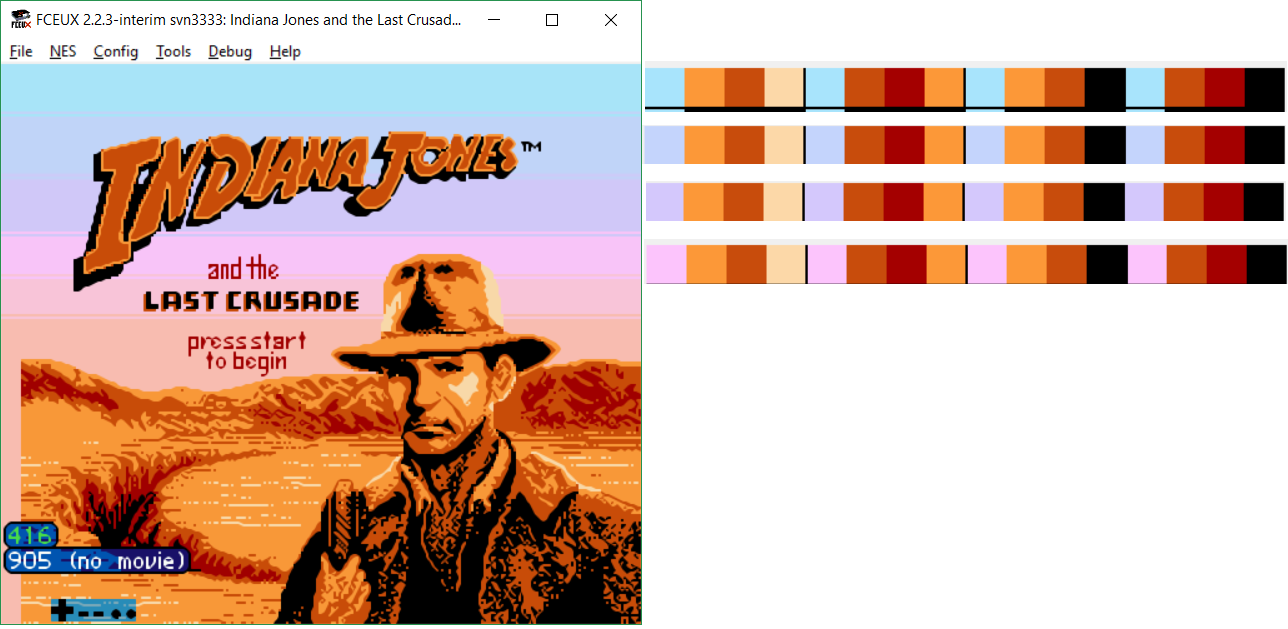
Indiana Jones and Gradient Fill
Please note that the game does not switch the entire palette, but changes only one color. And the more she had not had time for the time that the beam moves from one line to another.
This is the most common background animation by changing the tile number that will draw the video processor, more often it is always performed once for one object. It is not interesting to disassemble such animations, and it makes no sense - almost any ordinary game animation is made like this (but more often the interactive part, for example, the lid of the opening chest, is drawn with a sprite). An example is the display of exploding objects in Contra or Super C.

In this game, with the explosion of a cannon, doors or gates, a logical "block" is updated, with a size of 4x4 tiles.
Create an illusion of tiles smaller than 8x8
Well described in the article with the analysis of Battle City . In short, for each 8x8 tile, several variants of the same type are created with missing 4x4 parts, as a result of the programmatic replacement of tiles, you can create the illusion that the game uses 4x4 pixel tiles:

In combination with the scrolling position change, a classic screen scrolling effect is created on a large level , present in almost any game with levels greater than a couple of screens in width or height (I’ll note only that the update takes place in the invisible part of the screen in advance so that the player can see already drawn part to the moment when the scroll reaches the new area). I will analyze the types of scrolling in the section of animations created by changing the position of scrolling.
It makes no sense to display the change in the screen page before the frame is finished drawing, normal people can wait until the next frame 1/24 second.
Animation of characters . An elementary example, in fact, is what sprites are for — moving them around the screen, depicting the characters of the game, so that gamers become interested.
Sprites can also draw particles , as well as add additional details to the background . Background tiles should be aligned to 8 pixels, sprites can be drawn anywhere on the screen, in addition, they are drawn from the second bank and another palette - due to this, limits on the number of colors in the picture are increased.
There is also the inappropriate use of sprites - in order to synchronize the processor and the video processor (for example, Sprite Zero Hit and Sprite Overflow ) with the help of them.
Interestingly, to distinguish the effects made by sprites from other effects "by eye" will not work, it is too easy to mask the background under the sprite and the sprite under the background and fool the player.
Emulators allow you to disable the layer of sprites and backgrounds in the settings, but playing in this mode is very inconvenient, so for easier detection of sprites, I wrote a lua-script , which, when turned on, does not interfere much with playing and at the same time uniquely emphasizes the sprites on the screen.
The video may seem a bit strange, but if you know the games shown in it well, you will understand what is happening on the screen in the shown episodes. Now you can accurately separate the sprite effects in games from others, and give specific examples.
Particle rendering
Rendering rain in Mitsume ga tooru .

Here you can see that the game uses 8x16 sprites (it is more advantageous to use such sprites in terms of the number of graphics shown on the screen at the same time, because regardless of the size of the sprites - 8x8 or 8x16, you can draw 64 sprites). You can also notice that the game draws raindrops through the frame, which makes it seem to the player that there are twice as many drops as there really are - because the sprites also need the game to draw the main character, projectiles and the boss, which also consists many particles of bees.
Drawing through a frame is possible only for small and fast moving objects (the human brain is designed in such a way that it represents the missing frames for fast moving objects, and the position of the objects is interpolated). In other cases, the player will notice the flickering of the object disappearing and appearing through the frame.
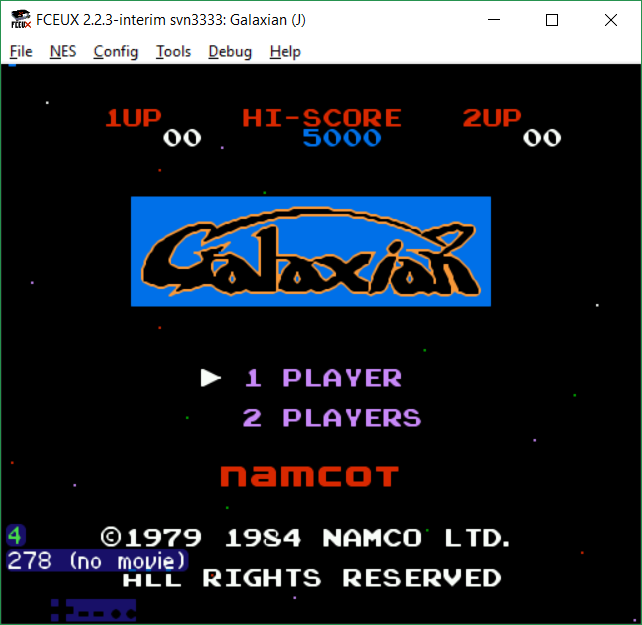
A similar effect is the rendering of stars in Galaxian or Addams Family .
Shadow display
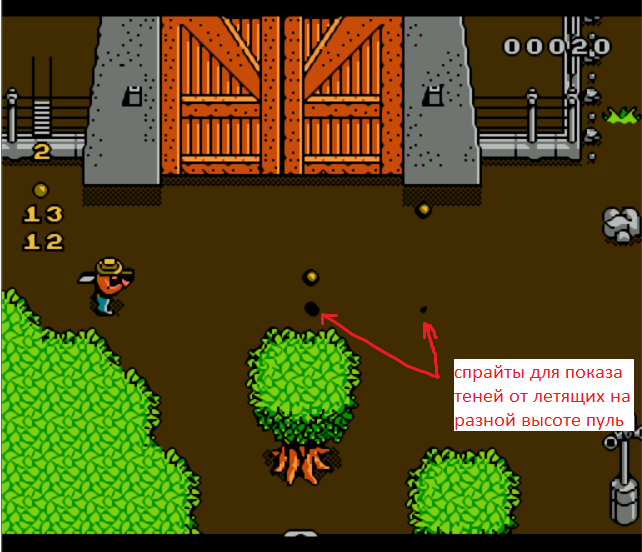
In 2,5-D games, such as Jurassic Park , sprites are used to display shadows under objects — so the player can determine the height at which the object is located.
Finishing details of the background - often used in screensavers or cut-scenes, where you need large and high-quality pictures.
Here, I think, comments are unnecessary, screensavers without sprites can be simply scary.
Disguise sprites under the background
A special trick of designers, one of those for which the game is recorded in the "best graphics for nes". It is difficult to notice it, but it’s easy to find a sprite detection script. Most often, the developers created an illusion of a separate background layer with sprites (the NES video processor does not support layers, which is why people who are not familiar with the console device think that the game does something impossible for the console).
Examples:
In Mitsume ga Tooru , in addition to the separate speed of the truck and the background, to enhance the effect of the sprites, a pole is drawn, as if on a separate layer, moving at a slow speed.

In the famous screensaver of Megaman 2, the sprites create the effect that the whole house is on a separate layer, although this is not so.
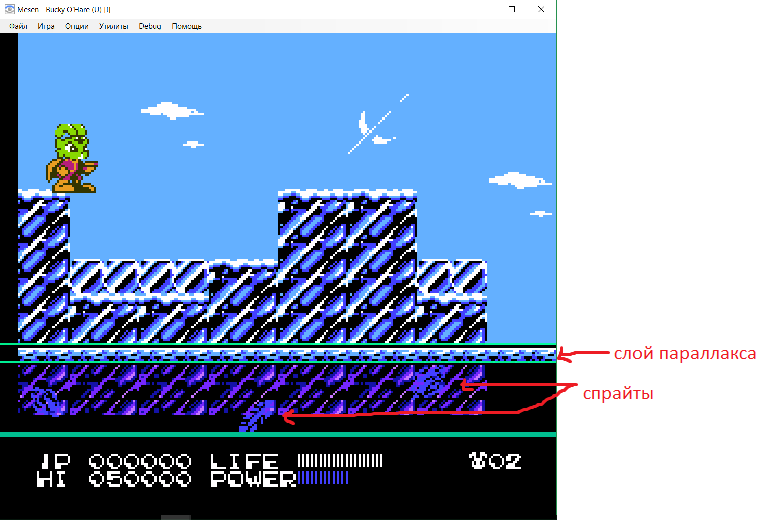
In Bucky O'Hare there is both a parallax effect (a separate moving layer is highlighted with green lines), and additionally for the illusion of water movement, sprites onto a fixed layer are added below.
The big wheel at the beginning of the tower after the first level in Castlevania 3 . It seems as if the wheel is spinning, but the moving gears are sprites, driving as if they are one with the base of the wheel. In addition, small gears are also animated by switching memory banks, this effect will be described later, in the example with Power Blade 2 .
There are also reverse effects when the background is disguised as a sprite (technically, this is NOT an animation of sprites, although it seems to her). For example, a whole boss may be drawn in the background. They do this because 64 sprites would not be enough to draw a huge boss. This effect will be considered in the group of effects by changing the position of the scroll.
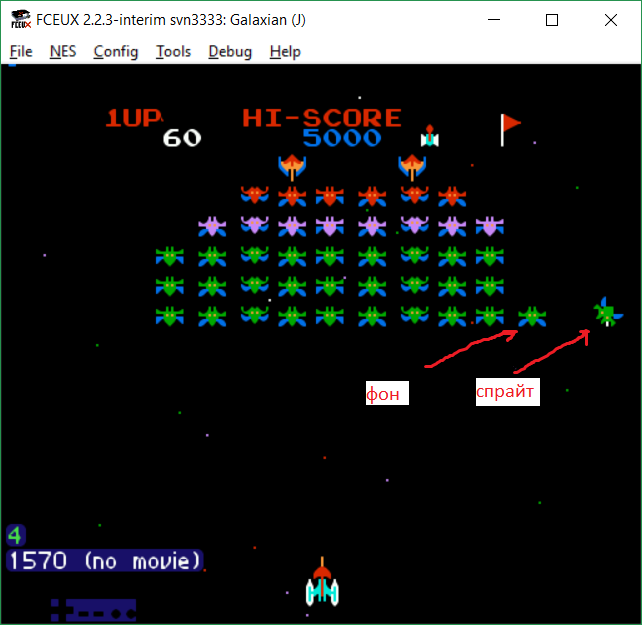
Separately mention games in which the sprites go into the background and back unnoticed by the player.
For example, Galaxian . The reason for this cunning aliens - to render them all sprites would not work, because they are too many.
This technique is often used in Capcom games to show interaction with interactive blocks — broken stones in Duck Tales 1-2 , boxes in the Chip and Dale Rescue Rangers 1-2 , shells in Little Mermaid .

On the screenshot are two boxes from Chip & Dale , one of which is drawn in the background, and the second is thrown by the player and is a sprite. You may also notice that the colors in the object palette are slightly different.
The Prince of Persia technique is more advanced. In those moments (and only in them), when a player runs through the “gates” drawn on the background, and must pass between two columns, the same column as the background that covers the player is drawn on top of the character with sprites. So both pillars in the background remain behind the character, but the third pillar temporarily appears in front of the character in order to preserve the illusion of the correct order of the objects.
Sprite Translucency Effects
The video processor does not support the translucency of sprites, so the developers had to show them not very realistic, but now they are already known in all ways - by drawing a sprite through the frame. As a result, all the players knew that if a character or boss “flashes” - then he is most likely invulnerable at this time.
Translucent / Opaque Background Effect
But it is possible to show the translucency of the background. For each sprite on the screen, the flag “ draw the sprite behind the background or in front of it ” is allocated in the video processor’s memory. If all pixels of the background tile are opaque, that sprite will be completely invisible behind the background. If the part of the background pixels is transparent and the other is not, then the character behind the background will “shine through”.
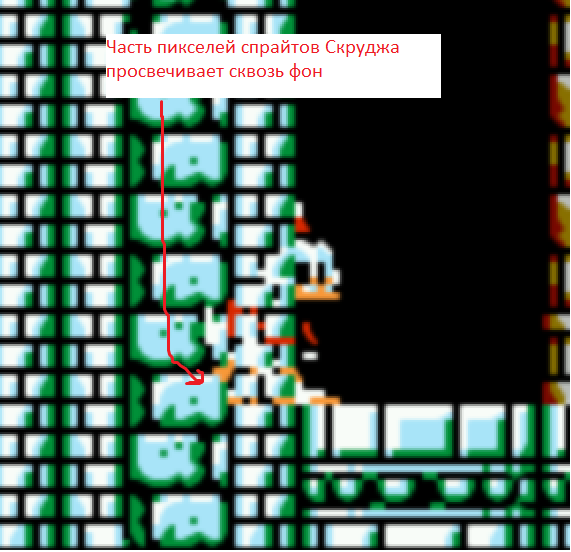
My favorite example of a translucent background is the secret passages in Duck Tales 2 .
If you exit the passage in slow motion frame by frame, you can notice the problem of organizing translucency in this way - the bit “behind the background / in front of the background” is set for the whole 8x8 sprite - therefore Scrooge briefly falls for the torches in the place where he partially stands in the aisle, and partly already got out of it.
The solution to this problem is to close the sprite partially with another sprite - this will enable you to increase the display accuracy up to 1 pixel. This effect can be observed in detail in Mystery World Dizzy or Nightshade .

The character is displayed partially behind the column, and partially in front of the wall, as it should. This effect is detailed here.
The effect of the Cat Felix bag
Finally, the reception from the category of "dirty hacks" from the game Felix the Cat . See how Felix hides in the bag - the lower part of the sprite disappears smoothly in the bag, and the top remains visible in front of the background.
If you enable the sprite display script, you get the following image:

On the left side there are 3 strange sprites (it is worth noting that the script displays sprites a bit wrong - the game uses 8x16 sprites, and the script draws only 8x8 pixels, so in fact they follow each other vertically).
If you look at a little more detail, namely, to enable the logging of the coordinates of sprites in the script, it will become noticeable that these are not 3 sprites, but 24, 8 each line. This is the maximum that can manage to render the video processor in one line. He does it from left to right, so after 8 sprites are drawn in the invisible area of the screen, Felix's sprites getting into the bag no longer have time to draw in these lines. In such a clever way, the disguise of that part of the sprites that are below the dive boundary is done
There are not so many games with such a masking effect (see here the section " Use of excess sprites for masking effects" )
Also note the number of sprites on the right, which create a solid line that hides the scrolling defects in the game engine. I will come back to this “effect” in the next part of the article, when I will analyze the scrolling effects.
For a start, it is worth a little more detail to consider the differences between the cartridges with CHR-ROM and CHR-RAM (there are also those on which both types of memory are present). For a programmer, the difference is that playing with CHR-ROM allows you to quickly switch entire banks of memory. Types of mappers have different sizes of "banks" - 1, 2, 4 kilobytes each. This makes it possible to have a common part of the bank and switchable. Switching is carried out by several commands to the mapper, and can be done at a speed several times per frame.
Cartridges with CHR-RAM require to “switch” the direct recording of the required number of bytes into the memory of the PPU address space (for a program, through recording at a specific CPU address). That is, to change one entire video memory tile, 16 recording commands are required.
More details on the differences and applications of different types of memory can be explored here . Animation effects are possible with both types of memory, however there are some differences.
The effect of changing the background animation by switching banks. The easiest way to select a few whole banks of CHR-ROM under the animation and switch them frame by frame. If the mapper supports small banks, they often make a common part of the tiles and switchable to save the number of banks needed.
An example of such an animation is mechanical objects in factories in the Power Blade 2 levels.
Animated mechanisms
Individual animation frames by banks (the lower half of the bank is switched).
You can explore the contents of CHR-ROM banks using any tile editor, for example, TLP . This also makes it possible to determine the size of the bank switched by the game.
Animation in CHR-RAM requires direct writing of tiles into memory and it is more difficult to track statically - data can be stored in a compressed form or even generated on-the-fly procedurally. Therefore, to track such effects, I wrote a couple of scripts.
One of them counts the number of records in CHR-RAM per frame in order to understand how many tiles the game animates. The other allows you to dump all the different CHR-RAM contents into files in separate files - you just need to start the game, go to the right place and examine the results of the script. All the results of the study of games in this section are obtained using these scripts.
One of the most "extreme" games using CHR-RAM animations is Battletoads .
First of all, it uses changing the contents of CHR-RAM to animate the characters ! Those.only one frame is stored in memory for each toad and it is constantly updated. This effect allows you to store more data in the memory bank.
Now let's run the script for counting the number of bytes transmitted per frame. The script is written for the Mesen emulator , because it only allows you to track the desired video processor events from lua.
As you can see, at the 2nd level, the game transmits up to 256 bytes per frame. Moreover, the toad is animated on even frames, and the background on odd frames (the game still needs to update screen pages when scrolling, they are also written to the PPU, as well as the animation of the second player).
. , , , , ( ):
CHR-RAM – 2x2 Gun Smoke . «» «» CadEditor :

This simple technique allows you to increase the number of game elements almost 2 times. If you look at the contents of PPU during the passage of a level, you can see how slowly it works, mirroring the entire memory bank takes a few seconds.
In order for the player not to notice flicker, the game does this at the moment when the character is walking along a long wasteland, on which there are no asymmetrical objects. So if the game forces you to go through a long empty corridor (best to black) - most likely this is required in order to seamlessly switch or load the memory bank. Such a version of the “huge seamless world without reloading” of the NES era.
It is worthwhile to analyze in more detail the most beautiful animation effect of bank switching (possible with both CHR-ROM and CHR-RAM), achieved in combination with the scrolling effect - parallax simulation (separate layer moving with a different speed than the main one).
For the presence of this effect, the game automatically falls into the ratings of the “best graphic games on nes”.
To determine it, if you have some experience, you can visually - a separate layer consists of only a few looped animated blocks. But for reliability, it is worth running the dump_animated_chr.lua script , which I mentioned above, in order not to be mistaken with the fact that parallax was made in this way (there is another way to implement parallax, with other limitations on capabilities).
Distinctive examples of creating a layer in this way are a looped “mosaic” animated background, and also the possibility of “parallax vertically” or “parallax behind a window” that cannot be achieved in another way.
Examples of games:
Bucky O'Hare . Parallax in the windows is an illusion of a separate layer.
Battletoads . Vertical Parallax - the walls of the well moves faster than the back wall, as they are closer.
Mitsume ga Tooru . The wall is separate from the platforms.
Micro Mashines . Paul "checkers" - with simultaneous horizontal and vertical parallax.
Let us analyze these beautiful effects in more detail.
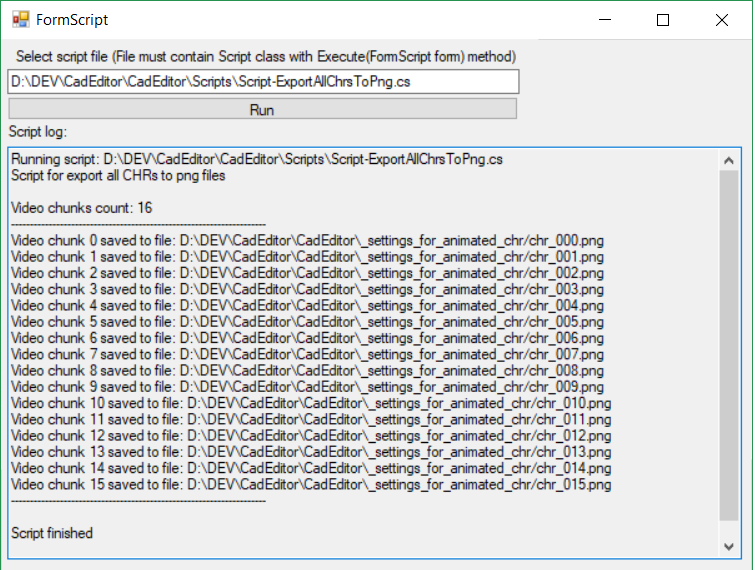
Here is the script for the CadEditor editor, which takes all the snapshots of the video memory and draws them in the form of png-pictures. The result of the work:
Then use the command for ImageMagic to glue the frames together:
It turns out this gif (for Bucky O'Hare ):
Look closely at the bottom right part of the image and you will see that 4 tiles are used for animation (“crawling” and flowing into each other) in 16 different banks, and the banks themselves are used in other places of the game, and only for these 4 tiles the place was specifically left. in each of the banks.
Similarly, it is possible to calculate that for combat toads in a well, for a vertical parallax effect, an animation of a wall block of 32 frames is 6 kilobytes of data for 1 block of 4x4 animation only!
Here you can see that when using CHR-RAM (in Combat Toads), unlike CHR-ROM (in Bucky), it is not necessary to allocate a whole bank or carefully plan a place in other banks in advance. However, the charge for this is more complex code and the inability to animate the entire bank.
Another way to study the effects of parallax is to destroy the illusion by placing an animated block in a place where it will not be stitched smoothly with other blocks. For example, open a level with a well in the CadEditor and add a “block indicator”:

Load the modified level into the emulator and see the result:
Now the device of this effect should finally become clear, and it may even be possible to try to repeat it in your code in one of the following articles.
Another “effect”, demonstrates Jurassic Park immediately after launching the game. This is just a recording of beautiful animation in several banks in a row frame by frame and scrolling it without any interactivity. I will not demonstrate it from the resentment of the developers, because they are so carried away by the demo effects at the start of the game, that they have no place for a beautiful ending, I think many players were disappointed by this.
Switching banks in the middle of a frame is a great way to expand the number of tiles available for drawing. After all, the upper part of the frame will be drawn in blocks from the old bank and will not change, and the lower one will use tiles of another bank!
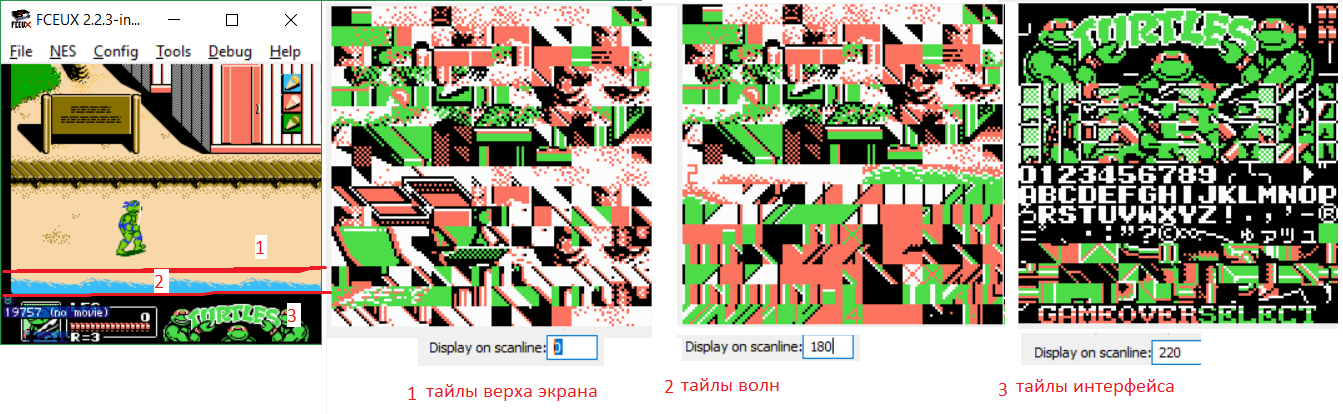
The obvious use of this is to draw the interface with one bank, and the game screen with another . You can also select some part of the screen (better separated horizontally from the main part). In Teenage Mutant Ninja Turtles 3 there are both of these effects - the background of the beach is drawn with tiles from one bank, the beach with others, and the beautiful interface with turtles faces the third.
A more technological effect is to switch the bank so as to draw one big beautiful picture . An example is Robocop 3 .

More examples of title screens with bank switching can be found in the Shiru article
The effect is tracked by simply exploring the Debug-> Name Table Viewer window in the emulator — only one of the tile sets is displayed in this window, the second at this moment looks like a “porridge”.
Finally, the last group of effects, perhaps the most interesting and extensive, as well as perfectly combined with other effects. For these effects, I will highlight a separate article (along with the effects of changing the state of the PPU).
The number of examples in it will depend on the results of the survey.
Scripts from the article can explore the effects of other games, throw up examples of games with beautiful and unusual effects (preferably, which are not yet in this list ), let's deal with their device.
Fceux is an emulator, it is necessary to take an assembly from the latest versions of the developers' sources, the public version has not been updated for a long time and there are no parts of the lua-functions needed for debugging.
render_sprites_numbers.lua - script for fceux for visual display of the numbers of sprites tiles on the screen, as well as their positions and display flags.
dump_animated_chr.lua - a script for fceux to save the contents of the unique CHR banks of the video processor to files for analyzing how an animation is made from them.
Mesen is an emulator that is best suited for debugging graphics effects, scripts written for it that are impossible to implement for fceux.
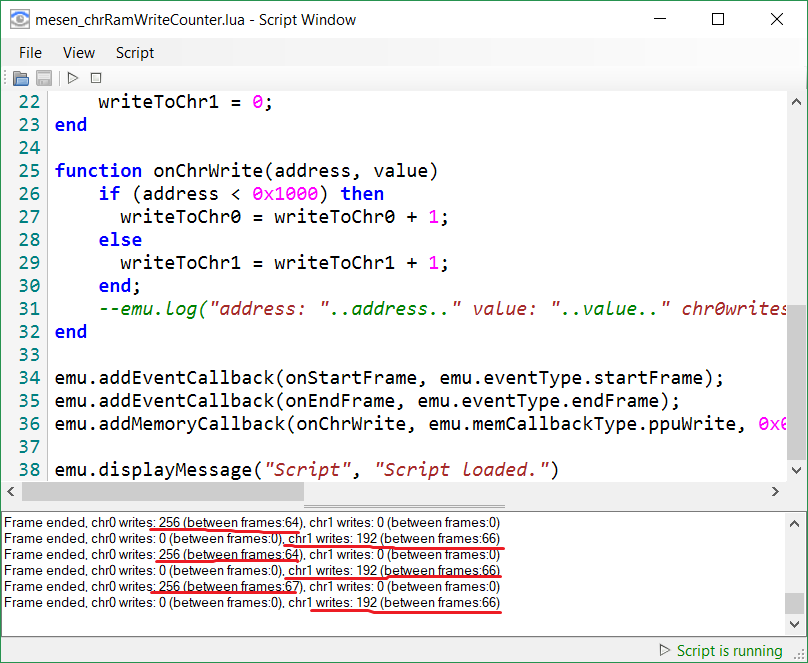
mesen_chrRamWriteCounter.lua - a script for mesen to display the lines on which the game changes the contents of the video processor's memory and count the number of such changes between frames and during the frame.
mesen_makeScreensEveryFrame.lua - a script for mesen to save screenshots each frame, used to create gif-animations.
CadEditor is a universal editor of NES-game levels, currently contains configs for displaying 1172 different levels for 118 games (the list is periodically expanded).
Script-ExportAllChrsToPng.cs is a script for CadEditor for building tile-pictures from binary files with PPU memory contents and palettes in the same way as NES emulators do.
I will try to continue the story about the withdrawal of graphics for NES games from the place where other tutorials end. Understanding yourself how to program animation effects is quite difficult, due to the small amount of information about this, both in Russian and in English. But you shouldn’t get upset, because you can use the code from classic games as documentation, which are now easy to find in the network in the form of ROM-files.
Therefore, before you program something, you have to figure out how these or other effects are arranged for NES, and the article will be devoted to how to do it. There are many articles from the category " Games that squeezed out of the NES maximum ", we will try to understand how all the main effects are made in these games, and also create tools that can be used to find other games that are no less technologically advanced.
Disclaimer
In any descriptions of the iron prefix NES or the use of terms, I could be wrong and, most likely, wrong. In the description of the program part, the information is supposedly more accurate, verified by disassembling and debugging scripts. Links to all the tools used in the article are listed at the end. If the text refers to an "emulator" without specifying the name, Fceux is implied. Particularly important or interesting, in my opinion, moments are highlighted with exclamation marks.
')
Summary of NES Graphics Output Capabilities
Suppose you read the nesdoug 'articles in BubaVV , and already know the basic things about graphics programming for NES. I will not write about it in detail, but only describe briefly and in a simplified way (you can skip this part and return to it when you have questions, why any effect is made this way and not otherwise):
- The NES video processor has four screen pages (and several modes of operation with them, most often two pages simply copy the contents of the other two), which contain data about displayed tiles and attributes of these tiles. A block of 2x2 tiles can be painted with just 3 different colors + use 1 background color.
- Also, the video processor is able to do hardware scrolling of pictures between multiple screen pages. This means that a portion of the first screen and a portion of the second can be drawn on the screen. The screen pages when rendering are "looped" in the order of 1-2-1-2-1-2 .., i.e. if the video processor has reached the end of one of the pages, it takes data from the beginning of the next. This is easier than it sounds, you can open any game in the emulator, and turn on the debugging screen display screen to see how it works.
(analysis of the scrolling device with pictures here ) - The picture on the screen is drawn by tiles from a CHR memory bank, in which there are 256 memory tiles at one time. The video processor "sees" two such banks, one for drawing sprites, the other for drawing the background.
At the same time, there is an 8x16 drawing mode for sprites, in which you can draw sprites with data from both banks at once.
This memory is on the cartridge, so depending on the “filling” of the cartridge, the banks can be arranged differently - programmatically switched banks with ROM memory (most often 1, 2 or 4 kilobyte each), or RAM memory into which you can write data (most often data is copied from banks with a code). - Tiles from banks are 8x8 pixels in 2-bit color. Two bits of the tile attribute color (common to all tile pixels) are added to these two bits. The result is a 4-bit color index in a palette of 16 colors. At the same time, two palettes are active in the video processor - for background tiles and sprites.
- In addition to the background, the video processor renders up to 64 sprites. There is also a limit on the number of sprites displayed on a single line, beyond which the video processor skips sprites that it does not have time to draw.
I will not analyze these features of NES in detail, they are “chewed” in review articles, for example, here . I brought them just to list the 5 basic ways to create animations and effects on NES - animation by writing to the screen, animating by changing the scrolling position, animating by changing the contents of the CHR-bank, animating by changing the palette and animating the drawing of sprites .
It may be worthwhile to isolate a separate way of animation by changing the state processor's bit , for example, turning on and off rendering, changing the brightness of color channels, changing the active screen, or alternately changing two active banks between each other.
Now, attention, all the graphical effects on the NES are done in one of these ways or a combination of them !
Below, I will examine examples of the effects of each type and tell you how to determine exactly how the game creates this or that effect. But before that, some more theory, which is very important to understand.
Synchronization of the central processor console and video processor
The video processor is controlled by the instructions of the console's central processor, but it works in parallel with it. To create a smooth animation, you need to make changes in the video memory only at the moment when the video processor is not busy drawing a frame, otherwise the user will replace a sudden change of state on the screen! At best, at worst, the user will also see a frantic “jerkiness” of the picture, since the change in the state of the video processor is recorded in his memory, and this leads to a loss of information in his internal registers that control the position of the raster drawing the picture on the screen. So you can write to the video memory only when the rendering of the background and sprites is turned off in the video processor.
Modern graphics systems usually do not allow changing the contents of the current frame, and use double buffering - they draw a picture in an invisible memory area, which the video card then displays on the screen as a whole. The old video processors did not have enough speed to prepare a whole frame in time while the previous one was being drawn.
To give commands to the video processor, the program has a very short time interval between the end of one frame and the beginning of the next! In order to have time to do it at the right time, the video processor at the end of the frame generates an interrupt. The program must install the interrupt handler. It is in this place that the fastest and most optimized code is written, and the most cunning tricks are found.
However, despite all the difficulties, many games perform operations with changing video memory not only in this processor (between frames), but also during frame rendering!
So all effects are further subdivided into interframe (change is made between frames) and midframe (change is made right during the drawing of one frame).
It uses several possible synchronization options for the central and video console processors.
- Using a mapper that generates interrupts at the end of the drawing of each row, either by timer or by some other condition. The interrupt tells the central processor "drop everything, only now you can quickly write a few bytes into the video memory, this is more important, you will return to the rest later." The program can install an interrupt handler - and execute some code while the beam on the screen is extinguished to go from one line to another. This is the easiest approach for the developer. The most common of these mappers is MMC3 . “Iron” part of the organization of this is very interesting, think about it - using the chip on the CARTRIDGE added a new opportunity to use the video processor on the CONSOLE.
- If mapper does not allow generating interrupts, perversions begin. The program should make an idle cycle, waiting for the appearance of any specially adjusted condition, indicating that the video processor has reached the drawing of a certain place on the screen (for this, sprites can be used or even console functions for sound output).
Another way is to measure the number of clocks on instructions that were executed (in this case, the program should ensure equality in the execution time of the two branches of the conditional operator, and ensure that instructions working with dynamically composed addresses do not go beyond the 256-byte memory page ). But even in this case, the CPU and PPU clock cycles do not exactly match, so the developers try to do such tricks in those parts of the screen where the user does not notice pixel blinks. Look at the screenshot: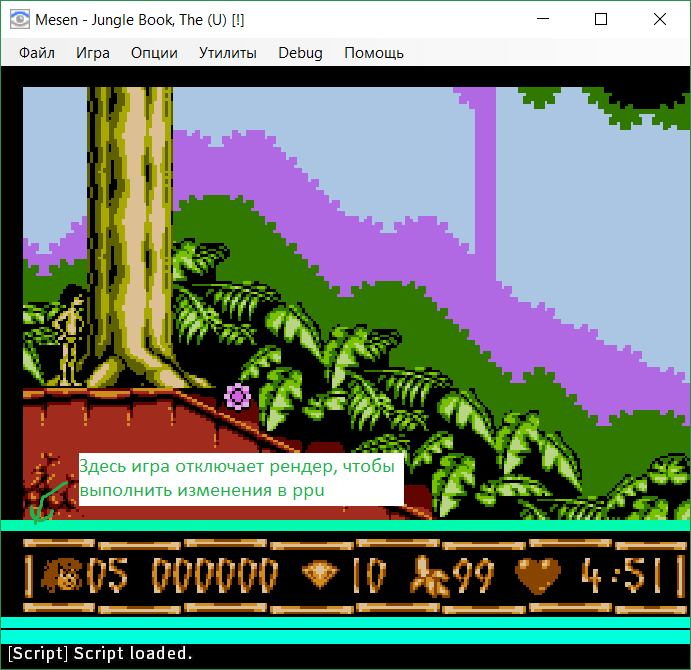
Pay attention to the width of the highlighted bar at the bottom of the screen - as long as the beam drawing the picture passes in this place, magic happens. Like a magician who only needs one flash to fool the viewer, the processor very quickly executes some code in order to have time to update that part of the video memory for which he didn’t have enough time between frames.
About both ways of synchronization between the CPU and PPU in the middle of the frame (interrupt, and according to the condition of checking on the CPU), if there is interest, I will tell in another article with code examples, now it’s enough to understand that changing the memory can be done between frames (and even Developers should do this quickly enough!), and even during the frame drawing.
Now you can proceed to the analysis of what can be achieved in one way or another.
Animation palette change
Interframe
Changing the palette between frames is one of the easiest to implement effects. There are several types of effects that are implemented with the help of animation palette.
The easiest of them - the usual flicker, when one color is replaced by another. Another effect is “running waves of color,” for example, waves of a waterfall, quicksand, or fire. Finally, the third type of effects is flashing one of the colors in the palette of one frame of the image while simultaneously blanking other colors, so you can show a moving particle of rain, snow, or another particle effect. If you carefully read the theory, you can calculate that such an animation will have a maximum of three frames, if you do not combine it with the animation by writing to the screen page (tiles are limited to two bits of color, one of which is occupied by background). All three types of such animation can be seen in different levels of the game Duck Tales 2 :
The video shows the animation playing in both directions.
Unfortunately, the rain effect is hard to see in the video, so here it is on the gif:
Identifying this type of animation is very easy, and special tools are not needed for this. Open the PPU Viewer window in the emulator and see if the palette changes or not. For ease of learning "flashing" frames with raindrops slow down the speed.
In the middle of the frame (midframe)
Changing the palette completely in the middle of the frame is difficult, but possible .
For animation in the game process, this method is not used, but occasionally used in static parts of the frame. The obvious effect is to draw an interface using a palette other than the level palette.
Less obvious is changing colors from one to another all the time to create a gradient effect.
How to recognize
The emulator allows you to see which palette was loaded at the time of drawing any line of the frame. See the screensaver Indiana Jones and the Last Crusade :
Indiana Jones and Gradient Fill
Please note that the game does not switch the entire palette, but changes only one color. And the more she had not had time for the time that the beam moves from one line to another.
Animation by writing to screen page
Interframe
This is the most common background animation by changing the tile number that will draw the video processor, more often it is always performed once for one object. It is not interesting to disassemble such animations, and it makes no sense - almost any ordinary game animation is made like this (but more often the interactive part, for example, the lid of the opening chest, is drawn with a sprite). An example is the display of exploding objects in Contra or Super C.
In this game, with the explosion of a cannon, doors or gates, a logical "block" is updated, with a size of 4x4 tiles.
Create an illusion of tiles smaller than 8x8
Well described in the article with the analysis of Battle City . In short, for each 8x8 tile, several variants of the same type are created with missing 4x4 parts, as a result of the programmatic replacement of tiles, you can create the illusion that the game uses 4x4 pixel tiles:
In combination with the scrolling position change, a classic screen scrolling effect is created on a large level , present in almost any game with levels greater than a couple of screens in width or height (I’ll note only that the update takes place in the invisible part of the screen in advance so that the player can see already drawn part to the moment when the scroll reaches the new area). I will analyze the types of scrolling in the section of animations created by changing the position of scrolling.
Midframe
It makes no sense to display the change in the screen page before the frame is finished drawing, normal people can wait until the next frame 1/24 second.
Sprites animation
Interframe
Animation of characters . An elementary example, in fact, is what sprites are for — moving them around the screen, depicting the characters of the game, so that gamers become interested.
Sprites can also draw particles , as well as add additional details to the background . Background tiles should be aligned to 8 pixels, sprites can be drawn anywhere on the screen, in addition, they are drawn from the second bank and another palette - due to this, limits on the number of colors in the picture are increased.
There is also the inappropriate use of sprites - in order to synchronize the processor and the video processor (for example, Sprite Zero Hit and Sprite Overflow ) with the help of them.
Interestingly, to distinguish the effects made by sprites from other effects "by eye" will not work, it is too easy to mask the background under the sprite and the sprite under the background and fool the player.
Emulators allow you to disable the layer of sprites and backgrounds in the settings, but playing in this mode is very inconvenient, so for easier detection of sprites, I wrote a lua-script , which, when turned on, does not interfere much with playing and at the same time uniquely emphasizes the sprites on the screen.
The video may seem a bit strange, but if you know the games shown in it well, you will understand what is happening on the screen in the shown episodes. Now you can accurately separate the sprite effects in games from others, and give specific examples.
Particle rendering
Rendering rain in Mitsume ga tooru .
Here you can see that the game uses 8x16 sprites (it is more advantageous to use such sprites in terms of the number of graphics shown on the screen at the same time, because regardless of the size of the sprites - 8x8 or 8x16, you can draw 64 sprites). You can also notice that the game draws raindrops through the frame, which makes it seem to the player that there are twice as many drops as there really are - because the sprites also need the game to draw the main character, projectiles and the boss, which also consists many particles of bees.
Drawing through a frame is possible only for small and fast moving objects (the human brain is designed in such a way that it represents the missing frames for fast moving objects, and the position of the objects is interpolated). In other cases, the player will notice the flickering of the object disappearing and appearing through the frame.
A similar effect is the rendering of stars in Galaxian or Addams Family .
Shadow display
In 2,5-D games, such as Jurassic Park , sprites are used to display shadows under objects — so the player can determine the height at which the object is located.
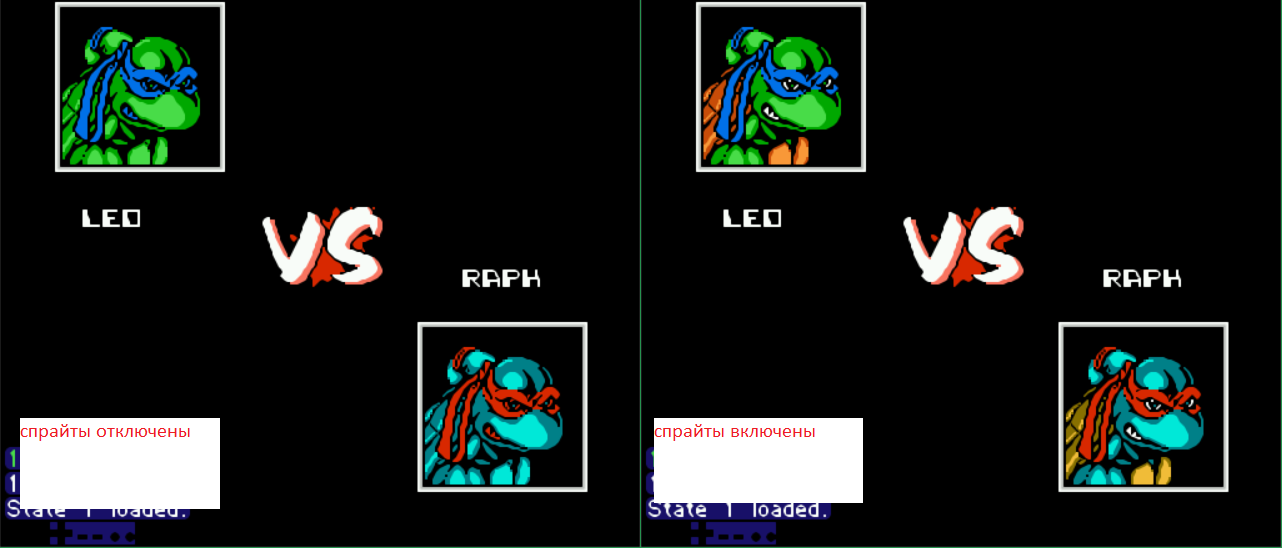
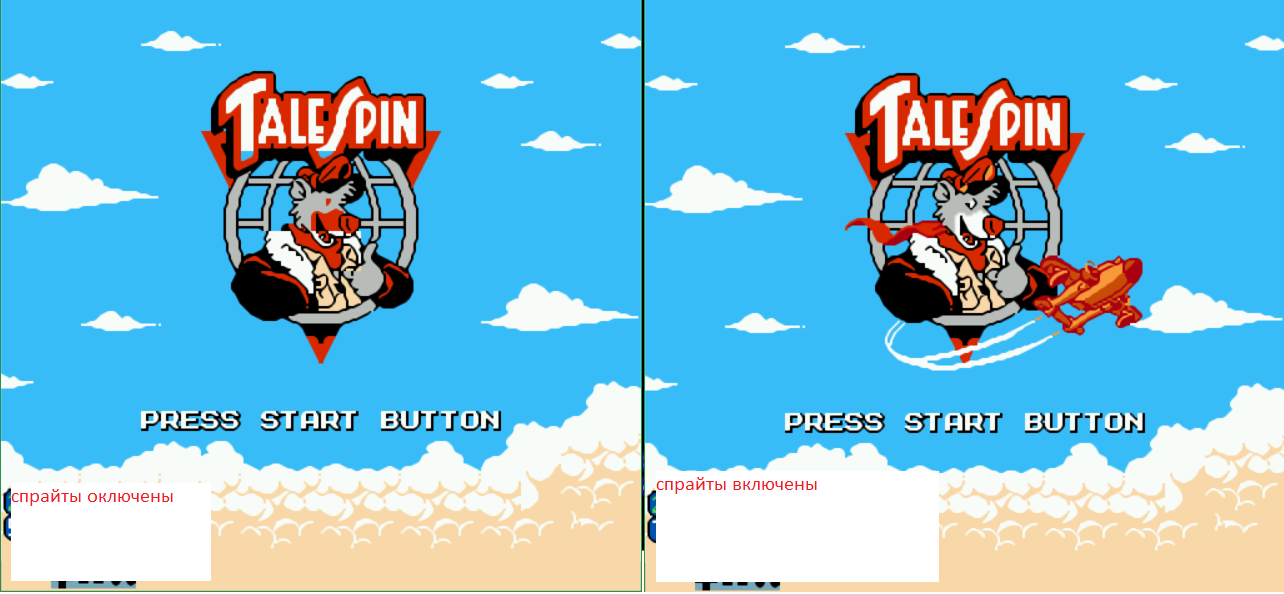
Finishing details of the background - often used in screensavers or cut-scenes, where you need large and high-quality pictures.
Here, I think, comments are unnecessary, screensavers without sprites can be simply scary.
Disguise sprites under the background
A special trick of designers, one of those for which the game is recorded in the "best graphics for nes". It is difficult to notice it, but it’s easy to find a sprite detection script. Most often, the developers created an illusion of a separate background layer with sprites (the NES video processor does not support layers, which is why people who are not familiar with the console device think that the game does something impossible for the console).
Examples:
In Mitsume ga Tooru , in addition to the separate speed of the truck and the background, to enhance the effect of the sprites, a pole is drawn, as if on a separate layer, moving at a slow speed.
In the famous screensaver of Megaman 2, the sprites create the effect that the whole house is on a separate layer, although this is not so.
In Bucky O'Hare there is both a parallax effect (a separate moving layer is highlighted with green lines), and additionally for the illusion of water movement, sprites onto a fixed layer are added below.
The big wheel at the beginning of the tower after the first level in Castlevania 3 . It seems as if the wheel is spinning, but the moving gears are sprites, driving as if they are one with the base of the wheel. In addition, small gears are also animated by switching memory banks, this effect will be described later, in the example with Power Blade 2 .
There are also reverse effects when the background is disguised as a sprite (technically, this is NOT an animation of sprites, although it seems to her). For example, a whole boss may be drawn in the background. They do this because 64 sprites would not be enough to draw a huge boss. This effect will be considered in the group of effects by changing the position of the scroll.
Separately mention games in which the sprites go into the background and back unnoticed by the player.
For example, Galaxian . The reason for this cunning aliens - to render them all sprites would not work, because they are too many.
This technique is often used in Capcom games to show interaction with interactive blocks — broken stones in Duck Tales 1-2 , boxes in the Chip and Dale Rescue Rangers 1-2 , shells in Little Mermaid .
On the screenshot are two boxes from Chip & Dale , one of which is drawn in the background, and the second is thrown by the player and is a sprite. You may also notice that the colors in the object palette are slightly different.
The Prince of Persia technique is more advanced. In those moments (and only in them), when a player runs through the “gates” drawn on the background, and must pass between two columns, the same column as the background that covers the player is drawn on top of the character with sprites. So both pillars in the background remain behind the character, but the third pillar temporarily appears in front of the character in order to preserve the illusion of the correct order of the objects.
Sprite Translucency Effects
The video processor does not support the translucency of sprites, so the developers had to show them not very realistic, but now they are already known in all ways - by drawing a sprite through the frame. As a result, all the players knew that if a character or boss “flashes” - then he is most likely invulnerable at this time.
Translucent / Opaque Background Effect
But it is possible to show the translucency of the background. For each sprite on the screen, the flag “ draw the sprite behind the background or in front of it ” is allocated in the video processor’s memory. If all pixels of the background tile are opaque, that sprite will be completely invisible behind the background. If the part of the background pixels is transparent and the other is not, then the character behind the background will “shine through”.
My favorite example of a translucent background is the secret passages in Duck Tales 2 .
If you exit the passage in slow motion frame by frame, you can notice the problem of organizing translucency in this way - the bit “behind the background / in front of the background” is set for the whole 8x8 sprite - therefore Scrooge briefly falls for the torches in the place where he partially stands in the aisle, and partly already got out of it.
The solution to this problem is to close the sprite partially with another sprite - this will enable you to increase the display accuracy up to 1 pixel. This effect can be observed in detail in Mystery World Dizzy or Nightshade .
The character is displayed partially behind the column, and partially in front of the wall, as it should. This effect is detailed here.
The effect of the Cat Felix bag
Finally, the reception from the category of "dirty hacks" from the game Felix the Cat . See how Felix hides in the bag - the lower part of the sprite disappears smoothly in the bag, and the top remains visible in front of the background.
If you enable the sprite display script, you get the following image:
On the left side there are 3 strange sprites (it is worth noting that the script displays sprites a bit wrong - the game uses 8x16 sprites, and the script draws only 8x8 pixels, so in fact they follow each other vertically).
If you look at a little more detail, namely, to enable the logging of the coordinates of sprites in the script, it will become noticeable that these are not 3 sprites, but 24, 8 each line. This is the maximum that can manage to render the video processor in one line. He does it from left to right, so after 8 sprites are drawn in the invisible area of the screen, Felix's sprites getting into the bag no longer have time to draw in these lines. In such a clever way, the disguise of that part of the sprites that are below the dive boundary is done
There are not so many games with such a masking effect (see here the section " Use of excess sprites for masking effects" )
Also note the number of sprites on the right, which create a solid line that hides the scrolling defects in the game engine. I will come back to this “effect” in the next part of the article, when I will analyze the scrolling effects.
Animations by changing the contents of the CHR-bank
For a start, it is worth a little more detail to consider the differences between the cartridges with CHR-ROM and CHR-RAM (there are also those on which both types of memory are present). For a programmer, the difference is that playing with CHR-ROM allows you to quickly switch entire banks of memory. Types of mappers have different sizes of "banks" - 1, 2, 4 kilobytes each. This makes it possible to have a common part of the bank and switchable. Switching is carried out by several commands to the mapper, and can be done at a speed several times per frame.
Cartridges with CHR-RAM require to “switch” the direct recording of the required number of bytes into the memory of the PPU address space (for a program, through recording at a specific CPU address). That is, to change one entire video memory tile, 16 recording commands are required.
More details on the differences and applications of different types of memory can be explored here . Animation effects are possible with both types of memory, however there are some differences.
Interframe animation
The effect of changing the background animation by switching banks. The easiest way to select a few whole banks of CHR-ROM under the animation and switch them frame by frame. If the mapper supports small banks, they often make a common part of the tiles and switchable to save the number of banks needed.
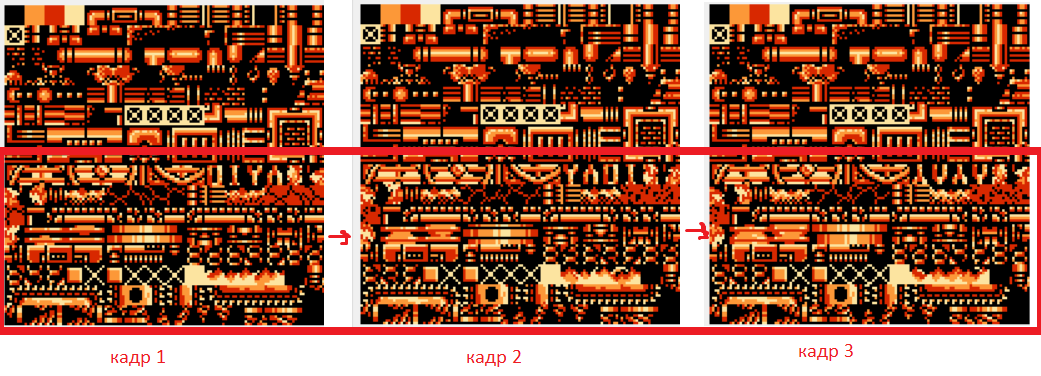
An example of such an animation is mechanical objects in factories in the Power Blade 2 levels.
Animated mechanisms
Individual animation frames by banks (the lower half of the bank is switched).
You can explore the contents of CHR-ROM banks using any tile editor, for example, TLP . This also makes it possible to determine the size of the bank switched by the game.
Animation in CHR-RAM requires direct writing of tiles into memory and it is more difficult to track statically - data can be stored in a compressed form or even generated on-the-fly procedurally. Therefore, to track such effects, I wrote a couple of scripts.
One of them counts the number of records in CHR-RAM per frame in order to understand how many tiles the game animates. The other allows you to dump all the different CHR-RAM contents into files in separate files - you just need to start the game, go to the right place and examine the results of the script. All the results of the study of games in this section are obtained using these scripts.
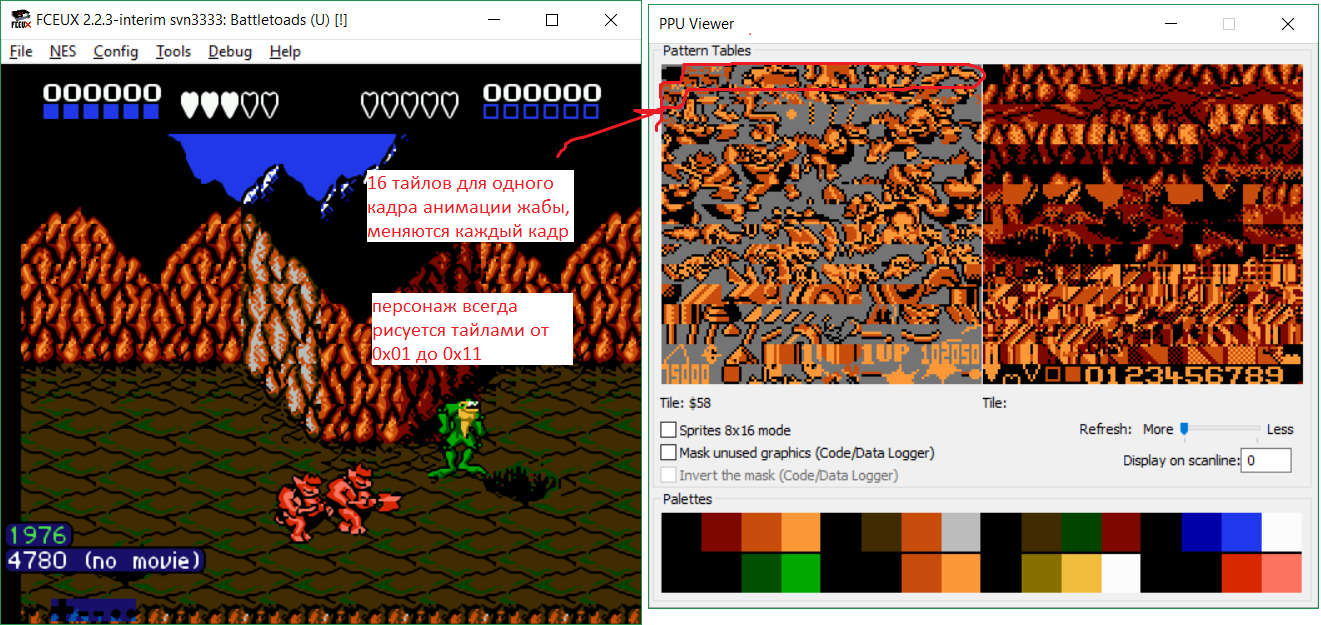
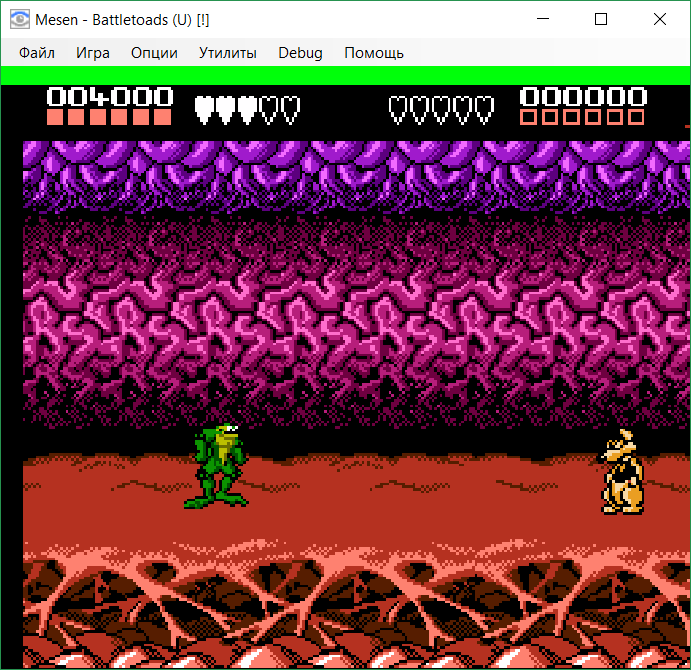
One of the most "extreme" games using CHR-RAM animations is Battletoads .
First of all, it uses changing the contents of CHR-RAM to animate the characters ! Those.only one frame is stored in memory for each toad and it is constantly updated. This effect allows you to store more data in the memory bank.
Now let's run the script for counting the number of bytes transmitted per frame. The script is written for the Mesen emulator , because it only allows you to track the desired video processor events from lua.
As you can see, at the 2nd level, the game transmits up to 256 bytes per frame. Moreover, the toad is animated on even frames, and the background on odd frames (the game still needs to update screen pages when scrolling, they are also written to the PPU, as well as the animation of the second player).
. , , , , ( ):
CHR-RAM – 2x2 Gun Smoke . «» «» CadEditor :
This simple technique allows you to increase the number of game elements almost 2 times. If you look at the contents of PPU during the passage of a level, you can see how slowly it works, mirroring the entire memory bank takes a few seconds.
In order for the player not to notice flicker, the game does this at the moment when the character is walking along a long wasteland, on which there are no asymmetrical objects. So if the game forces you to go through a long empty corridor (best to black) - most likely this is required in order to seamlessly switch or load the memory bank. Such a version of the “huge seamless world without reloading” of the NES era.
It is worthwhile to analyze in more detail the most beautiful animation effect of bank switching (possible with both CHR-ROM and CHR-RAM), achieved in combination with the scrolling effect - parallax simulation (separate layer moving with a different speed than the main one).
For the presence of this effect, the game automatically falls into the ratings of the “best graphic games on nes”.
To determine it, if you have some experience, you can visually - a separate layer consists of only a few looped animated blocks. But for reliability, it is worth running the dump_animated_chr.lua script , which I mentioned above, in order not to be mistaken with the fact that parallax was made in this way (there is another way to implement parallax, with other limitations on capabilities).
Distinctive examples of creating a layer in this way are a looped “mosaic” animated background, and also the possibility of “parallax vertically” or “parallax behind a window” that cannot be achieved in another way.
Examples of games:
Bucky O'Hare . Parallax in the windows is an illusion of a separate layer.
Battletoads . Vertical Parallax - the walls of the well moves faster than the back wall, as they are closer.
Mitsume ga Tooru . The wall is separate from the platforms.
Micro Mashines . Paul "checkers" - with simultaneous horizontal and vertical parallax.
Let us analyze these beautiful effects in more detail.
Here is the script for the CadEditor editor, which takes all the snapshots of the video memory and draws them in the form of png-pictures. The result of the work:
Then use the command for ImageMagic to glue the frames together:
convert -delay 1x24 -loop 0 *.png animation.gif It turns out this gif (for Bucky O'Hare ):
Look closely at the bottom right part of the image and you will see that 4 tiles are used for animation (“crawling” and flowing into each other) in 16 different banks, and the banks themselves are used in other places of the game, and only for these 4 tiles the place was specifically left. in each of the banks.
Similarly, it is possible to calculate that for combat toads in a well, for a vertical parallax effect, an animation of a wall block of 32 frames is 6 kilobytes of data for 1 block of 4x4 animation only!
Here you can see that when using CHR-RAM (in Combat Toads), unlike CHR-ROM (in Bucky), it is not necessary to allocate a whole bank or carefully plan a place in other banks in advance. However, the charge for this is more complex code and the inability to animate the entire bank.
Another way to study the effects of parallax is to destroy the illusion by placing an animated block in a place where it will not be stitched smoothly with other blocks. For example, open a level with a well in the CadEditor and add a “block indicator”:
Load the modified level into the emulator and see the result:
Now the device of this effect should finally become clear, and it may even be possible to try to repeat it in your code in one of the following articles.
Another “effect”, demonstrates Jurassic Park immediately after launching the game. This is just a recording of beautiful animation in several banks in a row frame by frame and scrolling it without any interactivity. I will not demonstrate it from the resentment of the developers, because they are so carried away by the demo effects at the start of the game, that they have no place for a beautiful ending, I think many players were disappointed by this.
Midframe animation
Switching banks in the middle of a frame is a great way to expand the number of tiles available for drawing. After all, the upper part of the frame will be drawn in blocks from the old bank and will not change, and the lower one will use tiles of another bank!
The obvious use of this is to draw the interface with one bank, and the game screen with another . You can also select some part of the screen (better separated horizontally from the main part). In Teenage Mutant Ninja Turtles 3 there are both of these effects - the background of the beach is drawn with tiles from one bank, the beach with others, and the beautiful interface with turtles faces the third.
A more technological effect is to switch the bank so as to draw one big beautiful picture . An example is Robocop 3 .
More examples of title screens with bank switching can be found in the Shiru article
The effect is tracked by simply exploring the Debug-> Name Table Viewer window in the emulator — only one of the tile sets is displayed in this window, the second at this moment looks like a “porridge”.
An animation of scrolling position changes
Finally, the last group of effects, perhaps the most interesting and extensive, as well as perfectly combined with other effects. For these effects, I will highlight a separate article (along with the effects of changing the state of the PPU).
The number of examples in it will depend on the results of the survey.
Scripts from the article can explore the effects of other games, throw up examples of games with beautiful and unusual effects (preferably, which are not yet in this list ), let's deal with their device.
Tools used
Fceux is an emulator, it is necessary to take an assembly from the latest versions of the developers' sources, the public version has not been updated for a long time and there are no parts of the lua-functions needed for debugging.
render_sprites_numbers.lua - script for fceux for visual display of the numbers of sprites tiles on the screen, as well as their positions and display flags.
dump_animated_chr.lua - a script for fceux to save the contents of the unique CHR banks of the video processor to files for analyzing how an animation is made from them.
Mesen is an emulator that is best suited for debugging graphics effects, scripts written for it that are impossible to implement for fceux.
mesen_chrRamWriteCounter.lua - a script for mesen to display the lines on which the game changes the contents of the video processor's memory and count the number of such changes between frames and during the frame.
mesen_makeScreensEveryFrame.lua - a script for mesen to save screenshots each frame, used to create gif-animations.
CadEditor is a universal editor of NES-game levels, currently contains configs for displaying 1172 different levels for 118 games (the list is periodically expanded).
Script-ExportAllChrsToPng.cs is a script for CadEditor for building tile-pictures from binary files with PPU memory contents and palettes in the same way as NES emulators do.
Source: https://habr.com/ru/post/353726/
All Articles