Creating a game on Lua and LÖVE - 7
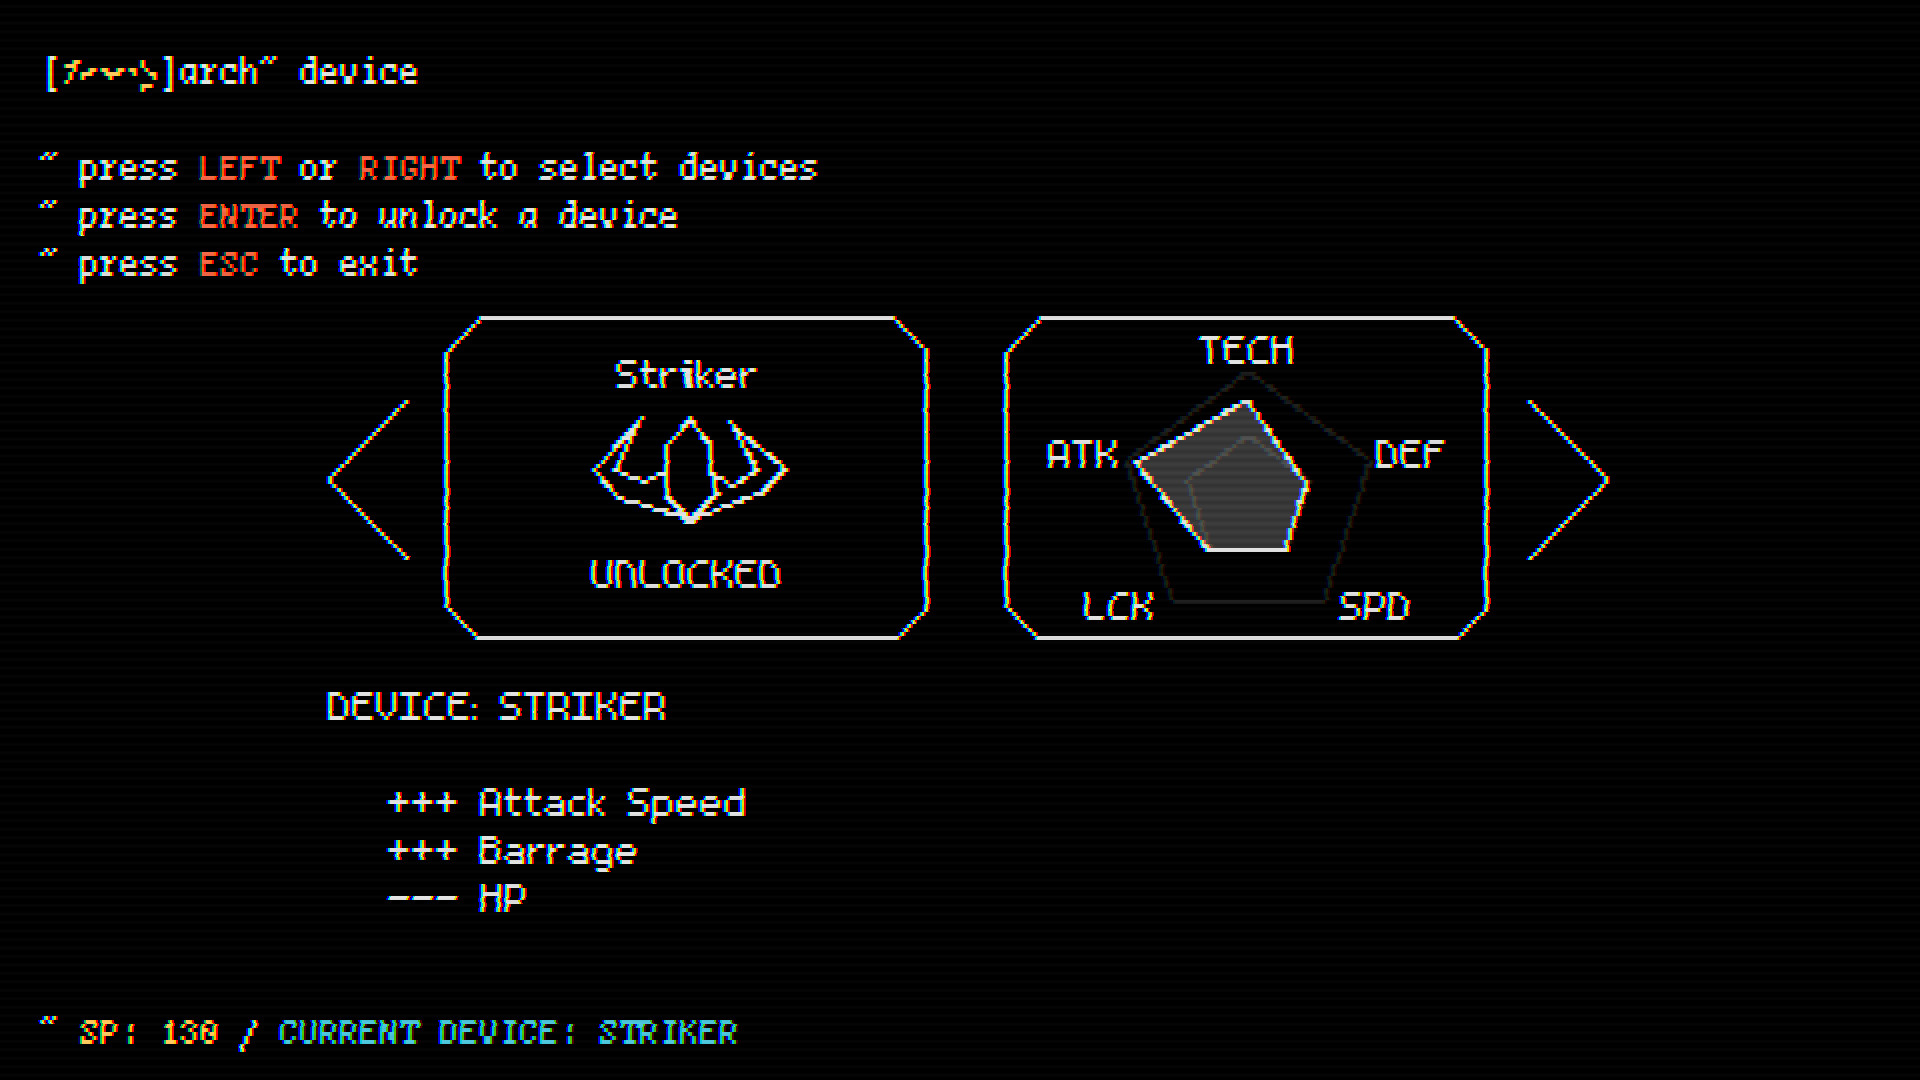
Table of contents
Table of contents
- Article 1
- Part 1. Game cycle
- Part 2. Libraries
- Part 3. Rooms and areas
- Part 4. Exercises
- Article 2
- Part 5. Basics of the game
- Part 6. Basics of the Player Class
- Article 3
- Part 7. Player Parameters and Attacks
- Part 8. Enemies
- Article 4
- Part 9. Director and game cycle
- Part 10. Code Writing Practices
- Part 11. Passive skills
- Article 5
- Part 12. Other Passive Skills
- Article 6
- Part 13. The skill tree
- Article 7
- Part 14. Console
- Part 15. Final
Part 14: Console
Introduction
In this part we will analyze the Console room. The console is much easier to implement than anything else, because in the end it comes down to displaying text on the screen. Here is what it looks like:
Gif
The Console room will consist of three different types of objects: lines, input lines, and modules. Lines are simply ordinary colored lines of text displayed on the screen. For example, in the example shown above, ":: running BYTEPATH ..." will be a string. From the point of view of the data structure, this will simply be a table storing the position of the line, its text and colors.
Input lines are lines into which a player can enter something. In the example shown above, these are the lines that contain the word "arch". When you enter certain commands in the console, these commands will be executed and create new lines or modules. From the point of view of data structure, input lines will look like simple lines, only with additional logic for reading input when the last line added to the room is an input line.
Finally, a module is a special object that allows the player to perform more complex actions than simply entering commands. This is a whole set of elements that appear when a player, for example, needs to choose a ship. Such objects can be created by various teams, that is, for example, when a player wants to change the volume of a sound in a game, he must enter “volume”, after which the Volume module will open, in which you can select the volume level. All of these modules themselves will also be objects, and the Console room will handle their creation and deletion accordingly.
')
Strings
Let's start with the lines. We can define a string like this:
{ x = x, y = y, text = love.graphics.newText(font, {boost_color, 'blue text', default_color, 'white text'} } That is, it has the position
x, y , as well as the text attribute. This text attribute is a Text object. We will use Text objects from LÖVE, because with their help you can easily define colored text. But before we can add lines to the Console room, we need to create it, so let's get this done. Basically, this task is similar to creating a SkillTree room.We will add a table of
lines in which all text lines will be stored, and then in the draw function we will go around the entire table and draw each line. We will also add the addLine function, which will add a new text line to the lines table: function Console:new() ... self.lines = {} self.line_y = 8 camera:lookAt(gw/2, gh/2) self:addLine(1, {'test', boost_color, ' test'}) end function Console:draw() ... for _, line in ipairs(self.lines) do love.graphics.draw(line.text, line.x, line.y) end ... end function Console:addLine(delay, text) self.timer:after(delay, function() table.insert(self.lines, {x = 8, y = self.line_y, text = love.graphics.newText(self.font, text)}) self.line_y = self.line_y + 12 end) end Something else is happening here. First, there is a
line_y attribute that tracks the position of y, in which we must add the following line. It is incremented by 12 each time you call addLine , because we want new lines to be added under the previous one, as it happens in normal terminals.In addition, the
addLine function has a delay. This delay is useful because when adding multiple lines to the console, we do not want them added at the same time. We want a slight delay before each addition, because everything looks better this way. In addition, we can do here so that, together with the delay in adding each line, it is added character by character. That is, instead of one line added at a time, each character is added with a slight delay, which will give us an even more pleasant effect. To save time, I will not do it myself, but it can be a good exercise for you (and we already have some logic for this in the InfoText object).All this should look like this:
And if we add a few lines, it will look like it should:
Input lines
The input lines are a little more complicated, but just a little bit. The first thing we want is to add the
addInputLine function, which will behave as addLine , except that it will add text to the input line and include the ability for the player to enter text. By default, we will use the text of the [root]arch~ input line, placed before the input, as in a normal terminal. function Console:addInputLine(delay) self.timer:after(delay, function() table.insert(self.lines, {x = 8, y = self.line_y, text = love.graphics.newText(self.font, self.base_input_text)}) self.line_y = self.line_y + 12 self.inputting = true end) end And
base_input_text looks like this: function Console:new() ... self.base_input_text = {'[', skill_point_color, 'root', default_color, ']arch~ '} ... end Also, when adding a new input line, we set
inputting to true. This boolean value will be used to tell us whether we should read keyboard input. If so, we can simply add to the list as a string all the characters that the player enters, and then add this string to our Text object. It looks like this: function Console:textinput(t) if self.inputting then table.insert(self.input_text, t) self:updateText() end end function Console:updateText() local base_input_text = table.copy(self.base_input_text) local input_text = '' for _, character in ipairs(self.input_text) do input_text = input_text .. character end table.insert(base_input_text, input_text) self.lines[#self.lines].text:set(base_input_text) end And the
Console:textinput will be called at every call of love.textinput , which happens every time a player love.textinput key: -- in main.lua function love.textinput(t) if current_room.textinput then current_room:textinput(t) end end The last thing we need to do is make the Enter and Backspace keys work. The Enter key will assign the
inputting value to false, get the contents of the input_text table and do something with it. That is, if a player has entered “help” and then pressed Enter, we will launch the help command. And the backspace key should simply remove the last element from the input_text table: function Console:update(dt) ... if self.inputting then if input:pressed('return') then self.inputting = false -- Run command based on the contents of input_text here self.input_text = {} end if input:pressRepeat('backspace', 0.02, 0.2) then table.remove(self.input_text, #self.input_text) self:updateText() end end end Finally, we can also simulate the pleasant effect of a flashing cursor. The easiest way to do this is to simply draw a flashing cursor at a position after the width of
base_input_text , concatenated with the contents of input_text . function Console:new() ... self.cursor_visible = true self.timer:every('cursor', 0.5, function() self.cursor_visible = not self.cursor_visible end) end Thus, we implement the blinking by drawing a rectangle only when
cursor_visible is true. Next we draw a rectangle: function Console:draw() ... if self.inputting and self.cursor_visible then local r, g, b = unpack(default_color) love.graphics.setColor(r, g, b, 96) local input_text = '' for _, character in ipairs(self.input_text) do input_text = input_text .. character end local x = 8 + self.font:getWidth('[root]arch~ ' .. input_text) love.graphics.rectangle('fill', x, self.lines[#self.lines].y, self.font:getWidth('w'), self.font:getHeight()) love.graphics.setColor(r, g, b, 255) end ... end Here, the variable
x stores the position of the cursor. We add 8 to it, because each line is drawn by default, starting at position 8, so if we do not take this into account, the position of the cursor will be incorrect. We will also assume that the width of the cursor rectangle will be equal to the width of the letter 'w' of the current font. Usually w is the widest letter, so we chose it. But it can be any constant number, for example 10 or 8.And all this will look like this:
Gif
Modules
Modules are objects. which contain logic that allows the player to do something in the console. For example,
ResolutionModule , which we implement, will allow the player to change the resolution in the game. We will separate the modules from the rest of the Console room code, because their logic can be quite complex, and it makes sense to separate them into separate objects. We implement a module that looks like this:Gif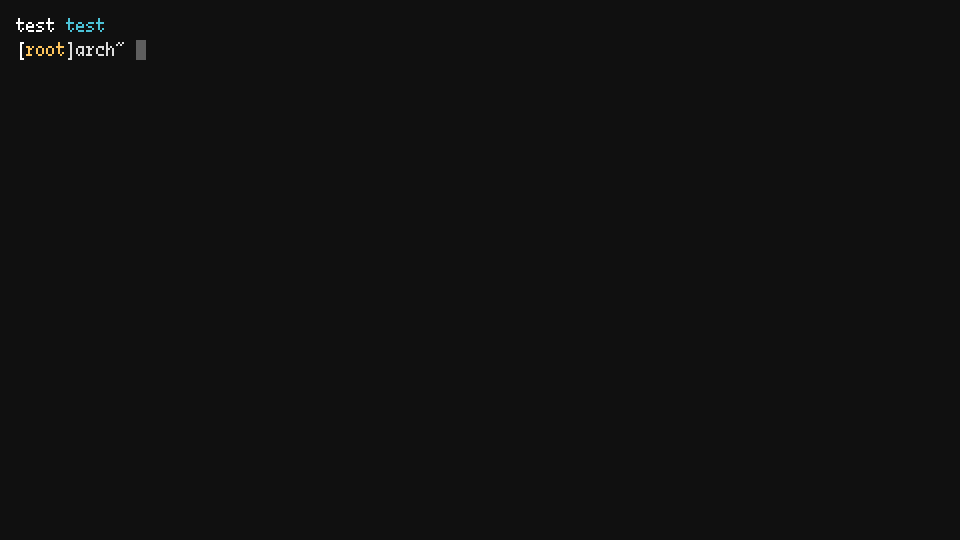
This module is created and added when the player presses Enter after entering the “resolution” command in the input line. After activating the module, it takes control from the console and adds several lines to it using the
Console:addLine . In addition to these added lines, it has a selection logic that allows you to select the desired resolution. After selecting the resolution and clicking on the Enter window changes to reflect this new resolution, we add a new input line using the Console:addInputLine and disable the option to select ResolutionModule in this object, returning control to the console.All modules will work in much the same way. They are created / added, perform their functions, taking control from the Console room, and then, after their behavior is completed, they return control to the console. We can implement the fundamentals of the modules in the Console object as follows:
function Console:new() ... self.modules = {} ... end function Console:update(dt) self.timer:update(dt) for _, module in ipairs(self.modules) do module:update(dt) end if self.inputting then ... end function Console:draw() ... for _, module in ipairs(self.modules) do module:draw() end camera:detach() ... end Since we write code only for ourselves, here we can skip some formalities. Although just said that we will have some rule / interface between the Console object
and Module objects, through which they will transfer player input control to each other, in fact, we will simply add modules to the
self.modules table, update and draw them. At the appropriate time, each module will activate / deactivate itself, that is, on the part of the Console, we do not need to do almost anything.Now let's look at creating the ResolutionModule:
function Console:update(dt) ... if self.inputting then if input:pressed('return') then self.line_y = self.line_y + 12 local input_text = '' for _, character in ipairs(self.input_text) do input_text = input_text .. character end self.input_text = {} if input_text == 'resolution' then table.insert(self.modules, ResolutionModule(self, self.line_y)) end end ... end end Here we make it so that the
input_text variable will store what the player entered in the input line, and then, if this text is “resolution”, we create a new ResolutionModule object and add it to the modules list. Most modules will need a link to the console, as well as the current position of y, to which the lines are added, so the module will be located under the lines of code already present in the console. To do this, when creating a new module object, we pass self and self.line_y .The implementation of the ResolutionModule itself is quite simple. For it, we just need to add a few lines, as well as a small amount of logic from a choice of several lines. To add rows, we simply do the following:
function ResolutionModule:new(console, y) self.console = console self.y = y self.console:addLine(0.02, 'Available resolutions: ') self.console:addLine(0.04, ' 480x270') self.console:addLine(0.06, ' 960x540') self.console:addLine(0.08, ' 1440x810') self.console:addLine(0.10, ' 1920x1080') end To simplify our work, we will make sure that all available permissions are multiples of the base resolution, so we just need to add these four lines.
After that we have to add the logic of choice. The selection logic is similar to hack, but it works well: we simply place a rectangle on top of the currently selected row and move this rectangle when the player presses the up and down keys. We will need a variable to track the line in which we are (1 through 4), and we will draw this rectangle in the corresponding position y based on this variable. It all looks like this:
function ResolutionModule:new(console, y) ... self.selection_index = sx self.selection_widths = { self.console.font:getWidth('480x270'), self.console.font:getWidth('960x540'), self.console.font:getWidth('1440x810'), self.console.font:getWidth('1920x1080') } end The variable
selection_index keeps track of the current selection, and initially it is equal to sx . sx can be 1, 2, 3 or 4, depending on the size selected by main.lua when calling the resize function. selection_widths stores the widths of the rectangle in each selection line. Since the rectangle should close each resolution, we need to determine its size based on the size of the characters that make up the string of this resolution. function ResolutionModule:update(dt) ... if input:pressed('up') then self.selection_index = self.selection_index - 1 if self.selection_index < 1 then self.selection_index = #self.selection_widths end end if input:pressed('down') then self.selection_index = self.selection_index + 1 if self.selection_index > #self.selection_widths then self.selection_index = 1 end end ... end In the update function, we process the logic of the player pressing "up" and "down." We just need to increase or decrease the
selection_index so that the value is not less than 1 and not more than 4. function ResolutionModule:draw() ... local width = self.selection_widths[self.selection_index] local r, g, b = unpack(default_color) love.graphics.setColor(r, g, b, 96) local x_offset = self.console.font:getWidth(' ') love.graphics.rectangle('fill', 8 + x_offset - 2, self.y + self.selection_index*12, width + 4, self.console.font:getHeight()) love.graphics.setColor(r, g, b, 255) end And in the draw function, we simply draw a rectangle in the appropriate position. The code looks terrible again and there are a lot of strange numbers in it, but we need to position the rectangle in the right place, and there are no “clean” methods for that.
Now we need only to make the object read input only when it is active, and that it is active only immediately after its creation and before the player presses Enter to select a resolution. After clicking on Enter, it should become inactive and no longer read input. The easiest way to do this is as follows:
function ResolutionModule:new(console, y) ... self.console.timer:after(0.02 + self.selection_index*0.02, function() self.active = true end) end function ResolutionModule:update(dt) if not self.active then return end ... if input:pressed('return') then self.active = false resize(self.selection_index) self.console:addLine(0.02, '') self.console:addInputLine(0.04) end end function ResolutionModule:draw() if not self.active then return end ... end The variable
active to true several frames after the module is created. Due to this, the rectangle will not be drawn before adding rows, because the rows are added with a slight delay. If the active variable is not active, then the update and draw functions will not be executed, that is, we will not read the input for this object and draw the selection rectangle. In addition, when you press Enter, we assign active to false, call the resize function, and then transfer control back to the Console, adding a new input line. All this gives us the appropriate behavior and because of this, everything will work as it should.Exercises
227. (CONTENT) Make it so that when the Console room has more lines than can fit on the screen, the camera will go down when adding lines and modules.
228. (CONTENT) Implement the
AchievementsModule module. It shows all the achievements and requirements necessary to unlock them. We will look at achievements in the next part of the tutorial, so go back to this exercise later!229. (CONTENT) Implement the module
ClearModule . This module allows you to delete all saved data or clear the skill tree. Saving / loading data will also be discussed in the next article, so you can also return to this exercise later.230. (CONTENT) Implement the module
ChooseShipModule . This module allows the player to select and unlock ships for gameplay.231. (CONTENT) Implement the HelpModule module. It displays all available commands and allows the player to select a team without entering text. The gamepad will be supported in the game, so forcing players to enter something is not very good.
232. (CONTENT) Implement the VolumeModule module. It allows the player to choose the volume of sound effects and music.
233. (CONTENT) Implement the commands
mute , skills , start , exit and device . mute mutes all sounds. skills makes the transition to the room SkillTree. start creates a ChooseShipModule, and then starts the game after the player selects the ship. exit exits the game.END
And on this we are done with the console. With just three concepts (lines, lines of input and modules) we can do a lot and add salt to the gameplay. The next part will be the last, in it we will consider various aspects that have not approached any of the previous parts.
Part 15: Final
Introduction
In this last part we will talk about some topics that are not combined with any of the previous parts, but are necessary for the finished game. We will cover the following topics: saving and loading data, achievements, shaders and sound.
Save and Load
Since this game does not require to save any data levels, saving and loading become very simple operations. For them we will use the bitser library and its two functions:
dumpLoveFile and loadLoveFile . These functions will save and load any data to / from the file that we pass to them using the love.filesystem . As they say on the link, the location of saving files depends on the operating system. In Windows, the file will be saved in C:\Users\user\AppData\Roaming\LOVE . To change the save location, we can use love.filesystem.setIdentity . If we change the value to BYTEPATH , the save file will be saved to C:\Users\user\AppData\Roaming\BYTEPATH .Anyway, we need only two functions:
save and load . They will be defined in main.lua . Let's start with the save function: function save() local save_data = {} -- Set all save data here bitser.dumpLoveFile('save', save_data) end The save function is quite simple. We will create a new
save_data table and put all the data we need to save into it. For example, if we want to save the amount of skill points a player has, then we simply write save_data.skill_points = skill_points , that is, the value contained in the global variable skill_points will be stored in skill_points . The same applies to all other types of data. However, it is important to limit yourself to storing values and tables of values. Saving objects as a whole, images, and other types of more complex data will most likely not work.After adding everything we want to save to
save_data , we simply call bitser.dumpLoveFile and save all this data to the 'save' file. When in C:\Users\user\AppData\Roaming\BYTEPATH a save file is created, and when this file exists, all the information we need to save will be saved there. We can call this function when you close the game or at the end of a round, this is up to you. The only problem I can see here is that if you save only at the end of the game in the event of a program crash, the player’s progress will most likely not be saved.We now turn to the download function:
function load() if love.filesystem.exists('save') then local save_data = bitser.loadLoveFile('save') -- Load all saved data here else first_run_ever = true end end The download function works in a similar way, but in the opposite direction. We call
bitser.loadLoveFile with the name of the saved file ( save ), and then put all the data inside the local table save_data . By writing all the saved data to this table, we can assign them to the corresponding variables. For example, if we want to load player skill points, we will write skill_points = save_data.skill_points , that is, we assign the saved skill points to our global skill points variable.In addition, additional logic is required for proper operation of the load function. If the player starts the game for the first time, the save file does not exist yet, that is, when you try to load it, the program will fall out. To fix this error, we need to check if the file exists using
love.filesystem.exists and load it only if it exists. If not, then we simply set the global variable first_run_ever to true. This variable is useful because usually when you first start the game, we need to perform some additional actions, such as starting a tutorial or displaying a message. The download function will be called once in love.load when loading the game. It is important that this function be called after the globals.lua file, because in it we rewrite the global variables.And on this with saving / loading we finished. What we actually need to save and load will be left as an exercise, because it depends on the realizable aspects you choose. For example, if you implement the skill tree exactly as in part 13, then you will most likely need to save the
bought_node_indexes table, because it stores all the nodes the player has bought.Progress
Because of the simplicity of the game, achievement is also very easy to implement (at least in comparison with everything else). We will have a regular global table called
achievements . And this table will contain the keys that represent the name of the achievement, and the values that determine whether the achievement is unlocked. , '50K' , , 50 000 , , achievements['50K'] true, — false., ,
10K Fighter , , 10 000 Fighter. , achievements['10K Fighter'] true, , 10K, Fighter. It looks like this: function Stage:finish() timer:after(1, function() gotoRoom('Stage') if not achievements['10K Fighter'] and score >= 10000 and device = 'Fighter' then achievements['10K Fighter'] = true -- Do whatever else that should be done when an achievement is unlocked end end) end , . , — , , , , . , .
Steam, , - . , , ,
achievements['10K Fighter'] true. , , save load ., . «», , , . , , , , . , , , , .
RGB- . , : - , , . .
, , , . - ( , ), , .. , RGB- , , . , , , .
, , X, , . , , . , (, 2,5D- ) , .
rgb_shift.frag
, , , :
extern vec2 amount; vec4 effect(vec4 color, Image texture, vec2 tc, vec2 pc) { return color*vec4(Texel(texture, tc - amount).r, Texel(texture, tc).g, Texel(texture, tc + amount).b, Texel(texture, tc).a); } rgb_shift.frag resources/shaders , Stage love.graphics.newShader . — effect . color , love.graphics.setColor , 0-255 0-1. 255, 255, 255, 255, vec4 1.0, 1.0, 1.0, 1.0. texture , . , LÖVE, . effect , . vec4, 4 — , , -.tc . 0 1 . — 0, 0 , — 1, 1 . texture2D ( LÖVE Texel ) . pc . ., , — , . vec2
amount , RGB-. send ., , :
return color*vec4( Texel(texture, tc - amount).r, Texel(texture, tc).g, Texel(texture, tc + amount).b, Texel(texture, tc).a); Texel . , , RGB-. ( ) , «» . tc - amount tc + amount , , . , ( -), ., . , ,
Area draw , . : function TrailParticle:new(area, x, y, opts) TrailParticle.super.new(self, area, x, y, opts) self.graphics_types = {'rgb_shift'} ... end draw, , :
function Area:drawOnly(types) table.sort(self.game_objects, function(a, b) if a.depth == b.depth then return a.creation_time < b.creation_time else return a.depth < b.depth end end) for _, game_object in ipairs(self.game_objects) do if game_object.graphics_types then if #fn.intersection(types, game_object.graphics_types) > 0 then game_object:draw() end end end end ,
Area:draw , . intersection , , graphics_types types . , , rgb_shift , area:drawOnly({'rgb_shift'}) , graphics_types . - , #fn.intersection , .Area:drawExcept , , , , - . It looks like this: function Area:drawExcept(types) table.sort(self.game_objects, function(a, b) if a.depth == b.depth then return a.creation_time < b.creation_time else return a.depth < b.depth end end) for _, game_object in ipairs(self.game_objects) do if not game_object.graphics_types then game_object:draw() else if #fn.intersection(types, game_object.graphics_types) == 0 then game_object:draw() end end end end ,
graphics_types , types 0, , .+
.
TrailParticle , RGB- . , RGB- TrailParticle, : function Stage:draw() ... love.graphics.setCanvas(self.rgb_shift_canvas) love.graphics.clear() camera:attach(0, 0, gw, gh) self.area:drawOnly({'rgb_shift'}) camera:detach() love.graphics.setCanvas() ... end , ,
main_canvas rgb_shift_canvas . , , 'rgb_shift' . , , . Shockwave Downwell .,
main_canvas , , . It will look like this: function Stage:draw() ... love.graphics.setCanvas(self.main_canvas) love.graphics.clear() camera:attach(0, 0, gw, gh) self.area:drawExcept({'rgb_shift'}) camera:detach() love.graphics.setCanvas() ... end . ,
rgb_shift_canvas final_canvas , RGB-. : function Stage:draw() ... love.graphics.setCanvas(self.final_canvas) love.graphics.clear() love.graphics.setColor(255, 255, 255) love.graphics.setBlendMode("alpha", "premultiplied") self.rgb_shift:send('amount', { random(-self.rgb_shift_mag, self.rgb_shift_mag)/gw, random(-self.rgb_shift_mag, self.rgb_shift_mag)/gh}) love.graphics.setShader(self.rgb_shift) love.graphics.draw(self.rgb_shift_canvas, 0, 0, 0, 1, 1) love.graphics.setShader() love.graphics.draw(self.main_canvas, 0, 0, 0, 1, 1) love.graphics.setBlendMode("alpha") love.graphics.setCanvas() ... end send amount , , . 0 1, gw gh . , , , 2 , rgb_shift_mag 2, 2/gw b 2/gh, 2 / , 2. main final, final , ., final :
function Stage:draw() ... love.graphics.setColor(255, 255, 255) love.graphics.setBlendMode("alpha", "premultiplied") love.graphics.draw(self.final_canvas, 0, 0, 0, sx, sy) love.graphics.setBlendMode("alpha") love.graphics.setShader() end ,
final_canvas , , distortion , , .:
Gif
, RGB- , «» .
, , , , . ripple .
API
ripple.newSound :play . , , , : -- in globals.lua shoot_sound = ripple.newSound('resources/sounds/shoot.ogg') function Player:shoot() local d = 1.2*self.w self.area:addGameObject('ShootEffect', ... shoot_sound:play() ... end :play , , . , , , , , . , . , sound.lua .. , , . , , , , , .
, , . , , « ». , . «», 1-5.
, - :
itch.io, , 1-9, , ( , ) Steam.
Source: https://habr.com/ru/post/353596/
All Articles