How to develop a SIEM (Information Security Incident Management System) in one day

“Colleagues, I remind you, in this quarter, advanced training courses are planned for partners on the topic of information security management. Our team is invited to prepare a practical lesson dedicated to the issues of building SIEM systems! ”- after such a proposal from the chief, there was a pause during the next training session.
The participants of the meeting, from among the supposed performers, understood the significance of such a proposal (
After two months of hard work and the preparation of the final version of the lesson, we admitted that we had spent this time incredibly productively. And they didn’t even realize how useful a professional response the team would be to answer such a “challenge”.
')
We are sharing the workshop materials on developing our own SIEM system in one day with convincing examples.
Disclaimer The material is voluminous, designed for a full school day at a measured pace. The example is primitive. The authors doubt the industrial applicability of open-source solutions of SIEM, but at the same time they believe that the study of practical examples will allow a better understanding of the subject area.
Source data analysis and problem statement
We specify the initial data and determine the average "profile" of the course listener. Our partners send to the training of engineers and specialists in the field of information security (IB), whose responsibilities include both conducting applied research, developing specialized software, and providing relevant services.
The audience promises to be prepared and experienced, with a higher education, selectively with academic degrees and professional certificates. Students in the courses are not “serving the number”, but are interested in new knowledge.
The wishes of partners are also known to consider in the classroom the construction of modern security incident management systems with a minimum of theory and a maximum of practice and benefit.
So, it is proposed to prepare a workshop, during which:
- talk about the well-known approaches to the construction of SIEM systems;
- to clarify the architectural features of the class of such systems on the example (albeit primitive, but convincing) of developing their own solution;
- demonstrate the operation of its own SIEM system in “combat-training” conditions for monitoring the security of a test network infrastructure.
We hope that students are familiar with network technologies and the basics of programming (examples of code are in PHP and C #).
We start the development of materials for future classes.
Workshop on the development of SIEM systems
In the opening remarks we confine ourselves to general explanations.
The main task of the SIEM system is to analyze events from different sources recorded in the protected infrastructure and detect attacks / attack scenarios / suspicious actions / deviations from the norm, forming appropriate security incidents if necessary.
The basic capabilities of the SIEM system should provide the following tasks [1, 2]:
- collection and storage of incoming security events;
- processing and analysis of recorded security events;
- detection of attacks and violations of security policies in real time (close to real time);
- identification and analysis of security incidents;
- report generation.
In addition, additional requirements are imposed on modern solutions of the SIEM class in order to ensure the implementation of the following functionality [3]:
- assessment of the security of resources of the controlled system;
- verification of compliance of the IS management system with existing requirements and standards;
- IS risk management, etc.
The functional model of the SIEM system combines the following functional subsystems: data collection, preprocessing, storage, analysis, presentation [1]. The generalized sequence of processing security events in the solutions of the SIEM is illustrated by the figure [2]:

Further it is proposed to consider an example of developing your own SIEM system for the development of practical skills.
The example simulates a simplified “brute-force” attack scenario with respect to a web-based training application. The task of the system being developed by SIEM is to notify the security administrator of an attempt to implement such an attack.
To build a test bench, open-source solutions and proprietary PHP and C # applications will be used. The architecture of the test bench is shown in the figure below (repeats the title image of the publication).
For ease of navigation, the example sections are numbered. Getting to practice:
 1. Organization of the test environment.
      1.1.  Install and configure the Apache web server.
      1.2.  Install and configure MongoDB data storage.
      1.3.  Install and configure the message broker RabbitMQ.
      1.4.  Installing and configuring the development environment Visual Studio.
 2. Develop a secure web application Buggy Webapp.
 3. Development of a connector for the Apache web server.
 4. Development of core correlation (event handler).
      4.1.  Performance evaluation of MongoDB data warehouse.
      4.2.  Formation of a set of correlation rules.
      4.3.  Core Correlation Implementation.
 5. Development of the security administration console.
 6. Testing the performance of the developed SIEM system.
Bibliographic list:
- “The use of information and security event management technology to protect information in critical infrastructures” is one of the first articles (2012) of the SPIIRAS computer security research team (I. V. Kotenko, I. B. Saenko, O. V. Polubelova , A. A. Chechulin) with general provisions on the construction and operation of SIEM systems. Full list of publications of the laboratory .
- Security Information and Event Management (SIEM) Implementation is a wonderful book by David Miller, Sean Harris, and others. The 2011 edition, with some outdated chapters, but in many ways still relevant. A systematic look at the organization of SIEM systems, accessible English, clear examples.
- Magic Quadrant for Security Information and Event Management 2015 . Gartner's thematic reports for 2016 and 2017 will also be useful to researchers of SIEM systems.
1. Organization of the test environment
Note. It is likely that the stand will function with the latest versions of software solutions used. But in order to ensure the reproducibility of the research results, we will fix the version numbers for which all the necessary dependencies have been clarified and the operability checked.
1.1 Installing and Configuring the Apache Web Server
As a web server, we will use the XAMPP for Windows build , version 7.1.9 (Apache 2.4.27 + PHP 7.1.9). Download and install XAMPP using the installer, select the default installation folder - “c: \ xampp \”.
To check the installation of the web server, simply open the XAMPP Control Panel and launch the Apache module. Then the welcome page of the XAMPP project will open in the browser at the address “http://127.0.0.1/”.
If there are no errors, go to the next item.
1.2 Install and configure MongoDB data storage
To organize the data warehouse, it is proposed to use the MongoDB document database . The main reason for this choice is the solution of the educational problem and familiarity with the approaches of NoSQL. In addition, even a cursory study of commercial SIEM systems allows us to conclude that most of the leading manufacturers, together with traditional SQL databases, use NoSQL / NewSQL technology in their solutions.
Below is a model of one well-known commercial SIEM system, confirming that the manufacturer uses MongoDB and RabbitMQ solutions (the message broker is discussed further):

We download from the official site and install the MongoDB Community Server version 3.4.10 installation package. Examples of instructions:
We check the server performance by creating a new document in the collection (collection) test (document) with a field (field) {a: 1}. An attempt to find a document in the collection should succeed.

Note that when you add a document to the collection, the MongoDB server, by default, complements the document with an _id field of type ObjectId . The “additive” is unique (not to be confused with the hash, the rules of formation are different) and allows you to uniquely identify the document in the collection.
Perform another check, more visual. Download one of the available administration tools, such as Robomongo version 1.1.0-Beta, and connect to the MongoDB server. The test collection must contain the created document with the field {a: 1}.
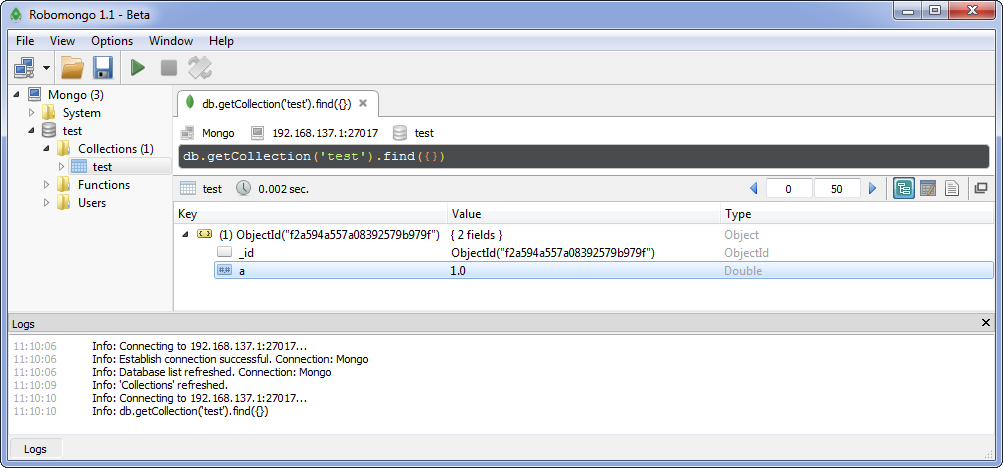
In the screenshot, instead of the expected address 127.0.0.1, the address is 192.168.137.1 - we use a distributed test bench for experiments, consisting of several physical workstations and virtual machines. But the difficulties in installing all components on the same workstation in the host operating system should not be.
An assessment of the performance of the data warehouse is proposed below.
If there are no errors, go to the next item.
Useful links and sources of additional knowledge:
- The popular science publication “NoSQL Distilled” by Martin Fowler and Pramod Sadaladzha. There is a decent translation - "NoSQL: a new methodology for developing non-relational databases."
- From fresh on Habré: "Why SQL prevails over NoSQL, and what it will lead to in the future" , "SQL or NoSQL - that is the question . "
1.3 Installing and Configuring the RabbitMQ Message Broker
To organize data exchange between the components of the developed system, we will use RabbitMQ message broker , one of the most common solutions of this class according to stackshare.io .
Follow the recommended RabbitMQ Server installation instructions for Windows (version 3.7.2). You will need to install Erlang , having previously checked the dependencies of the versions - for RabbitMQ Server 3.7.2, Erlang version 20.1 will do.
The installer will configure the RabbitMQ Server as a service. For further checks, go to the directory "c: \ Program Files \ RabbitMQ Server \ rabbitmq_server-3.7.2 \ sbin \".
Run the command to start the service:
rabbitmq-service start Check the status of the team
rabbitmqctl status If the status is without errors, then everything is fine.
To visually monitor the operation of the message broker, let's connect the appropriate plugin - Management plugin:
rabbitmq-plugins enable rabbitmq_management After launching the plug-in in the browser, the administration panel (default account is guest / guest) will be available at the address “http://127.0.0.1:15672/”.

When building the test bench, we installed a messaging server on the node with the address 192.168.137.1. If you need a remote connection to the administration panel, you will need to create a new user and grant him the appropriate permissions, for example:
rabbitmqctl add_user siemuser siempass rabbitmqctl set_user_tags siemuser administrator rabbitmqctl set_permissions -p / siemuser ".*" ".*" ".*" After checking the connection to the administration panel, we consider the installation and configuration of the message broker successful. We check the messaging in the following steps.
Sources of additional knowledge:
- Redis Pub / Sub : messaging system! Check it out.
- Google Protocol Buffers
1.4 Installing and Configuring the Visual Studio Development Environment
It so happened that the development of a security event handling core in our team is conducted in C #. Therefore, some examples will be in C #, nothing personal and no holivar. In addition, the language is simple enough to understand, which is consistent with the educational objectives of the project.
We use Visual Studio Community 2017, the starting point for installation is www.visualstudio.com/en/downloads/ . Checking the installation is postponed until the assembly of the first solution in C #.
2. Buggy Webapp Secure Web Application Development
For example, we will develop a simple web application that implements the user authentication function. Inspired by the ideas of minimalism in the markup, we impose the layout of the application using Bootstrap 4 . For implementation we use the PHP language.
The source code of the application Buggy Webapp: buggy / admin.php .
The admin.php script asks for a username and password and compares them with the corresponding administrative account settings (admin / admin). If the username and / or password do not match, an error message is displayed.
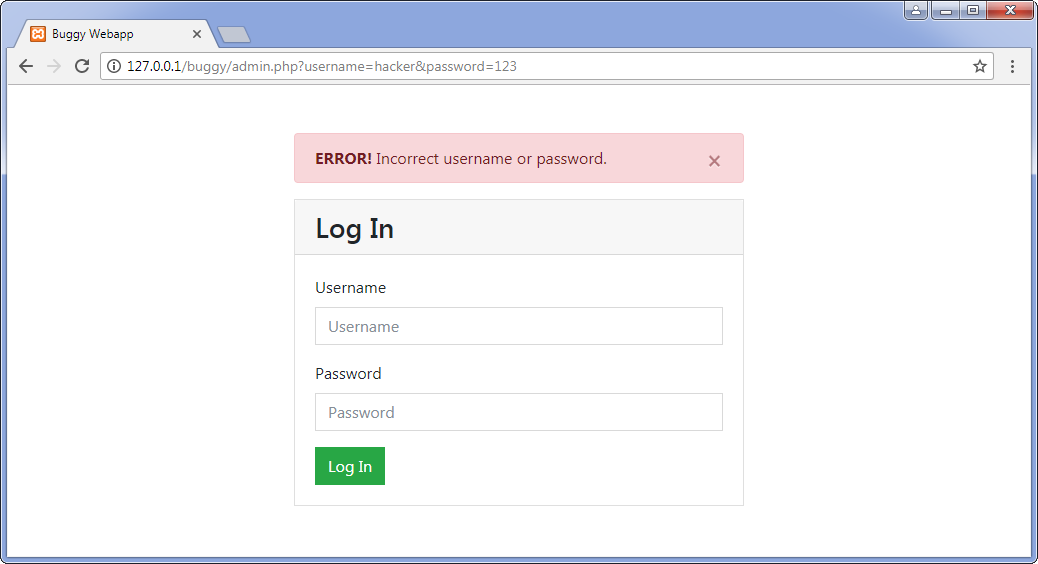
In the case of a correctly entered username and password, access to the administrative section is provided.

We save the admin.php file in the corresponding folder of the XAMPP assembly (the path to the file is “c: \ xampp \ htdocs \ buggy \ admin.php”). From the XAMPP control panel, we launch the web server, after which the web application should be available in the browser at the address “http://127.0.0.1/buggy/admin.php”. If there are no errors, go ahead.
3. Connector Development for Apache Web Server
How to track calls to the protected web application and try to detect suspicious user activity? A simple and understandable way is to view the access log (access log) of the web server.
In the case of the environment used, the access log is stored in the access.log file (the approximate path in XAMPP is “c: \ xampp \ apache \ logs \ access.log”).
After several downloads of the web application in the browser, we turn to the contents of the log file:
127.0.0.1 - - [01/Jan/2099:12:30:39 +0300] "GET /buggy/admin.php?username=hacker&password=123 HTTP/1.1" 200 2040 "http://127.0.0.1/buggy/admin.php" "Mozilla/5.0 (Windows NT 6.1; Win64; x64) AppleWebKit/537.36 (KHTML, like Gecko) Chrome/61.0.3163.91 Safari/537.36" The format of the record is defined in the Apache web server httpd.conf configuration file (approximate path in XAMPP is “c: \ xampp \ apache \ conf \ httpd.conf”):
LogFormat "%h %l %u %t \"%r\" %>s %b \"%{Referer}i\" \"%{User-Agent}i\"" combined CustomLog "logs/access.log" combined We get acquainted with the detailed description of the format , prepare the mapping scheme and proceed to the development of the connector.
Remember that code efficiency issues are less important for our conditions than simplicity.
Connector source code: ApacheConnector .
General description of the algorithm:
- At the initial stage, access the access.log access log and remember the file size.
- Further, in an infinite loop with a pause between iterations, we track file size changes. When we increase the size, we read the last added lines from the file and pass it to the RabbitMQ message queue, remember the new file size.
- The access.log file may be overwritten. We take into account such a case (reducing the file size).
We try to maintain the formatting style of the code according to the examples of Jeffrey Richter and Steve McConnell . Both of these books are hotly recommended to all interested parties.
To build a connector, you will need to connect the .NET / C # RabbitMQ client library to the project. The easiest way to do this is to install the appropriate NuGet package in the Package Manager Console of the Visual Studio development environment using the command:
Install-Package RabbitMQ.Client -Version 5.0.1 Note that when building a solution available on GitHub ( github.com/fisher85/AirSIEM ), there is no need to manually install packages — they will be downloaded automatically (only an Internet connection is required).
Perform a test launch of the connector with simultaneous testing of the message broker according to the following scenario:
- Launch the ApacheConnector application. The connector begins tracking changes in the size of the access.log file.
- In the browser, the Buggy Webapp web application page is updated several times, and the lines corresponding to browser requests to the web server will be added to the access log of the web server.
- The ApacheConnector application will detect file size changes and send the last lines to the RabbitMQ message broker's queue.

- If everything is properly configured, in the RabbitMQ administration panel (the address for our case is “http://192.168.137.1:15672/”) we will find an added non-zero load AirSIEM_ConnectorQueue queue.

If the test script ended in the same way, proceed to the next step. Otherwise, it is necessary to eliminate all errors that occur.
A modest experience in fixing RabbitMQ configuration errors:
- The first thing to try is to disable the firewall, antivirus, proxy, etc. If it helps, enable and configure them correctly.
- If a mismatch error occurs between Erlang hash of the interacting components, try leaving the single installed version of Erlang on the workstation.
Notes on the algorithm of the connector:
- Sources of inspiration: examples from Jeffrey Richter ’s book “Programming on the .NET 4.5 Platform” (Chapter 27, “Asynchronous Computational Operations”) and the Log Monitor project .
- Why not use FileSystemWatcher? In one case per million class will incorrectly track file changes . This case, according to a known law , was observed during the experiments.
4. Development of core correlation (event handler)
So, to this stage, we have configured a security event collection subsystem from a single source - the Apache web server. The ApacheConnector connector tracks access.log access history changes and sends the last lines to the RabbitMQ message broker's queue.
The next stage is the development of a correlation core (event handler). But previously, as noted earlier, it is proposed to estimate the speed of writing and reading from the MongoDB data warehouse. We expect that this component will be a bottleneck of the system being developed and will determine the upper limit of performance.
4.1 Performance evaluation of MongoDB data warehouse
Perform performance testing in a simple way - first, we estimate the speed of sequential writing to the repository (single documents and document packages), and then we estimate the speed of random reading a document from the collection.
Application source code: MongoBenchmark / Program.cs .
To work with MongoDB, you need to connect the .NET driver for MongoDB to the project. The easiest way to do this is to install the appropriate NuGet package in the Package Manager Console using the command:
Install-Package MongoDB.Driver -Version 2.5.0 After launching the application, we will evaluate the benchmark results:
InsertMany by 1: 20000 ops in 13.52 seconds (1479.15 ops/sec) => 1479.15 docs/sec InsertMany by 2: 10000 ops in 7.11 seconds (1406.24 ops/sec) => 2812.48 docs/sec InsertMany by 5: 4000 ops in 3.20 seconds (1250.93 ops/sec) => 6254.66 docs/sec InsertMany by 10: 2000 ops in 2.08 seconds (960.88 ops/sec) => 9608.78 docs/sec InsertMany by 50: 400 ops in 1.15 seconds (347.68 ops/sec) => 17384.15 docs/sec InsertMany by 100: 200 ops in 1.06 seconds (188.32 ops/sec) => 18832.26 docs/sec InsertMany by 250: 80 ops in 0.95 seconds (83.87 ops/sec) => 20968.05 docs/sec InsertMany by 500: 40 ops in 0.92 seconds (43.67 ops/sec) => 21835.64 docs/sec InsertMany by 1000: 20 ops in 0.93 seconds (21.39 ops/sec) => 21391.22 docs/sec InsertMany by 5000: 4 ops in 1.00 seconds (3.99 ops/sec) => 19936.32 docs/sec InsertMany by 10000: 2 ops in 1.01 seconds (1.97 ops/sec) => 19730.96 docs/sec InsertMany by 20000: 1 ops in 1.01 seconds (0.99 ops/sec) => 19832.80 docs/sec Find: 10000 ops in 6.17 seconds (1620.21 ops/sec) The “hump” of the distribution falls on the case of sending 500 events in one packet (block), the speed of sequential writing is 21,835 documents per second. The random read speed from the collection is 1620 documents per second. Considering the fact that the test stand is organized using personal computers of “non-top” configurations, we are quite satisfied with the results. We believe that the read and write speed values obtained in the experiment will allow the MongoDB data storage to handle the load planned in the example.
Notes:
- A widely cited source on the issue of “running time” of operations: a discussion of Environment.TickCount vs DateTime.Now on Stack Overflow.
- An attempt to insert into the collection two documents with the same _id will end in trouble as an exception MongoDB.Driver.MongoWriteException with an approximate explanation:
E11000 duplicate key error collection: test.events index: _id_ dup key: { : ObjectId('5a2a2b386a49df197845deaa') }
4.2 Formation of a set of correlation rules
And one more digression. When the next security event arrives, the correlation kernel tries to apply pre-loaded processing rules to it (rules for detecting dependencies between individual events, correlation rules). Let's form a test rule set that will be used later in the example.
To describe the rules, we will use the syntax of the correlation rules proposed in the OSSEC project with minimal changes. The example simulates a simplified brute-force attack scenario with respect to the protected web application, for this example we compose the corresponding set of rules test_webapp_rules.xml :
<group name="web-app"> <rule id="100000" level="0"> <match>/buggy/</match> <description>Access to BUGGY webapp</description> </rule> <rule id="100001" level="0"> <if_sid>100000</if_sid> <match>password</match> <description>Attempt to login to BUGGY webapp</description> </rule> <rule id="100002" level="1" frequency="3" timeframe="5"> <if_matched_sid>100001</if_matched_sid> <same_source_ip/> <description>Brute force trying to login to BUGGY webapp</description> </rule> </group> The format of the rule set is minimally different from the XML format. For example, multiple root elements are allowed in the file. Such a document is not a well-formed XML document; we will take this feature into account when parsing a file using the means provided by the System.XML namespace.
Next, we consider separately each rule and briefly explain the features of the syntax. The first rule:
<rule id="100000" level="0"> <match>/buggy/</match> <description>Access to BUGGY webapp</description> </rule> The <rule> element describes a rule.
The id attribute of the <rule> element defines the rule identifier. Identifiers are selected from the range recommended by the OSSEC project for the “copyright” rules:> = 100000.
The level attribute of the <rule> element determines the significance level of the rule. The minimum value is 0 (generally not displayed in the security administration console), the maximum value is 16.
The <match> element specifies a substring to search for in the message being processed.
The <description> element specifies the description of the rule that will be displayed as an alert to the security administrator.
The case of triggering such a rule is checked simply - if the substring specified in the <match> element is detected in the line of the message being processed, the core of the correlation will generate a security alert.
The logic of rule 100000 is as follows: notify the security system of all attempts to contact the protected Buggy Webapp web application. For this, the substring "/ buggy /" is monitored in all calls to the web server. The significance level of the 100000 rule is zero, there is no criticality in the monitored hits, the rule triggering will be used to build more complex chains of rules.
We note separately that, in essence, rule 100000 does not detect any dependencies between security events and does not reveal “correlations”. In this sense, it is more correct to call such a record a processing rule, and not a correlation rule.
The second rule:
<rule id="100001" level="0"> <if_sid>100000</if_sid> <match>password</match> <description>Attempt to login to BUGGY webapp</description> </rule> 100001 <if_sid> 100000, – , 100000.
100001: - ( 100000) - «password» ( ), – «Attempt to login to BUGGY webapp».
100001 .
:
<rule id="100002" level="1" frequency="3" timeframe="5"> <if_matched_sid>100001</if_matched_sid> <same_source_ip/> <description>Brute force trying to login to BUGGY webapp</description> </rule> 100002 <if_matched_sid> 100001, – , 100001 3 ( frequency=«3» <rule>) 5 (timeframe=«5»).
<same_source_ip/> , , <if_matched_sid>, IP- .
Rule 100002 logic: if during the last 5 seconds, many attempts (3 or more) to access the protected web application were recorded from the same address, then create an alert with a higher level of significance level = "1" about the attempt to select an access password - "Brute force trying to login to BUGGY webapp".
The set of correlation rules for the considered example is formed, we proceed to the immediate implementation of the event handler. At the end of the example, we will perform step-by-step debugging of the correlation core and check how the correlation rules are applied to incoming security events and which alerts are generated.
4.3 Core Correlation Implementation
The software implementation of the correlation core is the most complex and voluminous part of the example, essentially defining the entire logic of processing security events developed by the SIEM system.
In general, the logic of the core correlation is described as follows:
- The correlation core is “listening” to the AirSIEM_ConnectorQueue message queue.
- When the next message (event) arrives, the kernel tries to apply pre-loaded event processing rules (correlation rules) to it.
- If one of the rules is applicable to the received security event, the kernel, if necessary, forms a security incident and stores it in the alerts collection of the MongoDB data warehouse.
Source code: AirSIEM .
The implementation will be quite voluminous, so for the convenience of debugging, we will connect the NLog logging system to the project . The easiest way to do this is to install the appropriate NuGet package in the Package Manager Console using the command:
Install-Package NLog -Version 4.4.12 In addition, to work with the message broker, you need to connect the RabbitMQ.Client package, and to interact with the data store, you need the MongoDB.Driver package:
Install-Package RabbitMQ.Client -Version 5.0.1 Install-Package MongoDB.Driver -Version 2.5.0 NLog, ( Project > Add Existing Item) nlog.config ( ) ( Solution Explorer > nlog.config > Properties > «Copy To Output Directory» «Copy always»).
, . AirSIEM.exe.config – .
To verify the correctness of the correlation kernel, you need to make sure that in case of detection of attack scenarios (set by the relevant rules), the kernel creates security incidents and stores them in the alert collection of the MongoDB data warehouse. It is proposed to perform verification at the final stage, after the development of all system components.
5. Development of the security administration console
For the convenience of the security administrator, we will provide an appropriate solution - the management console. The functionality of the console is limited to viewing the generated security incidents, the implementation option is a PHP web application.
Source code: console / index.php .
In order for PHP code to interact with MongoDB, you need to perform two actions: connect the appropriate extension to the PHP interpreter, and the corresponding library to the web application.
5.1 Connecting the php_mongodb.dll extension to the web server
Recall that we use XAMPP for Windows as a web server. By default, the PHP interpreter does not know about the existence of the MongoDB repository, you can fix this by installing the MongoDB PHP Driver on Windows driver.
Open the installation instructions for our case - Installing the MongoDB PHP Driver on Windows .
Go to the site pecl.php.net/package/mongodb in search of a suitable version of the driver php_mongodb.dll. Select the latest stable version (1.4.0), Windows OS, PHP Version 7.1, thread safe, x86. The selected archive is php_mongodb-1.4.0-7.1-ts-vc14-x86.zip , in the archive you need the php_mongodb.dll file.
Copy the php_mongodb.dll driver to the PHP extensions folder. The default is "c: \ xampp \ php \ ext \". Add the line “extension = php_mongodb.dll” to the section for connecting extensions to the PHP settings file (by default, “c: \ xampp \ php \ php.ini”).
We restart Apache (the easiest way is from the XAMPP panel), so that at subsequent stages we don’t waste too much time analyzing errors like “Uncaught Error: Class 'MongoDB \ Driver \ Manager' not found”.
5.2 Connecting to the MongoDB PHP Library web application
Next you need to connect the MongoDB PHP Library to the admin console project.
We study the official documentation . The guide recommends the easiest way - using Composer .
Install Composer, get acquainted with examples of use.
Create a folder for the future project, for example, “c: \ xampp \ htdocs \ console \”, execute the mongodb package installation command in the folder:
composer require mongodb/mongodb The result of the command:

Composer will download the necessary files and add them to the project. In order for the project to use the functionality of the MongoDB PHP Library, you need to add one line to the code:
require_once __DIR__ . "/vendor/autoload.php"; Save the application code in the file "c: \ xampp \ htdocs \ console \ index.php" and open it in the browser.

The table may be non-empty at the first start, if the correlation kernel during test runs has generated security incidents and saved the relevant documents in the MongoDB data warehouse alerts collection.
If there are no errors, proceed to the final stage.
Sources of additional knowledge:
6. Functional check of the developed SIEM system
So, the development of the SIEM system is complete. At the final stage, we have to perform step-by-step debugging of the correlation core and make sure that the entire solution works correctly.
Recall the main task of the developed system is to notify the security administrator of an attempt to implement a brute-force attack scenario with respect to the protected web application.
Consider the final test case in general:
- The attacker opens the admin.php page of the protected Buggy Webapp web application and several times tries to find the username and password of the administrator.
- – «admin/admin» – ( – ).
- SIEM , .
Further it is proposed to execute a test script and consider the sequence of actions of the SIEM system.
Step 1. Preliminary preparation.
For the "purity" of the experiment, clear the data warehouse. To do this, connect to MongoDB using Robomongo and delete the AirSIEM database (if it exists).
Run the ApacheConnector.
Step 2. Modeling the actions of the attacker.
Open in the browser the web application Buggy Webapp at the address “http://127.0.0.1/buggy/admin.php”. Within 5 seconds, we make three attempts to select the administrator username and password.
Step 3. Checking the operation of the connector.
In the application window of the ApacheConnector, we check the fact of reading the web server access log and sending the registered security events to the message broker queue.
In the administration panel of the RabbitMQ message broker (“http://127.0.0.1:15672/”), we check the presence of load: messages should appear in the AirSIEM_ConnectorQueue queue.
Step 4. Checking the operation of the correlation kernel.
Further, the core of the correlation enters the process. Run the AirSIEM application. The correctness of the work will be evaluated by the logs Logs / log.txt (the path relative to the output build directory) of the logger NLog.
At the preliminary stage, the correlation rules are loaded:
----- AirSIEM start ----- ParseRuleDir start ParseRulesFromXML handles file: test_webapp_rules.xml 3 rules processed: 100000, 100001, 100002 ParseRuleDir: total 1 files processed ParseRuleDir: total 3 rules processed ParseRuleDir stop After the rules are loaded, the chains of rules are built:
CheckDependencies start Dependencies: 100000 children => 100001 100001 children => 100002 100002 children => CheckDependencies stop Next, queues are created to count the number of times that rules are triggered, the identifiers of which are found in the <if_matched_sid> elements. The test set contains 3 rules, among which only one rule 100002 counts the responses of another rule - with identifier 100001. A queue is created for identifier 100001:
GenerateQueueList start Created 1 queues: [100001, FireQueue object => ID=[100001], count=[0], timeFrame=[5 sec], maxSize=[1000]] GenerateQueueList stop Then, the subscriber is initialized and started, which “listens” to the AirSIEM_ConnectorQueue queue and passes the received messages to the handler:
RabbitMQConsumer init RabbitMQConsumer start After the first attempt of the attacker to pick up the username and password, the ApacheConnector connector sends the next line from the access server log of the web server to the RabbitMQ queue, the “subscriber” receives the message and sends it to the processing:
RMQ message received: ApacheConnector:127.0.0.1 - - [01/Jan/2099:16:24:57 +0300] "GET /buggy/admin.php?username=1&password... From the message, a normalized security event is generated (an instance of the SecurityEvent class):
SecurityEvent object => timestamp=[16:24:57], source=[127.0.0.1], destination=[], message=[GET /buggy/admin.php?username=1&password=1 HTTP/1.1] Next, the correlation kernel applies the loaded rules to the event being processed. During the first “pass”, only those rules are viewed whose operations do not depend on other rules:
Check rule 100000 - Access to BUGGY webapp Check <match>/buggy/</match> Rule 100000 matched ALERT: LEVEL 0 - Access to BUGGY webapp Rule 100000 is triggered, a security incident is generated, a notification is sent to MongoDB and displayed in the administrator console (during debugging, we will display all alerts, even with zero severity level).
Next, recursively look through the rules, the triggering of which depends on the triggering of rule 100000:
Check the child rules Check rule 100001 - Attempt to login to BUGGY webapp Check <if_sid>100000</if_sid> Check <match>password</match> Rule 100001 matched ALERT: LEVEL 0 - Attempt to login to BUGGY webapp Matched rule is queue tracked Enqueue item: FireQueueItem object => timestamp=[16:24:57], source=[127.0.0.1], destination=[] FireQueue object => ID=[100001], count=[1], timeFrame=[5 sec], maxSize=[1000] 1: FireQueueItem object => timestamp=[16:24:57], source=[127.0.0.1], destination=[] Check the child rules Check rule 100002 - Brute force trying to login to BUGGY webapp Check <if_matched_sid>100001</if_matched_sid> QueueDictionary.CheckIfMatched start counter++ => counter=[1] counterSameSourceIP++ => counterSameSourceIP=[1] Rule 100001 QueueDictionary.CheckIfMatched == FALSE Rule 100002 not matched Check rule 100002: OK Check the child rules: OK Check rule 100001: OK Check the child rules: OK Check rule 100000: OK As a result of processing, the rule 100001 is triggered, the first response is entered into the FireQueue's counting queue. When the number of operations becomes equal to 3, one of the conditions for triggering the rule 100002 is executed.
Let us skip the processing of the second access to the web application, we will immediately proceed to the third attempt to find the password:
RMQ message received: ApacheConnector:127.0.0.1 - - [01/Jan/2099:16:25:02 +0300] "GET /buggy/admin.php?username=1&password... SecurityEvent object => timestamp=[16:25:02], source=[127.0.0.1], destination=[], message=[GET /buggy/admin.php?username=1&password=1 HTTP/1.1] Check rule 100000 - Access to BUGGY webapp Check <match>/buggy/</match> Rule 100000 matched ALERT: LEVEL 0 - Access to BUGGY webapp Check the child rules Check rule 100001 - Attempt to login to BUGGY webapp Check <if_sid>100000</if_sid> Check <match>password</match> Rule 100001 matched ALERT: LEVEL 0 - Attempt to login to BUGGY webapp After the rule 100001 is triggered, it is checked whether the number of operations in any FireQueue counting queue is counted. Indeed, for the rule identifier 100001, such a queue exists:
Matched rule is queue tracked Enqueue item: FireQueueItem object => timestamp=[16:25:02], source=[127.0.0.1], destination=[] FireQueue object => ID=[100001], count=[3], timeFrame=[5 sec], maxSize=[1000] 1: FireQueueItem object => timestamp=[16:24:57], source=[127.0.0.1], destination=[] 2: FireQueueItem object => timestamp=[16:25:01], source=[127.0.0.1], destination=[] 3: FireQueueItem object => timestamp=[16:25:02], source=[127.0.0.1], destination=[] In the counting queue, 3 triggerings of rule 100001 were recorded during a timeframe time interval (5 seconds). Security event processing continues:
Check the child rules Check rule 100002 - Brute force trying to login to BUGGY webapp Check <if_matched_sid>100001</if_matched_sid> At this point, the number of triggerings of rule 100001 is checked. Since the <same_source_ip /> element was present in the description of the rule, the triggerings with the same source IP address are simultaneously counted:
QueueDictionary.CheckIfMatched start counter++ => counter=[1] counterSameSourceIP++ => counterSameSourceIP=[1] counter++ => counter=[2] counterSameSourceIP++ => counterSameSourceIP=[2] counter++ => counter=[3] counterSameSourceIP++ => counterSameSourceIP=[3] Rule 100001 QueueDictionary.CheckIfMatched == TRUE Rule 100002 matched ALERT: LEVEL 1 - Brute force trying to login to BUGGY webapp Check rule 100002: OK Check the child rules: OK Check rule 100001: OK Check the child rules: OK Check rule 100000: OK Rule 100002 is triggered, the core correlation detects a brute-force attack scenario and generates a corresponding security incident. Incident information is sent to the MongoDB data warehouse.
Step 5. Checking the data warehouse.
Check the formation of alerts. To do this, we connect to MongoDB with the help of Robomongo and view the collection of alerts documents in the AirSIEM database. The collection must be non-empty.
Step 6. Modeling security administrator actions.
Open the security administration console in your browser at: “http://127.0.0.1/console/index.php”. If all components of the SIEM system are configured correctly, after executing the test script, the console window should look like this:

We emphasize that not only individual events were detected, but the sequence of actions of the attacker was highlighted and the attack script was identified. In the administrator console, this is line number 7, highlighted in color, with a message about the detected implementation of a brute-force attack scenario. The time stamp 16:25:03 is set by the correlation core, the value differs from the time stamp of the event corresponding to the third attempt to gain access by the attacker (16:25:02).
If zero-level alerts are considered as false positives, you can disable their output to the console. And thereby reducing the burden on the operator.
Results
Security administrator notified of suspicious activity of the attacker. The system developed by SIEM has completed the task. A curtain.
Conclusions and Conclusion
The materials of the lesson deal with the construction of modern security incident management systems (SIEM) on the example of developing their own SIEM solution. The possibilities of practical application of the developed system in the conditions of monitoring the security of the protected web application are demonstrated: a brute-force attack scenario was successfully detected, an incident was generated, and the administrator was notified.
It is necessary to agree that the given example is rather primitive and does not reflect many architectural and functional features of SIEM systems as a class of information security tools. The attentive reader will correctly note that the final solution is more like WAF than SIEM.
In addition, the authors doubt the industrial applicability of open-source SIEM solutions and agree with most of the positions with the opinion of Anton Chuvakin - “Why No Open Source SIEM, EVER?” .
At the same time, the authors are confident that familiarity with SIEM systems using simple and clear examples (including code examples) will help researchers to understand the subject area in detail and, perhaps, inspire new discoveries. And let the number of information security incident management professionals grow!
All source codes of the projects used are available on GitHub in the AirSIEM open repository .
The authors will be glad to cooperate, all comments, comments and suggestions. Thank you for your attention, the main part of the lesson is complete, ready to answer your questions.
Source: https://habr.com/ru/post/353542/
All Articles