Nagios-traffic light from the Chinese blocks
As usual, for a start, a small “written statement of responsibility”.
Probably, many of those whom spinner sansara brought to the area of system administration and maintenance of servers in commercial quantities, thought about easing their difficult burden and fantasized more than once how to make it so that it was like in the song: “robots are injected, happy man” . I will share my recipe for gaining samadhi.
The main ways to monitor the monitoring system are few. The most common is reading electrical emails and peeping at the web interface. This functionality is usually available in any monitoring system. We will not speak about sending SMS and other esoteric. But there is one thing. Emails and web interfaces are not always convenient. And they do not always have the time and energy. In a situation where there is no dedicated specialist (or even an entire department) of monitoring, you need a means of signaling:
')
The initial conditions of the problem are as follows:
Thus the following configuration appears. On the Nagios server, the script checks the status and sends a command over the network to turn on the light bulb located in the tracking department.
The conditions of the problem are set, we proceed to the solution.
To begin with, we will define a method for obtaining monitoring status. In Nagios, this is done through the livestatus component. Setup and installation are described here . After installation, you can get the monitoring status in real time with the simplest script. This query is quite informative:
At the output we get three numbers in one line, separated by a space. This is the number of services in the state of CRITICAL, WARNING and UNKNOWN, respectively. At this point, the issue of monitoring monitoring status will be set aside for the time being, we will return to this later. I get the status from your favorite monitoring system at your discretion.
We turn to the most delicious part of our adventure, to the glands and wires.
Now it is necessary to select the transmission channel and the way of monitoring status indication. After some deliberation and searching, the choice fell on a set of infrared light bulbs, an infrared decoder and a USB-COM adapter. This kit connects to the workstation on which the Nagios client (nsclient ++) is deployed.
So, all the ingredients are listed, it remains to shake but do not mix.
Let's start with the light bulb.
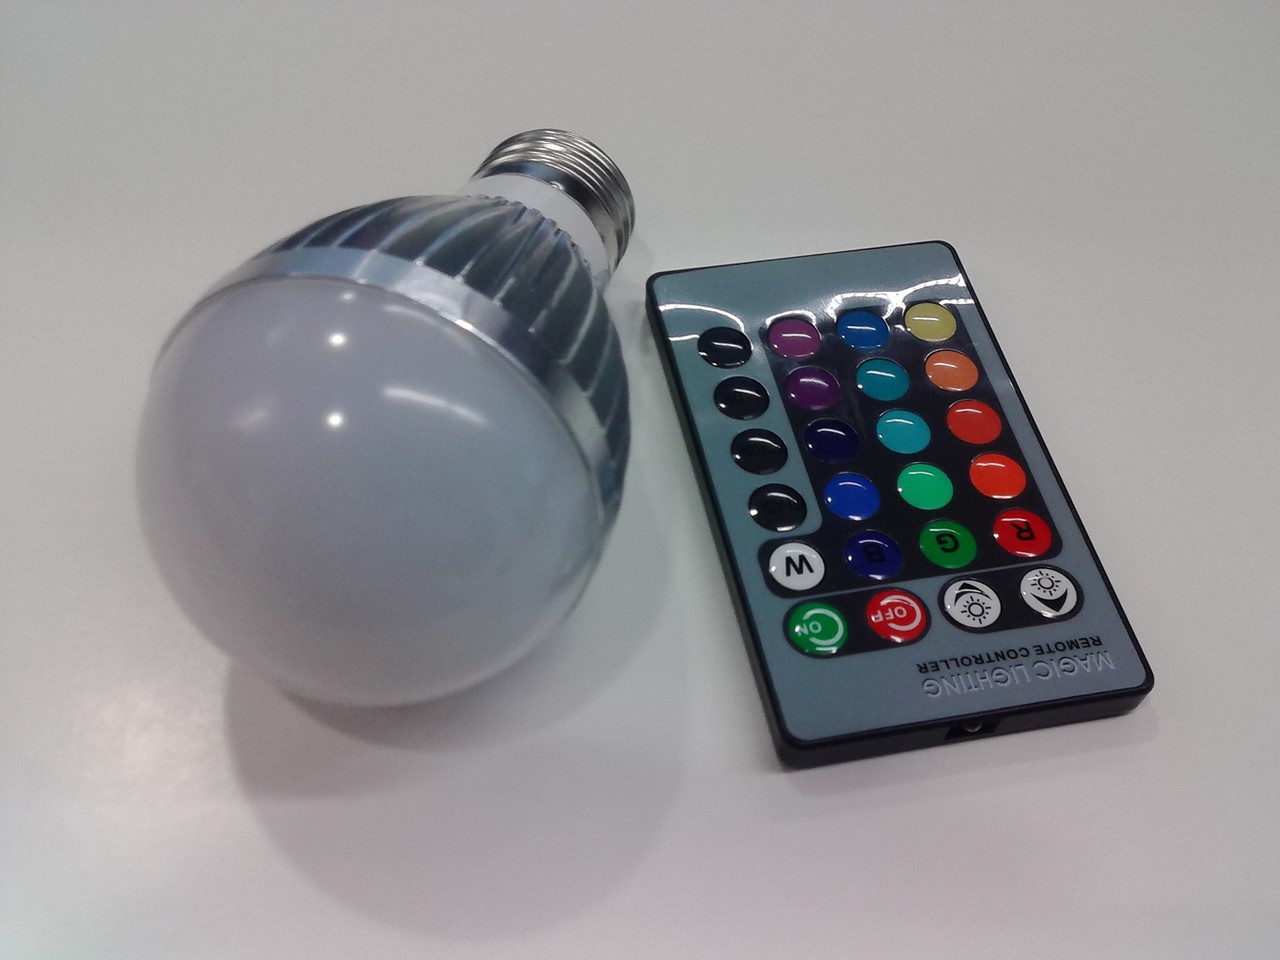
A light bulb (like all the other components) was bought on Ali. Search for the keywords “IR RGB LED bulb”. Very powerful is not needed, enough 3-5 watts. This is important because the lamp is in direct view all day, and too bright will interfere and blind.
And it is also important that it is controlled by the NEC protocol. Since the ready decoder supports only this protocol. At the same time do not forget to buy any table or floor lamp for the lamp, if you do not have it. Light bulb is enough to simply screw into the cover and turn on the 220V network.
The next component is an infrared decoder module (complete with a USB-COM adapter).
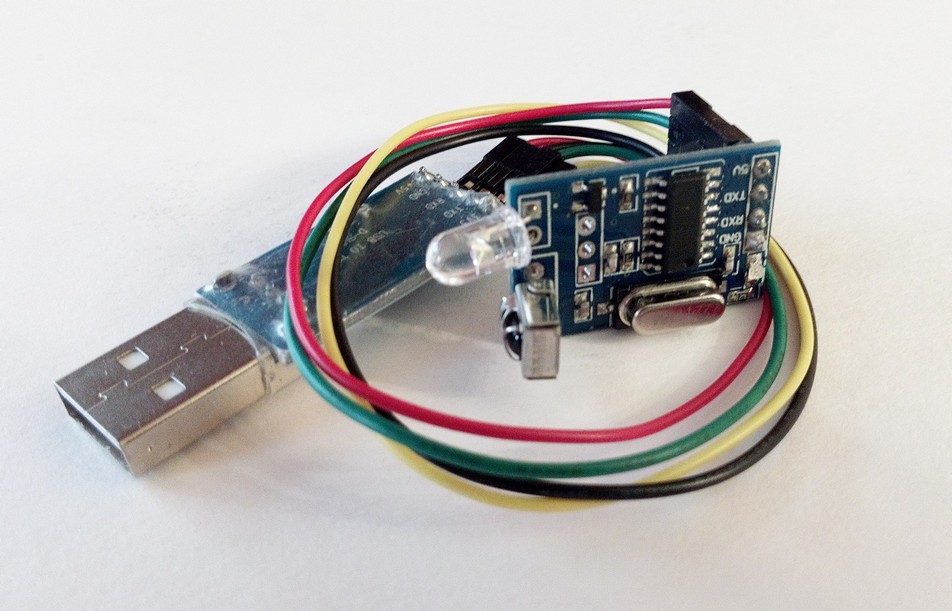
In Chinese bins, you can find the words “ir decoder”. For this beautiful module, there is even a diagram and a set of documentation, available here .
Any Prolific / Silicon Labs / FTDI / CH340 / etc will work as a USB-COM adapter. It is searched on Ali by the spell “serial converter usb ttl”. Just in case, let me remind you that at least two of the listed brands (FTDI and Prolific) are seen in an unequal struggle with the users of their products. This is reflected in the inoperability of fresh drivers with pirated adapters from China. It is necessary to roll back to previous versions of drivers. I will not dwell on this in more detail, there is a lot of information in the network.
Further narration implies that you have completed a tantric privacy session with a USB-COM adapter and an additional COM port has appeared in your system. Now we connect a decoder to the adapter (after disconnecting the adapter from the USB port!) To do this, it is enough to connect 8 pins with 4 wires (in no case the opposite!). Like that:
The time has come, with bated breath, connect our design to the USB port. If white smoke has not left the product, you can check the performance of the entire chain. It is necessary to make sure that the IR signal is received and sent, and also to record all codes from the control panel of the light bulb. For this perfect program RealTerm . I will not give screenshots, everything is simple and transparent. I do not want to deprive readers of the pleasure of slightly increasing the blood supply to their neocortex. It's nice.
Now, when you have intercepted codes of the “Enigma ” of the console in your hands, it remains to check the lamp triggering from the decoder. In the same program RealTerm send the received codes and watch the lamp trigger. There is a small nuance in sending codes. If you are too lazy to read the documentation on the adapter, I will give a hint. By default, after power on, the decoder works with the adapter at 9600. This is more than enough to send several bytes. But it is possible to increase the exchange rate with the adapter via RS232. In addition, before sending the code to the decoder, you must first send the prefix A1 F1. For example, when capturing the red button code, RealTerm issued 00 FF 09. In order for this code to get to the lamp through a decoder, you need to send the sequence A1 F1 00 FF 09. All codes are, of course, hexadecimal.
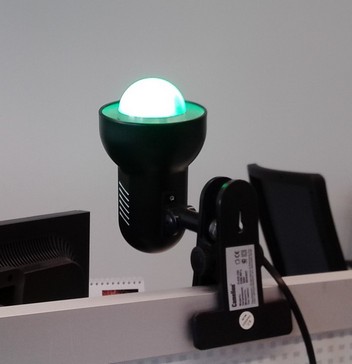
I hope you get to this stage without sacrifice or destruction. It remains to pack everything into the case and configure Nagios and the agent. As the body used the old mouse . Everything fits perfectly, looks stylish, fashionable, youth. The main thing is not to forget to drill a hole for the LED according to GOST.
Now a few words about the signaling algorithm. Since the light bulb is one, and simultaneously different services may be in different states, it means there may not be enough light bulbs for everyone. Therefore, it is necessary to display the worst state at the current time. It's time to return to the results of the status query via livestatus. Having received a string of numbers, we look at the very first number. If it is not equal to 0, turn on the red color and complete the processing of the query results. All other statuses are no longer interesting to us, since There are no channels to display them. If the first number is 0, look at the next number, etc. If all received values are equal to 0, then all services are in OK status and you can safely turn on the green color.
The number of services in the OK status is not requested and is not analyzed. In addition to displaying the status of services, the algorithm implements a kind of “heartbeat”. This is necessary to understand that the whole chain is working and working properly. Before any switching of the lamp, the violet color is turned on for one second, and then the corresponding one (red, yellow, orange or green). After turning on the desired color, a dimming code is sent three times to reduce the lamp brightness to a minimum. This lamp has only 4 gradations of brightness, and the lamp after switching always turns on the maximum.
That's the whole simple algorithm of the light bulb. Plus, the lamp turns off at night and turns on in the morning.
For those who liked the recipe, laid out the scripts and pieces of configs on the githab .
Everything is very simple there. If you do everything carefully and carefully, then you definitely ride on the quadrigue. Good luck.
- The goal of all the ridiculous gestures described in the article is one - to facilitate the monitoring of servers and applications.
- This bold trick can be repeated at home and at work, even unprepared athletes.
- I hope that this text will be useful not only to the adherents of Nagios, but also to the radiant Jedi of Zabbix and to the neophytes of other monitoring denominations.
- There will not be demonstrated the techniques of aerobatics in the use of a soldering station, oscilloscope and Ruby / Fortran / etc masterly possession. Everything described is primitive, disgusting, but cheap and cheerful. And most importantly - it works.
Probably, many of those whom spinner sansara brought to the area of system administration and maintenance of servers in commercial quantities, thought about easing their difficult burden and fantasized more than once how to make it so that it was like in the song: “robots are injected, happy man” . I will share my recipe for gaining samadhi.
The main ways to monitor the monitoring system are few. The most common is reading electrical emails and peeping at the web interface. This functionality is usually available in any monitoring system. We will not speak about sending SMS and other esoteric. But there is one thing. Emails and web interfaces are not always convenient. And they do not always have the time and energy. In a situation where there is no dedicated specialist (or even an entire department) of monitoring, you need a means of signaling:
')
- Not distracting from other tasks.
- Attracting attention in case of problems.
- Cheap and angry.
The initial conditions of the problem are as follows:
- Used by Nagios.
- All servers are located in DC, far from the support department office. Ordinary situation.
- Corporate policies prohibit the use of USB network devices (and drives, by the way). This means that it will not be possible to use ready-made WiFi and BT controllers of various LED garlands and other pleasures of the smart home and the Internet of things. It remains the good old serial port. Or USB-COM adapter. This wonderful device is not prohibited by domain policies.
Thus the following configuration appears. On the Nagios server, the script checks the status and sends a command over the network to turn on the light bulb located in the tracking department.
The conditions of the problem are set, we proceed to the solution.
To begin with, we will define a method for obtaining monitoring status. In Nagios, this is done through the livestatus component. Setup and installation are described here . After installation, you can get the monitoring status in real time with the simplest script. This query is quite informative:
GET services Stats: state = 2 Stats: state = 1 Stats: state = 3 Separators: 10 32 44 124 At the output we get three numbers in one line, separated by a space. This is the number of services in the state of CRITICAL, WARNING and UNKNOWN, respectively. At this point, the issue of monitoring monitoring status will be set aside for the time being, we will return to this later. I get the status from your favorite monitoring system at your discretion.
We turn to the most delicious part of our adventure, to the glands and wires.
Now it is necessary to select the transmission channel and the way of monitoring status indication. After some deliberation and searching, the choice fell on a set of infrared light bulbs, an infrared decoder and a USB-COM adapter. This kit connects to the workstation on which the Nagios client (nsclient ++) is deployed.
So, all the ingredients are listed, it remains to shake but do not mix.
Let's start with the light bulb.
A light bulb (like all the other components) was bought on Ali. Search for the keywords “IR RGB LED bulb”. Very powerful is not needed, enough 3-5 watts. This is important because the lamp is in direct view all day, and too bright will interfere and blind.
And it is also important that it is controlled by the NEC protocol. Since the ready decoder supports only this protocol. At the same time do not forget to buy any table or floor lamp for the lamp, if you do not have it. Light bulb is enough to simply screw into the cover and turn on the 220V network.
The next component is an infrared decoder module (complete with a USB-COM adapter).
In Chinese bins, you can find the words “ir decoder”. For this beautiful module, there is even a diagram and a set of documentation, available here .
Any Prolific / Silicon Labs / FTDI / CH340 / etc will work as a USB-COM adapter. It is searched on Ali by the spell “serial converter usb ttl”. Just in case, let me remind you that at least two of the listed brands (FTDI and Prolific) are seen in an unequal struggle with the users of their products. This is reflected in the inoperability of fresh drivers with pirated adapters from China. It is necessary to roll back to previous versions of drivers. I will not dwell on this in more detail, there is a lot of information in the network.
Further narration implies that you have completed a tantric privacy session with a USB-COM adapter and an additional COM port has appeared in your system. Now we connect a decoder to the adapter (after disconnecting the adapter from the USB port!) To do this, it is enough to connect 8 pins with 4 wires (in no case the opposite!). Like that:
| decoder | usb com |
|---|---|
| 5v | 5v |
| tx | rx |
| rx | tx |
| gnd | gnd |
The time has come, with bated breath, connect our design to the USB port. If white smoke has not left the product, you can check the performance of the entire chain. It is necessary to make sure that the IR signal is received and sent, and also to record all codes from the control panel of the light bulb. For this perfect program RealTerm . I will not give screenshots, everything is simple and transparent. I do not want to deprive readers of the pleasure of slightly increasing the blood supply to their neocortex. It's nice.
Now, when you have intercepted codes of the “
I hope you get to this stage without sacrifice or destruction. It remains to pack everything into the case and configure Nagios and the agent. As the body used the old mouse . Everything fits perfectly, looks stylish, fashionable, youth. The main thing is not to forget to drill a hole for the LED according to GOST.
Now a few words about the signaling algorithm. Since the light bulb is one, and simultaneously different services may be in different states, it means there may not be enough light bulbs for everyone. Therefore, it is necessary to display the worst state at the current time. It's time to return to the results of the status query via livestatus. Having received a string of numbers, we look at the very first number. If it is not equal to 0, turn on the red color and complete the processing of the query results. All other statuses are no longer interesting to us, since There are no channels to display them. If the first number is 0, look at the next number, etc. If all received values are equal to 0, then all services are in OK status and you can safely turn on the green color.
The number of services in the OK status is not requested and is not analyzed. In addition to displaying the status of services, the algorithm implements a kind of “heartbeat”. This is necessary to understand that the whole chain is working and working properly. Before any switching of the lamp, the violet color is turned on for one second, and then the corresponding one (red, yellow, orange or green). After turning on the desired color, a dimming code is sent three times to reduce the lamp brightness to a minimum. This lamp has only 4 gradations of brightness, and the lamp after switching always turns on the maximum.
That's the whole simple algorithm of the light bulb. Plus, the lamp turns off at night and turns on in the morning.
For those who liked the recipe, laid out the scripts and pieces of configs on the githab .
Everything is very simple there. If you do everything carefully and carefully, then you definitely ride on the quadrigue. Good luck.
Source: https://habr.com/ru/post/353280/
All Articles