UI tests in iOS project. Is there a profit and why are they being introduced at all?
There are quite a few people who did not just write UI tests at least once, but would do it in commercial projects, because this part of the development is very difficult to sell to the customer and argue to the manager why they are needed and why they take so long. The Novosibirsk company Improve Digital decided to take this step for a number of reasons, in particular, because the project under development is long-term and with great potential for further development.
Next, the transcript of Mikhail Domrachev 's speech at AppsConf 2017, during which he told how to implement UI tests in iOS projects in practice , and shared his thoughts when it is really necessary, and when - unnecessarily.
Looking ahead, we note that there are both pros and cons. But, in our opinion, a significant reduction in the number of design bugs without the enormous effort of manual testing is an indisputable advantage that anyone has to try on with the small difficulties that arise.
')

Let's start from afar, with a description of the project before we are faced with problems with the design.
We work with a fairly large foreign financial company, which has branches in different countries. Each country has its own mobile application, which has common functions, but differs in design and some specificity for a country related, for example, to legislation.
All our screens are implemented in tabular form. A table consists of a set of such bundles as a cell and a View-Model for it. That is, we can customize the cell content through the View-Model and set a specific design, in different countries it will look different, but in fact it is the same resource that lies in the Core framework.
The picture shows the screen. The top cell has its own View-Model, through which you can:
In the View-Model for the button you can set:
On average, about 70% of the functionality from the Core framework is reused in each new application, and only 30% of it is wound on to something new.
In the core framework is:
In each new application we have to add the following:
Although usually all cells are taken from Core. We can customize their design through the View-Model, they are quite versatile, and at the output we get a Lego design.
As a result, we have such a "Frankenstein".
This is the same screen, but in different countries. It has a common base implementation, that is, is programmed in Core. Differences in design, we implement through different categories for colors and pictures. If you look closely, you can hardly find 10 differences here, for example:
The second type of screen is more complicated. On the left - the basic implementation in the Core framework, on the right - the customer in a new country decided to display the same information in a slightly different way. Business logic is preserved, but it was necessary to make a new design. We used other cells (also from the Core framework), and also implemented a new functionality - credit card payment.
Everything seemed to be good, the customer was very pleased and offered to increase the speed and make new countries faster. But, naturally, we did not take everything into account.
To increase the momentum on the project, new developers were hired.
As already said, we have common resources for all countries, and they are in the public domain. A new developer (or even an old developer) could modify the parameters or move / change elements in the shared resources. Everyone, of course, understands that it is impossible to do this, but there have been cases all the same.
All our applications have the same style, for example, the same text alignment, certain cell colors, the same backgrounds. Over time, our designer began to forget about this single style and could make changes to the style of the base cell. But he did not even suspect that by doing so he could harm a completely different application, for which he was not even responsible. And the developer, who deals with them, also did not know that they hurt him. As a result, with manual testing, there were always some problems with the "left" design.
We immediately realized that the solution to these problems would be the introduction of Ul-tests. Before introducing ul-tests, we made a small analysis of the market of tools with the help of which it can be done on iOS projects, we did not consider other platforms.
We did the analysis on clear criteria:
Apple and Appium have such tools, while Calaba.sh is not in the basic configuration, but there is a Xamarin cloud where you can buy this function. Also, there are more than 2000 devices, where you can run tests. Test-recording is not always very good. When we do not write with our hands, we sometimes do not understand what is being generated. The absence of such a tool can play a plus. I will tell about it a bit later.
4. Experience with members of our team of any tool prior to our project.
All the guys in our team used only one tool - Apple. More precisely, they simply knew something about him. All voted unanimously for this tool. In principle, we had enough of the functions that it provides, other platforms were not so important to us.
I'll tell you about it a little more in detail.
iOS Ul testing is a rather young technology that was introduced in 2015. It is based on two things:
XCTest is based on only three classes:
It's simple - put the cursor in the function, press record. Runs a UI test. We click on the elements and generated code.
Let's see what he generated.
Of course, he doesn’t always do so badly, but I honestly tried to write down demos 3-4 times, and always ran into the same mistakes:
These minuses of UI test recording are not always encountered, but speed is important when writing UI tests. I want to write some functions quickly, beautifully, and at the same time I don’t want to come back and edit anything after test recording. It usually takes more time than you write yourself right away.
The first thing we encountered was the Stub manager , or rather, its absence. Prior to this, we did not implement unit tests on the project, and we didn’t emulate the connection to the network.
We wanted not to repeat test-recording errors and write tests that are cleaner and more accurate. This was helped by the Page object pattern . Few people know about him, but testers who write tests should be aware of.
We implemented the Snapshot tool for taking screenshots during the execution of our UI tests in order not only to see if our test fell while executing it, but also to see the result, to compare the design on the screens.
Consider in detail each item.
For some reason, it is considered that implementing network emulation is difficult. In fact, everything is done very simply with the help of the class NSURLProtocol . This is a class that allows you to predetermine the work of the URL loading system for iOS.
Everything is done in two steps:
When in an application you send a request to the network, the download system first checks to see if any of your NSURLProtocol's are registered. If so, then she addresses each of them in her own order and asks if it is possible to process this request. If we say yes, the request to the network is terminated, and we process it at the application level.
Only three methods need to be overridden:
A little more about startLoading, where all the magic happens.
Inside, we simply take the data from the cache
If we did not find this data, we simply create our own custom error, which will return to the request, as if it came from the network.
With Stub manager you only register your class. This is done through:
Everything is done very quickly, easily and works. So do not be afraid of this.
As I said, we decided to fight the drawbacks of test-recording and take a more responsible approach to writing UI tests. We tried to make the code cleaner, and applied the Page object pattern.
It is quite simple and is based on the fact that there must be some kind of layer between the tests and the screen for which the tests are written, where the reusable functionality is implemented. That is, all complex interactions with elements and all searches for elements on screens are sewn up there.
Benefits of Page object pattern:
We decided that it would be unnecessary to write a layer for each screen. We just wrote a common layer for the entire application, it is called XCTestUtils and consists of 3 components:
As you saw in the demo, to enter some text into textFields, a code is generated that clicks on each button. We have introduced the forceTap function - long press. When we click on textFields, we have a “Insert Text” or “Copy” die.
It turned out cool, and everyone was happy.
I will show a small demo about how we use the Page object pattern.
Through property FFElements, we access specific elements with a specific type and call methods to interact with them. We work with textFields like this: click, do a long press, and paste the text. It turned out only 6 lines - clear, readable, and, most importantly, working.
We run a UI test, it is run on the device, and we are looking to ensure that the design does not go. And we can and see.
Therefore, we decided to implement a tool such as Snapshot. It is part of the Fastlane group of tools, it is quite simple, it is easy to implement and it is of great benefit.
Snapshot benefits:
There are literally three steps required to deploy a snapshot.
We can specify in general all devices on which UI tests will be run, screenshots will be made in the same places on different devices.
In addition, we specify the scheme on which the UI tests are run, the folder where the result of all the screenshots will be stored, and the auxiliary settings.
We can also specify the languages in which we will run our UI tests. If you have a lot of localizations, you can specify all your localizations here and get screenshots with different languages at the output.
From a technical point of view, in the code itself you just need to add a specific file - SnaphotHelper. swift in target with tests. This file is generated in your project folder, when you do fastlane snapshot init, you just need to put it in the target.
Then we call inside the setup () method : [Snapshot setupSnapshot: app] inside all test cases where we want to take screenshots, and transfer XCUI Application there.
The last thing that remains is to simply run through the code to the places where we want to take a screenshot, specify the name of the screenshot with which the [Snapshot snapshot: @ "Name screen" picture waitForLoadingIndicator: YES] is generated , run from the terminal, make a fastlane snapshot and enjoy.
After passing the tests, there will be not only pictures from different screens, but an HTML page will be generated.

On it, all the pictures are divided into categories, for example, by device and localization, which you specified in Snapfile. True, the only negative - all these screenshots are sorted not by the sequence of their execution, but by name.
Before you decide to implement UI tests, you should pay attention to a few points:
In our project we received the following benefits :
I didn’t talk about it, but we have rather complicated routing. It may differ in different countries. We just check a specific element on each screen that is only on this screen, and if it is not there, it means that we are in the wrong place, something went wrong. So we check the routing.
But we also got small cons :
As I promised, at the end I’ll give my thoughts when it is really worth implementing UI tests.
Next, the transcript of Mikhail Domrachev 's speech at AppsConf 2017, during which he told how to implement UI tests in iOS projects in practice , and shared his thoughts when it is really necessary, and when - unnecessarily.
Looking ahead, we note that there are both pros and cons. But, in our opinion, a significant reduction in the number of design bugs without the enormous effort of manual testing is an indisputable advantage that anyone has to try on with the small difficulties that arise.
')
Backround
Let's start from afar, with a description of the project before we are faced with problems with the design.
- The project has been actively living and developing for 2 years, it can be called long-term.
- The development team is increasing.
- The project consists of many mobile applications that have common functionality.
- Developed the Core framework, which highlighted the overall functionality, and which is connected to each project in the form module.
We work with a fairly large foreign financial company, which has branches in different countries. Each country has its own mobile application, which has common functions, but differs in design and some specificity for a country related, for example, to legislation.
Technical side
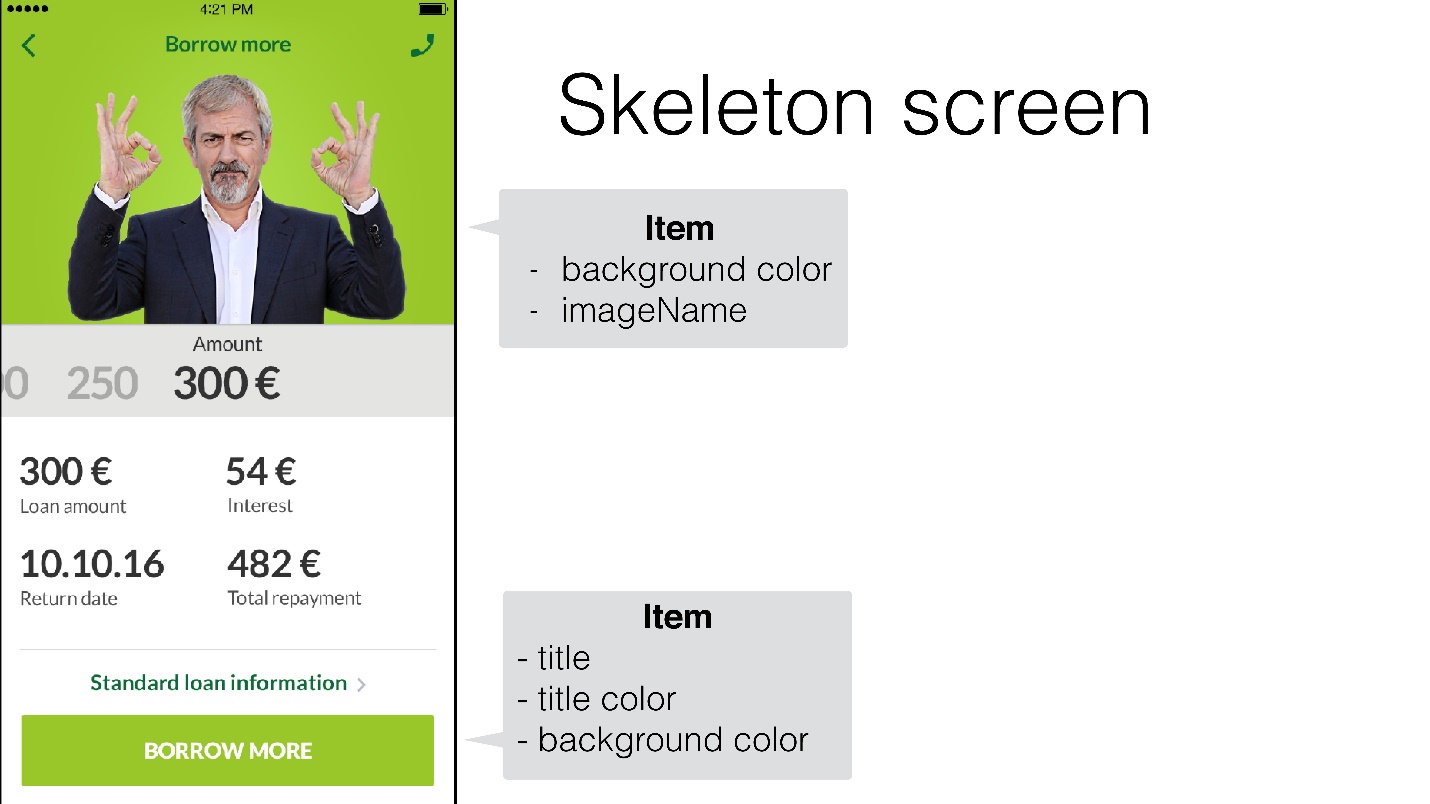
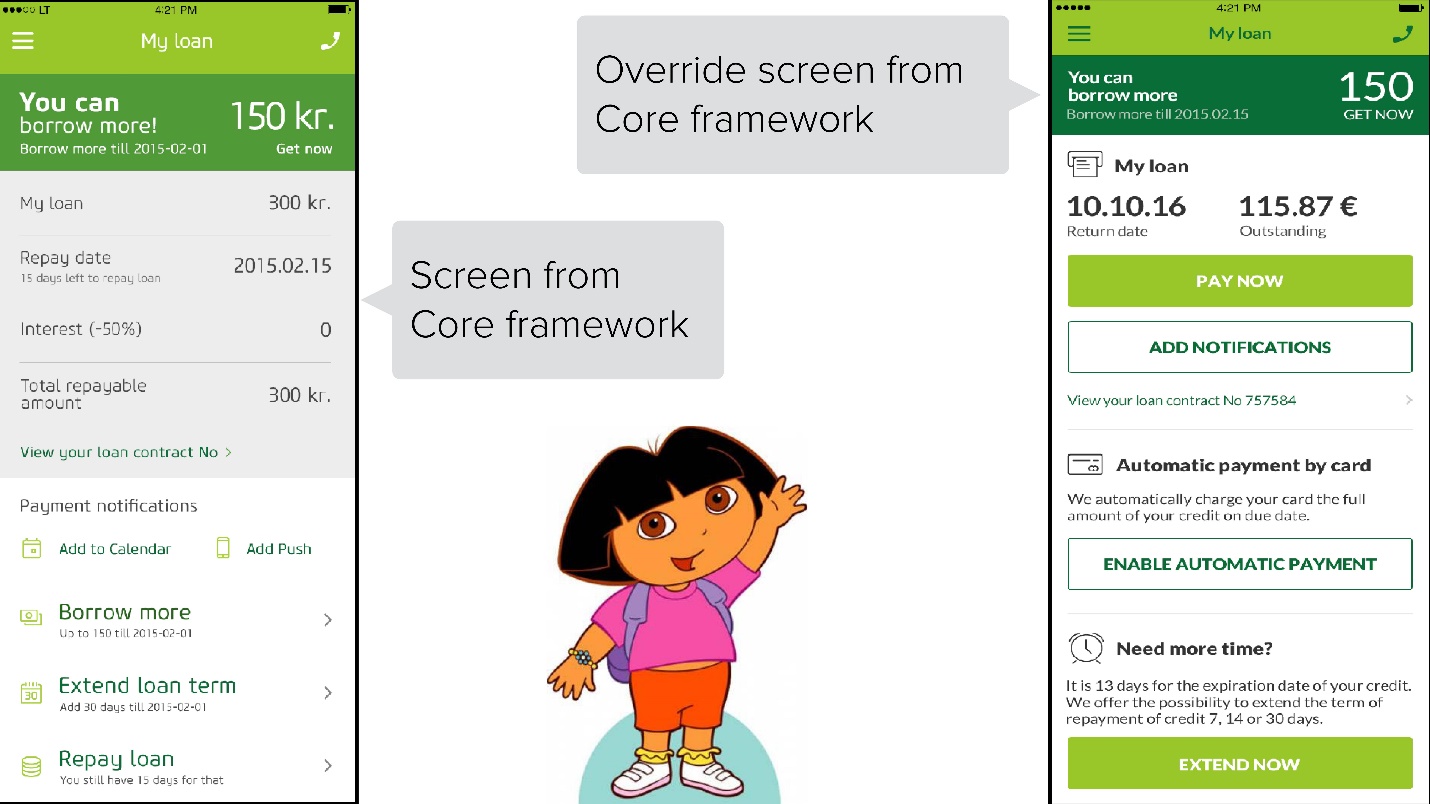
All our screens are implemented in tabular form. A table consists of a set of such bundles as a cell and a View-Model for it. That is, we can customize the cell content through the View-Model and set a specific design, in different countries it will look different, but in fact it is the same resource that lies in the Core framework.
The picture shows the screen. The top cell has its own View-Model, through which you can:
- customize the background color
- set the name of the image (imageName), which we take from resources.
In the View-Model for the button you can set:
- content (title)
- design (title color),
- background color of this button.
Core framework
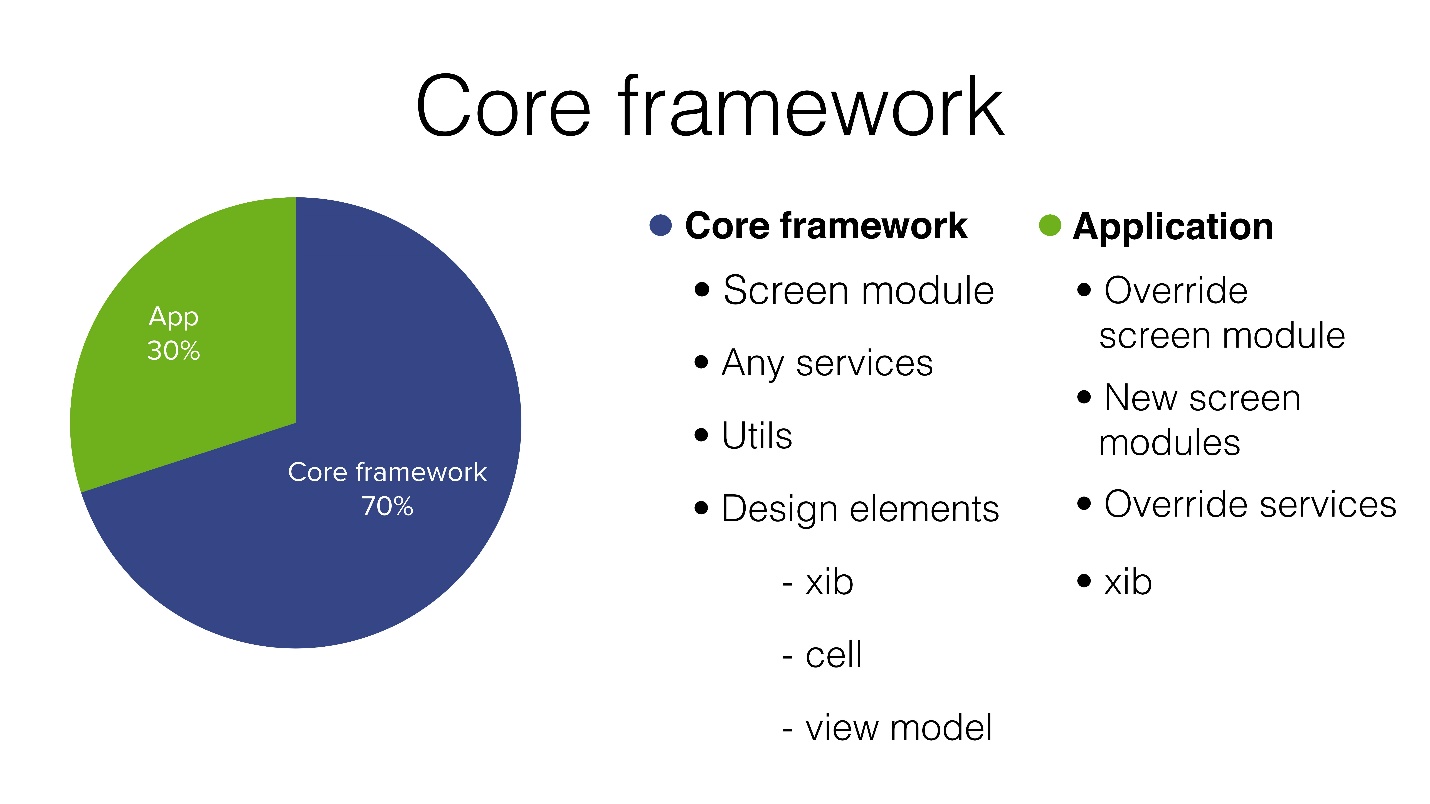
On average, about 70% of the functionality from the Core framework is reused in each new application, and only 30% of it is wound on to something new.
In the core framework is:
- Screen module - already ready screens in the form of modules. I call them modules, because some standard business logic has already been implemented there, routing the switch to other screens and has its own default design.
- Any services - various basic services, for example, for work with a network, with data caching, etc.
- Utils are categories (helper) that help you write code faster.
- Design elements - all design elements, which consist of:
- xib for all cells:
- cell classes for these cells
- View-Model .
In each new application we have to add the following:
- Override screen module - override screens from the Core framework.
- New screen modules — new screens if these functions are not reused anywhere.
- Override services - usually you need to override the Network-service, because APIs in all countries are not 100% identical.
- xib - sometimes you need to develop a new design for the cell.
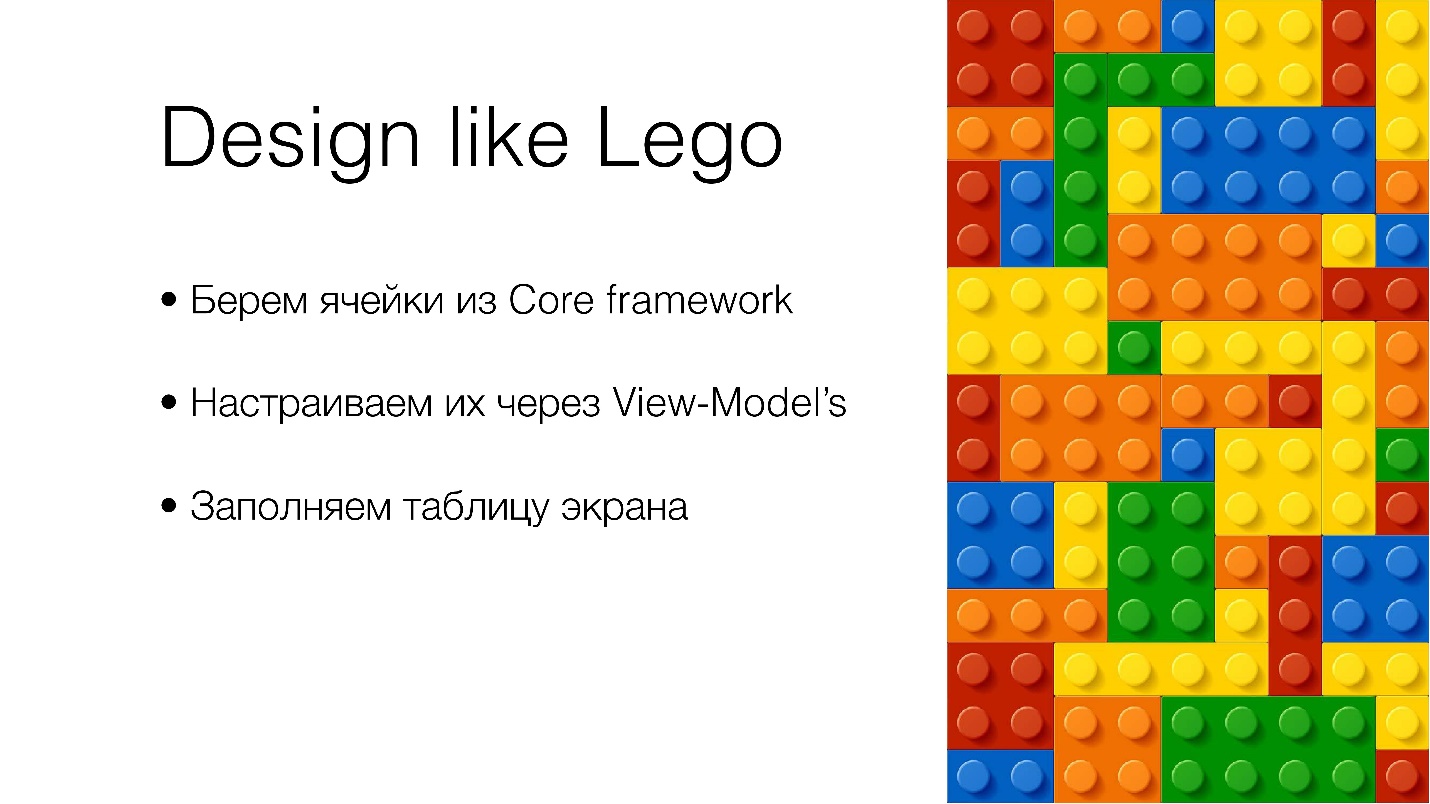
Although usually all cells are taken from Core. We can customize their design through the View-Model, they are quite versatile, and at the output we get a Lego design.
As a result, we have such a "Frankenstein".
Examples
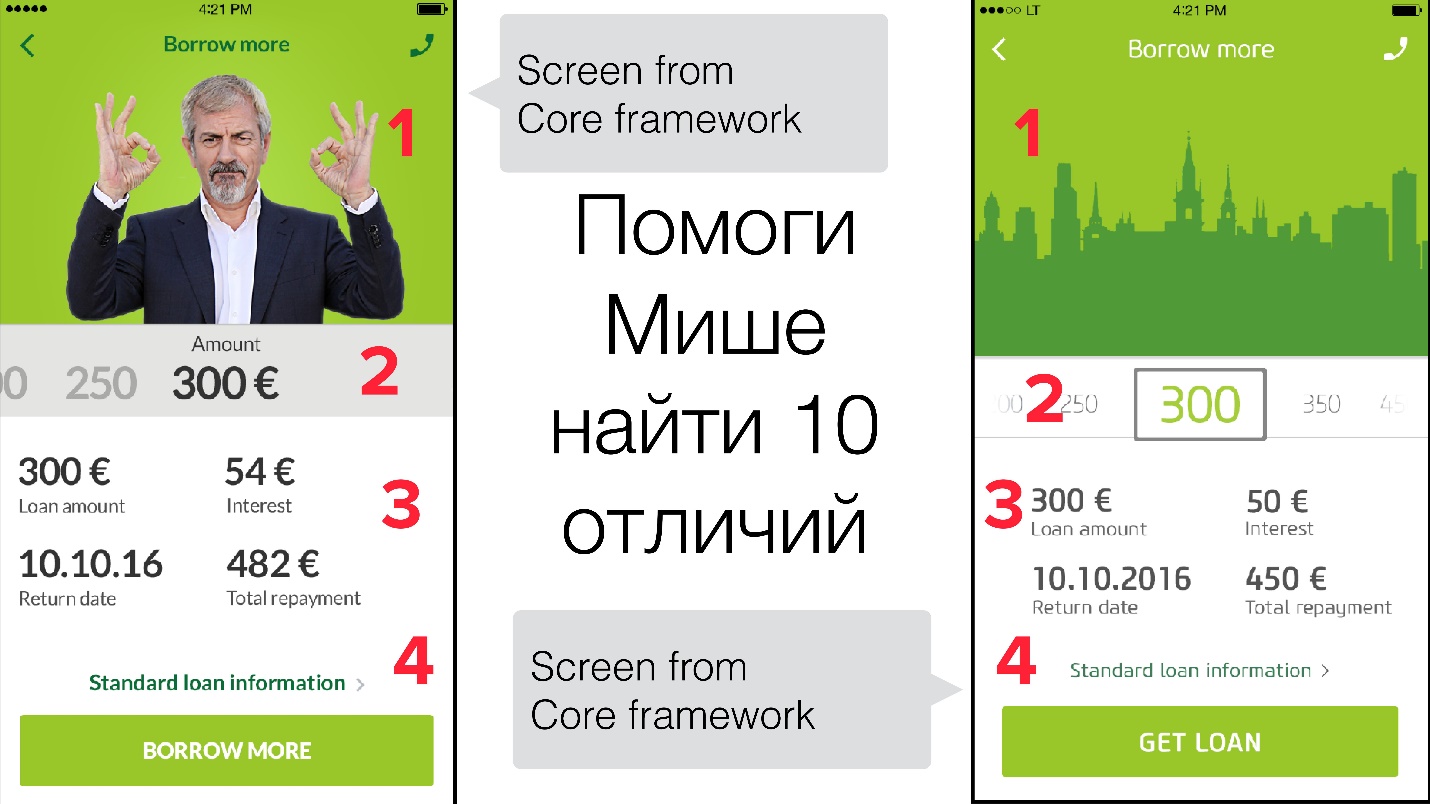
This is the same screen, but in different countries. It has a common base implementation, that is, is programmed in Core. Differences in design, we implement through different categories for colors and pictures. If you look closely, you can hardly find 10 differences here, for example:
- different pictures, in different countries in the resources there are different pictures with the same name;
- a different background at the calculator;
- various alignment of information and some other fonts;
- different color at the button
The second type of screen is more complicated. On the left - the basic implementation in the Core framework, on the right - the customer in a new country decided to display the same information in a slightly different way. Business logic is preserved, but it was necessary to make a new design. We used other cells (also from the Core framework), and also implemented a new functionality - credit card payment.
Everything seemed to be good, the customer was very pleased and offered to increase the speed and make new countries faster. But, naturally, we did not take everything into account.
Sources of problems
- New Developers
To increase the momentum on the project, new developers were hired.
- Shared resources
As already said, we have common resources for all countries, and they are in the public domain. A new developer (or even an old developer) could modify the parameters or move / change elements in the shared resources. Everyone, of course, understands that it is impossible to do this, but there have been cases all the same.
- The designer forgot about the uniform style of applications.
All our applications have the same style, for example, the same text alignment, certain cell colors, the same backgrounds. Over time, our designer began to forget about this single style and could make changes to the style of the base cell. But he did not even suspect that by doing so he could harm a completely different application, for which he was not even responsible. And the developer, who deals with them, also did not know that they hurt him. As a result, with manual testing, there were always some problems with the "left" design.
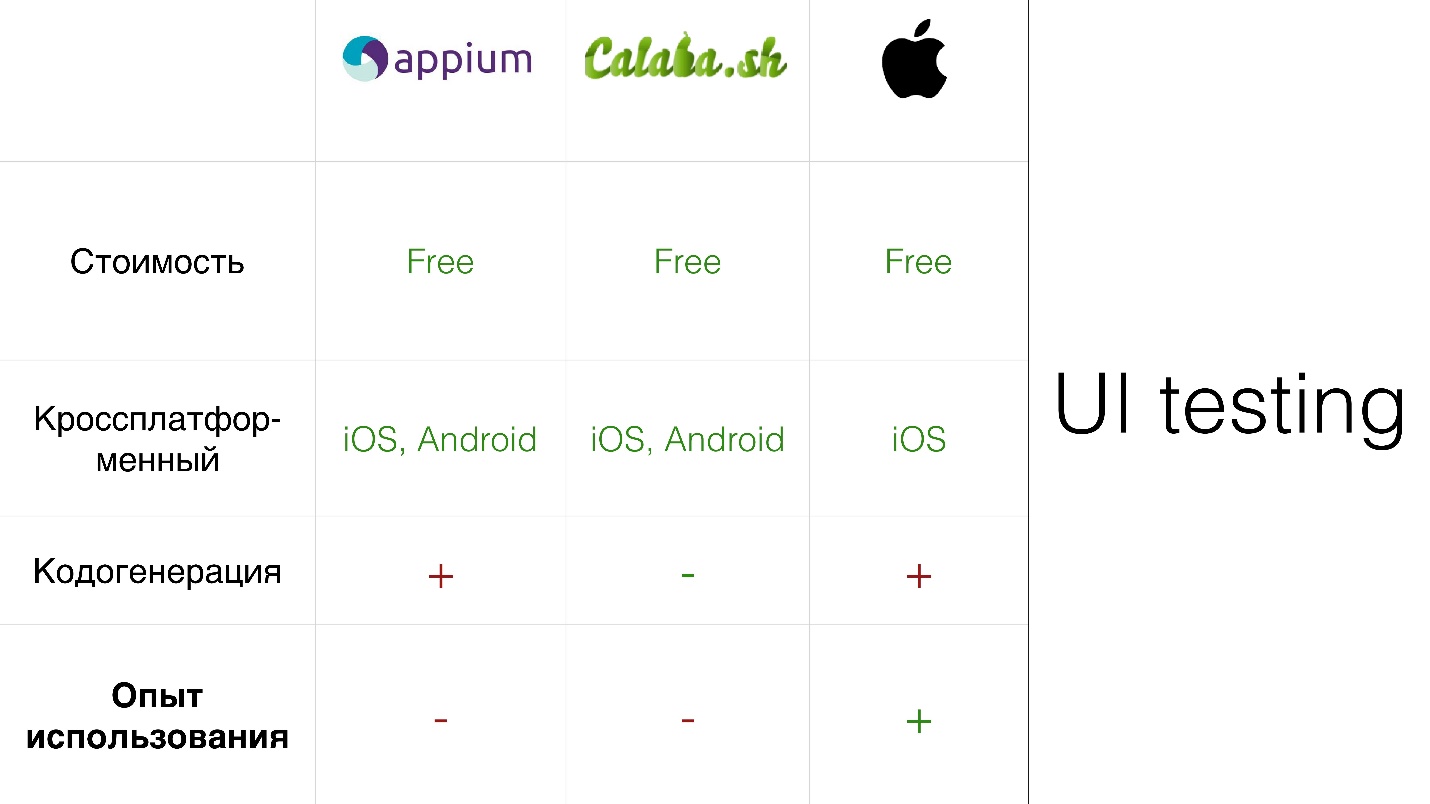
We immediately realized that the solution to these problems would be the introduction of Ul-tests. Before introducing ul-tests, we made a small analysis of the market of tools with the help of which it can be done on iOS projects, we did not consider other platforms.
Ul testing tools:
- iOS Ul testing from Apple;
- appium is now the most popular framework for writing uniform tests for different operating systems. You can write a general test and export it to different platforms.
- Calaba.sh - an open framework developed by Xamarin, also involves writing common tests for different platforms.
We did the analysis on clear criteria:
- Cost All our products in the basic configuration without any features are free, any developer can fasten them to their project and use.
- Cross platform This was not so important for us, but in the analysis we still considered this criterion.
- Kodogeneratsiya, that is, the possibility of test-recording - during the interaction with the UI elements generated the code of our test.
Apple and Appium have such tools, while Calaba.sh is not in the basic configuration, but there is a Xamarin cloud where you can buy this function. Also, there are more than 2000 devices, where you can run tests. Test-recording is not always very good. When we do not write with our hands, we sometimes do not understand what is being generated. The absence of such a tool can play a plus. I will tell about it a bit later.
4. Experience with members of our team of any tool prior to our project.
All the guys in our team used only one tool - Apple. More precisely, they simply knew something about him. All voted unanimously for this tool. In principle, we had enough of the functions that it provides, other platforms were not so important to us.
I'll tell you about it a little more in detail.
iOS Ul testing is a rather young technology that was introduced in 2015. It is based on two things:
- XCTest - a framework that allows you to write and run tests;
- Accessibility - allows people with disabilities to use Apple devices to the full. For UI tests, it provides the ability to interact with UI elements during the execution of UI tests.
XCTest is based on only three classes:
- XCUI Application - a kind of proxy between the application and tests;
- XCUIEIement - your UI element on the screen;
- XCUIEIementQuery - a request to search for an item that is on the screen by some criterion.
UI demo test recording
It's simple - put the cursor in the function, press record. Runs a UI test. We click on the elements and generated code.
Let's see what he generated.
XCUIApplication *app = app2; [app.buttons[@"start"] tap]; XCUIElement *element = [[[[app.otherElements containingType:XCUIElementTypeNavigationBar identifier:@“UIView”] childrenMatchingType:XCUIElementTypeOther].element childrenMatchingType:XCUIElementTypeOther].element childrenMatchingType:XCUIElementTypeOther].element; [element tap]; XCUIApplication *app2 = app; [app2.keys[@"t"] tap]; [app typeText:@“t"]; . . . [app typeText:@"c"]; [app2.keys[@“o"] [element tap]; Of course, he doesn’t always do so badly, but I honestly tried to write down demos 3-4 times, and always ran into the same mistakes:
- The XCUI Application was incorrectly initialized, did not do log and init for it, but equated some mythical variable app2, which had never been defined before. On the next screen, he did the same.
- Item found incorrect. The item has been exposed to AccessibilityNotifier, by which it should have searched for this item. But he did not see it, and began to search simply through childrenMatchingType.
Cons UI test recording:
- a lot of code;
- code that is not always readable - many times;
- not always working code;
- reuse of functionality is not implemented.
These minuses of UI test recording are not always encountered, but speed is important when writing UI tests. I want to write some functions quickly, beautifully, and at the same time I don’t want to come back and edit anything after test recording. It usually takes more time than you write yourself right away.
From theory to practice
The first thing we encountered was the Stub manager , or rather, its absence. Prior to this, we did not implement unit tests on the project, and we didn’t emulate the connection to the network.
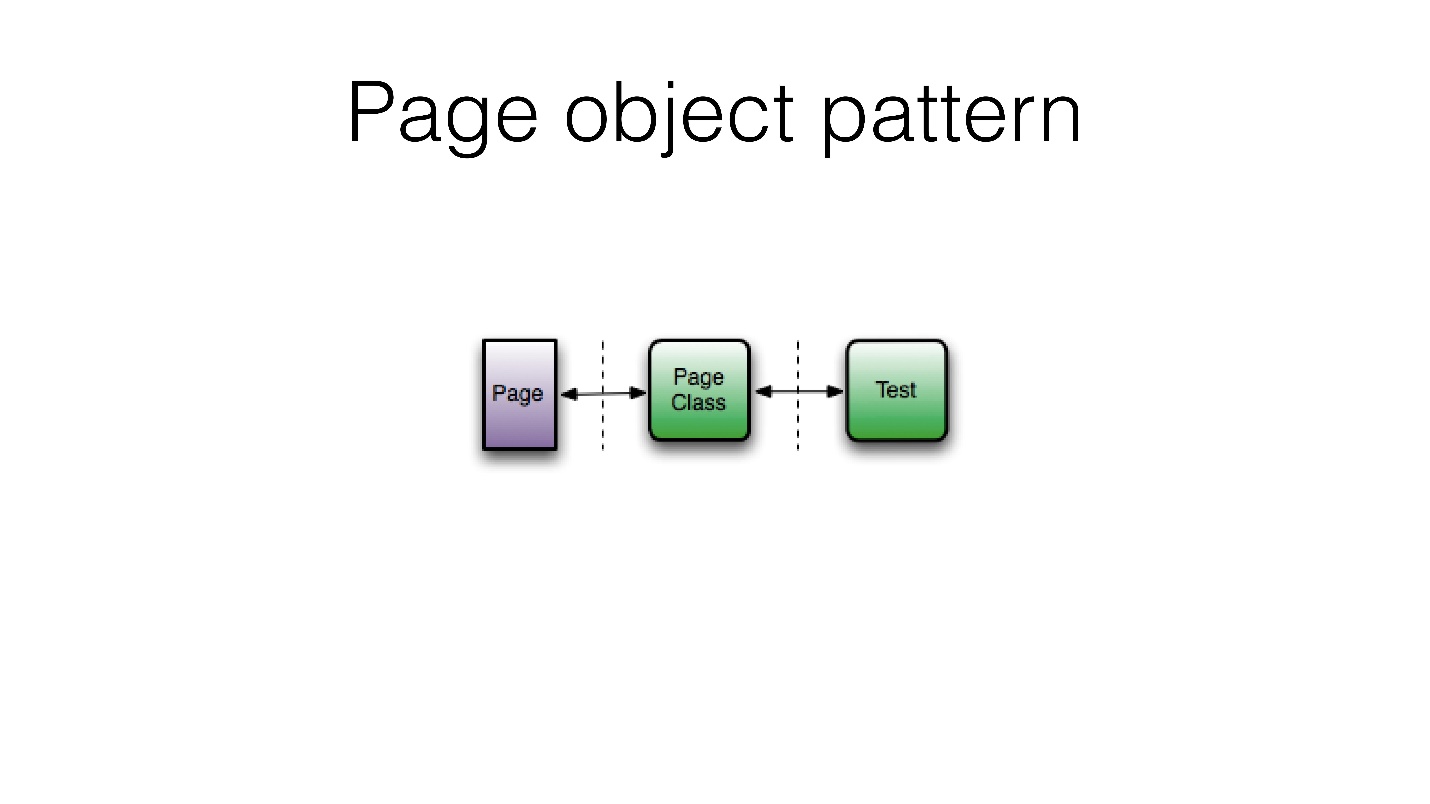
We wanted not to repeat test-recording errors and write tests that are cleaner and more accurate. This was helped by the Page object pattern . Few people know about him, but testers who write tests should be aware of.
We implemented the Snapshot tool for taking screenshots during the execution of our UI tests in order not only to see if our test fell while executing it, but also to see the result, to compare the design on the screens.
Consider in detail each item.
Stub manager
For some reason, it is considered that implementing network emulation is difficult. In fact, everything is done very simply with the help of the class NSURLProtocol . This is a class that allows you to predetermine the work of the URL loading system for iOS.
Everything is done in two steps:
- creating your own class that inherits from the NSURLProtocol;
- register it in the URL download system.
When in an application you send a request to the network, the download system first checks to see if any of your NSURLProtocol's are registered. If so, then she addresses each of them in her own order and asks if it is possible to process this request. If we say yes, the request to the network is terminated, and we process it at the application level.
Custom class NSURLProtocol
Only three methods need to be overridden:
- whether we can process this request (just returns true / false):
+(BOOL)canInitWithRequest:(NSURLRequest *)request - The startLoading method itself, where all the magic of data substitution takes place:
-(void)startLoading - at the end we tell the system that we have finished processing the request:
-(void)stopLoading
A little more about startLoading, where all the magic happens.
(void)startLoading NSData *cachedData if (cachedData) { NSHTTPURLResponse *response [self.client URLProtocol: didReceiveResponse: cacheStoragePolicy:]; [self.client URLProtocol:self didLoadData: cachedData]; [self.client URLProtocolDidFinishLoading: self]; } else { [self.client URLProtocol: self didFailWithError: } Inside, we simply take the data from the cache
(NSData *cachedData) . In our case, they are stored in different bundles, because for each test case for the same request there may be different answers. If there is such data, we create our own custom response, give it to the system, and also tell it to return the cached data.If we did not find this data, we simply create our own custom error, which will return to the request, as if it came from the network.
With Stub manager you only register your class. This is done through:
NSURLSessionConfiguration setProtocolClasses: @[[MyNSURLProtocol class]] Everything is done very quickly, easily and works. So do not be afraid of this.
Page object pattern
As I said, we decided to fight the drawbacks of test-recording and take a more responsible approach to writing UI tests. We tried to make the code cleaner, and applied the Page object pattern.
It is quite simple and is based on the fact that there must be some kind of layer between the tests and the screen for which the tests are written, where the reusable functionality is implemented. That is, all complex interactions with elements and all searches for elements on screens are sewn up there.
Benefits of Page object pattern:
- Readability code.
- Reuse of functionality.
- Centralized user interface.
Our approach
We decided that it would be unnecessary to write a layer for each screen. We just wrote a common layer for the entire application, it is called XCTestUtils and consists of 3 components:
- Class FFElements, in which the search for elements on the screen is sewn up. It has two functions: search by key and search by index.
@interface FFElements : NSObject -(XCUIElement *)objectForKeyedSubscript:(NSString *)key; -(XCUIElement *)objectAtIndexedSubscript:(NSUInteger)index; @end - Category to XCTestCase (Elements). Here we have specified certain FFElements that we need to write UI tests: cells, labels, buttons; text fields.
@interface XCTestCase (Elements) @property (nonatomic,readonly) FFElements *textFields; @property (nonatomic,readonly) FFElements *buttons; @property (nonatomic,readonly) FFElements *labels; @property (nonatomic,readonly) FFElements *cells; -(void)wait:(NSTimeInterval)interval; @end - A small category for XCUIEIement, which helps to work with textFields:
@interface XCUIElement (Utils) @property (nonatomic) NSString *pasteText; +(void)forceTap; @end
As you saw in the demo, to enter some text into textFields, a code is generated that clicks on each button. We have introduced the forceTap function - long press. When we click on textFields, we have a “Insert Text” or “Copy” die.
It turned out cool, and everyone was happy.
Demo
I will show a small demo about how we use the Page object pattern.
Through property FFElements, we access specific elements with a specific type and call methods to interact with them. We work with textFields like this: click, do a long press, and paste the text. It turned out only 6 lines - clear, readable, and, most importantly, working.
Snapshot
We run a UI test, it is run on the device, and we are looking to ensure that the design does not go. And we can and see.
Therefore, we decided to implement a tool such as Snapshot. It is part of the Fastlane group of tools, it is quite simple, it is easy to implement and it is of great benefit.
Snapshot benefits:
- makes screenshots;
- runs UI tests and takes screenshots in the right places;
- integrates easily with CI, because it runs from the terminal.
There are literally three steps required to deploy a snapshot.
- In the terminal, enter the command fastlane snapshot init. After that, it generates a file called Snapfile - this is the configuration file.
- Customize Snapfile.
- We indicate the places where we would like to receive a screenshot.
Snapfile
We can specify in general all devices on which UI tests will be run, screenshots will be made in the same places on different devices.
devices ([ "iPhone 6s" ]) scheme: "our scheme" output_directory: "./path/." stop_after_first_error: Bool reinstall_app: Bool clear_previous_screenshots: Bool Erase_simulator: Bool languages ([ "en-US" ]) In addition, we specify the scheme on which the UI tests are run, the folder where the result of all the screenshots will be stored, and the auxiliary settings.
We can also specify the languages in which we will run our UI tests. If you have a lot of localizations, you can specify all your localizations here and get screenshots with different languages at the output.
Time for screenshot
From a technical point of view, in the code itself you just need to add a specific file - SnaphotHelper. swift in target with tests. This file is generated in your project folder, when you do fastlane snapshot init, you just need to put it in the target.
Then we call inside the setup () method : [Snapshot setupSnapshot: app] inside all test cases where we want to take screenshots, and transfer XCUI Application there.
The last thing that remains is to simply run through the code to the places where we want to take a screenshot, specify the name of the screenshot with which the [Snapshot snapshot: @ "Name screen" picture waitForLoadingIndicator: YES] is generated , run from the terminal, make a fastlane snapshot and enjoy.
After passing the tests, there will be not only pictures from different screens, but an HTML page will be generated.
On it, all the pictures are divided into categories, for example, by device and localization, which you specified in Snapfile. True, the only negative - all these screenshots are sorted not by the sequence of their execution, but by name.
Pay attention!
Before you decide to implement UI tests, you should pay attention to a few points:
- Do not be afraid of Stub manager - it must be implemented 100%. On a real network, testing is bad.
- Page object pattern - you have to fight for the purity of your code, even if it is written for UI tests.
- You can easily embed the snapshot tool . If you have all the test cases ready, all the code has been written, this is done a maximum during noon.
In our project we received the following benefits :
- Reduced the number of bugs with the design to almost zero.
- Implemented a tool to quickly generate all screenshots of the application and integrated tests with CI.
- Made a check of the correct routing in the application.
I didn’t talk about it, but we have rather complicated routing. It may differ in different countries. We just check a specific element on each screen that is only on this screen, and if it is not there, it means that we are in the wrong place, something went wrong. So we check the routing.
But we also got small cons :
- The duration of the implementation of UI-tests . Create a basic framework: implement the Page object pattern, implement a Snapshot, Stub manager — this is done very quickly, but time is spent on thinking up test cases and debugging.
- Your tests will also need to be maintained when refactoring . In our case, this is done quite often. Of course, not much time is spent on this, but we should not forget about it.
As I promised, at the end I’ll give my thoughts when it is really worth implementing UI tests.
Use tests worth:
- If you have a long-term project - 100% UI tests need to be implemented. If you are constantly developing your product, you must be responsible for the quality of the design as well.
- In order to carry on a dialogue about Pixel Perfect and operate not with the words “something went there,” but give out screenshots of your entire application, where you will see what needs to be corrected.
- If you have complex logic of navigation in the application, you should also implement UI tests, this helps a lot. You can even not pay special attention to the design, but it is quite simple to implement the logic to test the navigation.
news
This year we decided to bring the conference on mobile development into a separate event - now AppsConf Moscow will be a completely separate event and will be held on October 8 and 9 . We plan to hold the largest mobile development event in Russia, gather activists from all mobile developer communities from across the country, and submit over 60 reports for more than 500 people.
But at the RIT ++ festival there will be many diverse related reports, for example, we received the following applications:
Mobile DevOps: we automate and improve the process of mobile development / Vyacheslav Chernikov (Binwell)
Microservices on the frontend in Mail.ru Mail / Egor Utrobin (Mail.ru)
Integration Testing of Scala Microservices / Yuri Badalyan (2GIS)
Examine the list of applications with which, however, the PC will still work for a month, and if you are interested, book your tickets .
Source: https://habr.com/ru/post/353276/
All Articles