Tips and Tricks for an IT Administrator: Deploying a Different OS with Windows Deployment Services
My colleague Gary Williams, a system administrator with extensive experience, shared tips on how to use Windows Deployment Services to deploy not just Windows. And today I offer his recommendations to your attention.
Windows Deployment Services (WDS) is a useful addition to the Windows platform. To deploy virtual machines from the Windows guest OS, this tool can be used directly out of the box. And after several deft hands movements, he is quite able to cope with the task of deploying Linux and VMware servers using the Preboot eXecution Environment (PXE) boot menu.
Among these manipulations - a couple of commands that are run from the command line. All you need to do is switch the PXE bootloader used by Windows to the bootloader for Linux. As a result, a menu item will be created that allows you to switch the boot from Linux PXE to that for Windows if necessary, and IIS will be used to operate the web interface to download the Linux configuration.
')
I use the configured WDS for deployment of Windows, CentOS and ESXi, about which I will tell in this post. I think that users of other platforms will find ideas here and for their deployment.
For our example, let's take a clean Windows server with a C drive : 60 GB under the OS and a 300 GB WDS disk for various WIM files that we need to install Windows and Linux.
Now you can boot the virtual machine using PXE, after seeing the standard Windows for WDS boot screen. This is worth doing in order to make sure that everything works, as we will further make changes to the main WDS functionality.
So, our WDS server is ready to deploy Windows images, but we want to be able to deploy Linux images as well. To do this, we will change the WDS bootloader to Linux PXE.
First we need a copy of sysLinux .
Important! The version should not exceed 3.86, otherwise it will not work with ESXi (since its installer is based on 3.26).
Unpacking sysLinux 3.86. zip into a temporary directory and then perform the following steps:
We need IIS for CentOS and ESXi installation files. I usually create just such a file structure of a web server on a VMDK with data:
- E: \ web - root folder pointed to by IIS
- E: \ web \ centos \ 7.x \ 7.1 - CentOS 7.1 installation files
- E: \ web \ vmware \ 6.5 - VMware 6.5 installation files
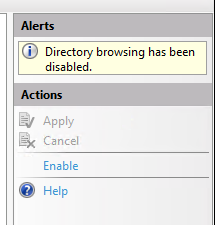
In the IIS settings, you need to enable the option to view the file structure so that the Linux and VMware installers can access the appropriate files.
To do this, launch the IIS management console, select the server you need, select its Default site and enable Directory browsing with the Enable command.
You can also enable HTTPS work.
Now you can add the ability to install Linux. Usually I follow these steps:
Finally, let's add the ability to install ESXi 6.5.
Perhaps this whole procedure will seem unnecessary to someone, but its result will allow you to use the PXE menu to switch to WDS and select any Windows OS that supports a WIM file. In addition, it can also be used to install Linux and VMware. You can also use other programs to your taste, for example, GParted or Memtest.
Windows Deployment Services (WDS) is a useful addition to the Windows platform. To deploy virtual machines from the Windows guest OS, this tool can be used directly out of the box. And after several deft hands movements, he is quite able to cope with the task of deploying Linux and VMware servers using the Preboot eXecution Environment (PXE) boot menu.
Among these manipulations - a couple of commands that are run from the command line. All you need to do is switch the PXE bootloader used by Windows to the bootloader for Linux. As a result, a menu item will be created that allows you to switch the boot from Linux PXE to that for Windows if necessary, and IIS will be used to operate the web interface to download the Linux configuration.
')
I use the configured WDS for deployment of Windows, CentOS and ESXi, about which I will tell in this post. I think that users of other platforms will find ideas here and for their deployment.
For our example, let's take a clean Windows server with a C drive : 60 GB under the OS and a 300 GB WDS disk for various WIM files that we need to install Windows and Linux.
Stage 1: Deploy WDS Server
- Install Windows Deployment Services and IIS on the server. This can be done through the Server Manager or using PowerShell:
Install-WindowsFeature –name Web-server -includemanagementtools Install-Windowsfeature –name WDS -includemanagementtools - Then you need to make changes to the DHCP pool. In particular, you can add more NICs to our server and configure a dedicated network, but I usually don’t do that, but instead I configure the primary DHCP server — I specify additional WDS DHCP attributes. Here are the settings I use:
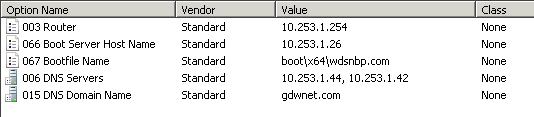
- Boot Server Host Name - enter the IP address of the WDS server.
- Bootfile Name - I specify the WDS executable file that I want to run on the client.
The remaining 3 settings have default values for DHCP. - On the WDS server, run the configuration wizard and complete the configuration.
- A couple of changes that I can advise to make in the setup:
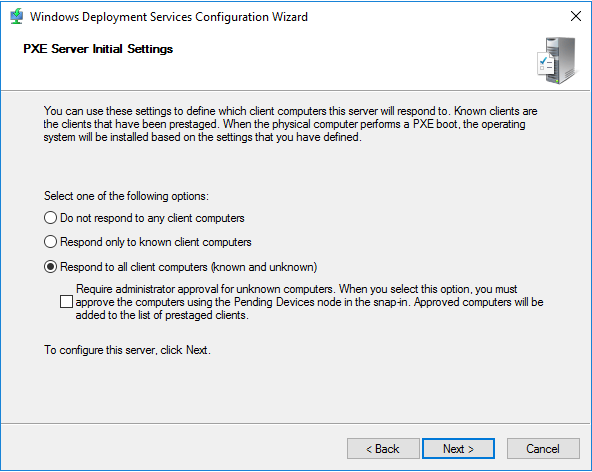
- You can integrate the server with Active Directory, because At this stage, we set the Windows settings, but I prefer a stand-alone server: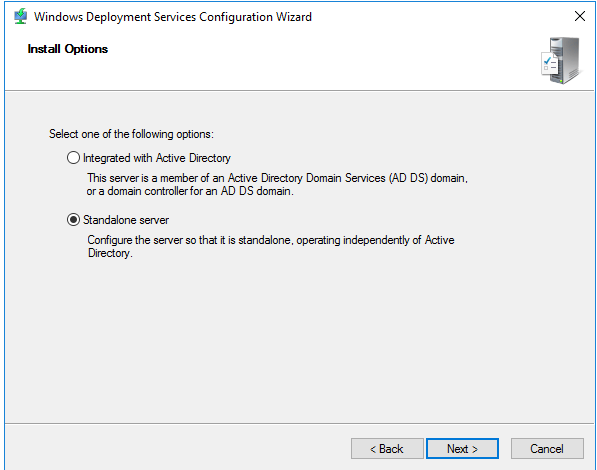
According to the specified setting, it will respond to requests from client machines and will not require any “dances” with AD:
- I usually change the path from C: \ RemoteInstall to E: \ RemoteInstall , where E: is the second disk mentioned above, which I intended for WIM files, Linux, etc.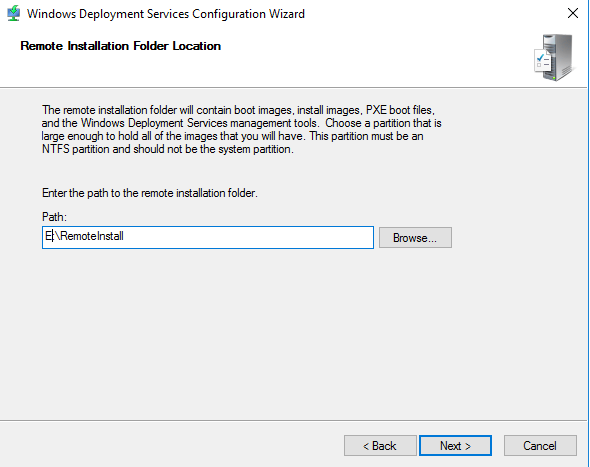
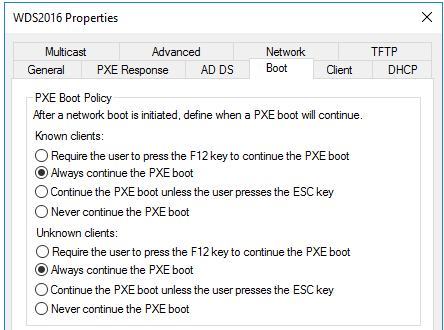
- Then you need to make changes to the PXE menu - to do this, you need to run the WDS installation UI, right-click on our server and in the properties on the Boot tab, change the F12 key to continue the PXE boot :
- You can then add .WIM files to our WDS server. We take the boot.wim and install.wim files with Windows 2016 ISO - and our server is prepared for the deployment of machines running Windows.
Now you can boot the virtual machine using PXE, after seeing the standard Windows for WDS boot screen. This is worth doing in order to make sure that everything works, as we will further make changes to the main WDS functionality.
Stage 2: Replacing the Windows Deployment Services Boot Loader
So, our WDS server is ready to deploy Windows images, but we want to be able to deploy Linux images as well. To do this, we will change the WDS bootloader to Linux PXE.
First we need a copy of sysLinux .
Important! The version should not exceed 3.86, otherwise it will not work with ESXi (since its installer is based on 3.26).
Unpacking sysLinux 3.86. zip into a temporary directory and then perform the following steps:
- Check for files
core \ pxeLinux.0
com32 \ menu \ vesamenu.c32
com32 \ modules \ chain.c32 - Rename the pxeLinux.0 file to pxeLinux.com .
- Copy the files into the remoteinstall \ boot \ x64 and remoteinstall \ boot \ x86 directories.
- Rename pxeboot.n12 to pxeboot.0 in x86 and x64 directories
- Then from the command line, run the following commands to change the bootloader to the Linux PXE loader:
wdsutil /set-server /bootprogram:boot\x86\pxeLinux.com /architecture:x86 wdsutil /set-server /N12bootprogram:boot\x86\pxeLinux.com /architecture:x86 wdsutil /set-server /bootprogram:boot\x64\pxeLinux.com /architecture:x64 wdsutil /set-server /N12bootprogram:boot\x64\pxeLinux.com /architecture:x64 - After that, in the x86 and x64 directories we create a subdirectory named pxeLinux.cfg , and in it we create a file with the name default and copy the following into it:Setting the boot menu
DEFAULT vesamenu.c32
PROMPT 0
NOESCAPE 0
ALLOWOPTIONS 0
# Timeout in units of 1/10 s
TIMEOUT 0
MENU MARGIN 10
MENU ROWS 16
MENU TABMSGROW 21
MENU TIMEOUTROW 26
MENU COLOR BORDER 30;44 #20ffffff #00000000 none
MENU COLOR SCROLLBAR 30;44 #20ffffff #00000000 none
MENU COLOR TITLE 0 #ffffffff #00000000 none
MENU COLOR SEL 30;47 #40000000 #20ffffff
MENU BACKGROUND flow.jpg
MENU TITLE PXE Boot Menu
#---
LABEL wds
MENU LABEL Windows Deployment Services
MENU DEFAULT
KERNEL pxeboot.0
#---
LABEL CentOS68
MENU LABEL CentOS 6.8
KERNEL /web/CentOS/6.8/images/pxeboot/vmlinuz
append initrd=/web/CentOS/6.8/images/pxeboot/initrd.img root=/dev/ram0 init=/Linuxrc ramdisk_size=100000 ks=https://[IP of your WDS server]/CentOS/6.8/centos-base-ks.cfg
#---
LABEL CentOS72
MENU LABEL CentOS 7.2
KERNEL /web/CentOS/7.2/images/pxeboot/vmlinuz
append initrd=/web/CentOS/7.2/images/pxeboot/initrd.img
#---
LABEL VMWare500U3
MENU LABEL VMWare 5.0.0 U3
KERNEL /web/VMWare/5.0.0/U3/mboot.c32
APPEND -c /web/VMWare/5.0.0/U3/boot.cfg
#---
LABEL VMWare553b
MENU LABEL VMWare 5.5 U3b
KERNEL /web/VMWare/5.5.0/U3b/mboot.c32
APPEND -c /web/VMWare/5.5.0/U3b/boot.cfg
#---
LABEL VMWare60
MENU LABEL VMWare 6.0
KERNEL /web/VMWare/6.0/mboot.c32
APPEND -c /web/VMWare/6.0/boot.cfg
#---
LABEL VMWare65
MENU LABEL VMWare 6.5
KERNEL /web/VMWare/6.5/mboot.c32
APPEND -c /web/VMWare/6.5/boot.cfg
#---
LABEL Abort
MENU LABEL AbortPXE
Kernel abortpxe.0
#---
LABEL local
MENU LABEL Boot from Harddisk
LOCALBOOT 0
Type 0x80
Stage 3: Edit IIS Settings
We need IIS for CentOS and ESXi installation files. I usually create just such a file structure of a web server on a VMDK with data:
- E: \ web - root folder pointed to by IIS
- E: \ web \ centos \ 7.x \ 7.1 - CentOS 7.1 installation files
- E: \ web \ vmware \ 6.5 - VMware 6.5 installation files
In the IIS settings, you need to enable the option to view the file structure so that the Linux and VMware installers can access the appropriate files.
To do this, launch the IIS management console, select the server you need, select its Default site and enable Directory browsing with the Enable command.
You can also enable HTTPS work.
Stage 4: Add Linux
Now you can add the ability to install Linux. Usually I follow these steps:
- Download the most “light” version of ISO from CentOS, mount the ISO and copy the contents to the E: \ web \ centos \ 7.x \ 7. [Version] directory (or another one with the same clear name).
- After this, you can add, for example, a startup file (kickstart file) for greater automation. For example, I personally add the following piece to the default file pxeLinux.cfg :
LABEL CentOS72 MENU LABEL CentOS 7.2 KERNEL /web/CentOS/7.2/images/pxeboot/vmlinuz append initrd=/web/CentOS/7.2/images/pxeboot/initrd.img inst.repo=[IP of your WDS server]/CentOS/7.2 ks=[IP of your WDS server]/CentOS/7.2/centos-base-ks.cfg
Step 5: Add VMware
Finally, let's add the ability to install ESXi 6.5.
- Similar to step 4, you need to copy all the files from the VMware ISO image to the appropriate directory on our WDS server.
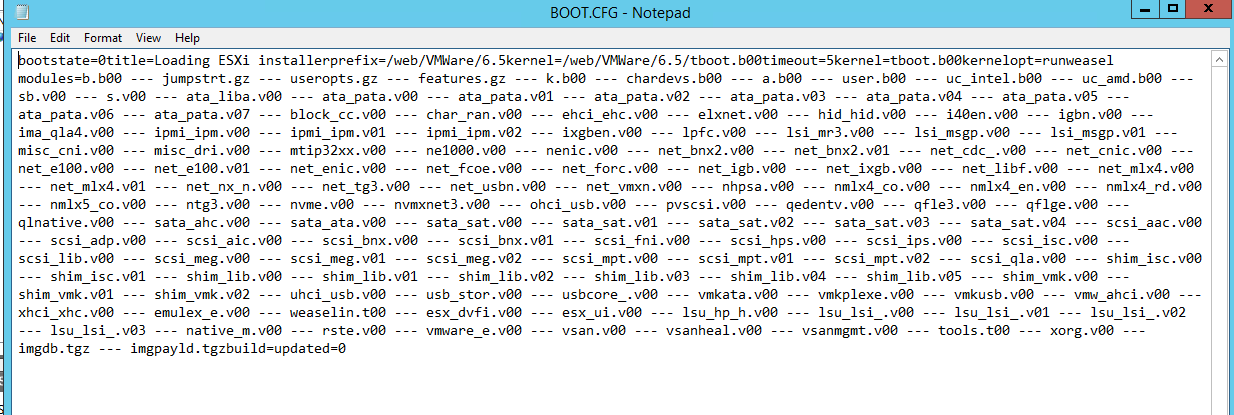
- Then you need to edit the boot.cfg file in the VMware directory and remove spaces. The file will look like this:
Conclusion
Perhaps this whole procedure will seem unnecessary to someone, but its result will allow you to use the PXE menu to switch to WDS and select any Windows OS that supports a WIM file. In addition, it can also be used to install Linux and VMware. You can also use other programs to your taste, for example, GParted or Memtest.
Source: https://habr.com/ru/post/353274/
All Articles