Creating a terminal system in UE4
Introduction
Our team consists of two members:
Sertaç Ogan
My name is Sertaci, I do gameplay programming. I have been developing projects on the Unreal Engine for about 3.5 years. Although my position is called “game programmer”, I like programming UIs too. I worked and continue to work on various projects published on Steam.
')
I also organize meetings on the Unreal Engine in Turkey . Over the past year I have organized many events and continue to organize them. Along with these events, I am thinking about organizing workshops on game development in conjunction with universities and high schools. In Turkey, there are many people who want to develop games and I like to share my experience, because when you share information, it becomes more!
In addition, I am a member of the Unreal Engine community version 4.18. Of course, even a small part in the development of this amazing engine is a great pleasure.
Kemal Gunel (Kemal Günel)
My name is Kemal, I am a 3D artist. Almost 10 years I have worked in the film and gaming industry. I usually do modeling and lighting. For the past four years I have been more focused on lighting. I use the Unreal Engine for 3.5 years. During this time I managed to work on various game projects and a lot of short and full-length films. I'm trying to combine things that I learned in the movie and that I discovered in the game development process. I share all this in the course format on my pages on Artstation and Youtube , where possible by helping other developers.
I also try to answer questions asked during participation in seminars and webinars, as well as at events organized by universities.
about the project
In this article we will try to explain how the terminal and puzzle systems, which are the basic mechanics of the TARTARUS game, work. We believe that the article will be useful for other developers as a demonstration of what the Unreal Engine 4 and the blueprint system is capable of. We will try to tell you as much as possible about the problems that have arisen and about their solutions. But before turning to the systems of terminals and puzzles, we would like to briefly tell about the project.
At its core, TARTARUS is a text-based first-person game. Your task is to save yourself and the ship with the failed systems from falling on the planet Neptune. The player uses the "terminal", as well as mechanical tools, which we describe below. The game is released on November 22.
We designed and implemented a terminal system based on our own needs. But in essence it is applicable to any projects. Below we describe the process of its creation.
Interface programming
First of all, I want to talk about the logical implementation of the process. If explained in simple terms, it is formed on the basis of the receipt and processing of player input. Especially for this, we created Widget Blueprint . The most important part here is that we had to make some changes in order to get player input. Otherwise, the OnKeyDown function could not intercept keystrokes.

After making all the necessary changes and transferring the focus to the interface, we can intercept player input. We will use the following scheme:

The most important part here is getting the names of user-pressed keys using the Key Get Display Name function. Further actions are performed in subsequent stages of the process.
Now we can receive input of the player and record the keys pressed by it. It is very important to break the task into parts in this way. We successfully solved the first part of the problem.
At the further stages we will process the received input and create a decision-making mechanism on its basis.
To process input, we first need to integrate it. We pass each key pressed to a String variable created specifically for this.
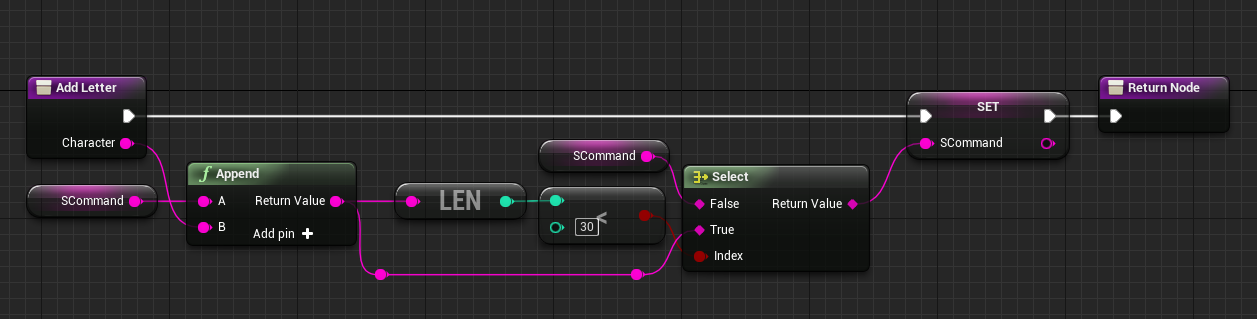
We have integrated all input received from users. But at this stage we have a small problem. The Key Get Display Name function returns values of the form Space, Comma, Period, Hyphen , as it returns the names of the keys. Therefore, we need to expose such keys to the processing process and convert them to the values we need.

To do this, we created a function that instead of the names of the keys pressed returns the corresponding characters. Later we integrated it into the previously created scheme.

The next step will be processing the received commands based on the standards we have created and their influence on the game process. But since the standards will differ from the system we want to create, I will briefly describe the standards we used for Tartarus.

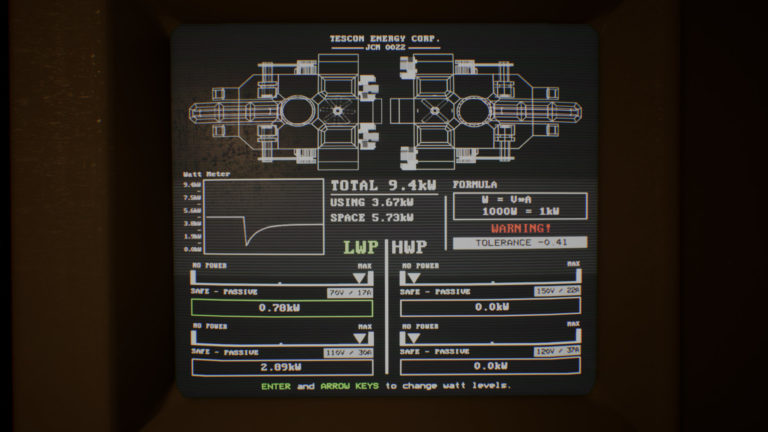
In the terminals developed by us for Tartarus there are several commands set in the system and their parameters. We recognize them and execute the necessary process based on the returned commands and parameters.
We perform these processes at the moment when users press the Enter key, that is, at the time of confirmation of the entered command. We share user-verified commands based on the standards we set.
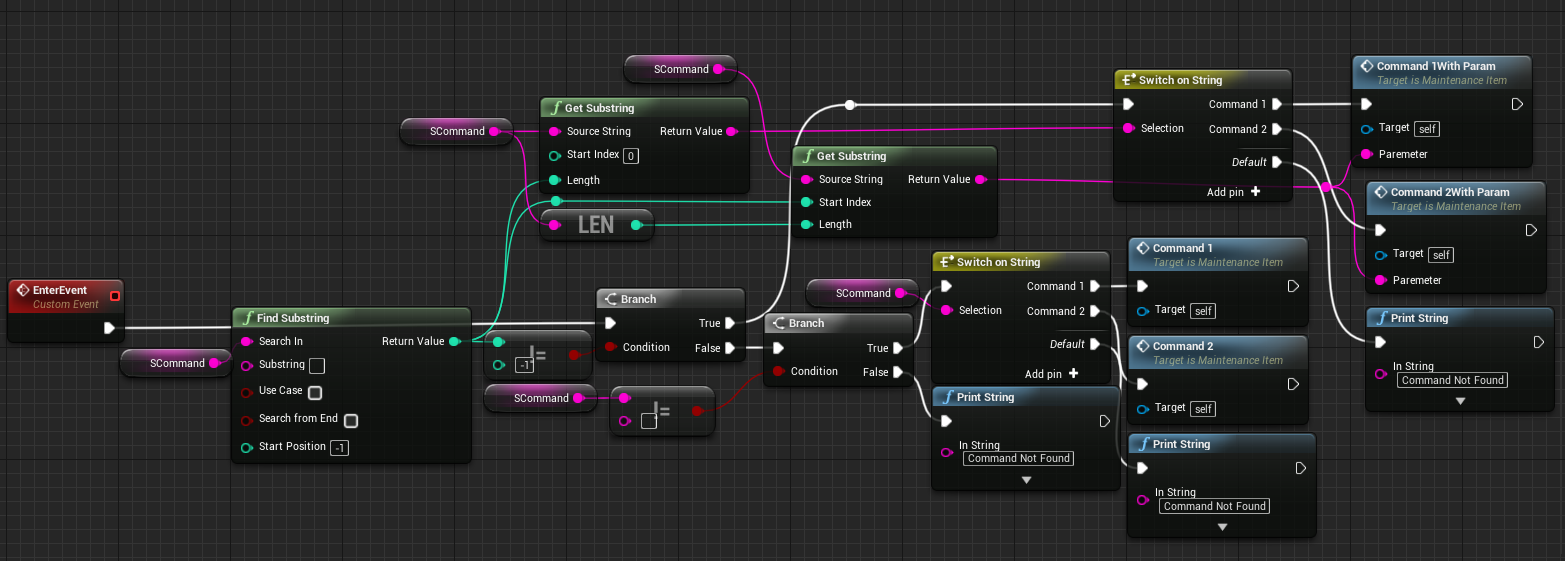
Some commands can be used without parameters. We determine this based on whether a space has been entered in the entered command. Later we created a decision-making mechanism based on two situations.
As I said at the beginning of the article, the system described above can vary greatly depending on which system you want to create. Therefore, you will need to set your own standards.
In the next step, we will construct the interface and make the system work. But first, I want to explain the logic of the system.

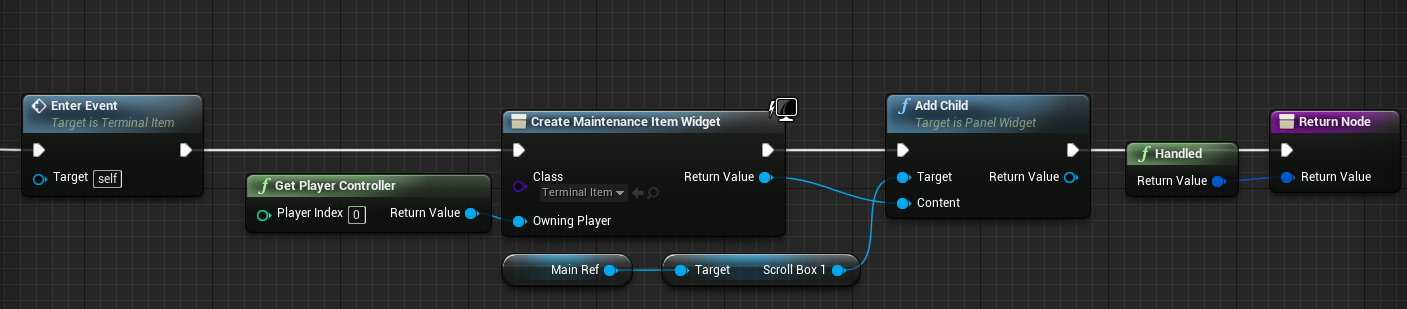
It is created in the form of two Widget Blueprints, which include the system interface and command lines. The first widget is MainWidget , which contains background processes and design. The second widget is ItemWidget, in which we recorded the commands described above. The command lines, that is, ItemWidget , are located in the ScrollBox located in the MainWidget , and when you press Enter, a new version is added.


After completing the design phase, we need to process the commands after pressing Enter, and then add a new ItemWidget to the ScrollBox .
In terms of logic, the system works in this way. After this stage, we will display our 2D interface screen on the models in the scene.
Material
We wanted the system developed by us to be changed according to our requirements. Due to this, we would not have to reinvent every terminal, the process of creativity would become more convenient, and problems would arise much less. For a start, we need a special “material”, while it is necessary to pick it up so that it fits our Lo-fi universe.
The most important aspect for us was the science fiction style. We wanted to create CRT screens so that the terminal displays look bright, vibrant and nostalgic. We will explain how we managed to create them in several stages.

Similar to the “standard” material shown above, we used all the terminals. We wanted it to be as simple and clear as possible. Let's look at it in a little more detail.

First we need to determine the limit of "visibility" of our terminals. A “capture camera” located in a scene must constantly look at the surface and display user input from various points in the system’s hierarchy, while ensuring minimal delays and maximum speed. To achieve this, we tied it to the “Texture Target” section, which is one of the “camera” sections, creating the “Canvas Render Target”. Then we created the materials “Terminal” using this texture.

Thanks to this rather simple but effective way, we were able to answer many questions, for example, whether the borders and restrictions of symbols should be visible on the screen. Later we finished the materials, adding details.

Scratches on glass screens are implemented using the Roughness Map, as in the example below (image taken from Google).

Another important parameter is the maximization necessary to create a Scanline effect that provides the illusion of sweep lines. Thanks to this texture, we got a more pleasant image, which allowed us to get rid of the monotony of the screen. It seems we were quite able to convey the retro mood.

Design drafts can be prepared in any 2D editor. The area of brighter shades in the upper part is the place that creates the effect of the scanning lines we have invented. A little later, we consider the principle of its work.

As you can see, we use three basic textures. Let's look at how and why we manage these materials. It seemed particularly important to us to control the screen size, especially for Roughness and Scanline textures. They should not be too big or too small. We need to solve the problem of imitating the effect of “Ghosting”, which occurs when the concentration of many lines is concentrated, for example, texts with it disappear with a delay. In addition, we do not want to touch the texture, combined with the value of Roughness. Therefore, we chose to divide the task into two parts.


The part that is shown in the upper left corner is the part where we manage the size of the scratches on the terminal screens. We repeat the texture using the Multiply node, the Texture Coordinate node and the Scalar Parameter, thus achieving the desired effect. In the upper right corner, we repeat the Scanline texture and increase the number of lines using the same nodes. Using the Panner node, we adjust their frequency and position. Another important point is that the terminal screens are made of glass. But instead of the translucent properties or masks of materials that create the classic effect of glass permeability, we wanted to use Opaque and provide brightness with the Roughness value. The diagram is shown below.

Finally, we tried to achieve the desired screen brightness using the Emissive value, again using the ScalarParameter. The result is somewhat similar to the example shown in the Material Editor. If you look closely, you will notice scratches.

Finally, we made Material Instance from the created material so that when changes are made we don’t have to go back and we can work faster and more efficiently.
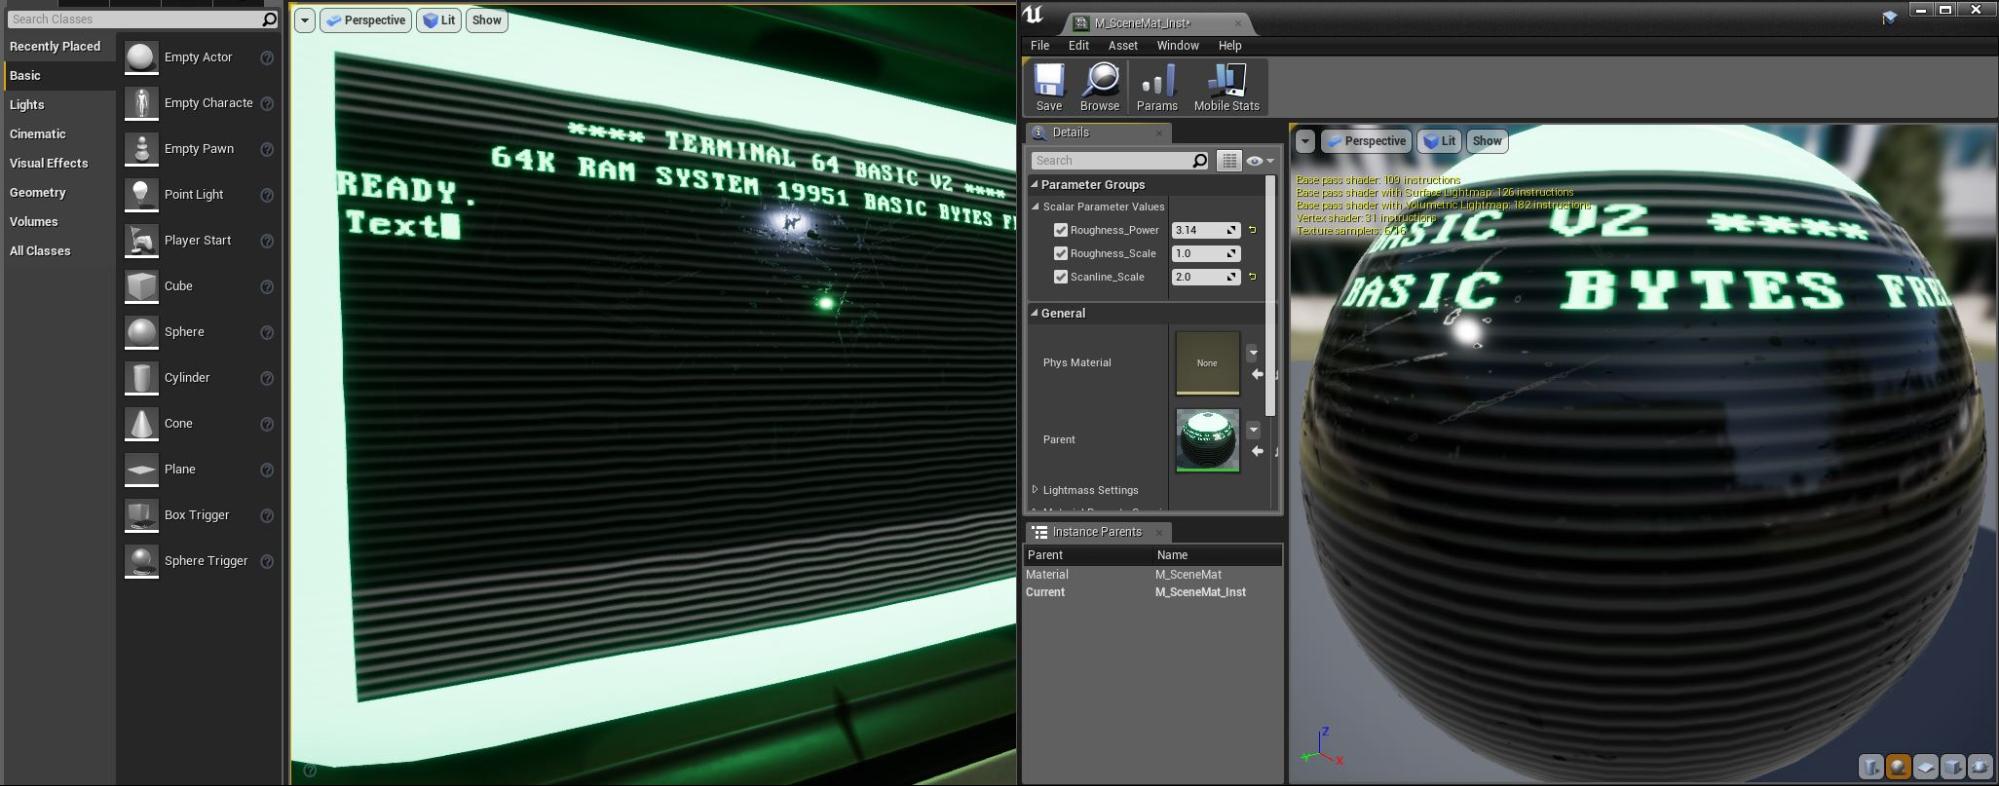
The above shows the Material Instance parameters and the mesh to which it is applied. Below it is shown in a more understandable form.


One of the terminals used in the game and the use of materials.

Since all the terminal screens in the game have a standard size, we did not have to make any changes or modifications in the future. Therefore, after preparing the materials, it remains for us to indicate which screens we see in which terminals, to save the folder hierarchy and add the puzzle interface to the screen, developing it and maintaining the same effect in certain events.
Ui puzzles
When developing the interface of puzzles, we are faced with many problems. He had to correspond to the game's narrative, each time reminding that we were on a spaceship, and still look beautiful. It cannot be said that all the steps we took were necessary. Below I will talk about them in more detail.
1) Defining an action / task requiring execution / solution.
2) Reduction of the action / task to the simplest form and adding steps that need to be executed / solved.
3) Developing an interface as a “concept” for an action / task that needs to be executed / resolved.
4) Improvement (design and code)
1) An action / task in a game requiring execution / solution is realized by physical actions or using a terminal. In the case of physical actions (for example, opening the valves in the correct order), they can be transferred quickly enough. Due to the modular design of the interaction system, similar situations occur very often (for example, the prompt “Press [E]”). But when the situation requires a solution on the terminal screen, our work becomes much more difficult and the same system is not applicable here.
2) For example, we need to connect to another section of the ship and open the door using the terminal. The player moves through the folder hierarchy, which is quite easy to change for each terminal after understanding the commands, as well as how and where to use them. But everything changes when it comes to the puzzle screen. In order to make simple actions, such as opening the door, difficult but understandable, and turn them from one action into a sequence, we had to work harder. If we continue the example with the door, the list of possible player actions is listed below.
A) Get a special program that opens the door, or the necessary information from the terminal, or from a physical object on the level.
B) Find a “special section” in which you can use this information or attach it using a command system.
C) After gaining access to a specific section, use the relevant information obtained earlier only for this section.
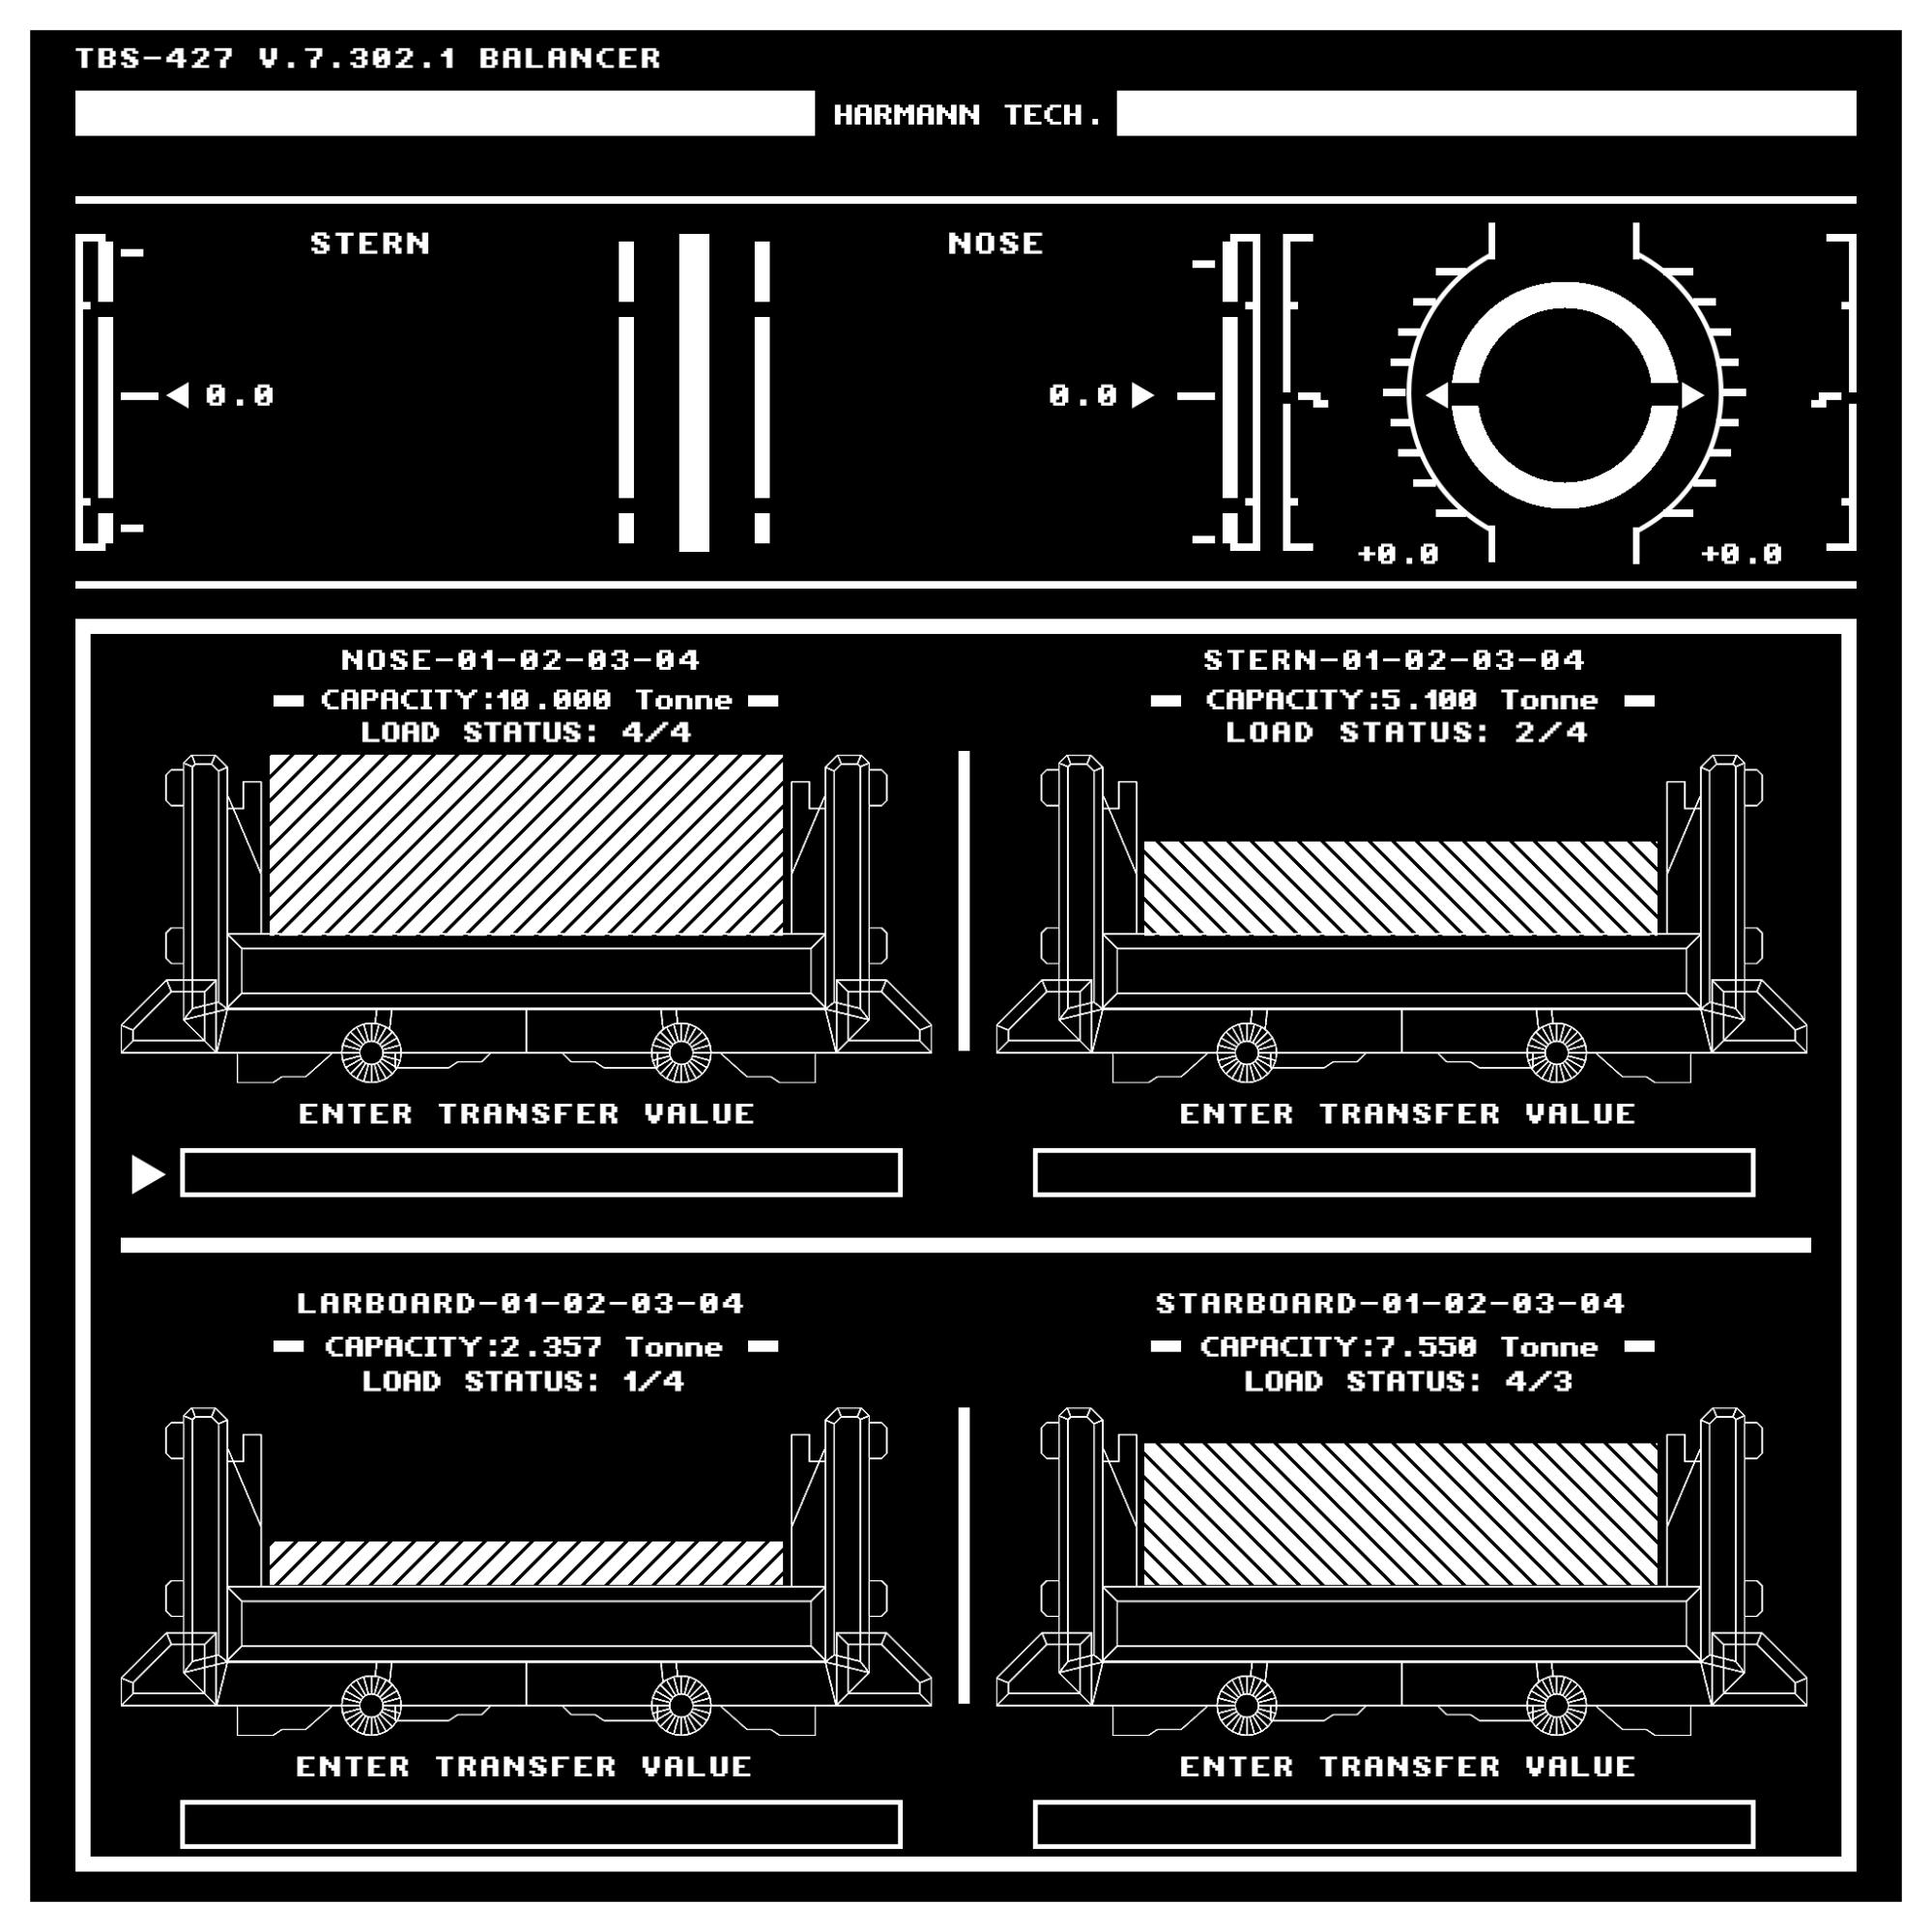
3) If we want the puzzle to be solved using the terminal screen, it is better to start by developing an interface concept. Thanks to this, we save time and we can predict possible problems. At the same time, we can understand whether the puzzle is relevant to the theme of the game. The biggest difficulty was placing the terminal screen within the screen and ensuring that all its parts were visible. It must be both functional, visual and provide audio feedback. In addition, we wanted some parts to be mobile. Therefore, all the elements of the puzzles were separate parts and were sometimes created in separate blocks. Below are some of the design concepts used in the game version and some parts of the puzzles.
4) The last is the stage of improvement. Here we thought about how we can improve the finished interface, while maintaining its clarity. Even though we sometimes did not want to, many elements had to be abandoned or changed.


Colors and Fonts
Tartarus terminals are “monochrome”. In other words, they consist of the same color values, or of the same color. The reason for this is that we wanted to create a simple and understandable design. In addition, it harmonized well with the general atmosphere and theme of the game. The first reviews we received at game shows proved to us that we are moving in the right direction. Therefore, later we did not have to make many changes. In sections deviating from standard design (interactive areas), we decided to use more red and green. We sought to make the design more convenient and understandable, both consciously and subconsciously.
Another problem with the colors of the terminal was that the user can change the text color of the terminal using a special command. Players can do this with the Color command. At first, we thought that no one would use it, but while watching the “gameplay” videos, we noticed that for many players the game works with non-standard colors. We wanted to leave this feature for two reasons. The first was that DOS users and people familiar with the command line were familiar with this and we wanted to revive their memories. The second reason was that due to the change in color, the gameplay became more personal. To sum up in brief, we decided that no one would suffer from the monotony of the screens and the slight revival of the colors. We think we made the right decision.
The next major issue was the fonts displayed on the terminal screens. They should not be too thin and too greasy, since terminal screens have curved surfaces, like CRT monitors. We did not want the characters at the edges of the screen to go beyond it or become unreadable. They had to correspond to the general theme of the game and the terminals. We chose a font that seemed suitable, readable and bold, similar to the style of DOS and Commodore.

Optimization
Another problem was the FPS subsidence in the game. We completed the prototyping of terminals and, after integrating them into the game, we noticed an average FPS decrease of 30%. Thanks to the speed tracking tools, we found out that the cause of the problem is the Capture Camera. Tartarus is a game mainly related to the use of terminals. But at the same time, we must solve all other problems inside the ship, managing the main characters. Therefore, when controlling a character, a capture camera is not required to capture every frame. We deactivated some parameters that allowed it to capture every possible frame. To do this, we selected the Capture Camera and deactivated the Capture Everyframe and Capture On Movement parameters in the Details panel.

We restore these parameters at the moment of switching to terminal management.

So we solved the problem with FPS. If your game is managed only through terminals, then there is no reason to use such antiquity.

In addition, we did everything not to perform unnecessary processes for the Event Tick. Event Tick leads to a decrease in performance due to unnecessary processes, since it is executed in each frame.
Focus
Another problem was that in some situations, for example, when you press Alt + Tab, the terminals lose focus. This was not a problem if the player was on the menu or interacted with the mouse. But we didn’t want the player to use the mouse in a situation where he would use only the keyboard. In addition, some users may have decided that this is a game bug. Therefore, we decided to use the following scheme. In this case, the user constantly focuses on the terminal until he departs from it.

The Event On Focus Lost event is triggered when the focus is lost, returning focus to the terminal. But the important point is that when the user wants to leave the terminal on purpose, we set the Lost Focus variable to true. Even if in this case this event is triggered, the focus is not transmitted automatically to the terminals.
Thoughts in conclusion
The above ideas came from the experience and process of working on the project. I think this is a great example of what anyone can do with just a blueprint system and the simplest setting of materials. I hope the article was at least a little helpful to you.


Source: https://habr.com/ru/post/353186/
All Articles