Installing IP PBX 3CX in Microsoft Azure Cloud
This week we have fulfilled another long-standing request from our users - we have added Microsoft Azure to the list of supported cloud platforms! Now you can add Azure and 3CX Business Telephony to your services in a couple of minutes. This will be especially convenient for organizations that are already placing their resources on Azure. Technical experts will be able to use their experience with Azure, without the need to learn new platforms.
As you know, 3CX is not a classic cloud, but so-called. cloud-ready PBX. The main advantage of this approach is that you are not working with your account in someone's cloud PBX, but with your full-fledged copy of the PBX. Your organization retains full control over both the PBX server and user data, including call history and call recording. You are also not limited to connecting your own IP telephony equipment and existing (or most profitable) VoIP operators
All that is required to install 3CX in Azure is your Azure Subscription ID (Azure subscription ID) when creating a PBX using the PBX Express service .
')
To get started, create a Microsoft Azure account . After that, in the Azure search bar, find the Cost Management + Billing section. Your subscription ID will be located either in the My subscriptions section (if it is your personal account) or in the Other subscriptions section (if it is an organization account). Copy the identifier - you will need it when creating a cloud PBX 3CX.

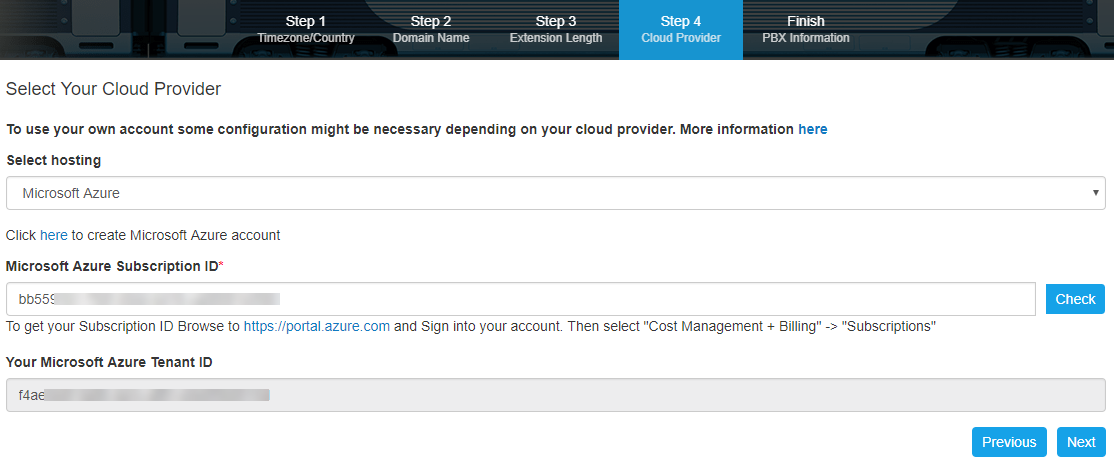
Start the PBX installation in the PBX Express wizard, as described in the manual . In the Select Your Cloud Provider section, paste the Azure Subscription ID and click Check. If Azure ID is found and will be able to assign resources, the Tenant ID code will appear in the corresponding field.
Then PBX Express will ask for permissions to your Azure portal. After that, in the wizard, select the region closest to you and the type of virtual machine. Debian Linux 9 will be installed on the virtual machine. The power of the virtual machine is best chosen according to the 3CX hardware requirements table .

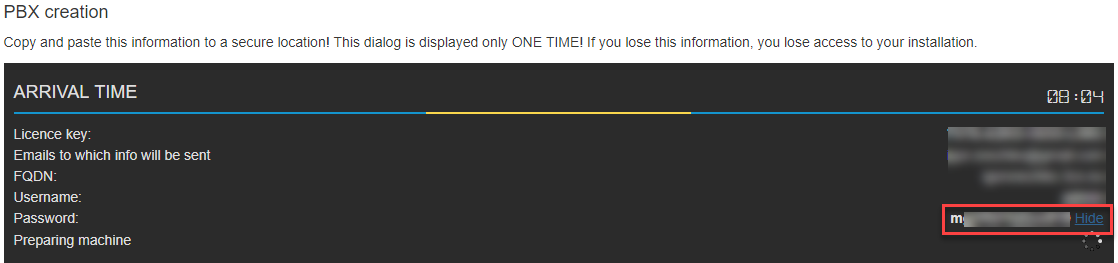
Click Finish, and preparation of virtual PBX will begin.
Note: the SSH password for the virtual machine is set the same as the password for accessing the web interface of the 3CX server. User: pbxexpress. You can change this password in the future.
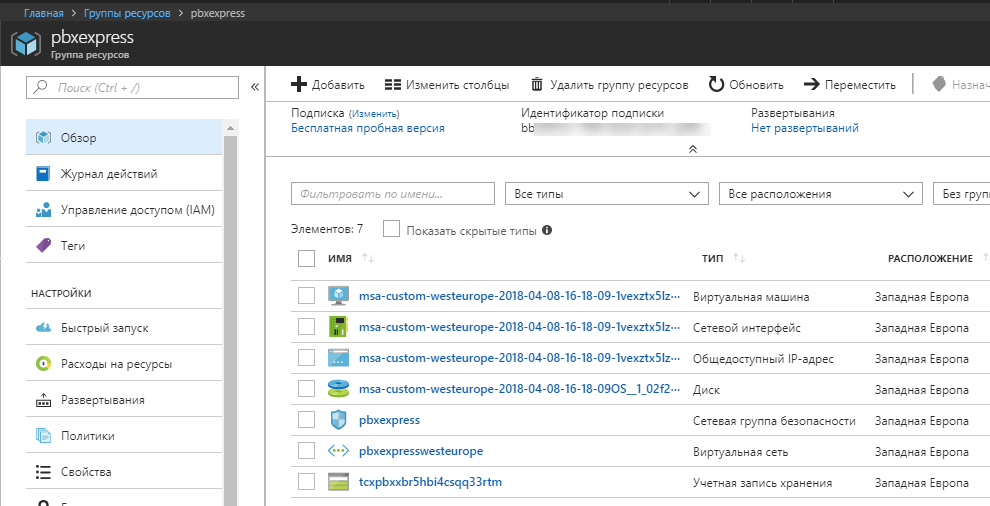
The 3CX PBX entity is created in the Azure pbxexpress Resource Group.
When the 3CX entity is created, the information on connecting to the PBX will be sent to the e-mail specified in the wizard. You can get started - connect your VoIP trunks, new users, gateways and IP phones.
As you know, 3CX is not a classic cloud, but so-called. cloud-ready PBX. The main advantage of this approach is that you are not working with your account in someone's cloud PBX, but with your full-fledged copy of the PBX. Your organization retains full control over both the PBX server and user data, including call history and call recording. You are also not limited to connecting your own IP telephony equipment and existing (or most profitable) VoIP operators
All that is required to install 3CX in Azure is your Azure Subscription ID (Azure subscription ID) when creating a PBX using the PBX Express service .
')
Get Azure Subscription ID
To get started, create a Microsoft Azure account . After that, in the Azure search bar, find the Cost Management + Billing section. Your subscription ID will be located either in the My subscriptions section (if it is your personal account) or in the Other subscriptions section (if it is an organization account). Copy the identifier - you will need it when creating a cloud PBX 3CX.
Installing a 3CX PBX in the Azure Cloud
Start the PBX installation in the PBX Express wizard, as described in the manual . In the Select Your Cloud Provider section, paste the Azure Subscription ID and click Check. If Azure ID is found and will be able to assign resources, the Tenant ID code will appear in the corresponding field.
Then PBX Express will ask for permissions to your Azure portal. After that, in the wizard, select the region closest to you and the type of virtual machine. Debian Linux 9 will be installed on the virtual machine. The power of the virtual machine is best chosen according to the 3CX hardware requirements table .
Click Finish, and preparation of virtual PBX will begin.
Note: the SSH password for the virtual machine is set the same as the password for accessing the web interface of the 3CX server. User: pbxexpress. You can change this password in the future.
The 3CX PBX entity is created in the Azure pbxexpress Resource Group.
When the 3CX entity is created, the information on connecting to the PBX will be sent to the e-mail specified in the wizard. You can get started - connect your VoIP trunks, new users, gateways and IP phones.
Source: https://habr.com/ru/post/353140/
All Articles