How to beat the routine, or the Ready application in Xcode in a couple of clicks

Each experienced developer has a set of tools that he is used to and is comfortable with working with. This may be the simplest setting of the environment, utilities for intermediate operations (for example, the Postman API Test Assistant), time-tested and personally developed by the library and snippets.
Also, many developers may have their own approach to the implementation of the selected architecture. Therefore, it is very useful to have in your arsenal an application procurement - a common skeleton, to which you will only have to add new modules, screens and features. In this article, I will explain how to create your own application template in Xcode.
Where is the heart of the template
How often do you create applications and write the same code over and over again, creating the basis of a future product? You declare base classes, make helper, lay architecture, create wrappers ... At such moments you want to have a tool that will allow you to instantly get a working application with a well-developed architecture and a written base for further development.
')
Such a tool exists, and we all use it constantly when we create the 'Single View App' in Xcode.
My search for instructions from Apple to create their own templates did not produce results. However, in Xcode, you can add the generation of your own files with already prepared code, and it is not difficult.
For an easy start, let's take the well-known Single View App. Go to Finder, press the Cmd + Shift + G key combination (go to folder) and specify the path:
/Applications/Xcode.app/Contents/Developer/Platforms/iPhoneOS.platform/Developer/Library/Xcode/Templates/Project Templates/iOS/ApplicationWe find there “Single View App.xctemplate” and copy, for example, to the desktop.
As you can see, the template consists of only 4 files:
- Main.storyboard. Storyboard containing the main view controller.
- TemplateIcon.png. Icon with a resolution of 48x48.
- TemplateIcon@2x.png. Icon with a resolution of 96x96.
- TemplateInfo.plist. The configuration file for the template.
Only the last file, TemplateInfo.plist, plays a significant role here, because it contains all the settings. Main.storyboard is just one of the possible files that will be added to each application created using this template. In the absence of the second and third files from this list, your template will have a default icon. Therefore, the heart of the template is TemplateInfo.plist.
Basic properties of the configuration file
Conventionally, the properties of TemplateInfo can be divided into several categories:
1. Layout template
Assigning a unique identifier to a template and additional fields for display in the Xcode environment.
Required fields:
- Identifier
Unique identificator. Two templates with the same ID cannot exist at the same time. Also used for inheritance in other patterns.
- Kind
Template Type For projects, Xcode.Xcode3.ProjectTemplateUnitKind is always used.
- Concrete
A field that indicates whether the template will appear in the list when creating a new application. It makes sense to put NO when it is called from another template and is not independent in itself. In other cases, always set to YES.
Optional fields:
- Platforms
Determines which platforms the template is used for. It is useful only to prevent inheritance in templates for other platforms (for example, when trying to import a template for iOS into a template for WatchOS).
- Name
The display name for the template. The default directory name is * .xctemplate.
- SortOrder
Serial number. If there is no such field, it is considered as the last.
- Description
Description of the template. The latest versions of Xcode are not displayed.
2. Inheritance
Templates in Xcode have a very useful property: they can include properties and files from other templates. It is very useful if there is a need to expand the template with additional features from another one, while not copying the files again or editing the configuration file. Direct analogy - inheritance in the PLO.
3. Ancestors
A list of Identifier templates whose properties and files will be included in the project.
4. Content generation
You can fill in the new application as already prepared files, and by registering their generation in the settings.
PS Since projects can be created using both Objective-C and Swift, it must be borne in mind that the generation of files must be spelled out for different languages separately.
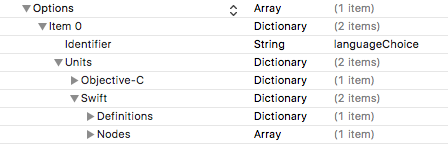
For this, the Options field is created, which is an array. As the first element, create a Dictionary and create two keys. The first is a String Identifier with a value of "languageChoice". The second is Units, which is a Dictionary. In Units we create two more Dictionary with the names “Objective-C” and “Swift”, respectively. All further Definitions and Nodes are placed inside these directories. If there is no language binding (for example, we want to add xib, storyboard, or prescribe content for some file), Definitions and Nodes can be declared on the same level as the other parameters.
5. Definitions
Here the code generation is announced and the paths to the files that will be added to the application are written.
Definitions is an associative array and contains a list of files or variables. Each file, in turn, is also an associative array, which contains the path to the file. It can consist of two properties - Path and Group.
Path - the direct path to the file, which is located in the .xctemplate directory.
Group is an array, each element of which is a directory included in the specified path. The file itself is not specified.
For example, the file has a path:
Presentation/Common/ViewController/Base/ViewController.swiftThen Definition for him will look like this:
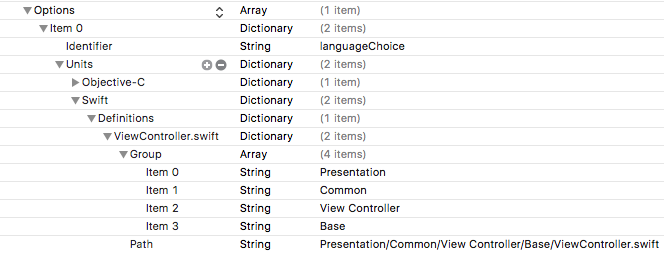
Accordingly, if the file is not nested and lies directly in .xctemplate /, then the Group array is not created.
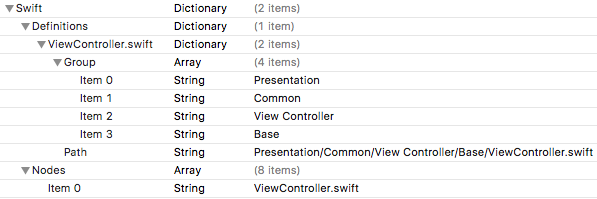
6. Nodes
After we have specified the file location paths, it is necessary to create links with which we point either to the file created or to the content. Nodes is an ordinary array whose elements are keys from Definitions. For the above example, Nodes would look like this:
Code generation inside TemplateInfo.plist
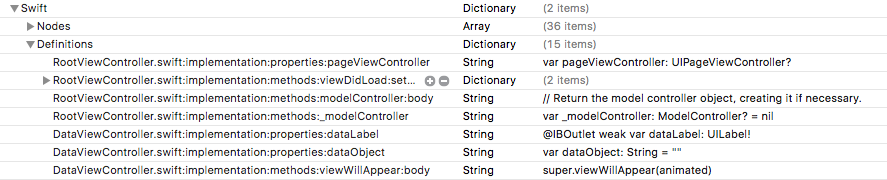
You can add code to the file created in TemplateInfo.plist by writing it to Definitions and pointing it to Nodes. This is done using the “:” operator after specifying the file, after which the code is written. For example, in the standard Page-Based App template you can see that a lot of code generation is described in Definitions:
The order of the code in the file depends on the order of the links in the Nodes array. If the specified file does not exist, it will be created.
The following constants work in the previously created files and inside TemplateInfo.plist:
___COPYRIGHT___ Copyright line
___DATE___ Date the project was created (file)
___DIRECTORY___ Full path to the file
___FILEBASENAME___ File name without extension
___FILEEXTENSION___ File Extension
___FILENAME___ Full file name
___FULLUSERNAME___ Name of the user authorized in the system
___ORGANIZATIONNAME___ Name of the organization specified when creating the project
___PACKAGENAME___ / ___PROJECTNAME___ The name of the product specified when creating the project
___TIME___ Time when the project was created (file)
___USERNAME___ Account Name of an Authorized User
Editing the application settings window
When creating a template, you can also edit the application settings window, which will later appear when you call this template.
For example, for the “Single View App”, Apple offers us several text fields for entering the name of the developer and the name of the organization, several checkboxes for inclusion in the project unit tests or CoreData, as well as a drop-down list for choosing a programming language. All this is governed by the Options field - an array from a Dictionary. For each option, the following list of features is available:
- Identifier
Identifier by which you can change or use the value stored in the option field.
- Default
The value that will be the default for this field.
- SortOrder
Sequence number by which this option will be displayed in the window.
- Nae
Title for option.
- Type
The type of field to create. There are the following field types:
- Static. Static, non-editable text. In the sense of - nothing more than a label.
- Checkbox. Normal checkbox. Since it is essentially a Bool field, it also needs to define Units, which will contain the appropriate set of actions for true and false values. An example of use can be found in the “Core Data Cocoa Touch App.xctemplate” base template, which will be mentioned in the template creation section.
- Text. The text box.
- Popup Provides a selection from a drop-down list that must be defined in the Values array.
Create an application template
Before you begin, you need to prepare the files with the written code that we want to see in the application created using our template. If you do not have your own blank, you can take mine . This is the simplest implementation of MVVM without using any libraries. There are not many files here, but for example it is enough. I will analyze the further creation of the template by their example.
To begin with, we will create a directory in which the templates created by us will be stored. To do this, run the command in the console
$ mkdir -p ~/Library/Developer/Xcode/Templates/Project\ Templates/PrivateThis is the way Xcode will look for application templates. You can call the Private folder at your discretion, as long as it is on this path. There may be several such directories, but the templates embedded in them must have a different Identifier. Otherwise, the existence of the template in all but one directory will be ignored.
The previously copied “Single View App.xctemplate” will be renamed to “MVVM Application.xctemplate” and copied to the Private folder. If you start Xcode now and go to the menu for creating a new application, you can already see at the bottom of the new Private section, where there will be one single “MVVM Application” template. Since we haven’t changed anything yet, when using it we will get the same Single View App (which, by the way, disappeared from the list of basic ones, because it has the same Identifier).
The next step is to move the Presentation folder and two icon files - TemplateIcon.png and TemplateIcon@2x.png. Now you need to change the Identifier so that Xcode sees our template as completely new. For example, we define the Identifier as “MVVMTemplate”. Now, when creating a new application in Xcode, we will see that the “Single View App” has returned to its proper place, and in the Private section there is “MVVM Application” with our icon.
Next, we will see from which templates the Single View App is inherited. Open TemplateInfo.plist and go to Ancestors, where we see:
com.apple.dt.unit.storyboardApplication
com.apple.dt.unit.coreDataCocoaTouchApplication
There are templates with these identifiers in the same place as the Single View App. Let's understand in order.
In the first Storyboard App.xctemplate template, there is only a configuration file in which you can see the Definitions and Nodes fields. They state that the main.storyboard will be used as the main storyboard, and the path to it will be indicated. We do not need this, because we already have the MainScreen.storyboard file, which we want to use as the main one. Therefore, we delete the Storyboard App.xctemplate template from Ancestors.
Next comes the “Core Data Cocoa Touch App.xctemplate” template. The checkbox field is added to its options to enable CoreData, and the Units field contains all the required code generation and import of the ___ PACKAGENAMEASIDENTIFIER ___. Xcdatamodeld file. Suppose that we don't need CoreData either, and also remove this parent.
But here's the problem: if we now try to create an application using our template, then it will not be visible in the list. The fact is that the parents we deleted, in turn, also had the Ancestors list, which contained the required basic Cocoa Touch App Base template, which has the identifier com.apple.dt.unit.cocoaTouchApplicationBase. Adding it to the Ancestors list of our template, we will again return it to the list of available. Having carefully studied this basic template, you will understand why it is so necessary, and we move on.
Now let's write all the paths and links for the copied files. Since the code is written for Swift, I will do this only for him.
Go to Options -> languageChoice (Item 0) -> Units -> Swift and create a Dictionary here called Definitions. Now let's write down all the paths to the files that we have:
Presentation/Common/View Controller/Base/ViewController.swift
Presentation/Common/View Model/Base/ViewModel.swift
Presentation/Common/View Model/ViewModelHolder.swift
Presentation/Main Screen/MainScreen.storyboard
Presentation/Main Screen/View Controller/MainViewController.swift
Presentation/Main Screen/View Model/MainViewModel.swift
We get the following list:
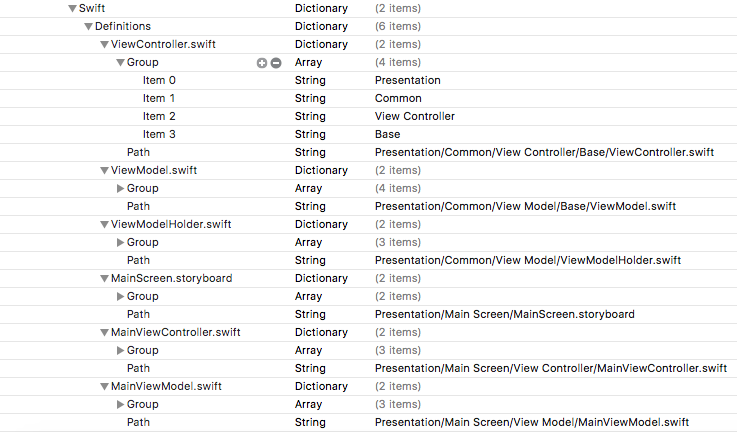
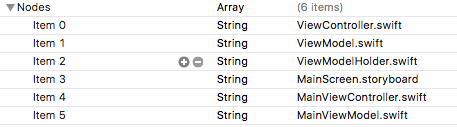
Now we fill the Nodes links, it will look like this:
It remains to add the final touch - put MainScreen.storyboard as the main one. Create Definitions and Nodes for the whole file and add the following fields to them:
Definitions:
Key
Info.plist: UIMainStoryboardFile
Value
<key>UIMainStoryboardFile</key> <string>MainScreen</string> Nodes:
Info.plist: UIMainStoryboardFile
We get the following:

In the example I attached there is a ready-made version of the TemplateInfo.plist file.
This article does not describe all the functions for creating templates and files. It is simply not possible to include here the description of each parameter. Therefore, in the repository, in which lies an example, I have enclosed the documentation (unofficial), which describes all the possibilities and lists all the existing parameters (at the time of the existence of Xcode 4). Most of the functions can be understood by digging into Apple's basic templates, at the same time seeing their implementation. I just described the necessary minimum for simple creation of plain templates.
If you have any comments and additions, I will be glad to hear them and supplement the article in order to increase its usefulness.
Source: https://habr.com/ru/post/353138/
All Articles