Procedural maze generation in Unity
Note: This tutorial is written for Unity 2017.1.0 and is intended for advanced users. It is understood that you are already familiar with the programming of games in Unity.
You, as a Unity-developer, probably have enough experience in creating levels manually. But did you ever want to generate levels on the fly? Procedural generation of meshes for floors and walls, in contrast to the simple arrangement of previously created models, provides much more flexibility and replayability of the game.
In this tutorial you will learn the following:
- Procedurally generate levels using the example of creating a game about running in a maze.
- Generate data mazes.
- Use maze data to build a mesh.
Getting Started
Most algorithms (such as this and this , for example) create “ideal” dense labyrinths, that is, those that have only one correct path and no loops. They look like labyrinths published in the “Puzzle” newspaper sections.
')

However, it is more pleasant to play most games when mazes are not ideal and there are loops in them. They should be extensive and consisting of open spaces, and not from narrow winding corridors. This is especially true for the rogue-like genre, in which procedural levels are not so much “labyrinths”, but rather dungeons.
In this tutorial, we will implement one of the simplest maze algorithms described here . I chose it in order to realize the mazes in the game with minimal effort. This simple approach works well in classic games listed by reference, so we can use it to create mazes in a game called Speedy Treasure Thief .
In this game, each level is a new maze, in which a treasure chest is hidden. However, you do not have much time to search for him and escape before the guards return! At each level there is a time limit and you can play until you get caught. Points scored depend on the amount of treasure you stole.
First, create a new empty project in Unity.
Download project blank , unpack it and import into new project ** proc-mazes-starter.unitypackage **. In the draft of the project there is the following content:
- Folder Graphics , which contains all the necessary graphics for the game.
- Scene Scene is the source scene for this tutorial containing the player and the UI.
- Scripts folder containing two auxiliary scripts. We will write the rest of the scripts during the tutorial.
And this is enough to get started. Each of these points will be discussed in more detail later.
Set the code architecture
Let's start by adding an empty project to the scene. Select GameObject ▸ Create Empty , name it Controller, and place it at (X: 0, Y: 0, Z: 0). This object will simply be the attachment point of the scripts controlling the game.
In the project's Scripts folder, create a C # script called GameController , then create another script and name it MazeConstructor . The first script will control the game as a whole, and the second will be engaged in the generation of a maze.
Replace all lines in GameController with the following code:
using System; using UnityEngine; [RequireComponent(typeof(MazeConstructor))] // 1 public class GameController : MonoBehaviour { private MazeConstructor generator; void Start() { generator = GetComponent<MazeConstructor>(); // 2 } } Briefly tell what we have just created:
- The
RequireComponentattributeRequireComponentcomponent when this script is added to a GameObject. - A private variable stores the reference returned by
GetComponent().
Add this script to the scene: drag the GameController script from the Project window to the GameObject Controller in the Hierarchy window.
Notice that the MazeConstructor has also been added to the Controller ; this happens automatically thanks to the
RequireComponent attribute.Now replace everything in the MazeConstructor with the following code:
using UnityEngine; public class MazeConstructor : MonoBehaviour { //1 public bool showDebug; [SerializeField] private Material mazeMat1; [SerializeField] private Material mazeMat2; [SerializeField] private Material startMat; [SerializeField] private Material treasureMat; //2 public int[,] data { get; private set; } //3 void Awake() { // default to walls surrounding a single empty cell data = new int[,] { {1, 1, 1}, {1, 0, 1}, {1, 1, 1} }; } public void GenerateNewMaze(int sizeRows, int sizeCols) { // stub to fill in } } This is what happens here:
- All these fields are available to us in the Inspector .
showDebugswitches the debug display, and various Material references are materials for the generated models. By the way, theSerializeFieldattribute displays the field in the Inspector , even though the variable isprivate. - Next comes the
dataproperty. Access declarations (for example, declaring a property aspublic, but then assigning it to aprivate set) make it read-only outside the class. Thus, the maze data can not be changed from the outside. - The last part of the interesting code is in
Awake(). The function initializesdatawith a 3 x 3 array of ones surrounding zero. 1 means a wall, and 0 means empty space, that is, the default grid looks like a room surrounded by a wall.
This is already a good foundation for the code, but until we see anything yet!
To display the maze data and check how it looks, add the following method to the MazeConstructor :
void OnGUI() { //1 if (!showDebug) { return; } //2 int[,] maze = data; int rMax = maze.GetUpperBound(0); int cMax = maze.GetUpperBound(1); string msg = ""; //3 for (int i = rMax; i >= 0; i--) { for (int j = 0; j <= cMax; j++) { if (maze[i, j] == 0) { msg += "...."; } else { msg += "=="; } } msg += "\n"; } //4 GUI.Label(new Rect(20, 20, 500, 500), msg); } Consider each of the commented sections:
- This code checks if debugging is enabled.
- Initialization of several local variables: local copy of the saved maze, maximum row and column, and row.
- Two nested loops go through the rows and columns of a two-dimensional array. For each row / column in the array, the code will check the stored value and add "...." or "==" depending on whether the value is zero. Also, after passing through all the columns in a row, the code adds a new row so that each row of the array starts with a new row line.
- Finally,
GUI.Label()displays the string being created. This project uses the new GUI system for outputting data to the player, but the old system is easier to create quick debug messages.
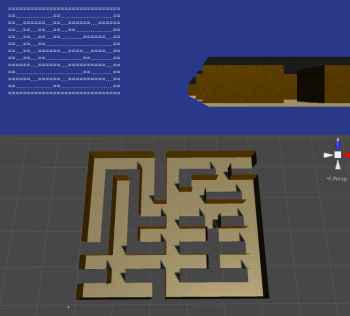
Don't forget to enable Show Debug for the MazeConstructor component. Click Play , and the saved maze data (which is the default maze for now) will be displayed:

Not a bad start! However, the code does not yet generate the maze itself. In the next section, I will explain how to solve this problem.
Generating Maze Data
Notice that in
MazeConstructor.GenerateNewMaze() is empty; This is a blank that we fill out later. At the end of the Start() method of the GameController script , add the following line. She will call this method stub: generator.GenerateNewMaze(13, 15); The “magic” numbers 13 and 15 are the parameters of the method that determine the size of the maze. Although we are not using them yet, these size options define the number of rows and columns of the grid.
At this stage, we can proceed to generating data for the maze. Create a new script MazeDataGenerator ; this class encapsulates data-generation logic, and will be used in the MazeConstructor . Open a new script and replace everything with the following code:
using System.Collections.Generic; using UnityEngine; public class MazeDataGenerator { public float placementThreshold; // chance of empty space public MazeDataGenerator() { placementThreshold = .1f; // 1 } public int[,] FromDimensions(int sizeRows, int sizeCols) // 2 { int[,] maze = new int[sizeRows, sizeCols]; // stub to fill in return maze; } } Note that this class does not inherit from MonoBehaviour. It will not be used directly as a component, but only inside the MazeConstructor , therefore it is not required to have MonoBehaviour functionality.
placementThresholdwill be used by the data generation algorithm to determine if the space is empty. In the class constructor, this variable is assigned a default value, but it is madepublicso that other code can control the configuration of the generated maze.- One of the methods (in this case,
FromDimensions()) is still empty and left with a blank, which we fill in later.
Next, we will add several sections of code to the MazeConstructor so that it can invoke the stub method. First, let's add a private variable to store the data generator:
private MazeDataGenerator dataGenerator; Then create an instance of it in
Awake() , saving the generator to a new variable by adding the next line at the top of the Awake() method. dataGenerator = new MazeDataGenerator(); Finally, call
FromDimensions() in GenerateNewMaze() , passing the size of the grid and saving the resulting data. Find in GenerateNewMaze() line that says // stub to fill in , and replace it with the following: if (sizeRows % 2 == 0 && sizeCols % 2 == 0) { Debug.LogError("Odd numbers work better for dungeon size."); } data = dataGenerator.FromDimensions(sizeRows, sizeCols); Here is added a warning that it is better to use odd numbers for sizes, because the generated maze will be surrounded by walls.
Run the game to see empty maze data, but with the correct dimensions:
Fine! Everything is ready to save and display the maze data! The time has come to implement the labyrinth generation algorithm inside
FromDimensions() .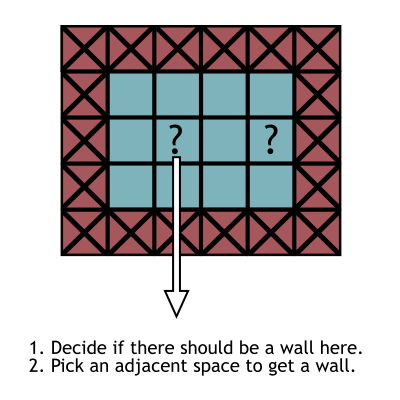
The algorithm described above bypasses every second cell in the grid (that is, not every cell!) By positioning the wall and choosing the next blocking space. The algorithm programmed here will differ slightly from it, it also decides whether to skip space, which can lead to the appearance of open spaces in the maze. Since the algorithm does not have to store a lot of information or know a lot about the rest of the maze, for example, about the branch points that need to be passed, the code becomes very simple.
To implement this maze generation algorithm, add the following code to the
FromDimensions() of MazeDataGenerator by replacing the line with // stub to fill in . int rMax = maze.GetUpperBound(0); int cMax = maze.GetUpperBound(1); for (int i = 0; i <= rMax; i++) { for (int j = 0; j <= cMax; j++) { //1 if (i == 0 || j == 0 || i == rMax || j == cMax) { maze[i, j] = 1; } //2 else if (i % 2 == 0 && j % 2 == 0) { if (Random.value > placementThreshold) { //3 maze[i, j] = 1; int a = Random.value < .5 ? 0 : (Random.value < .5 ? -1 : 1); int b = a != 0 ? 0 : (Random.value < .5 ? -1 : 1); maze[i+a, j+b] = 1; } } } } As you can see, the code gets the boundaries of a 2D array, and then bypasses it:
- For each grid cell, the code first checks to see if the current cell is out of the grid (that is, if any of the indices are on the border of the array). If so, he puts the wall, assigning 1.
- Next, the code checks whether the coordinates are divided by 2 in order to perform actions in every second cell. There is also an additional check on the
placementThresholdvalue described above in order to randomly skip this cell and continue traversing the array. - Finally, the code assigns a value of 1 to the current cell and a randomly selected neighboring cell. The code uses several ternary operations to add an array of 0, 1, or -1 to the index, thus obtaining the index of the neighboring cell.
Display the maze data again to see what the generated maze looks like:
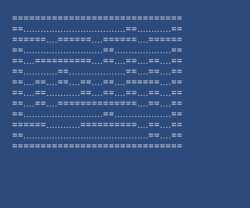
Restart the game to see that the maze data is new each time. Fine!
The next serious task is to generate a 3D mesh from 2D maze data.
Maze Mesh Generation
Now, after generating all the maze data, we can build a mesh based on this data.
Create another new MazeMeshGenerator script. Just as the MazeDataGenerator encapsulates the maze generation logic, the MazeMeshGenerator will contain the mesh generation logic and be used by the MazeConstructor to complete this maze generation step.
More precisely, it will later contain the logic for generating the mesh. First, we simply create a textured quad for display, and then modify this code to generate the entire maze. To do this, we need to make small changes to the Unity editor, and then go deeper into the code.
First we need to bind the materials that will be applied to the generated mesh.
Select the Graphics folder in the Project window, then select the Hierarchy Controller in the window to display its Maze Constructor component in the Inspector .
Drag materials from the Graphics folder to the Maze Constructor material slots. Use the floor-mat for Material 1 and the wall-mat for Material 2, and drag start and treasure to the appropriate slots.
Since we are already working in the Inspector , we will also add the Generated tag: click on the Tag menu at the top of the Inspector and select Add Tag . When generating meshes, we will assign them this tag to find them.
Having made all the necessary changes in the Unity editor, open a new script and replace everything with this code:
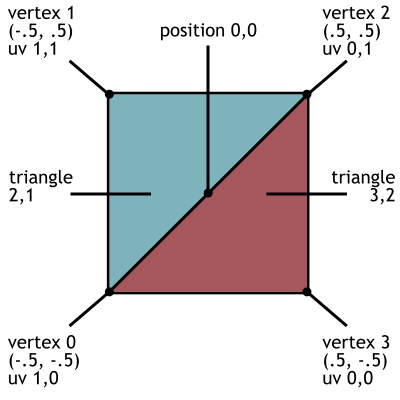
using System.Collections.Generic; using UnityEngine; public class MazeMeshGenerator { // generator params public float width; // how wide are hallways public float height; // how tall are hallways public MazeMeshGenerator() { width = 3.75f; height = 3.5f; } public Mesh FromData(int[,] data) { Mesh maze = new Mesh(); //1 List<Vector3> newVertices = new List<Vector3>(); List<Vector2> newUVs = new List<Vector2>(); List<int> newTriangles = new List<int>(); // corners of quad Vector3 vert1 = new Vector3(-.5f, -.5f, 0); Vector3 vert2 = new Vector3(-.5f, .5f, 0); Vector3 vert3 = new Vector3(.5f, .5f, 0); Vector3 vert4 = new Vector3(.5f, -.5f, 0); //2 newVertices.Add(vert1); newVertices.Add(vert2); newVertices.Add(vert3); newVertices.Add(vert4); //3 newUVs.Add(new Vector2(1, 0)); newUVs.Add(new Vector2(1, 1)); newUVs.Add(new Vector2(0, 1)); newUVs.Add(new Vector2(0, 0)); //4 newTriangles.Add(2); newTriangles.Add(1); newTriangles.Add(0); //5 newTriangles.Add(3); newTriangles.Add(2); newTriangles.Add(0); maze.vertices = newVertices.ToArray(); maze.uv = newUVs.ToArray(); maze.triangles = newTriangles.ToArray(); return maze; } } The two fields at the top of the class,
width and height , are similar to the placementThreshold of the MazeDataGenerator : these are the values that are set by default in the constructor and used by the mesh generation code.The main part of the interesting code is inside
FromData() ; this is the method that the MazeConstructor calls to generate a mesh. At the moment, this code simply creates a single quadrilateral to demonstrate its work. Soon we will expand it to a whole level.This illustration shows what the quad is created from:
The code is long, but quite repetitive with slight variations:
- A mesh consists of three lists: vertices, UV coordinates, and triangles.
- The list of vertices stores the position of each vertex ...
- The UV coordinates listed correspond to the nodes in this list ...
- And triangles are indices in the list of vertices (i.e., “this triangle consists of vertices 0, 1, and 2”).
- Notice that two triangles are created; The quadrilateral consists of two triangles. Also note that the
Listdata types are used (to append to the list), but in the endMeshrequiresArrays.
The MazeConstructor should create an instance of the MazeMeshGenerator , and then call the mesh generation method. It should also display the mesh, so we will add the following code snippets:
First, add a private field to store the mesh generator.
private MazeMeshGenerator meshGenerator; Create its instance in Awake () , saving the mesh generator in the new field by adding the following line at the top of the Awake () method:
meshGenerator = new MazeMeshGenerator(); Next, add the DisplayMaze () method:
private void DisplayMaze() { GameObject go = new GameObject(); go.transform.position = Vector3.zero; go.name = "Procedural Maze"; go.tag = "Generated"; MeshFilter mf = go.AddComponent<MeshFilter>(); mf.mesh = meshGenerator.FromData(data); MeshCollider mc = go.AddComponent<MeshCollider>(); mc.sharedMesh = mf.mesh; MeshRenderer mr = go.AddComponent<MeshRenderer>(); mr.materials = new Material[2] {mazeMat1, mazeMat2}; } Finally, to call DisplayMaze (), add the following line to the end of GenerateNewMaze () :
DisplayMaze(); Mesh itself is just data. It is invisible until it is assigned to an object (if more specifically, an MeshFilter object) in the scene. Therefore, DisplayMaze() not only calls MazeMeshGenerator.FromData() , but also inserts this call in the middle of creating an instance of a new GameObject , setting the Generated tag, adding the MeshFilter and the generated mesh, adding the MeshCollider for collisions with the mesh, and finally adding the MeshRenderer and materials.We wrote the
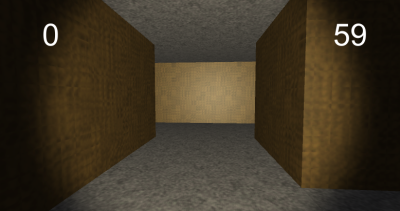
MazeMeshGenerator class and created a copy of it in the MazeConstructor , so click Play :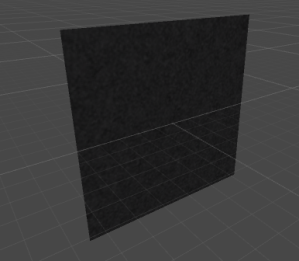
We built the textured quad completely with code! This is an interesting and important beginning, so pause to analyze your work at this stage and understand how the code works.
Next, we will quite refactor
FromData() , replacing it completely with this code: public Mesh FromData(int[,] data) { Mesh maze = new Mesh(); //3 List<Vector3> newVertices = new List<Vector3>(); List<Vector2> newUVs = new List<Vector2>(); maze.subMeshCount = 2; List<int> floorTriangles = new List<int>(); List<int> wallTriangles = new List<int>(); int rMax = data.GetUpperBound(0); int cMax = data.GetUpperBound(1); float halfH = height * .5f; //4 for (int i = 0; i <= rMax; i++) { for (int j = 0; j <= cMax; j++) { if (data[i, j] != 1) { // floor AddQuad(Matrix4x4.TRS( new Vector3(j * width, 0, i * width), Quaternion.LookRotation(Vector3.up), new Vector3(width, width, 1) ), ref newVertices, ref newUVs, ref floorTriangles); // ceiling AddQuad(Matrix4x4.TRS( new Vector3(j * width, height, i * width), Quaternion.LookRotation(Vector3.down), new Vector3(width, width, 1) ), ref newVertices, ref newUVs, ref floorTriangles); // walls on sides next to blocked grid cells if (i - 1 < 0 || data[i-1, j] == 1) { AddQuad(Matrix4x4.TRS( new Vector3(j * width, halfH, (i-.5f) * width), Quaternion.LookRotation(Vector3.forward), new Vector3(width, height, 1) ), ref newVertices, ref newUVs, ref wallTriangles); } if (j + 1 > cMax || data[i, j+1] == 1) { AddQuad(Matrix4x4.TRS( new Vector3((j+.5f) * width, halfH, i * width), Quaternion.LookRotation(Vector3.left), new Vector3(width, height, 1) ), ref newVertices, ref newUVs, ref wallTriangles); } if (j - 1 < 0 || data[i, j-1] == 1) { AddQuad(Matrix4x4.TRS( new Vector3((j-.5f) * width, halfH, i * width), Quaternion.LookRotation(Vector3.right), new Vector3(width, height, 1) ), ref newVertices, ref newUVs, ref wallTriangles); } if (i + 1 > rMax || data[i+1, j] == 1) { AddQuad(Matrix4x4.TRS( new Vector3(j * width, halfH, (i+.5f) * width), Quaternion.LookRotation(Vector3.back), new Vector3(width, height, 1) ), ref newVertices, ref newUVs, ref wallTriangles); } } } } maze.vertices = newVertices.ToArray(); maze.uv = newUVs.ToArray(); maze.SetTriangles(floorTriangles.ToArray(), 0); maze.SetTriangles(wallTriangles.ToArray(), 1); //5 maze.RecalculateNormals(); return maze; } //1, 2 private void AddQuad(Matrix4x4 matrix, ref List<Vector3> newVertices, ref List<Vector2> newUVs, ref List<int> newTriangles) { int index = newVertices.Count; // corners before transforming Vector3 vert1 = new Vector3(-.5f, -.5f, 0); Vector3 vert2 = new Vector3(-.5f, .5f, 0); Vector3 vert3 = new Vector3(.5f, .5f, 0); Vector3 vert4 = new Vector3(.5f, -.5f, 0); newVertices.Add(matrix.MultiplyPoint3x4(vert1)); newVertices.Add(matrix.MultiplyPoint3x4(vert2)); newVertices.Add(matrix.MultiplyPoint3x4(vert3)); newVertices.Add(matrix.MultiplyPoint3x4(vert4)); newUVs.Add(new Vector2(1, 0)); newUVs.Add(new Vector2(1, 1)); newUVs.Add(new Vector2(0, 1)); newUVs.Add(new Vector2(0, 0)); newTriangles.Add(index+2); newTriangles.Add(index+1); newTriangles.Add(index); newTriangles.Add(index+3); newTriangles.Add(index+2); newTriangles.Add(index); } Wow, what a long piece of code! But here again almost the same thing is repeated, only some numbers change. In particular, the code for generating the quadrangle is moved to a separate
AddQuad() method to call it again for the floor, ceiling and walls of each grid cell.- The last three parameters of
AddQuad()are the same list of vertices, UVs and triangles. The first line of the method gets the index to start with. When you add new quadrilaterals, the index will increase. - However, the first parameter to
AddQuad()is the transformation matrix, and this part can be difficult to understand. In fact, the position / rotation / scale can be stored as a matrix, and then applied to the vertices. This is what theMultiplyPoint3x4()call does. Thus, the quad generation code can be used for floors, ceilings, walls, etc. We only need to change the transformation matrix used! - Let's
FromData()back toFromData(). Lists for UV vertices and triangles are created at the top. This time we have two lists of triangles. The UnityMeshobject can have many sub-mixes with different materials on each, that is, each list of triangles is a separate mix. We announce two mixes so that you can assign different materials to the floor and walls. - After that, we go through the 2D array and create quadrilaterals for the floor, ceiling and walls in each grid cell. Each cell needs a floor and ceiling, in addition, checks are performed on neighboring cells for the need for walls. Notice that
AddQuad()is called several times, but each time with a different transformation matrix and different lists of triangles used for floors and walls. Also note that thewidthandheightare used to determine the position and size of the quadrilaterals. - Oh, and a small addition:
RecalculateNormals()prepares the mesh for lighting.
Click Play to see how the entire mesh is generated:
Congratulations, we are done with the labyrinth generation and the main part of the programming required for Speedy Treasure Thief ! In the next section, we will look at the rest of the game.
Finish the game
We need to make in the code and other additions and changes, but first let's use what was in the draft of the project. As I mentioned in the introduction, there are two scripts in the project, a scene with a player and a UI, as well as all the graphics for the game with a maze. The FpsMovement script is just a one-script version of the character controller from my book , and TriggerEventRouter is an auxiliary code, convenient for working with game triggers.
The player is already configured in the scene, including the FpsMovement component and
A directional light source is attached to the camera. In addition, skybox and ambient lighting are disabled in the Lighting Settings window. Finally, in the scene there is a UI canvas with labels for points and time.
And this is all that is in the project blank. Now we will write the remaining code for the game.
Let's start with the MazeConstructor . To begin, add the following properties to store the dimensions and coordinates:
public float hallWidth { get; private set; } public float hallHeight { get; private set; } public int startRow { get; private set; } public int startCol { get; private set; } public int goalRow { get; private set; } public int goalCol { get; private set; } Now you need to add new methods. The first is
DisposeOldMaze() ; as the name implies, it removes the existing maze. The code finds all objects with the Generated tag and destroys them. public void DisposeOldMaze() { GameObject[] objects = GameObject.FindGameObjectsWithTag("Generated"); foreach (GameObject go in objects) { Destroy(go); } } Next we add the
FindStartPosition() method. This code starts at 0.0 and goes through all the maze data until it finds an open space. These coordinates are then saved as the starting position of the maze. private void FindStartPosition() { int[,] maze = data; int rMax = maze.GetUpperBound(0); int cMax = maze.GetUpperBound(1); for (int i = 0; i <= rMax; i++) { for (int j = 0; j <= cMax; j++) { if (maze[i, j] == 0) { startRow = i; startCol = j; return; } } } } Similarly,
FindGoalPosition() essentially does the same thing, only starts at maximum values and performs a countdown. Add this method too. private void FindGoalPosition() { int[,] maze = data; int rMax = maze.GetUpperBound(0); int cMax = maze.GetUpperBound(1); // loop top to bottom, right to left for (int i = rMax; i >= 0; i--) { for (int j = cMax; j >= 0; j--) { if (maze[i, j] == 0) { goalRow = i; goalCol = j; return; } } } } PlaceStartTrigger() and PlaceGoalTrigger() place objects in the scene at the start and target positions. , , TriggerEventRouter ( ). , , - . . private void PlaceStartTrigger(TriggerEventHandler callback) { GameObject go = GameObject.CreatePrimitive(PrimitiveType.Cube); go.transform.position = new Vector3(startCol * hallWidth, .5f, startRow * hallWidth); go.name = "Start Trigger"; go.tag = "Generated"; go.GetComponent<BoxCollider>().isTrigger = true; go.GetComponent<MeshRenderer>().sharedMaterial = startMat; TriggerEventRouter tc = go.AddComponent<TriggerEventRouter>(); tc.callback = callback; } private void PlaceGoalTrigger(TriggerEventHandler callback) { GameObject go = GameObject.CreatePrimitive(PrimitiveType.Cube); go.transform.position = new Vector3(goalCol * hallWidth, .5f, goalRow * hallWidth); go.name = "Treasure"; go.tag = "Generated"; go.GetComponent<BoxCollider>().isTrigger = true; go.GetComponent<MeshRenderer>().sharedMaterial = treasureMat; TriggerEventRouter tc = go.AddComponent<TriggerEventRouter>(); tc.callback = callback; } ,
GenerateNewMaze() : public void GenerateNewMaze(int sizeRows, int sizeCols, TriggerEventHandler startCallback=null, TriggerEventHandler goalCallback=null) { if (sizeRows % 2 == 0 && sizeCols % 2 == 0) { Debug.LogError("Odd numbers work better for dungeon size."); } DisposeOldMaze(); data = dataGenerator.FromDimensions(sizeRows, sizeCols); FindStartPosition(); FindGoalPosition(); // store values used to generate this mesh hallWidth = meshGenerator.width; hallHeight = meshGenerator.height; DisplayMaze(); PlaceStartTrigger(startCallback); PlaceGoalTrigger(goalCallback); } GenerateNewMaze() , , , .MazeConstructor , ! , . .
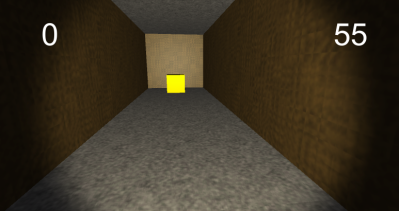
GameController . :
using System; using UnityEngine; using UnityEngine.UI; [RequireComponent(typeof(MazeConstructor))] public class GameController : MonoBehaviour { //1 [SerializeField] private FpsMovement player; [SerializeField] private Text timeLabel; [SerializeField] private Text scoreLabel; private MazeConstructor generator; //2 private DateTime startTime; private int timeLimit; private int reduceLimitBy; private int score; private bool goalReached; //3 void Start() { generator = GetComponent<MazeConstructor>(); StartNewGame(); } //4 private void StartNewGame() { timeLimit = 80; reduceLimitBy = 5; startTime = DateTime.Now; score = 0; scoreLabel.text = score.ToString(); StartNewMaze(); } //5 private void StartNewMaze() { generator.GenerateNewMaze(13, 15, OnStartTrigger, OnGoalTrigger); float x = generator.startCol * generator.hallWidth; float y = 1; float z = generator.startRow * generator.hallWidth; player.transform.position = new Vector3(x, y, z); goalReached = false; player.enabled = true; // restart timer timeLimit -= reduceLimitBy; startTime = DateTime.Now; } //6 void Update() { if (!player.enabled) { return; } int timeUsed = (int)(DateTime.Now - startTime).TotalSeconds; int timeLeft = timeLimit - timeUsed; if (timeLeft > 0) { timeLabel.text = timeLeft.ToString(); } else { timeLabel.text = "TIME UP"; player.enabled = false; Invoke("StartNewGame", 4); } } //7 private void OnGoalTrigger(GameObject trigger, GameObject other) { Debug.Log("Goal!"); goalReached = true; score += 1; scoreLabel.text = score.ToString(); Destroy(trigger); } private void OnStartTrigger(GameObject trigger, GameObject other) { if (goalReached) { Debug.Log("Finish!"); player.enabled = false; Invoke("StartNewMaze", 4); } } } - , — .
- , , .
MazeConstructor, ,Start(),GenerateNewMaze().StartNewGame(), . , , .StartNewMaze(), . , , .Update(), , , . .OnGoalTrigger()OnStartTrigger()— , TriggerEventRouter MazeConstructor .OnGoalTrigger(), , .OnStartTrigger(), , , .
. Unity. Canvas Hierarchy Inspector. Canvas , . , , ( Player , Time Canvas Score ) Inspector. Show Debug , Play:
! , .
?
, . , Unity.
,
FromDimensions() . ; .!
Source: https://habr.com/ru/post/353104/
All Articles