RISC-V core generation and testing
As I wrote in my last post , the name of my project at GSoC-2016 is “RISC-V port at Parallella”, and the first thing I had to do was to get acquainted with the RISC-V ecosystem. One of the best ways to do this is to watch the video from the presentation of the first RISC-V workshop on Youtube. In order to understand the most important concepts, I recommend the following presentations:
Another link if you are interested in Chisel, a Scala-based language that is used to describe the current hardware implementation of the RISC-V core (the Rocket core has an in-order pipeline, BOOM is out-of-order), and any future implementations.
Chisel (Jonathan Bachrach) Quick Guide video slides
')
Working with Rocket Chip, adding extensions, ASIC infrastructure and FPGA (Colin Schmidt) video slides
If you are deeply interested in RISC-V and community development, I invite you to take part in workshops .
Our RISC-V port on Parallella will use a completely standard kernel, generated using Rocket Chip from Chisel sources (the article gives a very good introduction). The end result will be Verilog RTL (in unreadable form, only the source code on Chisel is readable), which we can include in our FPGA project for Parallella, which is available in the Parallella OH (Open Hardware) repository . However, I will not go into details now, all this will be discussed in the following posts.
In order to compile the software for this kernel, you can use the RISC-V GNU toolchain, which can be found here . There are two compilation options: either with the Newlib C library, which is used for programs running on the proxy kernel (proxy kernel, pk) or compiling with the GNU C library (glibc), for compiling Linux and programs for Linux. I compiled both versions ( Linux kernel , release 4.1) using the accompanying instructions, and it all worked, as expected, when simulating in Spike , the reference simulator RISC-V ISA.
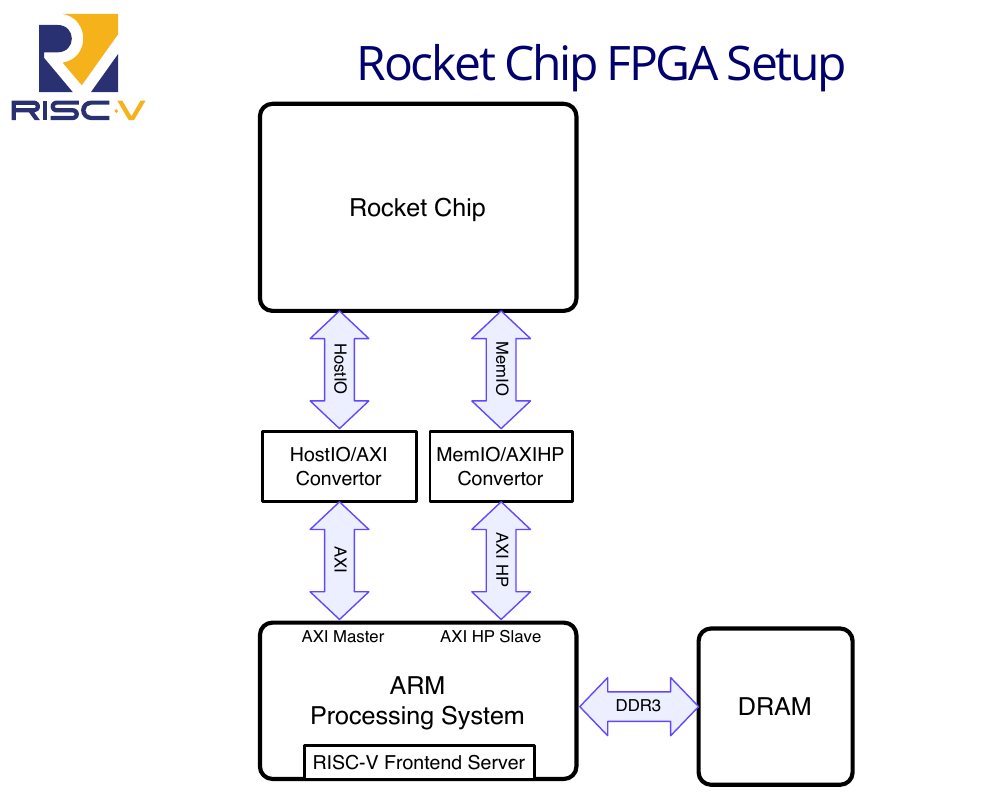
The main repository of Rocket Chip is connected by using Git submodules with all the repositories containing source codes (mainly Chisel), which are needed for proper generation using their wrapper files located in src / main / scala /. Each submodule is associated with a particular commit, obviously working, as a result, the assembly is stable. Personally, I did not encounter any errors when generating the default RV64G core (64 bits, [I] nteger, [M] ultiply / Division, [A] tomic, [F] Single Floating, [D] ouble Floating), the shortening of IMAFD is reduced to G (General) containing L1 instruction and data caches, TLB and FPU with MemIO and HostIO interfaces for communication with the outside world.
In a typical FPGA system (as shown in the diagram from the Y.Lee Rocket Chip presentation ), these two interfaces are needed to access the main memory and to load the RISC-V core (bootstrap). The latter is used to control CSR (control-status registers) and support system calls (for I / O operations) from the target machine (which runs the proxy kernel or the Linux kernel) to the host machine (that is, to the dual core ARM processor in Zynq FPGA) running riscv-fesvr instance (front end server) to dispatch system calls to the operating system (i.e. ARM Linux).
To configure the kernel, you can also change the values inside the Config.scala file . This file contains a set of configurations for various applications (C ++ model, normal sized FPGA, small FPGA, VLSI, etc.). Whatever the script does that takes the variable CONFIG = XXX (i.e. DefaultFPGAConfig), this sets the desired configuration used to build the C ++ simulator or Verilog RTL for FPGA or VLSI. This is a very useful thing if you want to experiment with various available options, quickly generate and test them in software or hardware.
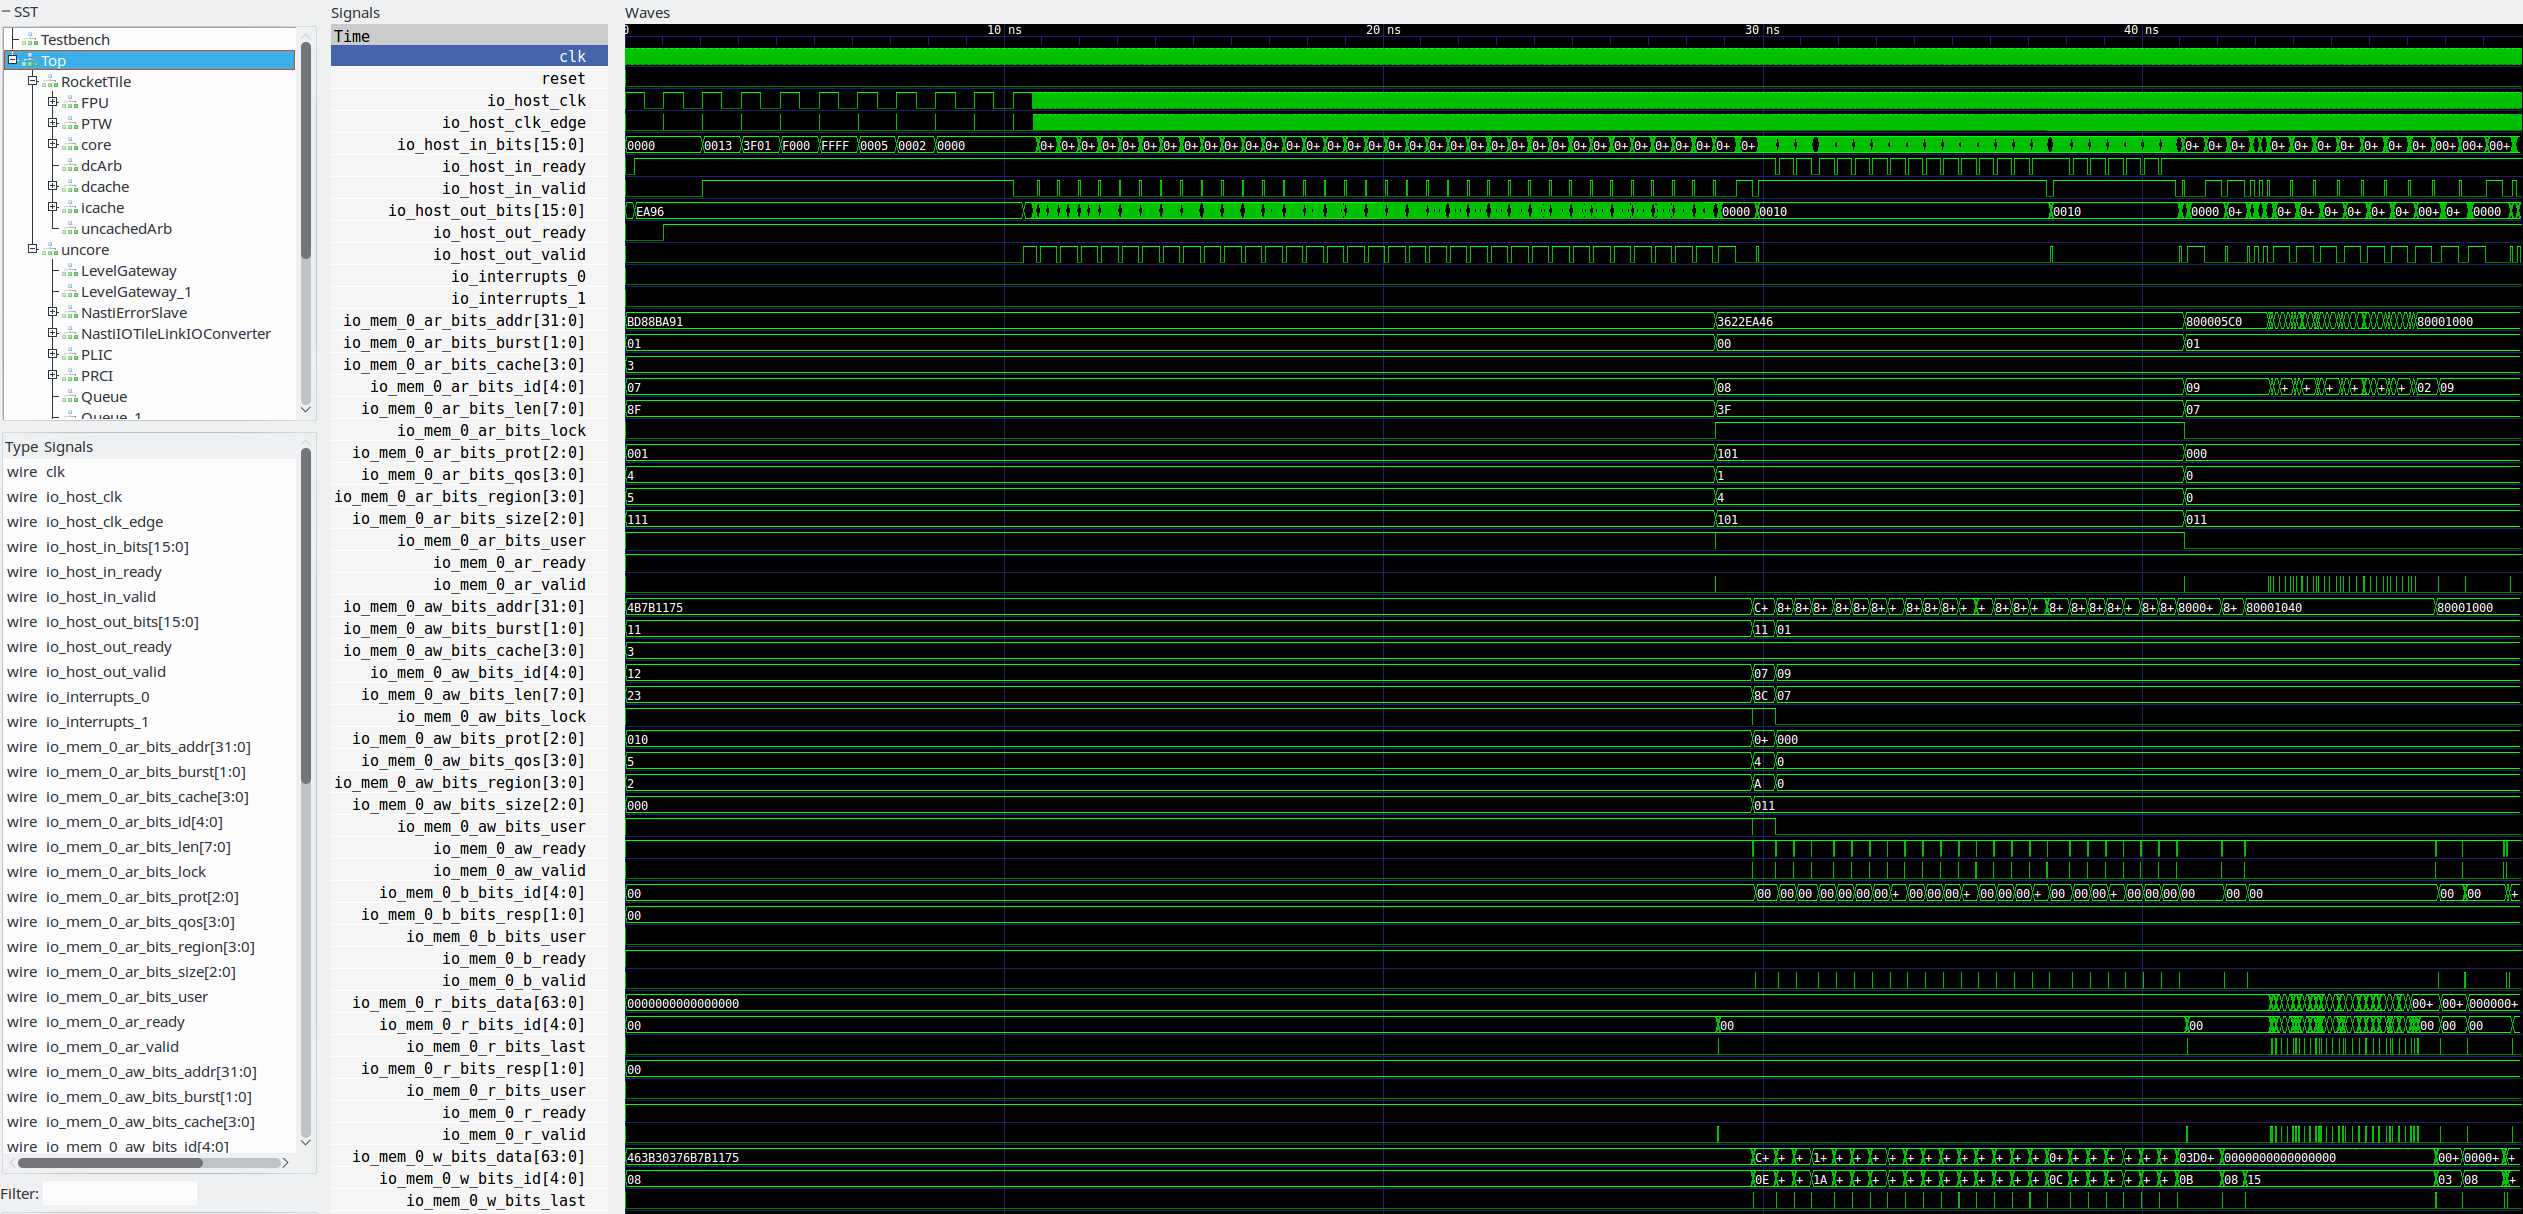
It is a good idea to compile the toolchain (with Newlib is best) before generating any kernels, since you need to compile and run tests to verify your kernel using the C ++ simulator or Synopsys VCS. Unfortunately, I was able to use only the first, but not the last. You cannot use any Verilog simulator (for example, Verilator, Icarus Verilog, Modelsim, QuestSim), since the testbench uses DirectC functions (linking Verilog testbenches and arbitrary C / C ++ code). Fortunately, the C ++ simulator provides VCD output and I was able to use GTKWave to view the generated test benchmarks.
I also added a session with simple commands needed to build the RISC-V toolchain and generate the RV64G core for FPGA. These commands will be added to the final compilation script, which I am developing to fully automate everything necessary to get the RISC-V working core inside the Zynq chip on Parallella.
In the next post, we will look at how to get an IP block from the generated RV64G core so that it can be easily connected to projects, for testing on Zedboard or for use in a large project on Parallella.
- Introduction (Krste Asanović) video slides
- Tulchain RISC-V (Andrew Waterman) video slides
- RISC-V SoC Generator “Rocket Chip” in Chisel (Yunsup Lee) video slides
- The structure of the software stack RISC-V (Sagar Karandikar) video slides
- Debugging on RISC-V (Albert Ou) video slides
- Porting RISC-V with OpenEmbedded (Martin Maas) video slides
- RISC-V Test Environment (Stephen Twigg) Video Slides
Another link if you are interested in Chisel, a Scala-based language that is used to describe the current hardware implementation of the RISC-V core (the Rocket core has an in-order pipeline, BOOM is out-of-order), and any future implementations.
Chisel (Jonathan Bachrach) Quick Guide video slides
')
Working with Rocket Chip, adding extensions, ASIC infrastructure and FPGA (Colin Schmidt) video slides
If you are deeply interested in RISC-V and community development, I invite you to take part in workshops .
Our RISC-V port on Parallella will use a completely standard kernel, generated using Rocket Chip from Chisel sources (the article gives a very good introduction). The end result will be Verilog RTL (in unreadable form, only the source code on Chisel is readable), which we can include in our FPGA project for Parallella, which is available in the Parallella OH (Open Hardware) repository . However, I will not go into details now, all this will be discussed in the following posts.
In order to compile the software for this kernel, you can use the RISC-V GNU toolchain, which can be found here . There are two compilation options: either with the Newlib C library, which is used for programs running on the proxy kernel (proxy kernel, pk) or compiling with the GNU C library (glibc), for compiling Linux and programs for Linux. I compiled both versions ( Linux kernel , release 4.1) using the accompanying instructions, and it all worked, as expected, when simulating in Spike , the reference simulator RISC-V ISA.
The main repository of Rocket Chip is connected by using Git submodules with all the repositories containing source codes (mainly Chisel), which are needed for proper generation using their wrapper files located in src / main / scala /. Each submodule is associated with a particular commit, obviously working, as a result, the assembly is stable. Personally, I did not encounter any errors when generating the default RV64G core (64 bits, [I] nteger, [M] ultiply / Division, [A] tomic, [F] Single Floating, [D] ouble Floating), the shortening of IMAFD is reduced to G (General) containing L1 instruction and data caches, TLB and FPU with MemIO and HostIO interfaces for communication with the outside world.
In a typical FPGA system (as shown in the diagram from the Y.Lee Rocket Chip presentation ), these two interfaces are needed to access the main memory and to load the RISC-V core (bootstrap). The latter is used to control CSR (control-status registers) and support system calls (for I / O operations) from the target machine (which runs the proxy kernel or the Linux kernel) to the host machine (that is, to the dual core ARM processor in Zynq FPGA) running riscv-fesvr instance (front end server) to dispatch system calls to the operating system (i.e. ARM Linux).
To configure the kernel, you can also change the values inside the Config.scala file . This file contains a set of configurations for various applications (C ++ model, normal sized FPGA, small FPGA, VLSI, etc.). Whatever the script does that takes the variable CONFIG = XXX (i.e. DefaultFPGAConfig), this sets the desired configuration used to build the C ++ simulator or Verilog RTL for FPGA or VLSI. This is a very useful thing if you want to experiment with various available options, quickly generate and test them in software or hardware.
It is a good idea to compile the toolchain (with Newlib is best) before generating any kernels, since you need to compile and run tests to verify your kernel using the C ++ simulator or Synopsys VCS. Unfortunately, I was able to use only the first, but not the last. You cannot use any Verilog simulator (for example, Verilator, Icarus Verilog, Modelsim, QuestSim), since the testbench uses DirectC functions (linking Verilog testbenches and arbitrary C / C ++ code). Fortunately, the C ++ simulator provides VCD output and I was able to use GTKWave to view the generated test benchmarks.
I also added a session with simple commands needed to build the RISC-V toolchain and generate the RV64G core for FPGA. These commands will be added to the final compilation script, which I am developing to fully automate everything necessary to get the RISC-V working core inside the Zynq chip on Parallella.
# Rocket Chip git clone https://github.com/ucb-bar/rocket-chip.git cd rocket-chip git submodule update --init export TOP=$(pwd) # (Ubuntu) sudo apt-get install autoconf automake autotools-dev curl \ libmpc-dev libmpfr-dev libgmp-dev gawk build-essential bison flex \ texinfo gperf libtool patchutils bc # RISC-V ( Newlib ) export RISCV=$TOP/riscv-tools # , , ) export PATH=$PATH:$RISCV/bin cd $RISCV git submodule update --init --recursive # build.common # JOBS = / , ./build.sh # RISC-V, # Spike ( ISA) # - (pk) cd $TOP echo -e '#include <stdio.h>\n int main(void) \ { printf("Hello world!\\n"); return 0; }' > hello.c riscv64-unknown-elf-gcc -o hello hello.c spike pk hello # : Rocket Chip # -j8 -jN ( / ) cd $TOP/emulator make # (: ) # make -j8 run-asm-tests # make -j8 run-bmark-tests # : make output/rv64ui-p-add.out # : Rocket Chip VCD # -j8 -jN cd $TOP/emulator # vcd2vpd, src/main/scala/Testing.scala # .vpd .vcd (6 ) make debug # (: ) # make -j8 run-asm-tests-debug # make -j8 run-bmark-tests-debug # # vcd2vpd: make output/rv64ui-p-add.vcd # Rocket Chip Verilog RTL FPGAs ( fsim/generated-src/) # "DefaultFPGAConfig", # , "SmallFPGAConfig" FPU # . make CONFIG=ConfigName verilog # (src/main/scala/Configs.scala) # Verilog RTL Top.ConfigName.v cd $TOP/fsim make verilog In the next post, we will look at how to get an IP block from the generated RV64G core so that it can be easily connected to projects, for testing on Zedboard or for use in a large project on Parallella.
Source: https://habr.com/ru/post/352928/
All Articles