Creating a game on Lua and LÖVE - 6
Table of contents
14. Console
15. Final
Table of contents
- Article 1
- Part 1. Game cycle
- Part 2. Libraries
- Part 3. Rooms and areas
- Part 4. Exercises
- Article 2
- Part 5. Basics of the game
- Part 6. Basics of the Player Class
- Article 3
- Part 7. Player Parameters and Attacks
- Part 8. Enemies
- Article 4
- Part 9. Director and game cycle
- Part 10. Code Writing Practices
- Part 11. Passive skills
- Article 5
- Part 12. Other Passive Skills
- Article 5
- Part 13. The skill tree
14. Console
15. Final
Part 13: The skill tree
Introduction
In this part of the article we will focus on creating a tree of skills. Here is what it looks like now . We will not locate each node manually (I will leave this as an exercise), but consider everything necessary for the implementation and proper operation of the tree of skills.
First, we will look at how to set each node, then learn how to read these definitions, create the necessary objects, and apply appropriate passive skills to the player. Then we move on to the main objects (nodes and links), and then consider saving and loading the tree. And at the end we implement the functionality necessary for the player to spend skill points on tree nodes.
Skill tree
A skill tree can be defined in many different ways, each with its own advantages and disadvantages. We can choose from about three options:
')
- Create a skill tree editor that places, connects and determines the parameters of each node visually;
- Create a skill tree editor that places and links nodes visually, but defines the parameters for each node in a text file;
- Define everything in a text file.
I am one of those people who want to make implementation as easy as possible and who have no problems with doing a large amount of manual and boring work, so I usually solve problems in this way. That is, of the three options proposed above, I tend to the third.
For the first two options, we would need to create a visual skill tree editor. To understand what this entails, we must try to list the high-level functions that the visual editor of the skill tree must have:
- Placement of new nodes
- Tying nodes together
- Deleting nodes
- Moving nodes
- Text input to define the parameters of each node
I only thought of these high-level features that imply other functions:
- The nodes are likely to somehow align with each other, that is, we need some sort of alignment system. Perhaps the nodes can be placed only in accordance with a certain grid system.
- Linking, deleting, and moving nodes implies that we need to be able to select certain nodes to which we want to apply such actions. This means that we also have to implement the node selection function.
- If we choose the option in which the parameters are determined visually, then text input is required. You can organize the correct operation of the TextInput element in LÖVE in several ways, with a little effort ( github.com/keharriso/love-nuklear ), so we only need to add the logic of the display of the text input element and read information from it after writing.
As you can see, adding the skill tree editor does not seem like a lot of work compared to what we have already done. Therefore, if you want to choose this option, then it is quite viable and can in your case improve the process of creating a tree of skills. But as I said, I usually have no problems with performing large volumes of manual and boring work, that is, I can easily determine everything in a text file. Therefore, in this article we will not implement any skill tree editor and fully define it in a text file.
Tree definition
So, to start defining a tree, we need to think about what elements the node consists of:
- Passive skill text:
- Title
- Parameters that can be changed (6% Increased HP, +10 Max Ammo, etc.)
- Position
- Attached nodes
- Node type (normal, medium or large)
An example of a “4% Increased HP” node is shown in the gif below:

For example, it may have the following definition:
tree[10] = { name = 'HP', stats = { {'4% Increased HP', 'hp_multiplier' = 0.04} } x = 150, y = 150, links = {4, 6, 8}, type = 'Small', } We believe that
(150, 150) is a suitable position, and the positions in the tree table of the nodes associated with it are 4, 6, and 8 (the position of the node is 10, since it is defined in the tree[10] ). Thus, we can easily define hundreds of tree nodes, pass this huge table to a certain function that considers it, creates Node objects and associates them in an appropriate way, after which we can apply any necessary logic to the tree.Nodes and Camera
Now that we have an idea of how the tree file will look like, we can begin the implementation on this basis. The first thing we need is to create a new room
SkillTree and then use gotoRoom to go into it at the beginning of the game (because now we will work in it). The basics of this room will be the same as that of the Stage room, so I will assume that you will manage to create it yourself.We will define two nodes in the
tree.lua file, but for now we will do it only by their position. Our goal is to read these nodes from a file and create them in the SkillTree room. We can define them as follows: tree = {} tree[1] = {x = 0, y = 0} tree[2] = {x = 32, y = 0} And we can consider them as follows:
function SkillTree:new() ... self.nodes = {} for _, node in ipairs(tree) do table.insert(self.nodes, Node(node.x, node.y)) end end Here we believe that all objects of our SkillTree will not be inside the Area, that is, we do not need to use
addGameObject to add a new game object to the environment. It also means that we will need to track existing objects on our own. In this case, we do this in the nodes table. The Node object looks like this: Node = Object:extend() function Node:new(x, y) self.x, self.y = x, y end function Node:update(dt) end function Node:draw() love.graphics.setColor(default_color) love.graphics.circle('line', self.x, self.y, 12) end This is a simple object that does not extend the capabilities of GameObject at all. For now, we’ll just draw in his position as a circle. If we go around the list of
nodes and call update / draw for each node that is in it, assuming the camera is fixed at position 0, 0 (unlike the Stage room, where it is fixed at gw/2, gh/2 ) then it should look like this:
As expected, we see here both nodes that are defined in the tree file.
Camera
For the skill tree to work properly, we need to change the camera's work slightly. As long as we have the same behavior as in the Stage room, then the camera is simply tied to the position and does not do anything interesting. But in SkillTree, we want the camera to move with the mouse, and the player can move it away (and zoom in back), so that we can see most of the tree at the same time.
To move the camera, we want to make sure that when the player holds the left mouse button and drags the screen, it moves in the opposite direction. That is, when the player holds the button and moves the mouse up, we want the camera to move down. The easiest way to achieve this is by tracking the position of the mouse in the previous frame, as well as in the current frame, and then moving in the direction opposite to the vector
current_frame_position - previous_frame_position . It all looks like this: function SkillTree:update(dt) ... if input:down('left_click') then local mx, my = camera:getMousePosition(sx, sy, 0, 0, sx*gw, sy*gh) local dx, dy = mx - self.previous_mx, my - self.previous_my camera:move(-dx, -dy) end self.previous_mx, self.previous_my = camera:getMousePosition(sx, sy, 0, 0, sx*gw, sy*gh) end If you check, then everything will work as intended. Note that
camera:getMousePosition slightly changed compared to the default functionality , since we work with the canvas in a different way than the library expects. I changed it a long time ago, so I don’t remember why I did it, so I’ll just leave it at that. But if you're curious, then it is worth considering this in more detail and figuring out whether to do it this way, or there is a way to use the default camera module without changes.As far as distance / approximation is concerned, we simply change the camera's
scale property when scrolling the mouse wheel up / down: function SKillTree:update(dt) ... if input:pressed('zoom_in') then self.timer:tween('zoom', 0.2, camera, {scale = camera.scale + 0.4}, 'in-out-cubic') end if input:pressed('zoom_out') then self.timer:tween('zoom', 0.2, camera, {scale = camera.scale - 0.4}, 'in-out-cubic') end end Here we use a timer to make the scaling a bit smoother and look better. In addition, we give both timers the same
'zoom' id, because we want one tween to stop when we start the other. The only thing that remains in this code snippet is the addition of lower and upper scale limits, because we do not want it, for example, to go below.Links and Parameters
Thanks to the previous code, we can add nodes and move through the tree. Now we will look at connecting nodes and displaying their parameters.
To link the nodes, we will create a
Line object, and this Line object will receive in its constructors the id two nodes it connects. id denotes the index of the node in the tree object. That is, a node created from tree[2] will have id = 2 . We can modify the Node object as follows: function Node:new(id, x, y) self.id = id self.x, self.y = x, y end And we can create a Line object like this:
Line = Object:extend() function Line:new(node_1_id, node_2_id) self.node_1_id, self.node_2_id = node_1_id, node_2_id self.node_1, self.node_2 = tree[node_1_id], tree[node_2_id] end function Line:update(dt) end function Line:draw() love.graphics.setColor(default_color) love.graphics.line(self.node_1.x, self.node_1.y, self.node_2.x, self.node_2.y) end Here we use the passed identifiers to get the corresponding nodes and save to
node_1 and node_2 . Then we simply draw a line between the positions of these nodes.Now in the SkillTree room we need to create Line objects based on the
links table of each node in the tree. Suppose we have a tree that looks like this: tree = {} tree[1] = {x = 0, y = 0, links = {2}} tree[2] = {x = 32, y = 0, links = {1, 3}} tree[3] = {x = 32, y = 32, links = {2}} We want node 1 to be connected to node 2, node 2 to be connected to node 1 and 3, and node 3 to be connected to node 2. From the point of view of implementation, we must go through each node and each of its links, and then Based on these relationships, create Line objects.
function SkillTree:new() ... self.nodes = {} self.lines = {} for id, node in ipairs(tree) do table.insert(self.nodes, Node(id, node.x, node.y)) end for id, node in ipairs(tree) do for _, linked_node_id in ipairs(node.links) do table.insert(self.lines, Line(id, linked_node_id)) end end end The last thing we can do here is draw the nodes using the
'fill' mode, otherwise, the lines will be superimposed on the nodes and will be issued a little: function Node:draw() love.graphics.setColor(background_color) love.graphics.circle('fill', self.x, self.y, self.r) love.graphics.setColor(default_color) love.graphics.circle('line', self.x, self.y, self.r) end And after that, everything should look like this:

We now turn to the parameters: let's say we have such a tree:
tree[1] = { x = 0, y = 0, stats = { '4% Increased HP', 'hp_multiplier', 0.04, '4% Increased Ammo', 'ammo_multiplier', 0.04 }, links = {2} } tree[2] = {x = 32, y = 0, stats = {'6% Increased HP', 'hp_multiplier', 0.04}, links = {1, 3}} tree[3] = {x = 32, y = 32, stats = {'4% Increased HP', 'hp_multiplier', 0.04}, links = {2}} We want to achieve the following:
Regardless of distance or approximation, when the user hovers the mouse over a node, he must display his parameters in a small rectangle.
The first thing we can do is find out if the player hovers over the node or not. The easiest way to do this is to check whether the position of the mouse is inside the rectangle defining each node:
function Node:update(dt) local mx, my = camera:getMousePosition(sx*camera.scale, sy*camera.scale, 0, 0, sx*gw, sy*gh) if mx >= self.x - self.w/2 and mx <= self.x + self.w/2 and my >= self.y - self.h/2 and my <= self.y + self.h/2 then self.hot = true else self.hot = false end end For each node, the width and height are determined, so we will check whether the position of the
mx, my mouse is inside the rectangle defined by its width and height. If so, then we set hot to true, otherwise false. That is, hot is just a boolean, telling us if the cursor is pointing at a node.We now turn to drawing a rectangle. We want to draw a rectangle on top of everything that is on the screen, so we cannot do it in the Node class, since each node is drawn sequentially and our rectangle can sometimes end up under one node or another. Therefore, I do it directly in the room SkillTree. It is also important that we do this outside the
camera:attach and camera:detach block, because we want the size of this rectangle to remain the same regardless of the scale.Its basis is as follows:
function SkillTree:draw() love.graphics.setCanvas(self.main_canvas) love.graphics.clear() ... camera:detach() -- Stats rectangle local font = fonts.m5x7_16 love.graphics.setFont(font) for _, node in ipairs(self.nodes) do if node.hot then -- Draw rectangle and stats here end end love.graphics.setColor(default_color) love.graphics.setCanvas() ... end Before drawing a rectangle, we need to find out its width and height. The width depends on the size of its longest parameter, because by definition the rectangle must be larger than it. To do this, we will try to do something like this:
function SkillTree:draw() ... for _, node in ipairs(self.nodes) do if node.hot then local stats = tree[node.id].stats -- Figure out max_text_width to be able to set the proper rectangle width local max_text_width = 0 for i = 1, #stats, 3 do if font:getWidth(stats[i]) > max_text_width then max_text_width = font:getWidth(stats[i]) end end end end ... end The variable
stats will contain a list of parameters for the current node. That is, if we go through the tree[2] node, then the stats will matter {'4% Increased HP', 'hp_multiplier', 0.04, '4% Increased Ammo', 'ammo_multiplier', 0.04} . The parameter table is always divided into three elements. The first is the visual description of the parameter, then comes the variable that changes the Player object, and then the value of this effect. We only need a visual description, that is, we have to go through the table with an increment of 3, which we do in the for loop shown above.After that we need to find the width of the string, taking into account the font used, and for this we use
font:getWidth . The maximum width of all our parameters will be stored in the variable max_text_width , after which we can proceed to drawing the rectangle: function SkillTree:draw() ... for _, node in ipairs(self.nodes) do if node.hot then ... -- Draw rectangle local mx, my = love.mouse.getPosition() mx, my = mx/sx, my/sy love.graphics.setColor(0, 0, 0, 222) love.graphics.rectangle('fill', mx, my, 16 + max_text_width, font:getHeight() + (#stats/3)*font:getHeight()) end end ... end We want to draw a rectangle at the position of the mouse, except that we do not need to use
camera:getMousePosition , because we do not take into account camera transformations. However, we cannot simply use love.mouse.getPosition directly, because the canvas is scaled to sx, sy , that is, the mouse position returned by the LÖVE function is incorrect if the scale of the game is different from 1. Therefore, to get the right value, we need to divide this position on the scale.Having obtained the correct position, we can draw a rectangle with a width of
16 + max_text_width , which gives us a border of 8 pixels on each side, and a height of font:getHeight() + (#stats/3)*font:getHeight() . The first element of this formula ( font:getHeight() ) is used for the same purpose as 16 in the width calculation, that is, it gives the value for the border. In our case, the upper and lower bounds of the rectangle will be equal to font:getHeight()/2 . The second part is simply the height occupied by each line of parameters. Since the parameters are grouped in three, it is logical to consider each parameter as #stats/3 , and then multiply this number by the height of the line.The last thing to do is draw the text. We know that the x position of all texts will be equal to
8 + mx , because we decided that there would be a border of 8 pixels on each side. And we also know that the position of the first text in y will be equal to my + font:getHeight()/2 , because we decided that the border at the top and bottom will be equal to font:getHeight()/2 . We only need to figure out how to draw a few lines, but we already know this because we chose the height of the rectangle to be (#stats/3)*font:getHeight() . This means that each line is drawn 1*font:getHeight() , 2*font:getHeight() and so on. It all looks like this: function SkillTree:draw() ... for _, node in ipairs(self.nodes) do if node.hot then ... -- Draw text love.graphics.setColor(default_color) for i = 1, #stats, 3 do love.graphics.print(stats[i], math.floor(mx + 8), math.floor(my + font:getHeight()/2 + math.floor(i/3)*font:getHeight())) end end end ... end And so we get the result we need. If you look at the whole code, it looks like this:
function SkillTree:draw() love.graphics.setCanvas(self.main_canvas) love.graphics.clear() ... -- Stats rectangle local font = fonts.m5x7_16 love.graphics.setFont(font) for _, node in ipairs(self.nodes) do if node.hot then local stats = tree[node.id].stats -- Figure out max_text_width to be able to set the proper rectangle width local max_text_width = 0 for i = 1, #stats, 3 do if font:getWidth(stats[i]) > max_text_width then max_text_width = font:getWidth(stats[i]) end end -- Draw rectangle local mx, my = love.mouse.getPosition() mx, my = mx/sx, my/sy love.graphics.setColor(0, 0, 0, 222) love.graphics.rectangle('fill', mx, my, 16 + max_text_width, font:getHeight() + (#stats/3)*font:getHeight()) -- Draw text love.graphics.setColor(default_color) for i = 1, #stats, 3 do love.graphics.print(stats[i], math.floor(mx + 8), math.floor(my + font:getHeight()/2 + math.floor(i/3)*font:getHeight())) end end end love.graphics.setColor(default_color) love.graphics.setCanvas() ... end And I know that if I had seen such a code a few years ago, I wouldn’t like it very much. It looks ugly, disordered, and sometimes confusing, but from my experience, stereotypical rendering code in game development looks like this. Everywhere there are a lot of small and seemingly random numbers, a lot of different problems instead of a whole piece of code, and so on. Today I’ve gotten used to this type of code and it’s not annoying me anymore, and I advise you to get used to it too, because if you try to make it cleaner, then in my experience it will only lead to more confusing and less intuitive solutions.
Gameplay
Now that we can arrange nodes and connect them together, we need to encode the logic of buying nodes. A tree will have one or several “entry points” from which a player can start buying nodes, and from which he can only buy nodes adjacent to already purchased ones. For example, in my scheme there is a central initial node, which do not give any bonuses, with which four additional nodes are connected that make up the beginning of the tree:
Suppose now that we have a tree that initially looks like this:
tree = {} tree[1] = {x = 0, y = 0, links = {2}} tree[2] = {x = 48, y = 0, stats = {'4% Increased HP', 'hp_multiplier', 0.04}, links = {3}} tree[3] = {x = 96, y = 0, stats = {'6% Increased HP', 'hp_multiplier', 0.06}, links = {4}} tree[4] = {x = 144, y = 0, stats = {'4% Increased HP', 'hp_multiplier', 0.04}} 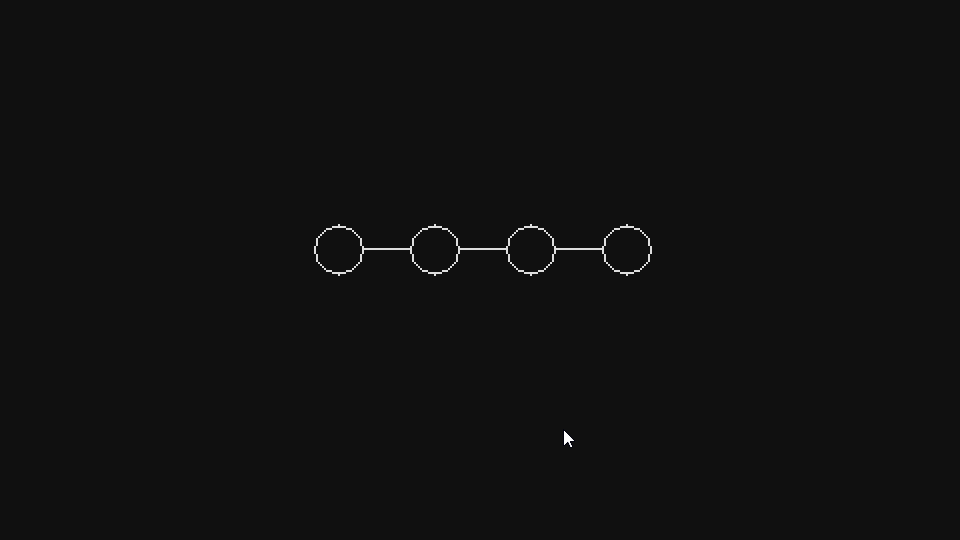
The first thing we need is to make this node 1 already activated, while others are not. By activated node, I mean that it is already purchased by the player and its effects are applied in the gameplay. Since node 1 has no effects, in this way we can create a “source node” from which the tree will grow.
We will do this through the global
bought_node_indexes table, which will simply contain a bunch of numbers pointing to the tree nodes that have already been bought. In our case, we simply add 1 to it, that is, the tree[1] will be active. We also need to slightly change nodes and links graphically so that we can more easily see which ones are active and which ones are not. For now, we will simply display blocked nodes in gray (with alpha = 32 instead of 255), and not white: function Node:update(dt) ... if fn.any(bought_node_indexes, self.id) then self.bought = true else self.bought = false end end function Node:draw() local r, g, b = unpack(default_color) love.graphics.setColor(background_color) love.graphics.circle('fill', self.x, self.y, self.w) if self.bought then love.graphics.setColor(r, g, b, 255) else love.graphics.setColor(r, g, b, 32) end love.graphics.circle('line', self.x, self.y, self.w) love.graphics.setColor(r, g, b, 255) end And for links:
function Line:update(dt) if fn.any(bought_node_indexes, self.node_1_id) and fn.any(bought_node_indexes, self.node_2_id) then self.active = true else self.active = false end end function Line:draw() local r, g, b = unpack(default_color) if self.active then love.graphics.setColor(r, g, b, 255) else love.graphics.setColor(r, g, b, 32) end love.graphics.line(self.node_1.x, self.node_1.y, self.node_2.x, self.node_2.y) love.graphics.setColor(r, g, b, 255) end We activate the line only when both its nodes are purchased, which looks logical. If we say in the room designer SkillTree
bought_node_indexes = {1} , we get something like this:
And if we say that
bought_node_indexes = {1, 2} , then we get this: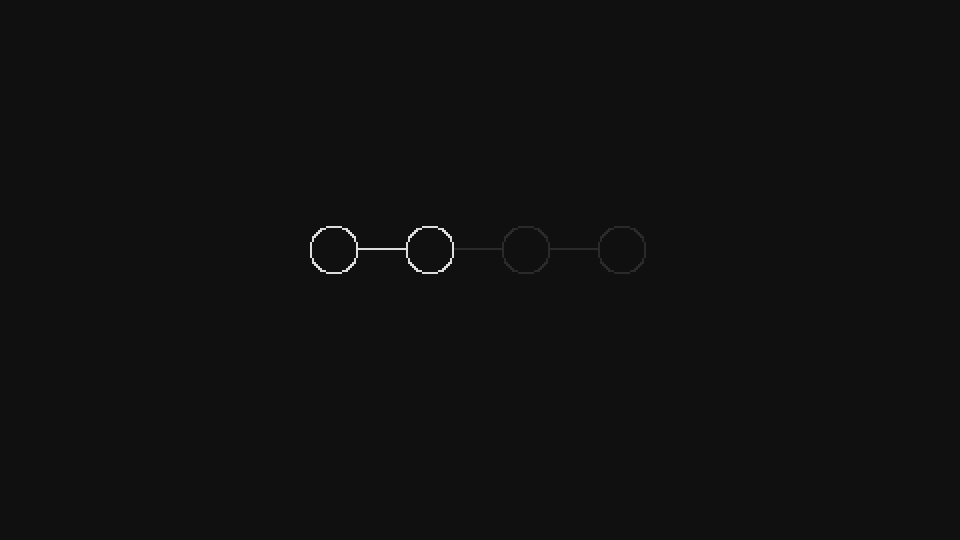
And everything works as we expected. Now we want to add the logic necessary so that when a node is clicked, it is bought, if it is connected to another node that has already been purchased. Determining whether we have enough skill points to purchase a node and adding a confirmation step before purchasing a node will be left for the exercises.
Before we make it possible to buy nodes that are connected to already purchased ones, we need to fix a small problem with how we define our tree. Now we have the following definition:
tree = {} tree[1] = {x = 0, y = 0, links = {2}} tree[2] = {x = 48, y = 0, stats = {'4% Increased HP', 'hp_multiplier', 0.04}, links = {3}} tree[3] = {x = 96, y = 0, stats = {'6% Increased HP', 'hp_multiplier', 0.06}, links = {4}} tree[4] = {x = 144, y = 0, stats = {'4% Increased HP', 'hp_multiplier', 0.04}} One of the problems of this definition is its unidirectionality. And this was logical to expect, since if it were not unidirectional, then we would have to define connections between several nodes many times:
tree = {} tree[1] = {x = 0, y = 0, links = {2}} tree[2] = {x = 48, y = 0, stats = {'4% Increased HP', 'hp_multiplier', 0.04}, links = {1, 3}} tree[3] = {x = 96, y = 0, stats = {'6% Increased HP', 'hp_multiplier', 0.06}, links = {2, 4}} tree[4] = {x = 144, y = 0, stats = {'4% Increased HP', 'hp_multiplier', 0.04, links = {3}}} And although in such an implementation there is no particularly big problem, we can make it so that it is enough to define the connections only once (in any direction), and then apply an operation that automatically makes the connections determined in the opposite direction.
We can do this by walking through the list of all nodes, and then through all the connections of each node. For each link found, we go to the corresponding node and add the current node to its links. For example, if we are in node 1 and see that it is associated with 2, then we go to node 2 and add node 1 to its list of links. Thus, we guarantee that when we have a definition in one direction, there will be a definition and in the opposite direction. In code, it looks like this:
function SkillTree:new() ... self.tree = table.copy(tree) for id, node in ipairs(self.tree) do for _, linked_node_id in ipairs(node.links or {}) do table.insert(self.tree[linked_node_id], id) end end ... end First, it’s worth noting that instead of using the global variable
tree we copy it locally to the self.tree attribute, and then use this attribute. In the objects SkillTree, Node and Line we have to replace the references to the global tree local attribute tree SkillTree. We have to do this because we will change the definition of the tree, adding the numbers of certain nodes to the relationship table, and in the general case (for the reasons explained in Part 10), we do not want to change global variables in this way. This means that every time we enter the SkillTree room, we copy the global definition to a local one and use the local definition in the code.With this in mind, we will now go through all the nodes of the tree and create node feedbacks. It is important to use
ipairs node.links or {} inside the call, because a link table can be defined for some nodes. It is also important to note that we do this before creating Node and Line objects, although this is not necessary.In addition, it should be noted here that sometimes the table
linkswill contain duplicate values. Depending on the way the table is defined, treewe will sometimes have nodes bidirectionally, that is, the links will already be where they should be. This is actually not a problem, except that it can lead to the creation of multiple Line objects. To prevent this, we can re-walk the tree and make sure that all tables linkscontain only unique values: function SkillTree:new() ... for id, node in ipairs(self.tree) do if node.links then node.links = fn.unique(node.links) end end ... end Now the only thing left is to make it so that when we click on a node we check whether it is connected to the node already purchased:
function Node:update(dt) ... if self.hot and input:pressed('left_click') then if current_room:canNodeBeBought(self.id) then if not fn.any(bought_node_indexes, self.id) then table.insert(bought_node_indexes, self.id) end end end ... end And this will mean that if the mouse cursor is
canNodeBeBoughthovered over the node and the player presses the left mouse button, then we check with the help of the SkillTree object function whether this node can be purchased (we will implement the function below). If it can be bought, we add it to the global table bought_node_indexes. Here we also make it so that you cannot add a node to this table twice. Although if we had added it several times, it would not change anything and would not cause any bugs.The function
canNodeBeBoughtworks like this: it passes through the connected nodes to the node that was transferred to it and will check if any of them is inside the table bought_node_indexes. If so, then this node is connected to the already purchased one, that is, you can buy it: function SkillTree:canNodeBeBought(id) for _, linked_node_id in ipairs(self.tree[id]) do if fn.any(bought_node_indexes, linked_node_id) then return true end end end This is what we wanted:
The last problem we will consider is how to apply the effects of the selected nodes to the player. This is simpler than it seems due to the way we structured everything in parts 11 and 12. Now the definition of a tree looks like this:
tree = {} tree[1] = {x = 0, y = 0, links = {2}} tree[2] = {x = 48, y = 0, stats = {'4% Increased HP', 'hp_multiplier', 0.04}, links = {3}} tree[3] = {x = 96, y = 0, stats = {'6% Increased HP', 'hp_multiplier', 0.06}, links = {4}} tree[4] = {x = 144, y = 0, stats = {'4% Increased HP', 'hp_multiplier', 0.04}} As you can see, we have the second parameter value - a string that should point to a variable defined in the Player object. In our case, it is variable
hp_multiplier. If we go back to the Player object and see where it is used hp_multiplier, we will see the following: function Player:setStats() self.max_hp = (self.max_hp + self.flat_hp)*self.hp_multiplier self.hp = self.max_hp ... end It is used in the function
setStatsas a multiplier of base HP, folded with some simple HP value, which we expected. We want the following behavior from the tree: for all nodes inside bought_node_indexeswe apply their parameter to the corresponding player variable. That is, if inside this table there are nodes 2, 3 and 4, then the player must have hp_multiplierequal to 1.14 (0.04 + 0.06 + 0.04 + base equal to 1). We can relatively simply implement it like this: function treeToPlayer(player) for _, index in ipairs(bought_node_indexes) do local stats = tree[index].stats for i = 1, #stats, 3 do local attribute, value = stats[i+1], stats[i+2] player[attribute] = player[attribute] + value end end end We define this function in
tree.lua. As expected, we go through all purchased nodes, and then by their parameters. For each parameter, we take an attribute ( 'hp_multiplier') and value (0.04, 0.06), and then apply them to the player. In the example we are discussing, the line is player[attribute] = player[attribute] + valueparsed into player.hp_multiplier = player.hp_multiplier + 0.04or into player.hp_multiplier = player.hp_multiplier + 0.06, depending on which node we cycle around. This means that by the end of the external for we will apply all purchased passive skills to player variables.It is important to note that various passive skills need to be handled a little differently. Some skills are of type boolean, others must be applied to variables that are Stat objects, and so on. All these differences need to be handled outside of this function.
224. (CONTENT)Implement skill points. We have a global variable
skill_pointsthat stores the amount of skill points a player has. When a player buys a new node in the skill tree, this variable should decrease by 1. The player should not be able to buy more nodes than he has skill points. A player can buy no more than 100 knots. If necessary, you can slightly change these numbers. For example, in my game, the price of each node increases depending on how many nodes the player has already bought.225. (CONTENT)Implement a step before buying nodes, where the player can refuse to buy. This means that the player can click on the nodes, as if buying them, but to confirm the purchase, he must click on the “Apply Points” button. If you click on the “Cancel” button, all selected nodes will be canceled. Here is what it looks like:

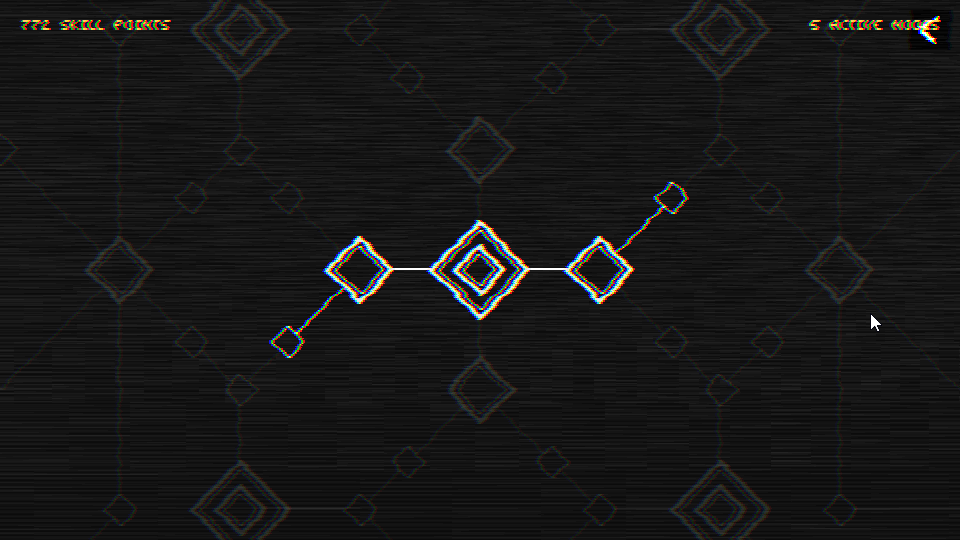
226. (CONTENT) Implement a skill tree. You can make this tree of any size that suits you, but obviously, the larger it is, the more possible interactions it will have and the more interesting it will be. For reference: here is what my tree looks like:

Do not forget to add to each separate type of passive skill the corresponding behaviors in the function
treeToPlayer!END
And this article ends. In the next part we will look at the Console room, and the part after it will be the last. In the last part, we will look at some aspects, one of which is loading and saving. We have not discussed one of the elements of the skill tree, namely the preservation of the nodes purchased by the player. We want these nodes to remain purchased throughout the passage, as well as after closing the game, so in the last part we will consider this feature in more detail.
And as I have said many times before, if you don’t want, you can don’t create a tree of skills. If you performed all the actions from the previous parts, then you already have all realized passive skills from parts 11 and 12, and you can present them to the player in any form convenient for you. I decided to use wood, but you can choose something else if manually creating a huge tree seems like a bad idea to you.
Source: https://habr.com/ru/post/352896/
All Articles