We are preparing an iOS client for GraphQL

I am sure that each of us at least once had problems with the REST API. Eternal battles with back-up for the desired format of the API, several requests for the screen and so on. Agree that this is not uncommon, but a daily routine. And recently, Tribuna Digital launched a new project - Betting Insider. Initially, the project was implemented on iOS and Android, and later the development of the web version began. The existing API was very inconvenient for the web. This all led to the fact that we decided to arrange an experiment and try GraphQL with the client from Apollo. If you want to get acquainted with this technology in iOS closer, then welcome under the cat!
A little bit about GraphQL
GraphQL - (Graph Query Language) is a query language and an instance for handling these queries. To put it simply, this is an interlayer between our servers and the client, which gives the client what he needs from the server. Communication with this layer occurs directly in GraphQL. If you want to read in more detail directly about GraphQL Language and so on, or do not know anything at all, then we read here and here . There, everything is quite detailed and with pictures.
What do we need?
For further work, we need NodeJS , Node Package Manager , CocoaPods .
If you want to highlight graphql queries, then install this plugin . You also need to download a pre-prepared project . And the most important is to get your personal key. Here is the instruction, and we are requesting such an OSP:
')
- user
- repo
What do we do?
We will write a small client for github in which we can find the top 20 repositories for any keyword. To get a feel for the Github API and GraphQL, you can play around here .
Project Setup
Before you start writing code, install some packages and set up a project.
The Apollo library uses code that is generated by their apollo-codegen tool. Install it using npm:
npm install -g apollo-codegen Next, go to the folder with the project and open the Source. Download the diagram of your GraphQL server, and instead of <token> insert your personal key, which you should have done above:
apollo-codegen download-schema https://api.github.com/graphql --output schema.json --header "Authorization: Bearer <token>" Create a GraphQL folder in the Source folder.
Next, you need to register a script for our code generator:
APOLLO_FRAMEWORK_PATH="$(eval find $FRAMEWORK_SEARCH_PATHS -name "Apollo.framework" -maxdepth 1)" if [ -z "$APOLLO_FRAMEWORK_PATH" ]; then echo "error: Couldn't find Apollo.framework in FRAMEWORK_SEARCH_PATHS; make sure to add the framework to your project." exit 1 fi cd "${SRCROOT}/Source" $APOLLO_FRAMEWORK_PATH/check-and-run-apollo-codegen.sh generate $(find . -name '*.graphql') --schema schema.json --output GraphQL/API.swift 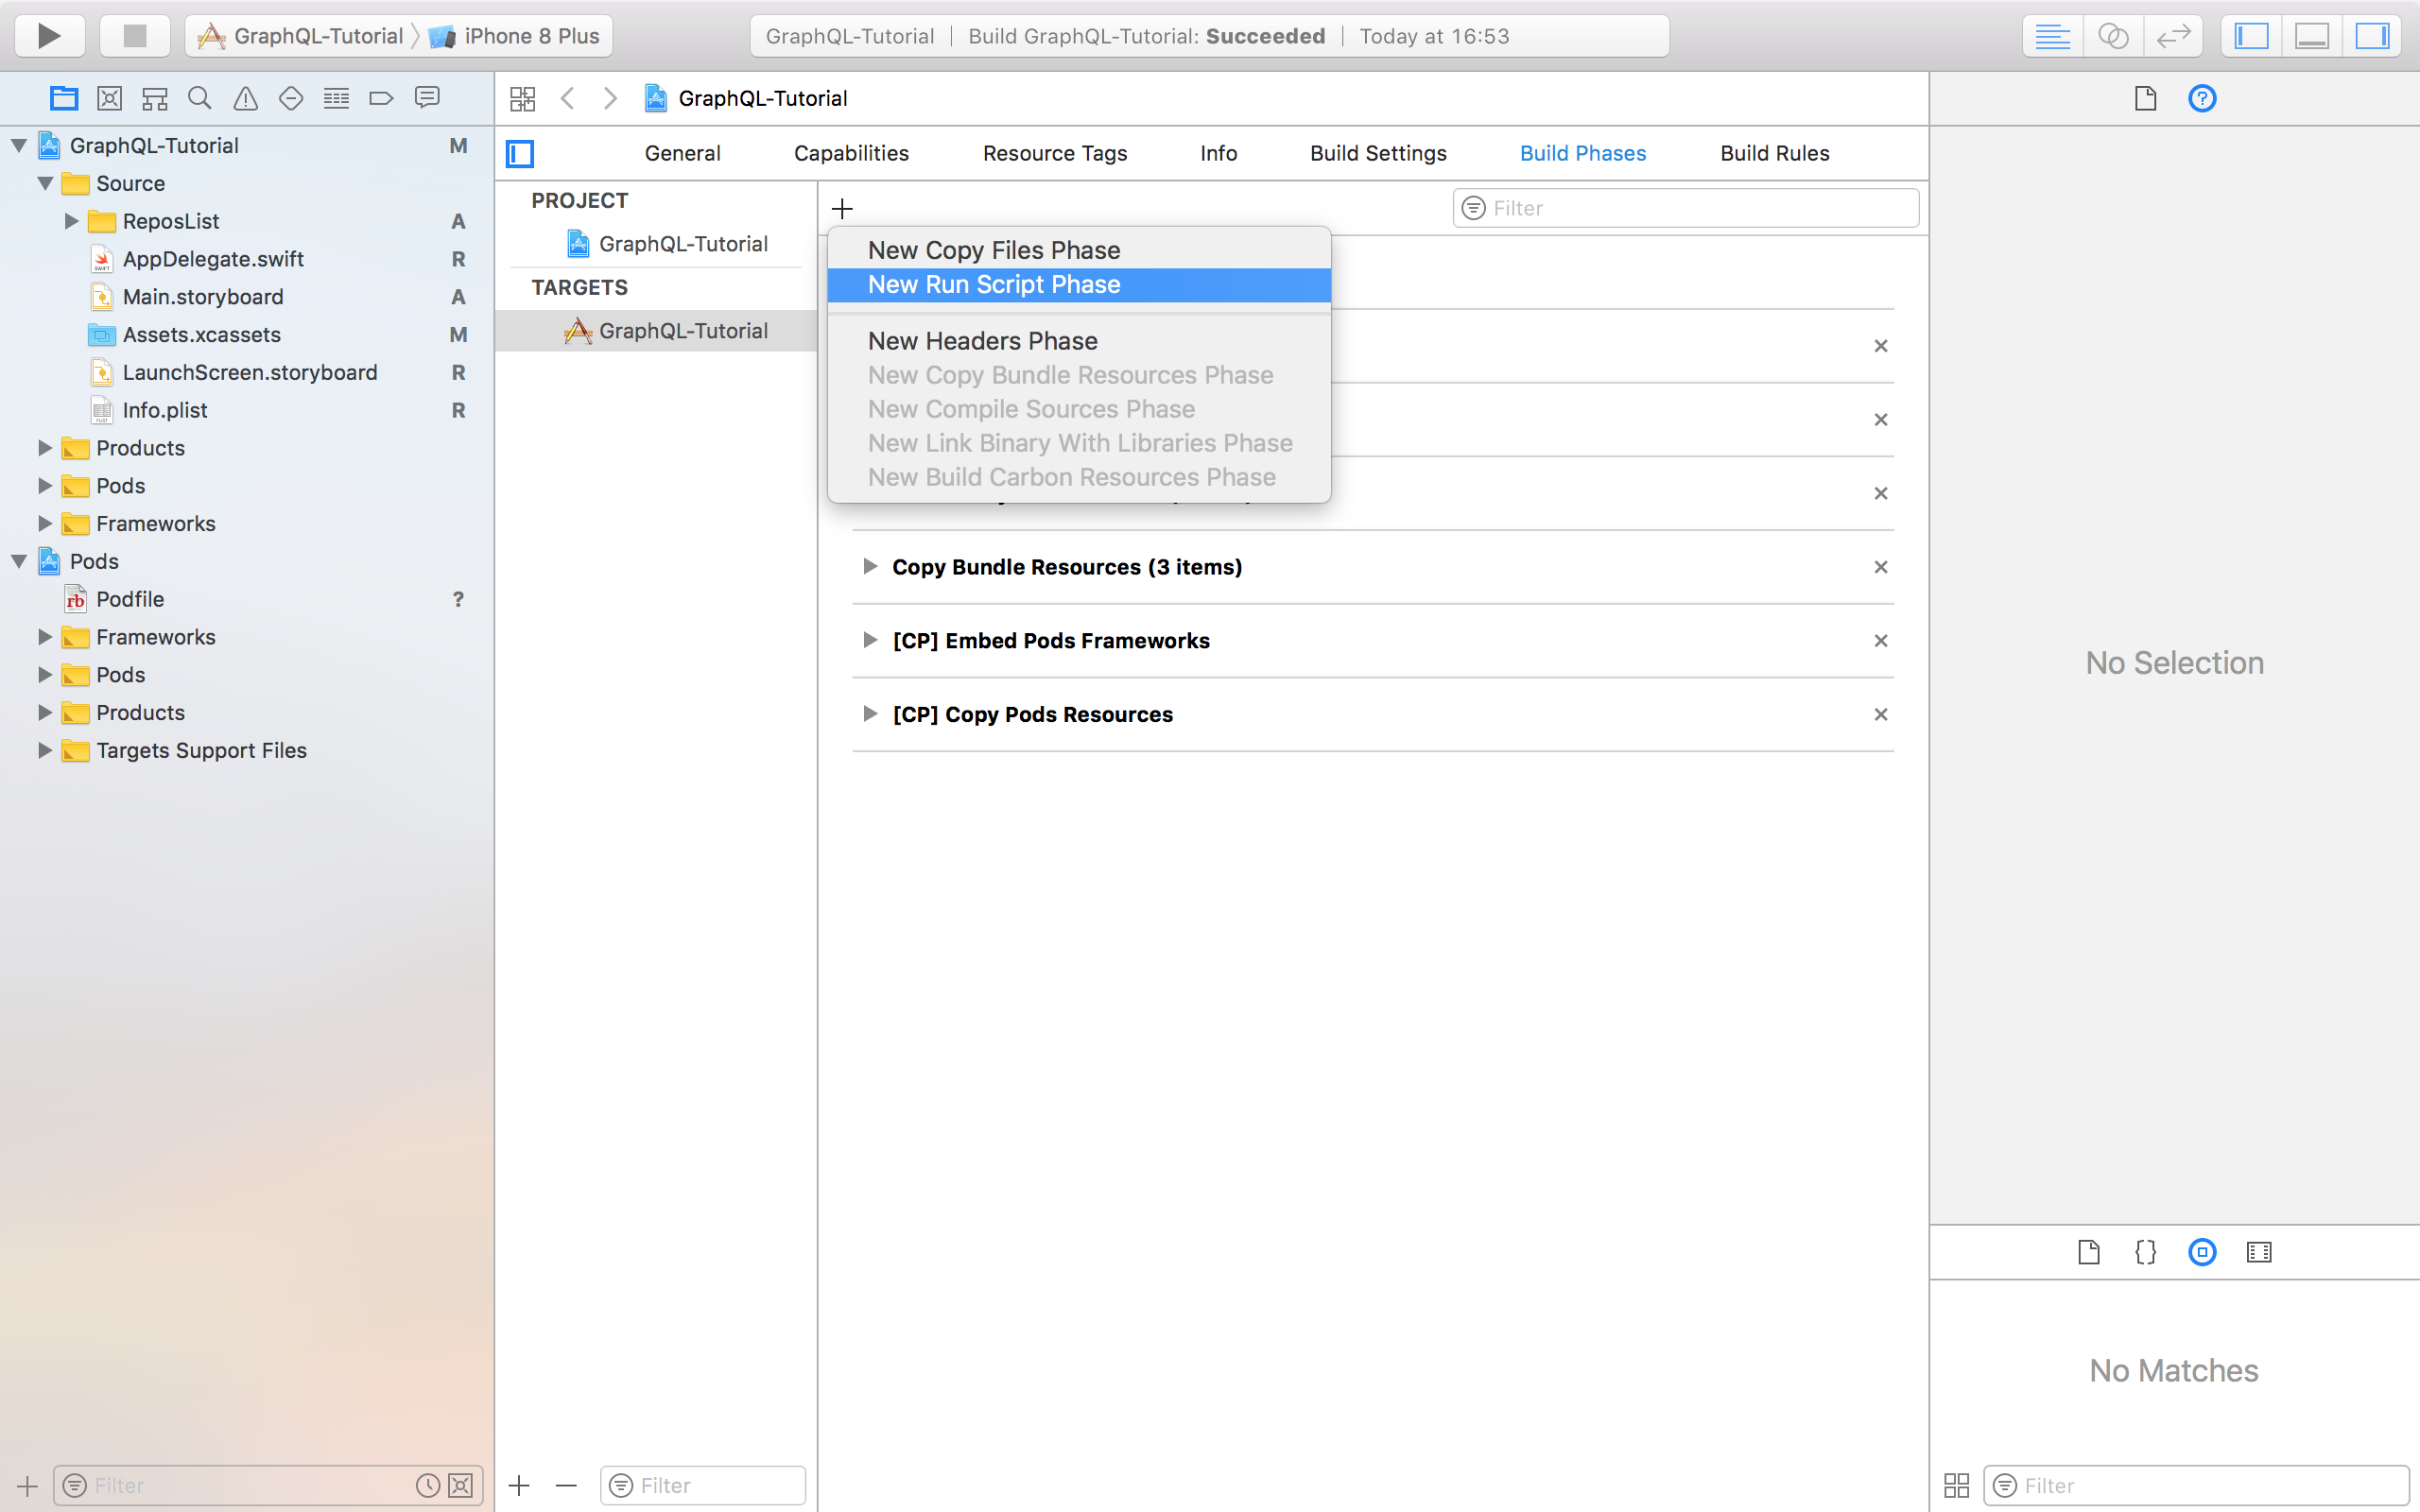
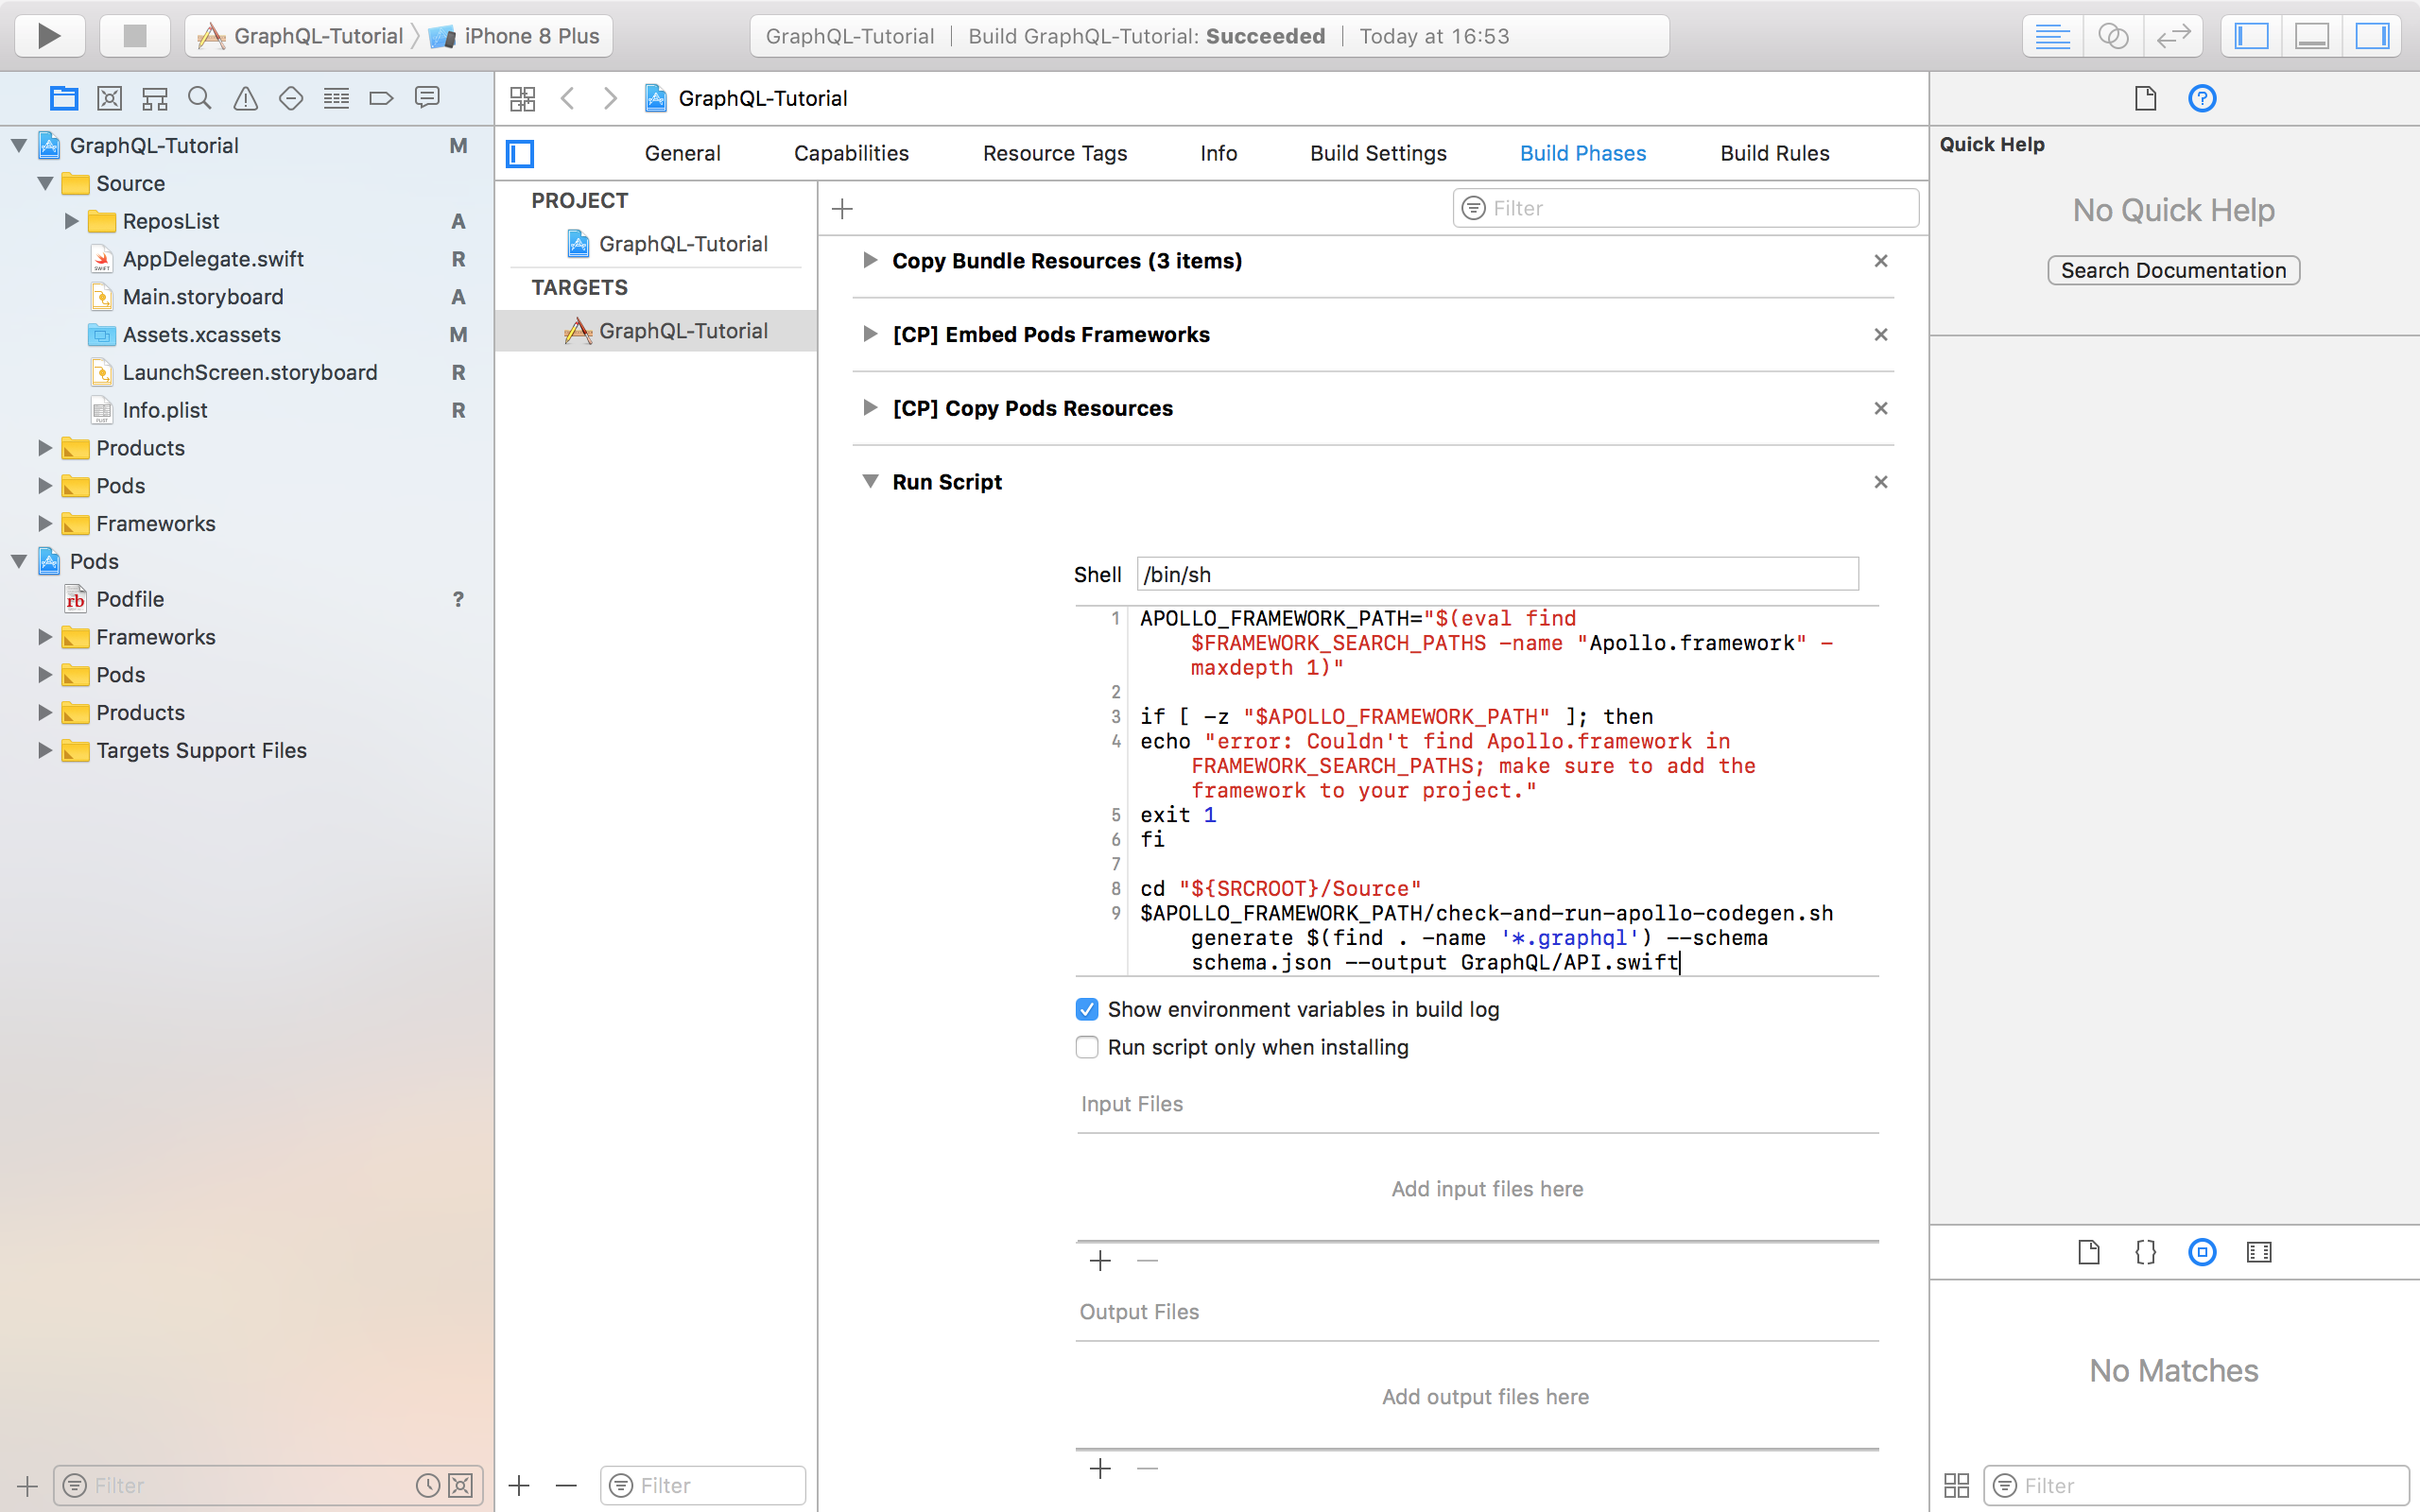
When you first start a project build, this script will create an API.swift file that will contain the necessary code to work with your requests, and will be updated with each build. At the moment, Xcode will generate an error at the build stage, as we are missing something.
Requests
The code generator for creating an API needs a file, where all queries in GraphQL will be written. Create a new empty file in the Source / GraphQL folder (at the bottom of the file list) with the name github.graphql. Next, let's write a query to this file, which will give us the first 20 repositories for the search query, and also immediately determine the fragment for the repository.
query SearchRepos($searchText: String!) { search(first: 20, query: $searchText, type: REPOSITORY) { nodes { ... on Repository { ...RepositoryDetail } } } } fragment RepositoryDetail on Repository { id nameWithOwner viewerHasStarred stargazers { totalCount } } Next, build the project so that the code we need is generated. Add the resulting API.swift file to the project.
IMPORTANT: If you added a new code to * .graphql, first build the project and only then begin to write a new code!
Customer
You need to create an Apollo client. Create it in AppDelegate.swift above the AppDelegate declaration. Since communication with github requires authorization, you need to add a header to all our requests. We get just such a thing:
let apollo: ApolloClient = { let configuration = URLSessionConfiguration.default configuration.httpAdditionalHeaders = ["Authorization": "bearer <your token>"] let url = URL(string: "https://api.github.com/graphql")! return ApolloClient(networkTransport: HTTPNetworkTransport(url: url, configuration: configuration)) }() Search query
Now you need to make sure that when you click on the Search button, we send a request to the server. Create a file ReposListViewModel.swift, but ReposListViewModel. This will be the class that will send our requests to the server, as well as manage the status of existing requests.
To begin, import Apollo, and then create a variable of type Cancellable and call it currentSearchCancellable:
import Apollo class ReposListViewModel { private var currentSearchCancellable: Cancellable? } Next, create a function that will accept the text for the search, and in the callback we will transfer the resulting array. Finally go directly to sending the request! First you need to create a query. Our code generator generated a query for us, which corresponds to the name we gave it in the graphql file: SearchReposQuery, and we will initialize it with the help of search text. Next, to get a response, we call the fetch function in the Apollo client, to which we will transfer our query, and also select the main execution queue and the corresponding caching policy. In callback fetch gives our optional result and error. For the time being we will not think about the error handling, but simply print it in case of occurrence. Let's pull out of the result the RepositoryDetail, which also generated the code generator to us and pass them to the search callback function. Such function will turn out
:
func search(for text: String, completion: @escaping ([RepositoryDetail]) -> Void) { currentSearchCancellable?.cancel() let query = SearchReposQuery(searchText: text) currentSearchCancellable = apollo.fetch(query: query, cachePolicy: .returnCacheDataAndFetch, queue: .main, resultHandler: { (result, error) in if let result = result, let data = result.data { let repositoryDetails = (data.search.nodes ?? [SearchReposQuery.Data.Search.Node?]()).map{$0?.asRepository}.filter{$0 != nil}.map{($0?.fragments.repositoryDetail)!} completion(repositoryDetails) } else { print(error as Any) completion([RepositoryDetail]()) } }) } Now we will create the viewModel as the ReposListViewController parameter, as well as an array for storing the RepositoryDetail:
let viewModel = ReposListViewModel() var repositoryDetails = [RepositoryDetail]() Next, change the numberOfRowsInSection to:
func tableView(_ tableView: UITableView, numberOfRowsInSection section: Int) -> Int { return repositoryDetails.count } Also need to update ReposListCell:
class ReposListCell: UITableViewCell { @IBOutlet weak var repoName: UILabel! @IBOutlet weak var starCount: UILabel! @IBOutlet weak var starButton: UIButton! var repositoryDetail: RepositoryDetail! { didSet { repoName.text = repositoryDetail.nameWithOwner starCount.text = "\(repositoryDetail.stargazers.totalCount)" if repositoryDetail.viewerHasStarred { starButton.setImage( imageLiteral(resourceName: "ic_full_star"), for: .normal) } else { starButton.setImage( imageLiteral(resourceName: "ic_empty_star"), for: .normal) } } } } And cellForRow will take this form:
func tableView(_ tableView: UITableView, cellForRowAt indexPath: IndexPath) -> UITableViewCell { let cell = tableView.dequeueReusableCell(withIdentifier: "ReposListCell") as! ReposListCell cell.repositoryDetail = repositoryDetails[indexPath.row] return cell } It remains to ask the viewModel for the data we need on click:
func searchBarSearchButtonClicked(_ searchBar: UISearchBar) { viewModel.search(for: searchBar.text ?? "") { [unowned self] repositoryDetails in self.repositoryDetails = repositoryDetails self.tableView.reloadData() } } Done! Compile and look for the top 20 repositories for your request!
Put the stars
As you already understood, the star in the layout of the cell is not just. Let's add this functionality to our application. To do this, you need to create a new mutation request, but before that let's get your ID here . Now you can insert a search query with the appropriate clientMutationID and build the project:
mutation AddStar( $repositoryId: ID!) { addStar(input: {clientMutationId: “<your ID>”, starrableId: $repositoryId}) { starrable { ... on Repository { ...RepositoryDetail } } } } mutation RemoveStar($repositoryId: ID!) { removeStar(input: {clientMutationId: “<your ID>”, starrableId: $repositoryId}) { starrable { ... on Repository { ...RepositoryDetail } } } } Add the execution of these requests to the ViewModel. The logic is the same as with query, but instead of fetch, we now call perform:
func addStar(for repositoryID: String, completion: @escaping (RepositoryDetail?) -> Void ) { currentAddStarCancellable?.cancel() let mutation = AddStarMutation(repositoryId: repositoryID) currentAddStarCancellable = apollo.perform(mutation: mutation, queue: .main, resultHandler: { (result, error) in if let result = result, let data = result.data { let repositoryDetails = data.addStar?.starrable.asRepository?.fragments.repositoryDetail completion(repositoryDetails) } else { print(error as Any) completion(nil) } }) } func removeStar(for repositoryID: String, completion: @escaping (RepositoryDetail?) -> Void ) { currentRemoveStarCancellable?.cancel() let mutation = RemoveStarMutation(repositoryId: repositoryID) currentAddStarCancellable = apollo.perform(mutation: mutation, queue: .main, resultHandler: { (result, error) in if let result = result, let data = result.data { let repositoryDetails = data.removeStar?.starrable.asRepository?.fragments.repositoryDetail completion(repositoryDetails) } else { print(error as Any) completion(nil) } }) } Now we need to let the ViewController know that we pressed the button. Make it a cell delegate. To do this, create a protocol and add it to the ReposListCell.swift file:
protocol ReposListCellDelegate: class { func starTapped(for cell: ReposListCell) } Add a new cell class parameter and a star click handling:
weak var delegate: ReposListCellDelegate? override func awakeFromNib() { super.awakeFromNib() starButton.addTarget(self, action: #selector(starTapped), for: .touchUpInside) } @objc func starTapped() { delegate?.starTapped(for: self) } Now let's set the controller as delegate to cellForRow:
func tableView(_ tableView: UITableView, cellForRowAt indexPath: IndexPath) -> UITableViewCell { let cell = tableView.dequeueReusableCell(withIdentifier: "ReposListCell") as! ReposListCell cell.repositoryDetail = repositoryDetails[indexPath.row] cell.delegate = self return cell } Add a function that will update the data in the table:
func updateTableView(for newDetail: RepositoryDetail?) { if let repositoryDetail = newDetail { for (index, detail) in repositoryDetails.enumerated() { if detail.id == repositoryDetail.id { self.repositoryDetails[index] = repositoryDetail for visibleCell in tableView.visibleCells { if (visibleCell as! ReposListCell).repositoryDetail.id == repositoryDetail.id { (visibleCell as! ReposListCell).repositoryDetail = repositoryDetail } } } } } } And it remains to expand the controller for the previously created controller:
extension ReposListViewController: ReposListCellDelegate { func starTapped(for cell: ReposListCell) { if cell.repositoryDetail.viewerHasStarred { viewModel.removeStar(for: cell.repositoryDetail.id) { [unowned self] repositoryDetail in self.updateTableView(for: repositoryDetail) } } else { viewModel.addStar(for: cell.repositoryDetail.id) { [unowned self] repositoryDetail in self.updateTableView(for: repositoryDetail) } } } } Done! We can run the application, search for the top 20 repositories and put / remove asterisks!
This is not all. Interesting is the use of this library in the amount of RxSwift, the solution to the problem of pagination, and Apollo also supports caching, but about everything next time!
If you want to solve such problems with us - join us! Questions and resumes can be sent to mail jobs@tribuna.digital.
More vacancies here!
Source: https://habr.com/ru/post/352850/
All Articles