We write a simple plugin for VirtualDub
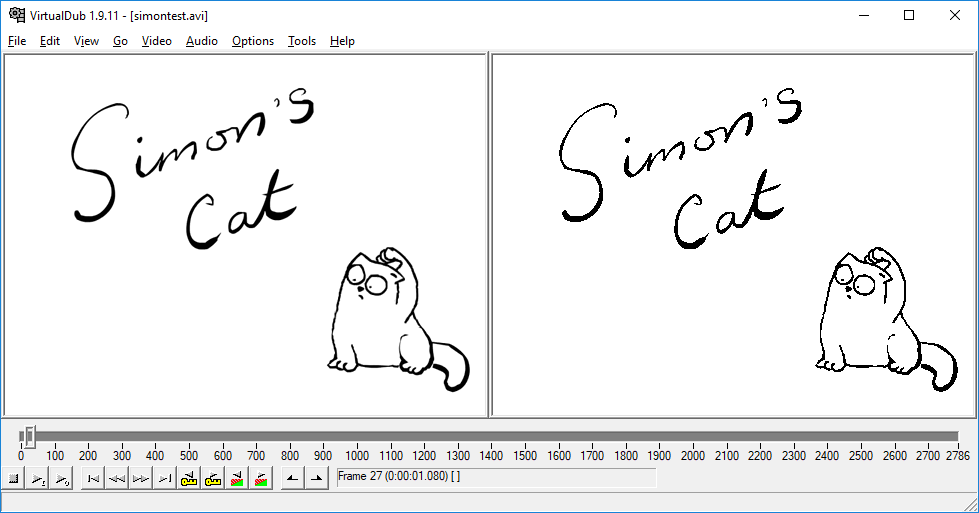
Despite the fact that video processing slowly moves to OpenCL / CUDA VirtualDub remains a convenient tool for simple actions with video. Trimming a frame, adding filters or overlaying is much more convenient than from the ffmpeg console. In addition, over the years, a lot of filters have been developed that allow you to perform many operations quickly and conveniently. Despite the simplicity of the SDK, some nuances arise when writing a plugin. The article is devoted to working with them.
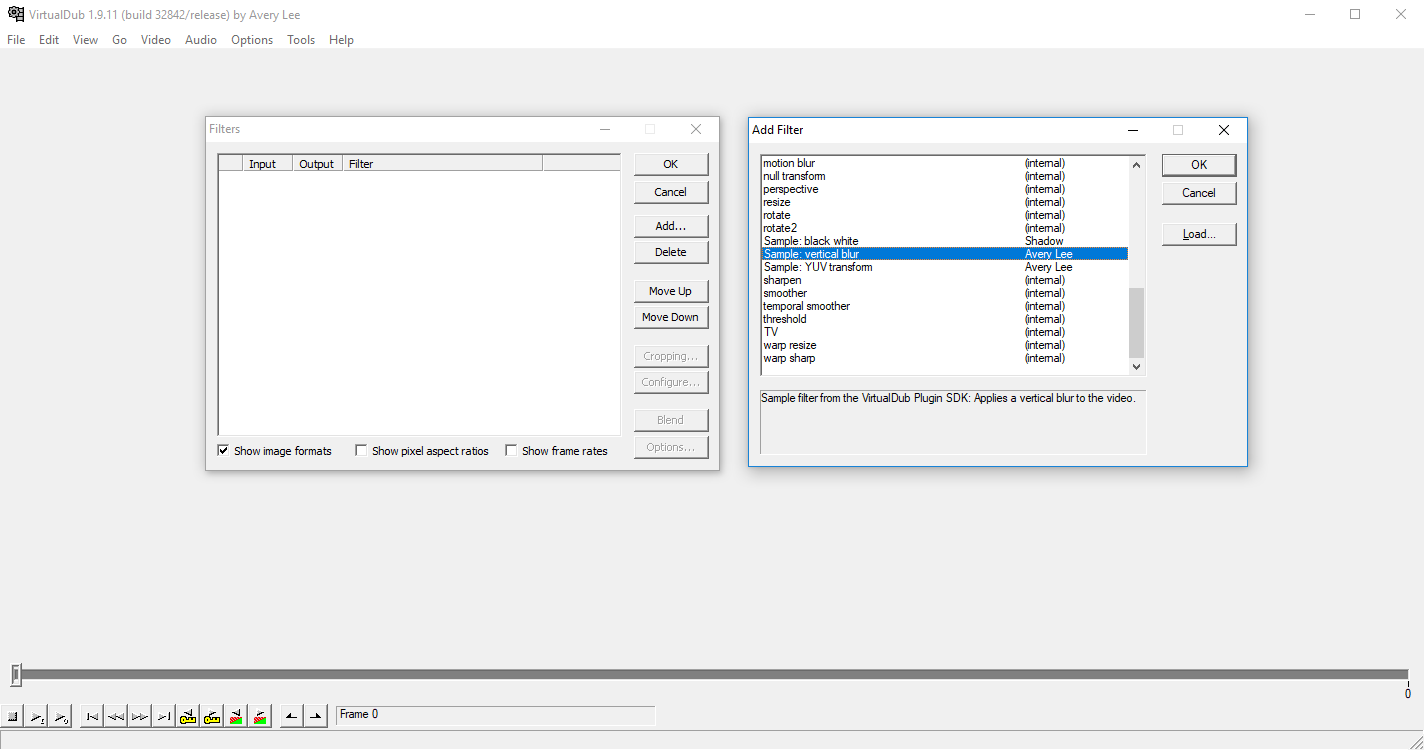
The SDK is available at the link from the author’s site . The latest version is 1.1 (VDPluginSDK-1.1.zip). Download and unpack in a convenient folder for you. Inside there is a help file PluginSDK.chm, a partial translation of which this text is. Development will be conducted in Microsoft Visual Studio Community 2015, you can use both older and newer versions. To check the environment settings, you can use the project files with examples that are in the src folder, Samples.sln for new studio versions or SamplesVC6.dsw for the good old Visual Studio 6. After building the samples, the file SampleVideoFilter.vdf will appear in the out \ Release or out \ Debug folder . This is a test filter. To check it, just put it in the VirtualDub \ plugins folder and add it from the filters menu. If everything works, then Visual Studio is installed correctly.
As an example, we write a filter from scratch. Tutorial is designed for beginners or remembering Win32 API. Create an empty DLL project in the studio.
')
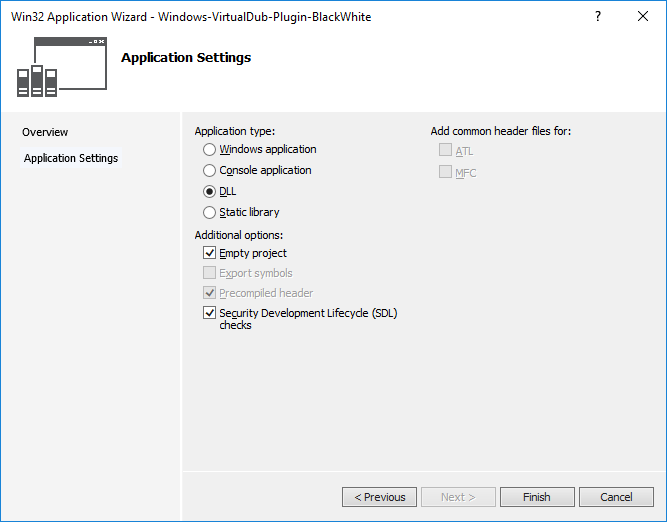
VirtualDub plug-ins have the vdf extension, so in order not to rename it, we change the extension to the properties Properties → General → Target extension to .vdf each time. We change for all configurations, so do not forget to switch them on the Configuration settings tab: to All Configurations and Platform to All platforms.

Copy the include folder from the unpacked SDK into the project and add files from it to the project via Atl-Shift-A or the Add → Existing Item menu. To work, we need the header files from the include folder and the VDXFrame helper file set. Do not forget to add the include folder to the list of folders where the system will search for them. This is done from Properties → VC ++ Directories → Include Directories, add a link to the project root in the form $ (ProjectDir) \ include.

We add the VDXFrame library to the project, in the examples it is used as a separate module, but since the license allows, we will add it in the form of source code. Create the src folder in the project directory and copy the VideoFilter.cpp, VideoFilterEntry.cpp, VideoFilterDialog.cpp and stdafx.cpp files into the SDK from the SDK. Next, copy the header file from include \ stdafx.h to the previously created include folder. Do not forget to add copied files to the project via Atl-Shift-A or from the Add → Existing Item menu. This completes the integration of the helper library.
Moving on to writing code. Add a new main.cpp file to the project via Add → Existing Item or the Ctrl-Shift-A key combination. Add the following lines to main
A plugin can contain an arbitrary number of filters described by the VDX_DECLARE_VIDEOFILTER macro with a parameter in the form of the VDXFilterDefinition class as the employee wrapper above the filter class. The filter itself is described in three text fields: Author, Title and Description. Create a filter class named BlackWhiteFilter, the author of VirtualDub classes are named using CamelCase so we create a new class inherited from VDXVideoFilter in the BlackWhiteFilter.h file. The variable g_VFVAPIVersion will contain the API version. Functions defined with virtual are part of the SDK, and the ToBlackAndWhite method will implement image conversion.
We write the implementation in the BlackWhiteFilter.cpp file, the Start () method is executed first, it is intended for any preliminary actions, for example, to determine compatibility with the AVX instruction set or CUDA support. Leave it empty for now. Within the scope of this class, the VDXFrame helper provides a pointer to an instance of the VDXFilterActivation class, named fa, containing information about the frame and buffers.
The GetParams () method is used by VirtualDub to determine the compatibility of the filter; it must return the bit mask from the FILTERPARAM enumeration.
For a filter that will convert an image of RGB32 to black and white, FILTERPARAM_SWAP_BUFFERS and FILTERPARAM_PURE_TRANSFORM are suitable. If we want to support the color coding different from RGB32 and the SDK version is less than 12, we write a check for g_VFVAPIVersion and if it is supported we check the format of the resulting image in the field fa-> src.mpPixmapLayout-> format. Early versions of VirtualDub did not support the presentation of a color other than RGB32. To simplify processing, we will follow the RGB32 format, but in general VirtualDub supports a large list of formats listed in the VDXPixmapFormat.
Frame processing is performed by the Run () method. Data on the frame and the input and output buffers are stored in the variable fa, which is an instance of the class VDXFilterActivation. VirtualDub supports frame cropping, so the processing algorithm can be optimized by obtaining information about a window selected by the user with coordinates x1, y1, x2, y2. Frame data is stored in the src and dst objects, respectively, the input and output buffer.
If we continue to write code with SDK support less than version 12, the implementation of the Run () method will look like this:
The location of the raw data in the structure depends on the version supported by the plugin. So, 6 parameters will be passed to the ToBlackAndWhite function:
To simplify the code, we will ignore the cropping parameters, so the frame will be processed at the same speed regardless of the Crop parameter in the settings. The point in the buffer is stored in the kPixFormat_XRGB8888 format and occupies 32 bits. We implement the simplest frame conversion to black and white. We don’t have an optimization task, so we’ll consider it by the formula with the calculation in floating point arithmetic
GRAY = 0.299 * R + 0.587 * G + 0.114 * B
We organize two cycles, one goes through the lines and the second through the points; the boundary level for determining the color of the point is assumed to be 128.
We assemble the plugin, copy the Windows-VirtualDub-Plugin-BlackWhite.vdf file into the VirtualDub plugins folder and make it active. In the list it will be visible under the name that we defined in the VDXFilterDefinition class - Black White filter. The plugin compiled for the 64-bit version will not be visible in the 32-bit version of VirtualDub, so do not forget to check the active configuration of the project.
The plugin without settings is pretty dull, we add the ability to configure and preview button. To do this, we would have to dive into the jungle of the Win32 API, but there are enough books written on this topic, so we will not go into details.
For a visual representation of the settings window, we need a dialog box. Create a new resource file via the menu Ctrl-Shift-A → Resource → Resource File with the name Resource.rc. Add a dialog box to it through the Add Resource → Dialog menu and change its name to IDD_DIALOG_BLACKWHITE_SETTING. By default, we already have two buttons, Ok and Cancel. It is better to create resources in the English locale, otherwise you can get a problem with the unreadable Russian font on the Cancel button. Add a preview button to the screen with the name IDC_SLIDER_THRESHOLD. In order not to return later we will add the rest of the controls for the settings, this will be a slider for changing the IDC_SLIDER_THRESHOLD threshold value and the IDbox_CHECK_INVERTED checkbox allowing you to invert the image. It can be done like this.

Create a dialog class BlackWhiteFilterDialog inherited from VDXVideoFilterDialog.
A reference to the IVDXFilterPreview class that controls the preview window is passed to the constructor; we will store the local reference in the mifp variable.
The Show method (HWND parent) is overloaded with a call to the parent constructor and uses the ID of the settings dialog resource IDD_DIALOG_BLACKWHITE_SETTING as a parameter.
DlgProc is used to process messages from the dialog box and implements the processing of the life cycle of the dialog in the OnInit (), OnDestroy () methods and event handling from the controls in OnCommand.
First, let's process the closing of the dialog using the Ok and Cancel buttons. In addition, we need a Preview handler that controls the display of the preview window via the Toggle method ((VDXHWND) mhdlg).
The class for working with the dialog is written, now it needs to be called, for this we overload the Configure method (VDXHWND hwnd) in the BlackWhiteFilter class and implement it
We compile the project, copy the plugin file to the VirtualDub folder, add a new filter to the list and see our dialog and the available Preview button.

We have a configuration window, but the filter has no settings yet, we proceed to the implementation. The settings will be stored in the BlackWhiteFilterConfig class containing only two variables, mTreshold as the threshold value and the inversion flag mInvert.
Edit the BlackWhiteFilterDialog class by adding two BlackWhiteFilterConfig instances to it to store the mConfigNew and mConfigOld configurations. These variables will keep the old and changed state of the settings and we will need to use the button
Ok and Cancel. Edit the constructor by adding a parameter that stores the settings and initializes the configuration.
The settings should be stored somewhere, add the BlackWhiteFilterConfig mConfig variable to the BlackWhiteFilter class and change the initialization of the BlackWhiteFilterDialog class in the Configure method to a new one.
Now you need to work again with the Win32 controls. In the BlackWhiteFilterDialog class, we will write two methods that connect our configuration and its implementation in a dialog.
It remains to use these two methods in the life cycle of the dialogue. In OnCommand, for the Ok button, we call SaveToConfig (), and for the Cancel button, we restore the old set of settings by assigning mConfigNew = mConfigOld. The initial parameters of the dialog are configured in the OnInit () method, the slider range is set to 0-255 and focus is set to it.
Changing the settings should be displayed in the preview window using the RedoFrame () method. To do this, edit the DlgProc method by adding the call to save the parameters in the method in the WM_HSCROLL handler for the slider to check that the Preview window is enabled if (mifp && SaveToConfig ()) mifp-> RedoFrame ( ). To process the CheckBox, we add a condition for the case to the IDC_CHECK_INVERTED identifier in the OnCommand method and perform the same update.
Let's rewrite the ToBlackAndWhite method to use the configuration, taking into account two parameters, inversion and threshold values. The constant BST_UNCHECKED is inherited from the Win32 API and is used as the value of the flag true / false.
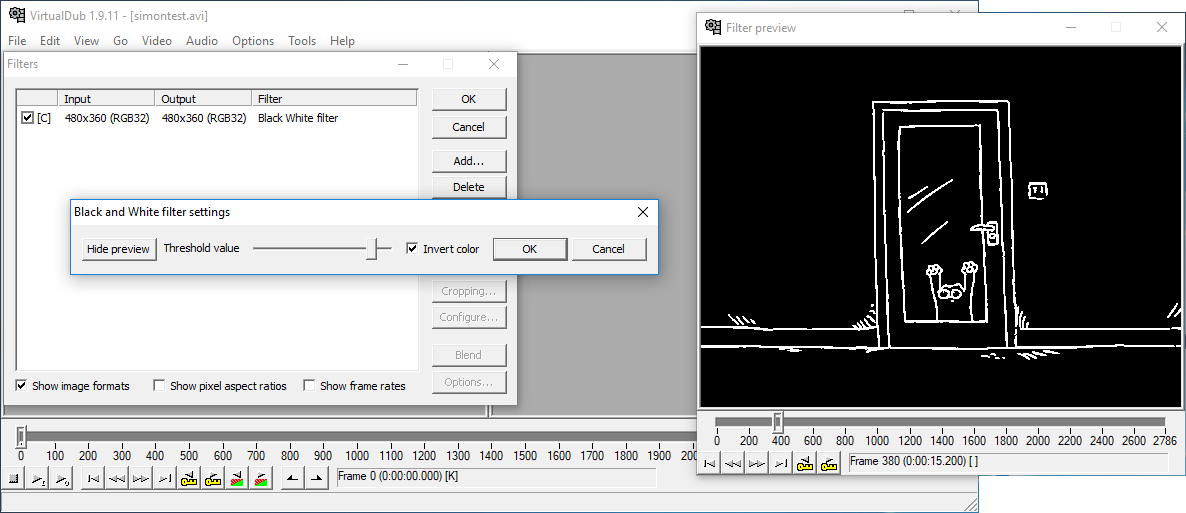
We put together a project and test the filter in VirtualDub again, turning on the inversion turned the cute cat into something gothic scary.
We are left quite a bit before the final. VirtualDub filters support saving parameters to the settings file, for this you need to serialize our settings class. To do this, there is a macro VDXVF_DECLARE_SCRIPT_METHODS () which is added to the header of the BlackWhiteFilter class and a set of methods for recording and displaying the settings GetSettingString, GetScriptString and the ScriptConfig method for parsing the parameters from the settings file. The number and arguments there are specified in the macro VDXVF_DEFINE_SCRIPT_METHOD as the last parameter. The new version of the BlackWhiteFilter class will look like this.
We implement methods that are not enough. We declare the number of parameters and their type in the macro VDXVF_DEFINE_SCRIPT_METHOD, we have two of them, both are integer, so the initialization string will be “ii”. The list of supported formats can be viewed in the class IVDXScriptInterpreter, the whole, fractional and string parameters are available. The GetSettingString method displays the parameters in the settings bar, it is needed for a person who can quickly see the parameters in the Filters window, in the Filter description column. The GetScriptString method formats the parameters for saving them to the VirtualDub configuration file (* .vcf) and then reading them with the ScriptConfig method.
By adding this code and assembling the plugin, we will be able to see the filter settings in the Filters window and save them to a file via the Save processing setting file menu.

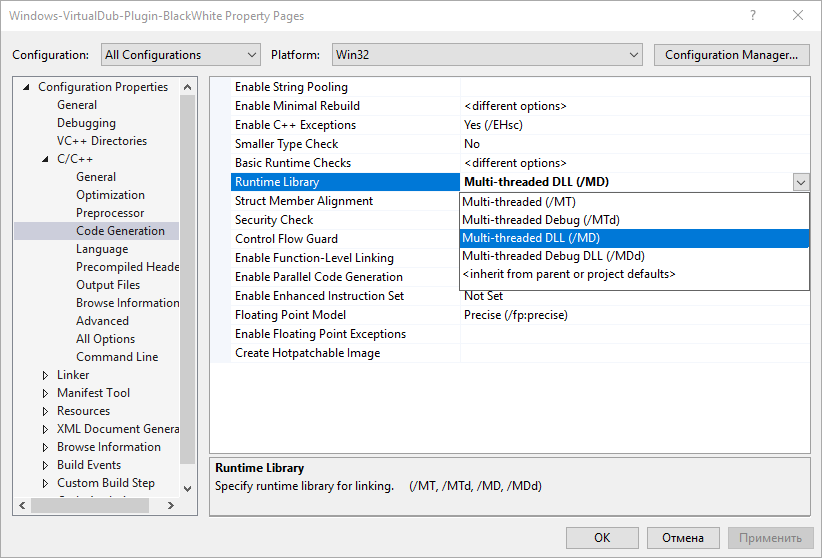
By default, a project is built with dependencies on the VC Runtime installed in the system, if you plan to use it on other computers, you need to specify the Multi-threaded (/ MT) option from the Configuration-> C / C ++ -> Code Generation-> Runtime Library configuration menu. . The plugin will increase its size tenfold, but users will not have to select Runtime for the version of Visual Studio that the developer used.
The project code is available on github . The material is aimed at people who need to do something quickly and remember the subtleties of working with the Win32 API reluctance. I needed this plugin to transfer the video to the platform with a one-bit color representation, and every time I drove a set of frames through XnView.
The SDK is available at the link from the author’s site . The latest version is 1.1 (VDPluginSDK-1.1.zip). Download and unpack in a convenient folder for you. Inside there is a help file PluginSDK.chm, a partial translation of which this text is. Development will be conducted in Microsoft Visual Studio Community 2015, you can use both older and newer versions. To check the environment settings, you can use the project files with examples that are in the src folder, Samples.sln for new studio versions or SamplesVC6.dsw for the good old Visual Studio 6. After building the samples, the file SampleVideoFilter.vdf will appear in the out \ Release or out \ Debug folder . This is a test filter. To check it, just put it in the VirtualDub \ plugins folder and add it from the filters menu. If everything works, then Visual Studio is installed correctly.
As an example, we write a filter from scratch. Tutorial is designed for beginners or remembering Win32 API. Create an empty DLL project in the studio.
')
VirtualDub plug-ins have the vdf extension, so in order not to rename it, we change the extension to the properties Properties → General → Target extension to .vdf each time. We change for all configurations, so do not forget to switch them on the Configuration settings tab: to All Configurations and Platform to All platforms.
Copy the include folder from the unpacked SDK into the project and add files from it to the project via Atl-Shift-A or the Add → Existing Item menu. To work, we need the header files from the include folder and the VDXFrame helper file set. Do not forget to add the include folder to the list of folders where the system will search for them. This is done from Properties → VC ++ Directories → Include Directories, add a link to the project root in the form $ (ProjectDir) \ include.
We add the VDXFrame library to the project, in the examples it is used as a separate module, but since the license allows, we will add it in the form of source code. Create the src folder in the project directory and copy the VideoFilter.cpp, VideoFilterEntry.cpp, VideoFilterDialog.cpp and stdafx.cpp files into the SDK from the SDK. Next, copy the header file from include \ stdafx.h to the previously created include folder. Do not forget to add copied files to the project via Atl-Shift-A or from the Add → Existing Item menu. This completes the integration of the helper library.
Moving on to writing code. Add a new main.cpp file to the project via Add → Existing Item or the Ctrl-Shift-A key combination. Add the following lines to main
#include <vd2/VDXFrame/VideoFilter.h> #include <BlackWhiteFilter.h> VDXFilterDefinition filterDef_blackWhite = VDXVideoFilterDefinition<BlackWhiteFilter>("Shadwork", "Black White filter", "Example for VirtualDub Plugin SDK: Applies a Black White filter to video."); VDX_DECLARE_VIDEOFILTERS_BEGIN() VDX_DECLARE_VIDEOFILTER(filterDef_blackWhite) VDX_DECLARE_VIDEOFILTERS_END() VDX_DECLARE_VFMODULE() A plugin can contain an arbitrary number of filters described by the VDX_DECLARE_VIDEOFILTER macro with a parameter in the form of the VDXFilterDefinition class as the employee wrapper above the filter class. The filter itself is described in three text fields: Author, Title and Description. Create a filter class named BlackWhiteFilter, the author of VirtualDub classes are named using CamelCase so we create a new class inherited from VDXVideoFilter in the BlackWhiteFilter.h file. The variable g_VFVAPIVersion will contain the API version. Functions defined with virtual are part of the SDK, and the ToBlackAndWhite method will implement image conversion.
#include <vd2/VDXFrame/VideoFilter.h> #include <vd2/VDXFrame/VideoFilterEntry.h> #ifndef FILTER_VD_BLACK_WHITE #define FILTER_VD_BLACK_WHITE extern int g_VFVAPIVersion; class BlackWhiteFilter : public VDXVideoFilter { public: virtual uint32 GetParams(); virtual void Start(); virtual void Run(); protected: void ToBlackAndWhite(void *dst, ptrdiff_t dstpitch, const void *src, ptrdiff_t srcpitch, uint32 w, uint32 h); }; #endif We write the implementation in the BlackWhiteFilter.cpp file, the Start () method is executed first, it is intended for any preliminary actions, for example, to determine compatibility with the AVX instruction set or CUDA support. Leave it empty for now. Within the scope of this class, the VDXFrame helper provides a pointer to an instance of the VDXFilterActivation class, named fa, containing information about the frame and buffers.
The GetParams () method is used by VirtualDub to determine the compatibility of the filter; it must return the bit mask from the FILTERPARAM enumeration.
- FILTERPARAM_SWAP_BUFFERS creates two independent buffers for the input and output frames, it is recommended to always use so as not to create such buffers by hand
- FILTERPARAM_NEEDS_LAST transfers not only the current frame to the filter but also the one before it, which is used for filters whose state depends on the previous frame
- FILTERPARAM_SUPPORTS_ALTFORMATS informs VirtualDub that the plugin supports frame encoding other than RGB32, for example YUV, which allows optimization of calculations
- FILTERPARAM_ALIGN_SCANLINES filter requires data alignment of 16 bytes, and therefore does not support for example the length of a string of 13 bytes
- FILTERPARAM_PURE_TRANSFORM filter behavior depends only on the data in the frame buffer, allows you to speed up the processing and display of the filter
- FILTERPARAM_NOT_SUPPORTED filter does not support input data in this format and will not work
For a filter that will convert an image of RGB32 to black and white, FILTERPARAM_SWAP_BUFFERS and FILTERPARAM_PURE_TRANSFORM are suitable. If we want to support the color coding different from RGB32 and the SDK version is less than 12, we write a check for g_VFVAPIVersion and if it is supported we check the format of the resulting image in the field fa-> src.mpPixmapLayout-> format. Early versions of VirtualDub did not support the presentation of a color other than RGB32. To simplify processing, we will follow the RGB32 format, but in general VirtualDub supports a large list of formats listed in the VDXPixmapFormat.
uint32 BlackWhiteFilter::GetParams() { if (g_VFVAPIVersion >= 12) { switch (fa->src.mpPixmapLayout->format) { case nsVDXPixmap::kPixFormat_XRGB8888: break; default: return FILTERPARAM_NOT_SUPPORTED; } } fa->dst.offset = 0; return FILTERPARAM_SWAP_BUFFERS; } Frame processing is performed by the Run () method. Data on the frame and the input and output buffers are stored in the variable fa, which is an instance of the class VDXFilterActivation. VirtualDub supports frame cropping, so the processing algorithm can be optimized by obtaining information about a window selected by the user with coordinates x1, y1, x2, y2. Frame data is stored in the src and dst objects, respectively, the input and output buffer.
class VDXFilterActivation { public: const VDXFilterDefinition *filter; // void *filter_data; VDXFBitmap& dst; VDXFBitmap& src; VDXFBitmap *_reserved0; VDXFBitmap *const last; uint32 x1; uint32 y1; uint32 x2; uint32 y2; VDXFilterStateInfo *pfsi; IVDXFilterPreview *ifp; IVDXFilterPreview2 *ifp2; // (V11+) uint32 mSourceFrameCount; // (V14+) VDXFBitmap *const *mpSourceFrames; // (V14+) VDXFBitmap *const *mpOutputFrames; // (V14+) }; If we continue to write code with SDK support less than version 12, the implementation of the Run () method will look like this:
void BlackWhiteFilter::Run() { if (g_VFVAPIVersion >= 12) { const VDXPixmap& pxdst = *fa->dst.mpPixmap; const VDXPixmap& pxsrc = *fa->src.mpPixmap; switch (pxdst.format) { case nsVDXPixmap::kPixFormat_XRGB8888: ToBlackAndWhite(pxdst.data, pxdst.pitch, pxsrc.data, pxsrc.pitch, pxsrc.w, pxsrc.h); break; } } else { ToBlackAndWhite(fa->dst.data, fa->dst.pitch, fa->src.data, fa->src.pitch, fa->dst.w, fa->dst.h); } } The location of the raw data in the structure depends on the version supported by the plugin. So, 6 parameters will be passed to the ToBlackAndWhite function:
- void * dst0 - output frame buffer
- ptrdiff_t dstpitch - the full length of the string in bytes of the output buffer
- const void * src0 - input frame buffer
- ptrdiff_t srcpitch - the full length of the input buffer string
- uint32 w - frame width in pixels
- uint32 h - frame height in pixels
To simplify the code, we will ignore the cropping parameters, so the frame will be processed at the same speed regardless of the Crop parameter in the settings. The point in the buffer is stored in the kPixFormat_XRGB8888 format and occupies 32 bits. We implement the simplest frame conversion to black and white. We don’t have an optimization task, so we’ll consider it by the formula with the calculation in floating point arithmetic
GRAY = 0.299 * R + 0.587 * G + 0.114 * B
We organize two cycles, one goes through the lines and the second through the points; the boundary level for determining the color of the point is assumed to be 128.
void BlackWhiteFilter::ToBlackAndWhite(void *dst0, ptrdiff_t dstpitch, const void *src0, ptrdiff_t srcpitch, uint32 w, uint32 h) { char *dst = (char *)dst0; const char *src = (const char *)src0; for (uint32 y = 0; y<h; ++y) { // Get scanline uint32 *srcline = (uint32 *)src; uint32 *dstline = (uint32 *)dst; for (uint32 x = 0; x<w; ++x) { // Process pixels uint32 data = srcline[x]; float gray = 0.299f * (data & 0x000000ff) + 0.587f * ((data & 0x0000ff00) >> 8) + 0.114f *((data & 0x00ff0000) >> 16); dstline[x] = gray < 128 ? 0x00000000 : 0x00ffffff; } src += srcpitch; dst += dstpitch; } } We assemble the plugin, copy the Windows-VirtualDub-Plugin-BlackWhite.vdf file into the VirtualDub plugins folder and make it active. In the list it will be visible under the name that we defined in the VDXFilterDefinition class - Black White filter. The plugin compiled for the 64-bit version will not be visible in the 32-bit version of VirtualDub, so do not forget to check the active configuration of the project.
The plugin without settings is pretty dull, we add the ability to configure and preview button. To do this, we would have to dive into the jungle of the Win32 API, but there are enough books written on this topic, so we will not go into details.
For a visual representation of the settings window, we need a dialog box. Create a new resource file via the menu Ctrl-Shift-A → Resource → Resource File with the name Resource.rc. Add a dialog box to it through the Add Resource → Dialog menu and change its name to IDD_DIALOG_BLACKWHITE_SETTING. By default, we already have two buttons, Ok and Cancel. It is better to create resources in the English locale, otherwise you can get a problem with the unreadable Russian font on the Cancel button. Add a preview button to the screen with the name IDC_SLIDER_THRESHOLD. In order not to return later we will add the rest of the controls for the settings, this will be a slider for changing the IDC_SLIDER_THRESHOLD threshold value and the IDbox_CHECK_INVERTED checkbox allowing you to invert the image. It can be done like this.
Create a dialog class BlackWhiteFilterDialog inherited from VDXVideoFilterDialog.
#include <windows.h> #include <commctrl.h> #include <resource.h> #include <vd2/VDXFrame/VideoFilterDialog.h> #include <vd2/VDXFrame/VideoFilter.h> #ifndef FILTER_VD_BLACK_WHITE_DIALOG #define FILTER_VD_BLACK_WHITE_DIALOG class BlackWhiteFilterDialog : public VDXVideoFilterDialog { public: BlackWhiteFilterDialog(IVDXFilterPreview *ifp); bool Show(HWND parent); virtual INT_PTR DlgProc(UINT msg, WPARAM wParam, LPARAM lParam); protected: IVDXFilterPreview *const mifp; bool OnInit(); bool OnCommand(int cmd); void OnDestroy(); }; #endif A reference to the IVDXFilterPreview class that controls the preview window is passed to the constructor; we will store the local reference in the mifp variable.
BlackWhiteFilterDialog::BlackWhiteFilterDialog(IVDXFilterPreview *ifp):mifp(ifp){ } The Show method (HWND parent) is overloaded with a call to the parent constructor and uses the ID of the settings dialog resource IDD_DIALOG_BLACKWHITE_SETTING as a parameter.
bool BlackWhiteFilterDialog::Show(HWND parent) { return 0 != VDXVideoFilterDialog::Show(NULL, MAKEINTRESOURCE(IDD_DIALOG_BLACKWHITE_SETTING), parent); }; DlgProc is used to process messages from the dialog box and implements the processing of the life cycle of the dialog in the OnInit (), OnDestroy () methods and event handling from the controls in OnCommand.
INT_PTR BlackWhiteFilterDialog::DlgProc(UINT msg, WPARAM wParam, LPARAM lParam) { switch (msg) { case WM_INITDIALOG: return !OnInit(); case WM_DESTROY: OnDestroy(); break; case WM_COMMAND: if (OnCommand(LOWORD(wParam))) return TRUE; break; case WM_HSCROLL: if (mifp) mifp->RedoFrame(); return TRUE; } return FALSE; } First, let's process the closing of the dialog using the Ok and Cancel buttons. In addition, we need a Preview handler that controls the display of the preview window via the Toggle method ((VDXHWND) mhdlg).
bool BlackWhiteFilterDialog::OnCommand(int cmd) { switch (cmd) { case IDOK: EndDialog(mhdlg, true); return true; case IDCANCEL: EndDialog(mhdlg, false); return true; case IDC_PREVIEW: if (mifp) mifp->Toggle((VDXHWND)mhdlg); return true; } return false; } The class for working with the dialog is written, now it needs to be called, for this we overload the Configure method (VDXHWND hwnd) in the BlackWhiteFilter class and implement it
bool BlackWhiteFilter::Configure(VDXHWND hwnd) { BlackWhiteFilterDialog dlg(fa->ifp); return dlg.Show((HWND)hwnd); } We compile the project, copy the plugin file to the VirtualDub folder, add a new filter to the list and see our dialog and the available Preview button.
We have a configuration window, but the filter has no settings yet, we proceed to the implementation. The settings will be stored in the BlackWhiteFilterConfig class containing only two variables, mTreshold as the threshold value and the inversion flag mInvert.
#ifndef FILTER_VD_BLACK_WHITE_CONFIG #define FILTER_VD_BLACK_WHITE_CONFIG class BlackWhiteFilterConfig { public: BlackWhiteFilterConfig() { mTreshold = 128; mInvert = 0; } public: int mTreshold; int mInvert; }; #endif Edit the BlackWhiteFilterDialog class by adding two BlackWhiteFilterConfig instances to it to store the mConfigNew and mConfigOld configurations. These variables will keep the old and changed state of the settings and we will need to use the button
Ok and Cancel. Edit the constructor by adding a parameter that stores the settings and initializes the configuration.
BlackWhiteFilterDialog::BlackWhiteFilterDialog(BlackWhiteFilterConfig& config, IVDXFilterPreview *ifp):mifp(ifp){ mConfigNew = config; } The settings should be stored somewhere, add the BlackWhiteFilterConfig mConfig variable to the BlackWhiteFilter class and change the initialization of the BlackWhiteFilterDialog class in the Configure method to a new one.
bool BlackWhiteFilter::Configure(VDXHWND hwnd) { BlackWhiteFilterDialog dlg(mConfig, fa->ifp); return dlg.Show((HWND)hwnd); } Now you need to work again with the Win32 controls. In the BlackWhiteFilterDialog class, we will write two methods that connect our configuration and its implementation in a dialog.
void BlackWhiteFilterDialog::LoadFromConfig() { SendDlgItemMessage(mhdlg, IDC_SLIDER_THRESHOLD, TBM_SETPOS, TRUE, mConfigNew.mTreshold); SendMessage(mhdlg, IDC_CHECK_INVERTED, mConfigNew.mInvert, 0); } bool BlackWhiteFilterDialog::SaveToConfig() { int threshold = SendDlgItemMessage(mhdlg, IDC_SLIDER_THRESHOLD, TBM_GETPOS, 0, 0); int inverted = SendDlgItemMessage(mhdlg, IDC_CHECK_INVERTED, BM_GETCHECK, 0, 0); if (threshold != mConfigNew.mTreshold || inverted!= mConfigNew.mInvert) { mConfigNew.mTreshold = threshold; mConfigNew.mInvert = inverted; return true; } return false; } It remains to use these two methods in the life cycle of the dialogue. In OnCommand, for the Ok button, we call SaveToConfig (), and for the Cancel button, we restore the old set of settings by assigning mConfigNew = mConfigOld. The initial parameters of the dialog are configured in the OnInit () method, the slider range is set to 0-255 and focus is set to it.
bool BlackWhiteFilterDialog::OnInit() { mConfigOld = mConfigNew; // Set up slider to range 0-255 SendDlgItemMessage(mhdlg, IDC_SLIDER_THRESHOLD, TBM_SETRANGE, TRUE, MAKELONG(0, 255)); LoadFromConfig(); // gain focus to slide control HWND hwndFirst = GetDlgItem(mhdlg, IDC_SLIDER_THRESHOLD); if (hwndFirst) SendMessage(mhdlg, WM_NEXTDLGCTL, (WPARAM)hwndFirst, TRUE); // init preview button HWND hwndPreview = GetDlgItem(mhdlg, IDC_PREVIEW); if (hwndPreview && mifp) { EnableWindow(hwndPreview, TRUE); mifp->InitButton((VDXHWND)hwndPreview); } return false; } Changing the settings should be displayed in the preview window using the RedoFrame () method. To do this, edit the DlgProc method by adding the call to save the parameters in the method in the WM_HSCROLL handler for the slider to check that the Preview window is enabled if (mifp && SaveToConfig ()) mifp-> RedoFrame ( ). To process the CheckBox, we add a condition for the case to the IDC_CHECK_INVERTED identifier in the OnCommand method and perform the same update.
case IDC_CHECK_INVERTED: if (mifp && SaveToConfig())mifp->RedoFrame(); return true; Let's rewrite the ToBlackAndWhite method to use the configuration, taking into account two parameters, inversion and threshold values. The constant BST_UNCHECKED is inherited from the Win32 API and is used as the value of the flag true / false.
if (mConfig.mInvert == BST_UNCHECKED) { dstline[x] = gray < mConfig.mTreshold ? 0x00000000 : 0x00ffffff; } else { dstline[x] = gray > =mConfig.mTreshold ? 0x00000000 : 0x00ffffff; } We put together a project and test the filter in VirtualDub again, turning on the inversion turned the cute cat into something gothic scary.
We are left quite a bit before the final. VirtualDub filters support saving parameters to the settings file, for this you need to serialize our settings class. To do this, there is a macro VDXVF_DECLARE_SCRIPT_METHODS () which is added to the header of the BlackWhiteFilter class and a set of methods for recording and displaying the settings GetSettingString, GetScriptString and the ScriptConfig method for parsing the parameters from the settings file. The number and arguments there are specified in the macro VDXVF_DEFINE_SCRIPT_METHOD as the last parameter. The new version of the BlackWhiteFilter class will look like this.
#include <vd2/VDXFrame/VideoFilter.h> #include <vd2/VDXFrame/VideoFilterEntry.h> #include <BlackWhiteFilterDialog.h> #ifndef FILTER_VD_BLACK_WHITE #define FILTER_VD_BLACK_WHITE extern int g_VFVAPIVersion; class BlackWhiteFilter : public VDXVideoFilter { public: virtual uint32 GetParams(); virtual void Start(); virtual void Run(); virtual bool Configure(VDXHWND hwnd); virtual void GetSettingString(char *buf, int maxlen); virtual void GetScriptString(char *buf, int maxlen); VDXVF_DECLARE_SCRIPT_METHODS(); protected: void ToBlackAndWhite(void *dst, ptrdiff_t dstpitch, const void *src, ptrdiff_t srcpitch, uint32 w, uint32 h); BlackWhiteFilterConfig mConfig; void ScriptConfig(IVDXScriptInterpreter *isi, const VDXScriptValue *argv, int argc); }; #endif We implement methods that are not enough. We declare the number of parameters and their type in the macro VDXVF_DEFINE_SCRIPT_METHOD, we have two of them, both are integer, so the initialization string will be “ii”. The list of supported formats can be viewed in the class IVDXScriptInterpreter, the whole, fractional and string parameters are available. The GetSettingString method displays the parameters in the settings bar, it is needed for a person who can quickly see the parameters in the Filters window, in the Filter description column. The GetScriptString method formats the parameters for saving them to the VirtualDub configuration file (* .vcf) and then reading them with the ScriptConfig method.
VDXVF_BEGIN_SCRIPT_METHODS(BlackWhiteFilter) VDXVF_DEFINE_SCRIPT_METHOD(BlackWhiteFilter, ScriptConfig, "ii") VDXVF_END_SCRIPT_METHODS() void BlackWhiteFilter::GetSettingString(char *buf, int maxlen) { SafePrintf(buf, maxlen, " (Treshold:%d, Invert:%d)", mConfig.mTreshold, mConfig.mInvert); } void BlackWhiteFilter::GetScriptString(char *buf, int maxlen) { SafePrintf(buf, maxlen, "Config(%d, %d)", mConfig.mTreshold, mConfig.mInvert); } void BlackWhiteFilter::ScriptConfig(IVDXScriptInterpreter *isi, const VDXScriptValue *argv, int argc) { mConfig.mTreshold = argv[0].asInt(); mConfig.mInvert = argv[1].asInt(); } By adding this code and assembling the plugin, we will be able to see the filter settings in the Filters window and save them to a file via the Save processing setting file menu.
By default, a project is built with dependencies on the VC Runtime installed in the system, if you plan to use it on other computers, you need to specify the Multi-threaded (/ MT) option from the Configuration-> C / C ++ -> Code Generation-> Runtime Library configuration menu. . The plugin will increase its size tenfold, but users will not have to select Runtime for the version of Visual Studio that the developer used.
The project code is available on github . The material is aimed at people who need to do something quickly and remember the subtleties of working with the Win32 API reluctance. I needed this plugin to transfer the video to the platform with a one-bit color representation, and every time I drove a set of frames through XnView.
Source: https://habr.com/ru/post/352844/
All Articles