Continuous Integration for Newbies
What is CI
Continuous Integration is a software development practice that consists of merging working copies into a common main development branch several times a day and performing frequent automated project builds to quickly identify potential defects and solve integration problems. In a typical project, where developers work independently on different parts of the system, the integration stage is final. She can unpredictably delay the completion of work. The transition to continuous integration reduces the complexity of integration and makes it more predictable through early detection and elimination of errors and contradictions. The main advantage is the reduction of the cost of correcting a defect, due to its early detection.
If you do not know how to configure CI in your project, I invite you "under the cat"
To all lovers of styles and notations, I do not always follow the notations and requirements due to personal circumstances and reasons that I do not want to discuss. I know that I am receding from the canons of the React and JS communities, so I immediately apologize for this and consider the data of liberty to be a fool of the author. My goal is to share experiences and tell people how easy it is to set up CI today, I have nothing to do with Travis or Heroku, moreover, I don’t like Heroku, I only used it because of the simplicity of the settings for newbies. Further TLDR.
Why do we need it
In the course of work, I often have to update services and deploy them to destination servers. When there were few projects, it was not a particular problem, because releases were rare, deployments were quite rare. Tests were performed manually. Over time, projects and tasks became more, and the implementation of tasks of the same type began to take more time. Consider the classical problem solving process, suitable for most companies:
- Take the task from the list / Get from the authorities
- Create a new branch in git and open the pool request
- Write the code
- Personally or with the help of a colleague, we perform code review ( code review )
- Run tests
- Merge branch into master
- We carry out assembly of the project
- We publish a new assembly
This process is repeated for each task, if you wrote the code for 10 days and spent 1 hour on the assembly / deployment, then it looks reasonable and not labor-intensive. But what if you fixed a minor bug in 1 minute, but spend the same hour on deployment? In this situation, it looks quite wasteful. And if you need to perform 10 - 20 bugfixes per day ( bugfix , bug fix)?
The first way is to consolidate the pool of rekvesty and make the union in the master as rarely as possible. The second way is to configure the CI to test / build / deploy the process automatically. It’s inconvenient to review large rekvests, so we’ll go the second way.
What we will use to solve the problem
When I encountered this problem back in 2008, there were very few solutions on the market, then to automate these processes, I had to deploy my servers, monitor the correctness of library versions, write scripts to build a project, write scripts to upload a project to servers, and many other labor-intensive operations. Now everything is simpler, most of the tasks are amenable to automation, there are many cloud services on the market to solve them. After a long search, I decided to stop at the open source project travis-ci.org . "Travis" is free for open source projects, has a paid version for commercial use. I liked it for ease of setup and use. However, in order that it does not look like an advertisement, I want to note that more and more decent services appear on the market, for example: CircleCI , Codeship .
We will create a React application, for testing we will use Jest, to deploy Heroku. It is assumed that the reader has basic programming knowledge, basic English, basic intelligence, has a configured node.js environment, set by yarn , has accounts on github.com , heroku.com , travis-ci.org, or is able to create them passing this tutorial.
Create an application
Since The article is aimed at young developers, we will use a generator
React applications - create-react-app . Install it globally:
$ yarn global add create-react-app After installation, we will create our application, for example, we will write a web interface for managing the production line.
$ create-react-app factory_line_manager After creating the project and downloading all the libraries, go to the project folder and run it.
cd factory_line_manager $ yarn start The browser should open the page of our application. By default, if port 3000 is free - localhost: 3000

By default, create-react-app creates us a project with no build configuration , which means - without configurations. The generator will create for us a standard configuration file and we will not need to configure webpack , jest , babel and other libraries. In 95% of cases, these settings will produce a better and cleaner code than a beginner can configure on his own. Therefore, I highly recommend leaving the configuration as it is, until you understand how it works.
Make a copy of the project and run the following command in the console
$ yarn eject Confirm the operation. The generator will extract the configuration files to the project folder, where you can study them in detail.
Connecting GIT
For those who are familiar with git, create a new repository, connect our project to it and go on to the next chapter. For the rest - let's go step by step. You must have access to the ssh key configured, if you have not done this before, now is the time to link .
Go to github and create a new repository. I created the following repository habrahabr_topic_352282 .
Being in the project folder. Initialize git:
$ git init Add all files of our project to git
$ git add . Create the first committee:
$ git commit -m "First commit" We connect the local folder to your repository on the gita. Be careful, replace evilosa with your profile and habrahabr_topic_352282 to the repository you created:
$ git remote add origin git@github.com:evilosa/habrahabr_topic_352282.git Fill our project on a remote git server:
$ git push -u origin master After the last command, magic should happen and the code will be downloaded to our repository on the gita.
Customize CI
Go to the website travis-ci.org and log in with a github account (Sign in Github). In the window that appears, authorize the application through OAuth:

Click Authorize-CI and wait for the alarm to synchronize the data with our account on the github. After completing this process, you should see something like this:

Select the required repository from the list, in my case it is habrahabr_topic_352282 , turn on the toggle switch for it and click on the name to go to the project page.
We have done most of the work, now we need to create a configuration file for the alert. Create a .travis.yml file in the folder of our project with the following contents:
sudo: false language: node_js node_js: - 9 branches: only: - master Add changes to git and upload to server:
$ git add . $ git commit -m "Add travis config" $ git push -u origin master Setting up the first phase of the CI is complete. After uploading changes to git, Travis should see the settings and perform the testing and build of the project:
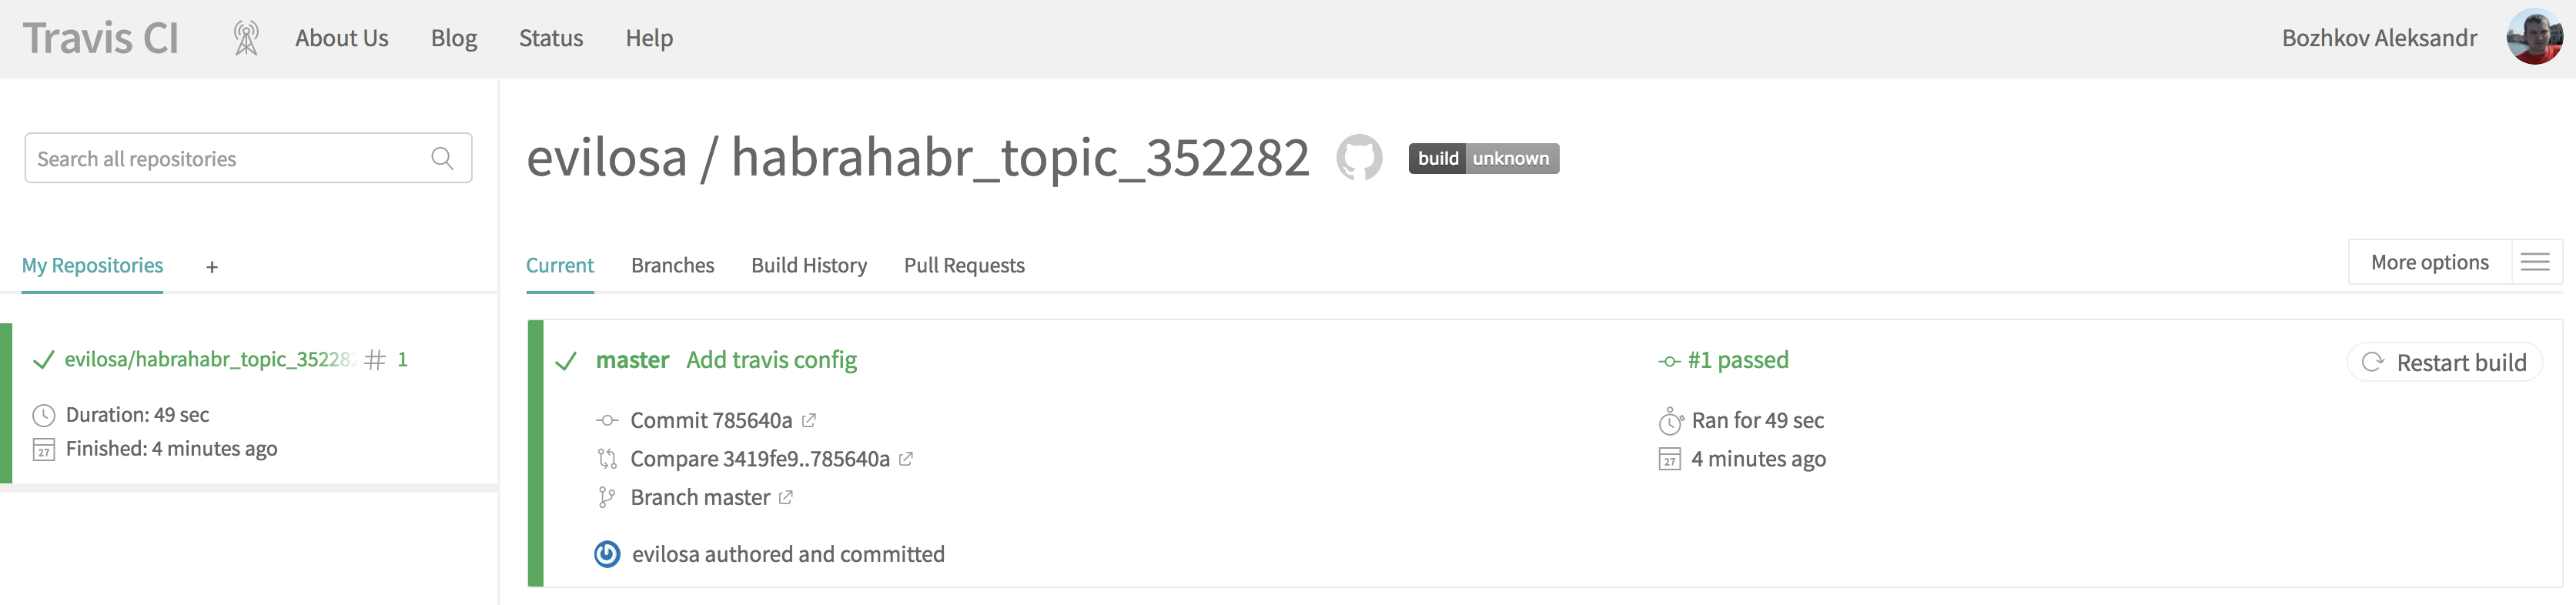
At the end of the logs, you should see the status of passing the tests:

Now, with each committee in the master branch, we will run an automatic construction and launch of tests on the alarm. Already not bad. Moving on. The next step is the automatic publication of our project on Heroku.
Log in to Heroku , create an account and log in. Please note that mail from mail.ru domain is blocked from them, use third-party services.
If you are a new user, you will see something like the following:

Create a new application by clicking the Create New App button. Enter your app name and location:

Please note the name of my application on Heroku, does not match the name of the repository.
Let's go back to our configuration file. .travis.yml . Add the following code to it by substituting your values:
deploy: provider: heroku app: " Heroku" api_key: secure: " API Heroku" Go to profile settings, to do this, click on the profile icon and select "Account settings". Find the item API key:

After clicking on the Reveal button, you will be able to copy the key.
Add changes to git and upload to server:
$ git add . $ git commit -m "Add Heroku deploy to travis" $ git push -u origin master Check the logs of alarm. If done correctly, we should see the following message:

We follow the link of the form https: // <Your application name on Heroku> .herokuapp.com / and see our React application.
If during the construction you saw this error:

This means that some package included in the create-react-app generator has been updated.
Update the list of packages locally and upload the changes to the wizard with the following commands:
$ yarn install $ git add . $ git commit -m "Update yarn.lock" $ git push -u origin master Our CI is ready, you can experience it in combat.
What to do next
This article is intended to familiarize the user with the basics of CI and serves as a starting point for further experiments. From the obvious disadvantages of the presented approach - your API key Heroku will be in the open repository. After going through the tutorial, I strongly recommend that you update it. For real projects, keys are defined via encrypted variables , you can read more about this here .
If you need to publish several versions of the application, for example - production, staging. Then you can make several branches in the gita and managing this process, publish different branches to different applications in Heroku, for example:
deploy: provider: heroku app: master: my-staging-application production: my-production-application api_key: secure: " API Heroku" Now you can change the configuration, upgrading the tests - experiment with the project and see what all this leads to. Try to write a test that will fill up the application. All functions and nuances of setting up services are described in detail in the documentation.
Bonus
Let's also, to show that we are cool progres, we will make two badges for our repository with an indication of the build status and the percentage of coverage of our code with tests - 

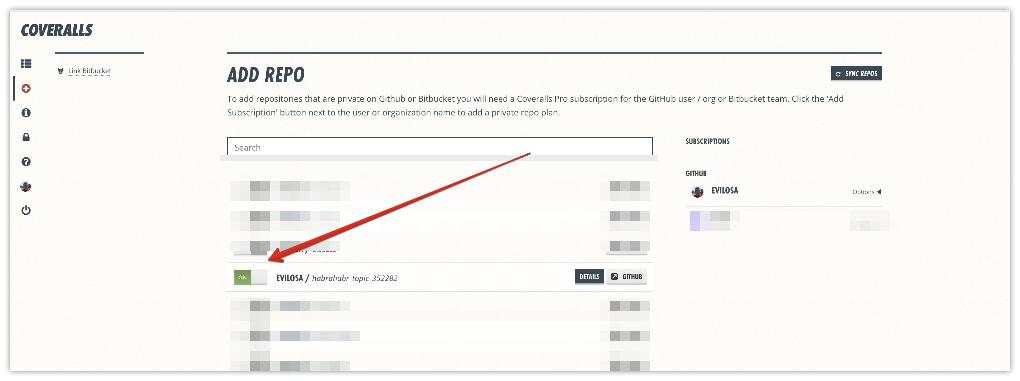
Log in and sign up to coveralls.io with your github account. After successful OAuth authorization, in the left menu, click Add repos . In the list that appears, switch the toggle switch for the desired project:
Add the following code to the .travis.yml file:
after_success: - cat ./coverage/lcov.info | ./node_modules/codecov.io/bin/codecov.io.js - cat ./coverage/lcov.info | ./node_modules/coveralls/bin/coveralls.js Replace the contents of the readme.md file readme.md substituting your values in the links:
# Factory line manager [![Travis][build-badge]][build] [![Coveralls][coveralls-badge]][coveralls] Awesome factory line manager! [build-badge]: https://img.shields.io/travis/< >/< >/master.png?style=flat-square [build]: https://travis-ci.org/< >/< > [coveralls-badge]: https://img.shields.io/coveralls/< >/< >/master.png?style=flat-square [coveralls]: https://coveralls.io/github/< >/< > Add the coverage directory to .gitignore
In the project for tests, by default, we add a check for code coverage by tests. To do this, in the package.json file, correct the code to the following:
... "scripts": { "start": "react-scripts start", "build": "react-scripts build", "test": "react-scripts test --env=jsdom --coverage --collectCoverageFrom=src/**/*js --collectCoverageFrom=!src/registerServiceWorker.js", ... In this config, we add a run to check the coverage of our code with tests. This is needed to generate the files needed to create a badge. We exclude the src/registerServiceWorker file from the check, because This file is not served by us.
Install the necessary dev dependencies for the project and upload everything to github:
$ yarn add codecov.io coveralls --dev $ git add . $ git commit -m "Add coverage" $ git push -u origin master Result after building project with alarm:

Conclusion
As you can see, setting up a full-fledged CI will take no more than 10 minutes if you have knowledge, in complex configs you can spend hours, maybe days and weeks. But how much of your time will you save by automating this process? I think everyone will decide for himself whether he needs it or not.
I hope the post was useful to you, the source code can be taken here , if you like it, plus, if not, it will be very good, minus one. I wish you a successful coding. Peace to all!
PS I specifically used different names in the project folder, the repository name and the application name in Heroku. API key regenerated. If anyone is interested, in my sales, I add an intermediate service to the CI pipeline for building Docker containers and publish the finished containers to the swarm cluster.
')
Source: https://habr.com/ru/post/352282/
All Articles