How to turn a website into a mobile application using 7 lines of JSON
In the material, the translation of which we publish today, we will focus on creating mobile applications based on existing web projects. The author of this article demonstrates tools that allow you to develop applications using the native capabilities of iOS and Android platforms and include materials from working sites or local resources with minimal effort. His story begins with the very seven lines of JSON-code that allow you to turn sites into mobile applications.
Turning a website into a mobile application
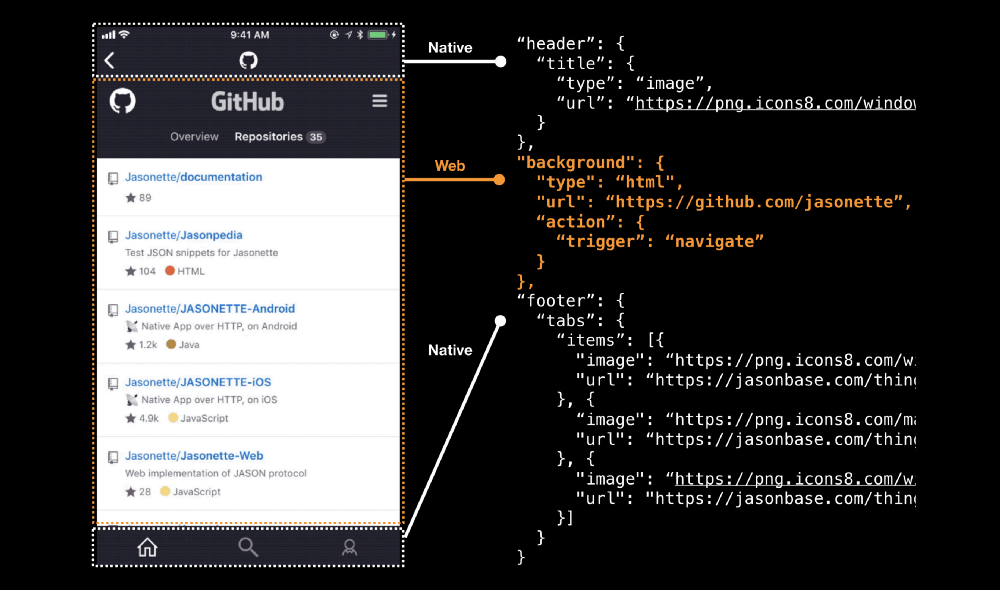
The figure above shows the code that allows you to turn a website into a mobile application. In particular, seven lines of JSON, highlighted in orange, are responsible for the “transformation”. The remaining program text fragments describe the capabilities related to the mobile platform on which the application runs.
What if I tell you that in order to take advantage of this approach, you do not need to redo the site, using some framework that brings the look of the resource closer to the type of mobile application? Moreover, what if the whole development process is to connect the site to a mobile application like the one shown above using a regular URL?
')
In addition, here is another question: “Can one simply use JSON editing to work with native APIs, with components of the user interface, to use system transitions between pages?”.
While you are thinking about the answers to these questions, I suggest taking a look at how a minimal application looks and works, created using the tools that I want to talk about here.
Minimum application
Notice how I embedded a page with github.com in this application, but everything else is native components, like the top navigation bar and the bottom control panel . In this case, the transitions between the pages of the application use the system capabilities. This is done automatically and does not require intervention in the site code.
Before I talk about how this is done, you may have a very reasonable question: “All this is good, but is it possible, using the method in question, to create something really useful, and not something like a simple“ viewer "Web pages in the native application container?".
Great question. As a matter of fact, this article is devoted to the answer to it. If in a nutshell, the essence of the method considered here is to create a two-way communication channel between the container for displaying web content and the application. This gives the application the ability to call JavaScript functions located in the container, and the container will allow access to native APIs located outside of it.
Take a look at an example that illustrates the above.
Application for creating QR codes
Here are the main components of this application:
A description of all these elements can be made simply by casting the appropriate JSON markup attributes, similar to the one shown above.
And finally, pay attention to the fact that the interaction of application components is shown here. Namely, the QR code changes after entering new data. This is done due to the possibility of calling a JavaScript function located inside the web application, which is responsible for creating QR codes based on the data transferred to it.
It should be noted that none of the mobile application development frameworks fundamentally tried to solve the problem of “transparent integration of web containers into native applications”, since all of them are either completely oriented towards the system capabilities of mobile platforms or rely entirely on HTML5.
When they talk about the future of mobile applications, usually everything revolves around the question of which approach will win: based on HTML5 or on native APIs. Tellingly, such considerations do not raise the topic of the coexistence of these two approaches, and, moreover, the synergy effect is not considered, which, thanks to the joint use of various technologies, will allow to achieve results that are not easy to achieve, relying on only one thing.
In this article I am going to talk about the following things:
Before we continue, let's first talk about whether it’s okay to use the HTML and JS capabilities in mobile applications, and when this approach can be useful. Here are some situations when mixing web technologies with the native capabilities of mobile platforms can be useful.
For the implementation of some parts of the application may make sense to use web technologies. For example, WebSocket is a web-based technology. To use it, you can use the web engine built into the mobile platform (
With this approach, you do not need to use additional libraries, it is enough, using standard technologies, to do what you need. This leads us to the following situation.
The use of web technologies in mobile applications helps to do things that without these technologies would require huge third-party libraries.
For example, in order to embed a QR code generator in a mobile application, you need a third-party library that will increase the size of the application package. However, if you use the standard tool for browsing the web and the JS library connected to the page using the simple
For some of the latest technologies, their robust and stable mobile implementations have not yet been created. However, most of these technologies are available in a web environment. As a result, the most effective way to integrate them into mobile applications is to use the appropriate JavaScript library.
Many novice developers who want to turn their websites into mobile applications find themselves in a difficult situation, finding out that some of the functions of their web projects are too complex to recreate them from scratch for each of the targeted mobile platforms.
For example, one of the pages of a certain site may be too complicated to quickly convert it into a mobile application format, while the rest of the content of the site is easily ported to a mobile application.
In such a case, it would be very useful if most of the application could be created using the mobile platform, but some particularly complex page could be transparently integrated into the application in its original form.
Jasonette is an open source project aimed at creating cross-platform native applications based on JSON markup.
The Jasonette framework is similar to a web browser, but instead of turning HTML code into web pages, it converts JSON markup to native iOS and Android applications. Similarity with the browser lies in the fact that any application based on Jasonette has the same basic code, which interprets different sets of JSON data in the process of building the final application. The developer does not need to work with the library code. The process of creating an application is to prepare its JSON description, which allows Jasonette to convert web pages into native applications in real time.
Read more about Jasonette here . In general, it can be said that the Jasonette project is aimed at developing native applications, and here we will talk about how to integrate HTML pages into these native applications.
By themselves, native mobile apps are fine, but sometimes they want to use web technologies, which can be done using standard web containers. However, their integration into applications is not easy. Here is what is needed for the transparent integration of web technologies into native applications:
In fact, the implementation of all this requires considerable effort, so I started with the first item of this list - with a simple embedding of the web container in the pages of native applications. So I released the first version of JSON Web Container .
This thing turned out to be useful, but it lacked the ability to interact with the parent container of the web container. Namely, the parent application could not control the web container, and the container could not access the parent application. As a result, the container was completely isolated from its environment in the form of an application.
After the release of the first version, I experimented with the second part of the above task, which was to allow the container to interact with the parent application.
Let's talk about how I managed to add interactivity to a regular web container, which made it much more powerful and interesting.
Previously, in the first version , in order to use the web container as a component to view the data, you first had to write
It’s quite natural that developers find it easier to initialize the container using a regular link to a web page, instead of entering all the HTML code of the page in one line.
The
Similarly, the output of web pages from the Internet is carried out (using a structure of the form
Previously, web containers were used only to display some content, they could not interact with the main application. This meant that the following usage scenarios were impossible:
The web container could only be used for displaying pages. This is similar to how
The goal of the Jasonette project is to create a standard markup language that allows you to describe cross-platform mobile applications. In this case, we need a markup language that can accurately describe the interaction between the parent application and the child web container.
In order to achieve this, I used JSON-RPC technology, which allowed us to organize the interaction of the application and the web container. Since everything in Jasonette is expressed as JSON objects, it was natural to use the standard JSON-RPC format as a communication protocol.
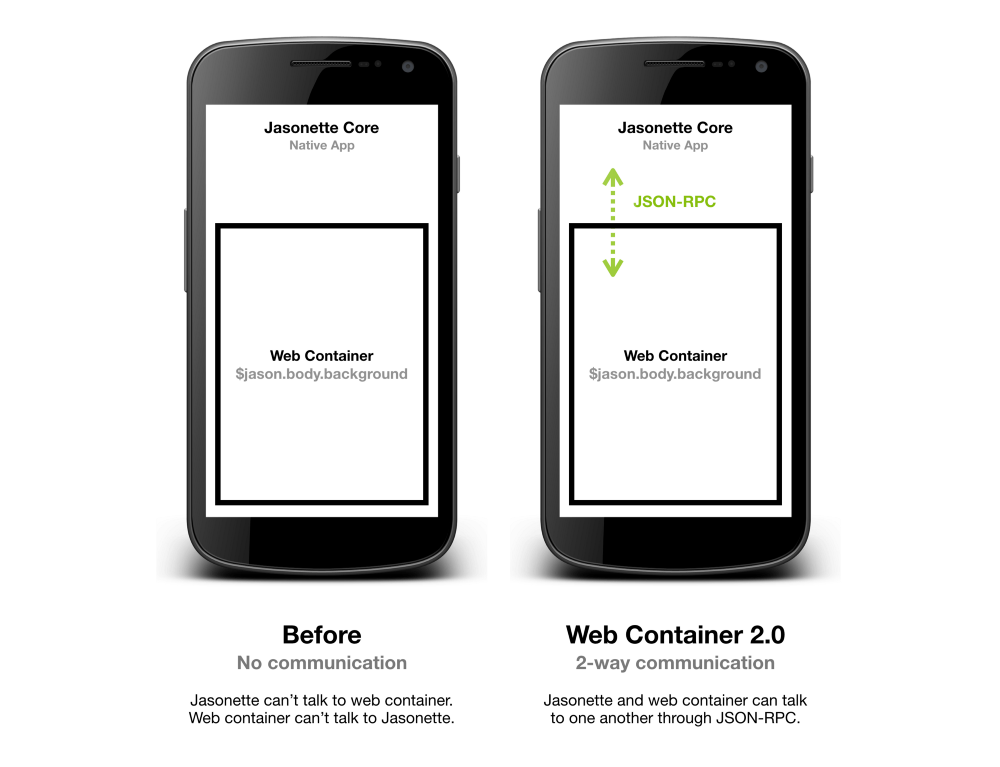
Before using JSON-RPC, Jasonette and the web container could not interact. After JSON-RPC implementation, two-way communication between the main application and the container has become possible.
In order to be able to call the JS functions that are in the web container, we declare the action
$ agent.request is a native API that initiates a JSON-RPC request to a web container. To use this mechanism, you need to pass an
The
Consider its attributes.
Here is the full code of the markup described:
Consider the meaning of the code given here.
When loading an item ($ jason.head.actions. $ Load ), you need to perform a JSON-RPC request described in
The parameters of the web container are specified in $ jason.body.background ; in this case, the local file
During the call to the container, the
Here I only talked about how the parent application can call JS functions from the web container, however, a reverse process is also possible when the container accesses the application to call the native APIs. Details on this can be found in the agent documentation .
Let us discuss an example of an application for creating QR codes that you have already seen above.
Application for creating QR codes
The code for this application can be found here.
Sometimes you need to dynamically inject JavaScript code into web containers after you have loaded the source HTML code.
Imagine you want to create your own web browser. To do this, you may need to embed your JS scripts in each web container in order to be able to influence its behavior. In fact, this is how web browser extensions work.
Even if you do not develop a web browser, you may need to use script injection if you need to provide the necessary behavior for pages that you cannot directly control. The only way a mobile application can interact with a web container is to use the
As already mentioned, the
Embedding JS code into a page loaded into a web container
Previously, a web container could handle link clicks in only two ways, being in one of two modes.
The problem here is that both of the above options are solutions that represent the concept of “all or nothing.”
When operating in read-only mode, the container ignores all user actions.
When operating in the "normal browser" mode, the web container works, literally, as a browser. When a user touches a link, the page to which the link leads is loaded. In this case, the developer is not able to intercept this event and call, for example, some native API.
Due to the capabilities of the new web container, the
Action to handle link interactions
Consider an example.
Here we attached to the web container the action
In addition, if you analyze the
This means that by analyzing the value of
Consider another example, which is an implementation of a web browser.
Here we check whether the URL contains the string
Now we can take advantage of the capabilities of the new Web Container element for application development. Namely, we are talking about the following:
All this gives us the opportunity, for example, to create our own browser, writing literally a half dozen lines of JSON code. Since we can now intercept link clicks, we can analyze
Consider an example.
Standard browser behavior
Here the web container behaves like a regular browser (
Behavior based on the analysis of the $ jason.url parameter
Here, when you click on a link, a native transition between pages is applied.
This can be achieved by processing various actions based on the value of
The first step in creating such an application is to join the
The second step is to perform in the
The following shows how we check whether the
If it was not possible to find a match to the above template, we make the
Here you can see the full JSON-code of this example, which, by the way, takes only 48 lines.
By “hybrid” applications usually mean normal web applications “wrapped” in native mobile applications.
However, here we mean something else. In our case, we are talking about real hybrid applications, when the same application can have several native views and several web views at the same time. In addition, one representation of such an application can have several native user interface components and a web container, and, all this is displayed in one native layout.
The transition between a control that displays web content and standard controls should be so invisible that it would be difficult to detect the boundary between them.
Hybrid application
In this example, I created an application that displays the site jasonbase.com in a web container acting as the main element for data visualization.
Jasonbase is a free hosting service that I created specifically to host JSON markup applications based on Jasonette.
, — , Jasonette-, , , -,
Jasonbase.com , . - Jasonette- - , , , , , , , .
.
, , , .
, , , :
, Jasonette, , :
, — , , , , .
, , ( , - , ). , , JS- , .
, Jasonette, , , , . , , , .
, , : « — ». , Jasonette, , , , , , HTML, , .
- Jasonette , -. «» «-». .
, , , , HTML-. , . , .
, , Jasonette - . , . — .
Dear readers! Jasonette - ?

Turning a website into a mobile application
Overview
The figure above shows the code that allows you to turn a website into a mobile application. In particular, seven lines of JSON, highlighted in orange, are responsible for the “transformation”. The remaining program text fragments describe the capabilities related to the mobile platform on which the application runs.
What if I tell you that in order to take advantage of this approach, you do not need to redo the site, using some framework that brings the look of the resource closer to the type of mobile application? Moreover, what if the whole development process is to connect the site to a mobile application like the one shown above using a regular URL?
')
In addition, here is another question: “Can one simply use JSON editing to work with native APIs, with components of the user interface, to use system transitions between pages?”.
While you are thinking about the answers to these questions, I suggest taking a look at how a minimal application looks and works, created using the tools that I want to talk about here.
Minimum application
Notice how I embedded a page with github.com in this application, but everything else is native components, like the top navigation bar and the bottom control panel . In this case, the transitions between the pages of the application use the system capabilities. This is done automatically and does not require intervention in the site code.
Before I talk about how this is done, you may have a very reasonable question: “All this is good, but is it possible, using the method in question, to create something really useful, and not something like a simple“ viewer "Web pages in the native application container?".
Great question. As a matter of fact, this article is devoted to the answer to it. If in a nutshell, the essence of the method considered here is to create a two-way communication channel between the container for displaying web content and the application. This gives the application the ability to call JavaScript functions located in the container, and the container will allow access to native APIs located outside of it.
Take a look at an example that illustrates the above.
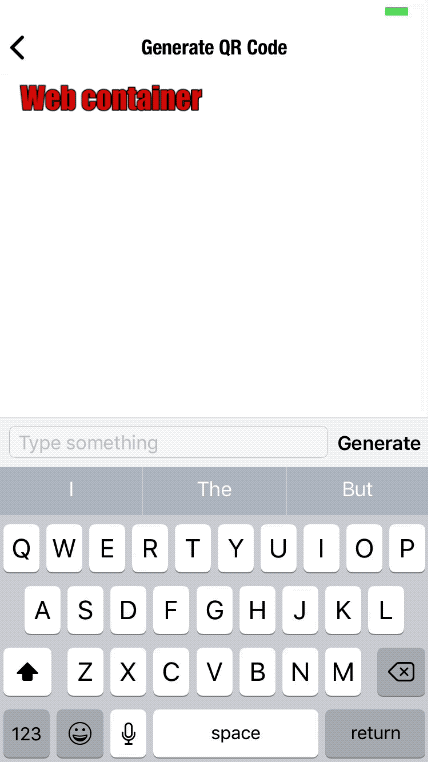
Application for creating QR codes
Here are the main components of this application:
- Native navigation header that supports built-in navigation.
- WebView element in which a web application that generates QR codes is embedded.
- System component for entering texts in the lower part of the window.
A description of all these elements can be made simply by casting the appropriate JSON markup attributes, similar to the one shown above.
And finally, pay attention to the fact that the interaction of application components is shown here. Namely, the QR code changes after entering new data. This is done due to the possibility of calling a JavaScript function located inside the web application, which is responsible for creating QR codes based on the data transferred to it.
It should be noted that none of the mobile application development frameworks fundamentally tried to solve the problem of “transparent integration of web containers into native applications”, since all of them are either completely oriented towards the system capabilities of mobile platforms or rely entirely on HTML5.
When they talk about the future of mobile applications, usually everything revolves around the question of which approach will win: based on HTML5 or on native APIs. Tellingly, such considerations do not raise the topic of the coexistence of these two approaches, and, moreover, the synergy effect is not considered, which, thanks to the joint use of various technologies, will allow to achieve results that are not easy to achieve, relying on only one thing.
In this article I am going to talk about the following things:
- About why sharing a web code and native components is often a good idea.
- About why transparent integration of HTML and native components is not an easy task, and how I managed to solve it.
- And, most importantly, I will talk about how you can use the technologies that will be discussed in order to quickly develop your own applications.
Why use web technology in mobile apps?
Before we continue, let's first talk about whether it’s okay to use the HTML and JS capabilities in mobile applications, and when this approach can be useful. Here are some situations when mixing web technologies with the native capabilities of mobile platforms can be useful.
▍1. Using technologies created for the web
For the implementation of some parts of the application may make sense to use web technologies. For example, WebSocket is a web-based technology. To use it, you can use the web engine built into the mobile platform (
WKWebView for iOS and WebView for Android) instead of installing a third-party library that simply “emulates” WebSocket.With this approach, you do not need to use additional libraries, it is enough, using standard technologies, to do what you need. This leads us to the following situation.
▍2. Reducing the size of the application package
The use of web technologies in mobile applications helps to do things that without these technologies would require huge third-party libraries.
For example, in order to embed a QR code generator in a mobile application, you need a third-party library that will increase the size of the application package. However, if you use the standard tool for browsing the web and the JS library connected to the page using the simple
<script> construction, you can get everything you need without installing third-party libraries.▍3. Solving the problem of lack of reliable mobile libraries
For some of the latest technologies, their robust and stable mobile implementations have not yet been created. However, most of these technologies are available in a web environment. As a result, the most effective way to integrate them into mobile applications is to use the appropriate JavaScript library.
▍4. Development of projects using both mobile platforms and web applications
Many novice developers who want to turn their websites into mobile applications find themselves in a difficult situation, finding out that some of the functions of their web projects are too complex to recreate them from scratch for each of the targeted mobile platforms.
For example, one of the pages of a certain site may be too complicated to quickly convert it into a mobile application format, while the rest of the content of the site is easily ported to a mobile application.
In such a case, it would be very useful if most of the application could be created using the mobile platform, but some particularly complex page could be transparently integrated into the application in its original form.
How it works?
▍A. Jasonette
Jasonette is an open source project aimed at creating cross-platform native applications based on JSON markup.
The Jasonette framework is similar to a web browser, but instead of turning HTML code into web pages, it converts JSON markup to native iOS and Android applications. Similarity with the browser lies in the fact that any application based on Jasonette has the same basic code, which interprets different sets of JSON data in the process of building the final application. The developer does not need to work with the library code. The process of creating an application is to prepare its JSON description, which allows Jasonette to convert web pages into native applications in real time.
Read more about Jasonette here . In general, it can be said that the Jasonette project is aimed at developing native applications, and here we will talk about how to integrate HTML pages into these native applications.
▍B. Jasonette Web Container
By themselves, native mobile apps are fine, but sometimes they want to use web technologies, which can be done using standard web containers. However, their integration into applications is not easy. Here is what is needed for the transparent integration of web technologies into native applications:
- The web container should be a natural part of the mobile application interface. The container should look like any other component of the user interface of the application. Otherwise, it will result in something clumsy, looking like what it really is - a website that is shown in a mobile application.
- The parent application must be able to control the child web container. With this approach, an application, of which the control for viewing the contents of a web page is a part, will have convenient means to influence it.
- The child web container must be able to trigger system events in the parent application. The web container embedded in the application must have the means to access the native API.
In fact, the implementation of all this requires considerable effort, so I started with the first item of this list - with a simple embedding of the web container in the pages of native applications. So I released the first version of JSON Web Container .
This thing turned out to be useful, but it lacked the ability to interact with the parent container of the web container. Namely, the parent application could not control the web container, and the container could not access the parent application. As a result, the container was completely isolated from its environment in the form of an application.
▍C. Jasonette Web Container 2.0: Application and Container Interaction
After the release of the first version, I experimented with the second part of the above task, which was to allow the container to interact with the parent application.
Let's talk about how I managed to add interactivity to a regular web container, which made it much more powerful and interesting.
Implementation: Interactive Web Container
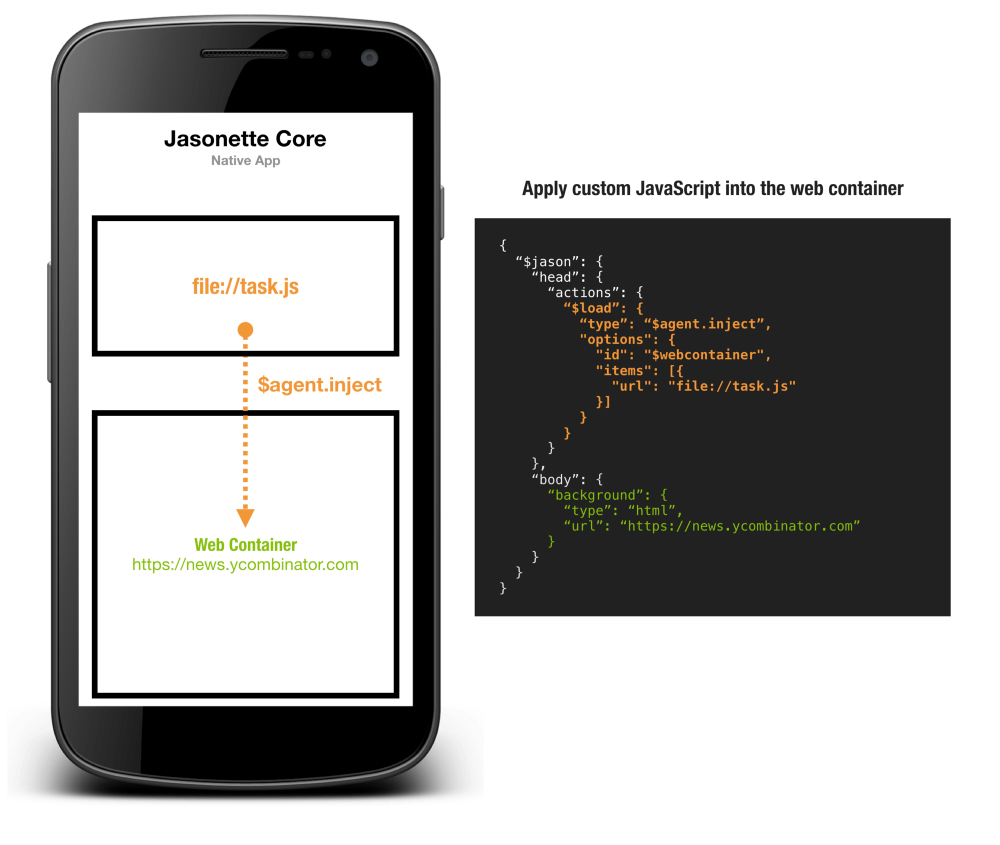
▍1. Download by URL
Task
Previously, in the first version , in order to use the web container as a component to view the data, you first had to write
"html" in the attribute $jason.body.background.type , and then in the attribute $jason.body.background.text , enter the HTML code. { "$jason": { "head": { ... }, "body": { "background": { "type": "html", "text": "<html><body><h1>Hello World</h1></body></html>" } } } } It’s quite natural that developers find it easier to initialize the container using a regular link to a web page, instead of entering all the HTML code of the page in one line.
Decision
The
url attribute appeared in Web Container 2.0. It supports local files in particular. By using the file://... construct in the container, you can output the file that comes with the application. { "$jason": { "head": { ... }, "body": { "background": { "type": "html", "url": "file://index.html" } } } } Similarly, the output of web pages from the Internet is carried out (using a structure of the form
http[s]://… ) { "$jason": { "head": { ... }, "body": { "background": { "type": "html", "url": "https://news.ycombinator.com" } } } } ▍2. Bilateral interaction between the application and the web container
Task
Previously, web containers were used only to display some content, they could not interact with the main application. This meant that the following usage scenarios were impossible:
- The impact of Jasonette on a web container. Namely, it was impossible to call JavaScript functions located in a container from a Jasonette application.
- The impact of the container on Jasonette. It was impossible to call native APIs from code located in a container.
The web container could only be used for displaying pages. This is similar to how
iframe elements are embedded into regular web pages when the page cannot access what is inside these elements.Decision
The goal of the Jasonette project is to create a standard markup language that allows you to describe cross-platform mobile applications. In this case, we need a markup language that can accurately describe the interaction between the parent application and the child web container.
In order to achieve this, I used JSON-RPC technology, which allowed us to organize the interaction of the application and the web container. Since everything in Jasonette is expressed as JSON objects, it was natural to use the standard JSON-RPC format as a communication protocol.
Before using JSON-RPC, Jasonette and the web container could not interact. After JSON-RPC implementation, two-way communication between the main application and the container has become possible.
In order to be able to call the JS functions that are in the web container, we declare the action
$agent.request . { "type": "$agent.request", "options": { "id": "$webcontainer", "method": "login", "params": ["username", "password"] } } $ agent.request is a native API that initiates a JSON-RPC request to a web container. To use this mechanism, you need to pass an
options object to it as a parameter.The
options object is the JSON-RPC request that will be sent to the web container.Consider its attributes.
id: the web container is built on top of the low-level agent architecture. Usually several agents may be associated with oneviewelement, each of them may have a unique identifier (ID). However, a web container is a special type of agent that can only have the$webcontaineridentifier, which is why we use this identifier in the request.method: the name of the javascript function to call.params: an array of parameters to pass to the called JS function.
Here is the full code of the markup described:
{ "$jason": { "head": { "actions": { "$load": { "type": "$agent.request", "options": { "id": "$webcontainer", "method": "login", "params": ["alice", "1234"] } } } }, "body": { "header": { "title": "Web Container 2.0" }, "background": { "type": "html", "url": "file://index.html" } } } } Consider the meaning of the code given here.
When loading an item ($ jason.head.actions. $ Load ), you need to perform a JSON-RPC request described in
options to the web container agent ( $ agent.request ).The parameters of the web container are specified in $ jason.body.background ; in this case, the local file
file://index.html .During the call to the container, the
login function will be searched, which, when called, thanks to params , will be passed two arguments, "alice" and "1234" . It will look like this: login("alice", "1234") Here I only talked about how the parent application can call JS functions from the web container, however, a reverse process is also possible when the container accesses the application to call the native APIs. Details on this can be found in the agent documentation .
Example
Let us discuss an example of an application for creating QR codes that you have already seen above.
Application for creating QR codes
- The text input component at the bottom of the window is 100% native.
- The QR code is generated by a web application hosted in a web container.
- When the user enters some text into the field and presses the
Generatebutton, the action of the$agent.requestagent of the web container is called, which causes the JS functionqrcalled.
The code for this application can be found here.
▍3. Script injection
Task
Sometimes you need to dynamically inject JavaScript code into web containers after you have loaded the source HTML code.
Imagine you want to create your own web browser. To do this, you may need to embed your JS scripts in each web container in order to be able to influence its behavior. In fact, this is how web browser extensions work.
Even if you do not develop a web browser, you may need to use script injection if you need to provide the necessary behavior for pages that you cannot directly control. The only way a mobile application can interact with a web container is to use the
$agent API. But if you cannot change the HTML content, the only way to add the $agent interface to a web container is to dynamically implement the scripts.Decision
As already mentioned, the
$jason.body.background web container is just an agent. This means that when working with it, you can use the same $agent.inject method as with normal agents.Embedding JS code into a page loaded into a web container
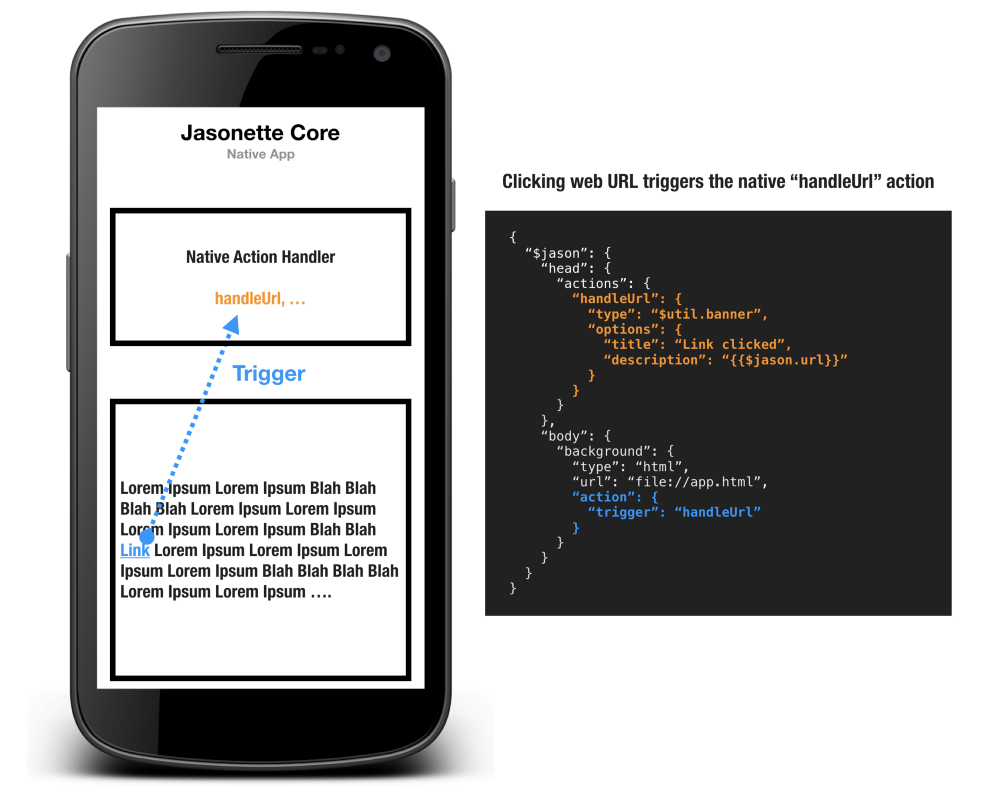
▍4. URL conversion processing
Previously, a web container could handle link clicks in only two ways, being in one of two modes.
- In read-only mode, the web container is treated as a read-only item, with all events, such as tapping or scrolling, being ignored. All web containers are read-only until they are switched to regular browser mode, as described below.
- In the "normal browser" mode, the web container can interact with the page as if we were working with a regular browser. You can enable this mode by writing the value
"type": "$default"to theactionattribute.
Task
The problem here is that both of the above options are solutions that represent the concept of “all or nothing.”
When operating in read-only mode, the container ignores all user actions.
When operating in the "normal browser" mode, the web container works, literally, as a browser. When a user touches a link, the page to which the link leads is loaded. In this case, the developer is not able to intercept this event and call, for example, some native API.
Decision
Due to the capabilities of the new web container, the
action attribute can be specified in the $jason.body.background attribute, which contains a description of the mechanism for processing links clicks.Action to handle link interactions
Consider an example.
{ "$jason": { "head": { "actions": { "displayBanner": { "type": "$util.banner", "options": { "title": "Clicked", "description": "Link {{$jason.url}} clicked!" } } } }, "body": { "background": { "type": "html", "url": "file://index.html", "action": { "trigger": "displayBanner" } } } } } Here we attached to the web container the action
"trigger": "displayBanner" . This means that when the user clicks on any link displayed on the page displayed in the web container, the displayBanner action will be triggered. At the same time, the web container itself will not process the click on the link.In addition, if you analyze the
displayBanner event, you will notice the $jason variable. In this case, the link that was clicked will be passed to the action through this variable. For example, if you click on the link that contains the address "https://google.com" , the following will fall into $jason : { "url": "https://google.com" } This means that by analyzing the value of
$jason.url various actions can be $jason.url .Consider another example, which is an implementation of a web browser.
{ "$jason": { "head": { "actions": { "handleLink": [{ "{{#if $jason.url.indexOf('signin') !== -1 }}": { "type": "$href", "options": { "url": "file://key.html" } } }, { "{{#else}}": { "type": "$default" } }] } }, "body": { "background": { "type": "html", "url": "file://index.html", "action": { "trigger": "handleLink" } } } } } Here we check whether the URL contains the string
signin , and, depending on the results of the check, we perform various actions.- If the URL contains a
signin, a native login window opens. - If the URL of this line does not contain, the action specified by the parameter
"type": "$default"is performed, as a result, our program behaves like a normal browser.
Examples
▍ Web browser development
Now we can take advantage of the capabilities of the new Web Container element for application development. Namely, we are talking about the following:
- Ability to standard processing clicks on the links, which corresponds to the behavior of a regular browser.
- The ability to handle clicks on links, based on their content.
All this gives us the opportunity, for example, to create our own browser, writing literally a half dozen lines of JSON code. Since we can now intercept link clicks, we can analyze
$jason.url and perform actions corresponding to different URLs.Consider an example.
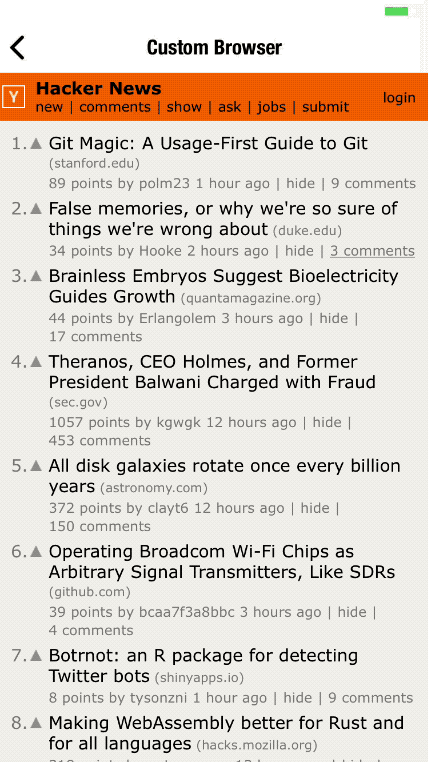
Standard browser behavior
Here the web container behaves like a regular browser (
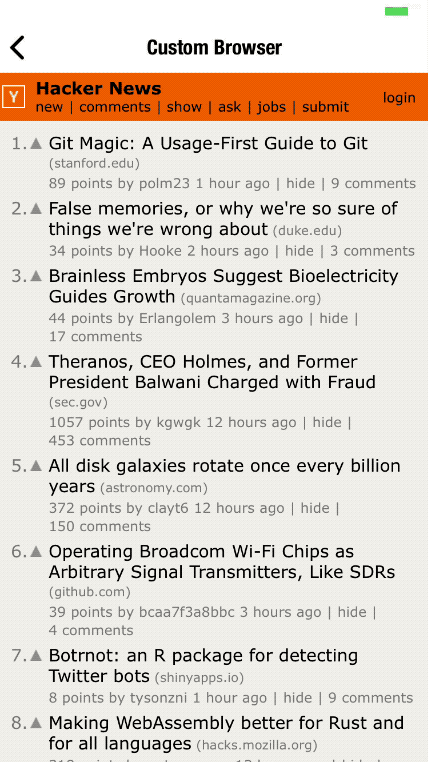
"type": "$default" ).Behavior based on the analysis of the $ jason.url parameter
Here, when you click on a link, a native transition between pages is applied.
This can be achieved by processing various actions based on the value of
$jason.url .The first step in creating such an application is to join the
visit action web container. { ... "body": { "background": { "type": "html", "url": "https://news.ycombinator.com", "action": { "trigger": "visit" } } } } The second step is to perform in the
visit action the corresponding operation based on the analysis of $jason.url .The following shows how we check whether the
newest , show , ask , and so on lines are in $jason.url (they are links in the top menu). If something like this can be found, we allow the web container to behave like a normal browser, setting the value to "type": "$default" .If it was not possible to find a match to the above template, we make the
$href native transition to the new window, passing the URL that the user clicked as a parameter. ... "actions": { "visit": [ { "{{#if /\\/(newest|show|ask)$/.test($jason.url) }}": { "type": "$default" } }, { "{{#else}}": { "type": "$href", "options": { "url": "https://jasonette.imtqy.com/Jasonpedia/webcontainer/agent/hijack.json", "preload": { "background": "#ffffff" }, "options": { "url": "{{$jason.url}}" } } } } ] }, Here you can see the full JSON-code of this example, which, by the way, takes only 48 lines.
▍Fast hybrid application development
By “hybrid” applications usually mean normal web applications “wrapped” in native mobile applications.
However, here we mean something else. In our case, we are talking about real hybrid applications, when the same application can have several native views and several web views at the same time. In addition, one representation of such an application can have several native user interface components and a web container, and, all this is displayed in one native layout.
The transition between a control that displays web content and standard controls should be so invisible that it would be difficult to detect the boundary between them.
Hybrid application
In this example, I created an application that displays the site jasonbase.com in a web container acting as the main element for data visualization.
Jasonbase is a free hosting service that I created specifically to host JSON markup applications based on Jasonette.
, — , Jasonette-, , , -,
$href JASON.Jasonbase.com , . - Jasonette- - , , , , , , , .
.
Results
, , , .
, , , :
- - .
- JavaScript-, .
- , , API.
, Jasonette, , :
- , , - .
- (JSON-RPC), , , -.
, — , , , , .
, , ( , - , ). , , JS- , .
, Jasonette, , , , . , , , .
, , : « — ». , Jasonette, , , , , , HTML, , .
- Jasonette , -. «» «-». .
, , , , HTML-. , . , .
, , Jasonette - . , . — .
Dear readers! Jasonette - ?
Source: https://habr.com/ru/post/352200/
All Articles