Aether Management Console: How to Deploy Corporate Security

The main steps to be taken to implement Panda corporate protection on Windows, Linux, Mac, Android devices from the Aether centralized management web console.
In this article, I want to tell you how you can quickly install Panda’s corporate cloud security solution from the Aether centralized management web console, and what you need to do to set up and implement Panda on your corporate network. I think that the article will be useful when testing a Panda corporate solution, as well as during its initial implementation.
The information presented in the article is valid for Panda Endpoint Protection , Panda Endpoint Protection Plus , Panda Adaptive Defense and Panda Adaptive Defense 360 solutions, which are managed from the new Aether management console .
')
Preliminary actions
Before you begin installing a Panda enterprise solution, make sure that:
- You have login credentials to access the Aether Panda enterprise solution for the centralized management cloud console.
- You have read the URL and ports for the correct operation of the product .
1. Quick Start Panda
1.1. Connecting to the management console
In order to protect the Panda corporate solution, you need to log into the Aether centralized cloud management console. This can be done in two ways:
1. From the invitation letter : When registering the licenses of the Panda corporate solution, an invitation letter was sent to the e-mail address you provided, in which your registration data were indicated: link to go to the management console, login and password.
2. Directly open the management console :
a. Open www.pandacloudsecurity.com
b. Enter your username and password
c. Click Login
1.2. Quick install protection
If you are logging in to the Panda Management Console for the first time and / or within your account you have never installed security, you will see a home page with a suggestion to add computers. As part of the quick installation, you can install protection on the required computers with default settings. In any case, you can later change the settings of computers and security at your discretion.
To perform a quick installation on your computer, click Add Computers .
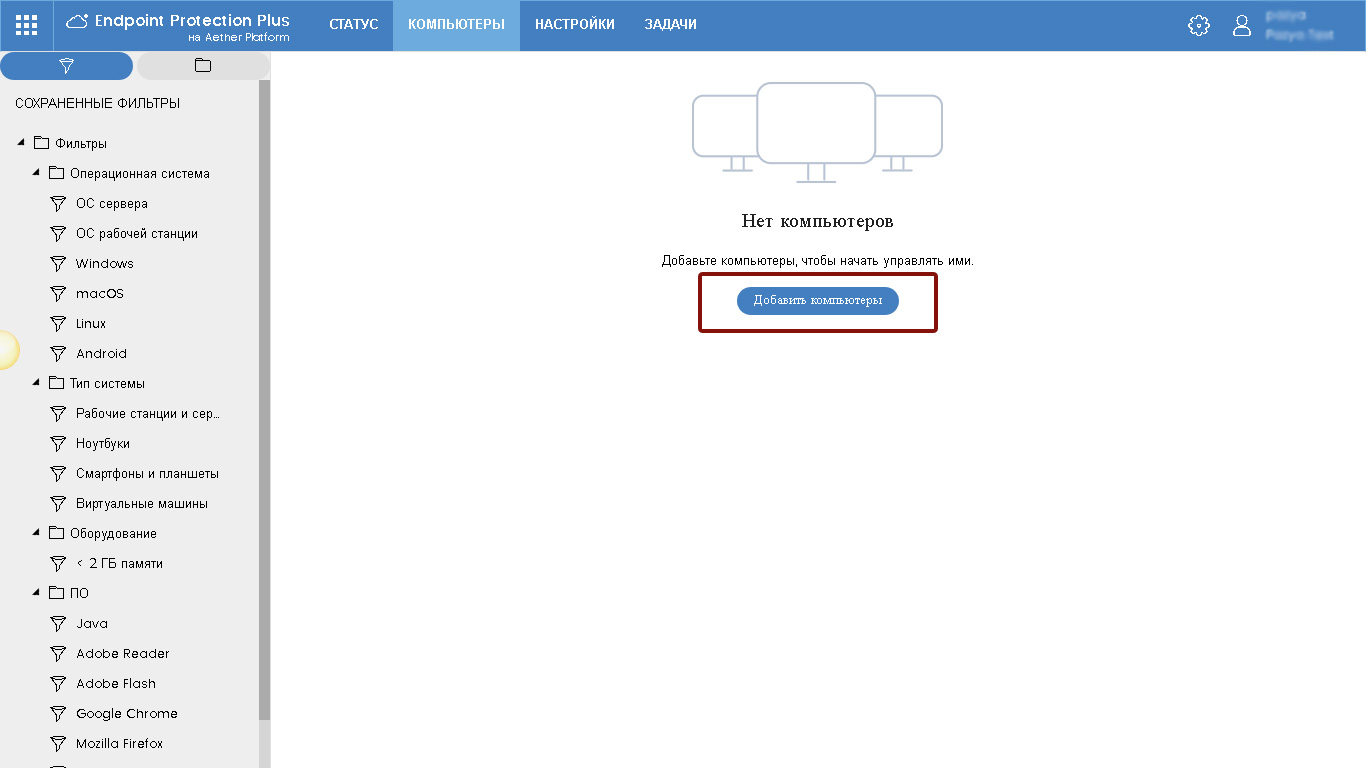
Fig. 1. Quick install protection
As a result, a window will open to select the operating system of the computer on which you plan to install Panda protection.
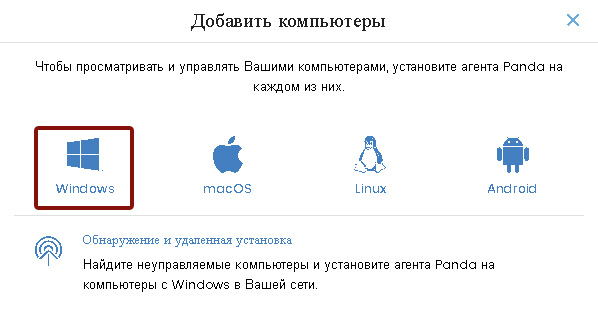
Fig. 2. The choice of computer operating system
As part of the quick installation, select the operating system of your computer (for example, Windows) by clicking on its logo. After that, a window opens to select installation options.

Fig. 3. Download installer
In this window, click on the Download installer button. As a result, the Panda Endpoint Agent.msi file will be downloaded to your computer. Then follow these steps:
1. Delete your current antivirus solution. It is recommended to restart the computer.
2. Start Panda Endpoint Agent.msi to start installing Panda protection.
3. Click the Next button to start the installation process, and then the Install button. The local Panda Endpoint Agent will be installed on the computer.
4. Click the Finish button to complete the installation wizard.
5. Double-click the Panda icon located in the system tray on the taskbar to see the Panda Endpoint Protection installation indicator. The installation process may take several minutes.
You can also see the installation indicator in the console. Connect to the console and select Computers from the main menu.
During the installation process, you will be asked to restart your computer to complete the installation. Please restart your computer when required.
After completing the steps above, your computer will be protected by the Panda enterprise solution.
1.3. Verifying the protection operation
To verify that your protection is working correctly, you can take the following action:
Go to www.eicar.org/download/eicar.com . In this case, an attempt will be made to download a file that every antivirus solution recognizes as Eicar-Test-File (Eicar-Test-File is a file developed by the European Institute for Computer Antivirus Research for testing the response of antivirus programs. For more information, visit ) .
Congratulations! Now your computer is correctly protected by the Panda enterprise solution.
You can more properly configure your protection by completing the basic steps that are presented in the next chapter 2.
When you install the default protection, it is possible that the protection will be installed in English. You can always change the language settings in the management console.
2. Three basic steps for setting up Panda Endpoint Protection
The first chapter of this document contains information about the quick installation of Panda corporate protection on your computer as part of the default settings. This chapter presents several basic and very simple steps, the implementation of which will allow you to more correctly configure the protection of all the required computers and devices with the help of the Panda corporate solution.
If you need reference information about the product, access to the administrator’s manual, etc., simply click the gear button in the upper right corner of the web console and select the appropriate item in the drop-down menu.
If you have questions or need additional help, please feel free to contact your supplier or the office of Panda Security, all contact details of which are presented at the end of the document.
2.1. Step 1: Setting Parameters
The management console allows you to customize computer, network, and security settings. As a result, profiles are formed, which can later be assigned to the required computers. Parameters can be configured both before the installation of local protection agents, and after.
To configure the settings, go to Settings .
2.1.1. Setting up security of workstations and servers
When you go to the Default Settings section, the Security -> Workstations and Servers section opens. Here you can configure security settings for workstations and servers Windows, Linux and Mac.
The default profile is Default Settings , which cannot be changed or deleted. Therefore, you can create your own profile by clicking on the Add button.
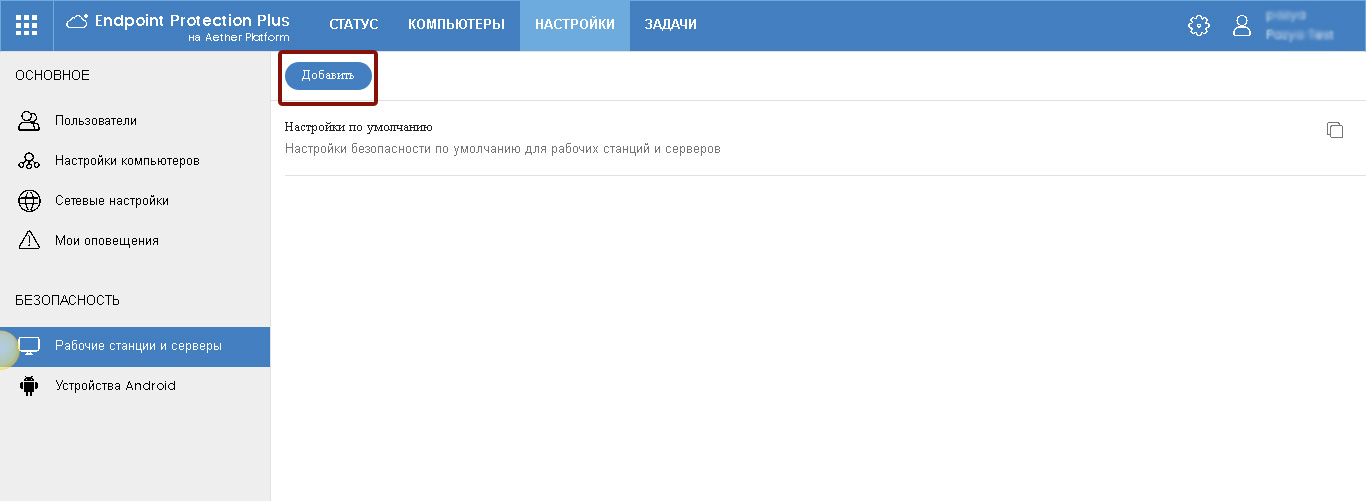
Fig. 4. Workstations and servers
On the page for adding a profile, specify its name, a brief description (optional) and click the Save button.
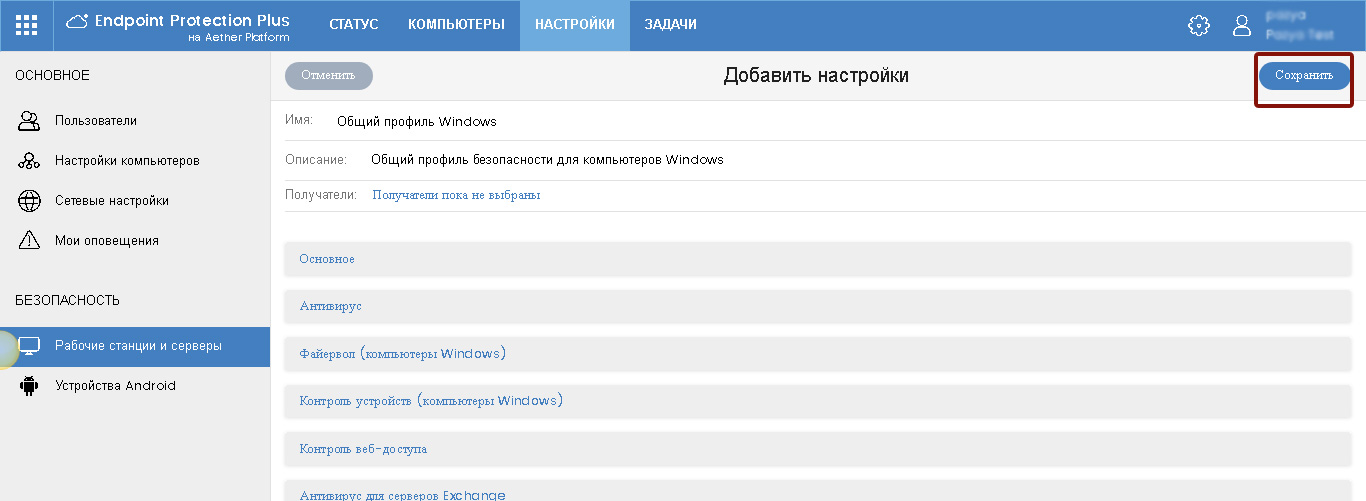
Fig. 5. Add Security Profile
After that, you can make basic settings of security parameters and all required settings of various product modules in the saved profile.
2.1.2. Setting up computers
In the Settings section, select the Computer Settings subsection. Here you can configure the basic parameters of the protection on protected devices. There is also a default Settings profile here, but you can create your own profiles by clicking the Add button.
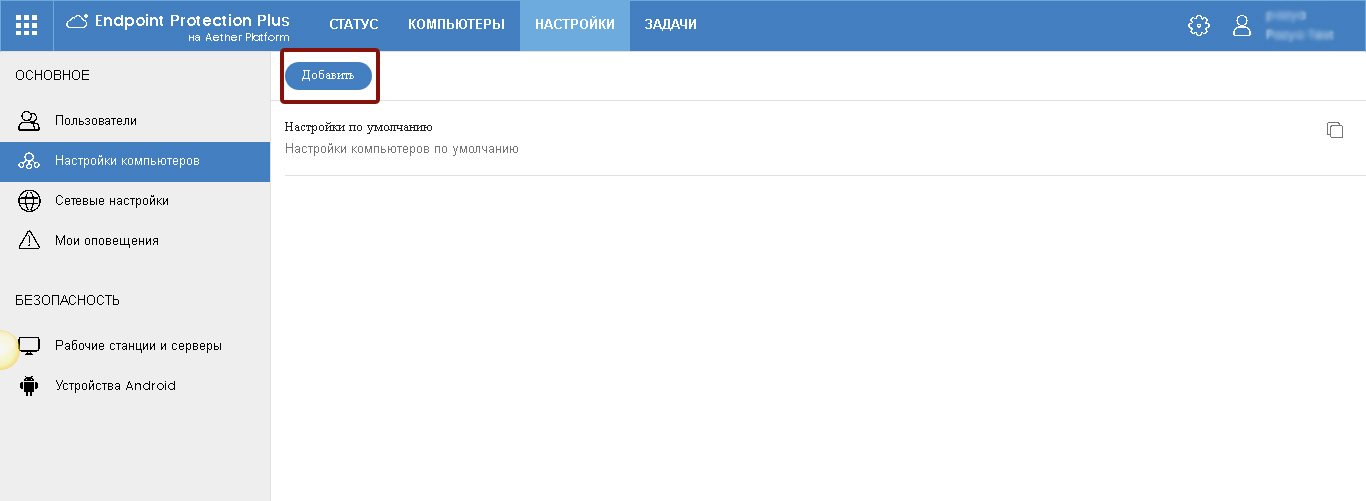
Fig. 6. Computer settings
As a result, a page with the addition of the settings profile will open.
On the page for adding a profile, specify its name, a brief description (optional) and click the Save button.

Fig. 7. Add computer settings profile
Settings are presented in two sections: Updates and Protection against unauthorized interference with the protection operation. Specify the required settings.
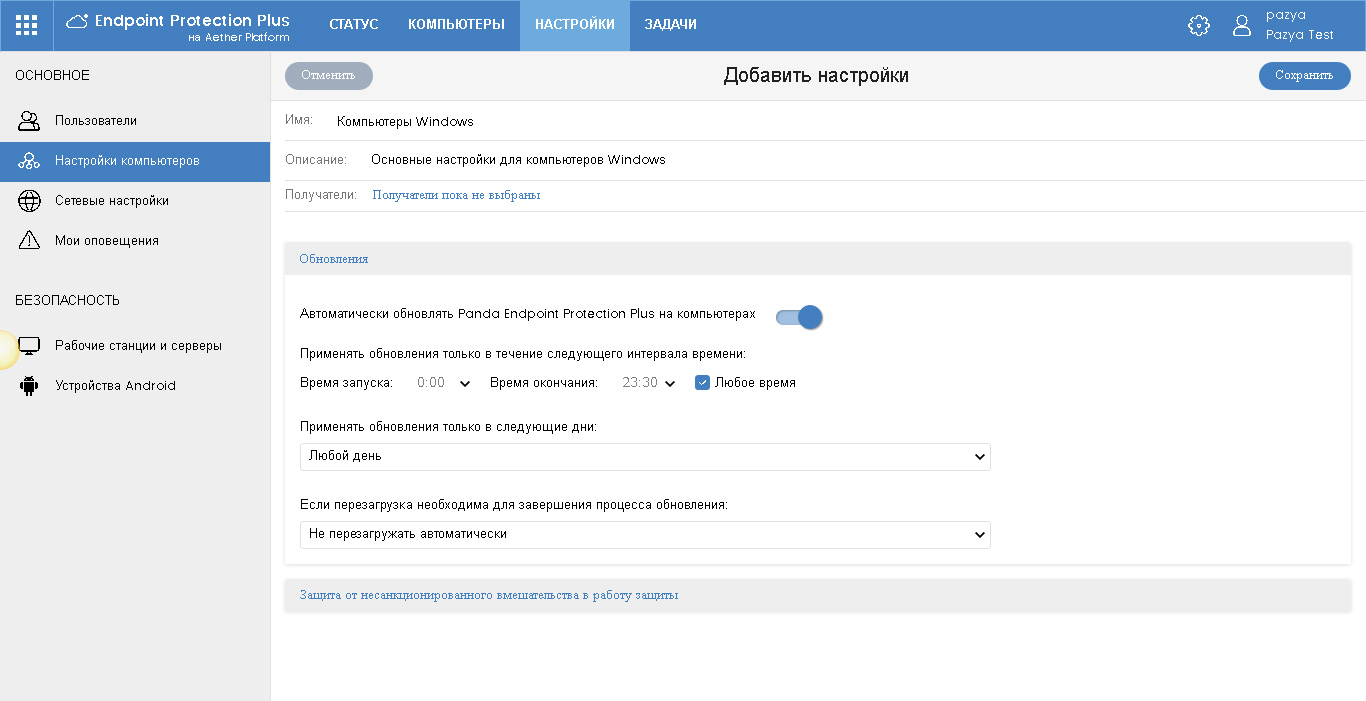
Fig. 8. Computer protection update settings
In the update settings, you can specify the update options for the local agents of the corporate Panda solution. We recommend enabling automatic updates at any time, but if necessary, you can specify a specific update schedule (specific days and hours).
In addition, specify whether to automatically restart the computers to complete the update process (if required), and if so, which ones (servers only, workstations only, or both).

Fig. 9. Settings for protection against unauthorized interference with protection work
In the tamper protection settings section, it is recommended that you request a password when removing protection from computers in order to exclude cases when employees can delete a local agent.
Also, just in case, you can allow control of security modules from the local console. There are no special risks because to do this, you still need to know a special password (it is configured immediately below), but in certain cases, for administrative or troubleshooting purposes, it is desirable that you have the opportunity to access advanced options in the local console.
2.1.3. Network settings
In the Settings section, select the Network Settings subsection. This is where you configure the basic network settings for the protection to work on protected devices.

Fig. 10. Network settings
This page has three tabs: Proxy and Language , Cache and Detection .
Proxy and language
The most important thing is to check the settings in the first tab so that the product as a whole functions correctly. There is a default settings profile here, but we recommend creating your own profiles, since In the default profile, which cannot be changed or deleted, English is set as the protection language, and proxy settings have not been made (if required).
To add a profile, click the Add button. Specify the name of the profile and its description (if necessary), and also set the required options in the Language and Proxy sections.
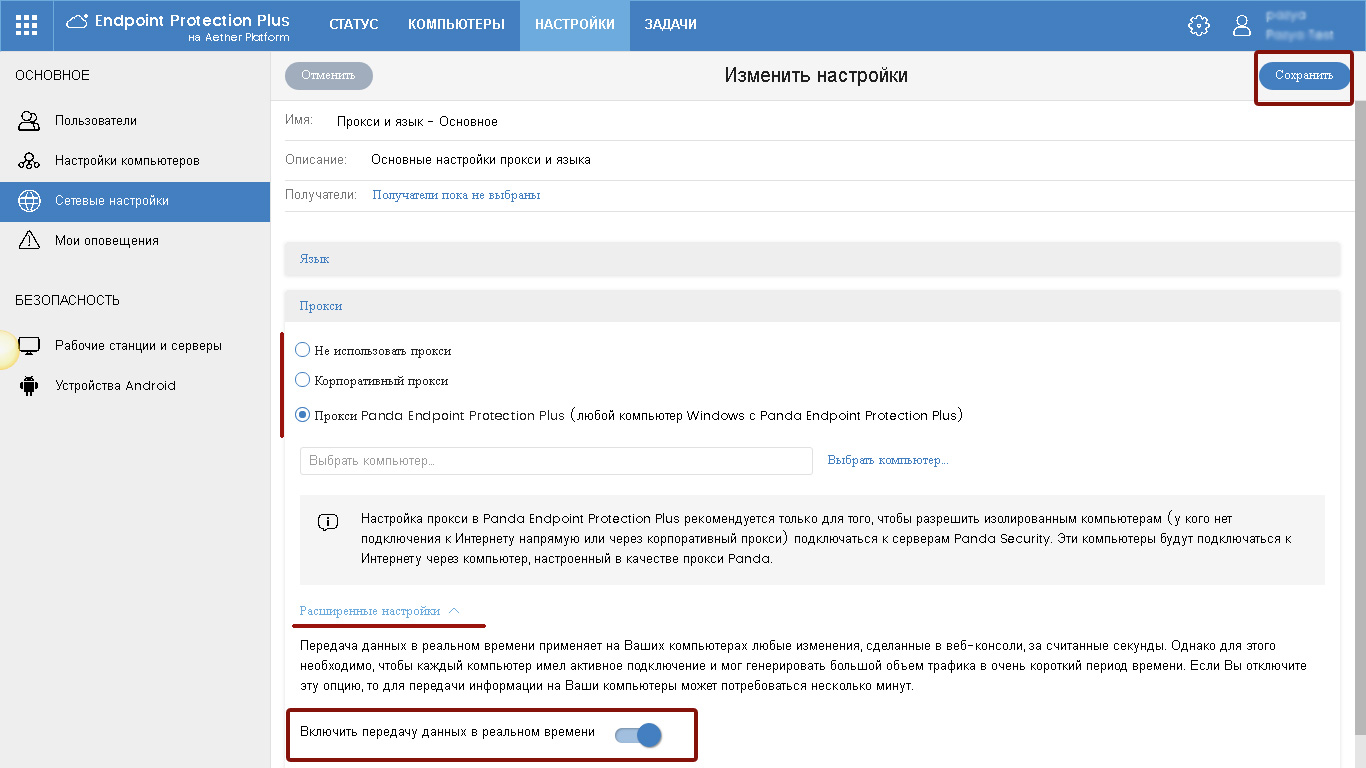
Fig. 11. Language and proxy settings
As for the Proxy section, if necessary, you can specify the parameters of the corporate proxy or select one of the computers on which the local Panda agent is installed, which will act as the Panda proxy. Proxy Panda is recommended only to allow isolated computers (who do not have an Internet connection directly or through a corporate proxy) to connect to Panda Security servers. These computers will connect to the Internet through a computer configured as a Panda proxy.
We also recommend that, if possible, in the advanced settings enable the Enable real-time data transfer option. By and large, this does not greatly increase traffic, but remote tasks and setting changes will be implemented in real time.
Cache
On the Cache tab, you can configure one or several computers that will work as a cache for storing updates, installers, and any other packages downloaded from the Internet. Thus, all updates and downloads will be transmitted within the network not using peer-to-peer technologies from the nearest available updated computers, but only from directly configured cache computers. See the Administrator’s Guide.
Detection
On this tab, you can configure computers from which unmanaged / unprotected computers will be searched for, on which you can quickly install Panda protection.
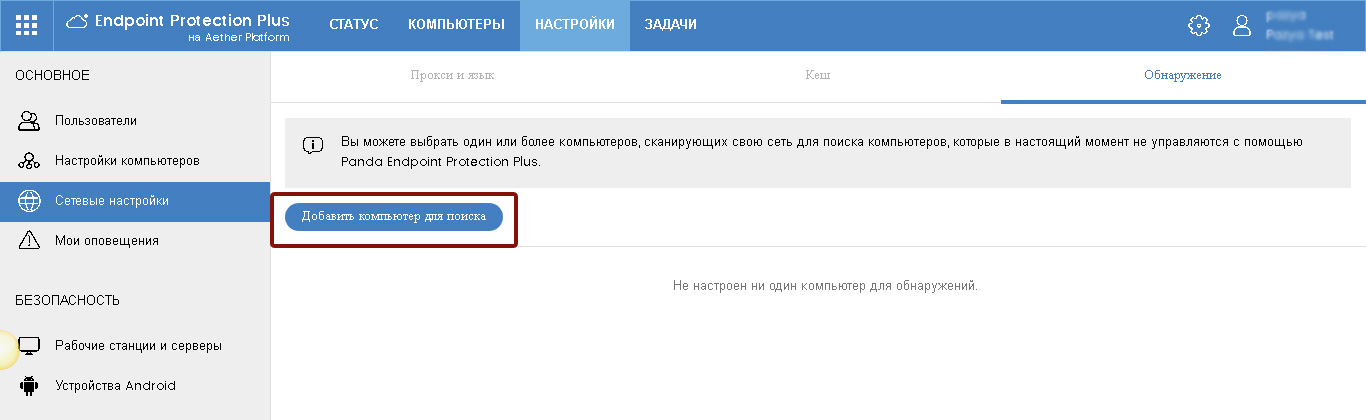
Fig. 12. Adding computers to search
To add a computer to search for, click the Add button, then in the list of computers with Panda protection installed, select a computer that will be used to search for other unmanaged / unprotected computers. In the event that you have several networks / network segments, then we recommend that you specify a separate computer for each of them.
After that, the selected computer will appear in the list. To perform an automatic check right now, click the Check Now link with it. Click the Configure link from it to customize how the computer detection function works.

Fig. 13. List of computers to search
On the settings page, specify the required options for detecting unmanaged computers. To save the settings, click Save .

Fig. 14. Computer settings for search
2.2. Step 2: Install Security
Solution Panda offers you several ways to install security. But regardless of the method chosen, the installation process downloads and installs the communication agent, which starts the installation process of the local protection on the required devices.
Ways to install Panda protection on your network:
1. Installer
It allows you to download an msi file that you can distribute to the required computers using third-party software distribution tools (SMS, Tivoli, etc.) or manually. It is suitable in those cases if you use automated means of software implementation in your network.
2. URL
Allows you to generate a URL, when clicked, which will start the automatic installation process. This URL can be sent by email. This method is most suitable for automated installation of the product on remote computers outside the local network, to which you do not have administrative access, or if you do not have the knowledge / ability to use automated software implementation tools or your network is rather small.
3. QR code / Google Play (for Android)
This method is intended only for Android devices and allows you to send a QR code or a link to go to Google Play to Android devices.
4. Remote detection of computers
If you have configured computers to remotely detect unmanaged computers on the network, you can automatically find unmanaged computers, remotely install Panda protection on them, and then bind these computers to the required groups and profiles.
There is also the possibility of automated installation using integration with Active Directory. See the Administrator’s Guide.
To add computers, go to Computers and click Add Computers .
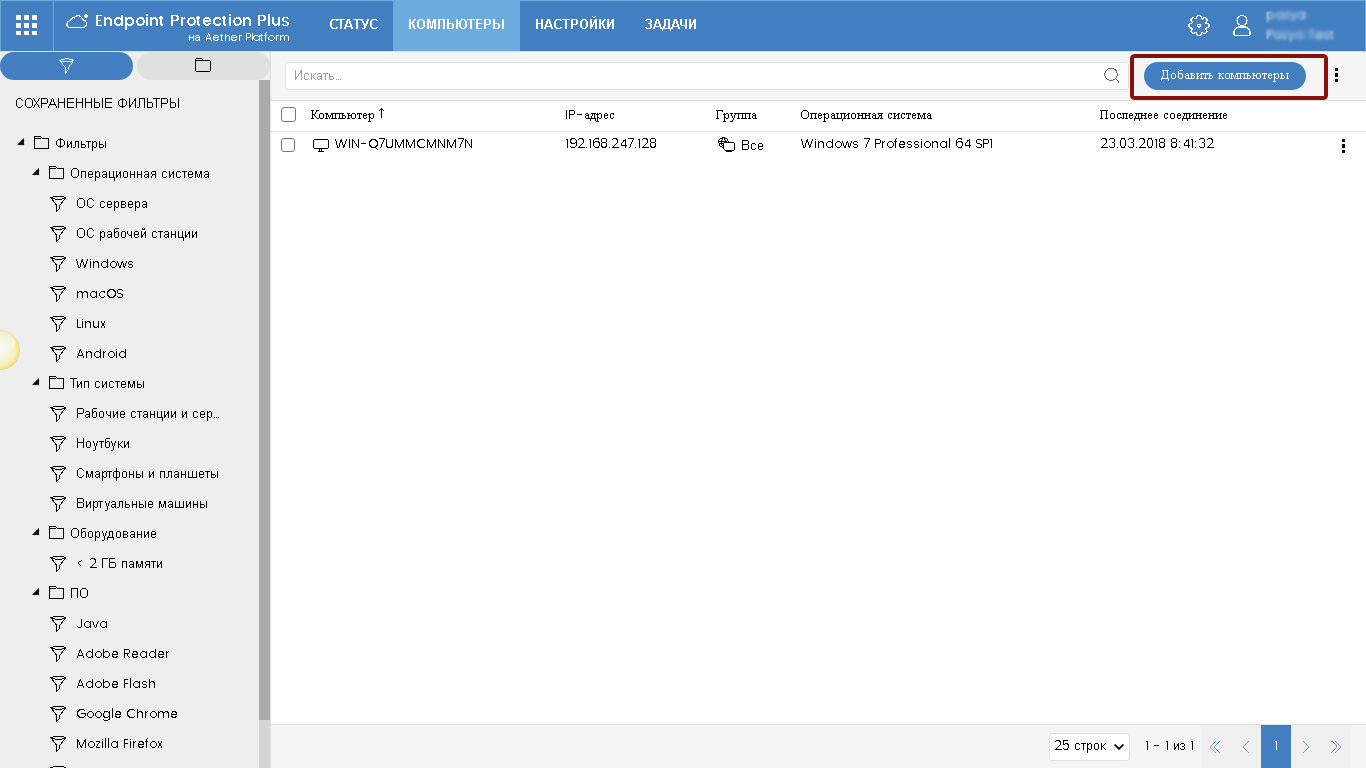
Fig. 15. Adding computers
2.2.1. Implementing Protection with Remote Detection
In the window that appears, click the Detection and Remote Installation link.
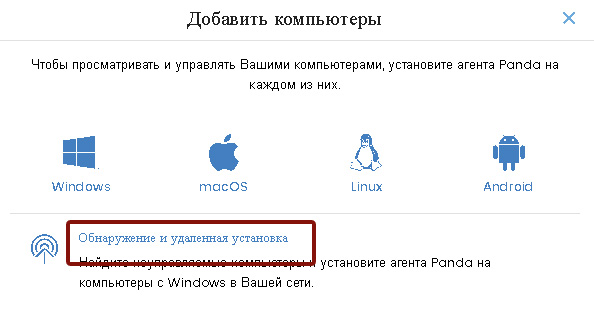
Fig. 16. Adding computers with remote discovery
Then specify the computer that will be used to search for unmanaged computers. After the search is completed, you can view the detected unmanaged computers in one of the following ways:
• In the Status section of the Protection Status widget, a warning will appear about unmanaged computers found.
• in the Status section in the context menu My Lists, you can add a quick transition to view the list of unmanaged computers
After that, in the list of unmanaged computers, you can remotely start the installation of the Panda agent, after which these computers will be added to the Computers section, where you can link them to the required groups and profiles. See the Administrator’s Guide for details.
2.2.2. Implementing protection with the installer
In this case, in the add computers window (see Figure 16), select the required operating system (Windows, Linux, Mac), specify the appropriate group and configuration profile, and click the Download Installer button.

Fig. 17. Adding computers with the installer
As a result of these actions, you will download the installation file in msi format to your computer, which you can then distribute using automated software deployment tools or run manually. Keep in mind that all computers on which this installer will be launched will be automatically added to the group of computers that you selected when downloading it.
2.2.3. Implementing URL Protection
Perform the same steps as for installation using the installer (see Section 2.2.2), but at the end click the Send URL by email button. As a result, the Microsoft Outlook window (or another installed and configured mail agent) opens to send an email with a link.
By the way, this method can also be used to install protection on Android devices.
As a result of these steps, you will be able to provide users with the appropriate links to install protection on their computers and devices. Keep in mind that all computers on which this URL will be opened will be automatically added to the group of computers that you selected when generating it. Note that within this method, the installation process depends on the end user (he must click on the URL to start the automatic installation process).
2.2.4. Implementing security using a QR code or Google Play
In this case, in the add computers window (see Figure 16), select the required operating system (Android), select the appropriate group to which you want to automatically add these Android devices.
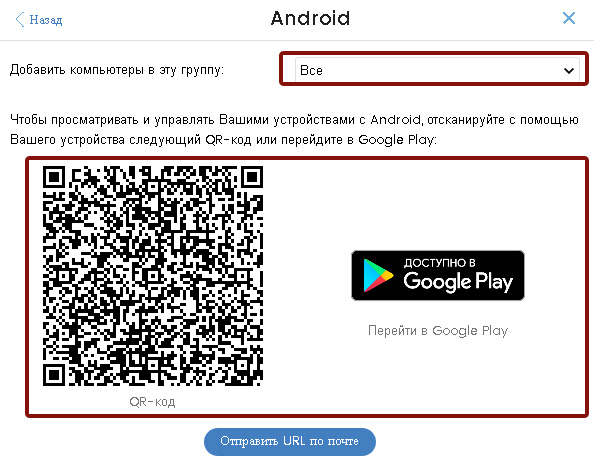
Fig. 18. Adding an Android device using a QR code or Google Play
After that, you can scan the QR code or click on the Google Play link if you want to install protection on the current Android device. You can also send the QR code as a picture to the required users in any way possible.
2.3. Step 3: Protection Monitoring
In order to verify the correctness of the implementation of the Panda protection in your network, as well as monitor and control the protection status of computers and devices and perform the required management, control and protection tasks, you need to go to the Computers section.
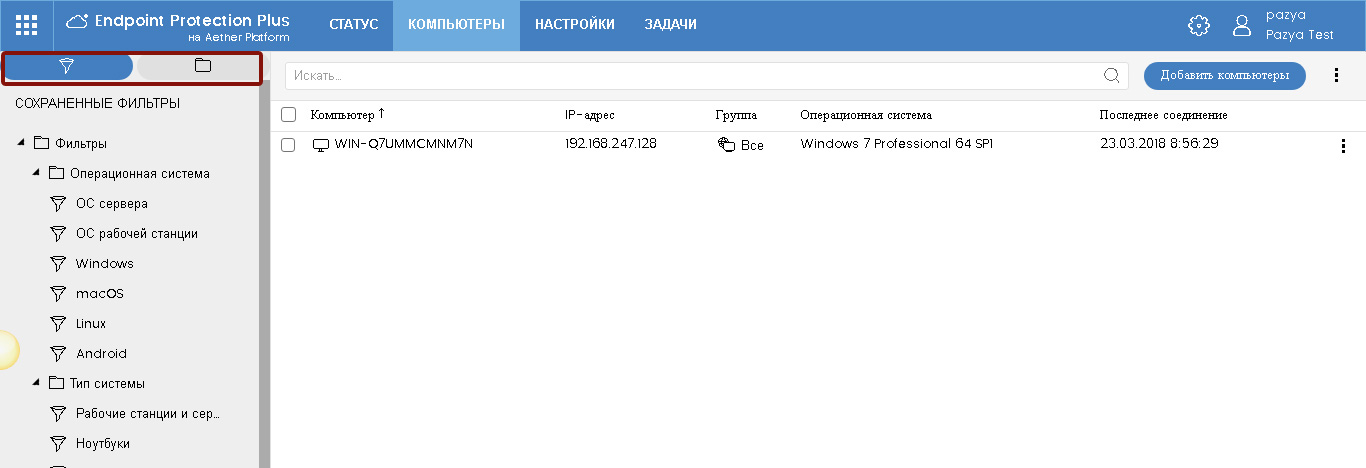
Fig. 19. List of computers
On the left side of the screen there is a selection block for the required computers either by filters or by organizational tree (groups and Active Directory folders). In the central part is a table with a list of computers.
In this section, you can select the required computers, check their status, perform various tasks remotely with respect to the required computers (groups of computers), etc. When you click on the computer of interest, you can go to the page with detailed information about it.
What actions and how you can do in relation to computers, see the Administrator's Guide.
3. Local agent
As a result of the solution implementation, a local agent will be installed on the protected devices, and a product icon will be displayed in the system tray.
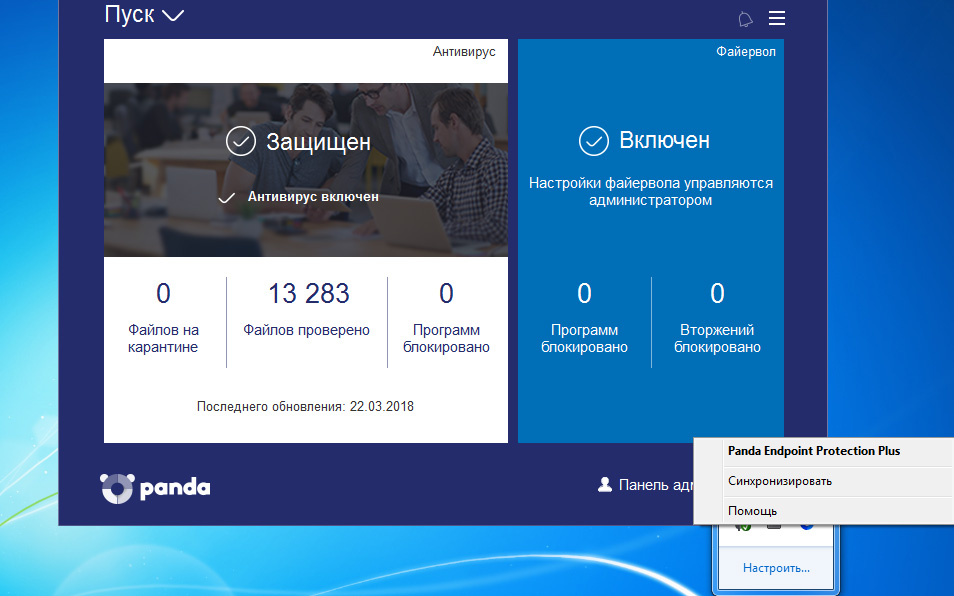
Fig. 20. Local console
In the local agent, the user can check the latest discovery information, run an on-demand anti-virus scan, synchronize the local agent with the cloud, and access the online help.
In the event that the security profile implies the ability to locally manage the firewall, then the user can also manage it in the local console.
In addition, the local console has a link to access the admin panel, access to which is limited by the administrator password (see section 2.1.2.). In this case, the administrator can go to this panel to make changes to the operation of the modules.

Fig. 21. Administrator Panel in the local console
In the event that any changes are made to the work of the modules, they will by default be active for 6 hours, although you can set a different period of their activity.
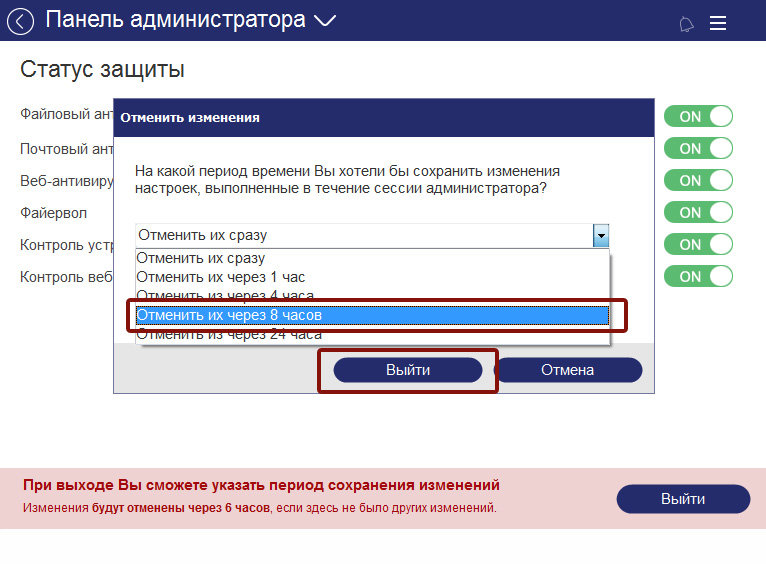
Fig. 22. Choosing a date for canceling changes in the local console administrator panel
Conclusion
As a result of the above steps, you can centrally and remotely implement Panda corporate protection on the required computers and devices simply and quickly. For details on the configuration and operation of Panda's corporate security, see the Administrator's Guide, which is available in the management console.
Thank you for your interest in the Panda solution.
Source: https://habr.com/ru/post/352104/
All Articles