Creating a chatbot using Q & A Maker and Microsoft Graph
Hi, Habr! Most recently, we conducted a hackathon for developers in Bucharest and Cluj. The main task of the group in Cluj was to create an effective chat program with Endava support and using Microsoft Graph and Q & A Maker. Today we will talk about this project, affecting the management of authentication to interact with the robot program through any channel, integrating Q & A Maker and using Microsoft Graph in conjunction with SharePoint. More under the cut!
This project was created during a private hackathon for Endava and Microsoft developers. This hackathon was held in the cities of Cluj and Bucharest (Romania). The participants' main task was to create prototypes of AI components that would improve the Endava web application used for IT support (for example, allow users to exchange natural language messages with chat software or optimize call management using machine learning technologies) .
')
The hackathon was conducted from January 30 to February 2, 2018. This GitHub page presents a piece of work that was completed in Cluj over three days. The development team included:
The main task of the group in Cluj was to create an effective chat program with support for several functions:
Information contained in this document:
Architectural solution:
The code for this solution uses the following technologies:
Our idea was to provide the robot program with access to the context with information about a specific user (for example, to SharePoint sites) and the ability to send e-mail. Therefore, the robot program was supposed to be safe and accessible only to employees.
To solve these problems, authentication was required. Its implementation was associated with a number of difficulties, for example, the robot program must be able to process e-mail, and therefore be able to authenticate the user in the absence of an internal authentication procedure. Endava Azure Active Directory is an AAD version 1 service. Therefore, we used AAD 1 as the platform for the main robot program. When implementing authentication, it is recommended to consider the following:
Authentication, security and authorization in the finished project are arranged as follows:
As you can see, the main context depends on the authentication in AAD. The following components work on the basis of AAD:
Now, after setting the necessary environment, you need to enter the correct values of the parameters listed below into the web.config file.
This setting is not the easiest task. In case of an authentication error, the system will display a message that will help you understand where to look for the cause. These messages are very detailed and quite helpful in troubleshooting. In general, this setup can be quite complex; You may need to contact your domain administrator to obtain certain access rights. It is highly recommended to allocate enough time for this stage. The good news is: as soon as this component works, you will not need to return to its configuration.
At the stage of creating and registering a robot program, the robot program name, ID and client key are generated. These values should be added to the following lines in the web.config file:
When creating a Q & A Maker, you will also receive an ID and key. They will be required in order to contact the service and receive recommendations. Put the appropriate keys in the following lines of the web.config file:
LUIS is used in the SharePoint Dialog to retrieve the URL or resource name of the SharePoint you want to access, as well as the type of access. When you create and configure this (like almost any other) service, you will receive the ID and secret. You will need to mark the class of the main dialog with the LUIS attribute:
Different authentication operations are implemented in the code a little differently. The main authentication procedure is to contact the AAD service, in which the solution receives a token for subsequent calls to the Microsoft Graph.
This mechanism works as follows:

Most of the code is related to the AuthBot component. As we have already discussed, it is important to migrate the code unchanged in order to block certain attack vectors. Remember that the token is very important because it contains all the credentials needed to access a variety of information (including, in our case, to send email from the user's address). Never try to save effort when working with a security system. Protection should be given maximum attention.
AAD authentication also works for email. Please note: you can verify authentication when communicating via email only if the robot program runs in a production environment. Emails are received from an Office 365 account and are processed approximately every ___ minutes.
For a user, interaction with the system via e-mail is almost the same as other channels. The user sends an email, the robot program sends an invitation to enter the system, in response to which the user must send the code. The AuthBot base code has been changed in such a way as to make the interaction more convenient (in particular, reduce the number of emails sent and simplify code extraction).
In response to the first letter, the robot program sends the user a message asking to follow the link in order to be authenticated. After that, the user must send the code:

After receiving it, the robot program sends a message about successful authentication. All other messages that the user sends will be processed by the utility processes of the robot program, taking into account the context for this user. Regardless of the communication channel (Teams or any other), the user can perform the same operations. However, the e-mail channel is slightly different from others: in particular, it is worthwhile to limit the volume of letters sent to the user and take into account a number of additional assumptions. More on this below.
Additional information about AuthBot is available on the appropriate GitHub page .
For authentication when interacting with a robot program, components from the SDK are used to develop such programs. If the main controller is marked with the attribute BotAuthentication, then the authentication mechanism using the key and secret mentioned in the previous section (in the section on configuration) will be used for it. It is completely transparent, and if you copy these two elements to the web.config file without errors, it will work fine. ID and secret you will need even in debug mode. The emulator supports this mechanism and is great for checking if your pair is working.
Keys are used to access the REST API. The work is organized in a simple and obvious way. Here is the code snippet:
The API is very simple. Documentation is available here . We use only one of the API, which returns no more than three answers to each question.
As explained in the previous section, to enable authentication, we simply specified a class attribute. This mechanism is completely transparent.
As already mentioned, the email channel (like the SMS channel) has certain features. In both cases, it is reasonable to strive to reduce the volume of transmitted messages. To do this, we slightly changed the authentication process to reduce the number of emails and extract the code from the email.
By sending an e-mail message, the user is unlikely to delete the previous correspondence and other unnecessary information - he will simply add a new text. As a result, the letter will contain the user's signature and other elements. Therefore, when interacting through this channel, additional work will be required to remove them. As an example, here is the AzureAuthDialog code snippet from AuthBot:
To reduce the number of emails sent to the user, we do not just ask him to send back the received authentication code, but output it on the web page and ask the user to reply to the email. As can be seen from the OAuthCallbackController code, the authentication procedure in AuthBot depends on the communication channel:
Each channel has a unique name. This allows you to easily adapt the actions of your robot program to the type of channel.
Another example is contained in the Q & A Dialog (kbDialog) code of the main robot program:
The purpose of this code is to extract only the first part of the email and remove the signature. It is assumed that a possible question is contained in the first three lines. Below are the previous letters or the user's signature. This is only an assumption, and it is not always satisfied, but during our three-day hackathon it worked perfectly.
Another example is the Q & A Maker code snippet, which controls the return of the response. Usually the solution provides the user with no more than three options and asks him which one best suits him. But if the user sends the question by e-mail, he expects to receive an answer, not a counter request. We decided to do this: if the question was received by e-mail, the solution simply returns the first answer. The option to include in the email the detailed content of all responses was also considered. The following code snippet shows how this processing is performed:
Microsoft Graph is a single REST API for reading, modifying, and creating user data (examples: custom calendar, email, SharePoint content, and OneDrive). As part of this project, we were interested in Graph API components for interacting with SharePoint and e-mail.
To simplify our task, we used the Microsoft.Graph Nuget package. Components from the Nuget-package process all requests and return objects. But you need to authenticate and get the token yourself. Fortunately, we have already prepared the authentication mechanism (and discussed above).
As an example, the following is the function code that returns the name of the owner of a certain SharePoint site:
When you create a GraphServiceClient object, you only need to transfer the token, as shown in the code, and after that you can call the necessary Graph functions.
All returned items are very easy to analyze, so working with them is simple and logical. In our case, we want to send an email to the SharePoint owner, so we need to get an email address and a name. Then we will be able to contact the user by name and send a letter.
Send an email using Microsoft Graph is also very simple:
In this example, a simple text message is sent, but HTML is also supported. It is also possible to send letters to several recipients. We had only three days to release a ready-made solution, so we decided to create a working, but as simple as possible code.
If the user has authenticated with his own credentials, the email will be sent from his mailbox and will be available in the Sent Items folder.
You can experiment with all the features of Microsoft Graph on this site. You can authenticate by specifying your own credentials, work with any functions, see how adding or deleting an area will affect the results.
Q & A Maker is a great tool for preparing question-answer pairs very quickly and for launching a cognitive service from which you can get answers to questions. This tool is very easy to integrate and very easy to use. Work on this service is still underway. The available version is for guidance only. Here's what it looks like:
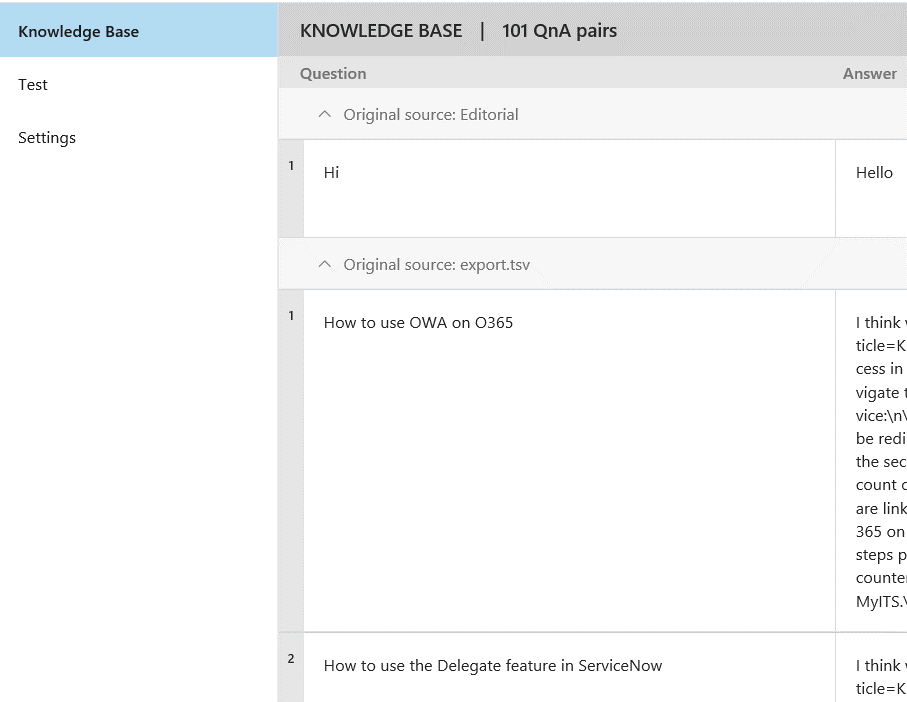
There are several ways to fill the list. You can use the API (documentation is available here ), import the tsv file, or specify the URL.
To use the Endava knowledge base, authentication was required, but to work with the Q & A Maker, it was not. Therefore, we had to export the base. The data was stored in various formats, including HTML code, and we needed to clean this code.
We cleaned the data with regular expressions: we removed the HTML tags, added tabs and line breaks. Here is the code snippet:
You may ask why the tab character is written as \\ t rather than \ t. The answer is the same as for the \\ n symbol. The fact is that Q & A Maker stores and returns answers in the form of raw text data. The tsv file used cannot contain carriage returns or additional tabs, otherwise the system may not process it correctly. The handlers for all channels correctly display the \ t and \ n characters, which makes it possible to better format the answer.
Important note: in Q & A Maker, you can store data with Markdown markup, but be aware that some channels may not support it! The screenshot shows some of the line breaks \ n.
We also added a link to the knowledge base home page in each answer. These pages look better than plain text, and may contain images that we completely removed from our main code. We tried to make the user as comfortable as possible.
When you select the appropriate answer, Q & A Maker analyzes the text of both the question and the answer. Therefore, the answers should also be as detailed as possible.
Setting up the LUIS service is quite simple. In our example, only one intent and three entities are used.
LUIS works like this:
To process an intent and call a specific function from your LUIS dialog class, simply mark the function with an attribute with the name of your intent, as shown below:
The interaction with the SharePoint robot program is much more linear, so we replace the LUIS dialogue with a dialogue through a form, which is much easier to work with in the case of linear questions. Most of the SharePoint issue handling code belongs to the SpFormHandler form. This is an elegant way to combine multiple dialogs. As can be seen from the code, any object can be passed to the constructor:
Both entities from LUIS and token are transmitted. Entities are used to obtain the URL or resource name of the SharePoint, as well as the type of access requested. LUIS contains many embedded entities, such as a URL. We strongly recommend using them: they work well and help save time.
Branching various dialogs, combining LUIS dialogs, dialogs using forms and ordinary dialogs with regard to solvable subtasks is a fully justified and workable approach.
The code for this project is only part of the code written in three days, but it is a good example of a combination of different technologies: authentication via Azure Active Directory, interaction with a robot program through various channels, including email, use of cognitive services, such as Q & A Maker and LUIS, via Microsoft Graph.
The published code and documentation form a fully functional solution. You can try out in practice both a partial and complete solution. To work with the Microsoft Graph component, you will need to authenticate and get a token. «», Azure Active Directory , . .
, .
 , , - , , . , , . Microsoft, 20 . , , .
Introduction
This project was created during a private hackathon for Endava and Microsoft developers. This hackathon was held in the cities of Cluj and Bucharest (Romania). The participants' main task was to create prototypes of AI components that would improve the Endava web application used for IT support (for example, allow users to exchange natural language messages with chat software or optimize call management using machine learning technologies) .
')
The hackathon was conducted from January 30 to February 2, 2018. This GitHub page presents a piece of work that was completed in Cluj over three days. The development team included:
- Corina Ciocanya (Corina Ciocanea), developer (Endava)
- Alexandru Marchis (Alexandru Marchis), developer (Endava)
- Tudor Muresan, developer (Endava)
- Laurent Ellerbach, Team Leader, Technical Evangelists (Microsoft)
Project Description
The main task of the group in Cluj was to create an effective chat program with support for several functions:
- Convenient (for the user) creating a request directly in the Endava case management system.
- Creating an experimental version of a robot program that will request access to SharePoint through the Microsoft Graph, sending an email directly to the SharePoint owner or preparing a request to create an application in a specialized company application called Service Now.
- Use Q & A Maker to find answers to user questions in the Endava pages with answers to questions.
- All authentication operations must be done through integration with Endava Active Directory.
- The solution should support the processing of e-mails, as previously the vast majority of users created appeals by sending e-mails.
Information contained in this document:
- How to manage authentication to interact with the robot program through any channel, including e-mail.
- How to integrate Q & A Maker with a robot program (the creation of a Q & A Maker robot program will not be considered here).
- Use Microsoft Graph in combination with SharePoint and sending email. The code here is part of a more complex solution that was developed in three days.
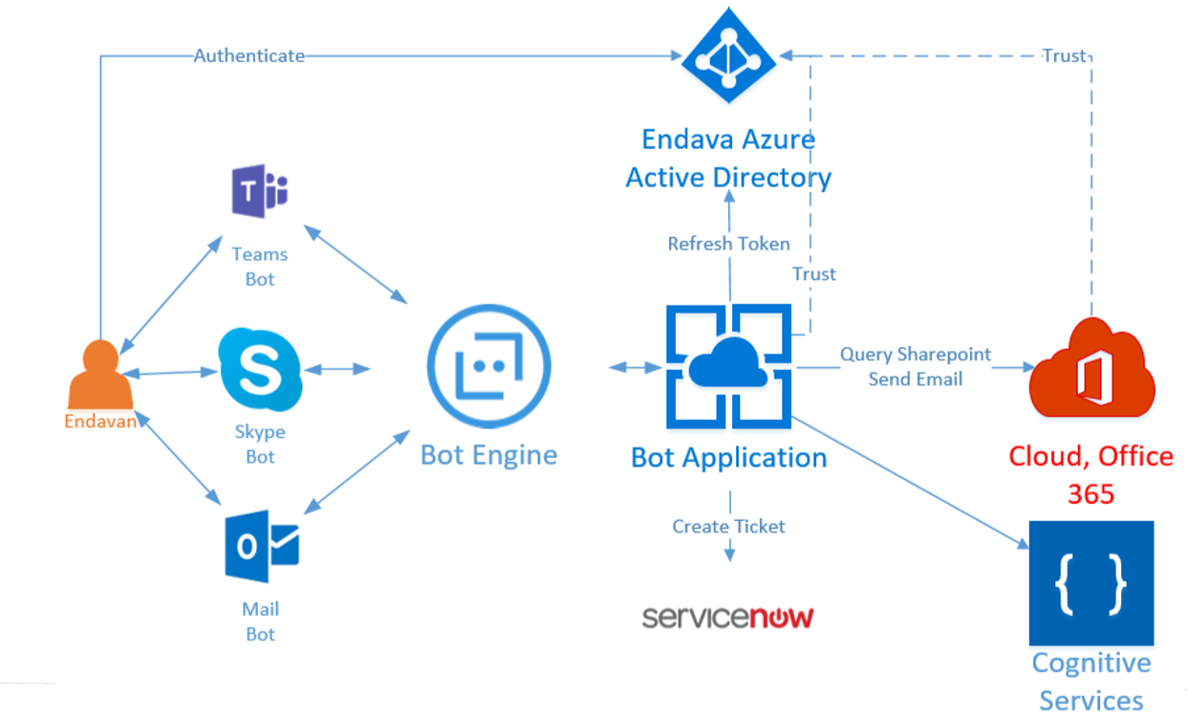
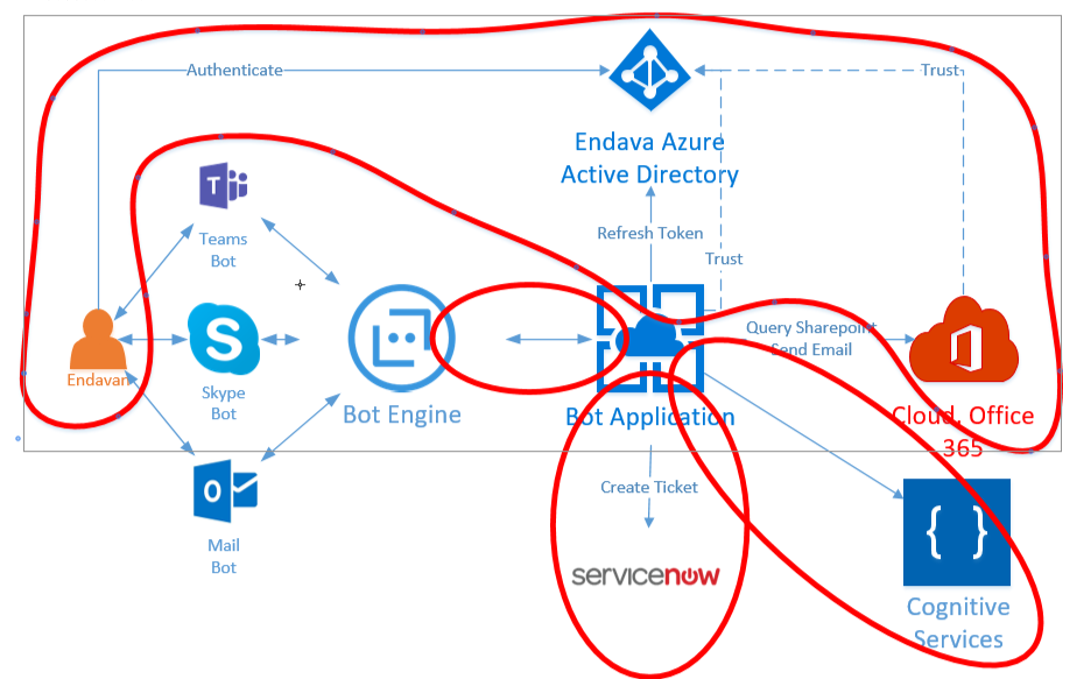
Architectural solution:
Used technologies
The code for this solution uses the following technologies:
- Q & A Maker ;
- Microsoft Bot Framework ;
- Microsoft Graph ;
- Azure Active Directory ;
- LUIS.ai - a cognitive text recognition service with the ability to analyze sentences;
- all services were hosted in Microsoft Azure , the robot program was implemented as a web application;
- all code was written in C # in Visual Studio Enterprise ; VSTS platform was used as a code repository.
Authentication
Our idea was to provide the robot program with access to the context with information about a specific user (for example, to SharePoint sites) and the ability to send e-mail. Therefore, the robot program was supposed to be safe and accessible only to employees.
To solve these problems, authentication was required. Its implementation was associated with a number of difficulties, for example, the robot program must be able to process e-mail, and therefore be able to authenticate the user in the absence of an internal authentication procedure. Endava Azure Active Directory is an AAD version 1 service. Therefore, we used AAD 1 as the platform for the main robot program. When implementing authentication, it is recommended to consider the following:
- If you use the code from the AuthBot example, be sure to save (copy) this mechanism. This is important for security reasons. The chat robot and your browser are in different contexts, blocking some attack vectors.
- Configure your AAD service to authorize for a specific application. You will receive a client ID and a secret that will need to be entered in the desired part of the web.config file.
- Ensure that the correct return URL is in the application configuration file. You can create several such addresses (for example, for the debug and for the working version), all of them must exactly match the redirect URL, so you need to specify the full path, including the protocol (https / http).
- Make sure that the AAD settings for the application for specific roles (for example, Sites.Read.All, Mail.ReadWrite, User.Read, People.Read, Directory.AccessAsUser.All) have the correct authorization parameters.
Authentication, security and authorization in the finished project are arranged as follows:
As you can see, the main context depends on the authentication in AAD. The following components work on the basis of AAD:
- Internal Service Service Now, which we will not consider here.
- The core of the robot program, of which the web application is a part. It uses the classic client ID and key.
- The program itself is a robot and cognitive services LUIS. It also uses the classic client ID and key.
- Robot software and Q & A Maker service. It also uses the classic client ID and key.
Configure keys and IDs to access all services
AAD Setup
Now, after setting the necessary environment, you need to enter the correct values of the parameters listed below into the web.config file.
- The Tenant parameter matches your domain name for AAD. This can be a second-level domain (yourdomain.com) or third (yourdomain.onmicrosoft.com), depending on the configuration.
- Settings ClientId (client ID) and ClientSecret (secret) you get when you configure the application.
- RedirectURL (redirect URL) - the URL where the robot program will be deployed. In our example, this is a local node. For a working version of the system, the URL will be different. We remind you that when you configure the application, you can specify multiple URLs for all possible cases.
<!-- AAD Auth v1--> <add key="ActiveDirectory.Mode" value="v1" /> <add key="ActiveDirectory.ResourceId" value="https://graph.microsoft.com/" /> <add key="ActiveDirectory.EndpointUrl" value="https://login.microsoftonline.com" /> <add key="ActiveDirectory.Tenant" value="YOUR_DOMAIN.COM" /> <add key="ActiveDirectory.ClientId" value="client_ID" /> <add key="ActiveDirectory.ClientSecret" value="super_secret" /> <add key="ActiveDirectory.RedirectUrl" value="http://localhost:3979/api/OAuthCallback" /> This setting is not the easiest task. In case of an authentication error, the system will display a message that will help you understand where to look for the cause. These messages are very detailed and quite helpful in troubleshooting. In general, this setup can be quite complex; You may need to contact your domain administrator to obtain certain access rights. It is highly recommended to allocate enough time for this stage. The good news is: as soon as this component works, you will not need to return to its configuration.
Setting up robot programs
At the stage of creating and registering a robot program, the robot program name, ID and client key are generated. These values should be added to the following lines in the web.config file:
<add key="BotId" value="YourBotId" /> <add key="MicrosoftAppId" value="" /> <add key="MicrosoftAppPassword" value="" /> Q & A Maker Setup
When creating a Q & A Maker, you will also receive an ID and key. They will be required in order to contact the service and receive recommendations. Put the appropriate keys in the following lines of the web.config file:
<!-- QnaMaker --> <add key="QnaMaker.KbId" value="QAMaker_ID" /> <add key="QnaMaker.KbKey" value="QAMaker_Key" /> LUIS Setup
LUIS is used in the SharePoint Dialog to retrieve the URL or resource name of the SharePoint you want to access, as well as the type of access. When you create and configure this (like almost any other) service, you will receive the ID and secret. You will need to mark the class of the main dialog with the LUIS attribute:
[LuisModel("Key-with-dash", "secret")] public class SpDialog : LuisDialog<object> Code Authentication Management
Different authentication operations are implemented in the code a little differently. The main authentication procedure is to contact the AAD service, in which the solution receives a token for subsequent calls to the Microsoft Graph.
Authentication in AAD
This mechanism works as follows:
Most of the code is related to the AuthBot component. As we have already discussed, it is important to migrate the code unchanged in order to block certain attack vectors. Remember that the token is very important because it contains all the credentials needed to access a variety of information (including, in our case, to send email from the user's address). Never try to save effort when working with a security system. Protection should be given maximum attention.
AAD authentication also works for email. Please note: you can verify authentication when communicating via email only if the robot program runs in a production environment. Emails are received from an Office 365 account and are processed approximately every ___ minutes.
For a user, interaction with the system via e-mail is almost the same as other channels. The user sends an email, the robot program sends an invitation to enter the system, in response to which the user must send the code. The AuthBot base code has been changed in such a way as to make the interaction more convenient (in particular, reduce the number of emails sent and simplify code extraction).
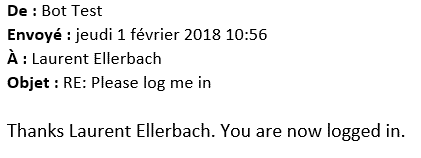
In response to the first letter, the robot program sends the user a message asking to follow the link in order to be authenticated. After that, the user must send the code:
After receiving it, the robot program sends a message about successful authentication. All other messages that the user sends will be processed by the utility processes of the robot program, taking into account the context for this user. Regardless of the communication channel (Teams or any other), the user can perform the same operations. However, the e-mail channel is slightly different from others: in particular, it is worthwhile to limit the volume of letters sent to the user and take into account a number of additional assumptions. More on this below.
Additional information about AuthBot is available on the appropriate GitHub page .
Authentication to interact with the robot program
For authentication when interacting with a robot program, components from the SDK are used to develop such programs. If the main controller is marked with the attribute BotAuthentication, then the authentication mechanism using the key and secret mentioned in the previous section (in the section on configuration) will be used for it. It is completely transparent, and if you copy these two elements to the web.config file without errors, it will work fine. ID and secret you will need even in debug mode. The emulator supports this mechanism and is great for checking if your pair is working.
namespace BotToQuerySharepoint { [BotAuthentication] public class MessagesController : ApiController { /// <summary> /// POST: api/Messages /// /// </summary> [BotAuthentication] public async Task<HttpResponseMessage> Post([FromBody]Activity activity) { // } } } Q & A Maker Authentication
Keys are used to access the REST API. The work is organized in a simple and obvious way. Here is the code snippet:
public virtual async Task MessageReceivedAsync(IDialogContext context, IAwaitable<IMessageActivity> item) { var message = await item; { string kbId = ConfigurationManager.AppSettings["QnaMaker.KbId"]; string kbKey = ConfigurationManager.AppSettings["QnaMaker.KbKey"]; string qnaUrl = $"https://westus.api.cognitive.microsoft.com/qnamaker/v2.0/knowledgebases/{kbId}/generateAnswer"; HttpClient client = new HttpClient(); var json = new { question = strtosend, top = 3 }; var content = new StringContent(JsonConvert.SerializeObject(json), Encoding.UTF8, "application/json"); content.Headers.Add("Ocp-Apim-Subscription-Key", kbKey); HttpResponseMessage response = await client.PostAsync(qnaUrl, content); if (response.StatusCode == HttpStatusCode.OK) { // , , } } } The API is very simple. Documentation is available here . We use only one of the API, which returns no more than three answers to each question.
Authentication in LUIS
As explained in the previous section, to enable authentication, we simply specified a class attribute. This mechanism is completely transparent.
Email Channel
As already mentioned, the email channel (like the SMS channel) has certain features. In both cases, it is reasonable to strive to reduce the volume of transmitted messages. To do this, we slightly changed the authentication process to reduce the number of emails and extract the code from the email.
By sending an e-mail message, the user is unlikely to delete the previous correspondence and other unnecessary information - he will simply add a new text. As a result, the letter will contain the user's signature and other elements. Therefore, when interacting through this channel, additional work will be required to remove them. As an example, here is the AzureAuthDialog code snippet from AuthBot:
if (msg.Text == null) { if (msg.ChannelId != "email") { await context.PostAsync($", ."); } context.Wait(this.MessageReceivedAsync); } else { // , (, Teams) string cleanedText = msg.Text; Match firstmatchedValue = Regex.Match(msg.Text, @"\d+", RegexOptions.IgnorePatternWhitespace); if (firstmatchedValue.Length > 0) cleanedText = firstmatchedValue.Value; if (cleanedText.Length >= 6 && magicNumber.ToString() == cleanedText.Substring(0, 6)) { context.UserData.SetValue<string>(ContextConstants.MagicNumberValidated, "true"); context.Done($" {authResult.UserName}. You are now logged in. "); } else { context.UserData.RemoveValue(ContextConstants.AuthResultKey); context.UserData.SetValue<string>(ContextConstants.MagicNumberValidated, "false"); context.UserData.RemoveValue(ContextConstants.MagicNumberKey); await context.PostAsync($" , . , ."); context.Wait(this.MessageReceivedAsync); } } To reduce the number of emails sent to the user, we do not just ask him to send back the received authentication code, but output it on the web page and ask the user to reply to the email. As can be seen from the OAuthCallbackController code, the authentication procedure in AuthBot depends on the communication channel:
await Conversation.ResumeAsync(resumptionCookie, message); if (message.ChannelId == "skypeforbusiness") resp.Content = new StringContent($"<html><body> ! , , :<br/> {magicNumber} </body></html>", System.Text.Encoding.UTF8, @"text/html"); else if (message.ChannelId == "email") resp.Content = new StringContent($"<html><body> ! , , :<br/> {magicNumber} </body></html>", System.Text.Encoding.UTF8, @"text/html"); else resp.Content = new StringContent($"<html><body> ! , , :<br/> <h1>{magicNumber}</h1>.</body></html>", System.Text.Encoding.UTF8, @"text/html"); Each channel has a unique name. This allows you to easily adapt the actions of your robot program to the type of channel.
Another example is contained in the Q & A Dialog (kbDialog) code of the main robot program:
string strtosend = message.Text; if (message.ChannelId == "email") { var str = strtosend.Split('\n'); int maxidx = str.Length; if (maxidx > 3) maxidx = 4; for (int i = 0; i < maxidx; i++) strtosend += str[i] + " "; } The purpose of this code is to extract only the first part of the email and remove the signature. It is assumed that a possible question is contained in the first three lines. Below are the previous letters or the user's signature. This is only an assumption, and it is not always satisfied, but during our three-day hackathon it worked perfectly.
Another example is the Q & A Maker code snippet, which controls the return of the response. Usually the solution provides the user with no more than three options and asks him which one best suits him. But if the user sends the question by e-mail, he expects to receive an answer, not a counter request. We decided to do this: if the question was received by e-mail, the solution simply returns the first answer. The option to include in the email the detailed content of all responses was also considered. The following code snippet shows how this processing is performed:
if (qnaResponse.answers.Count == 0) { await context.PostAsync( " . \n - QNA?"); context.Done(true); } else if ((qnaResponse.answers.Count == 1) || (message.ChannelId == "email")) { await context.PostAsync(qnaResponse.answers.First().answer); context.Done(true); } else { // } Microsoft Graph and SharePoint
Microsoft Graph is a single REST API for reading, modifying, and creating user data (examples: custom calendar, email, SharePoint content, and OneDrive). As part of this project, we were interested in Graph API components for interacting with SharePoint and e-mail.
To simplify our task, we used the Microsoft.Graph Nuget package. Components from the Nuget-package process all requests and return objects. But you need to authenticate and get the token yourself. Fortunately, we have already prepared the authentication mechanism (and discussed above).
As an example, the following is the function code that returns the name of the owner of a certain SharePoint site:
public async Task<UserInfo> GetOwnerNameForSite(string token, string siteId) { var graphService = new GraphServiceClient( new DelegateAuthenticationProvider( (requestMessage) => { requestMessage.Headers.Authorization = new AuthenticationHeaderValue("bearer", token); return Task.FromResult(0); })); var s = await graphService.Sites[siteId] .Drives.Request() .GetAsync(); var user = await graphService.Users[s.First().CreatedBy.User.Id].Request().GetAsync(); return new UserInfo() { EmailAddress = user.Mail, Name = user.DisplayName }; } When you create a GraphServiceClient object, you only need to transfer the token, as shown in the code, and after that you can call the necessary Graph functions.
All returned items are very easy to analyze, so working with them is simple and logical. In our case, we want to send an email to the SharePoint owner, so we need to get an email address and a name. Then we will be able to contact the user by name and send a letter.
Send an email using Microsoft Graph is also very simple:
public async Task SendEmail(string accessToken, string emailAddress, string body, string subject) { var message = new Message(); message.Body = new ItemBody() { Content = body, ContentType = BodyType.Text }; message.ToRecipients = new List<Recipient>() { new Recipient() {EmailAddress = new EmailAddress() {Address = emailAddress}} }; message.Subject = subject; var graphserviceClient = new GraphServiceClient( new DelegateAuthenticationProvider( (requestMessage) => { requestMessage.Headers.Authorization = new AuthenticationHeaderValue("bearer", accessToken); return Task.FromResult(0); })); await graphserviceClient.Me.SendMail(message, true).Request().PostAsync(); } In this example, a simple text message is sent, but HTML is also supported. It is also possible to send letters to several recipients. We had only three days to release a ready-made solution, so we decided to create a working, but as simple as possible code.
If the user has authenticated with his own credentials, the email will be sent from his mailbox and will be available in the Sent Items folder.
You can experiment with all the features of Microsoft Graph on this site. You can authenticate by specifying your own credentials, work with any functions, see how adding or deleting an area will affect the results.
Q & A Maker Tips
Q & A Maker is a great tool for preparing question-answer pairs very quickly and for launching a cognitive service from which you can get answers to questions. This tool is very easy to integrate and very easy to use. Work on this service is still underway. The available version is for guidance only. Here's what it looks like:
There are several ways to fill the list. You can use the API (documentation is available here ), import the tsv file, or specify the URL.
To use the Endava knowledge base, authentication was required, but to work with the Q & A Maker, it was not. Therefore, we had to export the base. The data was stored in various formats, including HTML code, and we needed to clean this code.
We cleaned the data with regular expressions: we removed the HTML tags, added tabs and line breaks. Here is the code snippet:
// ( — ) result = System.Text.RegularExpressions.Regex.Replace(result, @"<( )*style([^>])*>", "<style>", System.Text.RegularExpressions.RegexOptions.IgnoreCase); result = System.Text.RegularExpressions.Regex.Replace(result, @"(<( )*(/)( )*style( )*>)", "</style>", System.Text.RegularExpressions.RegexOptions.IgnoreCase); result = System.Text.RegularExpressions.Regex.Replace(result, "(<style>).*(</style>)", string.Empty, System.Text.RegularExpressions.RegexOptions.IgnoreCase); // <td> result = System.Text.RegularExpressions.Regex.Replace(result, @"<( )*td([^>])*>", "\\t", //\t System.Text.RegularExpressions.RegexOptions.IgnoreCase); You may ask why the tab character is written as \\ t rather than \ t. The answer is the same as for the \\ n symbol. The fact is that Q & A Maker stores and returns answers in the form of raw text data. The tsv file used cannot contain carriage returns or additional tabs, otherwise the system may not process it correctly. The handlers for all channels correctly display the \ t and \ n characters, which makes it possible to better format the answer.
Important note: in Q & A Maker, you can store data with Markdown markup, but be aware that some channels may not support it! The screenshot shows some of the line breaks \ n.
We also added a link to the knowledge base home page in each answer. These pages look better than plain text, and may contain images that we completely removed from our main code. We tried to make the user as comfortable as possible.
When you select the appropriate answer, Q & A Maker analyzes the text of both the question and the answer. Therefore, the answers should also be as detailed as possible.
LUIS Service Tips
Setting up the LUIS service is quite simple. In our example, only one intent and three entities are used.
LUIS works like this:
- User request: I would like to have [read] access to the [Development] sharepoint site.
- LUIS understands the intent — access to SharePoint — and extracts two entities: [read] and [Development].
To process an intent and call a specific function from your LUIS dialog class, simply mark the function with an attribute with the name of your intent, as shown below:
[LuisIntent("sp-access")] public virtual async Task ProcessSpAccessRequest(IDialogContext context, LuisResult luisResult) { var accessToken = await context.GetAccessToken( ConfigurationManager.AppSettings[ "ActiveDirectory.ResourceId"]); //, — Graph API SpFormHandler formHandler = new SpFormHandler(); IFormDialog<SharepointModel> formDialog = formHandler.GetFormDialog(luisResult.Entities, accessToken); context.Call(formDialog, OnFormComplete); } The interaction with the SharePoint robot program is much more linear, so we replace the LUIS dialogue with a dialogue through a form, which is much easier to work with in the case of linear questions. Most of the SharePoint issue handling code belongs to the SpFormHandler form. This is an elegant way to combine multiple dialogs. As can be seen from the code, any object can be passed to the constructor:
[Serializable] public class SpFormHandler { public IFormDialog<SharepointModel> GetFormDialog(IEnumerable<EntityRecommendation> entities, string token) { var spForm = new SharepointModel(); spForm.Token = token; foreach (EntityRecommendation entity in entities) { if (entity.Type == "sp-sitename" || entity.Type == "builtin.url") { spForm.SitenameOrUrl = entity.Entity; } if (entity.Type == "sp-accessright") { Enum.TryParse(entity.Entity, true, out AccessRights rights); spForm.AccessRights = rights; } } return new FormDialog<SharepointModel>(spForm, BuildForm, FormOptions.PromptInStart); } private IForm<SharepointModel> BuildForm() { // } } Both entities from LUIS and token are transmitted. Entities are used to obtain the URL or resource name of the SharePoint, as well as the type of access requested. LUIS contains many embedded entities, such as a URL. We strongly recommend using them: they work well and help save time.
Branching various dialogs, combining LUIS dialogs, dialogs using forms and ordinary dialogs with regard to solvable subtasks is a fully justified and workable approach.
Conclusion and further action
The code for this project is only part of the code written in three days, but it is a good example of a combination of different technologies: authentication via Azure Active Directory, interaction with a robot program through various channels, including email, use of cognitive services, such as Q & A Maker and LUIS, via Microsoft Graph.
The published code and documentation form a fully functional solution. You can try out in practice both a partial and complete solution. To work with the Microsoft Graph component, you will need to authenticate and get a token. «», Azure Active Directory , . .
, .
about the author
, , - , , . , , . Microsoft, 20 . , , .Source: https://habr.com/ru/post/351944/
All Articles