Learn OpenGL. Lesson 4.11 - Smoothing

Smoothing
In your research on three-dimensional rendering, you must have come across the appearance of pixelated chipping along the edges of the rendered models. These marks inevitably appear due to the principle of converting vertex data into screen fragments with a rasterizer somewhere in the depth of the OpenGL pipeline. For example, even on such a simple figure as a cube, these artifacts are already noticeable:

A quick glance may not notice anything, but it is worth looking more closely and the marked notches appear on the faces of the cube. Let's try to enlarge the image:

No, this is no good. Is this image quality you want to see in the release version of your application?
Content
Part 1. Start
')
Part 2. Basic lighting
Part 3. Loading 3D Models
Part 4. OpenGL advanced features
')
- Opengl
- Creating a window
- Hello window
- Hello triangle
- Shaders
- Textures
- Transformations
- Coordinate systems
- Camera
Part 2. Basic lighting
Part 3. Loading 3D Models
Part 4. OpenGL advanced features
- Depth test
- Stencil test
- Mixing colors
- Face clipping
- Frame buffer
- Cubic cards
- Advanced data handling
- Advanced GLSL
- Geometric Shader
- Instancing
- Smoothing
The effect of the apparent visibility of the pixel structure of an image along the edges of objects is called aliasing. In the computer graphics industry, quite a few techniques have been accumulated, called anti-aliasing or anti-aliasing techniques, which are struggling with this effect, allowing for smooth transitions at the boundaries of objects.
So, for example, one of the first was the super sampling anti-aliasing ( SSAA ) technique. The implementation is done in two passes: first, the render goes to an off-screen frame buffer with a resolution that is noticeably larger than the screen; then the image was transferred to the screen frame buffer with a decrease. This data redundancy due to resolution differences was used to reduce the aliasing effect and the method worked fine, but there was one “But”: performance. The conclusion of the scene in a huge resolution took away a lot of power from the GPU and the age of fame of this technology was short-lived.
But from the ashes of the old technology, a new, more advanced one was born: multi sampling anti-aliasing ( MSAA ). It is based on the ideas of SSAA, but implements them by a much more efficient method. In this tutorial, we will look at the MSAA approach, which is natively available in OpenGL.
Multisampling
To understand the essence of multisampling and how it works, we first have to go deeper into the guts of OpenGL and look at the work of its rasterizer.
A rasterizer is a set of algorithms and procedures that stand between the finally processed vertex data and the fragment shader. The rasterizer receives all vertices belonging to the primitive as input and converts this data into a set of fragments. Vertex coordinates, theoretically, can be absolutely any, but not the coordinates of the fragments - they are strictly limited by the resolution of your output device and the size of the window. And almost never the coordinates of the vertex of the primitive will not be superimposed on the fragments one-on-one: one way or another, the rasterizer will have to decide in some way in which fragment and by what screen coordinate each of the vertices will appear.
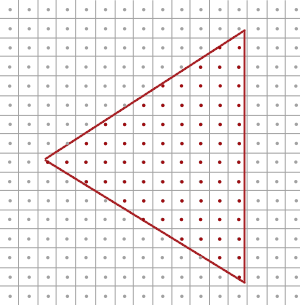
The image shows a grid representing screen pixels. In the center of each of them is the sampling / sampling point , which is used to determine whether the triangle covers a given pixel. Red marked sampling points covered with a triangle - for them the rasterizer will generate the corresponding fragment. Despite the fact that the edges of the triangle in some places overlap some pixels, they do not overlap the sampling point - here the fragment will not be created and the fragment shader for this pixel will not be executed.
I think you already guessed the reasons for aliasing. The render of this triangle on the screen will look like this:

Because of the finiteness of the number of pixels on the screen, some located along the edges of the triangle will be painted over, and some will not. As a result, it turns out that primitives are not rendered with smooth edges, which is manifested in the form of those notches.
When using multisampling, not one point is used to determine the overlap of a pixel by a triangle, but several (hence the name). Instead of a single sampling point in the center of the pixel, 4 subsample points will be used to determine the overlap, arranged according to a certain pattern. The consequence is that the color buffer size should also increase fourfold (in terms of the number of subsample points used).
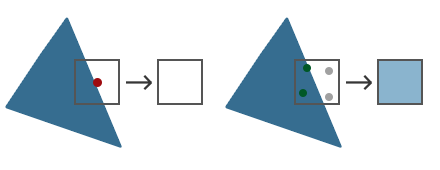
The standard overlap definition is shown on the left. For the selected pixel, the fragment shader will not be executed, and it will remain unpainted because no overlap has been registered. The case on the right shows a multisampling case, where each pixel contains 4 subsample points. Here you can see that the triangle covers only 2 subsample points.
The number of subsample points can be changed within certain limits. A greater number of points - better quality smoothing.From this point on, everything that happens becomes more interesting. Having determined that the two points of the subsample pixel were covered with a triangle, it is necessary to derive the resulting color for this pixel. The first guess would be to execute a fragment shader for each subsample point covered by a triangle and then average the colors of the whole subsample points in a pixel. In this case, we would have to run the fragment shader several times with the vertex data interpolated to the coordinates of each of the overlapped subsampling points (twice in this example) and save the resulting colors at these points. Fortunately, in fact, the multisampling process does not work that way - otherwise we would have to perform a considerable number of additional calls to the fragment shader, which would hit the performance a lot.
In fact, when using MSAA, the fragment shader is executed exactly once, regardless of the number of subsample points closed by the primitive. The fragment shader is executed with the vertex data interpolated to the center of the pixel, and the color obtained when it is executed is stored in each of the primitive subsample sampling points. When all the subsampling points of the frame buffer are filled with the colors of the primitives drawn by us, then a pixel-by-pixel averaging of colors to one value per pixel occurs. In this example, only two subsample points were overlapped and, accordingly, filled with the color of the triangle. The remaining two were filled with a transparent background color. When mixing the colors of these subsamples turned out to be a light blue color.
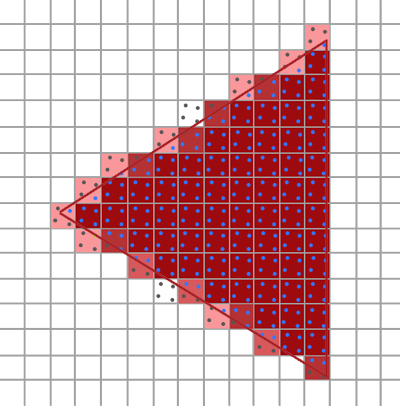
The frame buffer as a result contains the image of primitives with much more smoothed edges. See how the definition of subsample coverage on an already familiar triangle looks like:

It can be seen that each pixel contains four subsample points (the pixels that are not important for example are left blank), while the subsample points covered with a triangle are marked with blue, and the uncovered ones are marked with gray. A fragmentary shader will be called once inside the perimeter of a triangle, all of which will be saved in all four subsamples. On the edges, not all subsamples will be covered, so the result of the fragment shader will be saved only in a part of them. Depending on the number of triangle-covered subsample points, the resulting pixel color is determined based on the color of the triangle itself and other colors stored at the subsample points.
Simply put, the more subsamples covered by a triangle, the more the color of the pixel will correspond to the color of the triangle. If you now fill the colors of the pixels as in the example with a triangle without using multisampling, the following picture will be released:
As you can see, the fewer subsamples of a pixel belong to a triangle, the less its color corresponds to the color of a triangle. The clear borders of the triangle are now surrounded by pixels of a slightly lighter shade, which creates a smoothing effect when viewed from a distance.
But not only the color values are subject to the operation of the multisampling algorithm: the depth buffer and the stencil also begin to use multiple subsamples for the pixel. The vertex depth value is interpolated for each of the subsample points before performing the depth test. Stencil values are not stored for the entire pixel, but for each of the subsample points. For us, this also means an increase in the amount of memory occupied by these buffers, in accordance with the number of subsamples used.
Here we looked at the very basics of how multisampling works. The true internal logic of the rasterizer will be more complicated than the review given here. However, for the purposes of a general understanding of the principle and progress of multisampling, this is quite enough.
OpenGL multisampling
To use multisampling in OpenGL, you must use a color buffer that can store more than one color value per pixel (because MSAA means storing the color value at the subsampling points). Thus, we need some special type of buffer that can store a given number of subsamples - a multisample buffer.
Most window systems can provide us with a multisample buffer instead of a standard color buffer. GLFW also has this functionality; all that is required is to set a special flag that signals our desire to use a buffer with N subsample points, instead of the standard one:
glfwWindowHint(GLFW_SAMPLES, 4); Now, calling glfwCreateWindow will create an output window with a color buffer storing four subsamples for each screen coordinate. GLFW will also automatically create depth and stencil buffers using the same four subsample points per pixel. And the size of each of these buffers will grow four times.
After creating multisample buffers by GLWL, it remains to enable multisampling mode already in OpenGL:
glEnable(GL_MULTISAMPLE); In most OpenGL drivers, multisampling is active by default, so this call will be redundant, but explicitly including the functions you need is a good tone, and it also allows you to activate the mode regardless of the defaults of the specific implementation.
Actually, after ordering the multisample buffer and enabling the mode, all our work is finished, since everything else falls on the OpenGL rasterizer mechanisms and happens without our participation. If we now try to bring out the green cube, familiar from the very beginning of the lesson, then we will see that its faces are now much smoother:

Indeed, the edges of this cube look much more attractive. And the same effect will affect any object in your scene.
The source code of the example is here .
Off-screen multisampling
Creating a basic frame buffer with MSAA enabled is a simple task, thanks to GLFW. If we want to create our own buffer, for example, for an off-screen render, then we will have to take this process into our own hands.
There are two main methods of creating buffers with multisampling for further attachment to the frame buffer, similar to the examples already sorted out from the corresponding lesson : texture attachments and attachments of the render buffer type.
Multisampling Texture Attachment
To create a texture that supports multiple subsamples, use the texture target type GL_TEXTURE_2D_MULTISAPLE and the function glTexImage2DMultisample instead of the usual glTexImage2D :
glBindTexture(GL_TEXTURE_2D_MULTISAMPLE, tex); glTexImage2DMultisample(GL_TEXTURE_2D_MULTISAMPLE, samples, GL_RGB, width, height, GL_TRUE); glBindTexture(GL_TEXTURE_2D_MULTISAMPLE, 0); The second argument specifies the number of subsamples in the created texture. If the last argument is set to GL_TRUE , then the texture will use the same number and position of subsample points for each texel.
To attach such a texture to the framebuffer object, use the same glFramebufferTexture2D call, but this time with the specified texture type GL_TEXTURE_2D_MULTISAMPLE:
glFramebufferTexture2D(GL_FRAMEBUFFER, GL_COLOR_ATTACHMENT0, GL_TEXTURE_2D_MULTISAMPLE, tex, 0); As a result, the current frame buffer will be provided with a color-based texture buffer with multisampling support.
Renderbuffer with multisampling
Creating a render buffer with multiple subsample points is as easy as creating such a texture. Moreover, it is even simpler: all you need to do is change the call to glRenderbufferStorage to glRenderbufferStorageMultisample when preparing memory for the currently rendered buffer manager:
glRenderbufferStorageMultisample(GL_RENDERBUFFER, 4, GL_DEPTH24_STENCIL8, width, height); There is only one additional parameter from the new one, going after the target type of the render buffer, which indicates the number of subsample points. Here we have four such points.
Render frame buffer with multisampling
The render buffer in the multisample frame buffer goes automatically, without the required actions on our part. Every time we render into an attached frame buffer, the rasterizer itself performs the necessary operations. And we get a color (depth, stencil) buffer with multiple subsample points at the output. Since the frame buffer with multiple subsample points is still somewhat different from the usual one, it will not be possible to directly use its separate buffers for various operations, such as texture sampling in the shader.
An image with multisampling support contains more information than a regular one, therefore it is necessary to resolve ( resolve ) this image, or, in other words, convert its resolution to a smaller one. This operation is usually performed by calling glBlitFramebuffer , which allows you to copy the area of one frame buffer to another with the associated resolution of the present buffers with multiple subsampling points.
This function transfers the source area specified by the four coordinates in the screen space to the destination area also defined by the four screen coordinates. I recall the lesson on frame buffers : if we bind a frame buffer object to the target GL_FRAMEBUFFER , then the binding is implicitly carried out both to the target read from the frame buffer and to the write target to the frame buffer. To bind to these goals separately, special target identifiers are used: GL_READ_FRAMEBUFFER and GL_DRAW_FRAMEBUFFER, respectively.
During its operation, the glBlitFramebuffer function uses these anchor points to determine which of the frame buffers is the source of the image and which is the receiver. As a result, we could simply transfer the image from the multisample frame buffer to the standard using blitting:
glBindFramebuffer(GL_READ_FRAMEBUFFER, multisampledFBO); glBindFramebuffer(GL_DRAW_FRAMEBUFFER, 0); glBlitFramebuffer(0, 0, width, height, 0, 0, width, height, GL_COLOR_BUFFER_BIT, GL_NEAREST); By assembling and running the application, we would get an image identical to the previous example that did not use the frame buffer: an acid-green cube drawn using MSAA, as can be seen by examining its faces — they are still smooth:
Sample sources are here .
But what if the image from the frame buffer with multiple subsample points we would like to use as a data source for post-processing? We cannot directly use multisample textures in the shader. But you can try to transfer the image from the multisample frame buffer using blit to another, with the usual, not multisample, buffers. And then you can use a regular image as a resource for post-processing, in essence getting all the benefits of MSAA and adding post-processing on top of it. Yes, for this whole process you will have to create a separate frame buffer, which is purely an auxiliary object for enabling MSAA textures into regular ones, which can be used in the shader. In the form of pseudocode, the process looks like this:
unsigned int msFBO = CreateFBOWithMultiSampledAttachments(); // FBO ... glFramebufferTexture2D(GL_FRAMEBUFFER, GL_COLOR_ATTACHMENT0, GL_TEXTURE_2D, screenTexture, 0); ... while(!glfwWindowShouldClose(window)) { ... glBindFramebuffer(msFBO); ClearFrameBuffer(); DrawScene(); // glBindFramebuffer(GL_READ_FRAMEBUFFER, msFBO); glBindFramebuffer(GL_DRAW_FRAMEBUFFER, intermediateFBO); glBlitFramebuffer(0, 0, width, height, 0, 0, width, height, GL_COLOR_BUFFER_BIT, GL_NEAREST); // , glBindFramebuffer(GL_FRAMEBUFFER, 0); ClearFramebuffer(); glBindTexture(GL_TEXTURE_2D, screenTexture); DrawPostProcessingQuad(); ... } If we add this code to post processing examples from the lesson on the frame buffer , we can apply all those effects to the image of the scene without jagged edges. For example, with the blur effect you get something like this:

Since a standard texture with a single subsample point is used for postprocessing, some processing methods (searching for boundaries, for example) can add noticeable sharp edges and notches to the scene. To bypass this artifact you will have to either blur the result or implement your own smoothing algorithm.As you can see, for the combination of MSAA and off-screen rendering techniques, some details have to be taken into account. But all the extra effort pays off with a much higher quality of the resulting image. However, remember that the activation of multisampling can still significantly affect the final performance, especially when a large number of subsample points are set.
Own smoothing method
In fact, it is possible to transfer multisample textures directly into shaders, without blitting into auxiliary ordinary one. In this case, the GLSL capabilities provide access to individual subsampling points in the texture, which can be used to create your own smoothing algorithms (which is often in large graphic applications).
To begin, you will need to create a special sampler of the type sampler2DMS , instead of the usual sampler2D :
uniform sampler2DMS screenTextureMS; And to get the color value at the sampling point, use the following function:
vec4 colorSample = texelFetch(screenTextureMS, TexCoords, 3); // 4 Here you can see an additional argument - the number of the subsample point (counting from zero), which is addressed.
We will not consider the details of creating special smoothing algorithms here - this is nothing more than a starting point for your own research on this topic.
PS : We have a telegram-konf to coordinate transfers. If there is a serious desire to help with the translation, then you are welcome!
Source: https://habr.com/ru/post/351706/
All Articles