Recreating the water effect of Super Mario Sunshine for Nintendo GameCube
Note: In the original article there is a demo on WebGL2, which in translation is replaced by video and GIF.
One of my hobbies is writing model viewers and graphic tools for games. This is a good mix of topics of interest to me - graphics, rendering, reverse engineering of complex systems and nostalgia for old video games.
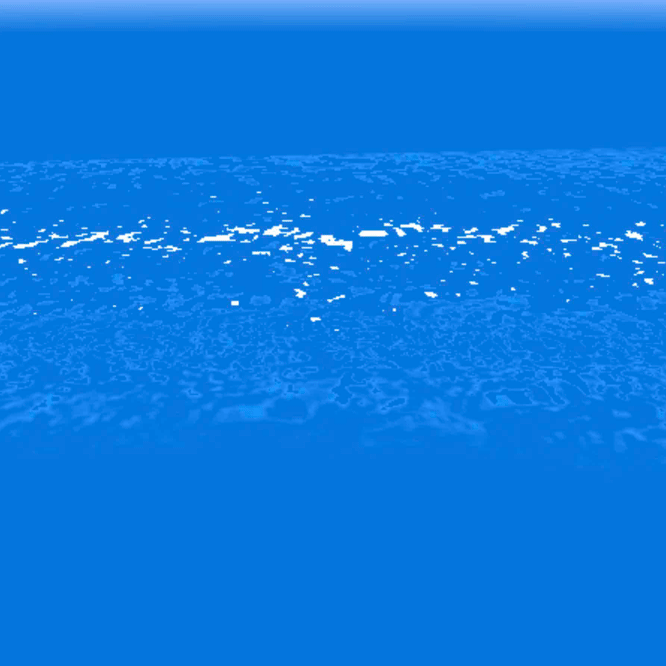
Recently, I expanded the capabilities of my WebGL based game viewing app by adding support for some games with the Nintendo GameCube, including The Legend of Zelda: The Wind Waker and Super Mario Sunshine. In the GameCube, if you do not know, an advanced, almost programmable video processor is installed, but with fixed functionality. Developers could not write shaders, and instead programmed sets of texture combiners in a way similar to glTexEnv used in pipelines, but maximized. For those who are accustomed to modern programmable video processors, it may seem an insane idea that with this trick you can implement complex effects. And yet, in 2002, Super Mario Sunshine was released with excellent-looking water. Here is how it looks in action:
')
This effect is loaded into the browser directly from the source files of the game for Delfino Plaza and placed on the plane. Let's take a closer look at how it is implemented.
Texturing plane
Believe it or not, this effect actually begins with this:

This effect can be viewed as a rather complex variation of a very ancient technique: “scrolling textures”. It is a bit more complicated than what I showed here, but the basics remain the same. Our plane begins its life as this scrolling wave texture, giving us an interesting noise with which to work. Then it is combined with the second layer of the same texture, but this time scrolling in only one dimension.

This gives us an interesting moire pattern, which is the basis of the fact that the water seems to be bubbling and moving in a natural way. You can even notice the "ghost" overlay when meeting two textures. This artifact is visible on the source material, but more like a deliberately added ray of the sun or light passing through the water. Such concealment of artifacts with the help of well-thought-out material design is an important part of game graphics creation techniques.
Obviously, the texture is not black. The colors are not black and white, they are mixed with the background, which gives us a more transparent look.

And we are starting to get something. At this stage, the second texture layer has already been added twice, like the first one, which makes it especially bright, as if with a bloom effect. This function will be useful later when we define lights on the water.
If we return to the source material, it looks much more “dynamic”. If you move the camera, zoom in and out, it seems that the texture changes. Near it is clearly visible, and at a distance it gradually disappears. In a traditional pipeline with fixed functionality, effects of this type are impossible. The material can not know the distance to the camera! However, to realize this effect, Nintendo performs a clever trick with a more traditional way. Let's talk about what I call a "mip trick."
Build a square mip from a round hole
Mip texturing is a traditional method of optimizing graphics. When video processors impose textures, they tend to ensure that the finished image is as smooth as possible and at the same time as fast as possible. The texture sampled here is actually only 64 × 64 pixels (yes, that's true!), And the browser windows are usually much larger. If you bring the camera closer, especially in the last demo, you can see the pixels and how they mix with each other, appear and dissolve. But we must not forget that video processors must perform these calculations for each pixel in the finished image. If you look from above, in this case the texture increases, but if you look at an angle, when the plane becomes more compressed at a distance, then the texture on the screen becomes smaller than 64 × 64 pixels.
When this happens, they say that the texture is “minimized” and the video processor needs to read much more texture pixels to make the finished image smooth. It is expensive in terms of computation — the video processor tends to read as few pixels as possible. For this reason, “mip-textures” were invented - pre-computed smaller versions of each image. When minimizing the texture, the video processor can use these versions instead of the full texture. So, we have a texture version of 32 × 32 pixels and 16 × 16 pixels, and the video processor can choose the one it needs, or even mix two versions to get the best picture. Mip-textures are an excellent example of a compromise between time and space, as well as an example of content optimization in the process of building an application.
However, as I said, this happens when the texture is minimized. This happens when it becomes smaller on the screen, and this usually happens when the texture is farther away . Do you understand what I'm getting at? This is the way to get the distance from the camera!
What if instead of using smaller versions of the same texture, we use different textures? Nintendo also came to the same decision. This is what I call the mip trick. The texture of the waves that I showed above is not the whole story. In practice, there is a complete wave texture with all levels of mip textures shown.
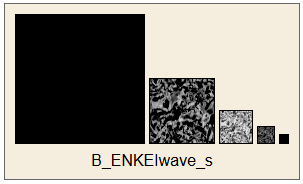
At the largest level of mip-textures (when the texture is closest to the camera) we do not have any pixels. In fact, it removes the effect of water in a small radius around the chamber, which makes the water clean. Firstly, it avoids the feeling of monotony of the water material, secondly, it helps in the gameplay, showing the player underwater objects near it. Smart decision! The second level of the mip-texture is exactly the texture that was used in the demo up to the current moment, and it has “medium strength”.
The third level of the mip-texture is the brightest, it corresponds to this “band” of bright glow in the middle. I think this band is a smart way to imitate reflections of the environment. At this distance from the camera, one can imagine that it is a reflection of the texture of the sky, inclined to the water at an angle of 20 degrees, for example, clouds. In the Sirena Beach level, this band has a yellow tint, giving the level a beautiful yellow glow, corresponding to the evening sunset.
Let's try to download all these mip-textures in our demo.
We are already much closer to the desired effect!
A brief digression: since the algorithm that chooses the mip-textures used for the texture is hard-coded in the video processor, this means that it is not necessarily portable. The GameCube renders in 640 × 548 resolution, and mip-textures are created for this size. The developers of the Dolphin emulator also noticed this - since Dolphin can render at higher resolutions than those supported by the GameCube console, this trick can break if you don’t treat it carefully. Fortunately, modern graphics APIs allow you to apply an offset when choosing mip-textures. After obtaining the screen resolution and having knowledge of the original resolution of 640 × 548 of the GameCube console, we can calculate this offset and use it during sampling.
Solving this problem, we can make the final touch. I repeat - believe it or not, but only one step is left to turn the last demo into a finished product. A simple function (called an alpha test) checks how bright the end pixel is, and if it is within certain limits, the pixel is completely discarded. In our case, all pixels are completely discarded in the interval from 0.13 to 0.92.
This gives the outer bands of the effect a unique “glitter food film” look. In the middle, water basically consists of brighter pixels, that is, a high threshold allows only the brightest pixels to shine through. It gives us such an empty strip and these amazing lights!
Forgotten tradition
In the modern world of programmable shaders, PBR pipelines and huge budgets for graphics, such tricks increasingly resemble forgotten knowledge. In my partial view, GameCube era games have the most beautiful graphics for that time. Even though I only mentioned the GameCube, the Wii is essentially using the same equipment, so the same tricks can be found in the games of the Mario Galaxy series, Super Smash Bros. Brawl and even in The Legend of Zelda: Skyward Sword. It is very interesting that with the video processor technology invented in 2001, Nintendo went all the way to 2012, when the Wii U was released.
Good art direction, huge amounts of creative design and detailed knowledge of the "iron" allowed to create stunning effects even in the face of such severe restrictions. For fun, try to deal with the effects of glass panels at the Delfino Hotel level or with the enhancements of this technique used in the Super Mario Galaxy .
The code used in each of these demos is open source and uploaded to GitHub . Obviously, all the work to create the original graphics made incredibly talented artists from Nintendo. In addition, I extend a special thanks to all my friends working on the Dolphin emulator team.
Source: https://habr.com/ru/post/351656/
All Articles