Minimal multiboot bootloader
This article explains how to create a minimal operating system kernel using the multi-boot standard. In fact, it will just load and print OK on the screen. In subsequent articles, we will expand it using the Rust programming language.
I tried to explain everything in detail and keep the code as simple as possible. If you have any questions, suggestions or any problems, please leave a comment or create a taska on GitHub . The source code is available in the repository .

Overview
When you turn on the computer, it loads the BIOS from a special flash memory. BIOS runs self-tests and hardware initialization tests, then it looks for bootable devices. If at least one was found, it transfers control to the loader, which is a small part of the executable code stored at the beginning of the storage device. The loader locates the kernel image on the device and loads it into memory. It also needs to switch the processor to the so-called protected mode , because x86 processors by default start in very limited real mode (to be compatible with programs from 1978).
We will not write a bootloader, because this is in itself a complex project (if you really want to do this, read about it here ). Instead, we will use one of the many tried and tested boot loaders to boot our kernel from a CD-ROM. But which one?
Multiboot
Fortunately, there is a bootloader standard: multiboot specification . Our kernel should only indicate that it supports the specification and any compatible bootloader will be able to download it. We will use the Multiboot 2 specification ( PDF )
along with the famous boot loader GRUB 2 .
To tell the loader about Multiboot 2 support, our kernel must begin with , which has the following format:
| Field | Type | Value |
|---|---|---|
| magic number | u32 | 0xE85250D6 |
| architecture | u32 | 0 for i386, 4 for MIPS |
| header length | u32 | total header size including tags |
| check sum | u32 | -( + + ) |
| tags | variable | |
| trailing tag | (u16, u16, u32) | (0, 0, 8) |
Translated to x86 assembler, it will look like this ( Intel syntax):
section .multiboot_header header_start: dd 0xe85250d6 ; (multiboot 2) dd 0 ; 0 ( i386) dd header_end - header_start ; ; dd 0x100000000 - (0xe85250d6 + 0 + (header_end - header_start)) ; `multiboot` ; dw 0 ; dw 0 ; dd 8 ; header_end: If you don't know the x86 assembler, then here is a little introductory:
- the title will be written to a section called
.multiboot_header(we will need this later), header_startandheader_endare tags that indicate the location in memory, we use them to calculate the length of the header,ddmeansdefine double(32bit) anddwmeansdefine word(16bit). They simply output the specified 32bit / 16bit constants,- The constant
0x100000000in calculating the checksum is a small hack to avoid compiler warnings.
We can already build this file (which I called multiboot_header.asm ) using nasm .
[loomaclin@loomaclin ~]$ yaourt nasm 1 extra/nasm 2.13.02-1 An 80x86 assembler designed for portability and modularity 2 extra/yasm 1.3.0-2 A rewrite of NASM to allow for multiple syntax supported (NASM, TASM, GAS, etc.) 3 aur/intel2gas 1.3.3-7 (3) (0.20) Converts assembly language files between NASM and GNU assembler syntax 4 aur/nasm-git 20150726-1 (1) (0.00) 80x86 assembler designed for portability and modularity 5 aur/sasm 3.9.0-1 (18) (0.61) Simple crossplatform IDE for NASM, MASM, GAS, FASM assembly languages 6 aur/yasm-git 1.3.0.r30.g6caf1518-1 (0) (0.00) A complete rewrite of the NASM assembler under the BSD License ==> Enter n° of packages to be installed (eg, 1 2 3 or 1-3) ==> --------------------------------------------------------- ==> 1 [sudo] password for loomaclin: resolving dependencies... looking for conflicting packages... Packages (1) nasm-2.13.02-1 Total Download Size: 0.34 MiB Total Installed Size: 2.65 MiB :: Proceed with installation? [Y/n] :: Retrieving packages... nasm-2.13.02-1-x86_64 346.0 KiB 1123K/s 00:00 [#############################################################################] 100% (1/1) checking keys in keyring [#############################################################################] 100% (1/1) checking package integrity [#############################################################################] 100% (1/1) loading package files [#############################################################################] 100% (1/1) checking for file conflicts [#############################################################################] 100% (1/1) checking available disk space [#############################################################################] 100% :: Processing package changes... (1/1) installing nasm [#############################################################################] 100% :: Running post-transaction hooks... (1/1) Arming ConditionNeedsUpdate... [loomaclin@loomaclin ~]$ nasm --version NASM version 2.13.02 compiled on Dec 10 2017 [loomaclin@loomaclin ~]$ The following command will produce a flat binary file, the resulting file will contain 24 bytes (in little endian , if you are working on an x86 machine):
[loomaclin@loomaclin ~]$ cd IdeaProjects/ [loomaclin@loomaclin IdeaProjects]$ mkdir a_minimal_multiboot_kernel [loomaclin@loomaclin IdeaProjects]$ cd a_minimal_multiboot_kernel/ [loomaclin@loomaclin a_minimal_multiboot_kernel]$ nano multiboot_header.asm [loomaclin@loomaclin a_minimal_multiboot_kernel]$ nasm multiboot_header.asm [loomaclin@loomaclin a_minimal_multiboot_kernel]$ hexdump -x multiboot_header 0000000 50d6 e852 0000 0000 0018 0000 af12 17ad 0000010 0000 0000 0008 0000 0000018 [loomaclin@loomaclin a_minimal_multiboot_kernel]$ Boot code
To load our kernel, we need to add code that can call the loader. Let's create the boot.asm file:
global start section .text bits 32 start: ; `OK` mov dword [0xb8000], 0x2f4b2f4f hlt There are several new commands here:
globalexports tags (makes them public). Thestartlabel will be the entry point to our core, it should be public,.textsection is the default section for executable code.bits 32indicates that the next lines are 32-bit instructions. This is necessary because the processor is still in protected mode whenGRUBstarts our kernel. When we switch to Long mode in the next article, we can runbits 64(64-bit instructions),mov dwordinstruction puts the 32-bit constant0x2f4b2f4fto the memory address ofb8000(this displaysOKon the screen, explained in the following articles),hltis an instruction that tells the processor to stop executing instructions.
After assembling, viewing and disassembling, we can see the processor opcodes in action:
[loomaclin@loomaclin a_minimal_multiboot_kernel]$ nano boot.asm [loomaclin@loomaclin a_minimal_multiboot_kernel]$ nasm boot.asm [loomaclin@loomaclin a_minimal_multiboot_kernel]$ hexdump -x boot 0000000 05c7 8000 000b 2f4f 2f4b 00f4 000000b [loomaclin@loomaclin a_minimal_multiboot_kernel]$ ndisasm -b 32 boot 00000000 C70500800B004F2F mov dword [dword 0xb8000],0x2f4b2f4f -4B2F 0000000A F4 hlt [loomaclin@loomaclin a_minimal_multiboot_kernel]$ Creating an executable file
To download our executable file later via GRUB , it must be an executable ELF file. Therefore, you need to create ELF object files instead of simple binaries using nasm . To do this, we simply add -f elf64 to the arguments.
To create the ELF executable code itself, we must link the object files. We will use a custom script to bind , called linker.ld :
ENTRY(start) SECTIONS { . = 1M; .boot : { /* */ *(.multiboot_header) } .text : { *(.text) } } Let's translate what is written in human language:
startis the entry point, the bootloader will go to this label after the kernel is loaded,. = 1M;sets the download address of the first section from the 1st megabyte, this is the location standard for loading the kernel,- the executable part has two sections: at the beginning of the
bootand.textafter, - the final section
.textwill contain all incoming sections.text, - sections named as
.multiboot_headerwill be added to the first output section (.boot) so that they are located at the beginning of the executable code. This is necessary becauseGRUBexpects to find a multiboot header at the beginning of the file.
Let's create ELF object files and link them using the above linker script:
[loomaclin@loomaclin a_minimal_multiboot_kernel]$ nasm -f elf64 multiboot_header.asm [loomaclin@loomaclin a_minimal_multiboot_kernel]$ nasm -f elf64 boot.asm [loomaclin@loomaclin a_minimal_multiboot_kernel]$ ld -n -o kernel.bin -T linker.ld multiboot_header.o boot.o [loomaclin@loomaclin a_minimal_multiboot_kernel]$ It is very important to pass the -n (or --nmagic ) flag to the linker, which disables the automatic alignment of sections in the executable file. Otherwise, the linker may align the page of the .boot section in the executable file. If this happens, GRUB will not be able to find the multiboot header, because it will not be at the beginning.
Use the objdump command to display the sections of the generated executable file and verify that the .boot section has the smallest offset in the file:
[loomaclin@loomaclin a_minimal_multiboot_kernel]$ objdump -h kernel.bin kernel.bin: file format elf64-x86-64 Sections: Idx Name Size VMA LMA File off Algn 0 .boot 00000018 0000000000100000 0000000000100000 00000080 2**0 CONTENTS, ALLOC, LOAD, READONLY, DATA 1 .text 0000000b 0000000000100020 0000000000100020 000000a0 2**4 CONTENTS, ALLOC, LOAD, READONLY, CODE [loomaclin@loomaclin a_minimal_multiboot_kernel]$ Note: Theldandobjdumpcommands are platform-specific. If you are not working on x86_64 architecture, you need to cross-compile binutils . After that, usex86_64‑elf‑ldandx86_64‑elf‑objdumpinstead ofldandobjdumprespectively.
Creating an ISO image
All BIOS based personal computers know how to boot from a CD-ROM, so we need to create a downloadable CD-ROM image containing our kernel and GRUB boot files in a single file called ISO . Create the following directory structure and copy kernel.bin to the boot directory:
isofiles └── boot ├── grub │ └── grub.cfg └── kernel.bin grub.cfg indicates the name of our kernel file and compatibility with multiboot 2 . It looks like this:
set timeout=0 set default=0 menuentry "my os" { multiboot2 /boot/kernel.bin boot } Execute commands:
[loomaclin@loomaclin a_minimal_multiboot_kernel]$ mkdir isofiles [loomaclin@loomaclin a_minimal_multiboot_kernel]$ mkdir isofiles/boot [loomaclin@loomaclin a_minimal_multiboot_kernel]$ mkdir isofiles/boot/grub [loomaclin@loomaclin a_minimal_multiboot_kernel]$ cp kernel.bin isofiles/boot/ [loomaclin@loomaclin a_minimal_multiboot_kernel]$ nano grub.cfg [loomaclin@loomaclin a_minimal_multiboot_kernel]$ cp grub.cfg isofiles/boot/grub/ Now we can create a bootable image using the following command:
[loomaclin@loomaclin a_minimal_multiboot_kernel]$ grub-mkrescue -o os.iso isofiles xorriso 1.4.8 : RockRidge filesystem manipulator, libburnia project. Drive current: -outdev 'stdio:os.iso' Media current: stdio file, overwriteable Media status : is blank Media summary: 0 sessions, 0 data blocks, 0 data, 7675m free Added to ISO image: directory '/'='/tmp/grub.jN4u6m' xorriso : UPDATE : 898 files added in 1 seconds Added to ISO image: directory '/'='/home/loomaclin/IdeaProjects/a_minimal_multiboot_kernel/isofiles' xorriso : UPDATE : 902 files added in 1 seconds xorriso : NOTE : Copying to System Area: 512 bytes from file '/usr/lib/grub/i386-pc/boot_hybrid.img' ISO image produced: 9920 sectors Written to medium : 9920 sectors at LBA 0 Writing to 'stdio:os.iso' completed successfully. Note:grub-mkrescuemay cause problems on some platforms. If it did not work for you, try the following steps:
- run the command with
--verbose,- make sure the
xorrisolibraryxorrisoinstalled (xorrisoorlibisoburnpackage).
[loomaclin @ loomaclin a_minimal_multiboot_kernel] $ yaourt xorriso
1 extra / libisoburn 1.4.8-2
frontend for libburn and libisofs
==> Enter n ° of packages to be installed (eg, 1 2 3 or 1-3)
==> - ==> 1
[sudo] password for loomaclin:
resolving dependencies ...
looking for conflicting packages ...
Packages (3) libburn-1.4.8-1 libisofs-1.4.8-1 libisoburn-1.4.8-2
Total Download Size: 1.15 MiB
Total Installed Size: 3.09 MiB
:: Proceed with installation? [Y / n]
:: Retrieving packages ...
libburn-1.4.8-1-x86_64 259.7 KiB 911K / s 00:00 [################################ #############################################] 100%
libisofs-1.4.8-1-x86_64 237.8 KiB 2.04M / s 00:00 [################################ ##############################################] 100%
libisoburn-1.4.8-2-x86_64 683.8 KiB 2.34M / s 00:00 [################################ ##############################################] 100%
(3/3) checking keys in keyring [############################## #####################################] 100%
(3/3) checking package integrity [########################################## ####################################] 100%
(3/3) loading package files [######################################### ####################################] 100%
(3/3) checking for file conflicts [############################## #####################################] 100%
(3/3) checking available disk space [######################################## #####################################] 100%
:: Processing package changes ...
(1/3) installing libburn [########################################## ###################################] 100%
(2/3) installing libisofs [######################################### ###################################] 100%
(3/3) installing libisoburn
- if you are using an EFI system,
grub-mkrescuewill try to create anEFIdefault image. You can specify the-d /usr/lib/grub/i386-pcargument to get rid of this behavior, or install themtoolspackage and get a workingEFIimage - on some systems, the command is named
grub2-mkrescue.
Loading
It's time to download our OS. To do this, use QEMU :
[loomaclin@loomaclin a_minimal_multiboot_kernel]$ qemu-system-x86_64 -cdrom os.iso (qemu-system-x86_64:10878): Gtk-WARNING **: Allocating size to GtkScrollbar 0x7f2337e5a280 without calling gtk_widget_get_preferred_width/height(). How does the code know the size to allocate? (qemu-system-x86_64:10878): Gtk-WARNING **: Allocating size to GtkScrollbar 0x7f2337e5a480 without calling gtk_widget_get_preferred_width/height(). How does the code know the size to allocate? (qemu-system-x86_64:10878): Gtk-WARNING **: Allocating size to GtkScrollbar 0x7f2337e5a680 without calling gtk_widget_get_preferred_width/height(). How does the code know the size to allocate? The emulator window will appear: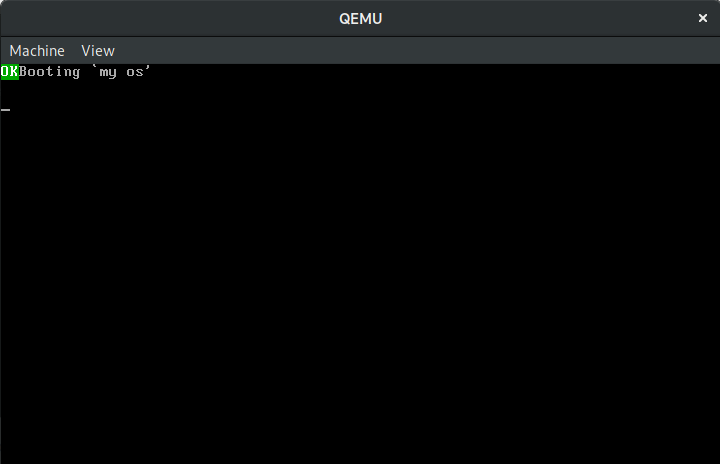
Notice the green text OK in the upper left corner. If this doesn't work for you, look at the comments section.
Summarize what happened:
- The BIOS boots the boot loader (GRUB) from a virtual CD-ROM (ISO).
- The loader read the executable kernel code and found the multiboot header.
- I copied the
.bootand.text.bootinto memory (at0x100000and0x100020). - Moved to the entry point (
0x100020, this can be found by callingobjdump -f). - The kernel displayed the text
OKgreen and stopped the processor.
You can also test it on real hardware. You need to write the resulting image to a disk or USB drive and boot from it.
Assembly automation
Now you need to call 4 commands in the correct order every time we change the file. This is bad. Let's automate this process with a Makefile . But first we need to create a suitable directory structure to separate the architecture-dependent files:
… ├── Makefile └── src └── arch └── x86_64 ├── multiboot_header.asm ├── boot.asm ├── linker.ld └── grub.cfg Create:
[loomaclin@loomaclin a_minimal_multiboot_kernel]$ mkdir -p src/arch/x86_64 [loomaclin@loomaclin a_minimal_multiboot_kernel]$ cp multiboot_header.asm src/arch/x86_64/ [loomaclin@loomaclin a_minimal_multiboot_kernel]$ cp boot.asm src/arch/x86_64/ [loomaclin@loomaclin a_minimal_multiboot_kernel]$ cp linker.ld src/arch/x86_64/ [loomaclin@loomaclin a_minimal_multiboot_kernel]$ cp grub.cfg src/arch/x86_64/ [loomaclin@loomaclin a_minimal_multiboot_kernel]$ nano Makefile The makefile should look like this:
arch ?= x86_64 kernel := build/kernel-$(arch).bin iso := build/os-$(arch).iso linker_script := src/arch/$(arch)/linker.ld grub_cfg := src/arch/$(arch)/grub.cfg assembly_source_files := $(wildcard src/arch/$(arch)/*.asm) assembly_object_files := $(patsubst src/arch/$(arch)/%.asm, \ build/arch/$(arch)/%.o, $(assembly_source_files)) .PHONY: all clean run iso all: $(kernel) clean: @rm -r build run: $(iso) @qemu-system-x86_64 -cdrom $(iso) iso: $(iso) $(iso): $(kernel) $(grub_cfg) @mkdir -p build/isofiles/boot/grub @cp $(kernel) build/isofiles/boot/kernel.bin @cp $(grub_cfg) build/isofiles/boot/grub @grub-mkrescue -o $(iso) build/isofiles 2> /dev/null @rm -r build/isofiles $(kernel): $(assembly_object_files) $(linker_script) @ld -n -T $(linker_script) -o $(kernel) $(assembly_object_files) # compile assembly files build/arch/$(arch)/%.o: src/arch/$(arch)/%.asm @mkdir -p $(shell dirname $@) @nasm -felf64 $< -o $@ Some comments (if you didn’t work with make before, check out the makefile tutorial ):
- $ (wildcard src / arch / $ (arch) / *. asm) selects all the assembler files in the
src/arch/$(arch)directory, so you do not need to update the Makefile when adding files, - the
patsubstoperation forassembly_object_filessimply translatessrc/arch/$(arch)/XYZ.asmtobuild/arch/$(arch)/XYZ.o, - the build target
$<and$@are automatically output variables , - if you are using cross-compiled binutils just replace
ldwithx86_64-elf-ld.
Now we can call make and all updated assembler files will be compiled and linked. The make iso command also creates an ISO image, and make run runs QEMU in addition.
What's next?
In the next article, we will create a page table and perform some processor configuration to switch to 64-bit long-mode .
Notes
- The formula from the table
-(magic + architecture + header_length)creates a negative value that does not fit into 32 bits. By subtracting from0x100000000we leave the value positive without changing the subtracted value. As a result, without an extra sign bit, the result is placed in 32 bits and the compiler is happy :) - We do not want to load the kernel by offset 0x0, since many specific memory areas can be located up to 1 megabyte mark (for example, the so-called VGA buffer at
0xb8000, which we use to displayOKon the screen).
')
Source: https://habr.com/ru/post/351568/
All Articles