Developing games under NES in C. Chapter 24. Appendix 2 - working with memory banks
The final part of the cycle. In this chapter, we look at working with the MMC3 mapper with examples.
<<< previous
A source
Previously, we did not use memory bank switching, but now it is time to master the MMC3 mapper. Without a mapper, you can use 32 kilobytes of PRG ROM for the code and 8 kilobytes of CHR ROM for graphics. Mapper allows you to bypass this barrier.
We will keep in mind the release of our game on a real cartridge. The [manual] (http://kevtris.org/mappers/mmc3/) states that we have the following options:
')
- Up to 64K PRG, 64K CHR
- Up to 512K PRG, 64K CHR
- Up to 512K PRG, VRAM
- Up to 512K PRG, 256K CHR
- Up to 128K PRG, 64K CHR, 8K CHR RAM
The list is incomplete. Choose the most compact format, 64 / 64k. You need to specify this in the header of the cartridge image so that the emulator knows about it. Image format documentation is available on the wiki :
Next you need to register memory banks in .cfg:
All memory banks will be loaded at the same address $ 8000. The executable code will be in the last non-reloadable bank, and it can be placed at any address. Memory allocation is the most difficult when working with the mapper, you have to be careful here.
Segments must be registered in the config:
The OAM segment is not used in this example.
Now write down something noticeable in each bank and see how it fits in the ROM file. For example, take the words Bank0, Bank1, and so on. These words will be displayed on the screen, switching banks with the Start button.
Placing a variable in the desired bank is done through the PRAGMA directive:
When you press Start, the memory bank is switched to the addresses $ 8000- $ 9FFF, and the first 5 bytes are displayed on the screen
TEXT1 is determined at compile time and points to a zero bank when the console starts. When changing the bank, this address will remain unchanged, and in any case, the text from the addresses of $ 8000-8004 will be displayed. Banks switch like this:
The address of $ 8000 belongs to ROM, but the record is intercepted by the mapper. Next is the number of the bank for loading. Details as usual on the [wiki] (http://wiki.nesdev.com/w/index.php/MMC3):
A bit of confusion brings random equality of addresses of the beginning of the bank and the official register of the mapper. We can transfer the bank to the addresses $ A000- $ BFFF:
But the control registers still remain at the addresses of $ 8000 and $ 8001.
I also added initialization code to the beginning of main (). This moment is not documented, but apparently, after RESET, the correct loading of only the last bank is guaranteed, at the addresses $ E000- $ FFFF. All our initialization code should be located only there.
Such a scheme of working with memory banks (when their beginning is fixed at one address) is very inconvenient. Usually at the beginning of each bank is stored an array with pointers to data structures and functions. Then you can go into them with indirect transitions, or a faster focus with a stack . There is an assembler, but it's worth it.
In any case, I want to add a scrolling background with parallax. To do this, every 4 frames, switch the CHR ROM bank to the PPU memory area — tiles will be picked up from there. MMC3 splits CHR ROM into banks of 64 tiles each, this is 0x400 bytes. We will make an animated waterfall, in each tile set they will be shifted by 1 pixel - if you change banks, you will get an animation.

Link to the source code, the next frame is shown by the Start button:
Dropbox
Github
MMC3 can also count lines displayed on TV. This is usually done through a zero sprite, but it works once per frame - sometimes it takes more. To imitate the parallax of the background, we will change the scrolling position every 20 lines. MMC3 will cause interrupts at the right moments, and scrolling to the desired position will be set in its handler. The handler is written in assembler, because when working with C you can accidentally damage the stack when calling the function http://www.cc65.org/faq.php#IntHandlers .
When the prefix is started, the interrupts are turned off, they must be enabled in main ().
Pointers in the interrupt vector at the end of the reset.s file must point to the correct handlers. Now you can configure the counting lines:
Apparently, the first line is not taken into account, because the interruption is triggered after 21 lines.
It is also very desirable to pull horizontal scrolling during a very short period. H-blank - the time of the ray to the beginning of the line. If this is not taken into account, there will be a slight distortion of the image. If you know where to look, it is noticeable in many games.
The MMC3 interrupt works exactly in H-blank, but its duration is not enough to go to the handler. So I put there a simple loop that waits for about 100 clock cycles until the next H-blank. This moment may not be accurately handled by some emulators. Real games do not wait for the next line and do a scroll shift in a monochromatic filled area. After the scroll shift, we wait for the next 20 lines, and repeat everything again.
If you want to see it with your own eyes, fix the loop limit in the handler. The shift literally 1 repetition will be visible - H-blank is really so short.

Start still switches banks, but here it is not noticeable.
Dropbox
Github
If you are too lazy to bother with recompiling, then here’s the gif:
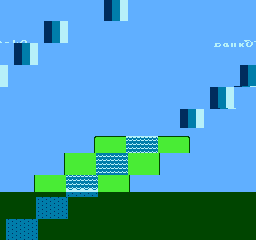
The timing cycle is shortened by 1 turn - scrolling changes a few pixels to the end of the line. Distortion is seen at the right end of the bottom row of each horizontal layer. It changes every frame, so that everything is dancing on the screen. If the interrupt works in the middle of the line, it will be very bad.
This work with scrolling allows you to realize the effect of parallax. The query 'NES parallax scrolling' on YouTube will give good examples. Again, note that in most games, the background layers are separated by a single-color fill.
<<< previous
A source
Previously, we did not use memory bank switching, but now it is time to master the MMC3 mapper. Without a mapper, you can use 32 kilobytes of PRG ROM for the code and 8 kilobytes of CHR ROM for graphics. Mapper allows you to bypass this barrier.
We will keep in mind the release of our game on a real cartridge. The [manual] (http://kevtris.org/mappers/mmc3/) states that we have the following options:
')
- Up to 64K PRG, 64K CHR
- Up to 512K PRG, 64K CHR
- Up to 512K PRG, VRAM
- Up to 512K PRG, 256K CHR
- Up to 128K PRG, 64K CHR, 8K CHR RAM
The list is incomplete. Choose the most compact format, 64 / 64k. You need to specify this in the header of the cartridge image so that the emulator knows about it. Image format documentation is available on the wiki :
INES header
.byte $4e,$45,$53,$1a
.byte $04 ; = 4 x 04000 PRG ROM
.byte $08 ; = 8 x 02000 CHR ROM
.byte $40 ; = №4 - MMC3
Next you need to register memory banks in .cfg:
Fragment of nes.cfg
# ROM:
# $8000,
PRG0: start = $8000, size = $2000, file = %O ,fill = yes, define = yes;
PRG1: start = $8000, size = $2000, file = %O ,fill = yes, define = yes;
PRG2: start = $8000, size = $2000, file = %O ,fill = yes, define = yes;
PRG3: start = $8000, size = $2000, file = %O ,fill = yes, define = yes;
PRG4: start = $8000, size = $2000, file = %O ,fill = yes, define = yes;
PRG5: start = $a000, size = $2000, file = %O ,fill = yes, define = yes;
PRG6: start = $c000, size = $2000, file = %O ,fill = yes, define = yes;
PRG7: start = $e000, size = $1ffa, file = %O ,fill = yes, define = yes;

# ROM
VECTORS: start = $fffa, size = $6, file = %O, fill = yes;
All memory banks will be loaded at the same address $ 8000. The executable code will be in the last non-reloadable bank, and it can be placed at any address. Memory allocation is the most difficult when working with the mapper, you have to be careful here.
Segments must be registered in the config:
nes.cfg
SEGMENTS {
HEADER: load = HEADER, type = ro;
CODE0: load = PRG0, type = ro, define = yes;
CODE1: load = PRG1, type = ro, define = yes;
CODE2: load = PRG2, type = ro, define = yes;
CODE3: load = PRG3, type = ro, define = yes;
CODE4: load = PRG4, type = ro, define = yes;
CODE5: load = PRG5, type = ro, define = yes;
CODE6: load = PRG6, type = ro, define = yes;
STARTUP: load = PRG7, type = ro, define = yes;
CODE: load = PRG7, type = ro, define = yes;
VECTORS: load = VECTORS, type = ro;
CHARS: load = CHR, type = rw;

BSS: load = RAM, type = bss, define = yes;
HEAP: load = RAM, type = bss, optional = yes;
ZEROPAGE: load = ZP, type = zp;
#OAM: load = OAM1, type = bss, define = yes;
}
The OAM segment is not used in this example.
Now write down something noticeable in each bank and see how it fits in the ROM file. For example, take the words Bank0, Bank1, and so on. These words will be displayed on the screen, switching banks with the Start button.
Placing a variable in the desired bank is done through the PRAGMA directive:
lesson19.c
#pragma rodata-name (“CODE0”)
#pragma code-name (“CODE0”)
const unsigned char TEXT1[]={
“Bank0”};

#pragma rodata-name (“CODE1”)
#pragma code-name (“CODE1”)
const unsigned char TEXT2[]={
“Bank1”};

#pragma rodata-name (“CODE2”)
#pragma code-name (“CODE2”)
const unsigned char TEXT3[]={
“Bank2”};
When you press Start, the memory bank is switched to the addresses $ 8000- $ 9FFF, and the first 5 bytes are displayed on the screen
Withdrawal of text from the bank
void Draw_Bank_Num(void){ // PPU_ADDRESS = 0x20; PPU_ADDRESS = 0xa6; for (index = 0;index < 5;++index){ PPU_DATA = TEXT1[index]; } PPU_ADDRESS = 0; PPU_ADDRESS = 0; } TEXT1 is determined at compile time and points to a zero bank when the console starts. When changing the bank, this address will remain unchanged, and in any case, the text from the addresses of $ 8000-8004 will be displayed. Banks switch like this:
Bank switch
if (((joypad1old & START) == 0)&&((joypad1 & START) != 0)){ ++PRGbank; if (PRGbank > 7) PRGbank = 0; *((unsigned char*)0x8000) = 6; // PRG $8000 *((unsigned char*)0x8001) = PRGbank; Draw_Bank_Num(); // The address of $ 8000 belongs to ROM, but the record is intercepted by the mapper. Next is the number of the bank for loading. Details as usual on the [wiki] (http://wiki.nesdev.com/w/index.php/MMC3):
A bit of confusion brings random equality of addresses of the beginning of the bank and the official register of the mapper. We can transfer the bank to the addresses $ A000- $ BFFF:
*((unsigned char*)0x8000) = 7; // PRG - $A000 *((unsigned char*)0x8001) = which_PRG_bank; But the control registers still remain at the addresses of $ 8000 and $ 8001.
I also added initialization code to the beginning of main (). This moment is not documented, but apparently, after RESET, the correct loading of only the last bank is guaranteed, at the addresses $ E000- $ FFFF. All our initialization code should be located only there.
Such a scheme of working with memory banks (when their beginning is fixed at one address) is very inconvenient. Usually at the beginning of each bank is stored an array with pointers to data structures and functions. Then you can go into them with indirect transitions, or a faster focus with a stack . There is an assembler, but it's worth it.
In any case, I want to add a scrolling background with parallax. To do this, every 4 frames, switch the CHR ROM bank to the PPU memory area — tiles will be picked up from there. MMC3 splits CHR ROM into banks of 64 tiles each, this is 0x400 bytes. We will make an animated waterfall, in each tile set they will be shifted by 1 pixel - if you change banks, you will get an animation.
Link to the source code, the next frame is shown by the Start button:
Dropbox
Github
MMC3 can also count lines displayed on TV. This is usually done through a zero sprite, but it works once per frame - sometimes it takes more. To imitate the parallax of the background, we will change the scrolling position every 20 lines. MMC3 will cause interrupts at the right moments, and scrolling to the desired position will be set in its handler. The handler is written in assembler, because when working with C you can accidentally damage the stack when calling the function http://www.cc65.org/faq.php#IntHandlers .
When the prefix is started, the interrupts are turned off, they must be enabled in main ().
asm (“cli”); // Pointers in the interrupt vector at the end of the reset.s file must point to the correct handlers. Now you can configure the counting lines:
*((unsigned char*)0xe000) = 1; // MMC3 IRQ *((unsigned char*)0xc000) = 20; // 20 *((unsigned char*)0xc001) = 20; *((unsigned char*)0xe001) = 1; // MMC3 IRQ Apparently, the first line is not taken into account, because the interruption is triggered after 21 lines.
It is also very desirable to pull horizontal scrolling during a very short period. H-blank - the time of the ray to the beginning of the line. If this is not taken into account, there will be a slight distortion of the image. If you know where to look, it is noticeable in many games.
The MMC3 interrupt works exactly in H-blank, but its duration is not enough to go to the handler. So I put there a simple loop that waits for about 100 clock cycles until the next H-blank. This moment may not be accurately handled by some emulators. Real games do not wait for the next line and do a scroll shift in a monochromatic filled area. After the scroll shift, we wait for the next 20 lines, and repeat everything again.
If you want to see it with your own eyes, fix the loop limit in the handler. The shift literally 1 repetition will be visible - H-blank is really so short.
Start still switches banks, but here it is not noticeable.
Dropbox
Github
If you are too lazy to bother with recompiling, then here’s the gif:
The timing cycle is shortened by 1 turn - scrolling changes a few pixels to the end of the line. Distortion is seen at the right end of the bottom row of each horizontal layer. It changes every frame, so that everything is dancing on the screen. If the interrupt works in the middle of the line, it will be very bad.
This work with scrolling allows you to realize the effect of parallax. The query 'NES parallax scrolling' on YouTube will give good examples. Again, note that in most games, the background layers are separated by a single-color fill.
Source: https://habr.com/ru/post/351530/
All Articles