Video conferencing in 7 steps

Yesterday we launched a beta version of our new video conferencing, which distributes video between participants through our own servers using SFU technology. Up to 100 (!!!) participants in one confer, video recording, new JavaScript API for managing from the cloud in real time - all this can be tried now and share ideas and wishes with me. Under the cat, step by step instructions on assembling a minimum video conferencing, and through a personal I am ready to share Voximplant resources so that you can evaluate everything yourself without spending money on it.
New functionality provides ample opportunities for creating one-to-many or many-to-many conferences, including flexible management of media elements, streams, etc. This tutorial will introduce you to all the features and benefits of new video conferencing: step by step you will learn how to work with Endpoints and media renderers, as well as create server video conferencing.
Step 1 - Layout
We propose to take as a basis a simple demo - on it we will demonstrate new concepts and chips. You can get a demo from our repository , in the folder Step 1 .
Please note that in the demo we use HTML templates and normalize.css (in addition to the main style.css file).
')
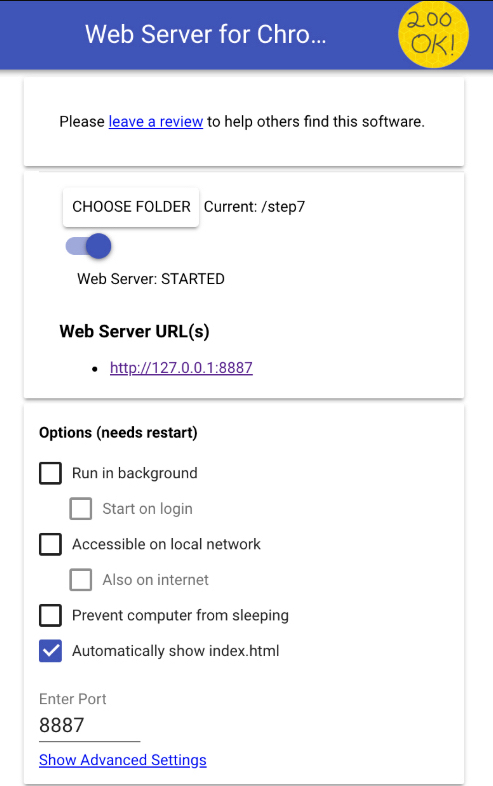
We also recommend using the web server for Chrome , because it makes development and debugging much easier. Install and open this application, click Choose folder and specify the folder with the project. After that you will see the Web Server URL.
Step 2 - Initialization and Login
To use the Web SDK, first we must:
- create an instance of the Voximplant class ;
- then initialize it ;
- and connect to the Voximplant cloud.
We will also use two JS files: index.js and helper.js . In the index.js file there will be a code that illustrates the new functionality; In the helper.js file , we have rendered a code that is not directly related to video conferencing.
So, create the index.js file in the project root. The first lines initialize logging and define variables to control the form:
Logger
Next we get an instance of the Voximplant class:
const sdk = VoxImplant.getInstance(); Now add a handler to submit the form:
Submit
In this handler, you need to add a condition under which the web client connects to the cloud:
Connection
Finally, we need to login. In case of a login error, this will be reflected in the log. To do this, add the following code to the same handler:
Log in
Step 3 - Call Processing
In our Web SDK there are methods and events for handling incoming calls. The code below allows you to receive calls, as well as correctly handle calls in the disconnected and failed statuses. The callForm handler starts the call after the form is submitted , and the callDisconnect handler hangs up. The call status is logged (see the column under the form).
Add the following code blocks to implement this logic. Start by creating a call and ending it:
Call and hangup
For incoming calls you need an appropriate handler:
Incoming calls
Fine! It remains only to add handlers for the states Connected, Disconnected and Failed:
Incoming calls
Now the web client can answer the first incoming call and reject all subsequent calls while the first call is active. The client also responds to the call status and logs.
Step 4 - VoxEngine: Cloud JS Scripts
The Web SDK cannot manage calls on its own, without a script in the cloud.
Create a conf_local script. First add the conference module to this script and define the variables for the conference and the participants count:
require("conference"); let conf; let partsCounter = 0; For the first call, we will need a special handler that will create a conference (the conference is created once per session):
First call
Now add a handler for all subsequent calls: it will receive calls and connect them to the already created conference; it will also increase the participant count:
Further calls
In the same handler, you should add a counter check: if there are no participants left in the conference, then this conference should be stopped.
Stop the conference
Step 5 - VoxEngine: Application Configuration
For the script to work, you need to create an application and a rule in it. Go to the Applications tab, enter the name of the new application (for example, conference-app ) and click Create .

It's time to create a rule for the conference, and let's call it - Conference . Bind the conf_local script. Please note: check Video conferencing to allow video streams.

Done! We prepared the Voximplant cloud to work with video conferencing.
Step 6 - What is Endpoint?
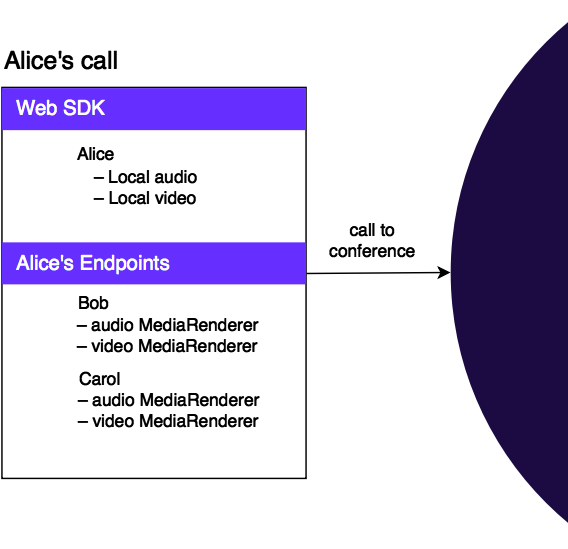
Endpoint is one of the new concepts of the latest release. Endpoint represents the incoming (remote) media element in a call:
Each call from the Web SDK contains only those Endpoints that send audio / video to that call. This means that the Web SDK will not have ASR and Recorder Endpoint calls.
The Voxengine conference generally includes all possible Endpoints:
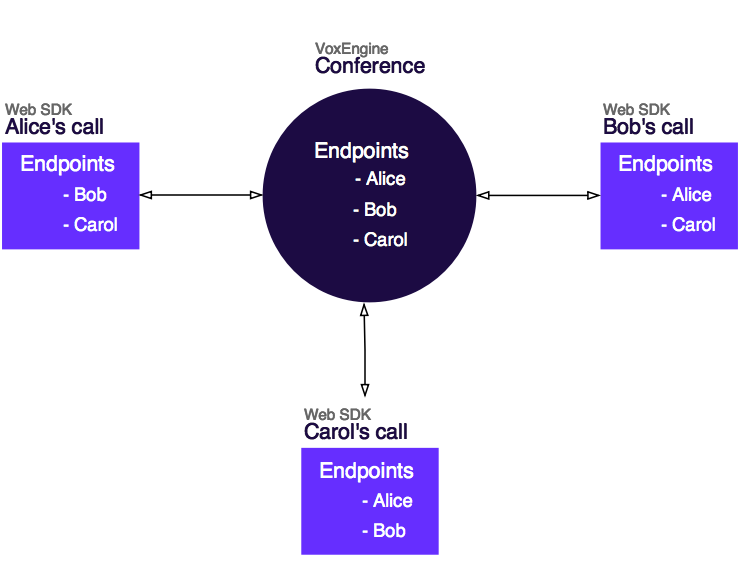
The Web SDK call also contains local audio / video. In addition, Endpoints inside the call include media renderers:
To track the behavior of Endpoints, there are special events . For example, we can track the moment when another participant joined the conference and create a container for rendering the video. Conversely, we can remove the container when another participant leaves the conference.
Add the bindCallCallbacks function with this handler:
currentCall.on(VoxImplant.CallEvents.EndpointAdded, onEndpointAdded); The onEndpointAdded function creates and places a container for rendering, and also contains a handler for removing the container:
onEndpointAdded
Actually, the function that removes the container:
onEndpointRemoved
Step 7 - Work with MediaRenderer
We have the ability to create a container for rendering video when the web client starts to receive the video stream, and also to delete this container when the video stream stops.
When a remote video starts coming to the web client, we have access to the MediaRenderer instance . We use this for advanced logging.
Add handlers for the RemoteMediaAdded and RemoteMediaRemoved events to the onEndpointAdded function:
MediaRenderers handlers
When you subscribe to a RemoteMediaAdded event, the Web SDK will no longer automatically render audio / video streams. Therefore, you must call the MediaRenderer.render method with an optional container parameter. To do this, add the following code to the onRemoteMediaAdded function:
onRemoteMediaAdded
How to use the demo
- Clone our repository to yourself.
- Install and open the Web Server for Chrome , click Choose folder and select the Step 7 folder from the repository. Open the suggested address ( Web Server URL ) in the browser.
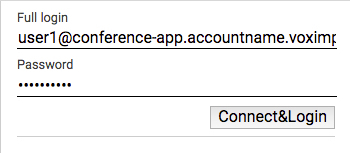
- Enter your login in the Full login field. Login consists of the username ( user1 ) + @ + application name ( conference-app ) + your account name Voimplant + voximplant.com . Then enter the password for user1 and click Connect & Login .Allow access to your microphone and camera.
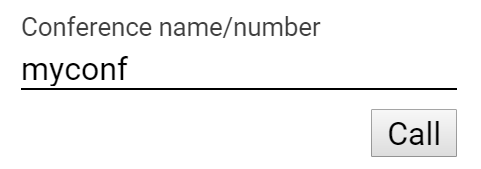
- Specify the conference name - myconf - and click Call .
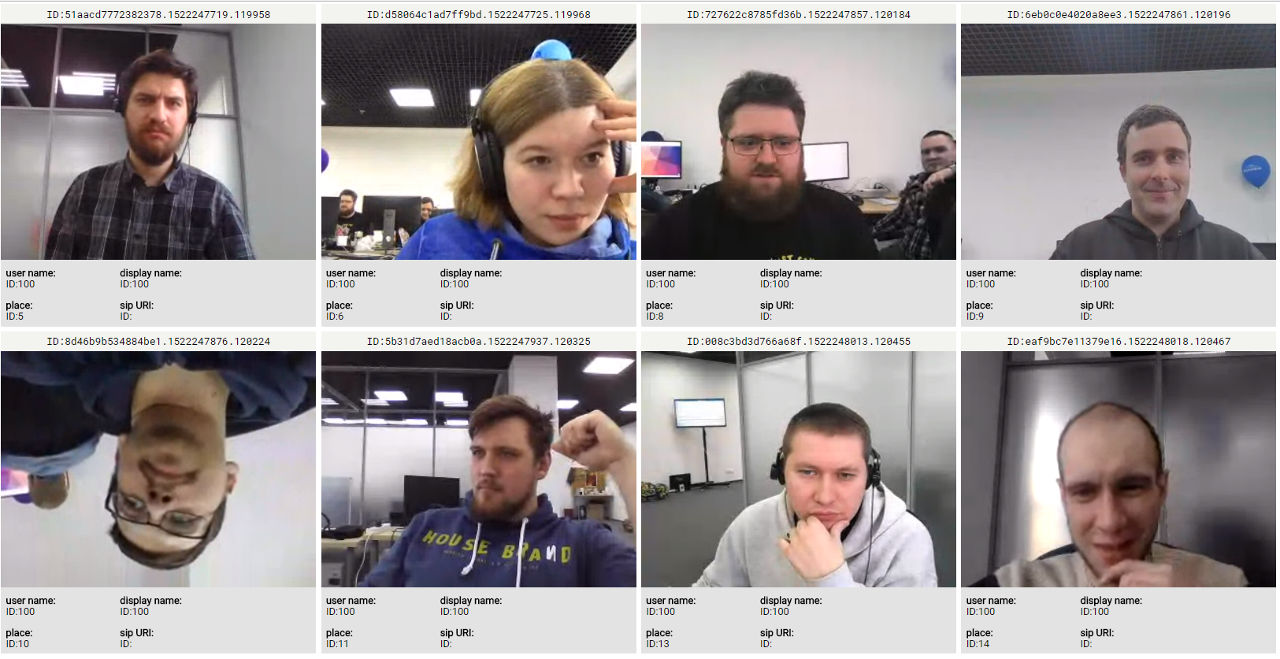
Great, now you are a participant in the conference. Ask your friends to do the same and enjoy the conference.
Conclusion
Video conferencing can be killerphic for one business, or it can be just a cool peg to the core functions of another business. It is not so important what the goal is, the main thing is that the implementation should be equally flexible in any case: this is the credo and the main feature of Voximplant. We hope that the tutorial was useful, but if you have any questions, welcome to the comments. Good conferences and you do not switch - there are many interesting things ahead.
The picture before the kata is taken from the report of Tzachi Levent-Levi.
Source: https://habr.com/ru/post/351486/
All Articles