Integration of 3CX with its own CRM system: CRM template generator
Starting with v15.5 SP2, the server CRM integration mechanism appeared in the PBX 3CX. It allows you to transfer the incoming Caller ID to the CRM system and find the corresponding client record in it. At the same time, 3CX receives the client's first and last name from CRM, adds them to the corporate PBX address book and shows them on the user's IP phone. The 3CX web client also shows this data and a button that allows you to go to the full client card directly in the CRM interface.
3CX out of the box comes with an extensive set of integration modules for popular CRM systems . However, each region and industry has its own popular systems, and it is impossible to provide support for each of them. Therefore, we went the other way - we created a template generator in which any user with basic programming skills can create an integration template with the selected CRM REST API and then install it on the PBX server.
The integration pattern defines authentication methods, authorization URLs, URLs, and methods for invoking contact data. This template is used by the server "engine" 3CX to access CRM.
')
In this article we will look at using the 3CX template generator to create an integration template with a new CRM system. For successful integration, a CRM system must have a RESTFul API with good documentation and support Basic or oAuth authentication modes.
CRM server integration uses API calls in the form of URL links for three tasks:
Authentication, for example:
Finding a match for a contact, for example:
Getting a contact name. Some CRM systems use a single URL for both the company name and the contact name. In this case, you need to configure individual URLs, for example:
Parameters are used to transmit the necessary information to CRM, which allows it to form answers. For example, for Salesforce CRM they are described here . In the template generator, add the following parameters (right-click on Parameters - Add):
In the Scenarios section, create an authentication script (right mouse button> Add)
In the Rule Groups section, create a new Rule Group. Set its parameters:
In the Variables section, add variables:
In the Outputs section, create:
Go to the Authentication section and install:
In the Scenarios> Add> Matching Scenario section, set:
In the Rule Groups section, create a Rule Group with parameters:
Add variables and paths to search for contact fields, for example:
To check the created template directly in the template generator, set the input parameter values. To do this, go to the Parameter Values section and fill in the parameters with the necessary values.

Specify the phone number (Caller ID), the call from which will be emulated, in the Number property (in the property editor).

After setting the parameters, right-click on the Parameter Values section and select Run. A new section will appear under the Parameter Values section (it will receive a name by the date and time of execution), in which the results of your CRM integration template will be visible. By selecting the Request / Response tab at the top, you can see the request and the JSON response containing the contact data from CRM.
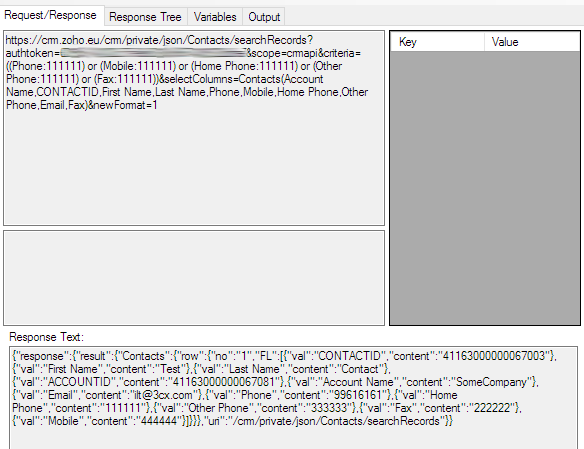
The answer is presented in the form of a tree and from it you can see that the contacts are located along the path response.result.Contacts.row.FL. This is an array in which there are values of first name, last name, telephone number, etc.
Add variables with the values we need. For example, to add a contact name, right-click on the content = 'Test' branch and select Add Variable. Change the variable name to FirstName (the default name is content).

In the CRM template tree, go to the Scenario section and right-click on the Outputs section. Add a new “answer”, change its type to ContactUrl and set the value that we need to receive (ie, which we found above for the contact name).
If after this we run the integration template again, we will see that all the necessary contact fields were correctly filled in the received “answer” (Output tab).

After generating (saving) the XML file of the template, copy it to the appropriate folders on the 3CX server and restart the 3CX Management Console and System services.
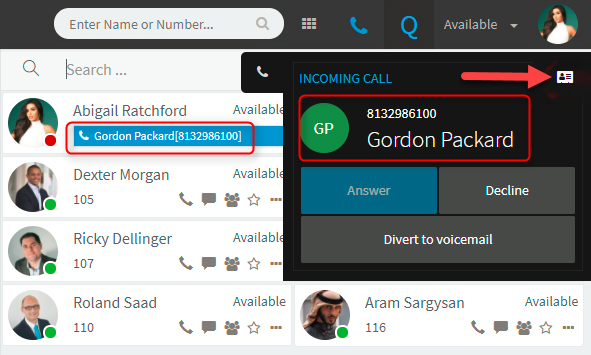
Now the incoming call number will be transferred to CRM to find a match. If a match is found, the 3CX web client displays the contact name and a button to go to the full contact card in the CRM system interface.
In conclusion, we note that server integration capabilities will gradually expand. So, the call logging of a CRM system is expected, i.e. saving the call history associated with the contact (in client CRM integration via the 3CX client for Windows, this option is still available). If you have any questions about the implementation of your own integration, ask them in a special forum for developers . And if you think that your CRM system should be officially supported by 3CX, submit an application here and, quite possibly, the developers will include a template for this CRM in the next release.
3CX out of the box comes with an extensive set of integration modules for popular CRM systems . However, each region and industry has its own popular systems, and it is impossible to provide support for each of them. Therefore, we went the other way - we created a template generator in which any user with basic programming skills can create an integration template with the selected CRM REST API and then install it on the PBX server.
The integration pattern defines authentication methods, authorization URLs, URLs, and methods for invoking contact data. This template is used by the server "engine" 3CX to access CRM.
')
In this article we will look at using the 3CX template generator to create an integration template with a new CRM system. For successful integration, a CRM system must have a RESTFul API with good documentation and support Basic or oAuth authentication modes.
CRM API URLs
CRM server integration uses API calls in the form of URL links for three tasks:
Authentication, for example:
https://login.salesforce.com/services/oauth2/token Finding a match for a contact, for example:
[Url]/services/data/v37.0/search/?q=FIND {[Number]} IN PHONE FIELDS RETURNING Contact(Id,FirstName,LastName,AssistantPhone,Fax, HomePhone, MobilePhone, OtherPhone, Phone, Email,AccountId) Getting a contact name. Some CRM systems use a single URL for both the company name and the contact name. In this case, you need to configure individual URLs, for example:
[Url]/services/data/v37.0/query/?q=SELECT name from Account where Id = '[AccountId]' Request parameters
Parameters are used to transmit the necessary information to CRM, which allows it to form answers. For example, for Salesforce CRM they are described here . In the template generator, add the following parameters (right-click on Parameters - Add):
- Name = ClientId, Title = Consumer Key:
- Name = ClientSecret, Title = Consumer Secret:
- Name = UserName, Title = Username:
- Name = Password, Title = Password:
- Name = SecurityToken, Title = Security Token:
Authentication
In the Scenarios section, create an authentication script (right mouse button> Add)
- ID = Auth, Request Type = Post
- URL = https://login.salesforce.com/services/oauth2/token
- Response Type = JSON
In the Rule Groups section, create a new Rule Group. Set its parameters:
- Path = instance_url
- Type = Any
In the Variables section, add variables:
- key = Url, Path = instance_url
- key = AccessToken, Path = access_token
In the Outputs section, create:
- Type = Bearer, Value = [AccessToken]
Go to the Authentication section and install:
- Type = Scenario
- Scenario = Auth (from dropdown list).
Contact matching search
In the Scenarios> Add> Matching Scenario section, set:
- Request Type = Get
- URL = [Url] /services/data/v37.0/search/?q=FIND {[Number]} IN PHONE FIELDS RETURNING Contact (Id, FirstName, LastName, AssistantPhone, Fax, HomePhone, MobilePhone, OtherPhone, Phone, Email , AccountId)
In the Rule Groups section, create a Rule Group with parameters:
- Path = searchRecords.Id, Type = Any
Add variables and paths to search for contact fields, for example:
- Key = Id, Path = searchRecords.Id
- Key = Phone, Path = searchRecords.Phone
- Key = OtherPhone, Path = searchRecords.OtherPhone
- Key = MobilePhone, Path = searchRecords.MobilePhone
- Key = HomePhone, Path = searchRecords.HomePhone
- Key = Fax, Path = searchRecords.Fax
- Key = FirstName, Path = searchRecords.FirstName
- Key = LastName, Path = searchRecords.LastName
- Key = Email, Path = searchRecords.Email
- Key = AcccountId, Path = searchRecords.AccountId
Integration testing
To check the created template directly in the template generator, set the input parameter values. To do this, go to the Parameter Values section and fill in the parameters with the necessary values.
Specify the phone number (Caller ID), the call from which will be emulated, in the Number property (in the property editor).
After setting the parameters, right-click on the Parameter Values section and select Run. A new section will appear under the Parameter Values section (it will receive a name by the date and time of execution), in which the results of your CRM integration template will be visible. By selecting the Request / Response tab at the top, you can see the request and the JSON response containing the contact data from CRM.
The answer is presented in the form of a tree and from it you can see that the contacts are located along the path response.result.Contacts.row.FL. This is an array in which there are values of first name, last name, telephone number, etc.
Add variables with the values we need. For example, to add a contact name, right-click on the content = 'Test' branch and select Add Variable. Change the variable name to FirstName (the default name is content).
In the CRM template tree, go to the Scenario section and right-click on the Outputs section. Add a new “answer”, change its type to ContactUrl and set the value that we need to receive (ie, which we found above for the contact name).
If after this we run the integration template again, we will see that all the necessary contact fields were correctly filled in the received “answer” (Output tab).
Generating and installing an XML template file
After generating (saving) the XML file of the template, copy it to the appropriate folders on the 3CX server and restart the 3CX Management Console and System services.
- 3CX for Windows c: \ ProgramData \ 3CX \ Instance1 \ Data \ Http \ Templates \ crm
- 3CX for Linux: / var / lib / 3cxpbx / Instance1 / Data / Http / Templates / crm
Now the incoming call number will be transferred to CRM to find a match. If a match is found, the 3CX web client displays the contact name and a button to go to the full contact card in the CRM system interface.
Conclusion
In conclusion, we note that server integration capabilities will gradually expand. So, the call logging of a CRM system is expected, i.e. saving the call history associated with the contact (in client CRM integration via the 3CX client for Windows, this option is still available). If you have any questions about the implementation of your own integration, ask them in a special forum for developers . And if you think that your CRM system should be officially supported by 3CX, submit an application here and, quite possibly, the developers will include a template for this CRM in the next release.
Source: https://habr.com/ru/post/351464/
All Articles