Installing the Linux + server (Nginx + Apache) + PostgreSQL + PHP on VirtualBox (Ubuntu Server 16.04.3 LTS)
On the Internet, I did not find a single recipe for installing and configuring such a rather non-standard server. I decided to write my own recipe.
The principle of operation is as follows:

Static data (files) gives Nginx, and the dynamics involved in Apache.
Let's start.
')
We need:
Virtualbox
Ubuntu Server 16.04.3 LTS (LTS - Long Time Support)
PuTTY
Go to superuser mode
Go to the root directory
Add a PostgreSQL repository
Add PHP Repository
Make update
Let's upgrade
My upgrade lasted five minutes.
We are becoming python, we will need it later
Let's start installing Apache, PHP and PostgreSQL
By default, PostgreSQL does not have single-byte and unsigned numbers, so we will install them.
There is an extension for PostgreSQL, pguint - github.com/petere/pguint
Go to the created directory
Now we need to compile this extension (here we need python, which we installed earlier).
Now, to the PostgreSQL server, in the correct database, where we want to use unsigned and single-byte numbers, we will send:
Back to root
Install Nginx, but stop Apache before that, so that it does not occupy port 80, otherwise Nginx will not install.
Nginx installation
Great, now stop and nginx
Apache setup
Change Apache Port
Replace
on
127.0.0.1 - means that Apache can only be accessed by local address.
8080 - you can put any free port.
Go to the folder with the available sites.
Create a configuration file for our pollack
And bring it to this form:
Let's see what we have in / var / www
Folder html, we no longer need, delete it along with the contents
Create your own folder with your site.
Go to the folder with our site
Create an index.pnp document
We write in it:
With this, we are finished.
Back to root
In apache, it costs rpaf 0.6 and it does not transmit / receive a port from nginx and does not work correctly as it should. Therefore, it must be updated.
Now compile
We leave in the root directory
Ok, let's continue Apache setup.
Replace
on
Put in order rpaf.conf
We give it to this form:
We include our site in Apache.
And run our Apache.
C Apache done.
Configure Nginx
Bring to this view:
Now create a symbolic link to this file.
Edit / etc / nginx / sites-available / default
Remove the default_server.
And insert the redirect from www. and ip
Run Nginx.
Great, we can check how it works.
But before this, edit the host file C: \ Windows \ System32 \ drivers \ etc
Open the hosts file through a text editor, and insert it in the bottom:
Replacing ip and domain with your own.
In the browser, go to domain-name.local , and if you did everything with this recipe, we should see a page with phpinfo.
Well, it remains for small.
Configure PostgreSQL.
Create a new PostgreSQL user
Let's go to the DBMS
And change the new user password
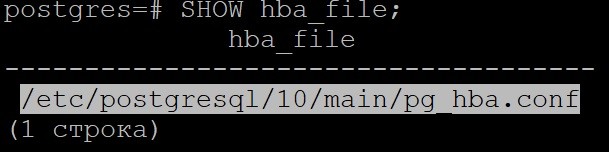
Now the new user needs to change the connection type, for this we need to find the pg_hba.conf file.
We write
Leaving DBMS
And we start to edit /etc/postgresql/10/main/pg_hba.conf
Are looking for
Find the following:
We lead to this form:
Reload PostgreSQL
Now we will enter the DBMS through a new user.
Enter the password, and get into the database.
Create a test database
And immediately go into it
Let's connect the pguint extension
And create a test pattern.
Fill in the table with test data
Let's look at the contents of the test_tb table.
Now we will try to display this data from php.
Close the connection to the DBMS
Open /var/www/domain-name.local/index.php
And we will result in the following form:
Now check and make sure it works.
Great, we configured (Nginx + Apache) + PostgreSQL + PHP and it works fine.
Install FTP server
Stop vsftpd before configuring
Open etc / vsftpd.conf
Set / replace / switch the following parameters:
Create a new user for access via FTP
Set a password for it
Create a user's home directory
Establish rights for her
Create a group for the user
Add a user to the group
Change the owner of the directory
Create a folder of our site
Change her owner
Mount our directories, open the file / etc / fstab
At the bottom of the insert
Add owner /var/www/domain-name.local
Assign rights
And run vsftpd
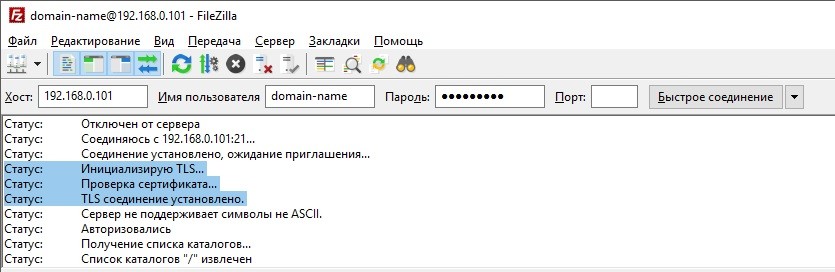
Check, I will use FileZilla.
All is well, try to create a directory.
Works.
Set up a secure FTP connection.
Stop vsftpd
Generate a certificate
Here we enter everything that lice your heart's content
Open etc / vsftpd.conf
Install / add the following parameters:
Save and run vsftpd
Let's try
Hooray, everything works, you can start developing a web application.
PS This recipe does not claim to be the only correct and ideal. If something is missed or you have suggestions for adding this recipe, welcome to the comments, accept any criticism. As my skills grow, this recipe will be supplemented and changed.
The principle of operation is as follows:
Static data (files) gives Nginx, and the dynamics involved in Apache.
Let's start.
')
We need:
Virtualbox
Ubuntu Server 16.04.3 LTS (LTS - Long Time Support)
PuTTY
Install VirtualBox
- Run the VirtualBox installer.

- We will leave the default settings.


- The installer will temporarily disconnect us from the network. Click "Yes".

- We start the installation.

- The finish.

Prepare VirtualBox for installing Ubuntu Server 16.04.3 LTS
- Download the image of ubuntu-16.04.3-server-amd64.iso
- Create a virtual machine.

- Name: default_server
Type: Linux
Version: Ubuntu (64-bit)
The amount of RAM: 2048 MBImportant: I have 8 GB of RAM, and in my case, two gigabytes will be enough. You might be different ...

Hard disk size: 15 GB
We will leave other parameters by default.
Click "Create". - Immediately configure the network.

Change the connection type from NAT to Network Bridge.
In the future, we will not engage in port forwarding. - We start our car.

Installing Ubuntu Server 16.04.3 LTS
- Select the boot disk with the Ubuntu Server 16.04.3 LTS image.

- We choose a convenient language, I have it Russian.
")
Click “Enter”. - Choose "Install Ubuntu Server".
")
- Choose a country.
")
Important: Read the hint at the bottom of the screen.
- I will not define the keyboard layout, I do not need it.
")
- Select the country for which the keyboard is intended.
")
- Choose a layout region.
")
- Select the key combination to switch the language. I feel comfortable through CTRL +
SHIFT.")
- Enter the name of the computer by which it will be known in the network.
")
- Enter the admin name.
")
- Enter the name of the admin account (Will be used as a login to log in).
")
- Enter the password from the admin account.
")
- Repeat password.
")
- Why not..?
")
- Choose a time zone.
")
- Let the system automatically use the entire disk.
")
- Disk for partitioning, choose the default.
")
- Write the changes to disk.
")
- We do not have a proxy, leave the field empty and continue.
")
- Let the system install security updates by itself.
")
- Select the set of programs that will be installed with the system.
We will have enough standard set and OpenSSH Server.")
- Install the main GRUB.
")
- Great, almost done.
")
We need to remove the disk from the drive.
Devices -> Optical Discs -> Remove Disk from Drive
Now click continue. - Great, Ubuntu Server is installed.

Enter the username, followed by the password, get into the system, all okay.
Turn off our car:poweroff - Specifically, we leave this machine alone, and we will use it only for cloning.
Clone our car:
Enter the name.
We continue.
We select the full cloning.
Click to clone. My cloning lasted two minutes.
Install PuTTY for SSH access
- Run the installation file.
")
- We will leave the default settings.
")
")
Click "Install". - The finish.
")
Connection via SSH to server
- Run a clone of our machine to find out its ip address.
Write the command:ifconfig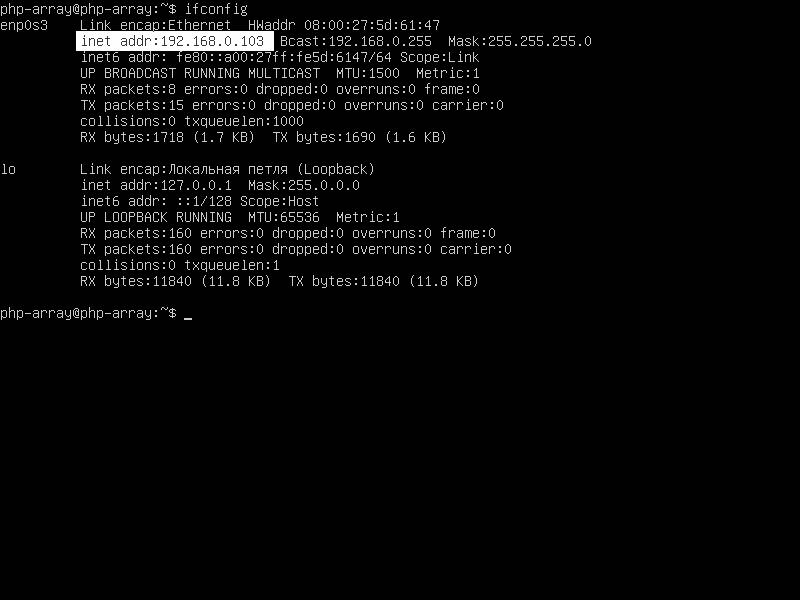
In the screenshot, I marked the place where your ip address will be written. I have this: 192.168.0.103 (it can be changed while I wrote the article, I changed to 192.168.0.101).
You can now log out of your account by writing:exit - Go to PuTTY, enter the ip address, and the name for the saved session.

Click "Save". - Now, with a double click on the name of the saved session.

We should observe the following:
Enter the username after the password.
SSH connection is successfully configured, now you can start setting up (Nginx + Apache) + PostgreSQL + PHP.
Install and configure (Nginx + Apache) + PostgreSQL + PHP
Go to superuser mode
sudo suGo to the root directory
cd /Add a PostgreSQL repository
wget -q https://www.postgresql.org/media/keys/ACCC4CF8.asc -O - | sudo apt-key add -sh -c 'echo "deb http://apt.postgresql.org/pub/repos/apt/ `lsb_release -cs`-pgdg main" >> /etc/apt/sources.list.d/pgdg.list'Add PHP Repository
add-apt-repository ppa:ondrej/phpMake update
apt-get updateLet's upgrade
apt-get upgradeMy upgrade lasted five minutes.
We are becoming python, we will need it later
apt-get install pythonLet's start installing Apache, PHP and PostgreSQL
apt-get install apache2 php7.2 php7.2-cli php7.2-curl php7.2-fpm php7.2-pgsql postgresql postgresql-contrib postgresql-server-dev-10 libapache2-mod-rpaf build-essential apache2-devBy default, PostgreSQL does not have single-byte and unsigned numbers, so we will install them.
There is an extension for PostgreSQL, pguint - github.com/petere/pguint
git clone https://github.com/petere/pguint.git /pguintGo to the created directory
cd /pguintNow we need to compile this extension (here we need python, which we installed earlier).
makemake installNow, to the PostgreSQL server, in the correct database, where we want to use unsigned and single-byte numbers, we will send:
CREATE EXTENSION uint; Back to root
cd /Install Nginx, but stop Apache before that, so that it does not occupy port 80, otherwise Nginx will not install.
service apache2 stopNginx installation
apt-get install nginxGreat, now stop and nginx
service nginx stopApache setup
a2dismod mpm_event

a2enmod mpm_worker

a2enmod proxy_fcgi

a2enconf php7.2-fpm
Change Apache Port
nano /etc/apache2/ports.confReplace
Listen 80 on
Listen 127.0.0.1:8080 127.0.0.1 - means that Apache can only be accessed by local address.
8080 - you can put any free port.
Go to the folder with the available sites.
cd /etc/apache2/sites-availableCreate a configuration file for our pollack
nano domain-name.local.confAnd bring it to this form:
<VirtualHost 127.0.0.1:8080> ServerName domain-name.local ServerAlias www.domain-name.local ServerAdmin admin@domain-name.local DocumentRoot /var/www/domain-name.local ErrorLog ${APACHE_LOG_DIR}/domain-name.local_error.log CustomLog ${APACHE_LOG_DIR}/domain-name.local_access.log vhost_combined </VirtualHost> Let's see what we have in / var / www
cd /var/www/

ls -F
Folder html, we no longer need, delete it along with the contents
rm -R htmlCreate your own folder with your site.
mkdir domain-name.local/Go to the folder with our site
cd domain-name.local/Create an index.pnp document
nano index.phpWe write in it:
<?php phpinfo(); ?> With this, we are finished.
Back to root
cd /In apache, it costs rpaf 0.6 and it does not transmit / receive a port from nginx and does not work correctly as it should. Therefore, it must be updated.
wget -O rpaf_v0.8.4.tar.gz https://github.com/gnif/mod_rpaf/archive/v0.8.4.tar.gz

gunzip rpaf_v0.8.4.tar.gz

tar xvf rpaf_v0.8.4.tar

cd mod_rpaf-0.8.4/
Now compile
make

make install
We leave in the root directory
cd /Ok, let's continue Apache setup.
nano /etc/apache2/apache2.confReplace
LogFormat "%v:%p %h %l %u %t \"%r\" %>s %O \"%{Referer}i\" \"%{User-Agent}i\"" vhost_combined on
LogFormat "%v:%p %{X-Forwarded-For}i %l %u %t \"%r\" %>s %O \"%{Referer}i\" \"%{User-Agent}i\"" vhost_combined Put in order rpaf.conf
nano /etc/apache2/mods-available/rpaf.confWe give it to this form:
<IfModule rpaf_module> RPAF_Enable On RPAF_ProxyIPs 127.0.0.1 ::1 RPAF_SetHostName On RPAF_SetHTTPS On RPAF_SetPort On RPAF_ForbidIfNotProxy Off RPAF_Header X-Forwarded-For </IfModule> We include our site in Apache.
a2ensite domain-name.local.confAnd run our Apache.
service apache2 startC Apache done.
Configure Nginx
nano /etc/nginx/sites-available/domain-name.localBring to this view:
server { listen 80; listen [::]:80; root /var/www/domain-name.local; index index.php index.html index.htm; server_name domain-name.local www.domain-name.local; location / { proxy_pass http://127.0.0.1:8080; proxy_redirect off; proxy_set_header Host $host; proxy_set_header X-Real-IP $remote_addr; proxy_set_header X-Forwarded-For $proxy_add_x_forwarded_for; proxy_set_header X-Forwarded-Proto $scheme; proxy_pass_header Set-Cookie; } location ~ /\.ht { deny all; } location ~* \.(ico|docx|doc|xls|xlsx|rar|zip|jpg|jpeg|txt|xml|pdf|gif|png|css|js|html)$ { root /var/www/domain-name.local; } add_header Strict-Transport-Security "max-age=63072000; includeSubDomains; preload"; add_header Content-Security-Policy "block-all-mixed-content"; add_header X-Frame-Options "SAMEORIGIN"; add_header X-XSS-Protection "1; mode=block"; add_header X-Content-Type-Options "nosniff"; resolver 8.8.8.8; } Now create a symbolic link to this file.
ln -s /etc/nginx/sites-available/domain-name.local /etc/nginx/sites-enabled/domain-name.localEdit / etc / nginx / sites-available / default
nano /etc/nginx/sites-available/defaultRemove the default_server.
And insert the redirect from www. and ip
server { listen 80; listen [::]:80; server_name www.domain-name.local; return 301 http://domain-name.local$request_uri; } server { listen 80; listen [::]:80; server_name 192.168.0.101; return 301 http://domain-name.local$request_uri; } Run Nginx.
service nginx startGreat, we can check how it works.
But before this, edit the host file C: \ Windows \ System32 \ drivers \ etc
Open the hosts file through a text editor, and insert it in the bottom:
192.168.0.101 domain-name.local
192.168.0.101 www.domain-name.local
Replacing ip and domain with your own.
In the browser, go to domain-name.local , and if you did everything with this recipe, we should see a page with phpinfo.
Well, it remains for small.
Configure PostgreSQL.
Create a new PostgreSQL user
sudo -u postgres createuser --superuser test-userLet's go to the DBMS
sudo -u postgres psqlAnd change the new user password
\password test-userNow the new user needs to change the connection type, for this we need to find the pg_hba.conf file.
We write
SHOW hba_file; Leaving DBMS
\qAnd we start to edit /etc/postgresql/10/main/pg_hba.conf
nano /etc/postgresql/10/main/pg_hba.confAre looking for
# Database administrative login by Unix domain socketFind the following:
# Database administrative login by Unix domain socket
local all postgres peer
We lead to this form:
# Database administrative login by Unix domain socket
local all postgres peer
local all test-user md5
Reload PostgreSQL
service postgresql restartNow we will enter the DBMS through a new user.
psql test-user -h 127.0.0.1 -d postgresEnter the password, and get into the database.
Create a test database
CREATE DATABASE test_db; And immediately go into it
\c test_dbLet's connect the pguint extension
CREATE EXTENSION uint; And create a test pattern.
CREATE TABLE test_tb( id uint4 PRIMARY KEY, title TEXT ); Fill in the table with test data
INSERT INTO test_tb(id, title) VALUES (1, ' 1'), (2, ' 2'), (3, ' 3'), (4, ' 4'), (5, ' 5'), (6, ' 6'), (7, ' 7'), (8, ' 8'), (9, ' 9'), (10, ' 10'), (2147483642, ' 2147483642'), (2147483643, ' 2147483643'), (2147483644, ' 2147483644'), (2147483645, ' 2147483645'), (2147483646, ' 2147483646'), (2147483647, ' 2147483647'), (2147483648, ' 2147483648'), (2147483649, ' 2147483649'), (2147483650, ' 2147483650'), (2147483651, ' 2147483651'), (2147483652, ' 2147483652'), (4294967286, ' 4294967286'), (4294967287, ' 4294967287'), (4294967288, ' 4294967288'), (4294967289, ' 4294967289'), (4294967290, ' 4294967290'), (4294967291, ' 4294967291'), (4294967292, ' 4294967292'), (4294967293, ' 4294967293'), (4294967294, ' 4294967294'), (4294967295, ' 4294967295') RETURNING id, title; Let's look at the contents of the test_tb table.
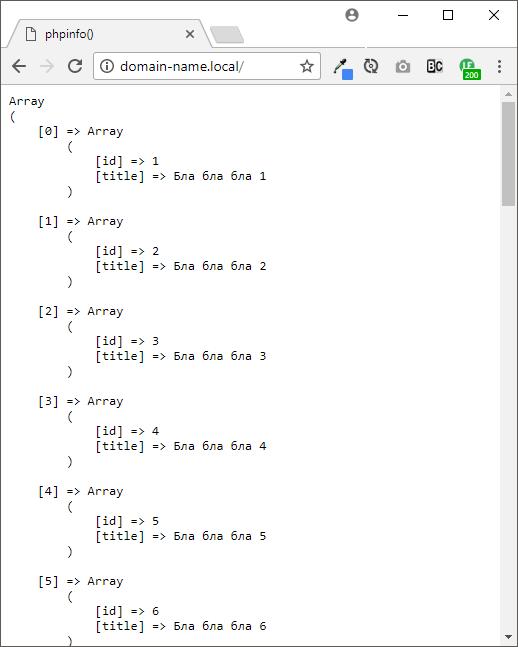
SELECT * FROM test_tb; Now we will try to display this data from php.
Close the connection to the DBMS
\qOpen /var/www/domain-name.local/index.php
nano /var/www/domain-name.local/index.phpAnd we will result in the following form:
<?php $dbh = new PDO('pgsql:host=localhost port=5432 user=test-user dbname=test_db password=password'); $test = $dbh->prepare('SELECT * FROM test_tb;'); $test->execute(); echo "<pre>"; print_r($test->fetchAll(PDO::FETCH_ASSOC)); echo "</pre>"; ?> Now check and make sure it works.
Great, we configured (Nginx + Apache) + PostgreSQL + PHP and it works fine.
Configure FTP site access
Install FTP server
apt-get install vsftpdStop vsftpd before configuring
service vsftpd stopOpen etc / vsftpd.conf
nano etc/vsftpd.confSet / replace / switch the following parameters:
- listen = YES
- listen_ipv6 = NO
- local_enable = YES
- write_enable = YES
- chroot_local_user = YES
- pam_service_name = ftp
Create a new user for access via FTP
useradd -d /home/domain-name -s /sbin/nologin domain-nameSet a password for it
passwd domain-nameCreate a user's home directory
mkdir -p /home/domain-nameEstablish rights for her
chmod aw /home/domain-nameCreate a group for the user
groupadd ftpsAdd a user to the group
usermod -G ftps domain-nameChange the owner of the directory
chown -R domain-name:ftps /home/domain-nameCreate a folder of our site
mkdir /home/domain-name/domain-name.localChange her owner
chown -R domain-name:ftps /home/domain-name/domain-name.localMount our directories, open the file / etc / fstab
nano /etc/fstabAt the bottom of the insert
/var/www/domain-name.local /home/domain-name/domain-name.local none bind 0 0Add owner /var/www/domain-name.local
chown www-data:domain-name /var/www/domain-name.local/ -RAssign rights
find /var/www/domain-name.local -type d -exec chmod 775 {} \;
find /var/www/domain-name.local -type f -exec chmod 664 {} \;
And run vsftpd
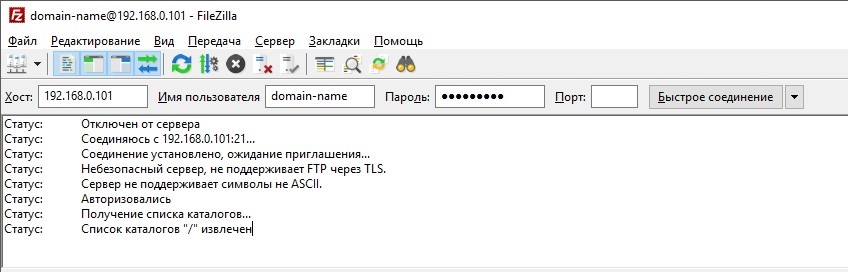
service vsftpd startCheck, I will use FileZilla.
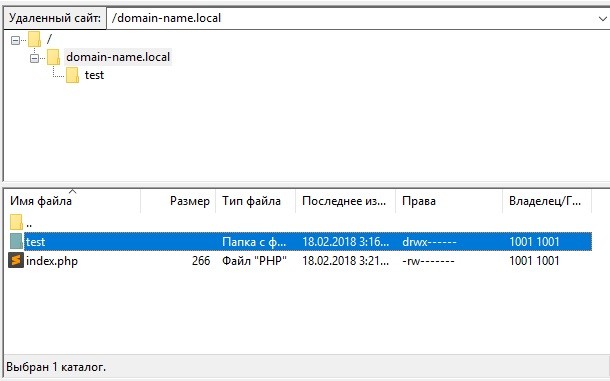
All is well, try to create a directory.
Works.
Set up a secure FTP connection.
Stop vsftpd
service vsftpd stopGenerate a certificate
openssl req -x509 -nodes -days 720 -newkey rsa:2048 -keyout /etc/ssl/private/vsftpd.key -out /etc/ssl/private/vsftpd.pemHere we enter everything that lice your heart's content
Country Name (2 letter code) [AU]:
State or Province Name (full name) [Some-State]:
Locality Name (eg, city) []:
Organization Name (eg, company) [Internet Widgits Pty Ltd]:
Organizational Unit Name (eg, section) []:
Common Name (eg server FQDN or YOUR name) []:
Email Address []:
Open etc / vsftpd.conf
nano etc/vsftpd.confInstall / add the following parameters:
- ssl_enable = YES
- ssl_tlsv1 = YES
- ssl_sslv2 = NO
- ssl_sslv3 = NO
- rsa_cert_file = / etc / ssl / private / vsftpd.pem
- rsa_private_key_file = / etc / ssl / private / vsftpd.key
- allow_anon_ssl = NO
- force_local_data_ssl = YES
- force_local_logins_ssl = YES
- ssl_ciphers = HIGH
Save and run vsftpd
service vsftpd startLet's try
Hooray, everything works, you can start developing a web application.
PS This recipe does not claim to be the only correct and ideal. If something is missed or you have suggestions for adding this recipe, welcome to the comments, accept any criticism. As my skills grow, this recipe will be supplemented and changed.
Source: https://habr.com/ru/post/351402/
All Articles