Simple Kanban Board for Jira
Here I will tell you how to make a kanban board for a project in Jira, using only QML and JavaScript. With minor modifications instead of Jira, you can use any other tracker that has the REST API.
Some time ago, now almost in another life, when I was a project manager, I realized that I was losing the idea of the employment of participants in our project. Someone is engaged in a big and important business, someone fixes urgent bugs, and maybe someone, I'm sorry, kicks the noodle, but I don’t know about it and I don’t set a task for him. And I wanted to have a clear picture of current affairs.
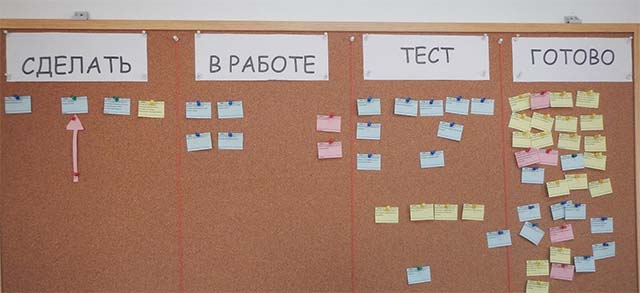
If your organization has already been diagnosed with kanban in the chronic stage and you are feeling all that is natural and tangible, then most likely your board looks like this, and it also has a division into stages of the process:
 Taken from here .
')
In my case, this option would not be rolled for several reasons.
Firstly, the whole team, with the exception of a couple of people, was located in another city, and it did not seem rational for me to organize video meetings.
Secondly, I have a persistent aversion to any kind of manual labor and manually pinning papers on the board (and there was no one else, see the previous paragraph), to track the movement of tasks in the tracker and accordingly to move the pieces of paper on the board to me. You could draw the cards in the computer, in Excel or in Trello, but you had to follow the tasks and move the cards again.
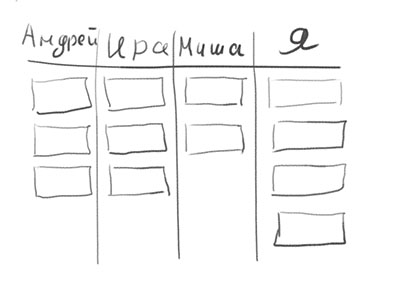
Thirdly, and most importantly, looking at this board, you can see the general state of affairs, find bottlenecks in the areas of the software production pipeline, but it’s completely impossible to see people and their loading.
So I needed a board:
a) electronic
b) associated with the tracker, i.e. reflecting the current situation
c) and that the column on the board corresponds to a specific person
In short, I decided this task at that time, made a presentation on a web-page. But I will not tell you anything about it - and that tracker (PVCS Tracker) is not very common, it has no API for the dll, and now the code for the page cannot be found.
And now I decided to repeat the exercise, taking QML as a toolkit. The choice is explained simply - to me it is a little more familiar than web technologies, and I know how to embed the resulting module into my tool written in Python and PyQt.
Yes, I know that for Jira there are a certain number of plugins in which there is a Kanban board - a search in the marketplace for the word "kanban" finds 33 options.
But using a plug-in means that you need to knock out the management of his purchase at the price of the corresponding number of all users on Jira, agree with the admins that they will put it on the server and will support it, and ... the impossibility of customizing it for my needs, since The plugin will be common to all. And I wanted to have a tool that can be used regardless of whether something is installed on the server or not, and changed, without looking at anyone.
In order not to make the article heavy, we will not say how to do it here:
- authorization in Jira
- operations on cards in QML with call transfer in JIRA - editing, changing statuses and executors by drag & drop, etc.
- work with Jira filters
If any of this is really interesting for you - write about it in the comments. I will not promise to do it immediately and sign it in detail, but, as nmivan said , “I will put it in a plan.”
Terminology has not yet been settled, so in some companies the issue is called a query , in others the problem , there are still tickets and applications . For the filter entity, which select issues in Jira, there are also a bunch of names - filter , query , selection , list .
I will use the terminology adopted in the localized Jira: the issue will be called the request , and the filter - the list .
A typical query address in the Jira web interface looks like this:
We take the protocol and the host name, that is, from the beginning of the address to the
Full description of the Jira REST API on the Atlassian website . There are all sorts of functions that are becoming more and more with each version, but really you only need to know a few methods:
Receive request PROJECT-1234 - JSON will return with the fields of the request. Note that internal names will be used for the field names, not the ones you see in the web interface. So the “Test Status” field can be
Create a new query. In the body of the call is transmitted JSON with filled request fields. Those fields that you did not pass will be filled with default values.
Change (edit) fields in the request. In the body of the call, JSON is transmitted, in which there are two blocks - “update” with instructions on changing fields, and “fields” with new field values.
The variable field must be in only one of these blocks.
While enough for the first time.
Since we are not going to change anything and edit, we will work anonymously with requests on the Jira server in Atlassian, in the project “JIRA Server (including JIRA Core)” , that is, figuratively speaking, in the Jira Main Project itself. Moreover, there are also our people there:

First of all, I recommend that you go to the project’s web interface and do a search for requests for any condition, for example:
This is necessary in order to make sure that you have compiled the request correctly - if this is not the case, the web interface will tell you.
The condition is copied and substituted into the jql parameter of the search function, we get the following URL:
https://jira.atlassian.com/rest/api/2/search?jql=project = JRASERVER and updated <= -1w ORDER BY updated DESC
Open it in the browser and get JSON. JSON is saved by the browser to a file with the .json extension, open it in Qt Creator - it turns out that the entire file is in one long line, and then watch your hands - format it as QML
Save it under a different name. It is more convenient to work with the resulting file, find the necessary fields in it and look at which structure the desired value is in. The original file will come in handy as a test source, so as not to go to the Atlassian server once again.
It makes sense to also get a list of all fields via the query
To create a project in Qt Creator, we will use the standard “Qt Quick Control Application” template.
You’ll get a project consisting of main.cpp and main.qml in the qml.qrc resource file.
We will not touch them yet, we will deal with more pressing problems.
Create a new file IssueCard.qml, the wizard by default will throw it into the resource file.
I first promptly inserted the design of the card with which the query will be displayed in Qt Creator's designer mode, then modified the QML manually.
By the way, QML designer is relatively good, especially compared to the first version. Binding positions of elements are visually shown and easily changed, automatically pulls up components from other qml-files in a project. Almost did not fall - only QtCreator poured just two times when I tried to set a gradient (nothing terrible happened - autosave works), and I could not chew on DelegateModel yet - probably, it was worth updating the environment. The QML designer, like the Qt Widgets designer, has a preview function:
The result is a QML request card, the file IssueCard.qml
To fill the card on request, add a new property ( property ) issue . The property will give us the opportunity to transfer to the card a request with all its contents from the outside for one assignment.
And in the signal for its change, we will write a code that parses the values and pushes them into the desired visual components.
As you can see, here I often use the JS.getValue function, I wrote it to simplify fetching a value from a complex JSON structure (if it is there), although the function itself is quite simple:
The function lies in the methods.js file, connected at the start of IssueCard.qml
Now you need to organize the cards in a scrollable vertical column. Scrolling is very convenient when there are many cards. To scroll, you need a ListView. Among the examples bundled with Qt is an example of "QML Dynamic View Ordering Tutorial 3 - Moving Dragged Items", in it dynamicview.qml is practically what we need, we copy it into a project under the name KanbanColumn.qml.
Just need to make a couple of improvements
1) Add a header to the column and make a property on the top-level object to assign the name of the column from the outside.
2) Since the request card is now a separate whole object, we replace the output made in the example through the Column and several Text with our IssueCard
With the column designer does not help us, because he does not digest DelegateModel. On the other hand, we don’t really need it, everything can be done manually.
Now you need to collect the column in the general window. We create the KanbanWindow.qml file, in it the designer places the necessary fields.
In its simplest form, it turns out like this:
In the ListView, you need to specify in the
Above, I also created the
And do not forget to insert KanbanWindow into the application window:
It's time to make the code that will receive the list of requests from Jira and fill in the models in QML.
In QML there is, albeit limited, but support for XMLHttpRequest and JSON parser (there is a detailed BlackRaven86 article on Habré ). Therefore, we have everything to write an appeal to the server and analysis of the answer.
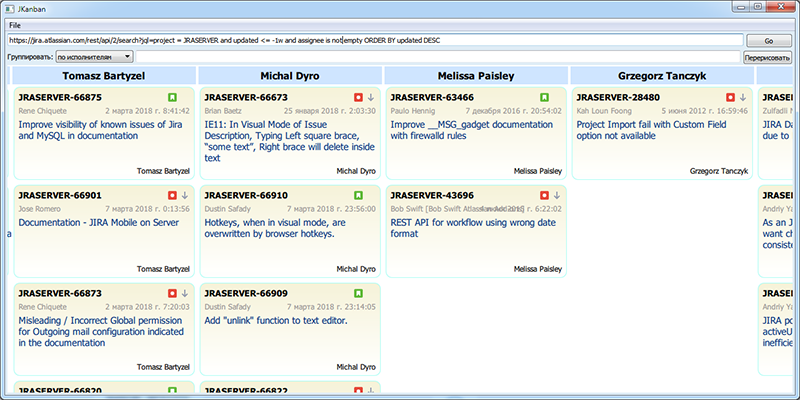
The function requests from the server (or from a local file) a list of requests, parses the json from the response, groups the requests by performers and fills the model in QML.
We connect function to the button
And check the work:
Basically, the board is ready. Then you can deal with its improvements and development.
I almost forgot - when you try to specify a URL to a real Jira server, for example, like this:
https://jira.atlassian.com/rest/api/2/search?maxResults=50&jql=project = JRASERVER and updated <= -1w and assignee is not ORDER BY updated ASC
and you are under Windows, then you most likely will not succeed. The problem in SSL - Qt Creator, running the program under the debugger, does not set the path to the OpenSSL libraries in the environment. Copy the libeay32.dll and ssleay32.dll to the created file and enjoy.
In order not to enter the URL to the Jira server each time, it is worth saving the entered string and restoring it at startup. And yes, QML can do LocalStorage.
Let's write functions for reading and saving parameters.
Add a call to save parameters ...
... and restoring them when creating KanbanWindow
Having grouped by artist, it is logical to make the choice of other grouping options - by status, by priority, and so on. This is how the panel of parameters for grouping KanbanParams.qml appeared.
As you can see, here the ComboBox contains a model with possible grouping options, and each element is assigned a JSON path to the value that will be used to define the group. Thus, the number of options for groupings can be expanded if desired.
At the top level, properties are defined, two of which are aliases to internal values. Aliases are needed so that you can assign the desired value, read from LocalStorage. As for the groupValuePath property:
then it simply returns the path to the value for the current grouping option.
Paste KanbanParams into KanbanWindow and we get this window:
I will not describe in detail how the parameters are processed,because I am tired of writing this article , see the code.
The resulting board can already be used to view the current situation with queries, but you can improve it:
The code is posted on GitHub .
Content
Prehistory
Alternatives for the smart and the rich
Required reservations
Getting started with the Jira REST API
Creating a project in Qt Creator
Draw request card design
We describe the column of cards
Board window
Writing code to call the REST API
LocalStorage to save and restore settings
Add grouping options
What's next?
Prehistory
Some time ago, now almost in another life, when I was a project manager, I realized that I was losing the idea of the employment of participants in our project. Someone is engaged in a big and important business, someone fixes urgent bugs, and maybe someone, I'm sorry, kicks the noodle, but I don’t know about it and I don’t set a task for him. And I wanted to have a clear picture of current affairs.
If your organization has already been diagnosed with kanban in the chronic stage and you are feeling all that is natural and tangible, then most likely your board looks like this, and it also has a division into stages of the process:
')
In my case, this option would not be rolled for several reasons.
Firstly, the whole team, with the exception of a couple of people, was located in another city, and it did not seem rational for me to organize video meetings.
Secondly, I have a persistent aversion to any kind of manual labor and manually pinning papers on the board (and there was no one else, see the previous paragraph), to track the movement of tasks in the tracker and accordingly to move the pieces of paper on the board to me. You could draw the cards in the computer, in Excel or in Trello, but you had to follow the tasks and move the cards again.
Thirdly, and most importantly, looking at this board, you can see the general state of affairs, find bottlenecks in the areas of the software production pipeline, but it’s completely impossible to see people and their loading.
So I needed a board:
a) electronic
b) associated with the tracker, i.e. reflecting the current situation
c) and that the column on the board corresponds to a specific person
In short, I decided this task at that time, made a presentation on a web-page. But I will not tell you anything about it - and that tracker (PVCS Tracker) is not very common, it has no API for the dll, and now the code for the page cannot be found.
And now I decided to repeat the exercise, taking QML as a toolkit. The choice is explained simply - to me it is a little more familiar than web technologies, and I know how to embed the resulting module into my tool written in Python and PyQt.
Alternatives for the smart and the rich
Yes, I know that for Jira there are a certain number of plugins in which there is a Kanban board - a search in the marketplace for the word "kanban" finds 33 options.
But using a plug-in means that you need to knock out the management of his purchase at the price of the corresponding number of all users on Jira, agree with the admins that they will put it on the server and will support it, and ... the impossibility of customizing it for my needs, since The plugin will be common to all. And I wanted to have a tool that can be used regardless of whether something is installed on the server or not, and changed, without looking at anyone.
Required reservations
In order not to make the article heavy, we will not say how to do it here:
- authorization in Jira
- operations on cards in QML with call transfer in JIRA - editing, changing statuses and executors by drag & drop, etc.
- work with Jira filters
If any of this is really interesting for you - write about it in the comments. I will not promise to do it immediately and sign it in detail, but, as nmivan said , “I will put it in a plan.”
Terminology has not yet been settled, so in some companies the issue is called a query , in others the problem , there are still tickets and applications . For the filter entity, which select issues in Jira, there are also a bunch of names - filter , query , selection , list .
I will use the terminology adopted in the localized Jira: the issue will be called the request , and the filter - the list .
Getting started with the Jira REST API
A typical query address in the Jira web interface looks like this:
https://jira.mycompany.ru/browse/PROJECT-1234
We take the protocol and the host name, that is, from the beginning of the address to the
browse , append rest/api/2/ - and we get the basic part of the REST API addresshttps://jira.mycompany.ru/rest/api/2/
Full description of the Jira REST API on the Atlassian website . There are all sorts of functions that are becoming more and more with each version, but really you only need to know a few methods:
GET https://jira.mycompany.ru/rest/api/2/issue/PROJECT-1234Receive request PROJECT-1234 - JSON will return with the fields of the request. Note that internal names will be used for the field names, not the ones you see in the web interface. So the “Test Status” field can be
customfield_10234 . To understand which field corresponds to which one, use the /rest/api/2/field query.POST https://jira.mycompany.ru/rest/api/2/issueCreate a new query. In the body of the call is transmitted JSON with filled request fields. Those fields that you did not pass will be filled with default values.
PUT https://jira.mycompany.ru/rest/api/2/issue/PROJECT-1234Change (edit) fields in the request. In the body of the call, JSON is transmitted, in which there are two blocks - “update” with instructions on changing fields, and “fields” with new field values.
The variable field must be in only one of these blocks.
Example
{ "update": { "summary":[ {"set":"Bug in business logic"} ], "components":[{"set":""}], "timetracking":[ {"edit":{"originalEstimate":"1w 1d","remainingEstimate":"4d"}} ], "labels":[ {"add":"triaged"}, {"remove":"blocker"}] }, "fields":{ "summary":"This is a shorthand for a set operation on the summary field", "customfield_10010":1, "customfield_10000":"This is a shorthand for a set operation on a text custom field" } } GET https://jira.mycompany.ru/rest/api/2/search?jql=... - get a list of queries matching the conditions in JQLExample
{ expand: "schema,names", startAt: 0, maxResults: 10, total: 738, issues: [{ expand: "operations,versionedRepresentations,editmeta,changelog,renderedFields", id: "947068", self: "https://jira.atlassian.com/rest/api/2/issue/947068", key: "JRASERVER-66937", fields: { customfield_18232: null, ... POST https://jira.mycompany.ru/rest/api/2/search - the same for complex conditions that do not fit into the URL stringGET https://jira.mycompany.ru/rest/api/2/field - get descriptions of all fields that can be used in queries.While enough for the first time.
Since we are not going to change anything and edit, we will work anonymously with requests on the Jira server in Atlassian, in the project “JIRA Server (including JIRA Core)” , that is, figuratively speaking, in the Jira Main Project itself. Moreover, there are also our people there:
First of all, I recommend that you go to the project’s web interface and do a search for requests for any condition, for example:
project = JRASERVER and updated <= -1w ORDER BY updated DESCThis is necessary in order to make sure that you have compiled the request correctly - if this is not the case, the web interface will tell you.
The condition is copied and substituted into the jql parameter of the search function, we get the following URL:
https://jira.atlassian.com/rest/api/2/search?jql=project = JRASERVER and updated <= -1w ORDER BY updated DESC
Open it in the browser and get JSON. JSON is saved by the browser to a file with the .json extension, open it in Qt Creator - it turns out that the entire file is in one long line, and then watch your hands - format it as QML
gif
Save it under a different name. It is more convenient to work with the resulting file, find the necessary fields in it and look at which structure the desired value is in. The original file will come in handy as a test source, so as not to go to the Atlassian server once again.
It makes sense to also get a list of all fields via the query
rest/api/2/field , in order to determine which identifier under which identifier the field you want is listed.Creating a project in Qt Creator
To create a project in Qt Creator, we will use the standard “Qt Quick Control Application” template.
You’ll get a project consisting of main.cpp and main.qml in the qml.qrc resource file.
main.qml
import QtQuick 2.3 import QtQuick.Controls 1.2 ApplicationWindow { id: applicationWindow1 visible: true width: 649 height: 480 title: qsTr("Hello World") menuBar: MenuBar { Menu { title: qsTr("File") MenuItem { text: qsTr("&Open") onTriggered: console.log("Open action triggered"); } MenuItem { text: qsTr("Exit") onTriggered: Qt.quit(); } } } } We will not touch them yet, we will deal with more pressing problems.
Draw a card design with the request
Create a new file IssueCard.qml, the wizard by default will throw it into the resource file.
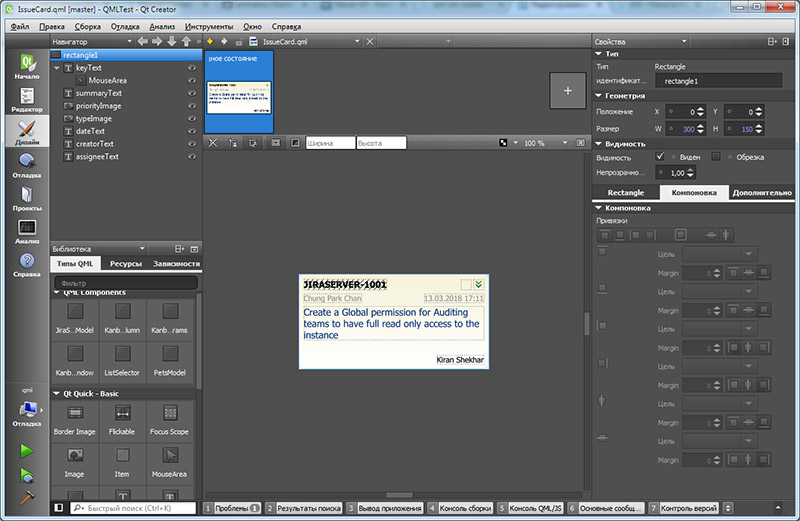
I first promptly inserted the design of the card with which the query will be displayed in Qt Creator's designer mode, then modified the QML manually.
By the way, QML designer is relatively good, especially compared to the first version. Binding positions of elements are visually shown and easily changed, automatically pulls up components from other qml-files in a project. Almost did not fall - only QtCreator poured just two times when I tried to set a gradient (nothing terrible happened - autosave works), and I could not chew on DelegateModel yet - probably, it was worth updating the environment. The QML designer, like the Qt Widgets designer, has a preview function:
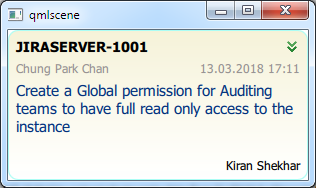
The result is a QML request card, the file IssueCard.qml
Code
import QtQuick 2.0 import "methods.js" as JS Rectangle { id: rectangle1 color: "#f1dada" radius: 10 gradient: Gradient { GradientStop { position: 0.00; color: "#f5f2d8"; } GradientStop { position: 1.00; color: "#ffffff"; } } border.color: "#abfdf4" width: 300 height: 150 Text { id: keyText text: "JIRASERVER-1001" property string url: "" anchors.top: parent.top anchors.topMargin: 8 anchors.left: parent.left anchors.leftMargin: 8 font.bold: true font.pixelSize: 14 MouseArea { anchors.fill: parent cursorShape: Qt.PointingHandCursor onClicked: Qt.openUrlExternally(parent.url) } } Text { id: summaryText y: 51 height: 42 color: "#002f7b" text: "Create a Global permission for Auditing teams to have full read only access to the instance" anchors.right: parent.right anchors.rightMargin: 8 anchors.left: parent.left anchors.leftMargin: 8 wrapMode: Text.WordWrap font.pixelSize: 15 textFormat: Text.PlainText } Image { id: priorityImage x: 276 width: 16 height: 16 anchors.top: parent.top anchors.topMargin: 9 anchors.right: parent.right anchors.rightMargin: 8 source: "minor.svg" } Image { id: typeImage x: 276 width: 16 height: 16 anchors.top: parent.top anchors.topMargin: 9 anchors.right: priorityImage.left anchors.rightMargin: 4 source: "" } Text { id: dateText x: 198 y: 31 color: "#949090" text: "13.03.2018 17:11" anchors.right: parent.right anchors.rightMargin: 8 font.pixelSize: 12 } Text { id: creatorText y: 31 color: "#949090" text: "Chung Park Chan" anchors.left: parent.left anchors.leftMargin: 8 font.pixelSize: 12 } Text { id: assigneeText x: 218 y: 128 text: "Kiran Shekhar" anchors.bottom: parent.bottom anchors.bottomMargin: 8 anchors.rightMargin: 8 anchors.right: parent.right font.pixelSize: 12 } } To fill the card on request, add a new property ( property ) issue . The property will give us the opportunity to transfer to the card a request with all its contents from the outside for one assignment.
property var issue: null And in the signal for its change, we will write a code that parses the values and pushes them into the desired visual components.
onIssueChanged: { var self = JS.getValue(issue,"self") var re = new RegExp("(https*:\/\/[^\/]+\/).+") var key = JS.getValue(issue,"key") var url = self.replace(re,'$1')+'browse/'+key keyText.text = key keyText.url = url summaryText.text = JS.getValue(issue,"fields/summary") dateText.text = (new Date(JS.getValue(issue,"fields/created"))).toLocaleString() creatorText.text = JS.getValue(issue,"fields/creator/displayName") var v = JS.getValue(issue,"fields/assignee/displayName") assigneeText.text = v === null ? "(no assigned)" : v var img = JS.getValue(issue,"fields/priority/iconUrl") var txt = JS.getValue(issue,"fields/priority/name") priorityImage.source = typeof img == 'undefined' || img === null ? "" : img img = JS.getValue(issue,"fields/issuetype/iconUrl") typeImage.source = typeof img == 'undefined' || img === null ? "" : img } As you can see, here I often use the JS.getValue function, I wrote it to simplify fetching a value from a complex JSON structure (if it is there), although the function itself is quite simple:
function getValue(json, path) { var arr = path.split('/'); for(var i=0; i<arr.length && json; i++) { json = json[arr[i]]; } return json; } The function lies in the methods.js file, connected at the start of IssueCard.qml
We describe the column of cards
Now you need to organize the cards in a scrollable vertical column. Scrolling is very convenient when there are many cards. To scroll, you need a ListView. Among the examples bundled with Qt is an example of "QML Dynamic View Ordering Tutorial 3 - Moving Dragged Items", in it dynamicview.qml is practically what we need, we copy it into a project under the name KanbanColumn.qml.
Just need to make a couple of improvements
1) Add a header to the column and make a property on the top-level object to assign the name of the column from the outside.
Code
Rectangle { id: root // property string title: "" ... // // Rectangle { id: titleRect anchors { top: parent.top left: parent.left right: parent.right margins: 2 } color: "#cfe5ff" height: titleText.height+10 Text { id: titleText text: root.title font.bold: true horizontalAlignment: Text.AlignHCenter font.pointSize: 12 anchors.centerIn: parent } } } 2) Since the request card is now a separate whole object, we replace the output made in the example through the Column and several Text with our IssueCard
It was
Rectangle { id: content ... width: dragArea.width; height: column.implicitHeight + 4 color: dragArea.held ? "lightsteelblue" : "white" Behavior on color { ColorAnimation { duration: 100 } } radius: 2 ... Column { id: column anchors { fill: parent; margins: 2 } Text { text: 'Name: ' + name } Text { text: 'Type: ' + type } Text { text: 'Age: ' + age } Text { text: 'Size: ' + size } } } It became
Item { id: content ... width: dragArea.width; height: card.height + 4 ... IssueCard { id: card issue: issueRecord anchors { fill: parent; margins: 2 } } // Rectangle { anchors.fill: parent color: "lightsteelblue" visible: dragArea.held // opacity: 0.5 } } With the column designer does not help us, because he does not digest DelegateModel. On the other hand, we don’t really need it, everything can be done manually.
Board window
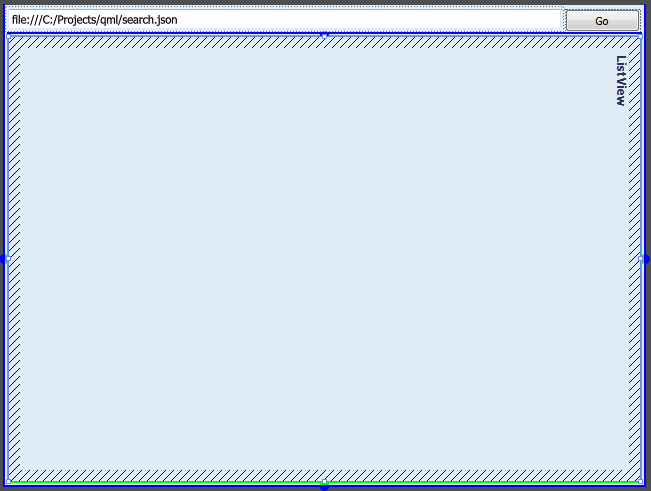
Now you need to collect the column in the general window. We create the KanbanWindow.qml file, in it the designer places the necessary fields.
In its simplest form, it turns out like this:
KanbanWindow.qml
import QtQuick 2.0 import QtQuick.Controls 1.2 Rectangle { id: rectangle1 width: 640 height: 480 color: "#e0edf6" clip: true Item { id: row1 anchors { top: parent.top left: parent.left right: parent.right margins: 4 } height: queryTE.height TextField { id: queryTE text: "file:///C:/Projects/qml/search.json" anchors.rightMargin: 4 anchors.right: goButton.left anchors.left: parent.left anchors.leftMargin: 0 } Button { id: goButton text: qsTr("Go") anchors.right: parent.right onClicked: JS.readIssues(queryTE.text) } } ListView { anchors{ top: row1.bottom bottom: parent.bottom right: parent.right left: parent.left margins: 4 } orientation: ListView.Horizontal clip: true } } In the ListView, you need to specify in the
delegate property that the model elements will be displayed in the form of KanbanColumn columns, in each of which you need to pass a list of requests, let's call it issueList . We will also create an empty model and also give it the name model . Rectangle { property var mainModel: [] ... ListView { ... model: ListModel { id: model } delegate: KanbanColumn { anchors.top: parent.top anchors.bottom: parent.bottom // 'groupName' title: groupName issues: issueList } } } Above, I also created the
mainModel property - it will serve us for temporary storage of data.And do not forget to insert KanbanWindow into the application window:
ApplicationWindow { id: applicationWindow1 visible: true width: 649 height: 480 title: qsTr("Hello World") ... KanbanWindow { anchors.fill: parent } } Writing code to call the REST API
It's time to make the code that will receive the list of requests from Jira and fill in the models in QML.
In QML there is, albeit limited, but support for XMLHttpRequest and JSON parser (there is a detailed BlackRaven86 article on Habré ). Therefore, we have everything to write an appeal to the server and analysis of the answer.
function readIssuesSimple(queryUrl) { var doc = new XMLHttpRequest(); doc.onreadystatechange = function() { if (doc.readyState == XMLHttpRequest.DONE) { var data = JSON.parse(doc.responseText); mainModel = data["issues"] model.clear() var list = mainModel // var gPath = "fields/assignee/displayName" var models = {} for(var i in list) { var item = list[i] var g = getValue(item, gPath) if(!(g in models)) models[g] = [] models[g].push({ issueRecord: item } ) } // , QML // , for(g in models) { var iss = models[g] if(g === null) g = '(null)' // 'model' - QML model.append({ groupName: g, issueList: iss }); } } } doc.open("GET", queryUrl); doc.send(); } The function requests from the server (or from a local file) a list of requests, parses the json from the response, groups the requests by performers and fills the model in QML.
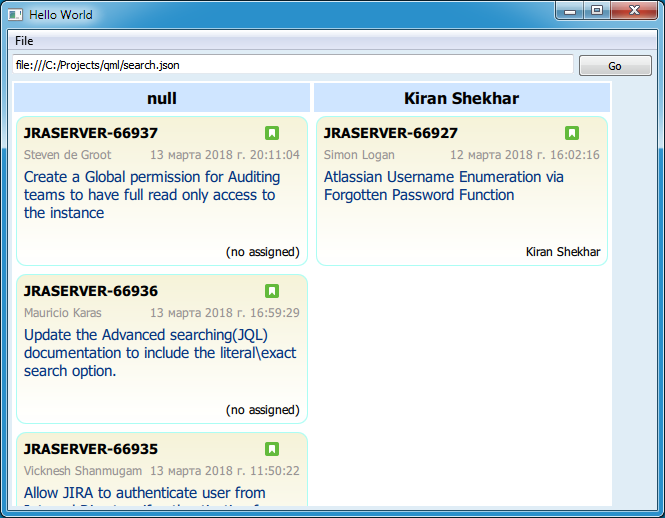
We connect function to the button
Button { id: goButton text: qsTr("Go") anchors.right: parent.right onClicked: JS.readIssuesSimple(queryTE.text) } And check the work:
gif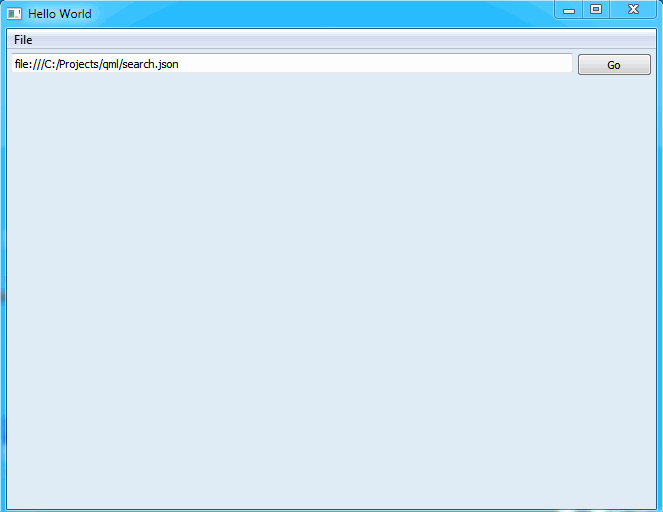
Basically, the board is ready. Then you can deal with its improvements and development.
I almost forgot - when you try to specify a URL to a real Jira server, for example, like this:
https://jira.atlassian.com/rest/api/2/search?maxResults=50&jql=project = JRASERVER and updated <= -1w and assignee is not ORDER BY updated ASC
and you are under Windows, then you most likely will not succeed. The problem in SSL - Qt Creator, running the program under the debugger, does not set the path to the OpenSSL libraries in the environment. Copy the libeay32.dll and ssleay32.dll to the created file and enjoy.
LocalStorage to save and restore settings
In order not to enter the URL to the Jira server each time, it is worth saving the entered string and restoring it at startup. And yes, QML can do LocalStorage.
Let's write functions for reading and saving parameters.
function loadSettings() { var dbConn = LocalStorage.openDatabaseSync("JKanban", "1.0", "", 1000000); dbConn.transaction( function(tx) { // Create the database if it doesn't already exist tx.executeSql('CREATE TABLE IF NOT EXISTS Settings(skey TEXT, svalue TEXT)'); var rs = tx.executeSql('select skey, svalue from Settings') var r = "" var c = rs.rows.length for(var i = 0; i < rs.rows.length; i++) { var skey = rs.rows.item(i).skey var svalue = rs.rows.item(i).svalue if(skey === 'query') queryTE.text = svalue } } ) } function saveSetting(skey, svalue) { var dbConn = LocalStorage.openDatabaseSync("JKanban", "1.0", "", 1000000); dbConn.transaction( function(tx) { tx.executeSql('delete from Settings where skey = ?', [ skey ]); tx.executeSql('INSERT INTO Settings VALUES(?, ?)', [ skey, svalue ]); } ) } Add a call to save parameters ...
function readIssuesSimple(queryUrl) { saveSetting('query',queryUrl) ... and restoring them when creating KanbanWindow
Rectangle { id: rectangle1 width: 640 height: 480 color: "#e0edf6" clip: true Component.onCompleted: JS.loadSettings() .... Add grouping options
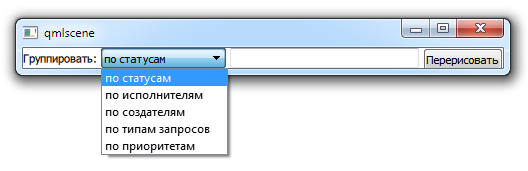
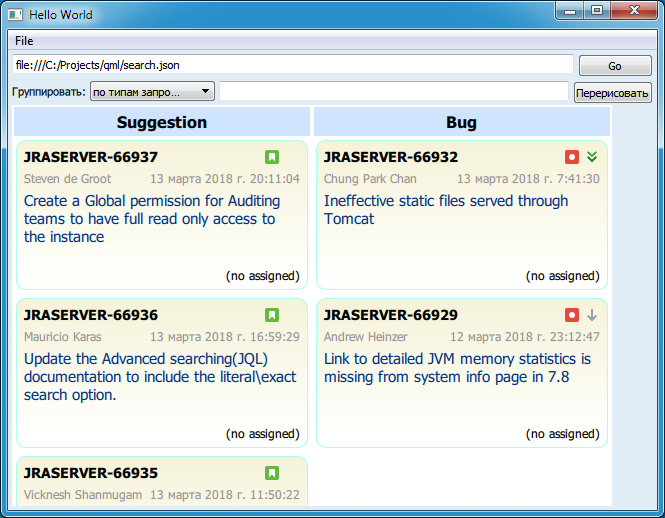
Having grouped by artist, it is logical to make the choice of other grouping options - by status, by priority, and so on. This is how the panel of parameters for grouping KanbanParams.qml appeared.
KanbanParams.qml
import QtQuick 2.0 import QtQuick.Controls 1.2 import QtQuick.LocalStorage 2.0 import "methods.js" as JS Item { width: 480 height: cbGroupField.height property alias groupVariant: cbGroupField.currentIndex property string groupValuePath: cbGroupField.model.get(cbGroupField.currentIndex).namePath property alias groupList: groupsTE.text Text { id: label height: cbGroupField.height text: qsTr(":") verticalAlignment: Text.AlignVCenter } ComboBox { id: cbGroupField anchors { left: label.right; leftMargin: 4 } model: ListModel { ListElement { text: qsTr(" ") namePath: "fields/status/name" } ListElement { text: qsTr(" ") namePath: "fields/assignee/displayName" } ListElement { text: qsTr(" ") namePath: "fields/creator/displayName" } ListElement { text: qsTr(" ") namePath: "fields/issuetype/name" } ListElement { text: qsTr(" ") namePath: "fields/priority/name" } } } TextField { id: groupsTE text: '' anchors { right: buttonGroups.left rightMargin: 4 left: cbGroupField.right leftMargin: 4 } } Button { id: buttonGroups text: qsTr("") anchors.right: parent.right onClicked: JS.repaintKanban() } } As you can see, here the ComboBox contains a model with possible grouping options, and each element is assigned a JSON path to the value that will be used to define the group. Thus, the number of options for groupings can be expanded if desired.
At the top level, properties are defined, two of which are aliases to internal values. Aliases are needed so that you can assign the desired value, read from LocalStorage. As for the groupValuePath property:
property string groupValuePath: cbGroupField.model.get(cbGroupField.currentIndex).namePath then it simply returns the path to the value for the current grouping option.
Paste KanbanParams into KanbanWindow and we get this window:
I will not describe in detail how the parameters are processed,
What's next?
The resulting board can already be used to view the current situation with queries, but you can improve it:
- Sort the cards into columns. For example, by priority request. And the color differentiation of
pants, sorry, requests for priorities and types of requests. I tried it - very convenient, I recommend. - Drag and drop cards between columns and assign a value corresponding to the new column. By the way, the status cannot be changed in this way, since in Jira the status does not change by assignment, but by transition.
- Make the input of new requests directly to the board.
- For the previous two points, authorization is required. Need to do.
- Since there is nothing here but QML, the project can be built under Android and iOS - it should work without alterations.
The code is posted on GitHub .
Source: https://habr.com/ru/post/351390/
All Articles