Introduction to Postman

“Developing an API is tricky, Postman makes it easy.” © Postdot Technologies, Inc
When you see the description of the tools Postman - breathtaking, waking up the feeling of absolute power over their future child. It seems that the “monsters” that have been bred in the past will finally fall before you!
In this article we will talk about Postman and try to write your first script.
Postman
The main purpose of the application is to create collections with requests to your API. Any developer or tester, opening a collection, can easily understand the work of your service. In addition, Postman allows you to design an API design and create a Mock server based on it. Your developers no longer need to spend time creating stubs. Server and client implementations can be launched simultaneously. Testers can write tests and perform automated testing directly from Postman. And tools for automatic documentation of descriptions from your collections will save time for another "useful feature." There is something for administrators - the authors have provided the possibility of creating collections for monitoring services.
Introduction
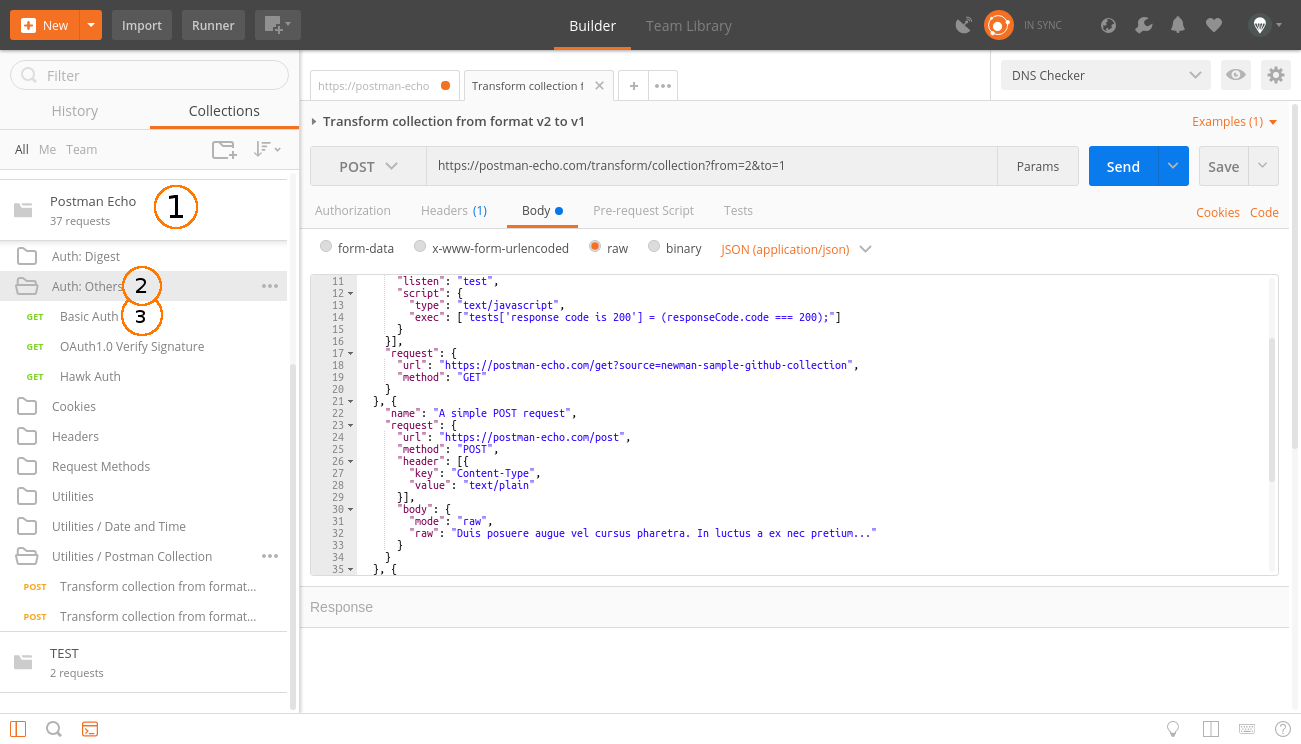
1 - collection, 2 - folder, 3 - request
The main concepts that Postman operates on are the Collection at the top level, and the Request at the bottom level. All work begins with a collection and comes down to describing your API using queries. Let's take a closer look at everything in order.
Collection
The collection is the starting point for the new API. You can view the collection as a project file. The collection combines all related queries. Usually, the API is described in one collection, but if you wish, there are no restrictions to do otherwise. A collection can have its own scripts and variables, which we will look at later.
Folder
Folder - used to combine queries into one group within the collection. For example, you can create a folder for the first version of your API - "v1", and inside you can group queries according to the meaning of the actions performed - "Order & Checkout", "User profile", etc. Everything is limited only by your imagination and needs. A folder, like a collection, can have its own scripts, but not variables.
Request
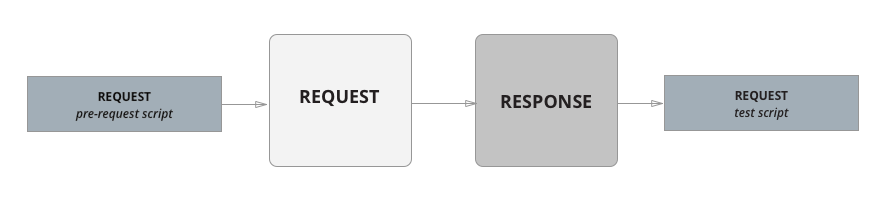
Request - the main component of the collection, for the sake of which everything was started. The request is created in the constructor. Query Designer is the main space you will have to work with. Postman is able to execute requests using all standard HTTP methods, all request parameters are under your control. You can easily change or add the headers, cookies, and request body you need. The request has its own scripts. Note the tabs "Pre-request Script" and "Tests" among the request parameters. They allow you to add scripts before and after the query. These two features make Postman a powerful tool to help with development and testing.

1 - tabs with queries, 2 - URL and method, 3 - query parameters, 4 - response parameters
Scripts
"Postman Sandbox" is a JavaScript runtime available when writing "Pre-request Script" and "Tests" scripts. "Pre-request Script" is used to perform the necessary operations before the request, for example, you can make a request to another system and use the result of its execution in the main request. "Tests" is used to write tests, check the results, and, if necessary, save them to variables.
The sequence of the request (from the office. Documentation)
In addition to scripts at the request level, we can create scripts at the folder level, and even at the collection level. They are also called “Pre-request Script” and “Tests”, but their difference is that they will be executed before and after each request in the folder, or, as you might guess, in the entire collection.
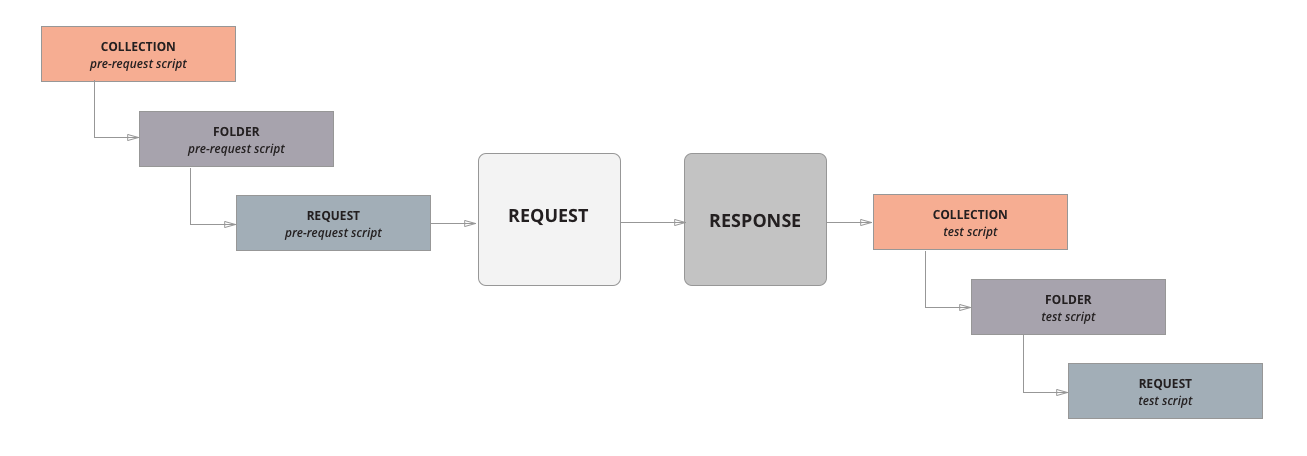
The sequence of the query with the scripts of folders and collections (from the office. Documentation)
Variables
Postman has several spaces and scopes for variables:
- Global variables
- Collection variables
- Environment variables
- Local variables
- Data level variables
Global variables and environment variables can be created by clicking on the gear in the upper right corner of the program. They exist separately from collections. Collection-level variables are created directly when editing collection parameters, and local variables from executed scripts. There are also data level variables, but they are only available from Runner, which we will discuss later.
![image [image]](https://habrastorage.org/getpro/habr/post_images/069/3b2/45b/0693b245b5f7d9defa176ecfa04ee4bb.png)
Priority of variable spaces (from office documentation)
The peculiarity of variables in Postman is that you can insert them in the request constructor, in the URL, in the POST parameters, in the Cookie, everywhere, using curly brackets as placeholders for substitution.

{{domain}} and {{slack_incoming_webhook}} - DNS Checker environment variables will be replaced with values during the execution of the query
Variables are also available from scripts, but calling the standard method of the built-in library pm will help:
// pm.globals.get("variable_key"); // pm.environment.get("variable_key"); // pm.variables.get("variable_key"); Collection runner
Designed to test and execute all requests from a collection or folder of your choice. At startup, you can specify the number of iterations, the number of times the folder or collection, the environment, and an additional file with variables will be launched. It is worth mentioning that requests are executed sequentially, according to the location in the collection and folders. The order of execution can be changed using the built-in command:
// "Create order", postman.setNextRequest('Create order'); After all the requests are completed, a report is generated that will show the number of successful and failed checks from the "Tests" scripts.
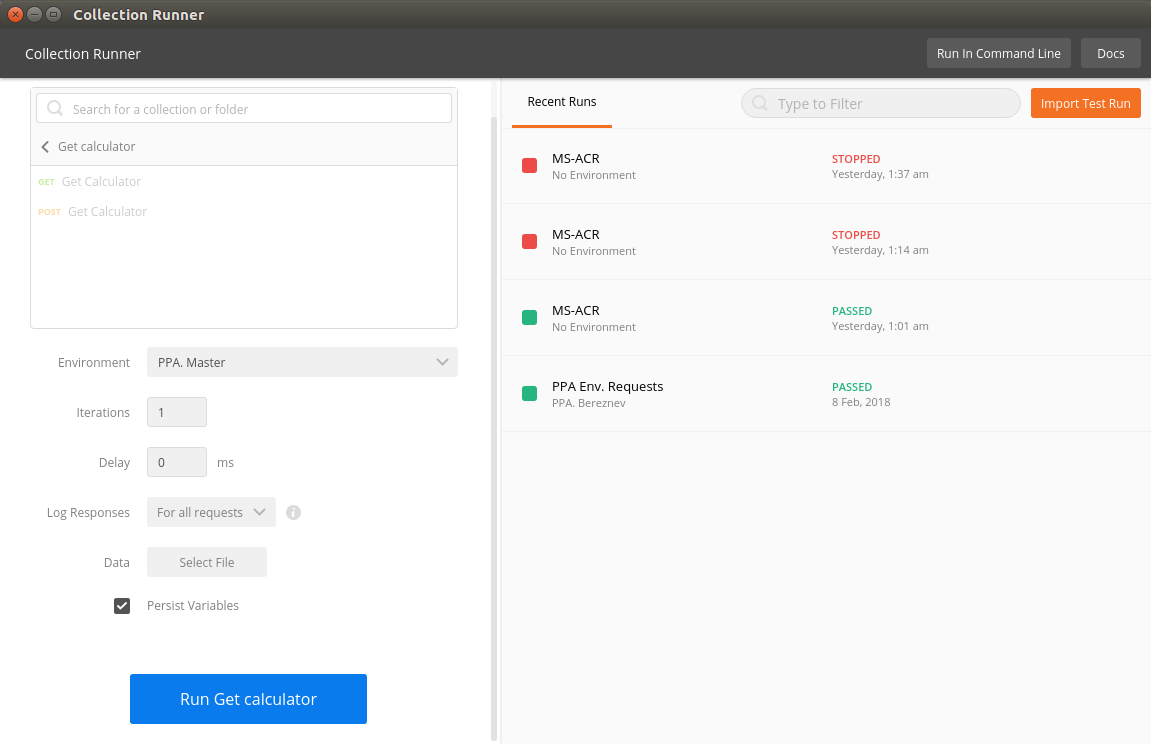
Collection runner
Console
Use the console to debug your scripts, and view additional information on requests. The console works both during the launch of a single query and during the launch of a batch of queries through Runner. To open it, find the console icon in the lower left corner of the main application screen:

Practice
Since the creation of collections and queries in the designer should not cause difficulties, the practical part is devoted to writing scripts, and consider how to create a chain of queries with tests. Before you start, create a new collection, name it “Habra”, then create a new environment called “Habra.Env”
Step 1
Create a new request, specify https://postman-echo.com/get?userId=777 as the URL, and leave the method as GET. Hereinafter, for simplicity and convenience, we will use the echo-server kindly provided by Postman developers. Save the request to the “Habra” collection and name it “Get user id”, it will simulate getting the user ID from the server. Go to the "Tests" tab and write the following code:
// pm.test("Status is ok, response is json", function () { pm.response.to.be.ok; // pm.response.to.be.json; // }); try { // userId json pm.environment.set("userId", pm.response.json().args.userId); } catch(e) { // console.log(e); } Using this script, we checked the status and format of the response, and also saved the user ID obtained from the response in an environment variable for later use in other queries. To test our test run the query. You should see the green label “PASS” in the “Tests” tab in the answer information panel, and “Status is ok, response is json” next to it.
Step 2
Now let's try to insert our user ID in json request. Create a new request, specify https://postman-echo.com/post as the URL, select the POST method, set the type for the request body as raw - application / json, and paste it into the body itself:
{"userId": {{userId}}, "username": "Bob"} Save the query to our collection, and name it "Update username", it will request an improvised endpoint to update the username of the user. Now, when calling the request, instead of {{userId}}, the system will automatically substitute the value from the environment variable. Let's check that this is true and write a small test for our new query:
// pm.test("Status is ok, response is json", function () { pm.response.to.be.ok; pm.response.to.be.json; }); // , userId userId pm.test("userId from env is equal to userId from response", function () { pm.expect(parseInt(pm.environment.get("userId"))).to.equal( pm.response.json().data.userId ); }); In our new test, we compare the userId received from the server with what is stored in our environment variable, they should be the same. Run the query and make sure the tests pass. Ok, move on.
Step 3
You may have noticed that two test scripts have the same format and status checks:
pm.test("Status is ok, response is json", function () { pm.response.to.be.ok; pm.response.to.be.json; }); Until we go too far, let's correct this situation and transfer these tests to the collection level. Open the editing of our collection, and transfer the format and status check to the "Tests" tab, and you can remove them from the requests. Now these checks will be automatically called before the "Tests" scripts for each request in the collection. Thus, we got rid of copying this check to each request.
Step 4
We learned how to record and get environment variables, it’s time to move on to something heavier. Let's use the built-in tv4 library (TinyValidator) and try to verify the correctness of the json object schema. Create a new request, use https://postman-echo.com/post as the URL, set the method to POST, specify raw - application / json for the request body, and paste it into it:
{ "profile" : { "userId": {{userId}}, "username": "Bob", "scores": [1, 2, 3, 4, 5], "age": 21, "rating": {"min": 20, "max": 100} } } After launching the request, the echo server should return our json model to us as a response in the "data" field, so we simulate the operation of a real server that could send us information about Bob’s profile. The model is ready, we will write a test that checks the correctness of the scheme:
// var profile = pm.response.json().data.profile; // var scheme = { // "type": "object", // "required": ["userId", "username"], // "properties": { "userId": {"type": "integer"}, "username": {"type": "string"}, "age": {"type": "integer"}, // "scores": { "type": "array", // "items": {"type": "integer"} }, // "rating": { "type": "object", "properties": { "min": {"type": "integer"}, "max": {"type": "integer"} } } } }; pm.test('Schema is valid', function() { // profile scheme var isValidScheme = tv4.validate(profile, scheme, true, true); // , true pm.expect(isValidScheme).to.be.true; }); Done, we validated the profile of the profile object. Run the query and make sure the tests pass.
Step 5
We got a little way from 3 queries and several tests. It is time to fully test it. But before that, let's make a small modification to our first request: replace the value “777” in the URL with the placeholder “{{newUserId}}”, and add the variable “newUserId” with the value “777” through the interface . Create a users.json file on your computer and put the following json array there:
[ {"newUserId": 100}, {"newUserId": 200}, {"newUserId": 300}, {"newUserId": 50000} ] Now run Runner. For "Collection Folder", select "Habra". As the "Environment" put "Habra.Env". The number of iterations is left 0, and in the field "Data" we select our users.json file. With this file, "Collection Runner" will understand that it needs to perform 4 iterations, and in each iteration it will replace the value of the variable "newUserId" with the value from the array in the file. If you specify the number of iterations more than the number of elements in the array, then all subsequent iterations will occur with the last value from the data array. In our case, after 4 iterations, the value of "newUserId" will always be 50,000. Our “Data” file will help us go all our way with different newUserId, and make sure that everything is stable regardless of the user.
Run our tests by clicking "Run Habra". Congratulations, you have successfully created a collection and tested our improvised way with the help of autotests!
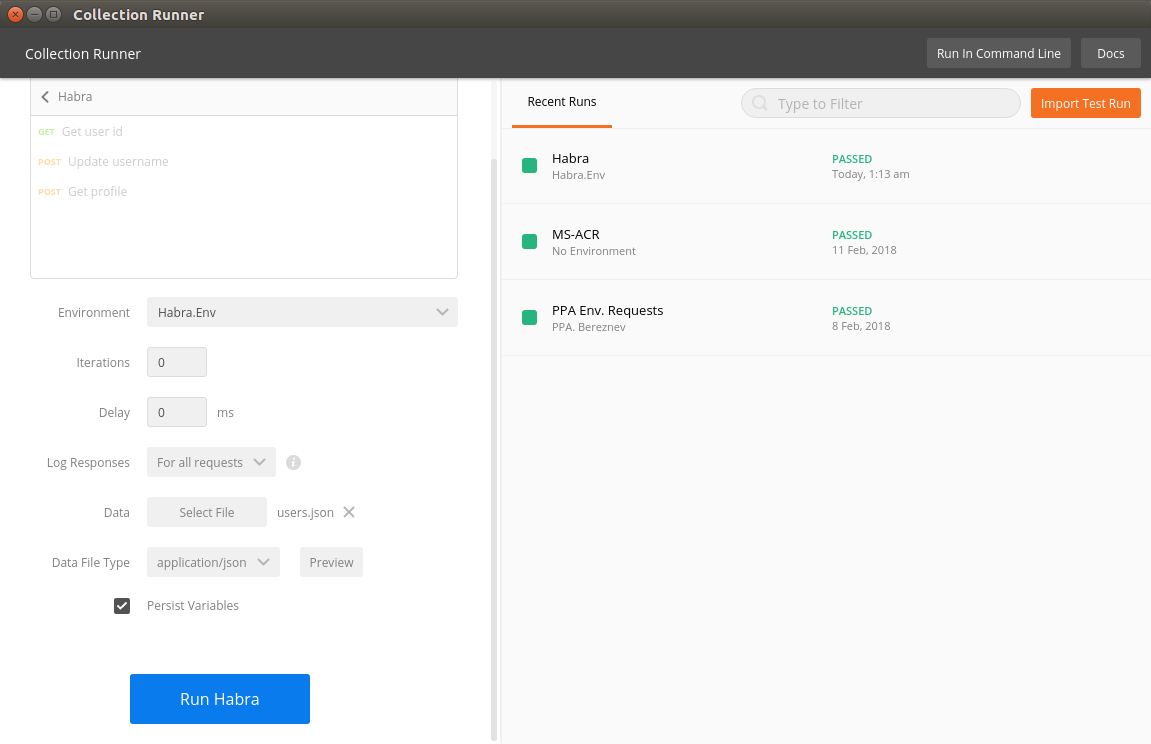
Testing the collection "Habra"
Now you know how to create scripts and you can easily write a couple of tests for your project.
Separately, I want to note that in a real project we do not keep all requests in the root of the collection, but try to arrange them in folders. For example, in the folder "Requests" we add all possible requests describing our API, and store the tests in a separate folder "Tests". And when we need to test a project, in Runner we run only the Tests daddy.
Good to know
In conclusion, we give the basic commands that you may need while writing scripts. For better learning, try to play with them yourself.
Setting and getting variables
// pm.globals.set(“key”, “value”); pm.globals.get(“key”); // pm.environment.set(“key”, “value”); pm.environment.get(“key”); // pm.variables.set(“key”, “value”); pm.variables.get(“key”); // , Testing or asserts
// assert pm.test(“ ”, function () { pm.response.to.be.success; pm.expect(“value”).to.be.true; pm.expect(“other”).to.equal(“other”); }); // tests tests[“ ”] = (“a” != “b”); tests[“ 2”] = true; Making requests
// get pm.sendRequest(“https://postman-echo.com/get”, function (err, res) { console.log(err); console.log(res); }); // post let data = { url: “https://postman-echo.com/post”, method: “POST”, body: { mode: “raw”, raw: JSON.stringify({ key: “value” })} }; pm.sendRequest(data, function (err, res) { console.log(err); console.log(res); }); Receive response for main request
pm.response.json(); // json pm.response.text(); // responseBody; // The answer is available only in the “Tests” tab.
Work with built-in libraries
Documentation regulates the presence of a number of built-in libraries, among which is tv4 for validating json, xml2js xml to json converter, crypto-js for working with encryption, atob, btoa, etc.
// xml2js var xml2js = require(“xml2js”); // xml json xml2js.parseString("<root>Hello xml2js!</root>", function(err, res) { console.log(res); }); Some of the libraries, such as tv4, do not require a direct connection through require and are accessible by name immediately.
Getting information about the current script
pm.info.eventName; // test prerequest pm.info.iteration; // Runner pm.info.iterationCount; // pm.info.requestName; // pm.info.requestId; // Managing the sequence of requests from the script
It should be noted that this method works only in the run mode of all scripts.
// postman.setNextRequest(“ ”); // postman.setNextRequest(ID); // // postman.setNextRequest(null); After moving to the next request, Postman returns to linear sequential query execution.
Creating a global helper
In some cases, you will want to create functions that should be available in all requests. To do this, in the first request in the section “Pre-request Script” write the following code:
// pm.environment.set("pmHelper", function pmHelper() { let helpers = {}; helpers.usefulMethod = function() { console.log(“It is helper, bro!”); }; return helpers; } + '; pmHelper();'); And in the following scripts we use it like this:
// var pmHelper = eval(pm.environment.get("pmHelper")); // pmHelper.usefulMethod(); This is just a small list of useful commands. The possibilities of scripts are much wider than can be covered in one article. Postman has some nice "Templates" that can be found when creating a new collection. Feel free to pry and study their implementation. And the official documentation contains answers to most questions.
Conclusion
The main advantages that prompted us to use Postman in your project:
- Visibility - all requests are always at hand, manual testing during development becomes easier
- Quick start - the involvement of a new player in a team, be it a programmer or a tester, passes easily and quickly
- Tests - the ability to write tests for requests, and then quickly make up of them, like puzzles, various options and ways of life of the application
- CI support - the ability to integrate tests into CI with the help of newman (this will be a separate article)
Among the minuses are:
- Editing the collection is tied to Postman, i.e., for changes, you will need to import, edit, and then export to the project repository
- Since the collection is in one big json file, Review changes are almost impossible.
Each project has its own approaches and views on testing and development. We saw more advantages for ourselves than minuses, and therefore we decided to use this powerful tool both for testing and for describing requests to the API of our project. And we can say from our own experience, even if you don’t use the testing tools that Postman provides, then having a collection of queries as a collection will be very useful. Collections Postman is a live, interactive documentation for your API, which will save a lot of time and speed up development, debugging and testing at times!
PS:
The basic functionality of Postman is free and meets daily needs, but there are some tools with a number of limitations in the free version:
- Postman API - allows you to access your account data, add, delete and update collections, requests, and other information programmatically, directly through the API. You can refer to it 1000 times a month.
- Mock server - allows you to deploy stubs for your API on Postman developer servers. Available 1000 requests per month.
- Api Monitoring - allows you to create collections for monitoring and launch them on a schedule from Postman developer servers. The monitoring system will make for you no more than 1000 requests per month
- Api Documentation - allows you to publish automatically generated documentation on the Postman application servers. Limit 1000 views per month
')
Source: https://habr.com/ru/post/351250/
All Articles