JD Humanoid Robot and Microsoft Cognitive Services
Today we will tell you about one interesting project. It used Microsoft Cognitive Services , which makes it easy to apply artificial intelligence technology by calling the REST API (and no training is needed). And all this with the example of the cute robot JD Humanoid. More under the cut!

Cognitive Services also contains client libraries for various programming languages, which further simplifies their use. We decided to integrate these services into an application created to control the JD Humanoid robot of EZ (hereinafter, we will call it simply “EZ robot”). We chose this particular humanoid robot, since it is quite simple to assemble. In addition, .NET, UWP SDK and even Mono SDK are attached to it, which opens up wide possibilities for its implementation with individual settings.
')
The package also includes the EZ Builder application , which allows you to control the EZ robot and implement specific scenarios based on built-in functional plug-ins and Blockley blocks. It is mainly intended for educational purposes, but it also has a “movement creator” function, which allows you to create robot movements and export them for use in applications created using the SDK. Of course, this application is featuring a starting point for setting up and getting started with any EZ robot.
The application is based on the existing Windows Forms project , which uses the EZ robot's own capabilities and efficiently implements the work with the camera. Taking this application as a basis, we expanded it and connected it to the following Cognitive Services: Face API, Emotion API, Speech API, Voice Recognition API, Language Understanding Intelligent Service, Speaker Recognition API, Computer Vision API, Custom Vision API. Due to this, the robot has new features:
The cognitive capabilities of the robot are demonstrated in this video.
Later in this document, we briefly describe how to work with the SDK of the EZ robot, as well as describe in detail the implementation scenarios using Cognitive Services.
The main prerequisite for working with the application is the ability to connect to the robot from the code of our application, call movements and receive incoming images from the camera. The application runs on the developer's computer, since the EZ robot does not have its own runtime and storage environment where it would be possible to place and run the application.
Thus, it works on a computer that connects to the EZ robot via a WiFi network, directly through an access point turned on by the robot itself (AP mode), or via a WiFi network created by another router (client mode). We chose the second option because it supports an Internet connection when developing and launching an application. Network settings when working with an EZ robot are described in detail here . When connected to the WiFi network, the EZ robot is assigned an IP address, which is later used to connect to the robot from the application. When using the SDK, the procedure is as follows:
Since the EZ robot camera is an isolated network device, we must connect to it for further use.
The official documentation of the EZ robot SDK package contains detailed examples of calling the special functions of the EZ robot, which become available after connecting to it.
The SDK allows you to interact with the robot's servomotor and control its movements. In order to create motion, it is necessary to specify frames (specific positions) and actions consisting of a set of such frames. Implementing it manually in code is not very easy, but in the EZ Builder application you can define frames, create actions from them, and then export them to code and use them in the application. To do this, we need to create a new project in EZ Builder, add the Auto Position plug-in and click the button with the gear image.
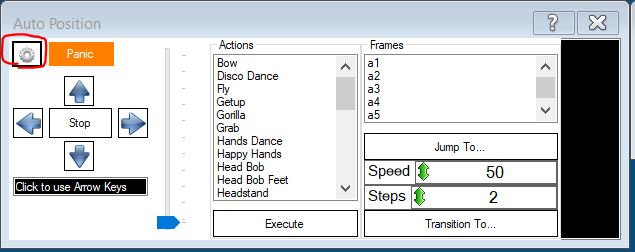
Figure 1. Auto Position Plugin
In the future, you can create new frames in the Frames panel, changing the angles of the robot servos. The next step is to create the necessary movements from the existing frames on the Action panel.
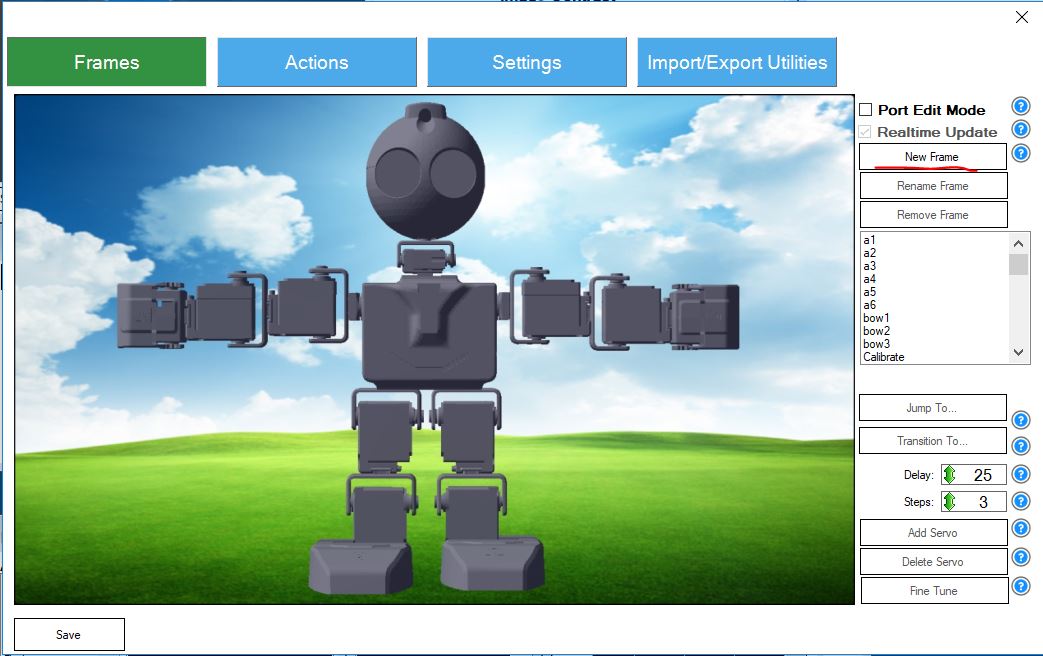
Figure 2. Auto Position frames
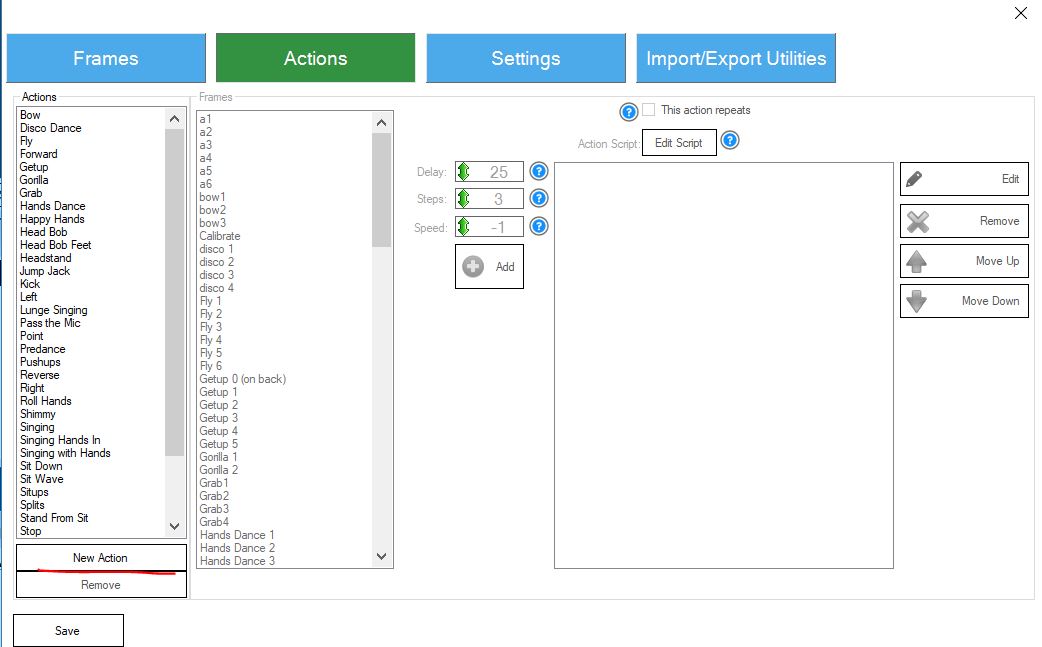
Figure 3. Auto Position actions
The created action can be exported via the import / export toolbar.
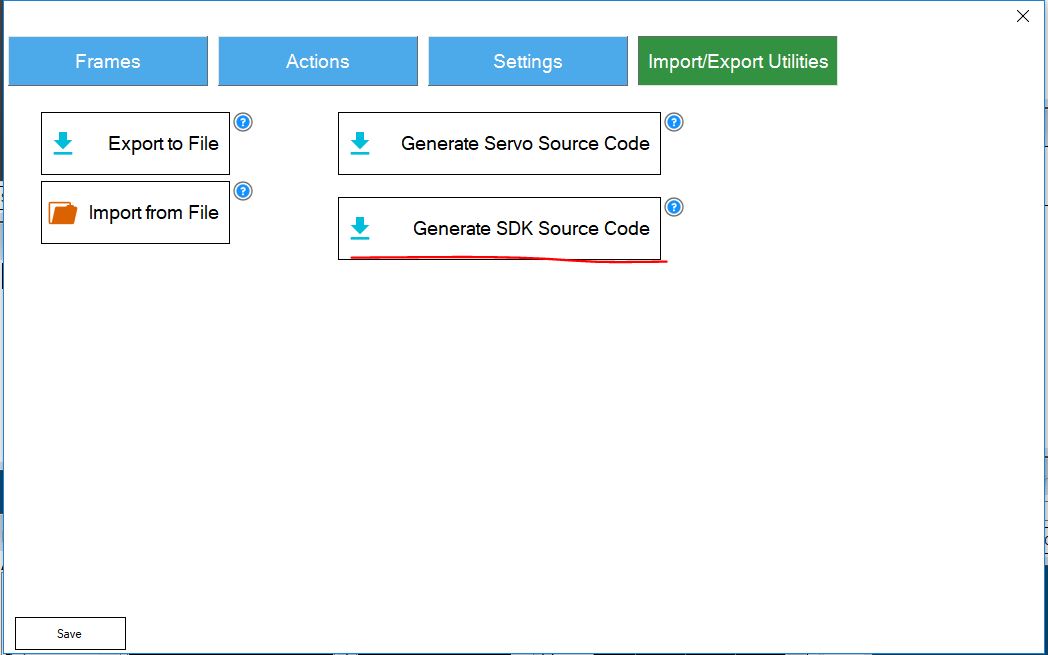
Figure 4. Exporting the source code of the Auto Position plugin
When you finish exporting the action, you can copy the code and paste it into your application. If we use different positions, we should rename the class AutoPositions, giving it a name that accurately reflects the type of movement. Then it can be used in the code as follows:
Since in the application we use images from the robot's camera as input data when calling Cognitive Services, we need to find a way to get these images. It is done this way.
As already mentioned, the application runs on the developer’s computer and simply sends commands to the robot. The robot does not have its own runtime. If you need to synthesize speech (in other words, you want the robot to utter a couple of phrases), then you need to choose one of the two options offered by the SDK. The first option involves the use of a standard audio device: the sound will be played by the developer’s computer, not by the speaker of the robot. This option is useful when you need a robot to speak through a computer speaker, for example, during presentations. However, in most cases, it is desirable that the sound is reproduced by the robot itself. Below is the implementation of both variants of calling the audio function using the SDK:
In this section, we will look at specific cognitive function scenarios implemented in the robot control application.
You can trigger the robot by giving voice commands through a microphone connected to the developer’s computer, since the EZ robot itself doesn’t have a microphone. We first used the EZ robot SDK for speech recognition. As it turned out, the recognition was not accurate enough, and the robot performed the wrong actions based on incorrectly understood commands. To increase recognition accuracy and freedom of action when submitting commands, we decided to use the Microsoft Speech API , which converts speech to text, as well as the Language Understanding Intelligent Service ( LUIS ) service to recognize the action required by a particular command. Use the links to these products to get more information about them and get started.
First you need to create an LUIS application, in which the necessary actions are attached to each team. The process of creating a LUIS application is described in this guide to get started. LUIS offers a web-based option where you can easily create an application and specify the desired actions. If necessary, you can also create entities that the LUIS application will recognize by the commands sent to the service. The result of exporting the LUIS application is contained in this repository in the LUIS Mode l folder.
After preparing the LUIS application, we implement the following logic: waiting for voice commands, calling the Microsoft Speech API, calling the LUIS recognition service. As a basis for this functionality, we used the following sample.
It contains the logic of recognizing long and short phrases from a microphone or from a .wav file and then recognizing the action by LUIS or without it.
We used the MicrophoneRecognitionClientWithIntent class, which contains functions for microphone command waiting, speech recognition, and the required action. In addition, the call function for waiting for short phrases is performed using the SayCommandButton_Click descriptor.
The command call logic uses the OnIntentHandler descriptor - here we analyze the response received from the LUIS service.
To implement the function of recognizing faces and emotions, we used the Face API and Emotion API services. Following the links above, you can learn more about these services and how to get started with them, get instructions on creating an API key and integrating services into your application.
EZ is able to recognize faces using the SDK. Calling Cognitive Services is not required. However, this is only a basic type of face recognition without additional parameters (for example, age, gender, facial hair, etc.). But we still use this local recognition function: it will help you to understand that there is a face in the image. After that, we will use the Cognitive Services Face API to get additional face parameters. This eliminates the need for unnecessary API calls.
The EZ robot's face recognition function also provides information on the location of the face in the picture. We decided to use this so that the robot turned its head and its camera was aimed directly at the face. We borrowed this code from the Win Form application as the basis of our project. At the same time, we added a sensitivity parameter that determines the speed of movement and adjustment of the position of the robot head.
So, in order for the Face API to identify specific people, we need to create a group of such people, register them and train the recognition model. We managed to do this effortlessly using the Intelligent Kiosk Sampl e application. The application can be downloaded from github . Remember to use the same Face API key for the Intelligent Kiosk application and the robot application.
For greater accuracy of face recognition, it is advisable to train the model on image samples taken by a camera that will be used later (the model will be trained on images of the same quality, which will improve the performance of the Face Identification API interface). To do this, we implemented our own logic, the execution of which allows you to save images from the camera of the robot. In the future, they will be used to train Cognitive Services models:
Next, we run the HeadTracking method, which performs the function of tracking, identifying and identifying individuals. In short, this class is the first to determine whether the face of the robot is in front of the camera. If so, then the position of the head of the robot changes accordingly (face tracking is performed). Then, the FaceApiCommunicator method will be called, which, in turn, will invoke the Face API (face detection and identification) interfaces, as well as the Emotion API. The last section processes the result obtained from the Cognitive Services APIs.
In the case of face recognition, the robot says: “Hello!” And adds the name of the person, except when the robot defines the expression of sadness on its face (using the Emotion API interface). Then the robot tells a funny joke. If it was not possible to identify the person, the robot simply says “hello”. At the same time, he distinguishes between men and women and builds phrases accordingly. According to the results obtained from the Face API interface, the robot also makes an assumption regarding the age of the person.
The following is the FaceApiCommunicator code, which contains message exchange logic with Face API and Emotion API.
The application of the robot supports the identification of a person not only by the image of his face, but also by his voice. This data is sent to the Speaker Recognition API . You can use the link provided for more information about this API.
As in the case of Face API, Speaker Recognition requires a recognition model trained in voice information from the speakers used. First you need to create a sound material for recognition in the format of wav. For this, the code below will work. Having created sound recognition material, we will use this application as a sample. With it, we will create profiles of people whom our robot should recognize by voice.
It should be borne in mind that in the created profiles there is no user name field. This means that you need to save a pair of created ProfileId and Name values in the database. In the application, we store this pair of values as entries in a static list:
In this way, we can create an entry in the .wav format and then send it to the Speaker Recognition service (to register or identify people). We created a logic that allows you to record voice data in a .wav file. To achieve this result from the .NET application, we use the winmm.dll interop assembly:
Then we will create the SpeakerRecognitionCommunicator component responsible for communicating with the Speaker Recognition API:
Finally, we have integrated the two functional elements discussed earlier into the ListenButton_Click handler. At the first click of the mouse, it initiates the recording of voice information, and the second - sends the recording to the service Speaker Recognition. , EZ , , ( ).
, «», , . Computer Vision API . , Computer Vision API.
, , ComputerVision .
Custom Vision API , . . , . , , , . Custom Vision API -, , . CustomVisionCommunicator, :
Custom Vision API , , , , , , , . Custom Vision API , :
, - . Cognitive Services, , Cognitive Services. , EZ SDK Cognitive Services.
EZ Cognitive Services.
Cognitive Services:
EZ:
() , Face API Speaker Recognition API . -, .

, Facebook . , , .
Cognitive Services also contains client libraries for various programming languages, which further simplifies their use. We decided to integrate these services into an application created to control the JD Humanoid robot of EZ (hereinafter, we will call it simply “EZ robot”). We chose this particular humanoid robot, since it is quite simple to assemble. In addition, .NET, UWP SDK and even Mono SDK are attached to it, which opens up wide possibilities for its implementation with individual settings.
')
The package also includes the EZ Builder application , which allows you to control the EZ robot and implement specific scenarios based on built-in functional plug-ins and Blockley blocks. It is mainly intended for educational purposes, but it also has a “movement creator” function, which allows you to create robot movements and export them for use in applications created using the SDK. Of course, this application is featuring a starting point for setting up and getting started with any EZ robot.
The application is based on the existing Windows Forms project , which uses the EZ robot's own capabilities and efficiently implements the work with the camera. Taking this application as a basis, we expanded it and connected it to the following Cognitive Services: Face API, Emotion API, Speech API, Voice Recognition API, Language Understanding Intelligent Service, Speaker Recognition API, Computer Vision API, Custom Vision API. Due to this, the robot has new features:
- Voice command recognition - in addition to the Win Form application buttons that trigger specific actions of the robot, we added speech recognition and natural language understanding functions so that our EZ robot understands the commands spoken aloud.
- Face Recognition and Identification - EZ robot is able to recognize faces by several parameters, as well as identify people by faces.
- Emotion Recognition - when recognizing faces, the EZ robot also determines emotions.
- Speaker Recognition - EZ is able to recognize people by voice.
- Computer vision - EZ robot can also describe the environment.
- Recognition of objects by their own parameters - the EZ robot is able to recognize specific objects placed in its field of vision.
The cognitive capabilities of the robot are demonstrated in this video.
Working with EZ Robot SDK
Later in this document, we briefly describe how to work with the SDK of the EZ robot, as well as describe in detail the implementation scenarios using Cognitive Services.
Connect to an EZ robot
The main prerequisite for working with the application is the ability to connect to the robot from the code of our application, call movements and receive incoming images from the camera. The application runs on the developer's computer, since the EZ robot does not have its own runtime and storage environment where it would be possible to place and run the application.
Thus, it works on a computer that connects to the EZ robot via a WiFi network, directly through an access point turned on by the robot itself (AP mode), or via a WiFi network created by another router (client mode). We chose the second option because it supports an Internet connection when developing and launching an application. Network settings when working with an EZ robot are described in detail here . When connected to the WiFi network, the EZ robot is assigned an IP address, which is later used to connect to the robot from the application. When using the SDK, the procedure is as follows:
using EZ_B; // EZ SDK var ezb = new EZB(); this.ezb.Connect("robotIPAddress"); Since the EZ robot camera is an isolated network device, we must connect to it for further use.
var camera = new Camera(this.ezb); this.camera.StartCamera(new ValuePair("EZB://" + "robotIPAddress"), CameraWidth, CameraHeight); The official documentation of the EZ robot SDK package contains detailed examples of calling the special functions of the EZ robot, which become available after connecting to it.
Creating robot movements
The SDK allows you to interact with the robot's servomotor and control its movements. In order to create motion, it is necessary to specify frames (specific positions) and actions consisting of a set of such frames. Implementing it manually in code is not very easy, but in the EZ Builder application you can define frames, create actions from them, and then export them to code and use them in the application. To do this, we need to create a new project in EZ Builder, add the Auto Position plug-in and click the button with the gear image.
Figure 1. Auto Position Plugin
In the future, you can create new frames in the Frames panel, changing the angles of the robot servos. The next step is to create the necessary movements from the existing frames on the Action panel.
Figure 2. Auto Position frames
Figure 3. Auto Position actions
The created action can be exported via the import / export toolbar.
Figure 4. Exporting the source code of the Auto Position plugin
When you finish exporting the action, you can copy the code and paste it into your application. If we use different positions, we should rename the class AutoPositions, giving it a name that accurately reflects the type of movement. Then it can be used in the code as follows:
// WavePositions AutoPositions private WavePositions wavePosition; // EZ private void EzbOnConnectionChange(bool isConnected) { this.ezbConnectionStatusChangedWaitHandle.Set(); if (isConnected) { // WavePosition wavePosition = new WavePositions(ezb); } } // Waving private async void Wave() { wavePosition.StartAction_Wave(); // Wave 5 await Task.Delay(5000); wavePosition.Stop(); // ezb.Servo.ReleaseAllServos(); } Obtaining images from the camera
Since in the application we use images from the robot's camera as input data when calling Cognitive Services, we need to find a way to get these images. It is done this way.
var currentBitmap = camera.GetCurrentBitmap; MemoryStream memoryStream = new MemoryStream(); currentBitmap.Save(memoryStream, System.Drawing.Imaging.ImageFormat.Jpeg); memoryStream.Seek(0, SeekOrigin.Begin); // , Cognitive Services Robot voice functions
As already mentioned, the application runs on the developer’s computer and simply sends commands to the robot. The robot does not have its own runtime. If you need to synthesize speech (in other words, you want the robot to utter a couple of phrases), then you need to choose one of the two options offered by the SDK. The first option involves the use of a standard audio device: the sound will be played by the developer’s computer, not by the speaker of the robot. This option is useful when you need a robot to speak through a computer speaker, for example, during presentations. However, in most cases, it is desirable that the sound is reproduced by the robot itself. Below is the implementation of both variants of calling the audio function using the SDK:
// ezb.SpeechSynth.Say(" "); // ezb.SoundV4.PlayData(ezb.SpeechSynth.SayToStream(" ")); Cognitive Services Integration
In this section, we will look at specific cognitive function scenarios implemented in the robot control application.
Recognition of voice commands
You can trigger the robot by giving voice commands through a microphone connected to the developer’s computer, since the EZ robot itself doesn’t have a microphone. We first used the EZ robot SDK for speech recognition. As it turned out, the recognition was not accurate enough, and the robot performed the wrong actions based on incorrectly understood commands. To increase recognition accuracy and freedom of action when submitting commands, we decided to use the Microsoft Speech API , which converts speech to text, as well as the Language Understanding Intelligent Service ( LUIS ) service to recognize the action required by a particular command. Use the links to these products to get more information about them and get started.
First you need to create an LUIS application, in which the necessary actions are attached to each team. The process of creating a LUIS application is described in this guide to get started. LUIS offers a web-based option where you can easily create an application and specify the desired actions. If necessary, you can also create entities that the LUIS application will recognize by the commands sent to the service. The result of exporting the LUIS application is contained in this repository in the LUIS Mode l folder.
After preparing the LUIS application, we implement the following logic: waiting for voice commands, calling the Microsoft Speech API, calling the LUIS recognition service. As a basis for this functionality, we used the following sample.
It contains the logic of recognizing long and short phrases from a microphone or from a .wav file and then recognizing the action by LUIS or without it.
We used the MicrophoneRecognitionClientWithIntent class, which contains functions for microphone command waiting, speech recognition, and the required action. In addition, the call function for waiting for short phrases is performed using the SayCommandButton_Click descriptor.
using Microsoft.CognitiveServices.SpeechRecognition; private void SayCommandButton_Click(object sender, EventArgs e) { WriteDebug("--- ----"); this.micClient = SpeechRecognitionServiceFactory.CreateMicrophoneClientWithIntentUsingEndpointUrl( this.DefaultLocale, Settings.Instance.SpeechRecognitionApiKey, Settings.Instance.LuisEndpoint); this.micClient.AuthenticationUri = ""; // this.micClient.OnIntent += this.OnIntentHandler; this.micClient.OnMicrophoneStatus += this.OnMicrophoneStatus; // this.micClient.OnPartialResponseReceived += this.OnPartialResponseReceivedHandler; this.micClient.OnResponseReceived += this.OnMicShortPhraseResponseReceivedHandler; this.micClient.OnConversationError += this.OnConversationErrorHandler; // this.micClient.StartMicAndRecognition(); } The command call logic uses the OnIntentHandler descriptor - here we analyze the response received from the LUIS service.
private async void OnIntentHandler(object sender, SpeechIntentEventArgs e) { WriteDebug("--- OnIntentHandler () ---"); dynamic intenIdentificationResult = JObject.Parse(e.Payload); var res = intenIdentificationResult["topScoringIntent"]; var intent = Convert.ToString(res["intent"]); switch (intent) { case "TrackFace": { // ToggleFaceRecognitionEvent?.Invoke(this, null); break; } case "ComputerVision": { var currentBitmap = camera.GetCurrentBitmap; var cvc = new CustomVisionCommunicator(Settings.Instance.PredictionKey, Settings.Instance.VisionApiKey, Settings.Instance.VisionApiProjectId, Settings.Instance.VisionApiIterationId); var description = await cvc.RecognizeObjectsInImage(currentBitmap); ezb.SoundV4.PlayData(ezb.SpeechSynth.SayToStream(description)); break; } //... / default: break; } } Recognition and identification of faces and emotions
To implement the function of recognizing faces and emotions, we used the Face API and Emotion API services. Following the links above, you can learn more about these services and how to get started with them, get instructions on creating an API key and integrating services into your application.
EZ is able to recognize faces using the SDK. Calling Cognitive Services is not required. However, this is only a basic type of face recognition without additional parameters (for example, age, gender, facial hair, etc.). But we still use this local recognition function: it will help you to understand that there is a face in the image. After that, we will use the Cognitive Services Face API to get additional face parameters. This eliminates the need for unnecessary API calls.
The EZ robot's face recognition function also provides information on the location of the face in the picture. We decided to use this so that the robot turned its head and its camera was aimed directly at the face. We borrowed this code from the Win Form application as the basis of our project. At the same time, we added a sensitivity parameter that determines the speed of movement and adjustment of the position of the robot head.
So, in order for the Face API to identify specific people, we need to create a group of such people, register them and train the recognition model. We managed to do this effortlessly using the Intelligent Kiosk Sampl e application. The application can be downloaded from github . Remember to use the same Face API key for the Intelligent Kiosk application and the robot application.
For greater accuracy of face recognition, it is advisable to train the model on image samples taken by a camera that will be used later (the model will be trained on images of the same quality, which will improve the performance of the Face Identification API interface). To do this, we implemented our own logic, the execution of which allows you to save images from the camera of the robot. In the future, they will be used to train Cognitive Services models:
// var currentBitmap = camera.GetCurrentBitmap; currentBitmap.Save(Guid.NewGuid().ToString() + ".jpg", ImageFormat.Jpeg); Next, we run the HeadTracking method, which performs the function of tracking, identifying and identifying individuals. In short, this class is the first to determine whether the face of the robot is in front of the camera. If so, then the position of the head of the robot changes accordingly (face tracking is performed). Then, the FaceApiCommunicator method will be called, which, in turn, will invoke the Face API (face detection and identification) interfaces, as well as the Emotion API. The last section processes the result obtained from the Cognitive Services APIs.
In the case of face recognition, the robot says: “Hello!” And adds the name of the person, except when the robot defines the expression of sadness on its face (using the Emotion API interface). Then the robot tells a funny joke. If it was not possible to identify the person, the robot simply says “hello”. At the same time, he distinguishes between men and women and builds phrases accordingly. According to the results obtained from the Face API interface, the robot also makes an assumption regarding the age of the person.
private async void HeadTracking() { if (!this.headTrackingActive) { return; } var faceLocations = this.camera.CameraFaceDetection.GetFaceDetection(32, 1000, 1); if (faceLocations.Length > 0) { // if (this.fpsCounter == 1) { foreach (var objectLocation in faceLocations) { this.WriteDebug(string.Format(" H:{0} V:{1} ", objectLocation.HorizontalLocation, objectLocation.VerticalLocation)); } } } // , if (faceLocations.Length == 0) { return; } // ( ) var faceLocation = faceLocations.First(); var servoVerticalPosition = this.ezb.Servo.GetServoPosition(HeadServoVerticalPort); var servoHorizontalPosition = this.ezb.Servo.GetServoPosition(HeadServoHorizontalPort); //Track face var yDiff = faceLocation.CenterY - CameraHeight / 2; if (Math.Abs(yDiff) > YDiffMargin) { if (yDiff < -1 * RobotSettings.sensitivity) { if (servoVerticalPosition - ServoStepValue >= mapPortToServoLimits[HeadServoVerticalPort].MinPosition) { servoVerticalPosition -= ServoStepValue; } } else if (yDiff > RobotSettings.sensitivity) { if (servoVerticalPosition + ServoStepValue <= mapPortToServoLimits[HeadServoVerticalPort].MaxPosition) { servoVerticalPosition += ServoStepValue; } } } var xDiff = faceLocation.CenterX - CameraWidth / 2; if (Math.Abs(xDiff) > XDiffMargin) { if (xDiff > RobotSettings.sensitivity) { if (servoHorizontalPosition - ServoStepValue >= mapPortToServoLimits[HeadServoHorizontalPort].MinPosition) { servoHorizontalPosition -= ServoStepValue; } } else if (xDiff < -1 * RobotSettings.sensitivity) { if (servoHorizontalPosition + ServoStepValue <= mapPortToServoLimits[HeadServoHorizontalPort].MaxPosition) { servoHorizontalPosition += ServoStepValue; } } } this.ezb.Servo.SetServoPosition(HeadServoVerticalPort, servoVerticalPosition); this.ezb.Servo.SetServoPosition(HeadServoHorizontalPort, servoHorizontalPosition); // // API var currentBitmap = camera.GetCurrentBitmap; (var faces, var person, var emotions) = await FaceApiCommunicator.DetectAndIdentifyFace(currentBitmap); // , if (person != null && !ezb.SoundV4.IsPlaying) { // if (emotions[0].Scores.Sadness > 0.02) { ezb.SoundV4.PlayData(ezb.SpeechSynth.SayToStream(" , . ! . . , ". )); //, Thread.Sleep(25000); } else { ezb.SoundV4.PlayData(ezb.SpeechSynth.SayToStream("" + person.Name)); Wave(); } } // , else if (faces != null && faces.Any() && !ezb.SoundV4.IsPlaying) { if (faces[0].FaceAttributes.Gender == "male") ezb.SoundV4.PlayData(ezb.SpeechSynth.SayToStream(", ! " + faces[0].FaceAttributes.Age)); else ezb.SoundV4.PlayData(ezb.SpeechSynth.SayToStream(", ! " + faces[0].FaceAttributes.Age)); Wave(); } } The following is the FaceApiCommunicator code, which contains message exchange logic with Face API and Emotion API.
using Microsoft.ProjectOxford.Common.Contract; using Microsoft.ProjectOxford.Emotion; using Microsoft.ProjectOxford.Face; using Microsoft.ProjectOxford.Face.Contract; using System; using System.Collections.Generic; using System.Drawing; using System.IO; using System.Linq; using System.Text; using System.Threading.Tasks; namespace EZFormApplication.CognitiveServicesCommunicators { public class FaceApiCommunicator { private const string FaceApiEndpoint = "https://westeurope.api.cognitive.microsoft.com/face/v1.0/"; private static List<FaceResult> personResults = new List<FaceResult>(); private static DateTime lastFaceDetectTime = DateTime.MinValue; public static async Task<(Face[] faces, Person person, Emotion[] emotions)> DetectAndIdentifyFace(Bitmap image) { FaceServiceClient fsc = new FaceServiceClient(Settings.Instance.FaceApiKey, FaceApiEndpoint); EmotionServiceClient esc = new EmotionServiceClient(Settings.Instance.EmotionApiKey); // // Emotion[] emotions = null; Person person = null; Face[] faces = null; // 10 if (lastFaceDetectTime.AddSeconds(10) < DateTime.Now) { lastFaceDetectTime = DateTime.Now; MemoryStream memoryStream = new MemoryStream(); image.Save(memoryStream, System.Drawing.Imaging.ImageFormat.Jpeg); // memoryStream.Seek(0, SeekOrigin.Begin); faces = await fsc.DetectAsync(memoryStream, true, true, new List<FaceAttributeType>() { FaceAttributeType.Age, FaceAttributeType.Gender }); if (faces.Any()) { var rec = new Microsoft.ProjectOxford.Common.Rectangle[] { faces.First().FaceRectangle.ToRectangle() }; // // ; - memoryStream = new MemoryStream(); image.Save(memoryStream, System.Drawing.Imaging.ImageFormat.Jpeg); memoryStream.Seek(0, SeekOrigin.Begin); // Emotion API , // — Emotion API emotions = await esc.RecognizeAsync(memoryStream, rec); // var groups = await fsc.ListPersonGroupsAsync(); var groupId = groups.First().PersonGroupId; // var identifyResult = await fsc.IdentifyAsync(groupId, new Guid[] { faces.First().FaceId }, 1); var candidate = identifyResult?.FirstOrDefault()?.Candidates?.FirstOrDefault(); if (candidate != null) { person = await fsc.GetPersonAsync(groupId, candidate.PersonId); } } } return (faces, person, emotions); } } public class FaceResult { public string Name { get; set; } public DateTime IdentifiedAt { get; set; } } } Recognition of sound from the speaker
The application of the robot supports the identification of a person not only by the image of his face, but also by his voice. This data is sent to the Speaker Recognition API . You can use the link provided for more information about this API.
As in the case of Face API, Speaker Recognition requires a recognition model trained in voice information from the speakers used. First you need to create a sound material for recognition in the format of wav. For this, the code below will work. Having created sound recognition material, we will use this application as a sample. With it, we will create profiles of people whom our robot should recognize by voice.
It should be borne in mind that in the created profiles there is no user name field. This means that you need to save a pair of created ProfileId and Name values in the database. In the application, we store this pair of values as entries in a static list:
public static List<Speaker> ListOfSpeakers = new List<Speaker>() { new Speaker() { Name = "Marek", ProfileId = "d64ff595-162e-42ef-9402-9aa0ef72d7fb" } }; In this way, we can create an entry in the .wav format and then send it to the Speaker Recognition service (to register or identify people). We created a logic that allows you to record voice data in a .wav file. To achieve this result from the .NET application, we use the winmm.dll interop assembly:
class WavRecording { [DllImport("winmm.dll", EntryPoint = "mciSendStringA", ExactSpelling = true, CharSet = CharSet.Ansi, SetLastError = true)] private static extern int Record(string lpstrCommand, string lpstrReturnString, int uReturnLength, int hwndCallback); public string StartRecording() { //MCIErrors — var result = (MCIErrors)Record("open new Type waveaudio Alias recsound", "", 0, 0); if (result != MCIErrors.NO_ERROR) { return "Error code: " + result.ToString(); } // .wav Speaker Recognition result = (MCIErrors)Record("set recsound time format ms alignment 2 bitspersample 16 samplespersec 16000 channels 1 bytespersec 88200", "", 0, 0); if (result != MCIErrors.NO_ERROR) { return "Error code: " + result.ToString(); } result = (MCIErrors)Record("record recsound", "", 0, 0); if (result != MCIErrors.NO_ERROR) { return "Error code: " + result.ToString(); } return "1"; } public string StopRecording() { var result = (MCIErrors)Record("save recsound result.wav", "", 0, 0); if (result != MCIErrors.NO_ERROR) { return "Error code: " + result.ToString(); } result = (MCIErrors)Record("close recsound ", "", 0, 0); if (result != MCIErrors.NO_ERROR) { return "Error code: " + result.ToString(); } return "1"; } } Then we will create the SpeakerRecognitionCommunicator component responsible for communicating with the Speaker Recognition API:
using Microsoft.ProjectOxford.SpeakerRecognition; using Microsoft.ProjectOxford.SpeakerRecognition.Contract.Identification; ... class SpeakerRecognitionCommunicator { public async Task<IdentificationOperation> RecognizeSpeaker(string recordingFileName) { var srsc = new SpeakerIdentificationServiceClient(Settings.Instance.SpeakerRecognitionApiKeyValue); var profiles = await srsc.GetProfilesAsync(); // , Guid[] testProfileIds = new Guid[profiles.Length]; for (int i = 0; i < testProfileIds.Length; i++) { testProfileIds[i] = profiles[i].ProfileId; } //IdentifyAsync , OperationLocation processPollingLocation; using (Stream audioStream = File.OpenRead(recordingFileName)) { processPollingLocation = await srsc.IdentifyAsync(audioStream, testProfileIds, true); } IdentificationOperation identificationResponse = null; int numOfRetries = 10; TimeSpan timeBetweenRetries = TimeSpan.FromSeconds(5.0); // while (numOfRetries > 0) { await Task.Delay(timeBetweenRetries); identificationResponse = await srsc.CheckIdentificationStatusAsync(processPollingLocation); if (identificationResponse.Status == Microsoft.ProjectOxford.SpeakerRecognition.Contract.Identification.Status.Succeeded) { break; } else if (identificationResponse.Status == Microsoft.ProjectOxford.SpeakerRecognition.Contract.Identification.Status.Failed) { throw new IdentificationException(identificationResponse.Message); } numOfRetries--; } if (numOfRetries <= 0) { throw new IdentificationException(" "); } return identificationResponse; } } Finally, we have integrated the two functional elements discussed earlier into the ListenButton_Click handler. At the first click of the mouse, it initiates the recording of voice information, and the second - sends the recording to the service Speaker Recognition. , EZ , , ( ).
private async void ListenButton_Click(object sender, EventArgs e) { var vr = new WavRecording(); if (!isRecording) { var r = vr.StartRecording(); // if (r == "1") { isRecording = true; ListenButton.Text = " "; } else WriteDebug(r); } else { var r = vr.StopRecording(); if (r == "1") try { var sr = new SpeakerRecognitionCommunicator(); var identificationResponse = await sr.RecognizeSpeaker("result.wav"); WriteDebug( ); wavePosition.StartAction_Wave(); var name = Speakers.ListOfSpeakers.Where(s => s.ProfileId == identificationResponse.ProcessingResult.IdentifiedProfileId.ToString()).First().Name; ezb.SoundV4.PlayData(ezb.SpeechSynth.SayToStream(" " + )); await Task.Delay(5000); wavePosition.Stop(); ezb.Servo.ReleaseAllServos(); } catch (IdentificationException ex) { WriteDebug("Speaker Identification Error: " + ex.Message); wavePosition.StartAction_Wave(); ezb.SoundV4.PlayData(ezb.SpeechSynth.SayToStream(", ")); //, await Task.Delay(5000); wavePosition.Stop(); ezb.Servo.ReleaseAllServos(); } catch (Exception ex) { WriteDebug(": " + ); } else WriteDebug(r); isRecording = false; ListenButton.Text = " "; } } , «», , . Computer Vision API . , Computer Vision API.
using Microsoft.ProjectOxford.Vision; ... public async Task<string> RecognizeObjectsInImage(Bitmap image) { // westeurope var vsc = new VisionServiceClient(visionApiKey, "https://westeurope.api.cognitive.microsoft.com/vision/v1.0"); MemoryStream memoryStream = new MemoryStream(); image.Save(memoryStream, System.Drawing.Imaging.ImageFormat.Jpeg); memoryStream.Seek(0, SeekOrigin.Begin); var result = await vsc.AnalyzeImageAsync(memoryStream,new List<VisualFeature>() { VisualFeature.Description }); return result.Description.Captions[0].Text; } , , ComputerVision .
case "ComputerVision": { var currentBitmap = camera.GetCurrentBitmap; var cvc = new CustomVisionCommunicator(); var description = await cvc.RecognizeObjectsInImage(currentBitmap); ezb.SoundV4.PlayData(ezb.SpeechSynth.SayToStream(description)); break; } Custom Vision API , . . , . , , , . Custom Vision API -, , . CustomVisionCommunicator, :
using Microsoft.Cognitive.CustomVision; using Microsoft.Cognitive.CustomVision.Models; ... class CustomVisionCommunicator { private string predictionKey; private string visionApiKey; private Guid projectId; private Guid iterationId; PredictionEndpoint endpoint; VisionServiceClient vsc; public CustomVisionCommunicator() { this.visionApiKey = Settings.Instance.VisionApiKey; this.predictionKey = Settings.Instance.PredictionKey; this.projectId = new Guid(Settings.Instance.VisionApiProjectId); // this.iterationId = new Guid(Settings.Instance.VisionApiIterationId); PredictionEndpointCredentials predictionEndpointCredentials = new PredictionEndpointCredentials(predictionKey); // , , endpoint = new PredictionEndpoint(predictionEndpointCredentials); vsc = new VisionServiceClient(visionApiKey, "https://westeurope.api.cognitive.microsoft.com/vision/v1.0"); } public List<ImageTagPrediction> RecognizeObject(Bitmap image) { MemoryStream memoryStream = new MemoryStream(); image.Save(memoryStream, System.Drawing.Imaging.ImageFormat.Jpeg); // memoryStream.Seek(0, SeekOrigin.Begin); var result = endpoint.PredictImage(projectId, memoryStream,iterationId); return result.Predictions.ToList(); } } Custom Vision API , , , , , , , . Custom Vision API , :
case "": { ezb.SoundV4.PlayData(ezb.SpeechSynth.SayToStream((", ! !"))); var currentBitmap = camera.GetCurrentBitmap; var cvc = new CustomVisionCommunicator(); var predictions = cvc.RecognizeObject(currentBitmap); if (RecognizeObject("")) { // grabPosition.StartAction_Takefood(); await Task.Delay(1000); ezb.SoundV4.PlayData(ezb.SpeechSynth.SayToStream((" "))); } else ezb.SpeechSynth.Say(" "); break; } Conclusion
, - . Cognitive Services, , Cognitive Services. , EZ SDK Cognitive Services.
findings
EZ Cognitive Services.
- Face API Custom Vision , . , , . Custom Vision .
- Speaker Recognition API .wav (. , Speaker Recognition, ). , .
- .wav winmm.dll — , .wav. : .
- Speaker Recognition — , API . , .
- EZ — , EZ , . Cognitive Service Microsoft Speech API Language Understanding Intelligent Service (LUIS).
- EZ JD , , . , , SDK .
useful links
Cognitive Services:
- Speech API
- Speech Recognition
- Language Understanding Intelligent Service (LUIS)
- Face API
- Emotion API
- Speaker Recognition API
- Computer Vision API
- Custom Vision API
- Intelligent Kiosk Sample ( UWP , Cognitive Services, , )
EZ:
() , Face API Speaker Recognition API . -, .
about the author
— Microsoft .
«As a technology evangelist at Microsoft, I do have an opportunity to learn and work with the newest technologies and subsequently help developers with adoption of these with ultimate goal of making their project/business even more successful. My area of focus is Azure Cloud in general, and especially services related to topics such as Micro Services, Internet of Things, Chat Bots, Artificial Intelligence. I like to spend my free time with technology, working on interesting projects, but I can also enjoy time outside of IT. I like to take in hand, put on or kick to almost any sports equipment and I really enjoy time when I can change the urban grey for the forest green.»
, Facebook . , , .
Source: https://habr.com/ru/post/351224/
All Articles