Strong typing for TypeScript Vue.js applications
Q : What are the weakest points of Vue?
The answer : At the moment, probably, unfriendly to typification. Our API was developed without scheduling support for typed languages (such as TypeScript), but we made great improvements in 2.5.
Q : Tony Hoare called null a billion-dollar error. What was the most unfortunate technical decision in your career?
')
The answer : It would be nice to use TypeScript initially, even when I started to rewrite the code for Vue 2.x.
from the interview "Creator Vue.js answers Habra"
Vue.js unfriendliness to typing forces the use of crutches to take advantage of TypeScript. One of the options proposed in the official documentation Vue.js is the use of decorators together with the library "vue-class-component".
I use another version of "crutches" to solve the problem of strong typing in Vue.js applications (without decorators and vue-class-component). Through the explicit definition of interfaces for the "data" and "props" options used in the instance constructor of Vue components. In some cases it is easier and more convenient.
This tutorial uses Visual Studio 2017 with applications Vue.js + Asp.Net Core MVC + TypeScript to illustrate both approaches to typing (with and without decorators). Although the examples given here can be placed in another environment (Node.js + Webpack).
Along the way, it demonstrates how to quickly alter a JavaScript component under the “full-fledged” TypeScript with strong typing enabled.
Content
Introduction
Used mechanisms
- Enable Strong Typing Options
- Typing through decorators
- Typing via input and output interfaces
Project TryVueMvcDecorator
- Test application
- configuration correction
- Correction Index.cshtml
- Transition to decorators
- Build and run the project
Project TryVueMvcGrid
- Test application
- Create AppGrid blank
- Build and run the project
- Adaptation for strict typing
Conclusion
Introduction
This article is a continuation of a series of articles:
- Vue.js + Asp.NETCore + TypeScript application without Webpack
- RequireJS for Vue.js + Asp.NETCore + TypeScript applications
- Vue.js + Asp.Net Core MVC + TypeScript and more Bootstrap4
In the examples that were cited in these articles, TypeScript was only used in half — strict typing was deliberately disabled. Now let's try to fully use TypeScript.
On the vast expanses of the Internet, you can find a lot of quality examples and ready-made applications that use Vue.js. But the vast majority of these examples are written in JavaScript. Therefore, pushing these examples into the TypeScript Procrustean Bed requires some effort.
The API, which is offered in the official documentation Vue.js , allows you to define a Vue component based on classes using the officially supported decorator vue-class-component . The use of decorators requires the installation of the compiler option {"experimentalDecorators": true} , which is somewhat annoying (there is a possibility of significant changes in future versions of TypeScript). In addition, an additional library is required.
The paranoid desire to get rid of "extra" libraries led me to use the explicit definition of interfaces for properties and data of a Vue component when solving the problem of strong typing in Vue.js + TypeScript applications.

In this tutorial, we first describe the mechanisms for using both crutches, then create 2 projects: TryVueMvcDecorator, TryVueMvcGrid.
Used mechanisms
If the source code of the Vue components that are driven to the TypeScript module is written in JavaScript, you can first try to compile it by simply disabling all compiler options that are responsible for control (they are disabled by default). Then, in the working code of the application, we tighten the screws, by including the necessary options and eliminating the causes of abuse of the TypeScript compiler.
After enabling a number of compiler options, the Vue component code may stop compiling. Since there is no explicit definition of the variables listed in "data" and "props". Below we describe the way to solve this problem with and without decorators.
Enable Strong Typing Options
The option {"strict": true} immediately turns on many checks (noImplicitAny, noImplicitThis, alwaysStrict, strictNullChecks, strictFunctionTypes, strictPropertyInitialization), so it is useful to include these checks in sequence. You can then further tighten the control, for example, by turning on checking for unused variables and parameters.
{ "compilerOptions": { ... "experimentalDecorators": true, //"noImplicitAny": true, //"noImplicitThis": true, //"alwaysStrict": true, //"strictNullChecks": true, //"strictFunctionTypes": true, //"strictPropertyInitialization": true, "strict": true, "noUnusedLocals": true, "noUnusedParameters": true }, "include": [ "./ClientApp/**/*.ts" ] } Gradually tightening control of the TypeScript compiler ("tightening the screws") allows you to quickly turn on strong typing, without particularly delving into the logic of the Vue-components.
Typing through decorators
The definition of a Vue component looks like a class definition, but in reality it is a call to the Vue.extend() function, which creates and registers an instance of a Vue object with certain properties and methods. Since the definition of properties and methods are specified in the parameter of the function call Vue.extend() , the TypeScript compiler does not know everything about them.
In the example above, it is assumed that the Vue instance has properties: name, initialEnthusiasm, enthusiasm, and also methods: increment (), decrement (), exclamationMarks (). Naturally, the TypeScript compiler can start swearing with a good language when trying to enable the appropriate type control options.
The vue-class-component decorator allows you to use the definition of a Vue component as a full-fledged class. Accordingly, it becomes possible to define all the properties and methods of the Vue component explicitly. And such a TypeScript compiler is quite normal to digest.
// Vue- export default Vue.extend({ template:'#hello-template', props: ['name', 'initialEnthusiasm'], data() { return { enthusiasm: this.initialEnthusiasm } }, methods: { increment() { this.enthusiasm++; }, decrement() { if (this.enthusiasm > 1) { this.enthusiasm--; } } }, computed: { exclamationMarks(): string { return Array(this.enthusiasm + 1).join('!'); } } }); // Vue- @Component({ template: '#hello-template', props: ['name', 'initialEnthusiasm'] }) export default class HelloComponent extends Vue { enthusiasm!: number; initialEnthusiasm!: number; data() { return { enthusiasm: this.initialEnthusiasm } }; // methods: increment() { this.enthusiasm++; }; decrement() { if (this.enthusiasm > 1) { this.enthusiasm--; } }; // computed: get exclamationMarks() { return Array(this.enthusiasm + 1).join('!'); } }; Typing via input and output interfaces
Using strong typing through defining interfaces for properties and data is based on the following point: Vue instances have corresponding proxies ( this.$props, this.$data ).
vm. $ data
The data object on which the Vue instance is monitoring. An instance proxies here calls to its fields. (For example, vm.a will point to vm. $ Data.a)
vm. $ props
An object that provides access to the current input data of the component. A Vue instance proxies access to the properties of its input data object.
For details, see the official documentation .
Due to this, in the above example for Vue-components we get: this.initialEnthusiasm equivalent to this.$props.initialEnthusiasm , and also this.enthusiasm equivalent to this.$data.enthusiasm . It remains to explicitly define interfaces for properties and data, and also to provide explicit type conversion when using this.$props, this.$data .
// interface HelloProps { name: string; initialEnthusiasm: number; } interface HelloData { enthusiasm: number; } // Vue ... enthusiasm = (this.$props as HelloProps).initialEnthusiasm; ... var thisData = this.$data as HelloData; if (thisData.enthusiasm > 1) { thisData.enthusiasm--; } ... For a better understanding of the approach used here, we present a more complex example of using interfaces for strong typing:
// ClientApp/components/DemoGrid.ts interface DemoGridProps { rows: Array<any>; columns: Array<string>; filterKey: string; } interface DemoGridData { sortKey: string; sortOrders: { [index: string]: number }; } export default Vue.extend({ ... computed: { filteredData: function () { var thisData = (this.$data as DemoGridData); var thisProps = (this.$props as DemoGridProps); var sortKey = thisData.sortKey; var filterKey = thisProps.filterKey && thisProps.filterKey.toLowerCase(); var order = thisData.sortOrders[sortKey] || 1; var rows = thisProps.rows; if (filterKey) { rows = rows.filter(function (row) { return Object.keys(row).some(function (key) { return String(row[key]).toLowerCase().indexOf(filterKey) > -1 }) }) } if (sortKey) { rows = rows.slice().sort(function (a, b) { a = a[sortKey] b = b[sortKey] return (a === b ? 0 : a > b ? 1 : -1) * order }) } return rows; } }, ... methods: { sortBy: function (key: string) { var thisData = (this.$data as DemoGridData); thisData.sortKey = key thisData.sortOrders[key] = thisData.sortOrders[key] * -1 } } }); As a result, we get a simple way to move to strict typing - after explicitly defining property and data interfaces, we stupidly look for this.someProperty and use explicit type conversion in these places. For example, this.columns will turn into (this.$props as DemoGridProps).columns .
Project TryVueMvcDecorator
In this tutorial section, we create a TypeScript application Vue.js with a solution to the problem of strong typing with the help of the "vue-class-component" designer.
Test application
As a starting point for a test application, we take the TryVueMvc project for Visual Studio 2017 on github. Either create this project from scratch in the previous tutorial Vue.js + Asp.Net Core MVC + TypeScript and more Bootstrap4 . You can build and run the project in the VS2017 environment either via the command line in the project directory:
npm install dotnet build dotnet bundle dotnet run In the browser, open the page, the address of which dotnet reports in the console, for example, http: // localhost: 52643 .
For those who prefer single-file Vue components and an assembly using a Webpack, the TryVueWebpack project can be used as a starting point for a test application. To build and run the application, via the command line in the project directory, do the following:
npm install npm run build Then you can also use dotnet run , or you can simply open the file wwwroot \ index.html.
Configuration adjustment
In the tsconfig.json file, add the compiler option {"experimentalDecorators": true} .
Add to the file package.json the installation of the NPM package "vue-class-component".
{ "version": "1.0.0", "name": "asp.net", "private": true, "dependencies": { "jquery": "^3.3.1", "popper.js": "^1.12.9", "bootstrap": "^4.0.0", "vue": "^2.5.13", "systemjs": "^0.21.0", "vue-class-component": "^6.2.0" } } Correcting bundleconfig.json to enable vue.js and vue-class-component.js to be copied from the node_modules directory to wwwroot / vendor.
[ { "outputFileName": "wwwroot/dist/vendor1.js", "inputFiles": [ "node_modules/jquery/dist/jquery.js", "node_modules/popper.js/dist/umd/popper.js", "node_modules/bootstrap/dist/js/bootstrap.js", "node_modules/systemjs/dist/system.src.js" ], "minify": { "enabled": true, "renameLocals": true }, "sourceMap": true }, { "outputFileName": "wwwroot/dist/vendor1.css", "inputFiles": [ "node_modules/bootstrap/dist/css/bootstrap.css" ], "minify": { "enabled": false } }, { "outputFileName": "wwwroot/dist/vendor1.min.css", "inputFiles": [ "node_modules/bootstrap/dist/css/bootstrap.min.css" ], "minify": { "enabled": false } }, { "outputFileName": "wwwroot/vendor/vue.js", "inputFiles": [ "node_modules/vue/dist/vue.js" ], "minify": { "enabled": true, "renameLocals": true }, "sourceMap": true }, { "outputFileName": "wwwroot/vendor/vue-class-component.js", "inputFiles": [ "node_modules/vue-class-component/dist/vue-class-component.js" ], "minify": { "enabled": true, "renameLocals": true }, "sourceMap": true }, { "outputFileName": "wwwroot/dist/main.css", "inputFiles": [ "ClientApp/**/*.css" ], "minify": { "enabled": true } }, { "outputFileName": "wwwroot/dist/app-bandle.min.js", "inputFiles": [ "wwwroot/dist/app-bandle.js" ], "minify": { "enabled": true, "renameLocals": true } }, { "outputFileName": "wwwroot/dist/app-templates.html", "inputFiles": [ "ClientApp/**/*.html" ], "minify": { "enabled": false, "renameLocals": false } } ] Adjustment Index.cshtml
Since we started using the vue-class-component, you need to tell the SystemJS where to load this library from. To do this, modify the Razor-rendering code in Views / Home / Index.cshtml.
@* Views/Home/Index.cshtml *@ @using Microsoft.AspNetCore.Hosting @inject IHostingEnvironment hostingEnv @{ var suffix = hostingEnv.IsDevelopment() ? "" : ".min"; var vueUrl = $"vendor/vue{suffix}.js"; var vueClassComponentUrl = $"vendor/vue-class-component{suffix}.js"; var mainUrl = $"dist/app-bandle{suffix}.js"; ViewData["Title"] = "TryVueMvc Sample"; } <section id="app-templates"></section> <div id="app-root">loading..</div> @section Scripts{ <script> System.config({ map: { "vue": "@vueUrl", "vue-class-component": "@vueClassComponentUrl" } }); $.get("dist/app-templates.html").done(function (data) { $('#app-templates').append(data); SystemJS.import('@mainUrl').then(function (m) { SystemJS.import('index'); }); }); </script> } Go to the decorators
To switch to decorators in our application, it is enough to change the code of the modules AppHello.ts and Hello.ts.
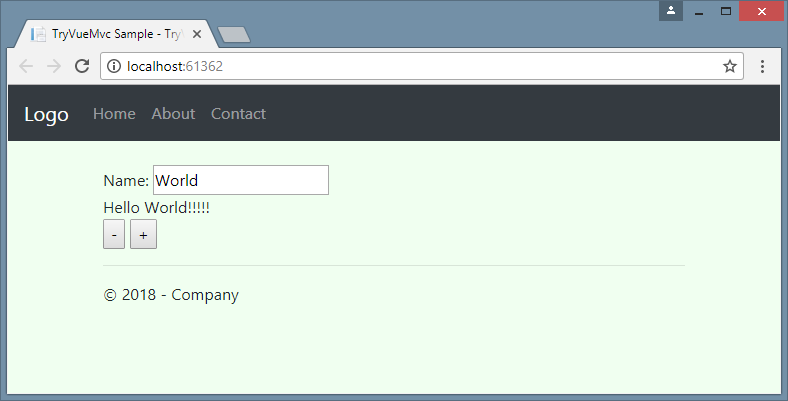
// ClientApp/components/AppHello.ts import Vue from "vue"; import Component from "vue-class-component"; import HelloComponent from "./Hello"; @Component({ template: '#app-hello-template', components: { HelloComponent } }) export default class AppHelloComponent extends Vue { data() { return { name: "World" } } }; // ClientApp/components/Hello.ts import Vue from "vue"; import Component from "vue-class-component"; @Component({ template: '#hello-template', props: ['name', 'initialEnthusiasm'] }) export default class HelloComponent extends Vue { enthusiasm!: number; initialEnthusiasm!: number; data() { return { enthusiasm: this.initialEnthusiasm } }; // methods: increment() { this.enthusiasm++; }; decrement() { if (this.enthusiasm > 1) { this.enthusiasm--; } }; // computed: get exclamationMarks() { return Array(this.enthusiasm + 1).join('!'); } }; If the TryVueWebpack project was used as a starting point, then the code for the AppHello.ts and Hello.ts modules will be slightly different.
// ClientApp/components/AppHello.ts import Vue from "vue"; import Component from "vue-class-component"; import HelloComponent from "./Hello.vue"; @Component({ components: { HelloComponent } }) export default class AppHelloComponent extends Vue { data() { return { name: "World" } } }; // ClientApp/components/Hello.ts import Vue from "vue"; import Component from "vue-class-component"; @Component({ props: ['name', 'initialEnthusiasm'] }) export default class HelloComponent extends Vue { enthusiasm!: number; initialEnthusiasm!: number; data() { return { enthusiasm: this.initialEnthusiasm } }; // methods: increment() { this.enthusiasm++; }; decrement() { if (this.enthusiasm > 1) { this.enthusiasm--; } }; // computed: get exclamationMarks() { return Array(this.enthusiasm + 1).join('!'); } }; Build and run the project
Building and running applications are traditional for the VS2017 environment. Bundling is performed via the "Bundler & Minifier \ Update Bundles" command of the context menu on the file bundleconfig.json. Also, assembly and launch can be done via the command line in the project directory. Should get something like the one shown in the screenshot.
You can compare your result of performing the described actions with the TryVueMvcDecorator project on github.
Project TryVueMvcGrid
Now we create an application Vue.js in TypeScript with a solution to the problem of strong typing by explicitly defining the types for the input (this. $ Props) and output (this. $ Data) data of the Vue component. At this time, we do without a decorator and an additional library.
The application is a bit more complicated by embedding an example from the official site Vue.js Grid Component Example . You can see the same example on jsfiddle .
We go from simple to complex. To facilitate understanding, we will break down the creation of AppGrid into four steps:
- preparing a test application (cloning TryVueMvc);
- creating an AppGrid application skeleton;
- transfer of the main source code of the example from the official site Vue.js;
- inclusion of strictly typing options with adaptation of the application code.
Test application
As a starting point for a test application, as well as in the previous case, take the TryVueMvc project for Visual Studio 2017 on github.
Creating an AppGrid Stub
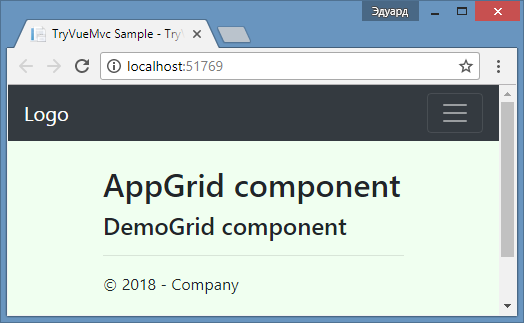
Replace the AppHello application with the blank (skeleton) of the AppGrid application. To do this, we change the contents of the ClientApp / index.ts file, and instead of the old files in the ClientApp / components folder, we create blanks for new components: AppGrid, DemoGrid.
// ClientApp/index.ts import Vue from "vue"; import AppGrid from "./components/AppGrid"; new Vue({ el: "#app-root", render: h => h(AppGrid), components: { AppGrid } }); // ClientApp/components/AppGrid.ts import Vue from "vue"; import DemoGrid from "./DemoGrid"; export default Vue.extend({ template: '#app-grid-template', components: { DemoGrid }, data: function () { return { foo: 42 } } }); <!-- ClientApp/components/AppGrid.html --> <template id="app-grid-template"> <div> <h2>AppGrid component</h2> <demo-grid /> </div> </template> // ClientApp/components/DemoGrid.ts import Vue from "vue"; export default Vue.extend({ template: '#demo-grid-template', props: ['foo'], data: function () { return { bar: 42 } } }); <!-- ClientApp/components/DemoGrid.html --> <template id="demo-grid-template"> <h4>DemoGrid component</h4> </template> After rebuilding and running the application in the browser, you should get something like the one shown in the screenshot.
Embedding the DemoGrid Example
We transfer the AppGrid.ts code and template contents. 'gridData' -> 'gridRows' return property 'gridData' -> 'gridRows' , so as not to be confused with data() . Compiling a ts code should proceed normally even after the inclusion of type control options, since strict typing is not required here.
// ClientApp/components/AppGrid.ts import Vue from "vue"; import DemoGrid from "./DemoGrid"; export default Vue.extend({ template: '#app-grid-template', components: { DemoGrid }, data: function() { return { searchQuery: '', gridColumns: ['name', 'power'], gridRows: [ { name: 'Chuck Norris', power: Infinity }, { name: 'Bruce Lee', power: 9000 }, { name: 'Jackie Chan', power: 7000 }, { name: 'Jet Li', power: 8000 } ] } } }); <!-- ClientApp/components/AppGrid.html --> <template id="app-grid-template"> <div> <form id="search"> Search <input name="query" v-model="searchQuery"> </form> <demo-grid :rows="gridRows" :columns="gridColumns" :filter-key="searchQuery"> </demo-grid> </div> </template> We transfer the code DemoGrid.ts and the contents of the template. Replace the input property 'data' -> 'rows' , so as not to be confused with data() . Defining properties Vue-components are remade into an array of names ( props: ['rows', 'columns', 'filterKey'] ).
// ClientApp/components/DemoGrid.ts import Vue from "vue"; export default Vue.extend({ template: '#demo-grid-template', props: ['rows', 'columns', 'filterKey'], data: function () { var sortOrders = {} this.columns.forEach(function (key) { sortOrders[key] = 1 }) return { sortKey: '', sortOrders: sortOrders } }, computed: { filteredData: function () { var sortKey = this.sortKey var filterKey = this.filterKey && this.filterKey.toLowerCase() var order = this.sortOrders[sortKey] || 1 var rows = this.rows if (filterKey) { rows = rows.filter(function (row) { return Object.keys(row).some(function (key) { return String(row[key]).toLowerCase().indexOf(filterKey) > -1 }) }) } if (sortKey) { rows = rows.slice().sort(function (a, b) { a = a[sortKey] b = b[sortKey] return (a === b ? 0 : a > b ? 1 : -1) * order }) } return rows } }, filters: { capitalize: function (str) { return str.charAt(0).toUpperCase() + str.slice(1) } }, methods: { sortBy: function (key) { this.sortKey = key this.sortOrders[key] = this.sortOrders[key] * -1 } } }); <!-- ClientApp/components/DemoGrid.html --> <template id="demo-grid-template"> <table> <thead> <tr> <th v-for="key in columns" @click="sortBy(key)" :class="{ active: sortKey == key }"> {{ key | capitalize }} <span class="arrow" :class="sortOrders[key] > 0 ? 'asc' : 'dsc'"> </span> </th> </tr> </thead> <tbody> <tr v-for="entry in filteredData"> <td v-for="key in columns"> {{entry[key]}} </td> </tr> </tbody> </table> </template> Create a ClientApp / css / demo-grid.css file based on the styles of the DemoGrid component.
/* ClientApp/css/demo-grid.css */ body { font-family: Helvetica Neue, Arial, sans-serif; font-size: 14px; color: #444; } table { border: 2px solid #42b983; border-radius: 3px; background-color: #fff; margin-top: .5rem; } th { background-color: #42b983; color: rgba(255,255,255,0.66); cursor: pointer; -webkit-user-select: none; -moz-user-select: none; -ms-user-select: none; user-select: none; } td { background-color: #f9f9f9; } th, td { min-width: 120px; padding: 10px 20px; } th.active { color: #fff; } th.active .arrow { opacity: 1; } .arrow { display: inline-block; vertical-align: middle; width: 0; height: 0; margin-left: 5px; opacity: 0.66; } .arrow.asc { border-left: 4px solid transparent; border-right: 4px solid transparent; border-bottom: 4px solid #fff; } .arrow.dsc { border-left: 4px solid transparent; border-right: 4px solid transparent; border-top: 4px solid #fff; } Build and run the project
Building and running the application is the same as for the TryVueMvcDecorator project described earlier. After rebuilding and running the application in the browser, you should get something like the one shown in the screenshot.

Strong Typing Adaptation
Now we begin to tighten the nuts. If you try to put the {"strict": true} compiler option right away, you will get a bunch of TypeScript errors when compiling.
As a rule, it is better to turn on the control step by step: turn on one option, eliminate the errors that have occurred, then do the same for the next option, etc.
To adapt the existing code of Vue-components under strict typification, first of all, we define interfaces for input (props) and output data (data) components.
interface DemoGridProps { rows: Array<any>; columns: Array<string>; filterKey: string; } interface DemoGridData { sortKey: string; sortOrders: { [index: string]: number }; } Then we set the compiler option {"noImplicitThis": true} and eliminate errors in the manner described earlier in the Typing section via the input and output interfaces .
After installing the compiler option {"noImplicitAny": true} with the other undefined types. After that the inclusion of {"strict": true} does not give any errors (for our example). The result of the adaptation of the module DemoGrid.ts is shown under the spoiler.
// ClientApp/components/DemoGrid.ts import Vue from "vue"; interface DemoGridProps { rows: Array<any>; columns: Array<string>; filterKey: string; } interface DemoGridData { sortKey: string; sortOrders: { [index: string]: number }; } export default Vue.extend({ template: '#demo-grid-template', props: ['rows', 'columns', 'filterKey'], //props: { rows: Array, columns: Array, filterKey: String }, data: function () { var sortOrders: any = {}; (this.$props as DemoGridProps).columns.forEach(function (key) { sortOrders[key] = 1 }) return { sortKey: '', sortOrders: sortOrders } as DemoGridData }, computed: { filteredData: function () { var thisData = (this.$data as DemoGridData); var thisProps = (this.$props as DemoGridProps); var sortKey = thisData.sortKey var filterKey = thisProps.filterKey && thisProps.filterKey.toLowerCase() var order = thisData.sortOrders[sortKey] || 1 var rows = thisProps.rows if (filterKey) { rows = rows.filter(function (row) { return Object.keys(row).some(function (key) { return String(row[key]).toLowerCase().indexOf(filterKey) > -1 }) }) } if (sortKey) { rows = rows.slice().sort(function (a, b) { a = a[sortKey] b = b[sortKey] return (a === b ? 0 : a > b ? 1 : -1) * order }) } return rows } }, filters: { capitalize: function (str: string) { return str.charAt(0).toUpperCase() + str.slice(1) } }, methods: { sortBy: function (key: string) { var thisData = (this.$data as DemoGridData); thisData.sortKey = key thisData.sortOrders[key] = thisData.sortOrders[key] * -1 } } }); You can compare your result of performing the described actions with the TryVueMvcGrid project on github.
Conclusion
The method for determining a Vue component through a decorator has its advantages and disadvantages. One of the drawbacks is the need to restructure the code when a working example is written in JavaScript. What requires more accuracy.
The strict typing option through the explicit definition of interfaces for the "data" and "props" options allows you to turn on the brains less at the stage of transferring the JavaScript code of the Vue component.
In addition, the interfaces enable the reuse of type definitions for input and output data of a Vue component. After all, the type of input data of one component often coincides with the output data of another.
Thanks
- Capital quotes are taken from an article on Habré: "The creator of Vue.js responds to Habr"
- Photo of a cat with a crutch taken here .
- When creating examples partially used: "TypeScript Vue Starter" .
- When creating the examples used: "Grid Component Example" .
Source: https://habr.com/ru/post/351216/
All Articles