Batch image processing in Windows with ImageMagick. Part I
ImageMagick is a free and cross-platform graphics editor.
It consists of several console utilities. His opportunities do not count as the stars in the sky.
There are many examples of how to use it online. But most of them are for Linux or PHP. For Windows, their cat cried. It is time to fill the gap.
There are many versions of ImageMagick. If the machine is no longer young and the memory is no more than 1024 MB, you will have Q8. Otherwise, download Q16 .
During installation, check the checkboxes:
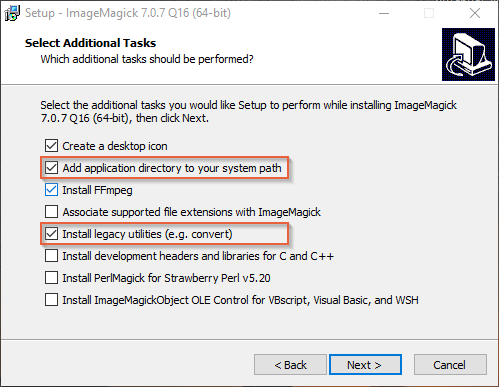
')
Thus, we get the whole set of utilities and add them to the system path variable.
- quality 80 - compression level ( 80 is approximately equal to 60 in Adobe Photoshop )
- filter Lanczos - Lanczos filter.
- gaussian-blur 0.05 - blur according to Gauss .
Parameters: Radius × Sigma in pixels. Sigma is the standard deviation from the normal Gaussian distribution . Slight blurring reduces the size, but reduces the quality when scaling an image.
- sampling-factor 4: 2: 0 - color subsampling .
A value of 4: 2: 0 reduces the resolution of the chroma channel to half. Only applies if the -quality parameter is less than 90. The -sampling-factor parameter determines the sample coefficients to be used by the JPEG encoder for chrominance sampling. If this option is omitted, the JPEG library will use its own default values. It is recommended to use it together with the -define jpeg parameter : dct-method = float , which gives a slight improvement in quality, without increasing the file size, since it uses a more accurate discrete cosine transform with a floating comma.
- unsharp 0x3 + 1 + 0 - gives a feeling of greater clarity of the image .
Values: Radius × Sigma + Gain + Threshold.
The radius is the radius of the Gaussian blur in pixels, not counting the central pixel ( 0 by default ). For acceptable results, the radius must be greater than sigma. If it is not set or set to zero, ImageMagick will calculate the maximum possible radius that will give acceptable results for the Gaussian distribution.
Sigma is the standard deviation of the gaussian blur in pixels ( 1.0 by default ). It is an important argument and determines the actual amount of blur that will take place.
Gain - the amount of difference between the original and the blurred image, which is added back to the original ( default 1.0 ).
Threshold - the amount of the quantitative difference between images ( default 0.05 ).
- colorspace RGB - RGB color space.
- interlace Plane - used if progressive JPEG is needed.
- strip — deletes all metadata ( exif, color profile, etc. ).
- resize - resizes the image in pixels.
- thumbnail - option similar to -resize. In addition to resizing, it also removes image metadata. They say that it works faster and better than -resize.
Resize width 100px, with the same aspect ratio ( height will change proportionally ):
Resize the height of 150px, with the same aspect ratio (the width will change proportionally ).
Resize without saving the aspect ratio:
Resize% ( Percentage ):
I will give for example, a batch file with the utility mogrify.exe (will process and overwrite all the images .jpg , in the directory from which it will be launched ):
PNG is compressed without loss and retains transparency ( alpha channel ).
Although, it is also possible to compress losses. Also, as with jpg, you can use the options: -gaussian-blur, -strip, -resize, -thumbnail, -unsharp.
As well as many options with options for png:
-define png: compression-filter = 2
-define png: compression-level = 9
-define png: compression-strategy = 1
- colors 255 - Why not 256? Because 1 is reserved for the alpha channel.
- depth 8 - number of bits.
- quality 90 - for png, this parameter has a different working principle and different values than for jpg.
For details on these options, see the ImageMagick website. There are a lot of them, for every taste and color. I gave the average parameters that suit me. Now let's see how they can be used in batch files.
Download all batch file >>
I tested all popular PNG compressors. For myself, I concluded: pngquant gives the best lossy PNG compression. If you use it to compress screenshots. With other images - not tested. It works very quickly. With the parameter "--strip" - removes all metadata.
pngquant is a PNG compressor that significantly reduces file sizes by converting images to a more efficient 8-bit PNG format with an alpha channel (often 60-80% less than 24/32-bit PNG files). Compressed images are fully compliant with standards and are supported by all web browsers and operating systems.
Pngquant command line options.
And of course there isa Kalashnikov batch file for batch processing:
For everything to work, you need to put pngquant.exe next to the batch file. Or copy it to any folder and in the batch file, instead of “pngquant.exe” , specify the path “YourPath \ pngquant.exe”
Note: pngquant for some reason does not handle files with Cyrillic names.
But, we digress. In the second part, continue and talk about batch adding watermarks using ImageMagick.
It consists of several console utilities. His opportunities do not count as the stars in the sky.
There are many examples of how to use it online. But most of them are for Linux or PHP. For Windows, their cat cried. It is time to fill the gap.
First was the installation
There are many versions of ImageMagick. If the machine is no longer young and the memory is no more than 1024 MB, you will have Q8. Otherwise, download Q16 .
During installation, check the checkboxes:
')
Thus, we get the whole set of utilities and add them to the system path variable.
Batch compression and resize PNG and JPG using ImageMagick
Resize and compression perform two ImageMagick utilities:
mogrify.exe - changes the original image.
convert.exe - based on the source, creates a new, modified image.
Jpg. Basic ImageMagick options for compressing and resizing
- quality 80 - compression level ( 80 is approximately equal to 60 in Adobe Photoshop )
- filter Lanczos - Lanczos filter.
- gaussian-blur 0.05 - blur according to Gauss .
Parameters: Radius × Sigma in pixels. Sigma is the standard deviation from the normal Gaussian distribution . Slight blurring reduces the size, but reduces the quality when scaling an image.
- sampling-factor 4: 2: 0 - color subsampling .
A value of 4: 2: 0 reduces the resolution of the chroma channel to half. Only applies if the -quality parameter is less than 90. The -sampling-factor parameter determines the sample coefficients to be used by the JPEG encoder for chrominance sampling. If this option is omitted, the JPEG library will use its own default values. It is recommended to use it together with the -define jpeg parameter : dct-method = float , which gives a slight improvement in quality, without increasing the file size, since it uses a more accurate discrete cosine transform with a floating comma.
- unsharp 0x3 + 1 + 0 - gives a feeling of greater clarity of the image .
Values: Radius × Sigma + Gain + Threshold.
The radius is the radius of the Gaussian blur in pixels, not counting the central pixel ( 0 by default ). For acceptable results, the radius must be greater than sigma. If it is not set or set to zero, ImageMagick will calculate the maximum possible radius that will give acceptable results for the Gaussian distribution.
Sigma is the standard deviation of the gaussian blur in pixels ( 1.0 by default ). It is an important argument and determines the actual amount of blur that will take place.
Gain - the amount of difference between the original and the blurred image, which is added back to the original ( default 1.0 ).
Threshold - the amount of the quantitative difference between images ( default 0.05 ).
- colorspace RGB - RGB color space.
- interlace Plane - used if progressive JPEG is needed.
- strip — deletes all metadata ( exif, color profile, etc. ).
- resize - resizes the image in pixels.
- thumbnail - option similar to -resize. In addition to resizing, it also removes image metadata. They say that it works faster and better than -resize.
It is important to understand that there is no "best" settings. Applying the same settings to all images will not give the best results. Some images will appear blurry, or vice versa, too sharp. Therefore, you need to select the "average" parameters that suit you.Examples of using the -thumbnail parameter:
Resize width 100px, with the same aspect ratio ( height will change proportionally ):
convert img.jpg -thumbnail 100x img1.jpg Resize the height of 150px, with the same aspect ratio (the width will change proportionally ).
convert img.jpg -thumbnail x150 img1.jpg Resize without saving the aspect ratio:
convert img.jpg -thumbnail 100x150! img1.jpg Resize% ( Percentage ):
convert img.jpg -thumbnail 20% img1.jpg For convenient batch processing of images, we will use batch files . These are batch files with the extension .BAT or .CMD. In the examples with jpg, we will set the compression with the quality of 80 and resize the width of 800px.
The batch file will change the image, only in the directory from which it is launched. He will create the Compressed folder and write modified images to it, adding to the name "_Compressed.jpg".
JPG - batch file for compression and resize with losses
The best, in my opinion, option for jpg:
@Echo Off Setlocal color 0a set "Source=%~dp0" cd /d "%~dp0" if not exist ".\*.jpg" ( echo. echo FAILED! Files *.jpg not found. echo. pause endlocal & exit ) else ( echo. echo Compress all JPG in a Directory: echo %Source% if not exist Compressed mkdir Compressed for %%i in (*.jpg) do ( convert ^ -quality 80 ^ -filter Lanczos ^ -sampling-factor 4:2:0 ^ -define jpeg:dct-method=float ^ -thumbnail 800x ^ "%%i" ".\Compressed\%%~ni_Compressed.jpg" ) )&& cls echo. echo Process done! echo. pause endlocal & exit What makes this batch file? In the directory from which it is launched, find all files with the extension * .jpg. It also creates the “Compressed” folder and copies all the processed images into it, adding “_Compressed.jpg” to their name.
I will give for example, a batch file with the utility mogrify.exe (will process and overwrite all the images .jpg , in the directory from which it will be launched ):
An example of a batch file with the utility mogrify.exe:
@Echo Off Setlocal color 0a set "Source=%~dp0" cd /d "%~dp0" if not exist ".\*.jpg" ( echo. echo FAILED! Files *.jpg not found. echo. pause endlocal & exit ) else ( echo. echo: mogrify: compress all JPG in a Directory: echo: %Source% for %%i in (*.jpg) do ( mogrify ^ -quality 80 ^ -filter Lanczos ^ -sampling-factor 4:2:0 ^ -define jpeg:dct-method=float ^ -gaussian-blur 0.05 ^ -thumbnail 800x ^ "%%i" ) )&& cls echo. echo Process done! echo. pause endlocal & exit Png. Basic ImageMagick options for compressing and resizing
PNG is compressed without loss and retains transparency ( alpha channel ).
Although, it is also possible to compress losses. Also, as with jpg, you can use the options: -gaussian-blur, -strip, -resize, -thumbnail, -unsharp.
As well as many options with options for png:
-define png: compression-filter = 2
-define png: compression-level = 9
-define png: compression-strategy = 1
- colors 255 - Why not 256? Because 1 is reserved for the alpha channel.
- depth 8 - number of bits.
- quality 90 - for png, this parameter has a different working principle and different values than for jpg.
For details on these options, see the ImageMagick website. There are a lot of them, for every taste and color. I gave the average parameters that suit me. Now let's see how they can be used in batch files.
PNG - batch file for compression and resize
Option 1. Compression and resize 400px width without loss:
@echo off Setlocal color 0a set "Source=%~dp0" cd /d "%~dp0" if not exist ".\*.png" ( echo. echo FAILED! Files *.png not found. echo. pause endlocal & exit ) else ( echo. echo Lossy compress all PNG in a Directory: echo %Source% if not exist Compressed mkdir Compressed FOR %%i IN (.\*.png) DO ( convert ^ -thumbnail 400x ^ -define png:compression-level=9 ^ -define png:compression-filter=2 ^ -define png:compression-strategy=1 ^ "%%i" ".\Compressed\%%~ni_Compressed.png" ) )&& cls echo. echo Process done! echo. pause endlocal & exit Option 2. Compression and resize 400px width with losses:
@Echo Off Setlocal color 0a set Source="%~dp0" cd /d "%~dp0" if not exist ".\*.png" ( echo. echo FAILED! Files *.png not found. echo. pause endlocal & exit ) else ( echo. echo Lossy compress all PNG in a Directory: echo %Source% if not exist Compressed mkdir Compressed FOR %%i IN (.\*.png) DO ( convert ^ -thumbnail 400x ^ -colors 255 ^ -depth 8 ^ -quality 90 ^ "%%i" ".\Compressed\%%~ni_Compressed.png" ) )&& cls echo. echo Process done! echo. pause endlocal & exit By changing the options and values of the parameters in these batch files, you can choose the right option for you, for batch compression and resize.
What to do if you changed the batch file and it stopped working?
- Remove all spaces at the end of lines.
In Notepad ++ you can do it like this: select all, Edit - Operations with Spaces - Remove trailing spaces and save. Or: Ctrl + A - Ctrl + Shift + B - Ctrl + S. - Check if the UTF-8 encoding is worth without a BOM. If you use Cyrillic in the batch file, OEM 866 encoding.
- Be sure to use the appropriate parameters for this format.
Download all batch file >>
And for dessert
I tested all popular PNG compressors. For myself, I concluded: pngquant gives the best lossy PNG compression. If you use it to compress screenshots. With other images - not tested. It works very quickly. With the parameter "--strip" - removes all metadata.
pngquant is a PNG compressor that significantly reduces file sizes by converting images to a more efficient 8-bit PNG format with an alpha channel (often 60-80% less than 24/32-bit PNG files). Compressed images are fully compliant with standards and are supported by all web browsers and operating systems.
Pngquant command line options.
And of course there is
@Echo Off Setlocal color 0a set "Source=%~dp0" cd /d "%~dp0" if not exist ".\*.png" ( echo. echo FAILED! Files *.png not found. echo. pause endlocal & exit ) else ( echo. echo Lossy compress all PNG in a Directory: echo %Source% if not exist Compressed mkdir Compressed for %%i in (*.png) do ( "pngquant.exe" --strip "%%i" -o ".\Compressed\%%~ni_Compressed.png" && (Echo "%%i" - OK& Rem.) || Echo === "%%i" - FAILED! ) ) echo. echo Process done! echo. pause endlocal & exit For everything to work, you need to put pngquant.exe next to the batch file. Or copy it to any folder and in the batch file, instead of “pngquant.exe” , specify the path “YourPath \ pngquant.exe”
Note: pngquant for some reason does not handle files with Cyrillic names.
But, we digress. In the second part, continue and talk about batch adding watermarks using ImageMagick.
Source: https://habr.com/ru/post/351014/
All Articles