React + SVG game development. Part 3
TL; DR: In these episodes, you'll learn how to get React and Redux to control SVG elements to create a game. The knowledge gained in this series will allow you to create animation not only for games. You can find the final version of the source code developed in this part on GitHub.
(the third part is the final one. In addition to completing the development of the game itself, the authorization using Auth0 and a simple realtime server are considered ).
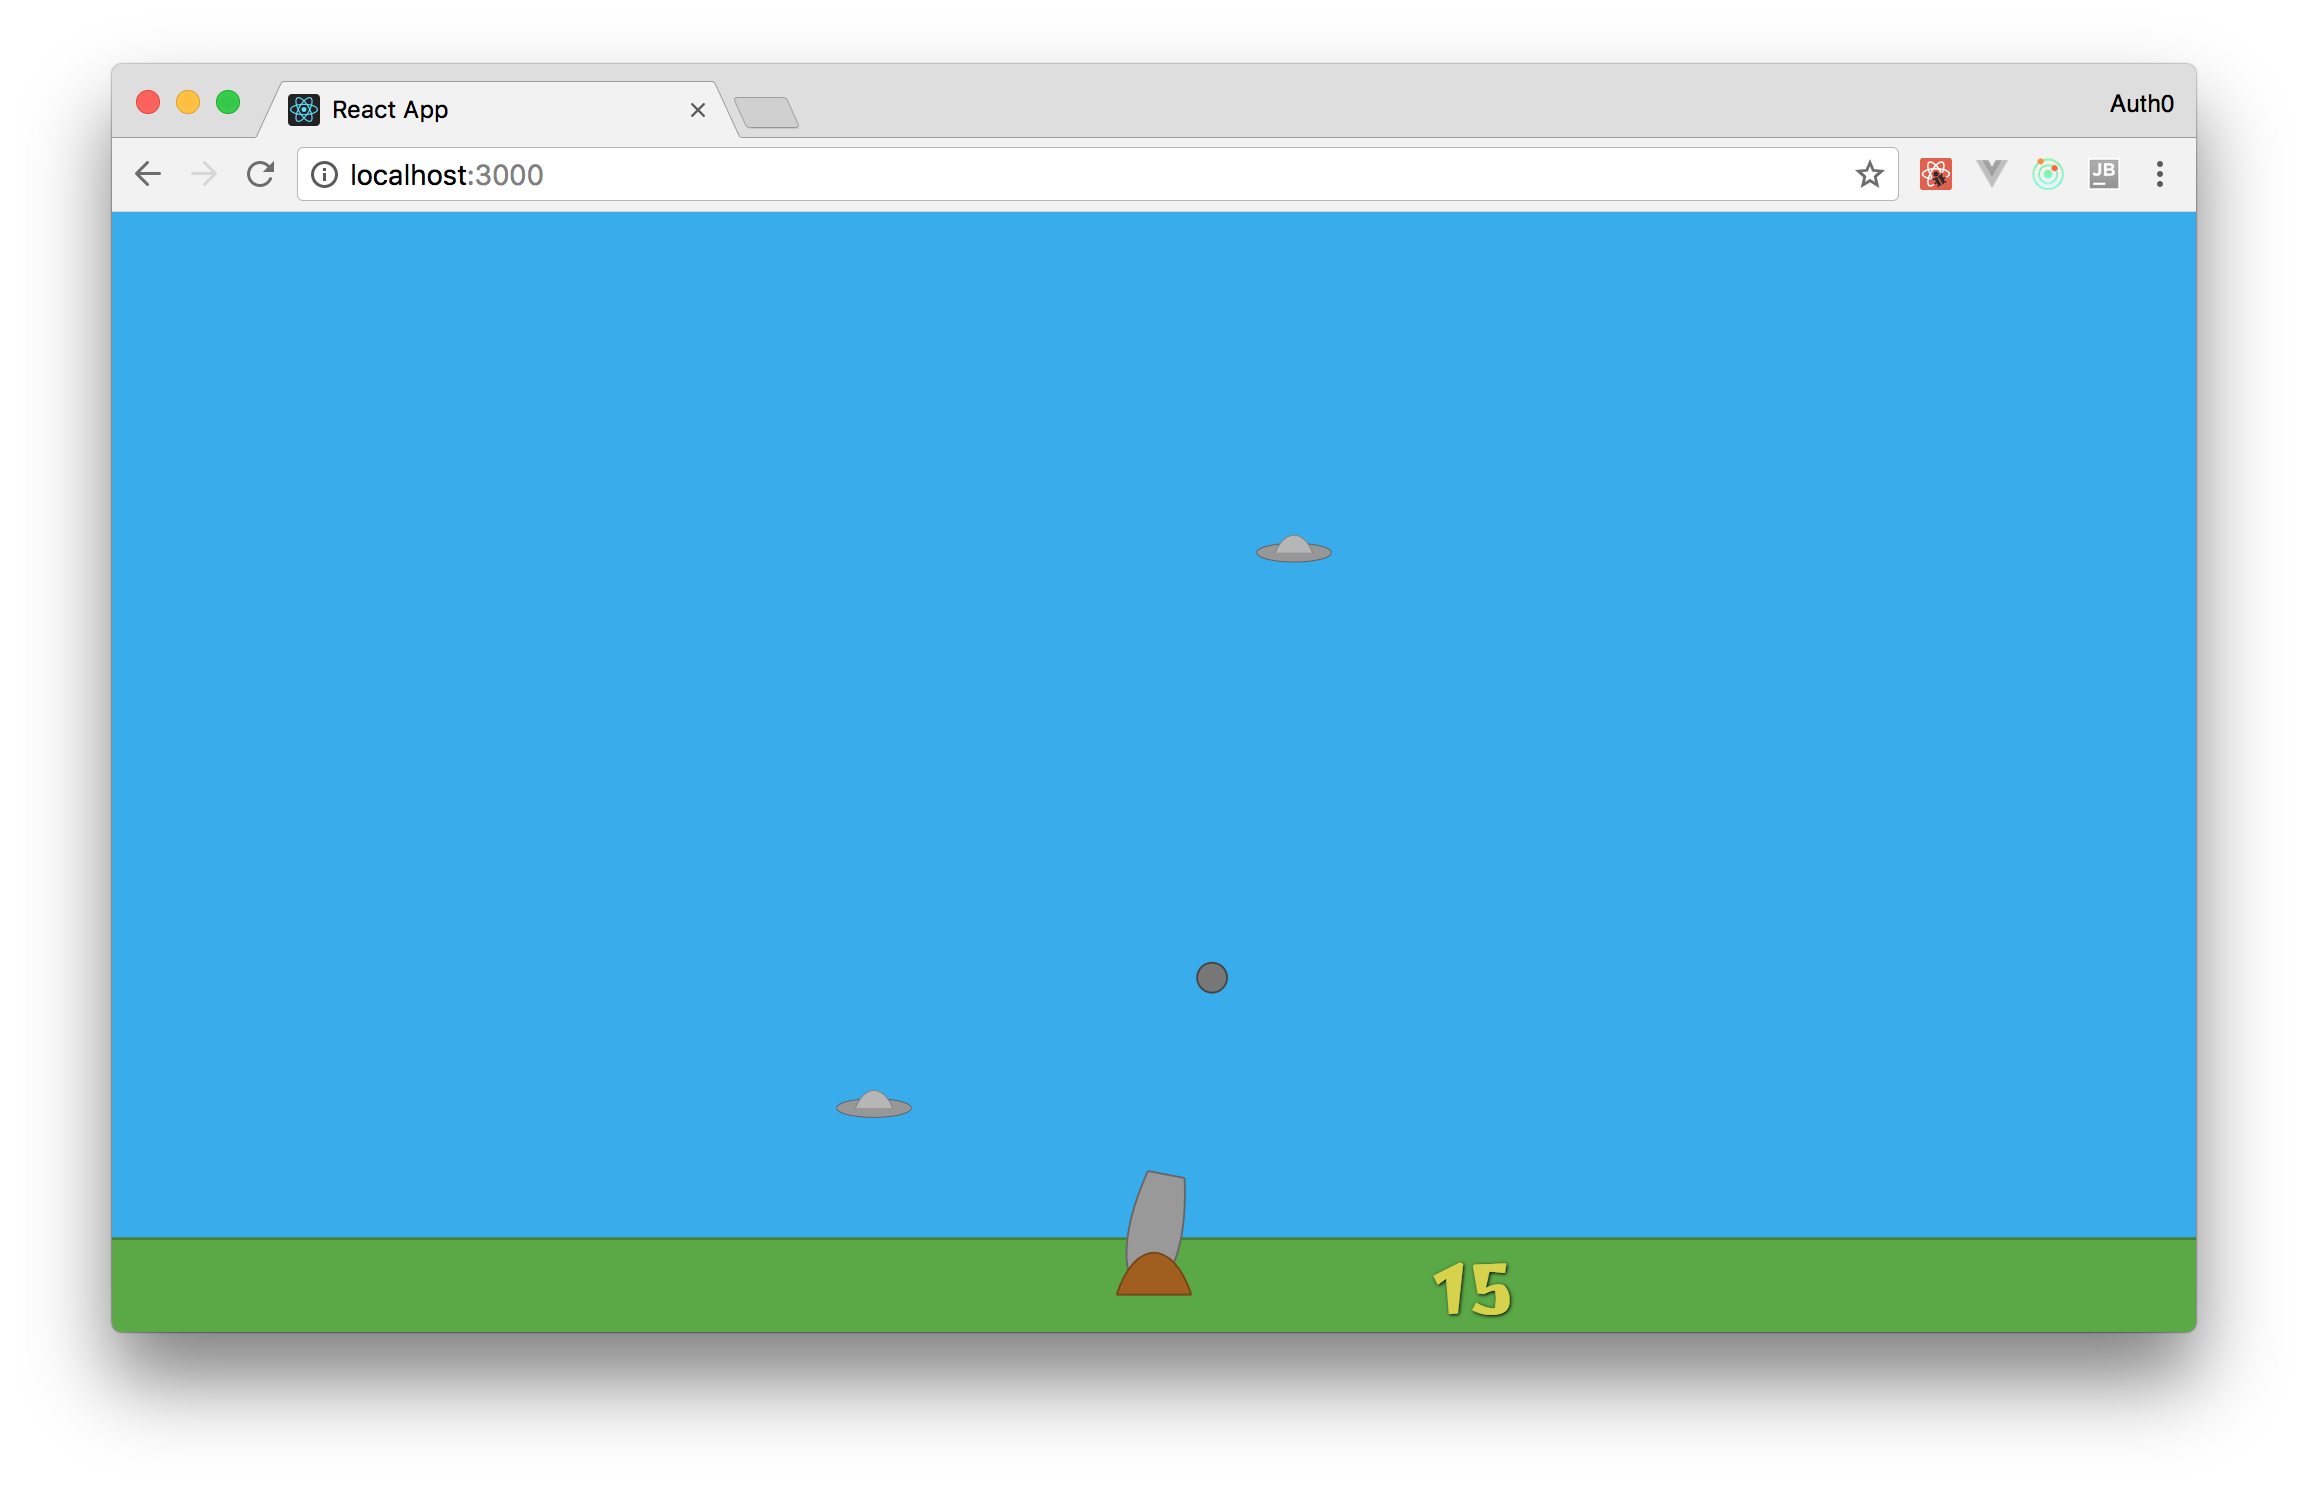
The game, the development of which you will be engaged in this series, is called "Aliens, go home!". The idea of the game is simple: you will have a gun with which you will shoot down "flying discs" that are trying to invade Earth. To destroy these UFOs, you need to fire a cannon by hovering the cursor and clicking the mouse.
If you're interested, you can find and run the final version of the game here (the link does not always work - note of the translator ). But do not get carried away with the game, you have a job!
In the previous series
In the first series, you used create-react-app to quickly launch a React application, and also install and configure Redux to control the state of the game. Then you learned how to use SVG with React components, creating Sky , Ground , CannonBase , and CannonPipe game elements. And finally, you mounted the sight for your gun, using an event handler and an interval to launch the Redux action, which changes the angle of the CannonPipe .
With these exercises, you have “mastered” your skills in creating a game (and not only) with the help of React, Redux and SVG.
In the second series, you created other elements necessary for the game ( Heart , FlyingObject and CannonBall ), gave players the opportunity to start the game and forced the aliens to fly (which they did in the end, right?).
Despite the fact that all these "features" are very cool, the development of the game was still not finished. Your gun still does not peel the nuclei, and there is no algorithm that determines that the nucleus has hit the target. In addition, the value of the CurrentScore component should increase whenever a player knocks down another newcomer.
Killing aliens and seeing how your points accumulate is, of course, cool, but you can make the game even more interesting. To do this, you need to add a leaderboard function - leaderboard ranking. Players will spend even more time to upgrade their rating to the leader.
After completing all these conditions, you can safely say that you have completed the development. In this case, we will not waste time and begin.
Note: if for some reason you do not have the code written in the previous section , you can simply copy it from the GitHub repository . After copying follow the further instructions.
LeaderBoard feature implementation (ranking)
The first thing you need to do in order for your game to truly become a game is to implement the rating function. This will allow players to be in the system, and the game will read their maximum points and show their rank.
Integrating React and Auth0
In order for Auth0 to identify players, you first need an Auth0 account. If you don’t have one yet, you can create a free account here .
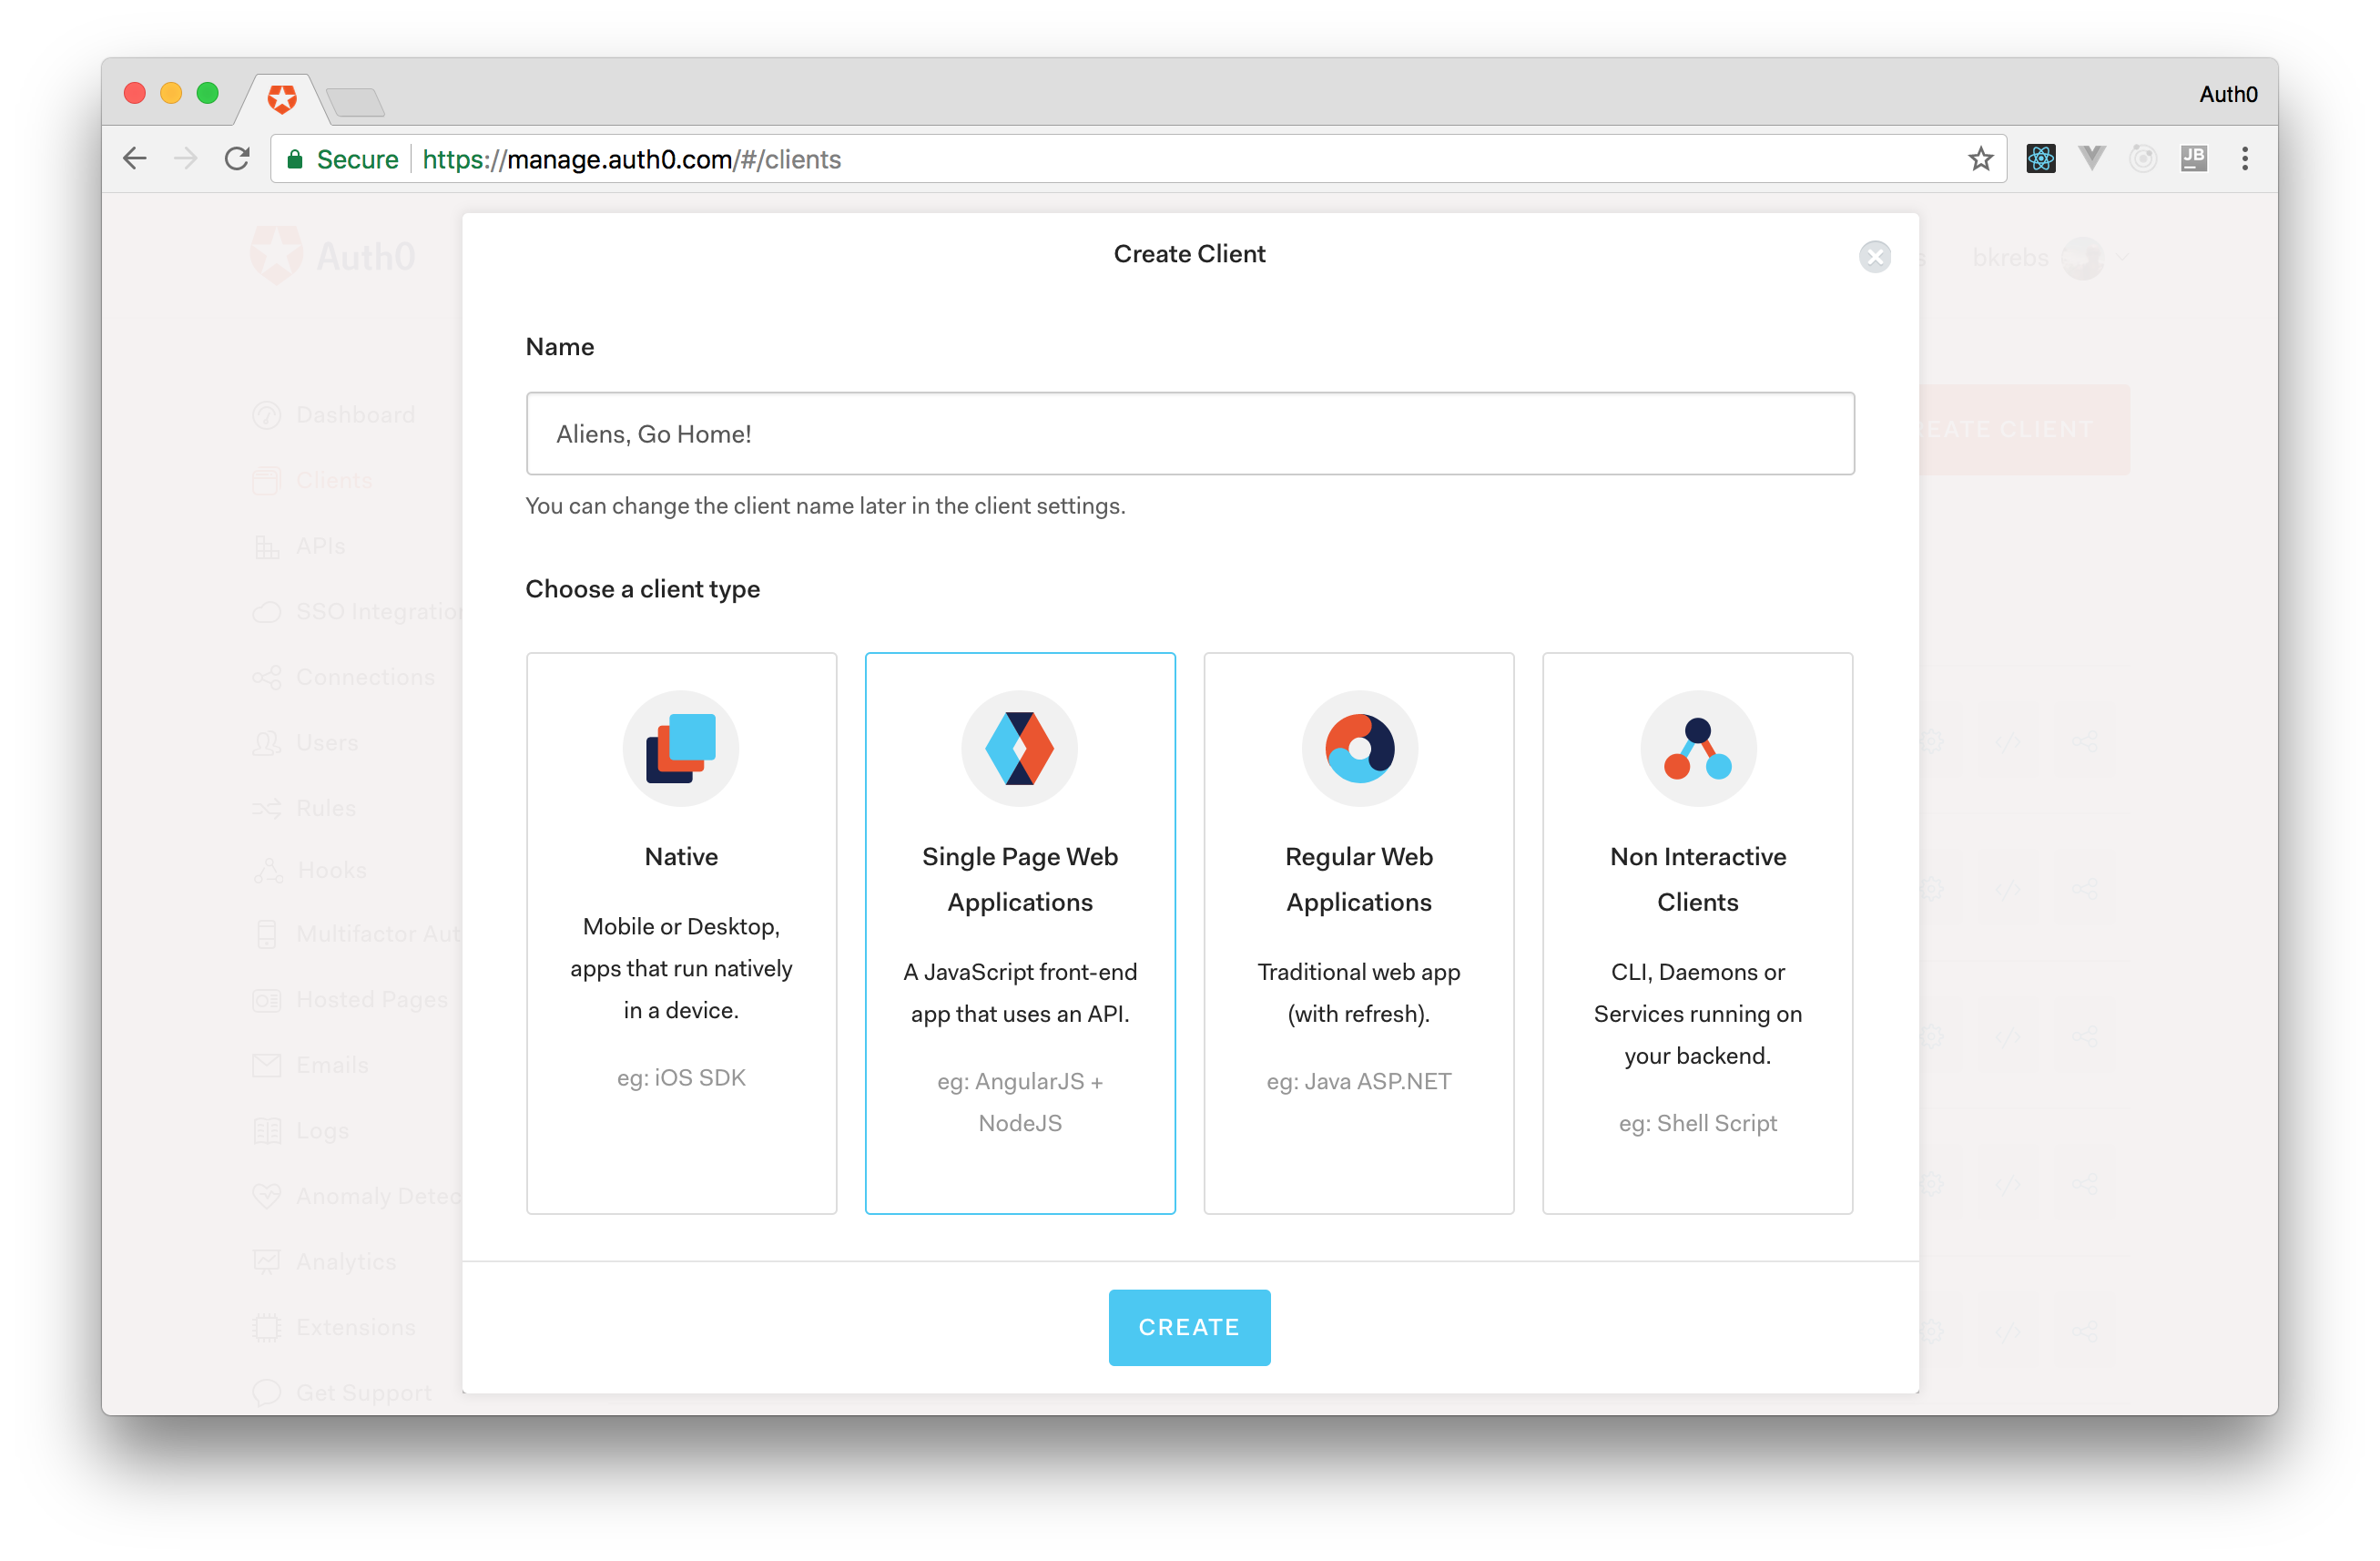
After you start an account, you only need to create an Auth0 Client to represent the game. To do this, go to the "Clients" page on the Auth0 control panel and click the "Create Client" button. On the information panel there will be a form where you need to specify the name and type of the client. You can ask Aliens, Go Home! as a name and choose the Single Page Web Application (your game is a SPA on React). Then click "Create".
After that, you will be redirected to the "Quick Start" tab of your client. Since in this article you will learn how to integrate React and Auth0, you can ignore this tab. Instead, you will need the Settings tab, so open it.
On the "Settings" page you need to do three things. First, add the value http://localhost:3000 to the field called Allowed Callback URLs . As explained on the dashboard ( in the dashboard ), after authenticating with Auth0, the player will be redirected to the URL specified in this field. Thus, if you are going to publish the game on the Internet, be sure to add its public URL (for example, http://aliens-go-home.digituz.com.br ).
After entering all your URLs in this field, click the "Save" button or the ctrl + s keys (if you have a MacBook, press command+s ). There are two things left: copy the values from the "Domain" and "Client ID" fields. But before using them, you need to program a little.
First you need to enter the following command in the root of the game to install the package auth0-web
npm i auth0-web As you can see, this package facilitates the integration between Auth0 and SPA.
The next step is to add a login button to the game so that users can authenticate through Auth0. To do this, create a new Login.jsx file inside the ./src/components directory with the code:
import React from 'react'; import PropTypes from 'prop-types'; const Login = (props) => { const button = { x: -300, y: -600, width: 600, height: 300, style: { fill: 'transparent', cursor: 'pointer', }, onClick: props.authenticate, }; const text = { textAnchor: 'middle', // x: 0, // X y: -440, // 440 style: { fontFamily: '"Joti One", cursive', fontSize: 45, fill: '#e3e3e3', cursor: 'pointer', }, onClick: props.authenticate, }; return ( <g filter="url(#shadow)"> <rect {...button} /> <text {...text}> Login to participate! </text> </g> ); }; Login.propTypes = { authenticate: PropTypes.func.isRequired, }; export default Login; The created component is agnostic in terms of what it performs when pressed. You define this action by adding it to the Canvas component. So, open Canvas.jsx and update:
// ... import Login from './Login'; import { signIn } from 'auth0-web'; const Canvas = (props) => { // ... const definitions return ( <svg ...> // ... { ! props.gameState.started && <g> // ... StartGame Title <Login authenticate={signIn} /> </g> } // ... flyingObjects.map </svg> ); }; // ... propTypes As you can see, in the new version you imported the Login component and the signIn function from the auth0-web package. Another component appeared in the code, which is displayed only until users start the game. You also registered the start of the signIn function when you click the authorization button.
Having done all this, configure the auth0-web with your Auth0 Client properties. To do this, open the App.js file:
// ... import import * as Auth0 from 'auth0-web'; Auth0.configure({ domain: 'YOUR_AUTH0_DOMAIN', // clientID: 'YOUR_AUTH0_CLIENT_ID', // id redirectUri: 'http://localhost:3000/', responseType: 'token id_token', scope: 'openid profile manage:points', }); class App extends Component { // ... componentDidMount() { const self = this; Auth0.handleAuthCallback(); Auth0.subscribe((auth) => { console.log(auth); }); // ... setInterval onresize } // ... trackMouse render } // ... propTypes export Note: you must replaceYOUR_AUTH0_DOMAINandYOUR_AUTH0_CLIENT_IDvalues copied from the Domain and Client ID fields of your Auth0 client. In addition, when publishing a game, you also need to replace the value ofredirectUri.
The improvements in this code are pretty simple. Here is a list:
configure: you used this function to configure theauth0-webpackage with your Auth0 Client properties.handleAuthCallback: This function is called in the"" componentDidMountto determine if a player returns with Auth0 after authentication. The function simply tries to extract the tokens from the URL, and if successful, selects the player profile and saves everything inlocalstorage.subscribe: this function is used to determine whether a player is authenticated or not (true - if access, false - if not).
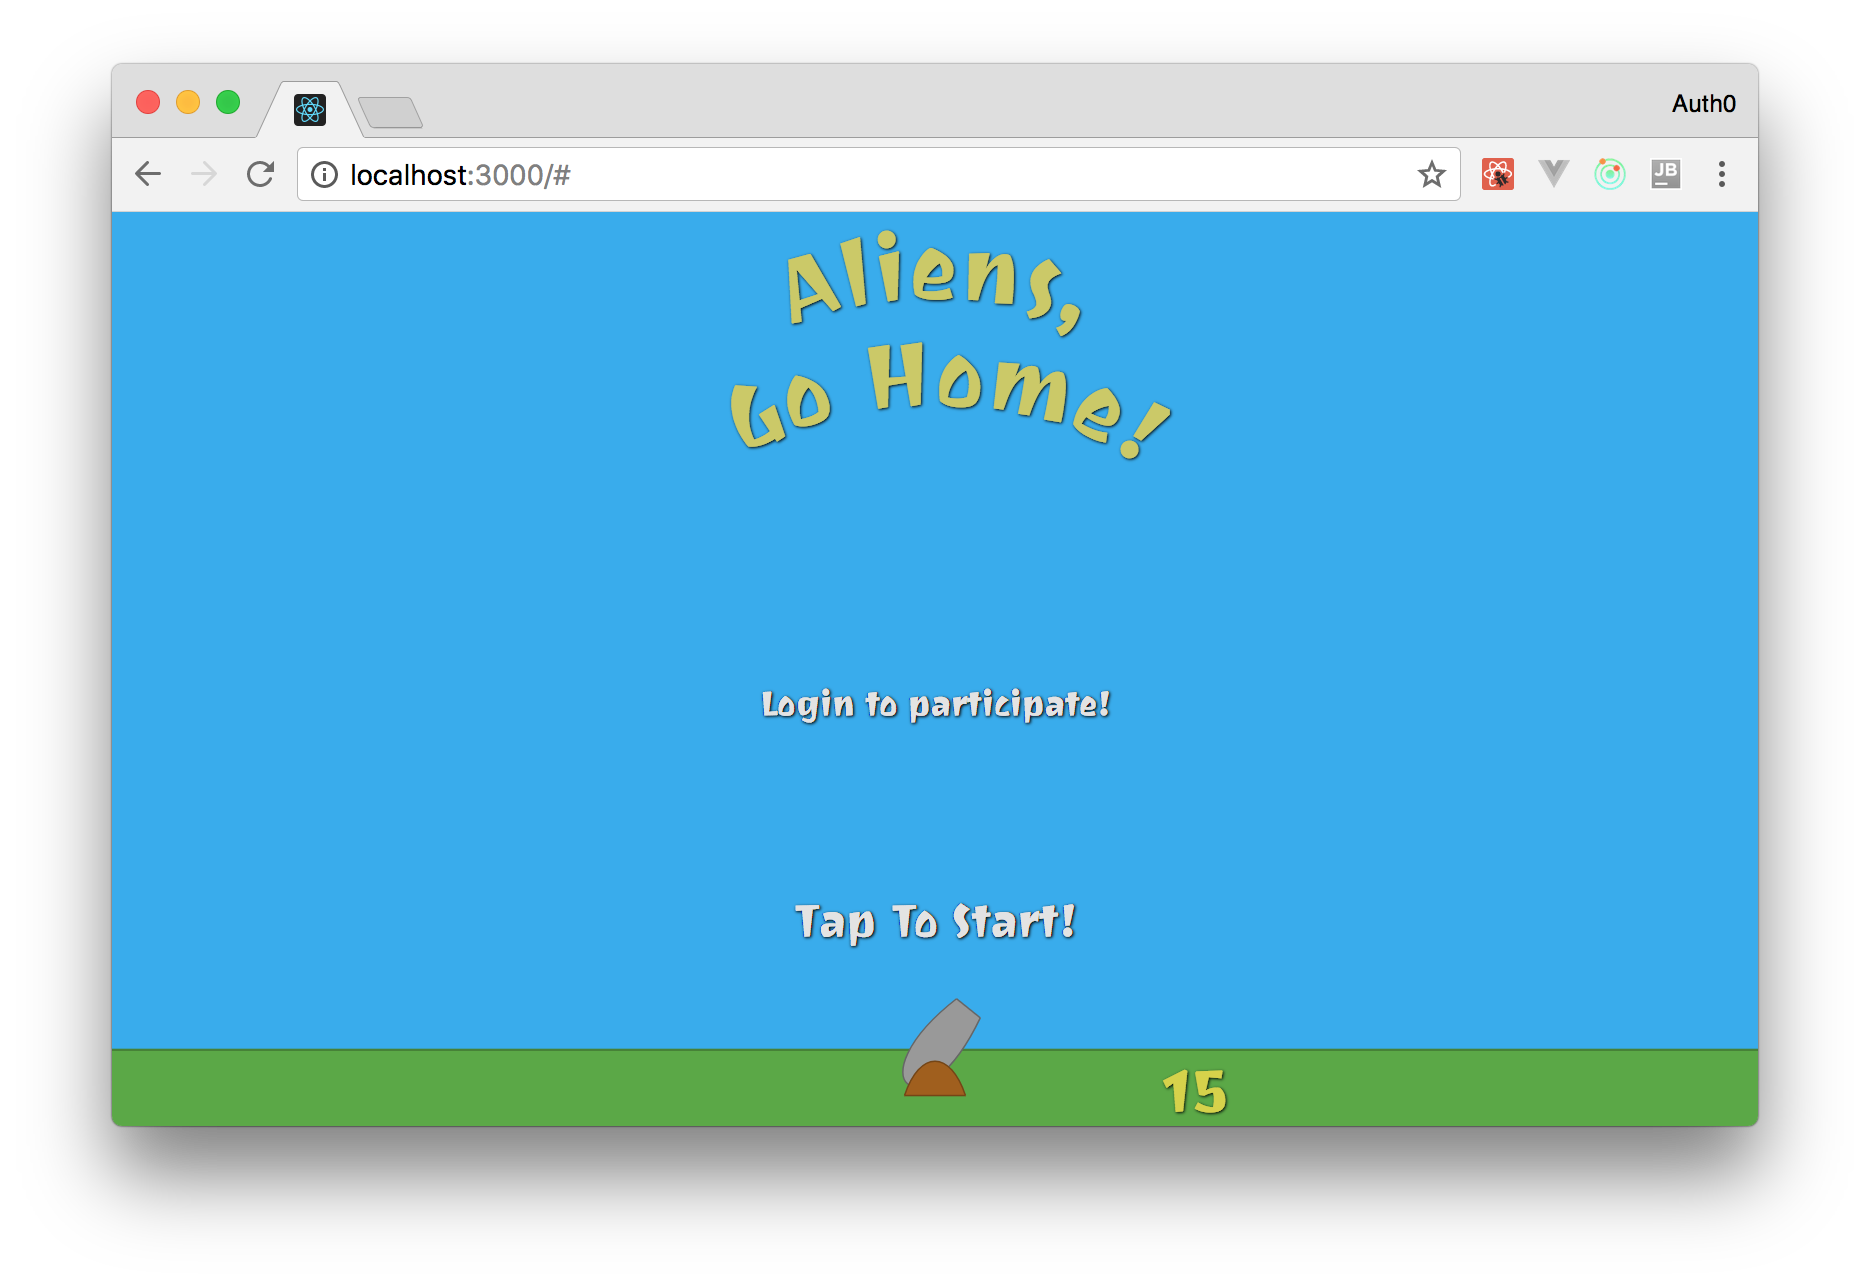
That's it, now your game uses Auth0 as an identity management service . If you now start the application ( npm start ) and open it in the browser ( http://localhost:3000 ), you will see the login button. Clicking on it will take you to the Auth0 login page, where you can log in.
After logging in, Auth0 will redirect you to the game again, where the handleAuthCallback function handleAuthCallback pull out your tokens. Then, when you tell your application to execute console.log , you can see true in the browser console.
Create LeaderBoard (rating)
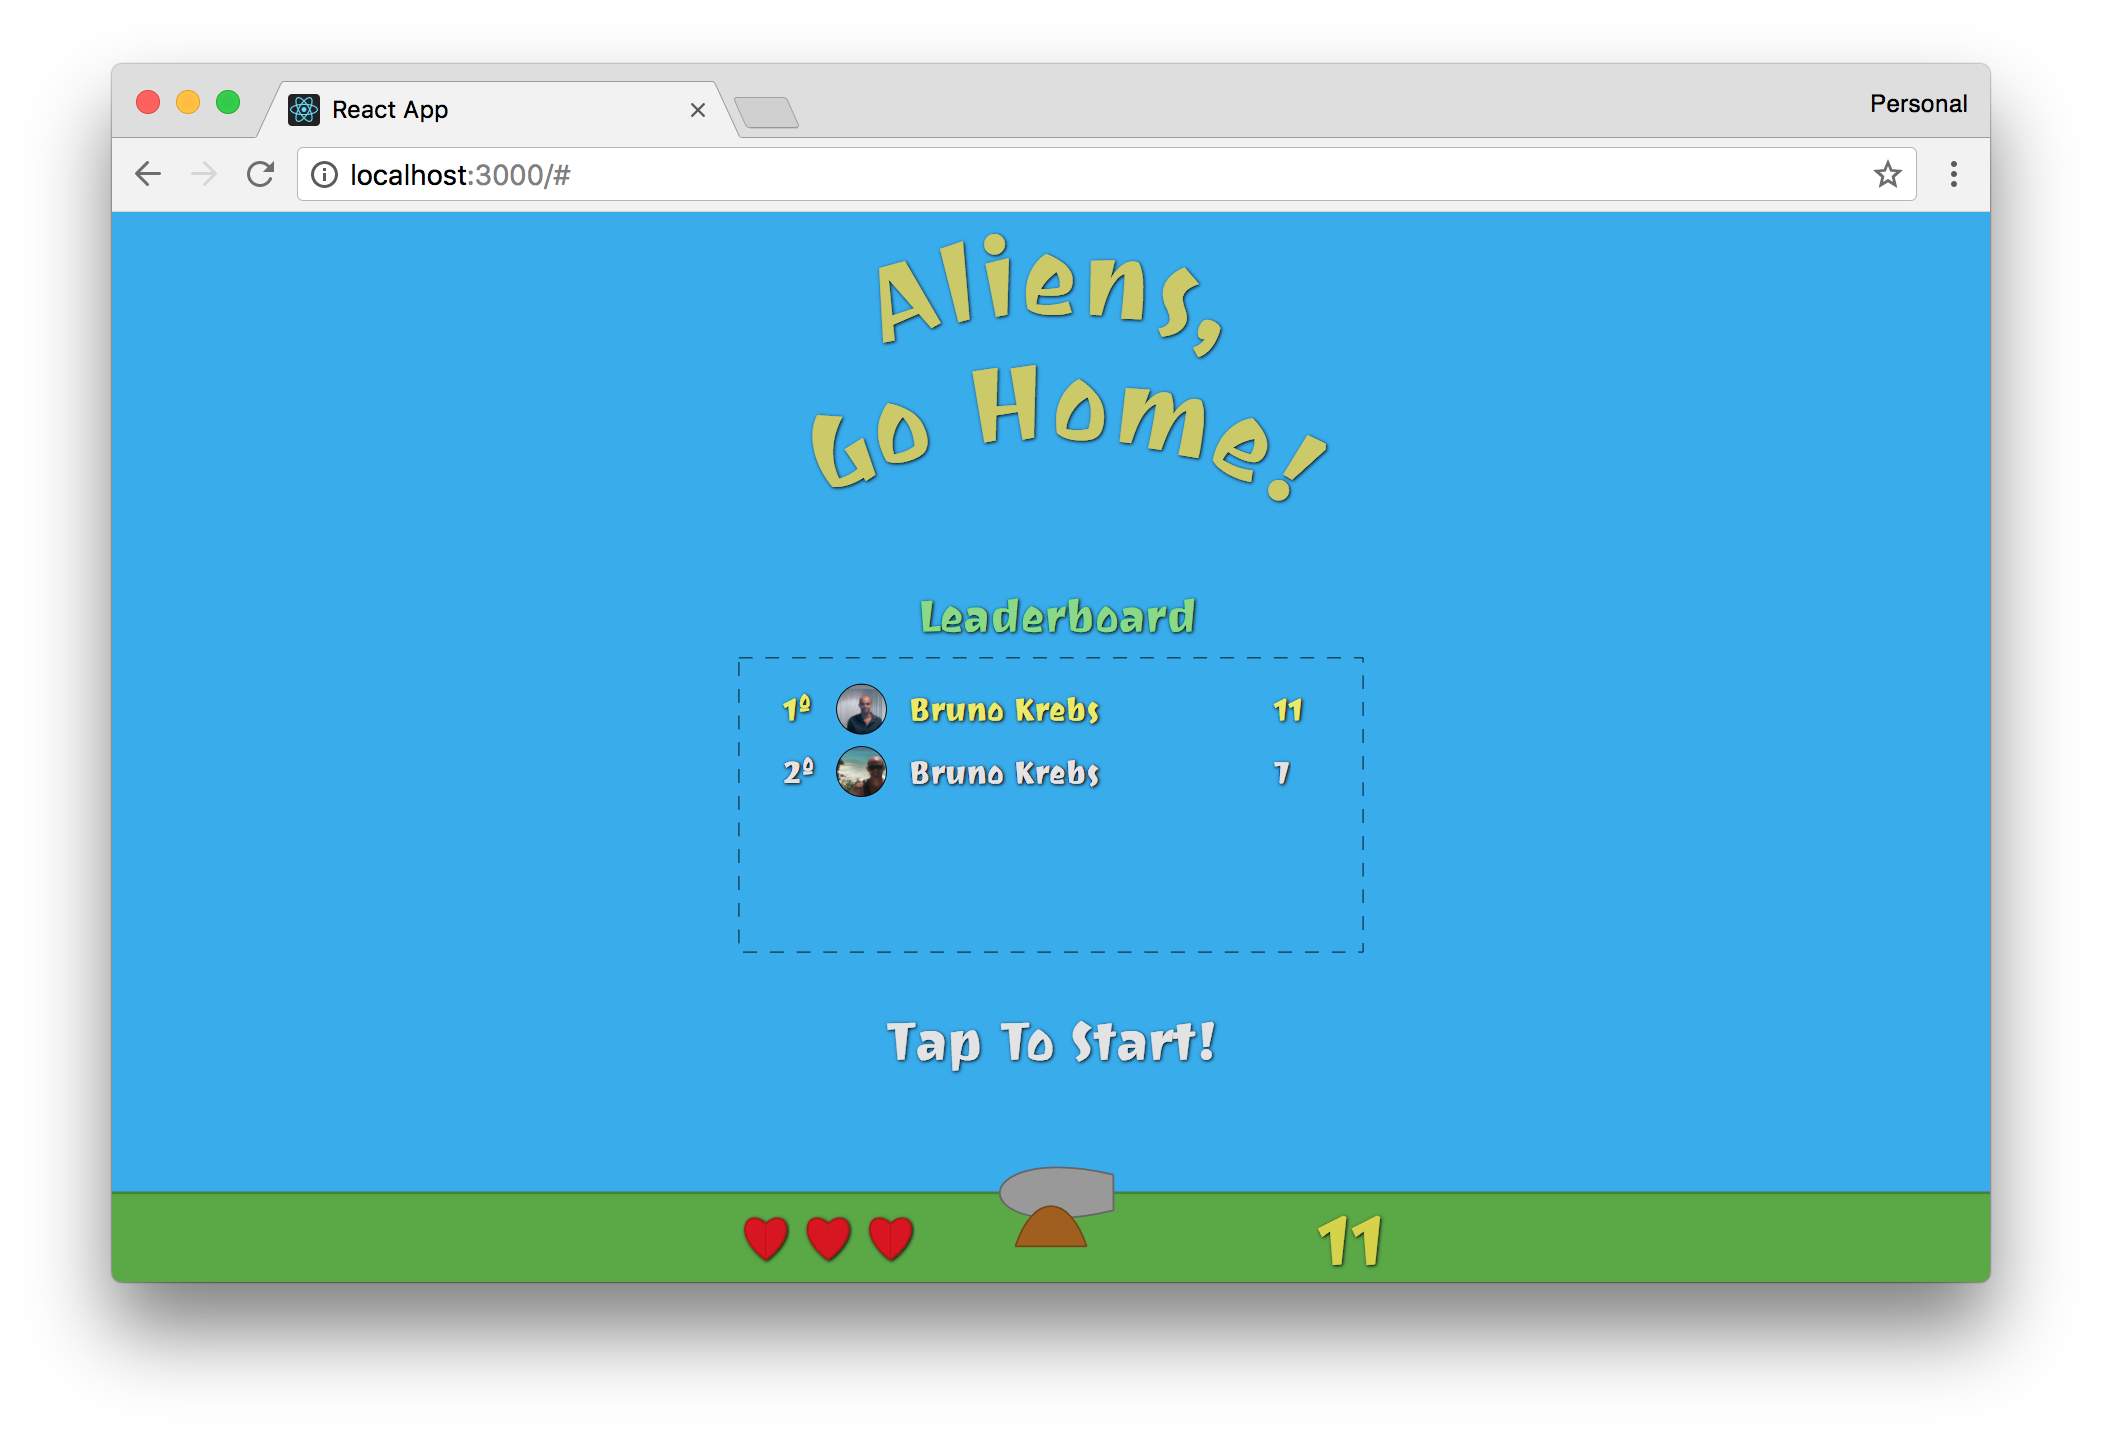
Now that you have configured Auth0 as an identity management system, you need to create components that display the player’s rating and maximum points. They are called: leaderboard and rank . It will require exactly two components, since it is not so easy to display player data beautifully (for example, points scored, name, position and avatar). This is not difficult, but for this you have to write some good code. In general, to make one component out of this is not the most deft device.
Since as long as you do not have players, first of all you need to define some "mock-up data" ( so-called "fish" - comment of the translator ) in order to fill the leaderboard. This is best done in the Canvas component. Also, since you are going to update your canvas, you can also replace the Login component with the Leaderboard component (at the same time, add the Login to the Leaderboard ):
// ... import // Login import Leaderboard from './Leaderboard'; const Canvas = (props) => { // ... () const leaderboard = [ { id: 'd4', maxScore: 82, name: 'Ado Kukic', picture: 'https://twitter.com/KukicAdo/profile_image', }, { id: 'a1', maxScore: 235, name: 'Bruno Krebs', picture: 'https://twitter.com/brunoskrebs/profile_image', }, { id: 'c3', maxScore: 99, name: 'Diego Poza', picture: 'https://twitter.com/diegopoza/profile_image', }, { id: 'b2', maxScore: 129, name: 'Jeana Tahnk', picture: 'https://twitter.com/jeanatahnk/profile_image', }, { id: 'e5', maxScore: 34, name: 'Jenny Obrien', picture: 'https://twitter.com/jenny_obrien/profile_image', }, { id: 'f6', maxScore: 153, name: 'Kim Maida', picture: 'https://twitter.com/KimMaida/profile_image', }, { id: 'g7', maxScore: 55, name: 'Luke Oliff', picture: 'https://twitter.com/mroliff/profile_image', }, { id: 'h8', maxScore: 146, name: 'Sebastián Peyrott', picture: 'https://twitter.com/speyrott/profile_image', }, ]; return ( <svg ...> // ... { ! props.gameState.started && <g> // ... StartGame Title <Leaderboard currentPlayer={leaderboard[6]} authenticate={signIn} leaderboard={leaderboard} /> </g> } // ... flyingObjects.map </svg> ); }; // ... propTypes export In the new version, you described the constant leaderboard , which contains an array of fictional players. These players have the following properties: id , maxScore , name and picture . Then inside the svg element you added a leaderboard component with the following parameters:
currentPlayer: determines who is playing at the moment. You now have fictional players, so you can see how it all works. The purpose of the transfer of this parameter is to make the player highlighted in the table.authenticate: the same parameter that you previously added to theLogincomponent.leaderboard: an array of fake players. Used to display the current rating.
Next, you need to describe the component Leaderboard . To do this, create a new Leaderboard.jsx file in the ./src/components directory and add the following:
import React from 'react'; import PropTypes from 'prop-types'; import Login from './Login'; import Rank from "./Rank"; const Leaderboard = (props) => { const style = { fill: 'transparent', stroke: 'black', strokeDasharray: '15', }; const leaderboardTitle = { fontFamily: '"Joti One", cursive', fontSize: 50, fill: '#88da85', cursor: 'default', }; let leaderboard = props.leaderboard || []; leaderboard = leaderboard.sort((prev, next) => { if (prev.maxScore === next.maxScore) { return prev.name <= next.name ? 1 : -1; } return prev.maxScore < next.maxScore ? 1 : -1; }).map((member, index) => ({ ...member, rank: index + 1, currentPlayer: member.id === props.currentPlayer.id, })).filter((member, index) => { if (index < 3 || member.id === props.currentPlayer.id) return member; return null; }); return ( <g> <text filter="url(#shadow)" style={leaderboardTitle} x="-150" y="-630">Leaderboard</text> <rect style={style} x="-350" y="-600" width="700" height="330" /> { props.currentPlayer && leaderboard.map((player, idx) => { const position = { x: -100, y: -530 + (70 * idx) }; return <Rank key={player.id} player={player} position={position}/> }) } { ! props.currentPlayer && <Login authenticate={props.authenticate} /> } </g> ); }; Leaderboard.propTypes = { currentPlayer: PropTypes.shape({ id: PropTypes.string.isRequired, maxScore: PropTypes.number.isRequired, name: PropTypes.string.isRequired, picture: PropTypes.string.isRequired, }), authenticate: PropTypes.func.isRequired, leaderboard: PropTypes.arrayOf(PropTypes.shape({ id: PropTypes.string.isRequired, maxScore: PropTypes.number.isRequired, name: PropTypes.string.isRequired, picture: PropTypes.string.isRequired, ranking: PropTypes.number, })), }; Leaderboard.defaultProps = { currentPlayer: null, leaderboard: null, }; export default Leaderboard; Do not be scared! In fact, the code is quite simple:
- You define the
leaderboardTitleconstant to set how the ranking table title will look. - You define the
dashedRectangleconstant to create arectelement that will serve as a "container" for the table. - You call the
sortfunction of theprops.leaderboardvariable to sort the rank. After that, the top row of the table will be occupied by the player with the most points, and the bottom - by the least. In case of equality of points among the players, they are ordered by name. - According to the results of the previous action, the
mapfunction is called to add each player his rank and add thecurrentPlayerflag. This flag highlights the line on which the current player is located. - As a result of the previous step (
mapfunction), you use thefilterfunction tofilterout players who are not in the TOP-3. In fact, you allow the current player to remain in the final array, even if he is not among the top three. - Finally, you iterate through the filtered array to show the
Rankelements if the player is logged in (props.currentPlayer&&leaderboard.map), or otherwise theLoginbutton is displayed.
We proceed to the final stage - we create the Rank component. To do this, create a new Rank.jsx file next to the Leaderboard.jsx file with the code:
import React from 'react'; import PropTypes from 'prop-types'; const Rank = (props) => { const { x, y } = props.position; const rectId = 'rect' + props.player.rank; const clipId = 'clip' + props.player.rank; const pictureStyle = { height: 60, width: 60, }; const textStyle = { fontFamily: '"Joti One", cursive', fontSize: 35, fill: '#e3e3e3', cursor: 'default', }; if (props.player.currentPlayer) textStyle.fill = '#e9ea64'; const pictureProperties = { style: pictureStyle, x: x - 140, y: y - 40, href: props.player.picture, clipPath: `url(#${clipId})`, }; const frameProperties = { width: 55, height: 55, rx: 30, x: pictureProperties.x, y: pictureProperties.y, }; return ( <g> <defs> <rect id={rectId} {...frameProperties} /> <clipPath id={clipId}> <use xlinkHref={'#' + rectId} /> </clipPath> </defs> <use xlinkHref={'#' + rectId} strokeWidth="2" stroke="black" /> <text filter="url(#shadow)" style={textStyle} x={x - 200} y={y}>{props.player.rank}º</text> <image {...pictureProperties} /> <text filter="url(#shadow)" style={textStyle} x={x - 60} y={y}>{props.player.name}</text> <text filter="url(#shadow)" style={textStyle} x={x + 350} y={y}>{props.player.maxScore}</text> </g> ); }; Rank.propTypes = { player: PropTypes.shape({ id: PropTypes.string.isRequired, maxScore: PropTypes.number.isRequired, name: PropTypes.string.isRequired, picture: PropTypes.string.isRequired, rank: PropTypes.number.isRequired, currentPlayer: PropTypes.bool.isRequired, }).isRequired, position: PropTypes.shape({ x: PropTypes.number.isRequired, y: PropTypes.number.isRequired }).isRequired, }; export default Rank; Do not be afraid of this code. Only one thing is unusual in it - you add the clipPath and rect elements to this component inside the defs element to create a rounded portrait.
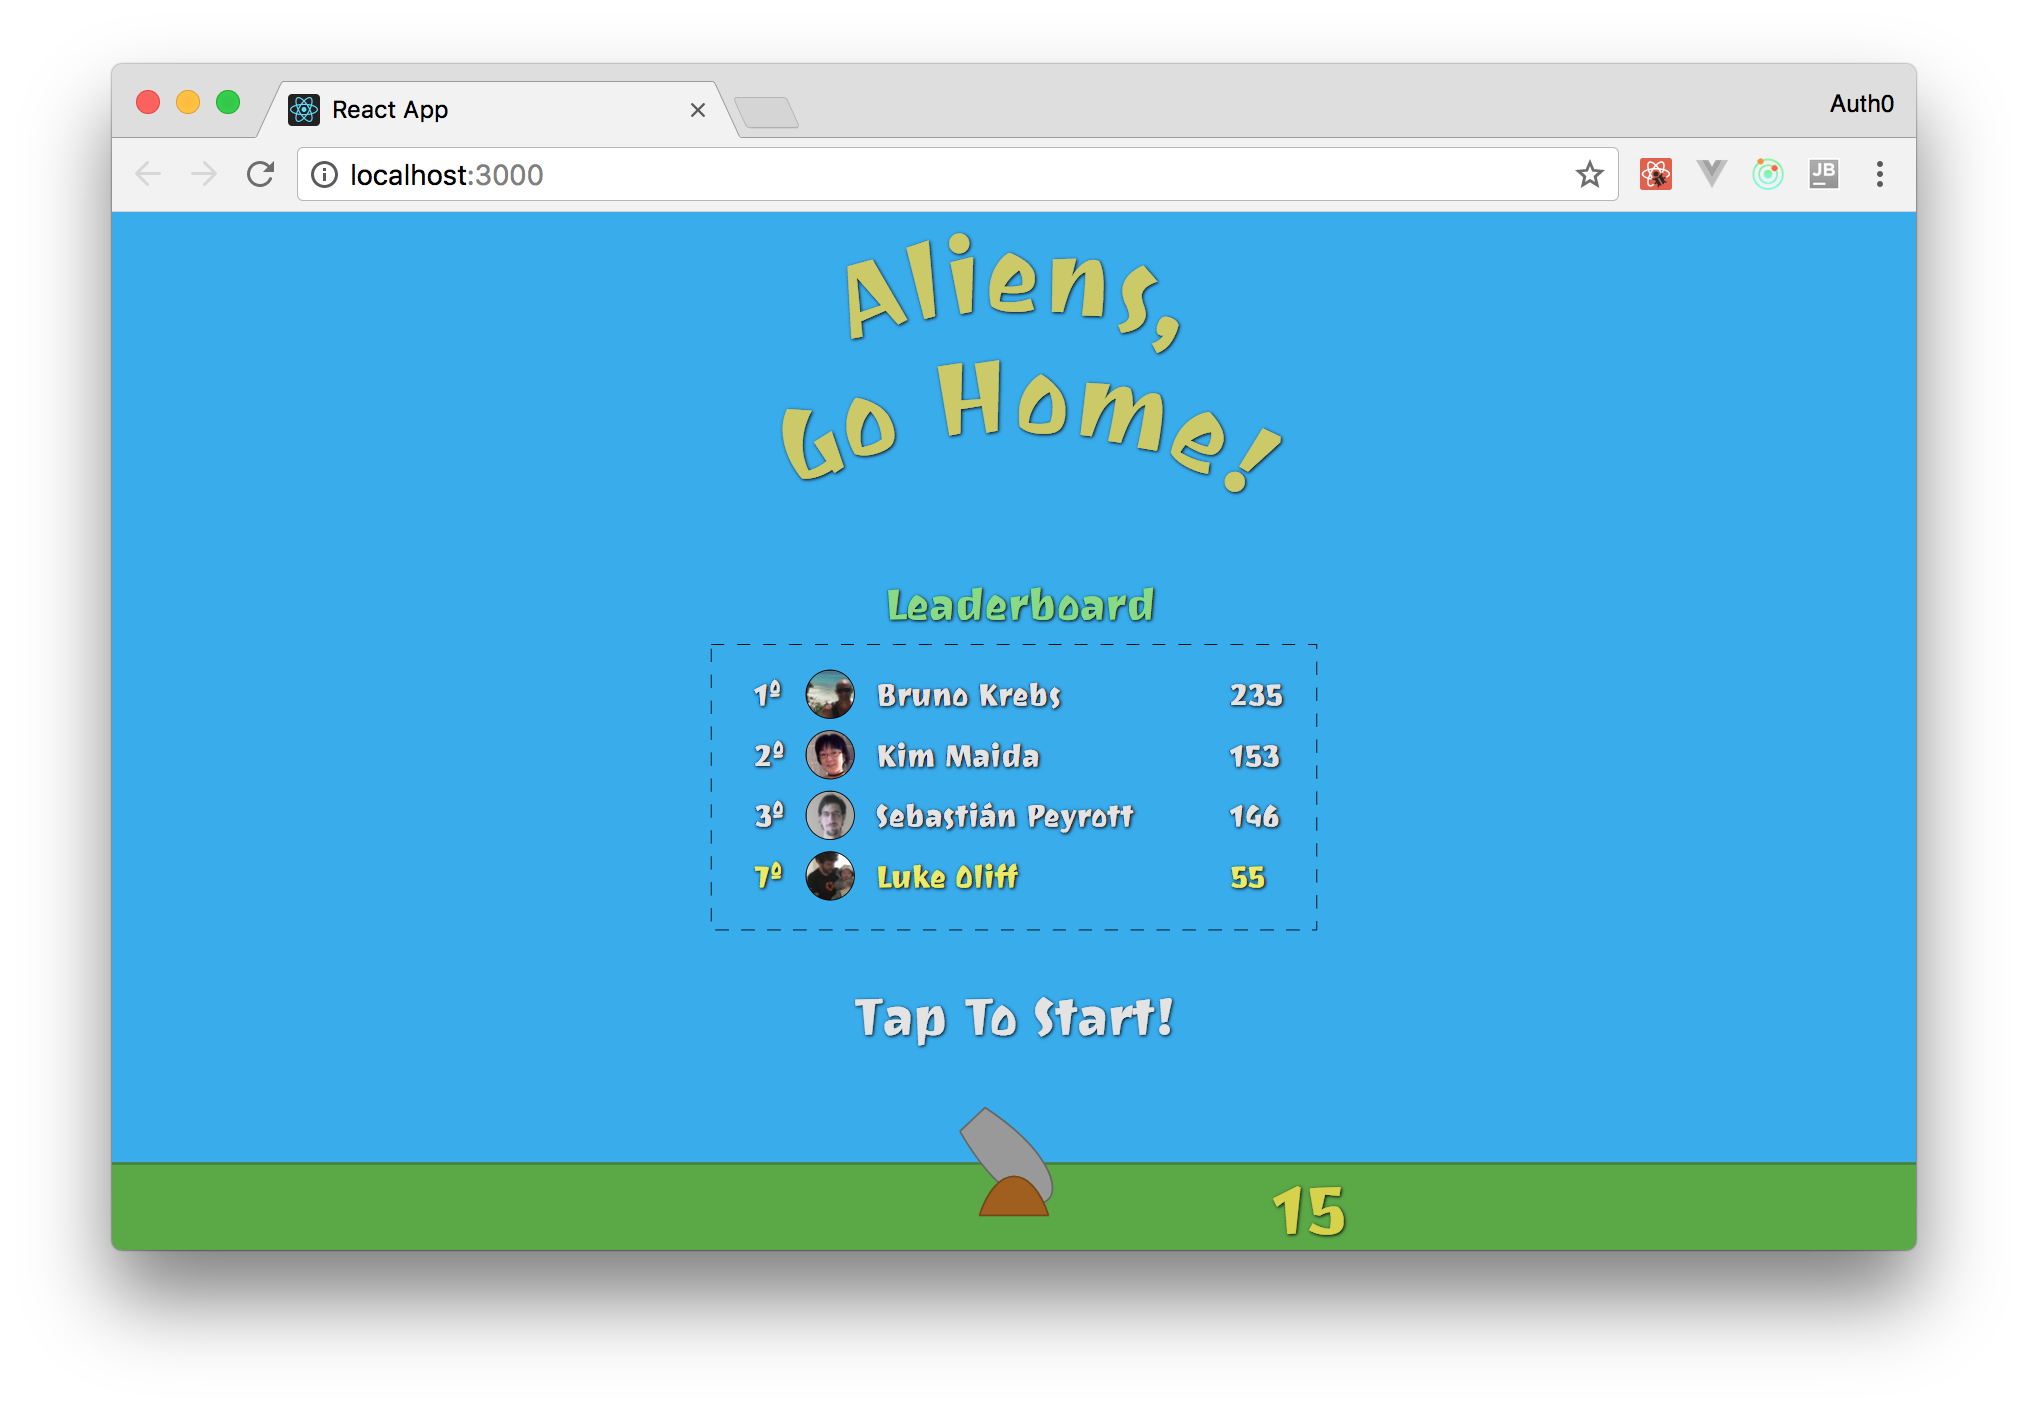
After all this, you can go to the application ( http://localhost:3000/ ) to see your new rating table.
Create a "real-time" rating table using Socket.IO
Great, now you use Auth0 as an identity management service and have all the components to display a rating table. What's next? That's right, you need a backend capable of sending real-time events to update the rating table.
Perhaps you thought it would be difficult to create such a server ( backend )? No, absolutely not. With Socket.IO, you can easily develop this feature. However, you would want to protect this service, right? To do this, you need to create an Auth0 API to represent your service.
Make it not so difficult. Just go to the API page of the Auth0 control panel and click the "Create API" button. After that, you must fill out a form with three fields:
- API name ( name ): you just need to set a friendly name to remember what the given API represents. So call: "Aliens, go back home!".
2. API identifier ( identifier ): here it is recommended to specify the final URL of the game, but in fact you can paste anything. However, enterhttps://aliens-go-home.digituz.com.br. - The Signing Algorithm offers two options: RS256 and HS256. You'd better leave this field blank (default is RS256). If you are interested in what the difference is, check here .

When complete all fields, click "Create". You will be redirected to the Quick Start tab inside your new API. From there, click on the "Scopes" tab ( Fields ) and add a new area called manage:points with the following description: "Reading and writing maximum points." This is a good way to define areas in Auth0 API applications.
After you add an area, you'll have to program a little. To implement a real-time rating table, do the following:
# mkdir server # ( ) cd server # NPM npm init -y # npm i express jsonwebtoken jwks-rsa socket.io socketio-jwt # touch index.js In the new file, add the code:
const app = require('express')(); const http = require('http').Server(app); const io = require('socket.io')(http); const jwt = require('jsonwebtoken'); const jwksClient = require('jwks-rsa'); const client = jwksClient({ jwksUri: 'https://YOUR_AUTH0_DOMAIN/.well-known/jwks.json' // }); const players = [ { id: 'a1', maxScore: 235, name: 'Bruno Krebs', picture: 'https://twitter.com/brunoskrebs/profile_image', }, { id: 'c3', maxScore: 99, name: 'Diego Poza', picture: 'https://twitter.com/diegopoza/profile_image', }, { id: 'b2', maxScore: 129, name: 'Jeana Tahnk', picture: 'https://twitter.com/jeanatahnk/profile_image', }, { id: 'f6', maxScore: 153, name: 'Kim Maida', picture: 'https://twitter.com/KimMaida/profile_image', }, { id: 'e5', maxScore: 55, name: 'Luke Oliff', picture: 'https://twitter.com/mroliff/profile_image', }, { id: 'd4', maxScore: 146, name: 'Sebastián Peyrott', picture: 'https://twitter.com/speyrott/profile_image', }, ]; const verifyPlayer = (token, cb) => { const uncheckedToken = jwt.decode(token, {complete: true}); const kid = uncheckedToken.header.kid; client.getSigningKey(kid, (err, key) => { const signingKey = key.publicKey || key.rsaPublicKey; jwt.verify(token, signingKey, cb); }); }; const newMaxScoreHandler = (payload) => { let foundPlayer = false; players.forEach((player) => { if (player.id === payload.id) { foundPlayer = true; player.maxScore = Math.max(player.maxScore, payload.maxScore); } }); if (!foundPlayer) { players.push(payload); } io.emit('players', players); }; io.on('connection', (socket) => { const { token } = socket.handshake.query; verifyPlayer(token, (err) => { if (err) socket.disconnect(); io.emit('players', players); }); socket.on('new-max-score', newMaxScoreHandler); }); http.listen(3001, () => { console.log('listening on port 3001'); }); Before you YOUR_AUTH0_DOMAIN what this code does, replace YOUR_AUTH0_DOMAIN your Auth0 domain (the one that you added to the App.js file). This value is in the jwksUri property.
Now, to understand how this works, read the following list:
expressandsocket.io: this is just an express server , extended with Socket.IO, to teach it to work in real time. If you have not previously used Socket.IO, check out their tutorial Get Started . It is quite simple.jwtandjwksClient: when authenticating with Auth0, your players will receive (among other things)access_tokenas JWT (JSON Web Token). Since you are using the RS256 algorithm, you need to use thejwksClientpackage to get the correct public key to verify JWT.jwt.verify: how to get the correct key, use this function to decode and evaluate JWT. If everything is in order, you simply send a list of players as requested. If not, thendisconnectclient (socket).on('new-max-score', ...): Finally, you attach thenewMaxScoreHandlerfunction to thenew-max-scoreevent. Thus, whenever you need to update a user's maximum points, you trigger this event from React.
The rest of the code is intuitive. You can focus on integrating this service into the game.
Socket.IO and React
After creating your "realtime backend service", let's proceed to integrating it into React. The best way to use React and Socket.IO is to install socket.io-client . To do this, enter the following code in the root of the React application:
npm i socket.io-client Then you connect the game to your service every time you authenticate players (there will be no unauthorized users in the table). Since you use Redux to store the state of the game, you need two steps to update its storage. Open the ./src/actions/index.js file and update it:
export const LEADERBOARD_LOADED = 'LEADERBOARD_LOADED'; export const LOGGED_IN = 'LOGGED_IN'; // ... MOVE_OBJECTS START_GAME ... export const leaderboardLoaded = players => ({ type: LEADERBOARD_LOADED, players, }); export const loggedIn = player => ({ type: LOGGED_IN, player, }); // ... moveObjects startGame ... The new version defines actions that should be launched in two steps:
LOGGED_IN: this action connects the game to the backend when the player logs in.LEADERBOARD_LOADED:LEADERBOARD_LOADEDthis action, you update the Redux store with “players” when the backend sends a list of players.
To have Redux respond to these steps, open the ./src/reducers/index.js file and update it:
import { LEADERBOARD_LOADED, LOGGED_IN, MOVE_OBJECTS, START_GAME } from '../actions'; // ... import const initialGameState = { // ... currentPlayer: null, players: null, }; // ... initialState function reducer(state = initialState, action) { switch (action.type) { case LEADERBOARD_LOADED: return { ...state, players: action.players, }; case LOGGED_IN: return { ...state, currentPlayer: action.player, }; // ... MOVE_OBJECTS, START_GAME, default case } } export default reducer; , LEADERBOARD_LOADED , Redux . , , , currentPlayer .
, , ./src/containers/Game.js :
// ... import import { leaderboardLoaded, loggedIn, moveObjects, startGame } from '../actions/index'; const mapStateToProps = state => ({ // ... angle gameState currentPlayer: state.currentPlayer, players: state.players, }); const mapDispatchToProps = dispatch => ({ leaderboardLoaded: (players) => { dispatch(leaderboardLoaded(players)); }, loggedIn: (player) => { dispatch(loggedIn(player)); }, // ... moveObjects startGame }); // ... connect export , realtime- ( ), . ./src/App.js :
// ... import import io from 'socket.io-client'; Auth0.configure({ // ... audience: 'https://aliens-go-home.digituz.com.br', }); class App extends Component { // ... componentDidMount() { const self = this; Auth0.handleAuthCallback(); Auth0.subscribe((auth) => { if (!auth) return; const playerProfile = Auth0.getProfile(); const currentPlayer = { id: playerProfile.sub, maxScore: 0, name: playerProfile.name, picture: playerProfile.picture, }; this.props.loggedIn(currentPlayer); const socket = io('http://localhost:3001', { query: `token=${Auth0.getAccessToken()}`, }); let emitted = false; socket.on('players', (players) => { this.props.leaderboardLoaded(players); if (emitted) return; socket.emit('new-max-score', { id: playerProfile.sub, maxScore: 120, name: playerProfile.name, picture: playerProfile.picture, }); emitted = true; setTimeout(() => { socket.emit('new-max-score', { id: playerProfile.sub, maxScore: 222, name: playerProfile.name, picture: playerProfile.picture, }); }, 5000); }); }); // ... setInterval onresize } // ... trackMouse render() { return ( <Canvas angle={this.props.angle} currentPlayer={this.props.currentPlayer} gameState={this.props.gameState} players={this.props.players} startGame={this.props.startGame} trackMouse={event => (this.trackMouse(event))} /> ); } } App.propTypes = { // ... propTypes currentPlayer: PropTypes.shape({ id: PropTypes.string.isRequired, maxScore: PropTypes.number.isRequired, name: PropTypes.string.isRequired, picture: PropTypes.string.isRequired, }), leaderboardLoaded: PropTypes.func.isRequired, loggedIn: PropTypes.func.isRequired, players: PropTypes.arrayOf(PropTypes.shape({ id: PropTypes.string.isRequired, maxScore: PropTypes.number.isRequired, name: PropTypes.string.isRequired, picture: PropTypes.string.isRequired, })), }; App.defaultProps = { currentPlayer: null, players: null, }; export default App; , :
audienceAuth0.- (
Auth0.getProfile())currentPlayer(Redux store) (this.props.loggedIn(...)). - (
io('http://localhost:3001', ...))access_token(Auth0.getAccessToken()). players, , Redux store (this.props.leaderboardLoaded(...)).
, , (events) new-max-score ( ). -, maxScore 120 , 5 . , 5 ( (setTimeout(..., 5000) ), c maxScore , 222 , .
Canvas : currentPlayer players . , ./src/components/Canvas.jsx :
// ... import const Canvas = (props) => { // ... gameHeight viewBox // leaderboard !!!! return ( <svg ...> // ... { ! props.gameState.started && <g> // ... StartGame Title <Leaderboard currentPlayer={props.currentPlayer} authenticate={signIn} leaderboard={props.players} /> </g> } // ... flyingObjects.map </svg> ); }; Canvas.propTypes = { // ... propTypes currentPlayer: PropTypes.shape({ id: PropTypes.string.isRequired, maxScore: PropTypes.number.isRequired, name: PropTypes.string.isRequired, picture: PropTypes.string.isRequired, }), players: PropTypes.arrayOf(PropTypes.shape({ id: PropTypes.string.isRequired, maxScore: PropTypes.number.isRequired, name: PropTypes.string.isRequired, picture: PropTypes.string.isRequired, })), }; Canvas.defaultProps = { currentPlayer: null, players: null, }; export default Canvas; :
leaderboard. .<Leaderboard />. :props.currentPlayerprops.players.propTypes, ,CanvascurrentPlayerplayers.
! Socket.IO. ( — — ., ) :
# cd server # node index.js & # (cd .. = ) cd .. # npm start : ( http://localhost:3000 ). , , :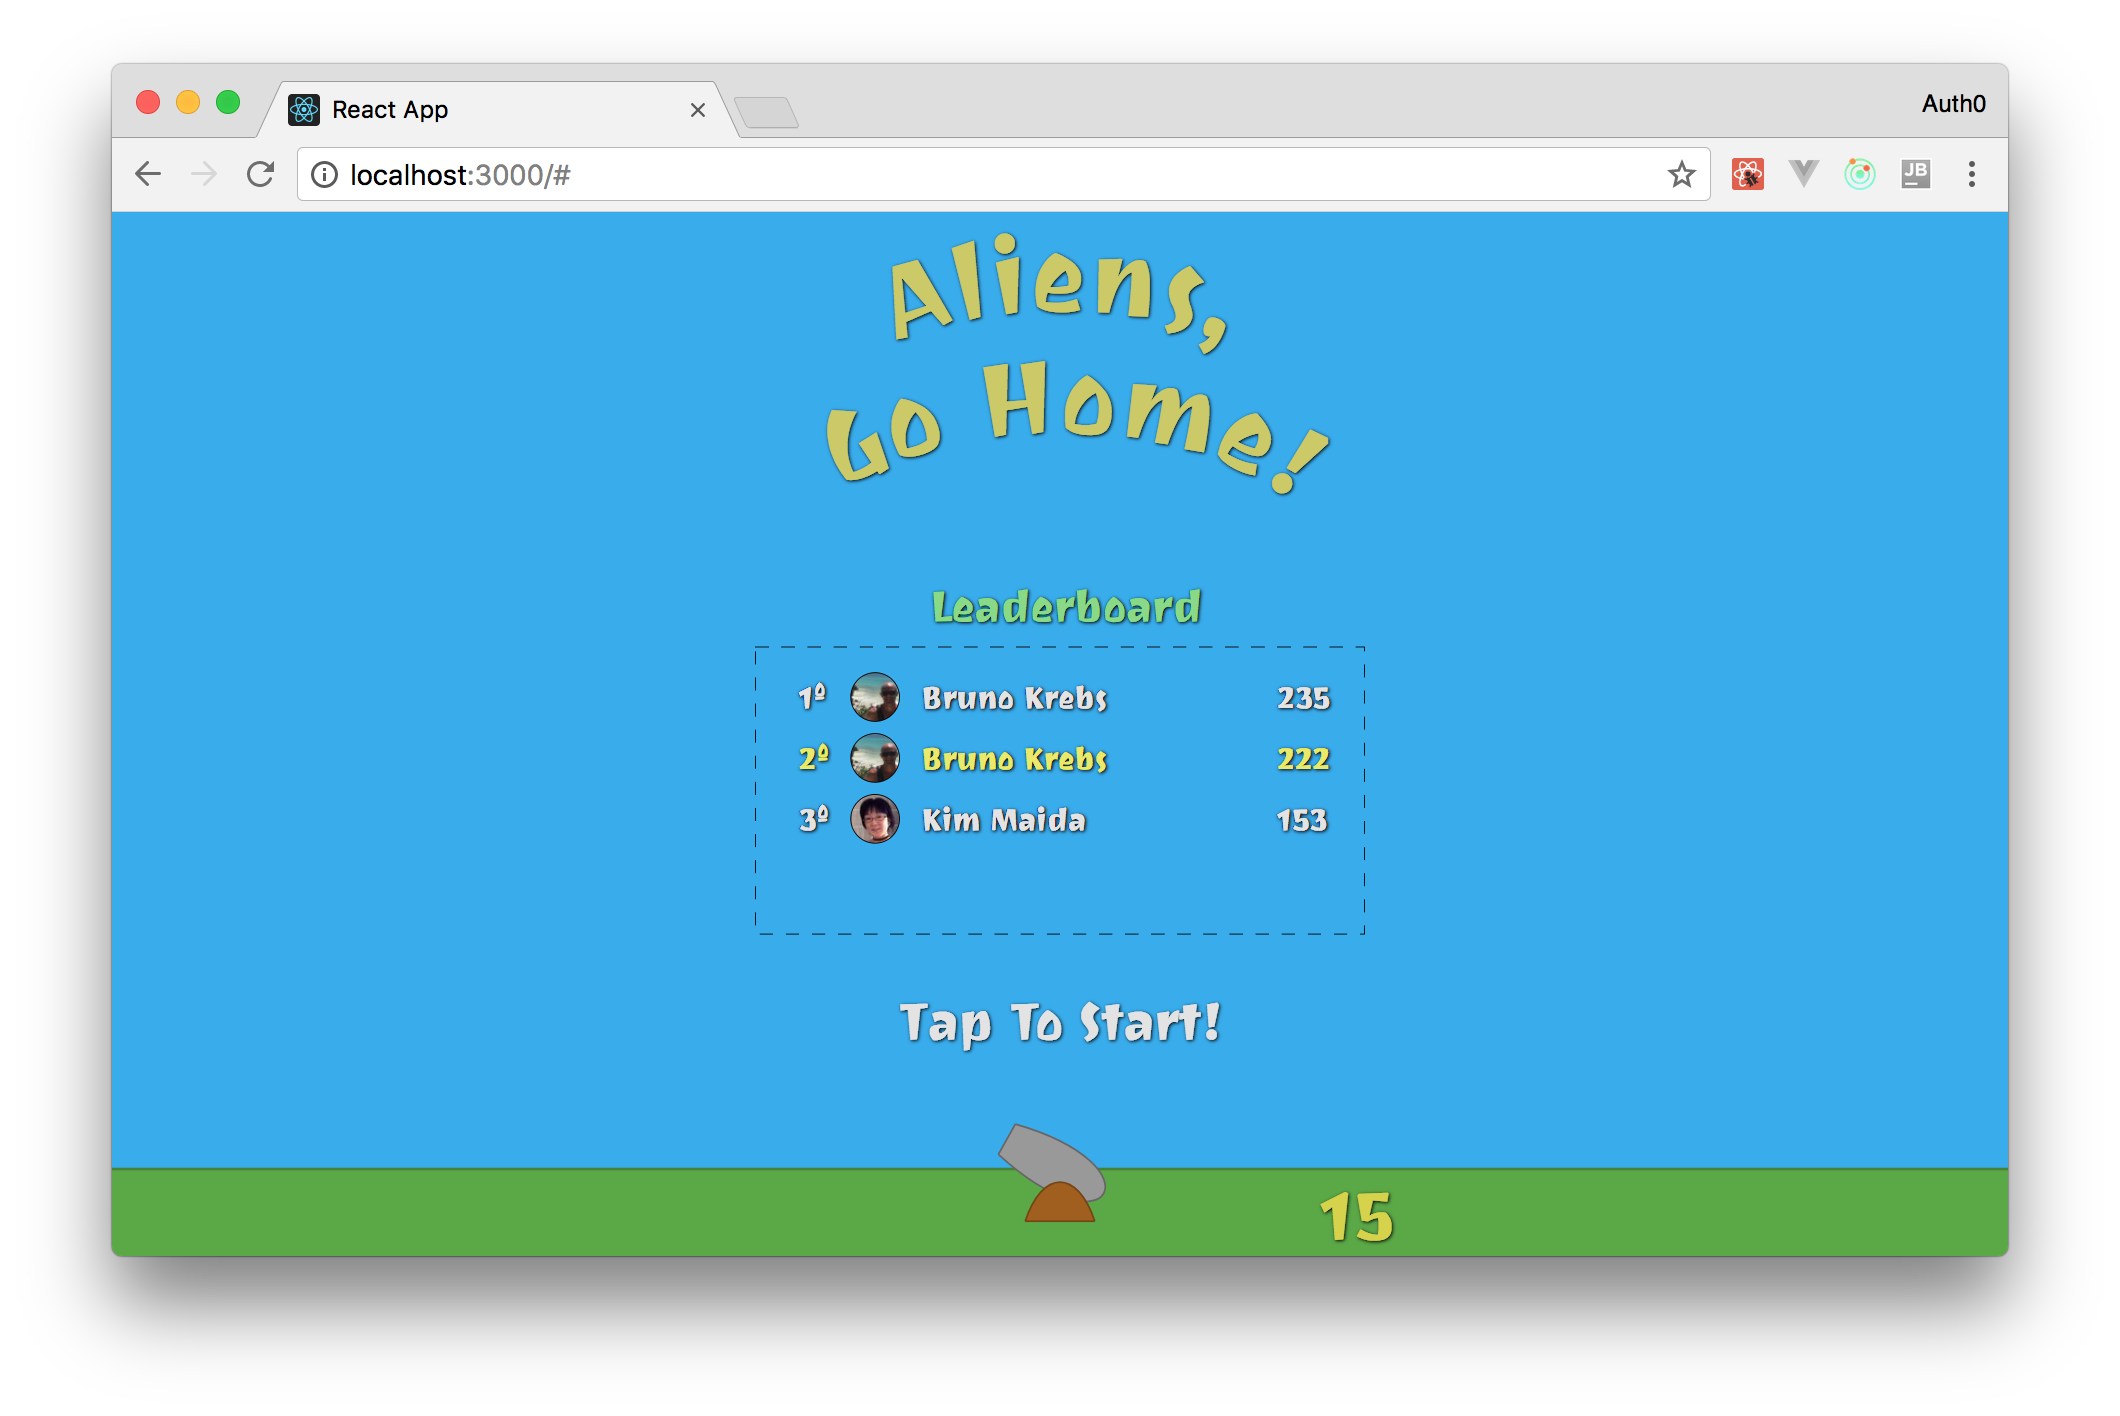
. , , . :
- : , "" .
- "": , , .
- "" : , , ( score ) . , "".
- : .
.
, onClick Canvas . Redux-, ( ). moveObjects .
"" . ./src/actions/index.js :
// ... export const SHOOT = 'SHOOT'; // ... export const shoot = (mousePosition) => ({ type: SHOOT, mousePosition, }); ( ./src/reducers/index.js ):
import { LEADERBOARD_LOADED, LOGGED_IN, MOVE_OBJECTS, SHOOT, START_GAME } from '../actions'; // ... import import shoot from './shoot'; const initialGameState = { // ... cannonBalls: [], }; // ... initialState function reducer(state = initialState, action) { switch (action.type) { // case- case SHOOT: return shoot(state, action); // ... } } , shoot , SHOOT . . shoot.js :
import { calculateAngle } from '../utils/formulas'; function shoot(state, action) { if (!state.gameState.started) return state; const { cannonBalls } = state.gameState; if (cannonBalls.length === 2) return state; const { x, y } = action.mousePosition; const angle = calculateAngle(0, 0, x, y); const id = (new Date()).getTime(); const cannonBall = { position: { x: 0, y: 0 }, angle, id, }; return { ...state, gameState: { ...state.gameState, cannonBalls: [...cannonBalls, cannonBall], } }; } export default shoot; , . , . , . , . , calculateAngle . , , (Redux store) .
, , Game , App . , ./src/containers/Game.js :
// ... import import { leaderboardLoaded, loggedIn, moveObjects, startGame, shoot } from '../actions/index'; // ... mapStateToProps const mapDispatchToProps = dispatch => ({ // ... shoot: (mousePosition) => { dispatch(shoot(mousePosition)) }, }); // ... connect export ./src/App.js :
// ... import statements and Auth0.configure class App extends Component { constructor(props) { super(props); this.shoot = this.shoot.bind(this); } // ... componentDidMount and trackMouse definition shoot() { this.props.shoot(this.canvasMousePosition); } render() { return ( <Canvas // other props shoot={this.shoot} /> ); } } App.propTypes = { // ... other propTypes shoot: PropTypes.func.isRequired, }; // ... defaultProps and export statements , App shoot props ( , "" shoot — . ) canvasMousePosition . Canvas . "" , onClick svg , "".
// ... import import CannonBall from './CannonBall'; const Canvas = (props) => { // ... gameHeight viewBox return ( <svg // ... onClick={props.shoot} > // ... defs, Sky Ground {props.gameState.cannonBalls.map(cannonBall => ( <CannonBall key={cannonBall.id} position={cannonBall.position} /> ))} // ... CannonPipe, CannonBase, CurrentScore </svg> ); }; Canvas.propTypes = { // ... shoot: PropTypes.func.isRequired, }; // ... defaultProps export : cannonBalls.map CannonPipe , "" .
, ( x: 0, y: 0 ) , ( angle ) . , "" ( ).
, ./src/utils/formulas.js :
// ... const degreesToRadian = degrees => ((degrees * Math.PI) / 180); export const calculateNextPosition = (x, y, angle, divisor = 300) => { const realAngle = (angle * -1) + 90; const stepsX = radiansToDegrees(Math.cos(degreesToRadian(realAngle))) / divisor; const stepsY = radiansToDegrees(Math.sin(degreesToRadian(realAngle))) / divisor; return { x: x +stepsX, y: y - stepsY, } }; moveCannonBalls.js calculateNextPosition . ./src/reducers/ :
import { calculateNextPosition } from '../utils/formulas'; const moveBalls = cannonBalls => ( cannonBalls .filter(cannonBall => ( cannonBall.position.y > -800 && cannonBall.position.x > -500 && cannonBall.position.x < 500 )) .map((cannonBall) => { const { x, y } = cannonBall.position; const { angle } = cannonBall; return { ...cannonBall, position: calculateNextPosition(x, y, angle, 5), }; }) ); export default moveBalls; . -, filter , cannonBalls (), . , -800 Y , ( -500) ( 500).
, ./src/reducers/moveObjects.js :
// ... import import moveBalls from './moveCannonBalls'; function moveObjects(state, action) { if (!state.gameState.started) return state; let cannonBalls = moveBalls(state.gameState.cannonBalls); // ... mousePosition, createFlyingObjects, filter return { ...newState, gameState: { ...newState.gameState, flyingObjects, cannonBalls, }, angle, }; } export default moveObjects; moveObjects , moveBalls . cannonBalls gameState .
, , . -:
, , , , , . "" , . "": .
: , . , , , . , , .
, ./src/utils/formulas.js :
// ... export const checkCollision = (rectA, rectB) => ( rectA.x1 < rectB.x2 && rectA.x2 > rectB.x1 && rectA.y1 < rectB.y2 && rectA.y2 > rectB.y1 ); , "" . checkCollisions.js ./src/reducers :
import { checkCollision } from '../utils/formulas'; import { gameHeight } from '../utils/constants'; const checkCollisions = (cannonBalls, flyingDiscs) => { const objectsDestroyed = []; flyingDiscs.forEach((flyingDisc) => { const currentLifeTime = (new Date()).getTime() - flyingDisc.createdAt; const calculatedPosition = { x: flyingDisc.position.x, y: flyingDisc.position.y + ((currentLifeTime / 4000) * gameHeight), }; const rectA = { x1: calculatedPosition.x - 40, y1: calculatedPosition.y - 10, x2: calculatedPosition.x + 40, y2: calculatedPosition.y + 10, }; cannonBalls.forEach((cannonBall) => { const rectB = { x1: cannonBall.position.x - 8, y1: cannonBall.position.y - 8, x2: cannonBall.position.x + 8, y2: cannonBall.position.y + 8, }; if (checkCollision(rectA, rectB)) { objectsDestroyed.push({ cannonBallId: cannonBall.id, flyingDiscId: flyingDisc.id, }); } }); }); return objectsDestroyed; }; export default checkCollisions; , :
objectsDestroyed.flyingDiscs(forEach) . , CSS, YcurrentLifeTime.cannonBalls(forEach) .checkCollision( ), , (). ,objectsDestroyed, .
moveObjects.js , :
// ... import import checkCollisions from './checkCollisions'; function moveObjects(state, action) { // ... // - // , let let flyingObjects = newState.gameState.flyingObjects.filter(object => ( (now - object.createdAt) < 4000 )); // ... { x, y } angle const objectsDestroyed = checkCollisions(cannonBalls, flyingObjects); const cannonBallsDestroyed = objectsDestroyed.map(object => (object.cannonBallId)); const flyingDiscsDestroyed = objectsDestroyed.map(object => (object.flyingDiscId)); cannonBalls = cannonBalls.filter(cannonBall => (cannonBallsDestroyed.indexOf(cannonBall.id))); flyingObjects = flyingObjects.filter(flyingDisc => (flyingDiscsDestroyed.indexOf(flyingDisc.id))); return { ...newState, gameState: { ...newState.gameState, flyingObjects, cannonBalls, }, angle, }; } export default moveObjects; checkCollisions , cannonBalls flyingObjects .
, "" , moveObjects gameState . -.
""
, - , "". "" , . "" . — ./src/reducers/moveObject.js . :
import { calculateAngle } from '../utils/formulas'; import createFlyingObjects from './createFlyingObjects'; import moveBalls from './moveCannonBalls'; import checkCollisions from './checkCollisions'; function moveObjects(state, action) { // ... newState.gameState.flyingObjects.filter const lostLife = state.gameState.flyingObjects.length > flyingObjects.length; let lives = state.gameState.lives; if (lostLife) { lives--; } const started = lives > 0; if (!started) { flyingObjects = []; cannonBalls = []; lives = 3; } // ... x, y, angle, objectsDestroyed return { ...newState, gameState: { ...newState.gameState, flyingObjects, cannonBalls: [...cannonBalls], lives, started, }, angle, }; } export default moveObjects; flyingObjects , , "" . , , 4 ( (now - object.createdAt) < 4000 ), , .
, "", Canvas . ./src/components/Canvas.jsx :
// ... import import Heart from './Heart'; const Canvas = (props) => { // ... gameHeight viewBox const lives = []; for (let i = 0; i < props.gameState.lives; i++) { const heartPosition = { x: -180 - (i * 70), y: 35 }; lives.push(<Heart key={i} position={heartPosition}/>); } return ( <svg ...> // ... {lives} </svg> ); }; // ... propTypes, defaultProps, export . ; , . , , , .
. ./src/reducers/moveObjects.js :
// ... import statements function moveObjects(state, action) { // ... const kills = state.gameState.kills + flyingDiscsDestroyed.length; return { // ...newState, gameState: { // ... props- kills, }, // ... angle, }; } export default moveObjects; ./src/components.Canvas.jsx CurrentScore ( 15) :
<CurrentScore score={props.gameState.kills} /> ! , , React, Redux, SVG CSS . , .
./server/index.js players . "" ( ) "" . . , :
const players = []; App . ./src/App.js :
// ... import // ... Auth0.configure class App extends Component { constructor(props) { // ... super this.shoot.bind(this) this.socket = null; this.currentPlayer = null; } // componentDidMount componentDidMount() { const self = this; Auth0.handleAuthCallback(); Auth0.subscribe((auth) => { if (!auth) return; self.playerProfile = Auth0.getProfile(); self.currentPlayer = { id: self.playerProfile.sub, maxScore: 0, name: self.playerProfile.name, picture: self.playerProfile.picture, }; self.props.loggedIn(self.currentPlayer); self.socket = io('http://localhost:3001', { query: `token=${Auth0.getAccessToken()}`, }); self.socket.on('players', (players) => { self.props.leaderboardLoaded(players); players.forEach((player) => { if (player.id === self.currentPlayer.id) { self.currentPlayer.maxScore = player.maxScore; } }); }); }); setInterval(() => { self.props.moveObjects(self.canvasMousePosition); }, 10); window.onresize = () => { const cnv = document.getElementById('aliens-go-home-canvas'); cnv.style.width = `${window.innerWidth}px`; cnv.style.height = `${window.innerHeight}px`; }; window.onresize(); } componentWillReceiveProps(nextProps) { if (!nextProps.gameState.started && this.props.gameState.started) { if (this.currentPlayer.maxScore < this.props.gameState.kills) { this.socket.emit('new-max-score', { ...this.currentPlayer, maxScore: this.props.gameState.kills, }); } } } // ... trackMouse, shoot, render } // ... propTypes, defaultProps export , :
- (
socketcurrentPlayer), . - ,
new-max-score. players( ),maxScore. , ,maxScore.componentWillReceiveProps, (maxScore).new-max-score.
It is finished! -. , Socket.IO React :
# node ./server/index & # React- npm start , . , .
Conclusion
. React , SVG — ( HTML) , Redux — , , , CSS . , Socket.IO, , Auth0 .
! . !
')
Source: https://habr.com/ru/post/350946/
All Articles